With today’s ultra-high resolution cameras, it’s easy to take multi-frame panoramas that put a substantial load on your computer and your post-processing software. Other large files can cause the same issues, like high-PPI scans. I’ve recently been re-editing some of my older panoramas, and I found many ways to improve on Photoshop’s default settings. I’d like to share them today.
In this guide, I’ll take a look at those Photoshop settings in detail, plus share my tips to make your panorama workflow more optimal. The tips also apply to other high-resolution images that you may be opening in Photoshop, such as huge scans with large file sizes.
Table of Contents
Photoshop Settings to Speed Up Large Files
Not everyone will stitch their panoramas in Photoshop; Lightroom offers a simpler stitching process, and 3rd party products like PTGui offer more expansive and in-depth settings. Even so, most photographers use Photoshop more than other software for their panoramas.
Bringing hundreds of megapixels worth of data into Photoshop can be a fraught process, however. Large files can turn your previously stable setup into a mess of crashes and glitches. Although my recommendations below may not solve those specific issues, they will reduce the rate of problems substantially.
1. Disable PSD and PSB Compression
Within the Photoshop > Preferences > File Handling panel, there are many useful settings. For working with large files, one of the most important is “Disable Compression of PSD and PSB Files.”
If you aren’t already familiar, PSB files represent one of the best ways to store your panorama or other large files at full resolution, while retaining support for things like layers, masks, smart objects, and other important features. It’s similar to Photoshop’s PSD files in functionality, but it throws away PSD’s 30K length and 2GB size limits.
What isn’t so great, however, is how long PSBs can take to save, even on very fast computers. On my computer, even with a 5950x processor saving to a 7GB/s NVME SSD, it was absurdly slow to save large files. Rather than a hardware bottleneck, it was a software bottleneck. Put simply, it appears that Photoshop’s compression approach is a slow, single-threaded process – one which can’t be sped up much with better hardware.
When editing panoramas or other large files, this is a huge deal. Disabling compression altogether speeds up both saving and opening files, all at a minor cost to disk space.
For reference, Photoshop spend up from 1:23 to save a file to just four seconds, and it only bumped the file size from 2.6 to 3.7GB. Considering drive space is about 2 cents per gigabyte, if you value your time at over about $2 an hour, you should definitely disable compression and leave it off!
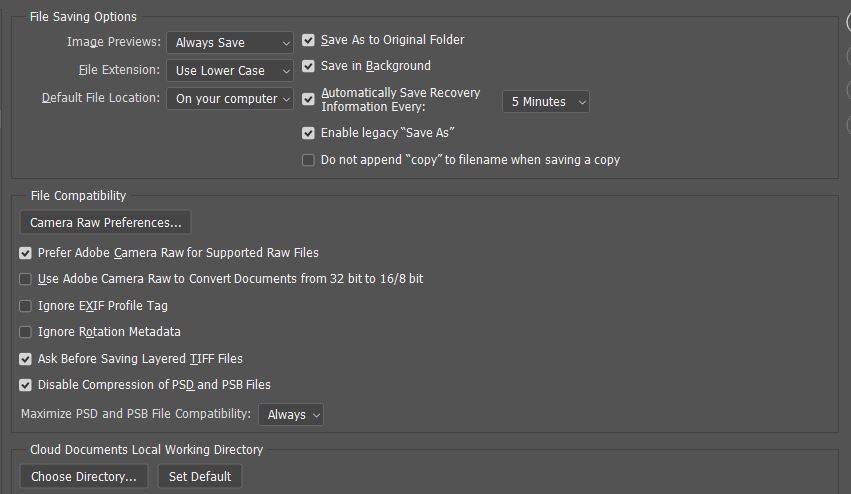
2. Increase the Frequency of Recovery Saves
To increase the frequency that Photoshop autosaves your image, shift the default of Automatically Save Recovery Information from 10 minutes to 5. This is also found in the “Photoshop > Preferences > File Handling” panel.
Don’t rely on Photoshop’s autosaves, of course; recovery saves can be inconsistent and out-of-date even at the fastest interval. But with large files, it’s a fact of life that Photoshop crashes more often. The auto recover feature will occasionally save you a lot of headache.
3. Memory Usage
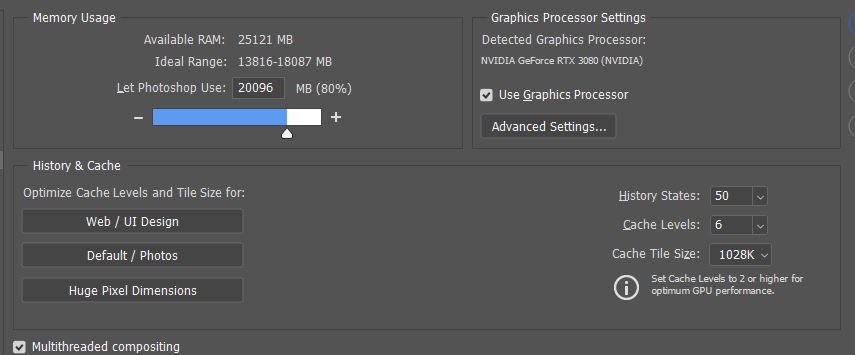
Moving on to the “Performance” tab (Photoshop > Preferences > Performance), there are a few options here that can improve Photoshop’s performance with large files. That’s particularly true if you have good hardware.
The first step is to bump up the amount of memory that Photoshop is allowed to use. Giving more space to Photoshop reduces the amount of space that your computer’s other programs can use, of course. But it’s so demanding to edit large files in Photoshop that I consider it a worthy tradeoff.
If you find that you’re still multitasking or are still running over your memory allotment, consider adding even more. I’ll have hardware upgrade recommendations later on in this guide.
4. History and Cache
The History and Cache settings (also under the “Performance” tab) can be a bit opaque to the average user. Fortunately, Photoshop has some quick presets which take your hardware into consideration. By just hitting the “Huge Pixel Dimensions” button, Photoshop aims to optimize those cache settings for your hardware and offer the best performance for large files.
5. Graphics Processor Settings
GPU support in Photoshop is in a weird place. Unlike some apps, Photoshop doesn’t heavily rely on GPU acceleration for many functions. Adobe lists things like Lens Blur, Neural Filters, and Select and Mask as using a GPU for acceleration, while features like Scrubby Zoom and Smooth Brush Resizing won’t work at all without a GPU.
While these are nice features to have, you can still edit without them. If you’re running into GPU related bugs, like broken rendering, some crashes, or image artifacts, consider troubleshooting Photoshop’s GPU settings.
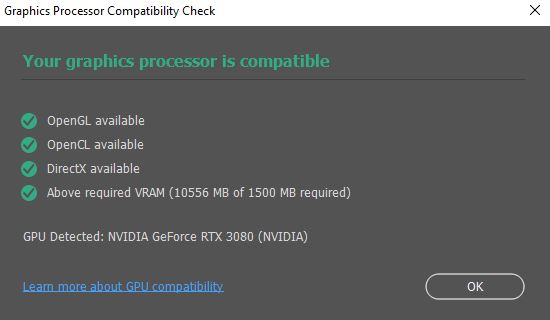
You can check Help > GPU Compatibility to see that Photoshop is working correctly with your GPU. You can also try disabling and re-enabling the GPU, along with updating your GPU drivers.
Beyond that, NVIDIA has a specific driver branch called Studio Drivers that are supposed to offer better support for content creation apps like Photoshop. They may be worth installing in lieu of the gaming branch, if you use Photoshop more than gaming applications.
6. Scratch Disks
When Photoshop has run out of available RAM, like when stitching a large panorama, it’s forced to use swap disk space. Ensuring that Photoshop is set to swap to your fastest disk can help reduce the negative impact of swapping. If, for some reason, your fastest disk isn’t your startup disk, you can select it in the “Scratch Disks” setting under Photoshop > Preferences > Scratch Disks. (You can read more about setting up and emptying Photoshop’s scratch disks here.)
For some use cases, having a designated swap disk may be a good idea. Designating a secondary SSD can protect your main drive from excessive writes, as well as reducing the impact on free space. I’ll go into more detail about drives in the following hardware section.

Computer Upgrades and Hardware
The following sections detail what hardware upgrades you can make to improve performance when editing large images. For some devices, like laptops, not all of these upgrades will be applicable, but instead can help inform buying decisions in the future.
Note that the following advice won’t speed up all types of post-processing, like bulk editing or working with video. If you’re looking for advice on any topics like that, feel free to ask me in the comments!
1. Processor
Photoshop, as I mentioned in the “PSD Compression” section above, does not parallelize well. This means that upgrading to the latest beefy processor, with 16 or more cores, isn’t a great way to spend your money. Instead, look towards a processor with a reasonable core count, but faster single thread performance.
Broadly speaking, i5s from Intel or something from the middle of the Ryzen product stack will be a good choice. Additionally, newer generations, with faster IPC performance, will be a better pick than an older chip with more cores.
Overall, unless you’re on a very old platform, the processor will not be the best place to spend your upgrade dollars.
2. Memory
Instead of upgrading your processor, consider putting your dollars towards more memory. For working with large image sets, having more RAM can make a huge difference. That improvement is even more evident when considering the cost of adding RAM. Thanks to the recent shift to DDR5, fast and high capacity DDR4 sets can be had for great values, for example.
16 GB and even 32GB kits are available for cheap. With that much RAM, you can edit large files while still leaving other programs like Lightroom open. Faster speeds can offer slight performance improvements, particularly on AMD’s platform. 3200 or 3600 speed kits are the sweet spot for price and performance. If you’re already running a high-capacity kit, however, don’t upgrade just for speed.
3. GPU
Few Photoshop operations are GPU-accelerated, and Photoshop’s GPU requirements are very minor. If you have a discrete GPU from the last few years, you’re probably fine.
Even for programs with more GPU support, like PTGui, I rarely found my GPU was put under any significant load. Combined with high GPU prices recently, it’s a poor value to upgrade this component.
4. SSD
Moving to an NVME SSD can offer a great speed boost to all your computing operations, from booting and starting programs, through swapping and moving files around. Picking up a fast 1 TB or 2 TB SSD, like the 980 Pro, can greatly improve the speed of your computer. If your computer supports Gen 4 SSDs, that can be 20 to 30 times faster than spinning disks, to say nothing of the improvement of random and I/O performance.
I like to pair SSDs with a few spinning hard drives to function as inexpensive bulk storage. In other words, you’re not working off these drives, just storing your backups there (or images that you aren’t likely to need again in the future, like the component photos of a panorama). Especially for panoramas, large scans, and other large files, this can save on your overall costs by quite a bit.
Two More Tips
1. Be Careful Duplicating Layers
I’ve got a bad habit of duplicating layers for small changes. While that isn’t much of a problem for small files, with larger images, duplicating the background just to make a small change can quickly balloon the file size.
Instead, consider using more targeted adjustments that don’t increase the file size as much. For example, adding adjustment layers can allow for the same level of control, without the same increase to file size. The same is true for minimizing the number of layers in general. (For example, you could use a single curves layer to adjust both color and contrast, instead of two separate layer adjustments.)

2. Preview Your “Filter” Edits Elsewhere
I make heavy use of Photoshop’s Camera Raw filter, but with massive files in Photoshop, its performance can be spotty. An alternative approach is to duplicate your ultra-large image to a second file, resize to something like 3000 pixels long, and use Camera Raw to test out your adjustments on that version. It’s far less likely to crash and is far more responsive. Then, after finding a set of adjustments you like, return to your original file and reapply with Last Filter (Alt+Ctrl+F)!
Unfortunately, this doesn’t work perfectly with targeted adjustments like masks within Camera Raw. Beyond that, other filters may require different values for a high-res image compared to the lower-res preview (like sharpening and noise reduction).
Even so, if it’s possible to use this tip for your photo, I recommend it. It dramatically reduces crashes and saves time when applying a Photoshop Filter.
Overall, dealing with large files can be very rewarding, especially for panoramas and ultra-high-res scans. If you set up Photoshop correctly using the recommendations above, you’ll turn the process into more of a fun challenge and less of a chore.
Let me know in the comments if you have any questions about optimizing Photoshop for huge files!
Alex – are there any similiar settings one can utilise in Lightroom? Many thanks
Not exactly – for LR, I’d just say check that GPU acceleration is enabled and increase the size of the cache. Unfortunately, LR scales even worse than Photoshop with additional hardware.
Alex – thanks for sharing your knowledge. I will definitely apply a few of these.
Thanks! Happy to hear they’re useful.
Thanks for the info about the settings, Alex! I process a lot of bokeh panos (Brenizer) and recently did a bunch of tests between Photoshop and Microsoft ICE which had interesting results. The latter was much quicker and nicer to use. Photoshop is not good at stitching out of focus frames, but it is better at blending images if they’re mis-aligned due to poor rotation technique (I shoot my panos hand-held). Photoshop takes a lot more RAM and performs worse when it runs out. I also had a 2nd faster nvme on my laptop so used that as scratch disk instead, but that slowed it down, as did uncompressed Tif files (which didn’t hurt ICE). Anyway, I’m gonna try your settings to see if it helps my stitching.
Give it a try! If you haven’t yet, I’d suggest trying PTGUi. PTGui has by far the best stitching performance (both in terms of speed and accuracy, even with poorly-shot panos) out of all the tools I’ve tried.