Nikon Picture Controls are the fundamental way in which Nikon photographers choose the colors, contrast, and “look” of a photo – that is, if you shoot JPEG. If you shoot RAW, maybe you’ve never given Picture Controls a second thought! But this could be a mistake. Here’s what you need to know.
What Are Nikon Picture Controls?
What exactly are Picture Controls? You can think of them as a set of filters or presets that determine how your photo looks. Traditionally, you can choose between some basic profiles like Standard, Landscape, Portrait, or Neutral. The differences between them are meant to improve the appearance of the subject in question. For example, the Landscape Picture Control will have more contrast and saturation than the Portrait Picture Control.
Today’s Nikon cameras don’t stop with those basic options, either. On newer Nikon cameras, you’ll find a subcategory called “Creative Picture Control” that has more unusual options, such as Melancholic, Dramatic, Morning, or Dream.
If you shoot in JPEG, it is important to choose these profiles very carefully. What you see is what you get – the Picture Control is irreversibly baked into your JPEG photo. Although you can somewhat change things around in post-processing, JPEG is inherently not very flexible, especially if you are trying to undo an aggressive Picture Control.
However, it’s a completely different situation if you shoot in RAW. Every Nikon RAW file has an embedded JPEG, and your choice of Picture Control still affects this embedded JPEG. This information can be used by your post-processing software to change the default appearance of the RAW file upon import. But it does not permanently change the colors and tones of the RAW file itself.
One example I like to give is that you can set the Monochrome Picture Control on your camera, and the RAW file will still be in color. The JPEG will not.
Choosing a Picture Control for JPEG
You might see yourself as an all-RAW photographer, but bear with me for a second. There are situations where you may need to shoot JPEG, and your choice of Picture Control is very important there.
The biggest one is if you shoot with a camera like the Nikon Zf, Z8, or Z9 that has a pre-release burst feature. This valuable feature lets you take photos slightly “back in time” and is very helpful for capturing fleeting moments that your reaction speed wouldn’t have caught. However, as I publish this article in Spring 2024, it is JPEG-only. (I hope that Nikon changes this soon!)
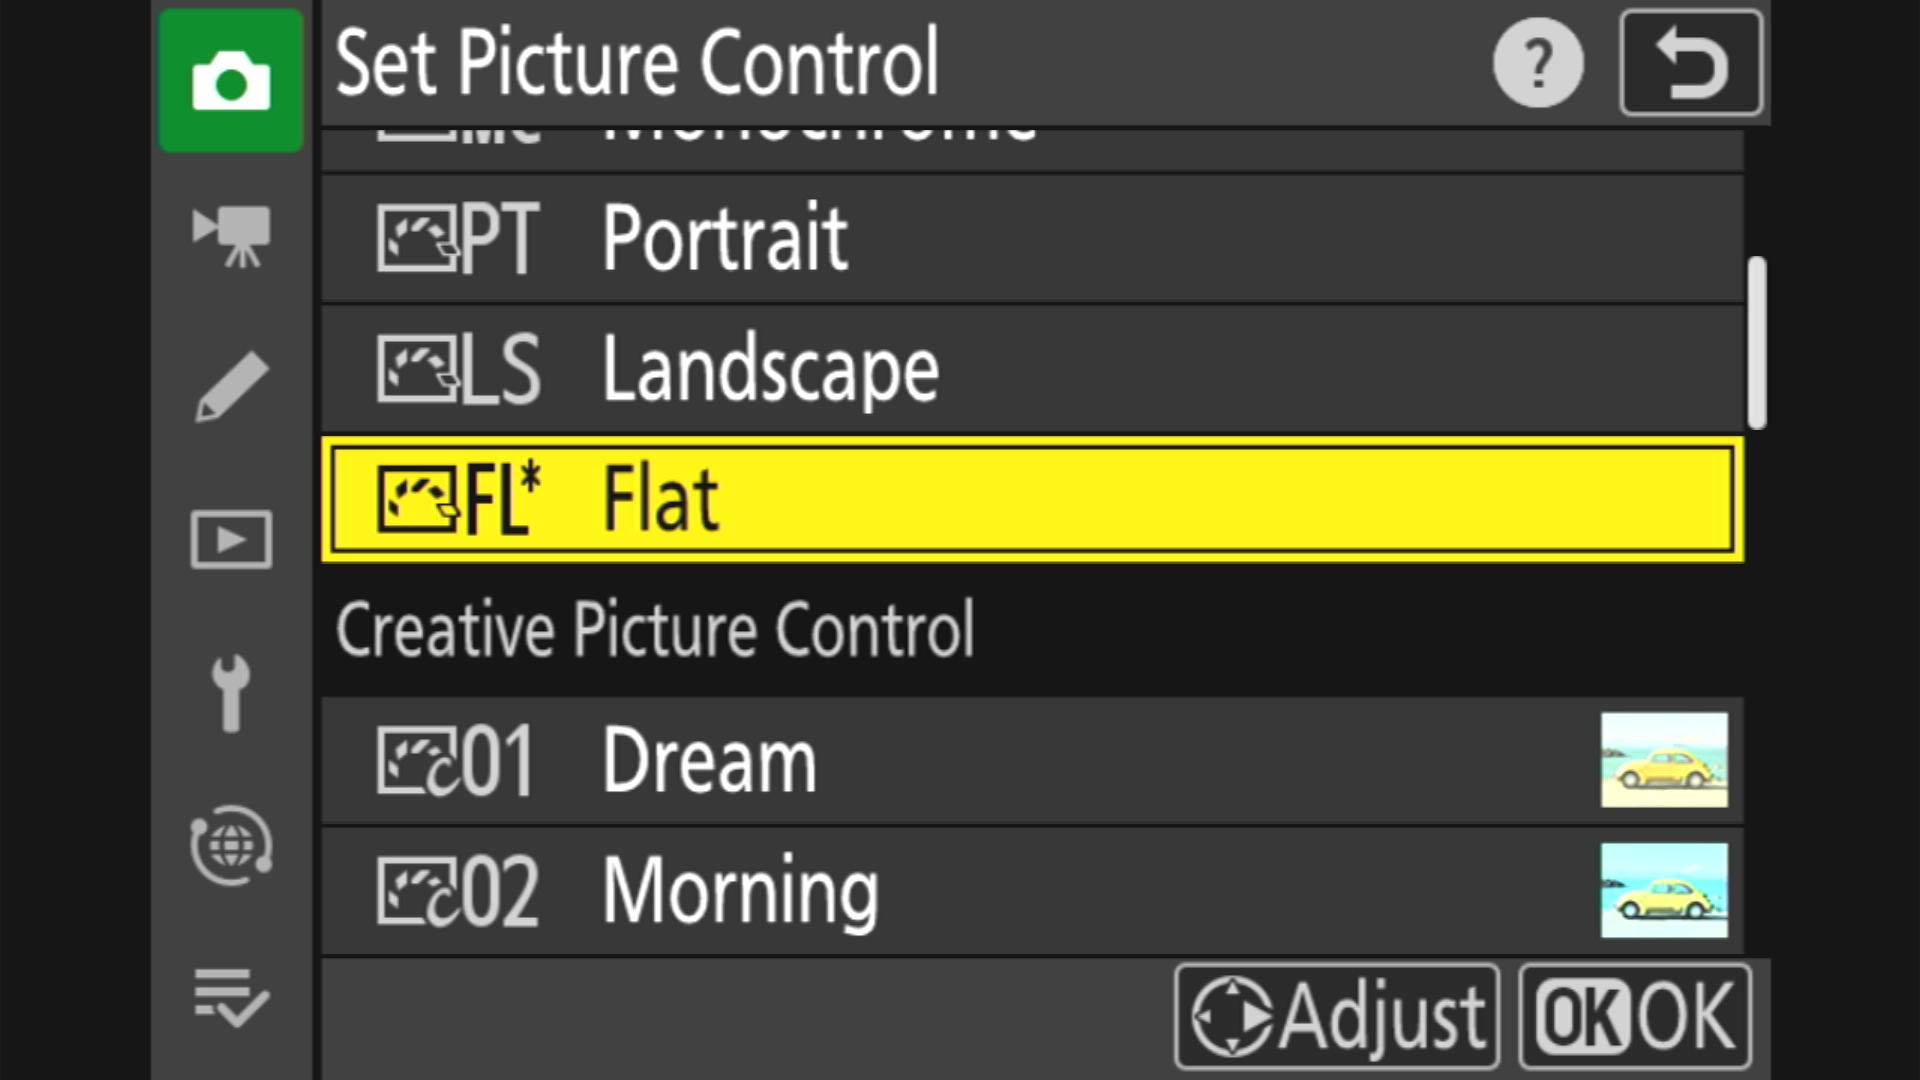
You will find that you get the most flexible (“RAW-like”) images by keeping your JPEG Picture Control nice and simple with minimum sharpening, noise reduction, contrast, and saturation. Nikon’s Flat Picture Control is good for this if you’re shooting in high-contrast light. However, in low-contrast light, I have found that the Flat Picture Control can be a little too flat and difficult to bring back to normal in Lightroom without some annoying color shifts. The Neutral or Standard Picture Controls work better in such conditions – still with sharpening and noise reduction turned off.
There are other applications where professional photographers will shoot JPEG, especially for broadcast sports where there is a quick deadline to send off your photos. I’m sure you already know if this applies to you, and news organizations will have their own standards for such JPEGs. However, as a general rule, the Standard Picture Control is also a good choice for taking ready-to-view JPEGs that need minimal editing.
Finally, most video shooters will need to set their Picture Control carefully. My recommendation is the same – the Flat profile if you plan to do complex editing and color grading, or the Standard profile if you want ready-to-view videos.
Choosing a Picture Control for RAW
I have already mentioned that RAW files do not have the Picture Control baked directly into the image (only into the embedded JPEG). So, does your choice of Picture Control even matter if you’re shooting in RAW? Yes it does!
Any time you see an image in your camera’s electronic viewfinder or on the rear LCD, your chosen Picture Control is being applied. This is the case even when shooting RAW. Your choice of Picture Control also affects how the in-camera histogram looks.
In other words, when you view any photos on your camera’s display, you are not actually looking at the RAW file. Instead, you’re looking at the embedded JPEG – Picture Control and all.
Here are two RAW files taken with the same settings to demonstrate why this can matter:
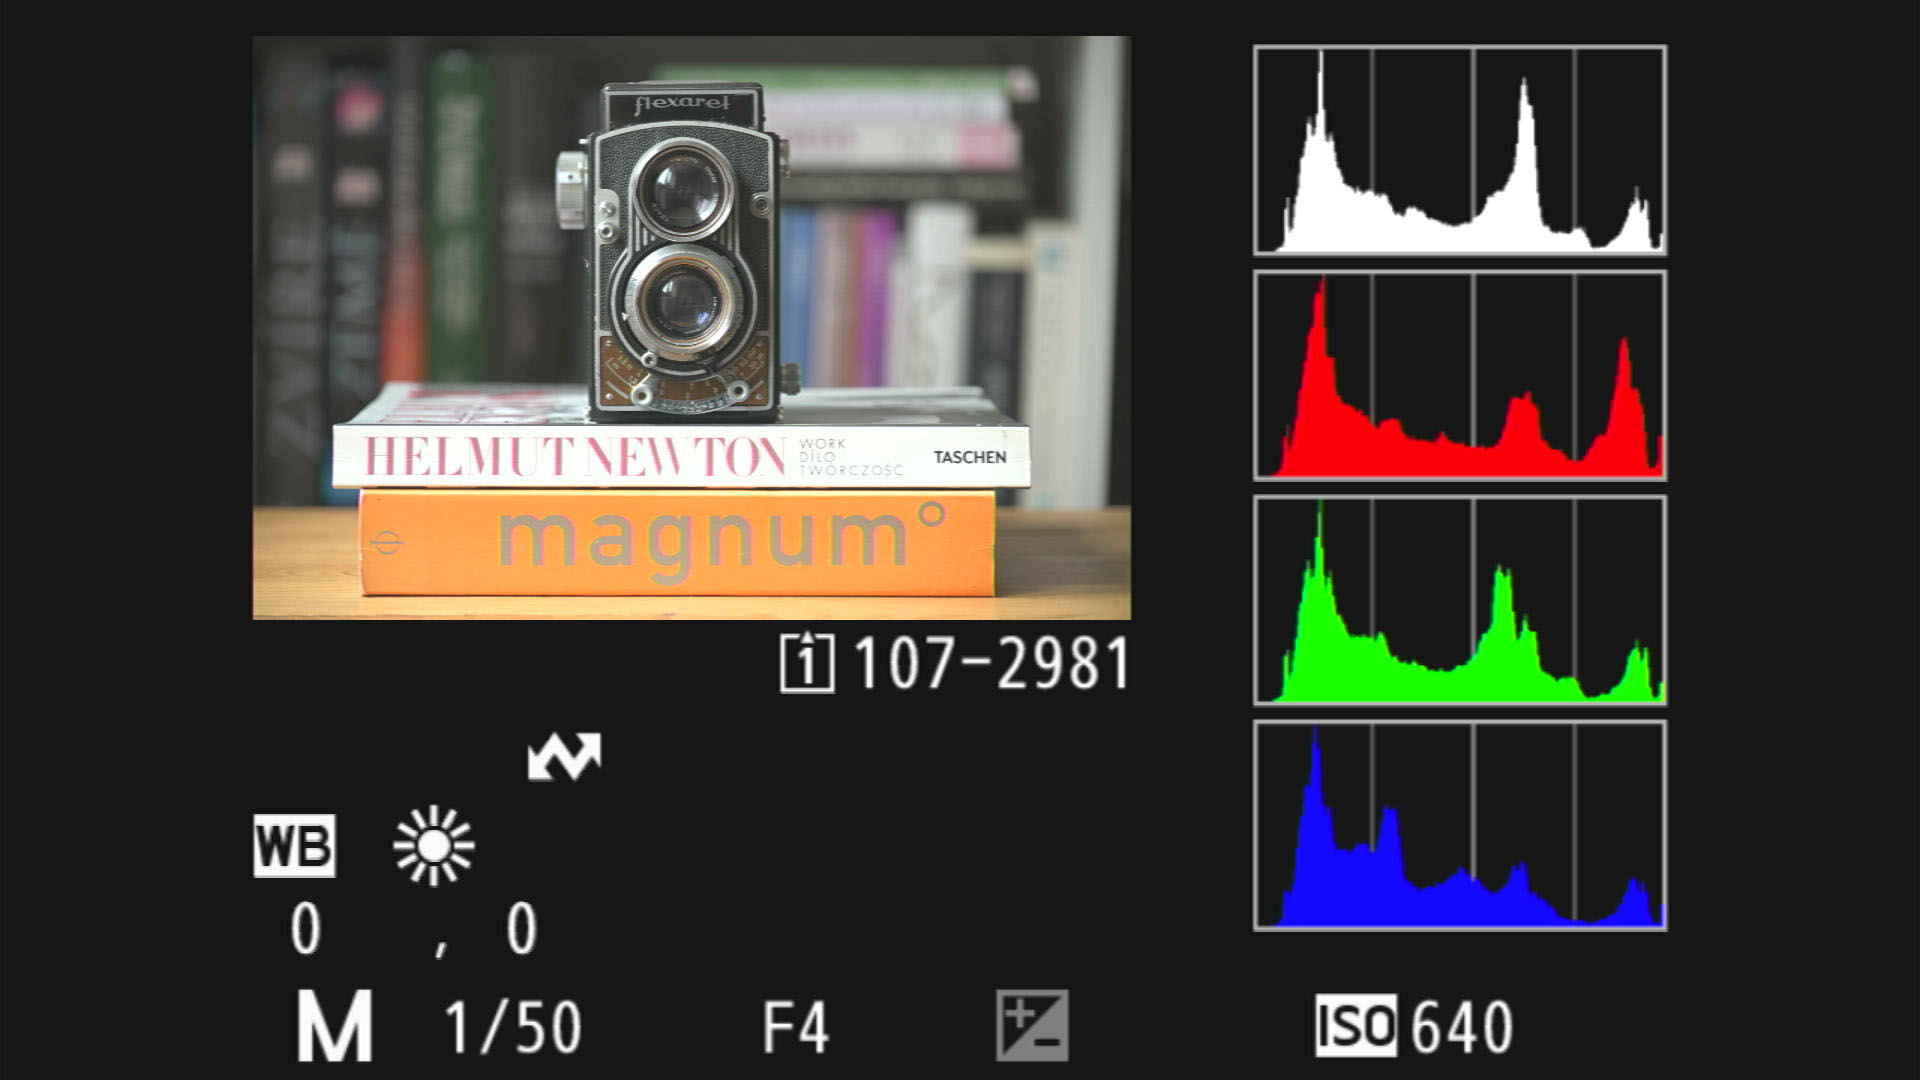
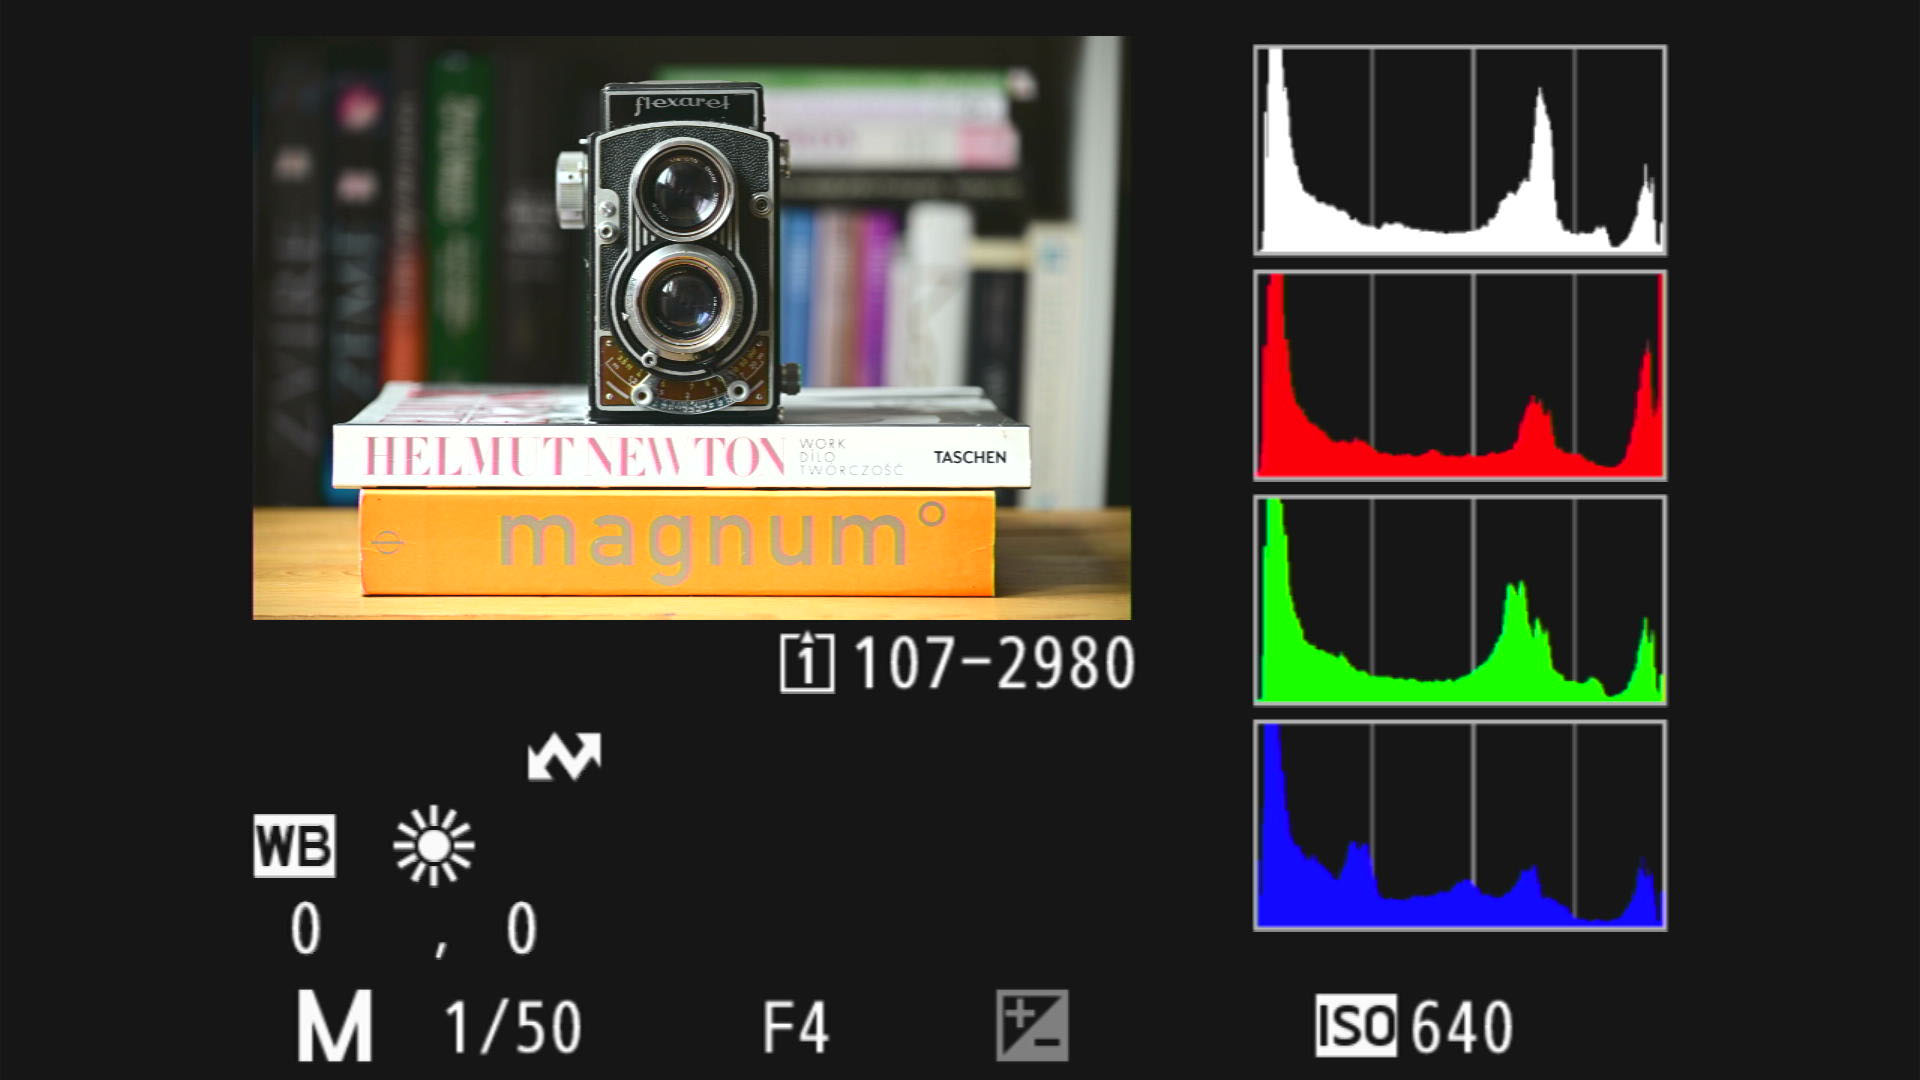
In the examples above, the image with the Vivid Picture Control looks more pleasing to me – however, it is not as accurate. For example, the Vivid image implies that there is significant overexposure of the red channel – whereas the Flat image shows much less overexposure. In fact, the RAW image will most likely not have any clipped highlights at all, or only very minimal clipping.
So, if you are the type of photographer who uses your histogram to expose to the right, your choice of Picture Control is extremely important. You’ll want to shoot with the flattest possible profile. This will more accurately show you which tones are going to be clipped in the RAW file rather just the embedded JPEG.
Does this mean you should always use the flattest Picture Control setting when shooting RAW? Maybe, but not necessarily. The other big reason to choose your Picture Control when shooting RAW is visualization.
Remember the example I mentioned earlier – that you can set a Monochrome Picture Control, and your RAW file will still be in color? Well, the image in your electronic viewfinder won’t be! When you look through the viewfinder, you’ll see the world in black and white. And if you’re planning to convert the RAW file to monochrome later anyway, maybe it will help you to see it in black and white from the start.
By the same token, the Flat Picture Control is so dull and lifeless that it may actually interfere with your composition decisions. Maybe you don’t notice some subtle lighting effects or a high-contrast rock that will become a problem later, since the image in the viewfinder is so low-contrast. In that case, you may prefer to set a more normal-looking Picture Control like Standard (or maybe Neutral if you don’t need too much extra punch).

Which approach do I prefer? Personally, as someone who always shoots RAW, I use Flat. It distorts the histogram the least and gives me a good idea of my starting point in post-processing. Another benefit I’ve found is that it’s less taxing on the eye than the profiles like Vivid or Landscape.
Still, using the Nikon Zf recently inspired me to shoot with the Monochrome Picture Control in an effort to pre-visualize my black and white photos better. Likewise, I would not begrudge someone for choosing a higher-contrast Picture Control as a RAW shooter, so long as it helps you visualize and compose your images better.
My main recommendation is that you don’t stick to the camera’s default Picture Control thoughtlessly. It’s best to decide which approach will benefit your photography more.
I hope that gave you a good idea of which Nikon Picture Controls to use, whether you shoot JPEG or RAW (or video). Let me know in the comments if you have any questions, and until next time, I wish you good light!