Nikon Picture Controls are the fundamental way in which Nikon photographers choose the colors, contrast, and “look” of a photo – that is, if you shoot JPEG. If you shoot RAW, maybe you’ve never given Picture Controls a second thought! But this could be a mistake. Here’s what you need to know.
What Are Nikon Picture Controls?
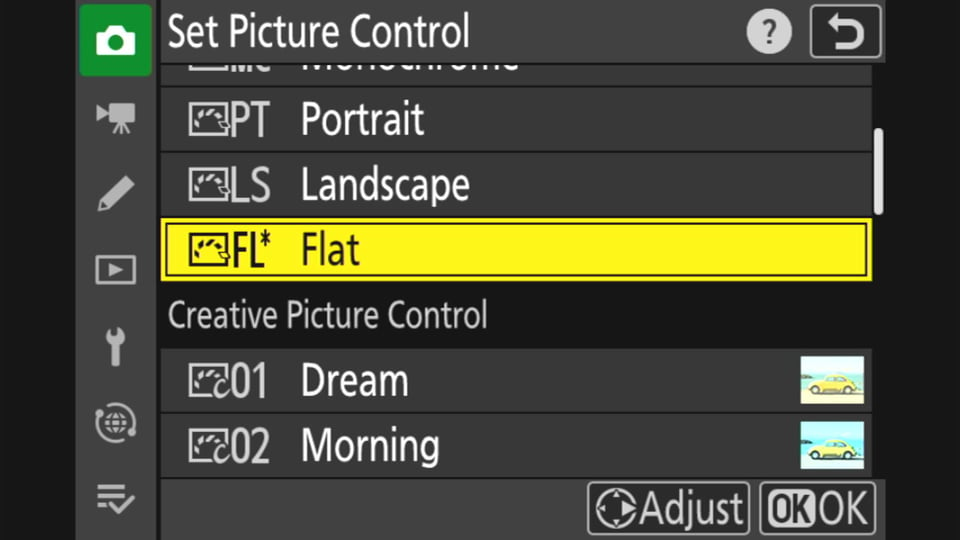
What exactly are Picture Controls? You can think of them as a set of filters or presets that determine how your photo looks. Traditionally, you can choose between some basic profiles like Standard, Landscape, Portrait, or Neutral. The differences between them are meant to improve the appearance of the subject in question. For example, the Landscape Picture Control will have more contrast and saturation than the Portrait Picture Control.
Today’s Nikon cameras don’t stop with those basic options, either. On newer Nikon cameras, you’ll find a subcategory called “Creative Picture Control” that has more unusual options, such as Melancholic, Dramatic, Morning, or Dream.
If you shoot in JPEG, it is important to choose these profiles very carefully. What you see is what you get – the Picture Control is irreversibly baked into your JPEG photo. Although you can somewhat change things around in post-processing, JPEG is inherently not very flexible, especially if you are trying to undo an aggressive Picture Control.
However, it’s a completely different situation if you shoot in RAW. Every Nikon RAW file has an embedded JPEG, and your choice of Picture Control still affects this embedded JPEG. This information can be used by your post-processing software to change the default appearance of the RAW file upon import. But it does not permanently change the colors and tones of the RAW file itself.
One example I like to give is that you can set the Monochrome Picture Control on your camera, and the RAW file will still be in color. The JPEG will not.
Choosing a Picture Control for JPEG
You might see yourself as an all-RAW photographer, but bear with me for a second. There are situations where you may need to shoot JPEG, and your choice of Picture Control is very important there.
The biggest one is if you shoot with a camera like the Nikon Zf, Z8, or Z9 that has a pre-release burst feature. This valuable feature lets you take photos slightly “back in time” and is very helpful for capturing fleeting moments that your reaction speed wouldn’t have caught. However, as I publish this article in Spring 2024, it is JPEG-only. (I hope that Nikon changes this soon!)
You will find that you get the most flexible (“RAW-like”) images by keeping your JPEG Picture Control nice and simple with minimum sharpening, noise reduction, contrast, and saturation. Nikon’s Flat Picture Control is good for this if you’re shooting in high-contrast light. However, in low-contrast light, I have found that the Flat Picture Control can be a little too flat and difficult to bring back to normal in Lightroom without some annoying color shifts. The Neutral or Standard Picture Controls work better in such conditions – still with sharpening and noise reduction turned off.
There are other applications where professional photographers will shoot JPEG, especially for broadcast sports where there is a quick deadline to send off your photos. I’m sure you already know if this applies to you, and news organizations will have their own standards for such JPEGs. However, as a general rule, the Standard Picture Control is also a good choice for taking ready-to-view JPEGs that need minimal editing.
Finally, most video shooters will need to set their Picture Control carefully. My recommendation is the same – the Flat profile if you plan to do complex editing and color grading, or the Standard profile if you want ready-to-view videos.
Choosing a Picture Control for RAW
I have already mentioned that RAW files do not have the Picture Control baked directly into the image (only into the embedded JPEG). So, does your choice of Picture Control even matter if you’re shooting in RAW? Yes it does!
Any time you see an image in your camera’s electronic viewfinder or on the rear LCD, your chosen Picture Control is being applied. This is the case even when shooting RAW. Your choice of Picture Control also affects how the in-camera histogram looks.
In other words, when you view any photos on your camera’s display, you are not actually looking at the RAW file. Instead, you’re looking at the embedded JPEG – Picture Control and all.
Here are two RAW files taken with the same settings to demonstrate why this can matter:
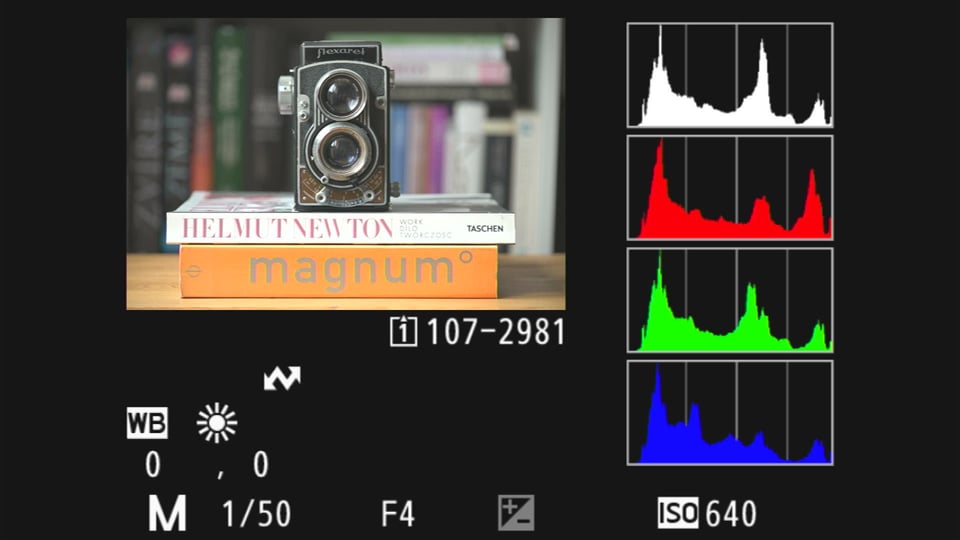
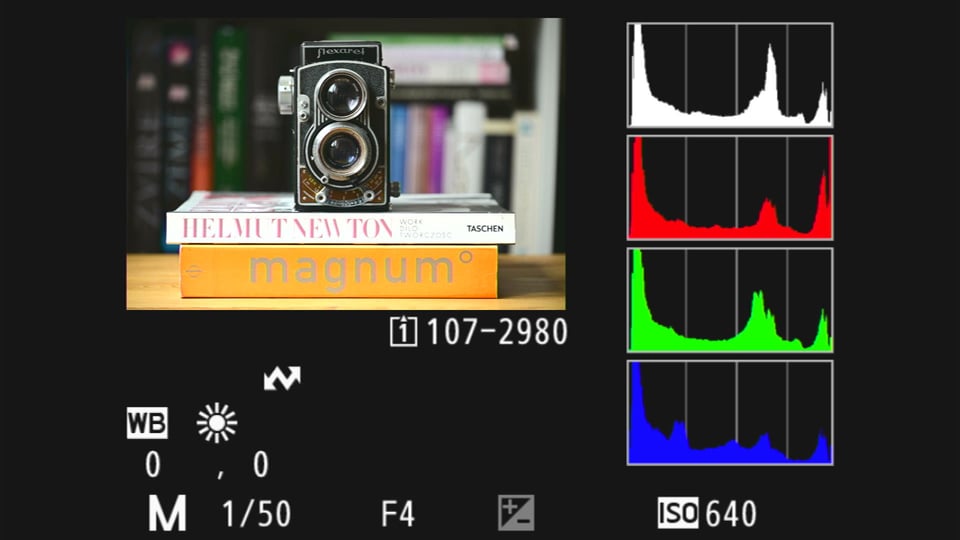
In the examples above, the image with the Vivid Picture Control looks more pleasing to me – however, it is not as accurate. For example, the Vivid image implies that there is significant overexposure of the red channel – whereas the Flat image shows much less overexposure. In fact, the RAW image will most likely not have any clipped highlights at all, or only very minimal clipping.
So, if you are the type of photographer who uses your histogram to expose to the right, your choice of Picture Control is extremely important. You’ll want to shoot with the flattest possible profile. This will more accurately show you which tones are going to be clipped in the RAW file rather just the embedded JPEG.
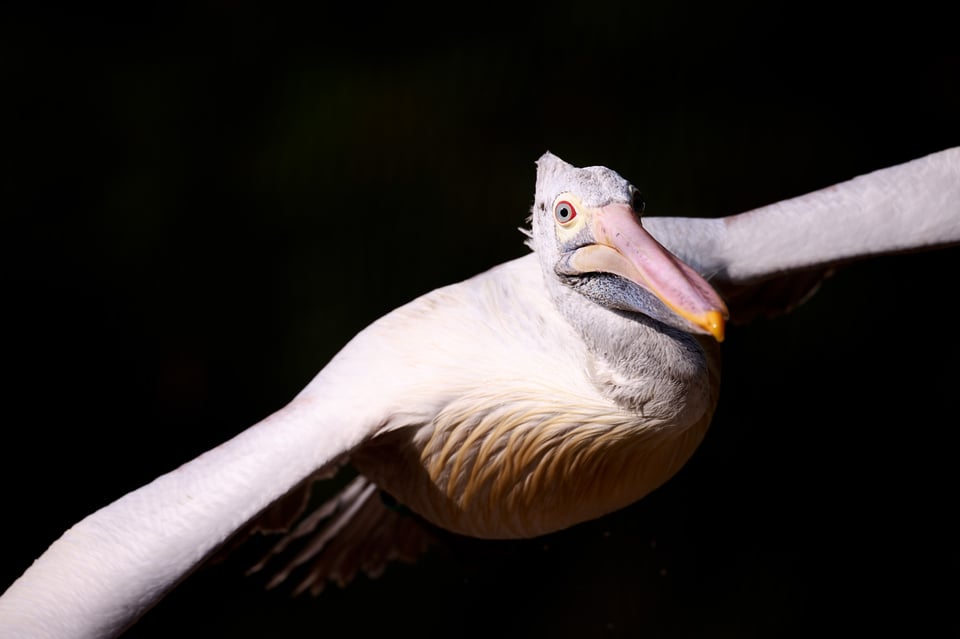
Does this mean you should always use the flattest Picture Control setting when shooting RAW? Maybe, but not necessarily. The other big reason to choose your Picture Control when shooting RAW is visualization.
Remember the example I mentioned earlier – that you can set a Monochrome Picture Control, and your RAW file will still be in color? Well, the image in your electronic viewfinder won’t be! When you look through the viewfinder, you’ll see the world in black and white. And if you’re planning to convert the RAW file to monochrome later anyway, maybe it will help you to see it in black and white from the start.
By the same token, the Flat Picture Control is so dull and lifeless that it may actually interfere with your composition decisions. Maybe you don’t notice some subtle lighting effects or a high-contrast rock that will become a problem later, since the image in the viewfinder is so low-contrast. In that case, you may prefer to set a more normal-looking Picture Control like Standard (or maybe Neutral if you don’t need too much extra punch).
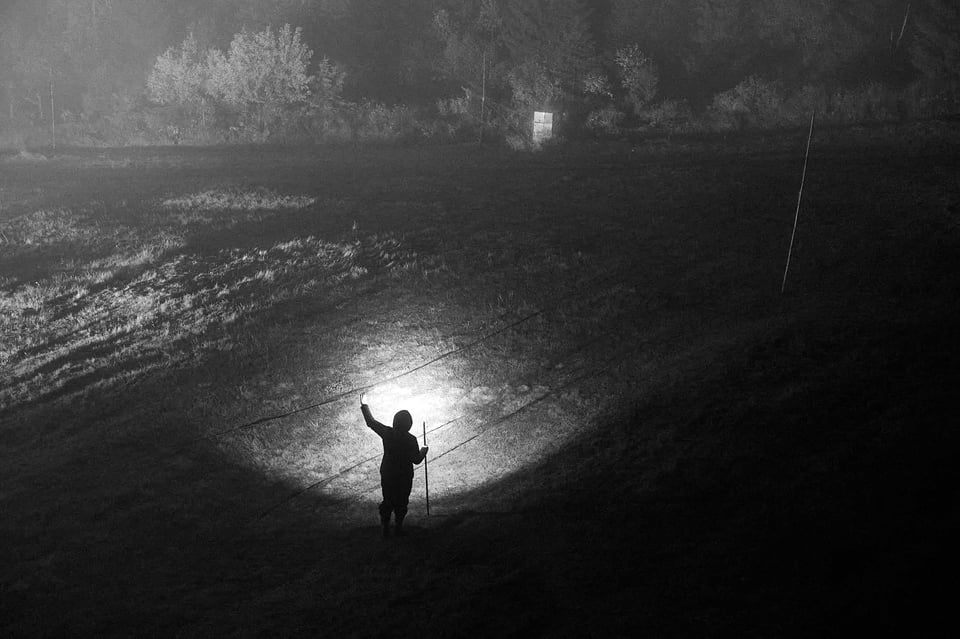
Which approach do I prefer? Personally, as someone who always shoots RAW, I use Flat. It distorts the histogram the least and gives me a good idea of my starting point in post-processing. Another benefit I’ve found is that it’s less taxing on the eye than the profiles like Vivid or Landscape.
Still, using the Nikon Zf recently inspired me to shoot with the Monochrome Picture Control in an effort to pre-visualize my black and white photos better. Likewise, I would not begrudge someone for choosing a higher-contrast Picture Control as a RAW shooter, so long as it helps you visualize and compose your images better.
My main recommendation is that you don’t stick to the camera’s default Picture Control thoughtlessly. It’s best to decide which approach will benefit your photography more.
I hope that gave you a good idea of which Nikon Picture Controls to use, whether you shoot JPEG or RAW (or video). Let me know in the comments if you have any questions, and until next time, I wish you good light!
Good article! maybe I don’t really understand it all, but please clarify me. If I take an original picture control profile from ex:. Nikon d700 and import it into Nikon d4s camera, will I have about the same colors and other aspects? Or will d4s not accept such changes, or will it accept it but to the extent of its matrix? I ask in the perspective of avoiding lengthy post-production processing. Thanks in advance.
In my photography, value of Picture Controls lies in the combination with RAW processing in NX Studio. With any other processing software, they are lost and you start with the software’s own RAW interpretation. For portrait images to be processed in B&W, I choose “Monochrome”, for colour portraits it’s “Portrait”; for other colour images “Flat” or “Neutral” suit me best for checking on the camera display.
Unfortunately, only Nikon NX Studio is actually the one that accurately reflects the camera’s picture control. Otherwise it’s exactly as you write “software’s own RAW interpretation”.
I think you missed the point somewhat. Picture controls are important for showing what your final results may look like. If you use the one that most closely matches your style, it can help a lot. I especially care for and use them, because I’m a photojournalist and often send straight out of camera JPEG’s to my devices and editors. Luckily on my Nikon D6 bodies there are lots of great options. I mostly use the C3 and C5 and then tune them to my liking. I usually add sharpening and saturation and also use D-lighting set to Auto or High. Anyways, on my D6’s it’s easy to customize them. I can also quickly pinch to zoom and hit the i-button and select quick crop. Plus I can also just flick up on the rear touchscreen and that cropped JPEG or a full RAW is immediately sent to my device(s)! I use the WT-6A transmitters and they have a 650ft range vs. 30-33ft range with built in wireless. Plus I’ve been using these types of transmitters for 12 years now and never once had a failure or issue. I can transfer 14bit full resolution RAW’s in just 2 seconds and at up to 650ft range. JPEG’s are even faster and I shoot both, RAW+JPEG. Anyways even if all you shoot and deal with is RAW, picture controls still matter in my opinion. To each their own though and if you don’t care, that’s fine. I’m just confused on where you lie or what you mean.
Picture controls are misunderstood. They are made to be used with Nikon RAW files and Nikon NX Studio. If you are using NX studio to process your RAW files then you get all the benefits of being able to apply any picture profile (when shooting RAW) that you choose after shooting. Your Nikon camera and NX studio work seamlessly together, making sure that all your settings and Nikon’s engineering in terms of how your images are rendered look exactly as Nikon meant them to look. When you use 3rd party software to process your RAW files, you are not exploiting your NEF file as Nikon intended. Of course, 3rd party software can be used to process your NEF files and post edit them but ideally we should use NX studio to process our NEF files and then export as TIFF files to further enhance them if necessary or needed.
If we consider the best view of the world to be the one that Nikon engineers have, then it’s exactly as you write, Steve. The combination of a Nikon camera with a certain profile and the NX Studio software will produce a result that is 100% Nikon. Other editors, be it Adobe Lightroom or Capture One, offer their own approach to handling raw RAW material. However, I don’t use Picture Control as a creative tool, so I’m more interested in the properties of the raw RAW material. That’s what this article is about. When I think about it, I would probably like to be able to use Picture Control, but I would also like to be able to see the RAW-based histogram and highlights.
Yes, agreed Libor. I tend to do the following:
Histogram Limitations: I know that the histogram shows an 8-bit preview instead of the 14-bit data, so there’s more image information available than it appears when shooting RAW.
Manual Shooting: I use manual mode and spot meter the brightest highlight to be +2.5 stops from midtone. I then check the most important shadow details to see if they’re within the camera’s dynamic range.
Flat Picture Profile: If shadows are outside the range, I use a flat picture profile to capture more detail in JPEGs, then add contrast and color during editing.
RAW Shooting: For me most of these issues are resolved when shooting in RAW format and using NX Studio. The Flat Picture Profile can be chosen to better represent RAW data in the histogram, and any Picture Profile can be applied later during editing.
This method helps in getting the best possible exposure and dynamic range in my photos!
One web sites did have some “fuji” but mostly kodak color profile for one to choose. I am not sure but did get into my z9. Still not as good as fuji when Jpg is concerned. Still miss the v50 fuji film.
There’s regular revisiting in forums of using a Custom picture Control file to see “Live Blinkies” ie Under/Over exposed regions of the scene in the EVF.
I have been relying on this method since soon after the Z9 launched.
Different files are available from the linked site below.
www.dpreview.com/forum…ad/4730098
github.com/horsh…ontrolsDev
You have just persuaded me to shoot RAW. I guess I have been to lazy and was content with JPEG Thanks for the inspiration
I’m very pleased to hear that, Nigel. There is a lot of potential in moving from JPEG to RAW. The only negative is more disk space, but then there are only positives. Just keep in mind that shooting in RAW doesn’t automatically mean higher quality photos. Basically, the main benefit is the much wider possibility of subsequent (non-destructive) editing. JPEG is bread, RAW is flour, eggs, yeast and water. You take a JPEG out of the oven baked (the memory card slot actually resembles the oven a bit), RAW you can pretty much tweak to taste.
This was a useful walkthrough. I’ve been sitting on standard for years since I always shoot raw, and when I’ve wanted to change it after-the-fact with NX Studio or whatever it’s been easy.
I’ll have to try using the monochrome profile for some of those high contrast shots I intend to be black and white, and maybe flat for when I’m really trying to ETTR.
With DSLRs I also used Standard. With the switch to mirrorless cameras, I went to Neutral/Flat. Both the natural viewfinder look and truer rendering of the histogram and highlights were my main motivations. For creative reasons, the only PC I use is monochrome. It’s a great tool for previsualization and also works with color filters. After a long time, I took the red and orange filters out of the closet. Unfortunately I only have them in the old Nikon 52mm diameter.
On the Nikon DSLRs I’ve used, the Monochrome Picture Control has options along the lines of:
Manual adjustments
Filter effect: The options in this menu simulate the effect of color filters on monochrome photographs.
• Off, yellow, orange, red, or green.
Toning: Choose the tint used in monochrome photographs from B&W (black-and-white), Sepia, Cyanotype (blue-tinted monochrome), Red, Yellow, Green, Blue Green, Blue, Purple Blue, Red Purple.
Everyone has their own workflow and artistic vision and process. However, I think shooting a flat profile all the time is overkill unless you intend to spend a lot of time pushing sliders in post, which is acceptable in some circumstances such as highly dynamic scenes or color critical commercial work, or you just love editing!
The new Z series cameras are so good with exposure (including using Active D-Lighting) and profiles/color accuracy that using specific profiles like Standard, Landscape, Portrait, etc. payoff with a big time savings when editing. When it’s your job, then it becomes a time=money=quality of life decision. That said, you’ve got to spend time shooting and editing the different camera profiles (and applying your own specific presets on import) to really understand for yourself how that fits into your photography and editing, and I’d guess it’s slightly different for everyone.
I totally agree, Eddie. Everyone has their own needs and there are countless ways to get a good result. My motivation for using Flat PC is the viewfinder with natural colors and contrast and a truer rendering of the histogram and highlights. Also, since I edit in Capture One, which ignores the profiles set in the camera, it doesn’t really matter what profile I set. My starting point for editing is the same whether I use Vivid or Flat. But for someone editing in NX Studio or (to some extent) Lightroom, it’s a different story.
Yikes! Almost everything in this article bothers me. First, I think it is an enormous mistake to shoot to the histogram. To me, that is a burdensome and cumbersome way to shoot a picture. More importantly, it inhibits the photographer from growing and learning his craft. The eye is what should be used to train oneself to shoot good photos….in my opinion. The photographer needs to be able to discern an area that is going to be blown out right in the viewfinder, with their eye, not because the histogram says so. Over time, the eye will learn to discern many things about a scene that may not work well. And it will also tell you when a scene is going to yield a perfect photo. For me, post processing is where the histogram belongs.
I shoot raw exclusively, and use Landscape picture control, which works well in almost every circumstance. The exception is if you are in a high contrast situation, like at a beach. When there is too much sun at the wrong time of the day, lowering your contrast by selecting Standard, can work well. But that is the point of picture control. It is just a presetting of contrast and a few other things. But I’ve found that shooting too flat is very hard to recover in post processing. You have to adjust all kinds of things to bring your photo up, and it seldom works well. Or, of course, you can reset your picture control in post. But you can also flatten your picture control in post. The advantage of that is so that your first look at your photo won’t be in flat and be a big disappointment when it looks so bad. :)
The last thing I want to address is importing one’s pictures into LR or other software, and losing data or color profile. The solution to that is dead easy. Get a card reader and copy/paste you photos into your computer, then open your software and you can do anything you like to your files that are just as they came off of the camera card. No conversions ruined your photos and no further conversions are necessary to fix them. And your files are not ruined in case you decide to switch to some other software at a future date.
This is where we have a bit of a difference of opinion, Elaine. The oversaturated color profiles bother me from the first look in the viewfinder. Just yesterday, I was discussing this topic with a colleague and we agreed that by setting flatter and less saturated profiles, you can get a similar experience to looking through an analog viewfinder. It’s not a big deal for brief shooting sessions, but if I had to look through an oversaturated viewfinder for hours at a time, I’d have to take some painkillers for my headaches.
Experience in judging a scene is a great thing, of course, but it comes with experience. Besides, the human eye can easily be wrong. The histogram and the blinking highlights are good reference points.
Another thing is that not every software can read the profiles set in the camera. For example, if you set a black and white profile in the Nikon Zf (or any other Nikon camera), Capture One will automatically convert it to color. You have to change it when importing. The situation is different with Fuji. Fuji cooperates quite closely with Capture One and their color profiles are automatically taken into account when importing.
Let me get back to the main point of my article. Flat/Neutral is for those who want to have a rough idea of what their RAW files contain. For someone who likes vivid colors in the viewfinder or shoots in JPEG, one of the more vivid profiles is preferable.
Libor, I think Elaine is coming at it from the perspective of a DSLR photographer, and using a higher-contrast profile makes sense. The rear LCD can be hard to see on a bright day, and using a low-contrast profile could make it especially hard to compose. Landscape would be a great choice. Though if you rely on the in-camera histogram, Landscape would show early clipping, and Flat would be a better choice.
Elaine, I’m not sure if Riley is talking about the same thing I am, but there’s no issue with any import method causing a conversion that can ruin your photo. Whether you copy/paste as you describe, or use Lightroom’s Move tool, or any other import process, the result will be the same. None of Lightroom’s edits are baked into the RAW file anyway, so you can always switch to a future software comfortably.
I was about to reply to Libor that I agree with him about an oversaturated profile. But landscape is not at all oversaturated. When I was a newbie, I had just gotten my first manual camera, the D300s. I shot in vivid and could never understand what was wrong with my pictures. It took me a while and many ruined pictures to figure it out. I learned that landscape profile gives a very well balanced picture. But what I had no idea of is that I gather that the Z cameras are different in this respect.
What I said about importing is what I have understood from many articles where people posted about working with Lightroom and other softwares – their catalogs and libraries and how the photos are not transferrable between softwares because they’ve been converted to DNG or some other proprietary format. I stand corrected.
Since you bring it up, I don’t think it is fair to write articles from a Z perspective only. That leaves so many people out. DSLR is valid and viable and must be taken into account. Z cameras are not the only game in town.
Elaine I absolutely agree with you, I had no idea this article was intended only for Z users until the end, perhaps P.L. could start specifying the target audience at the beginning of an article. I have zero interest in reading about Z issues, I’m sure Z users feel the same way about DSLR’s.
It’s not just intended for Z users. It’s just as applicable to DSLR users up until the visualization step at the end. And even that is just as applicable if you use the back panel to compose instead of the viewfinder, which I see lots of people doing.
If you had no idea until the end, then everything except the end was probably pretty applicable to you :)
Your last paragraph is incorrect, that isn’t how Lightroom or other software works.
What do you have in mind specifically? I don’t see anything controversial in the last paragraph. Thank you.
As a Lightroom Classic user, I was quite annoyed that my Zf’s picture controls weren’t sticking on import, especially when shooting in monochrome. While NX Studio will keep your picture controls on import, Lightroom will automatically convert to “Adobe Color”, which is a completely different color profile than Nikon’s color science. However I found that it is possible to get my in camera selected picture controls to stick on import. You still have full RAW functionality, but as I prefer Nikon’s default colors to start with, it has saved me quite a bit of time in post.
Navigate to Edit > Preferences (Win) or Lightroom Classic > Preferences (macOS) > Presets > change Master to “Camera Settings”. I’ve done the same on my Zf and its been a dream to shoot.
For what its worth, you can also switch between in camera picture controls in LR manually by going to Develop > Basic > Profile > Browse > Camera Matching, in the case of if you want to compare Nikon profiles in LR.
I find that this is not a very well known setting to change, so I hope that by sharing this it can help others!
If this is true, something must´ve changed. To my understanding LR can´t open the actual embedded adjustment file but instead uses camera profiles which are simulations made by Adobe. Correct me if I´m wrong.
It now works with Nikon’s profiles as they are compatible with Lightroom’s settings. For example if i change my picture control to add more clarity, sharpening, saturation, etc. it’ll transfer that over to Lightroom’s respective settings. The picture control settings are all stored in the RAW files, as for example I can’t access deep tone monochrome on my d7500 files, but I can on the Zf.
I believe this was implemented around ~2015-2017 as my D7500 had the ability as well.
Wow. I still think otherwise in 2024. Need to update my … brain.
This is mostly true. LR Classic can now recognize and maintain the in-camera presets to raw files on import. For Windows, specifically, go to Edit>Preferences>Presets>Raw Defaults>Global Defaults and change to Camera Settings. Adobe added this feature several years ago. It’s a great feature so that what-you-see when you take the photo is what-you-get when you import and edit.
This really is a certain advantage of Lightroom over, say, Capture One. If you configure it in Ligtroom as you wrote, it will accept the embedded profile. Better said, it will use Adobe’s equivalent of an embedded profile, since Nikon doesn’t provide their profiles to third parties. Unfortunately, this is not possible in Capture One. The only thing that can be done is to configure the app to always apply a profile, such as monochrome, to all photos from a particular camera. This is, of course, impractical. That’s why I have ProStandard set as the default import profile, which I change if I need something else.