In this article, I will explain how to set up Nikon’s shooting menu banks so that you can incorporate them into your photography workflow. What are shooting menu banks for, and how can they make your work faster and more enjoyable? Today, I’ll answer those questions and more.
In fast-moving genres of photography – including wildlife, street, sport, and so on – you will need to make decisions very quickly. And it’s not just decisions. Your reactions have to be quick, too. Losing just one or two seconds can mean missing a great photo. Nikon’s shooting menu banks can help you save those precious seconds.
Menu banks are nothing new under the sun at Nikon. In fact, they’re even in the menus of my old Nikon D200 from 2005. But I didn’t use them back then, so I missed out on many of their benefits. Now I use them all the time.
Table of Contents
To put it simply, Nikon’s shooting menu banks are a saved batch of camera settings that you can quickly recall. You can quickly switch between these batches of saved settings in response to changing conditions in front of your camera.
For example, imagine you are photographing a heron standing on the edge of a fast-flowing river. To add movement to the photo, you decide to shoot with a relatively long shutter speed for wildlife photography of 1/10 second.
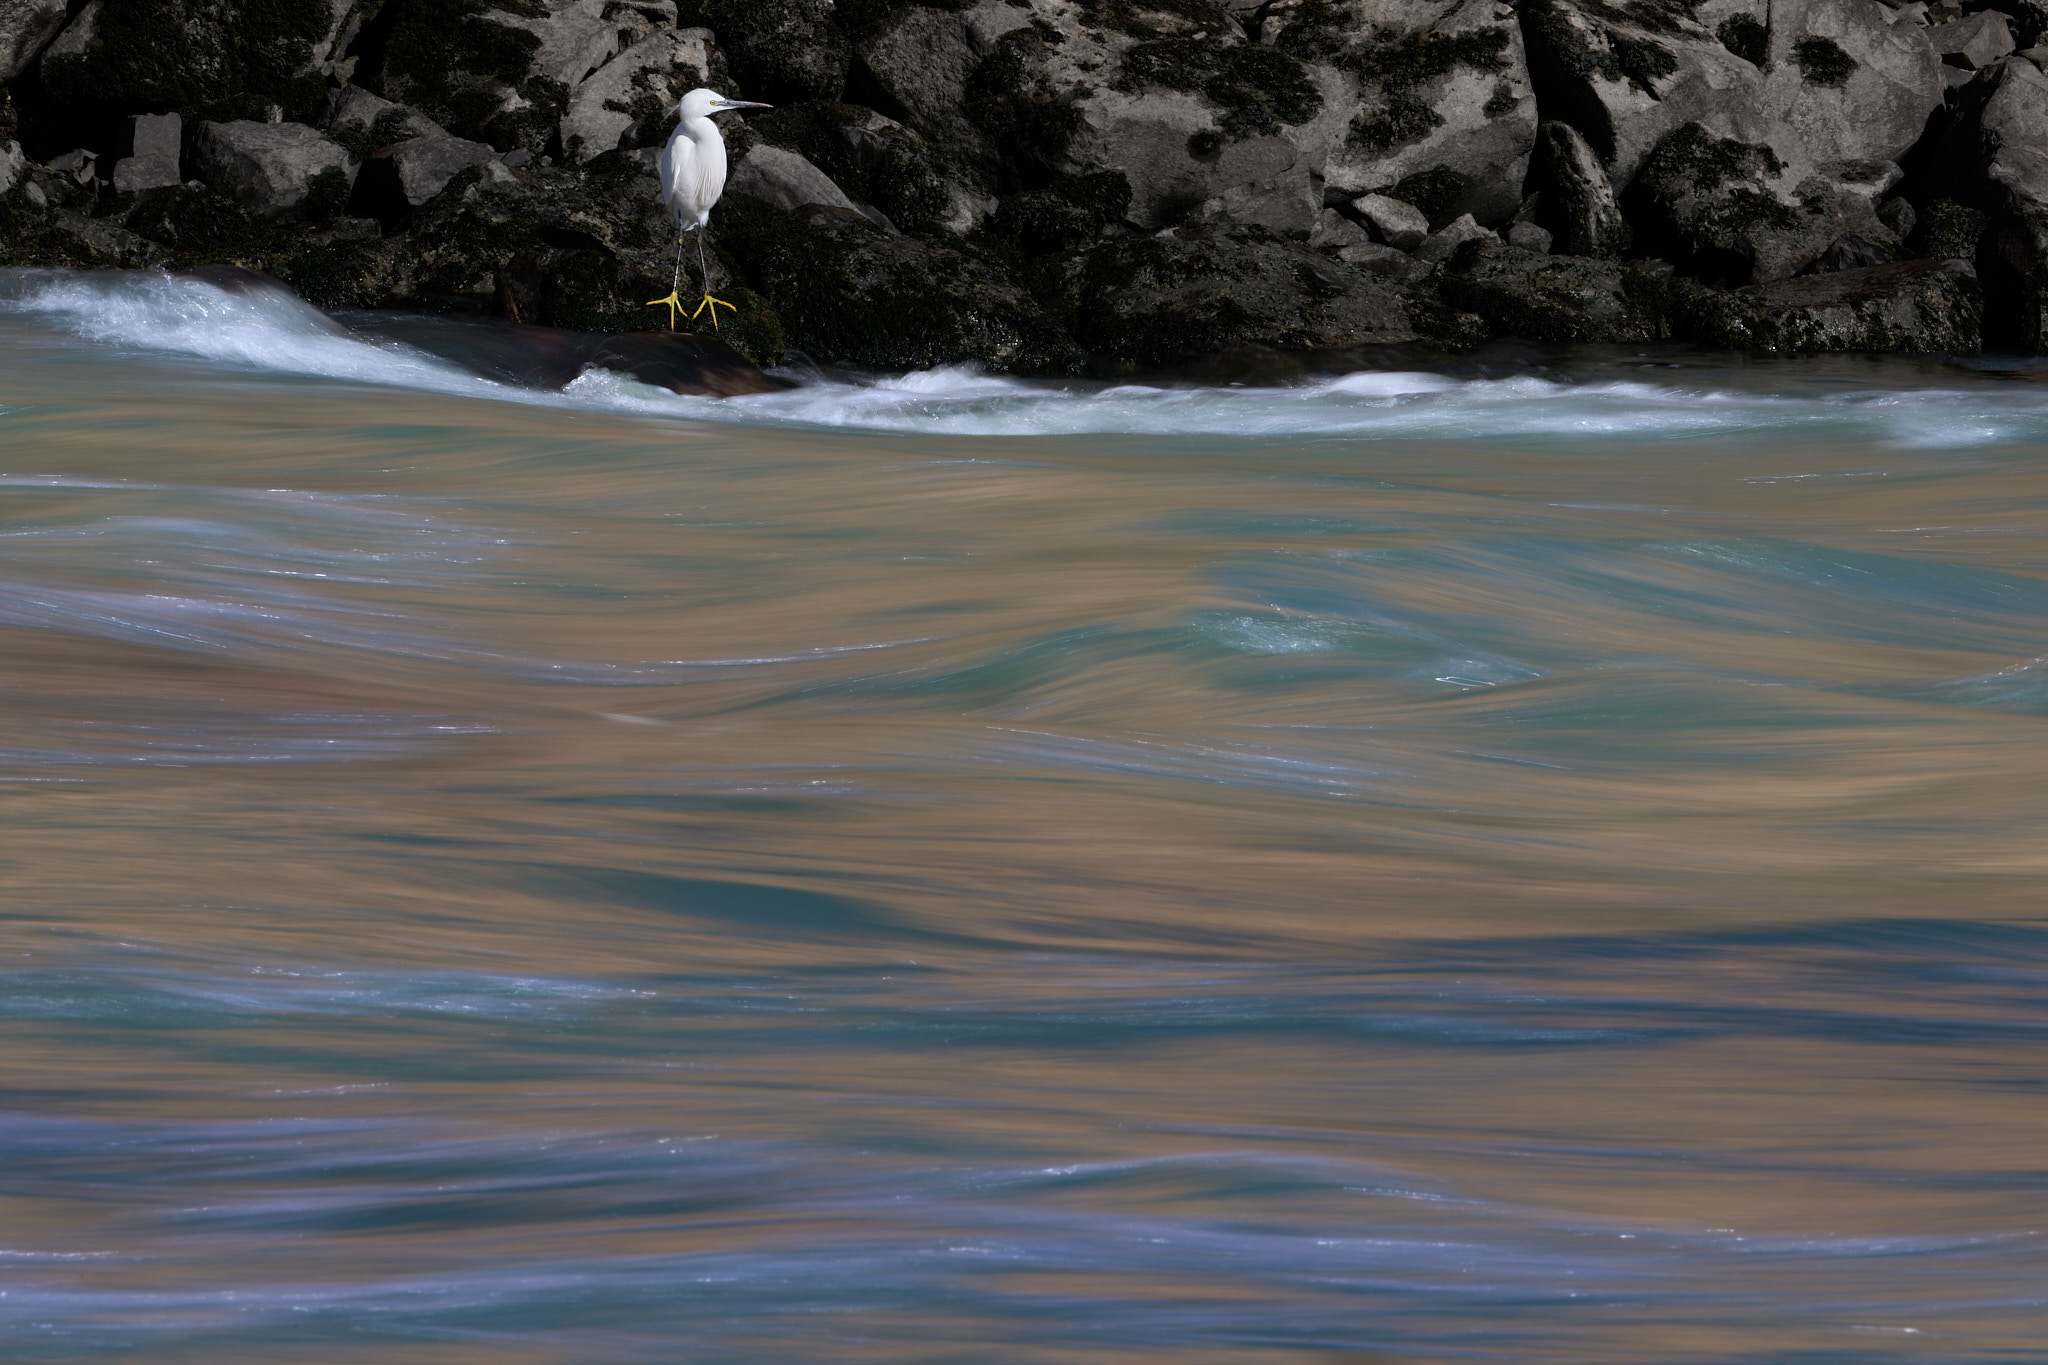
But then the heron suddenly jumps up, spreads its wings, and starts to fly. How quickly can you change your camera settings to freeze the motion? By the time you’ve set your aperture back to f/6.3 and your shutter speed back to 1/1600 second, the heron is gone.
But it doesn’t have to be that way. If your shooting menu banks are set up correctly, you can quickly revert to your “typical” wildlife photography settings in an instant. Just press an assigned button while turning the command dial a couple of clicks. It’s something you should be able to do in the blink of an eye. That’s the power of menu banks.

Note that Nikon’s menu banks do not reset to their originally set position. For example, if you create a menu bank and set f/8, then change to f/11, the next time you go back to that menu bank, it will be at f/11 and not f/8. The ability to “lock” menu banks so that they reset to the original state has been a requested feature among Nikon photographers, but for now, that is not how Nikon’s menu banks work.
Lastly, I recommend keeping something in mind about menu banks. Assuming that your particular Nikon camera has menu banks in the first place, you are always in one bank or another. Even if you never set up the shooting menu banks at all, that simply means that you are spending all your time in Bank A.
So, these are not really “just another camera setting” but rather something that cannot be avoided if you own a Nikon camera with menu banks. (Of course, you can stick to Bank A the whole time and not try to learn how menu banks actually work, but you would be missing out on some useful capabilities of your camera.)
As I mentioned earlier, Nikon’s menu banks are found in a variety of Nikon cameras, from some of their oldest DSLRs to many of their newest mirrorless cameras. However, the process of setting up the menu banks is essentially the same from camera to camera.
First, in the camera’s menu, go to the main Photo Shooting Menu. If your camera has menu banks, they’ll be right at the top of this menu.
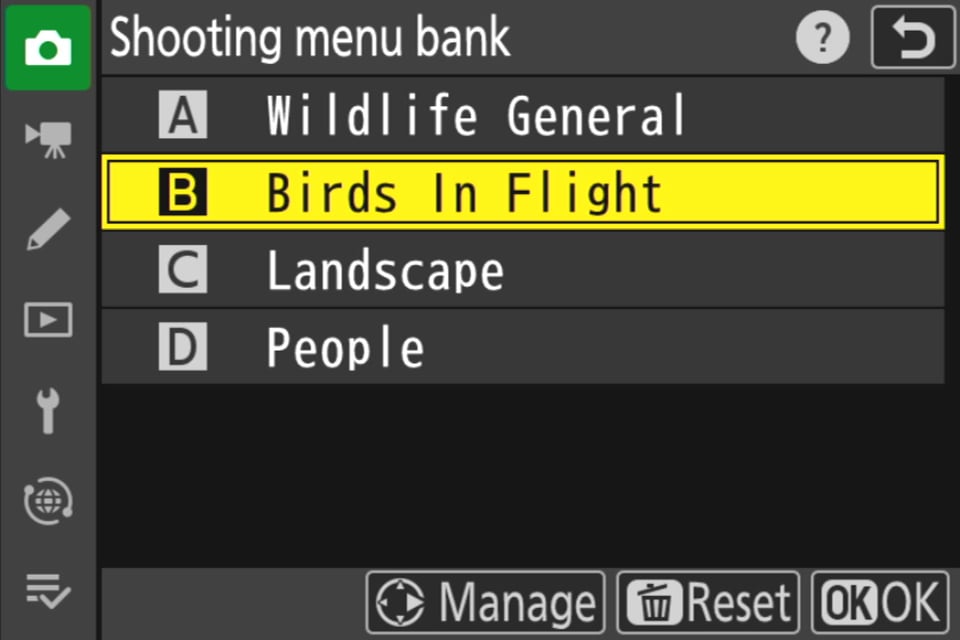
The camera will allow you to create up to four individual banks of camera settings. These are labeled by default with the letters A, B, C, and D. However, you can add a new name to each bank. I have named mine “Wildlife General,” “Birds In Flight,” “Landscape,” and “People.”
The next item to set up is the “Extended Menu Banks” option, which is the second item in the main Photo Shooting Menu. Change the default setting from OFF to ON. If you do not do this, the banks will be permanently linked by the same shooting mode (P, A, S, M) and it will not be possible to make independent settings for each bank. For example, you cannot have Manual in Bank A and Shutter Priority in Bank B. This would defeat the whole idea of having four different settings for four different shooting scenarios.
Then comes the most important step. It’s time to actually set up each of the banks. Just select the bank you want to set up, and then start going through your camera to set it up how you want. Almost anything in the Photo Shooting Menu is fair game. So are your exposure settings.
Of course, the exact settings that you choose are going to depend on your own photography and which bank you are working on. Think about the typical scenarios that you shoot and how you would want the camera to be set for those scenarios. Go through not just the camera menu, but also your exposure settings, for each shooting menu bank.
For example, for bird-in-flight photography, I like being in Manual mode with Auto ISO. So, I set up my “Birds In Flight” bank to be in Manual with Auto ISO! Meanwhile, I set up my “Landscape” bank to be in aperture priority with base ISO instead.
The biggest benefit of menu banks is to allow you to optimize the camera quickly for different photographic situations. Since the whole idea is to save time, you probably don’t want to dive back into the camera’s menu whenever you need to change the bank. How can you make this process faster?
One option is to put the shooting menu banks as the first item in the My Menu, then assign a button on your camera to access the top item in My Menu. But there’s a faster way: in the Custom Setting Menu, assign one of your camera’s customizable buttons to “Shooting Menu Bank.”
Once you’ve done that, all you need to do in order to change menu banks is press that button and rotate the command dial on the camera! This will quickly jump between your four different banks. Personally, I find that the video record button or the Fn2 button are good choices to assign for this purpose on most Nikon cameras.
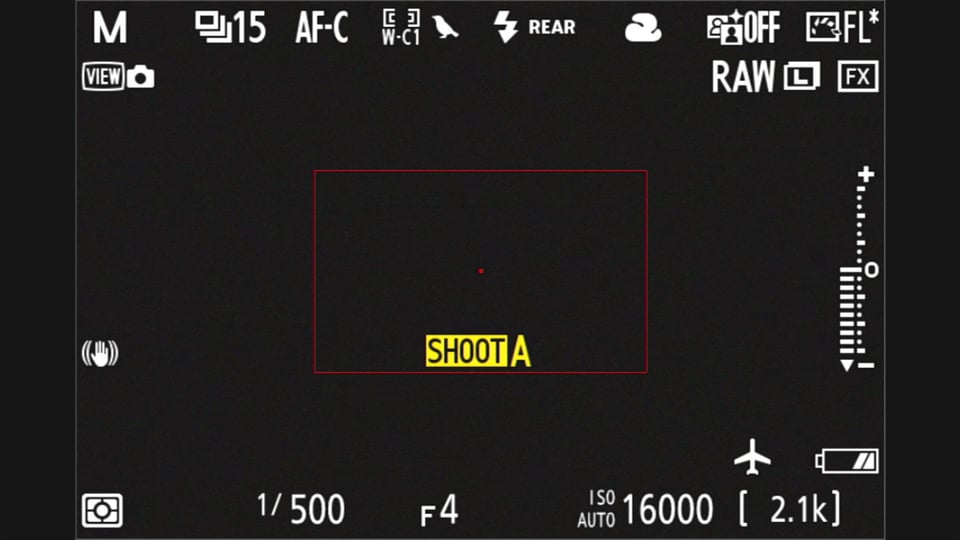
There is one limitation with Nikon DSLRs, however: You can’t see in the viewfinder which bank is currently in use. In the viewfinder of mirrorless cameras, you can see a yellow “SHOOT A/B/C/D” when switching between banks:
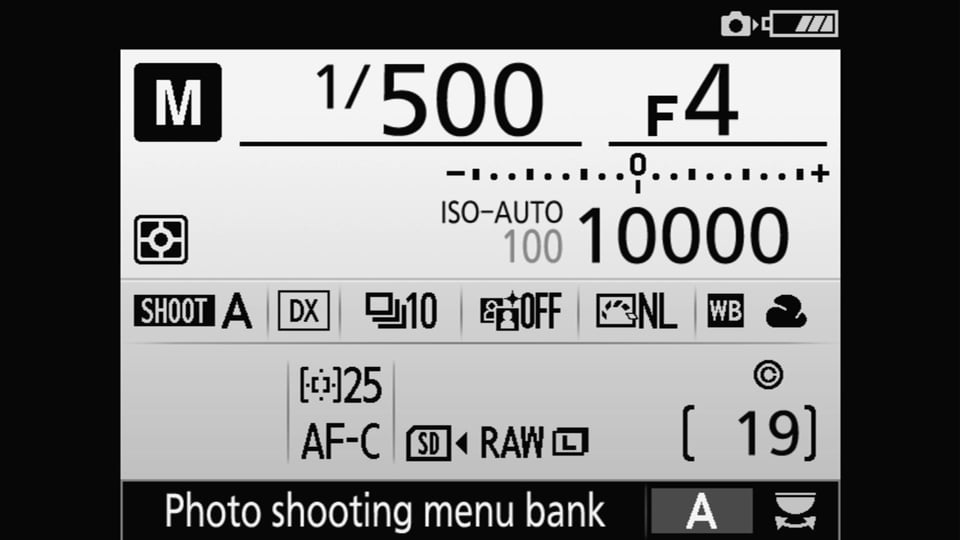
But on a DSLR, you’ll need to check the rear LCD or top display to tell which bank you’re using. Shown below is the rear LCD of a DSLR when changing menu banks:
However, with enough experience on your DSLR, this is not necessarily a problem – even if you look through the viewfinder the whole time. Based on how the camera settings in the viewfinder change, and how many clicks of the command dial you did, you will eventually be able to tell intuitively which bank you are using.
Like the name implies, Nikon’s shooting menu banks are confined to the settings in your camera’s Shooting Menu. (They also apply to your exposure settings as well as your camera mode, like manual or aperture-priority.) This means that they do not apply to your camera’s Setup Menu or Custom Settings Menu, for example. Any settings within those menus will hold steady across all four of your shooting menu banks.
However, not every camera setting that you would expect is saved in your menu banks. Within the Shooting Menu, for example, the exceptions are multiple exposure, interval timer shooting, focus shift shooting, time-lapse video, and auto capture.
There are a few other settings that are not saved by the menu banks. The most annoying is the camera’s drive mode. I’ve had several occasions where I will take a landscape photo with a 2-second self-timer, then switch to my wildlife menu banks quickly when I see an animal nearby. Guess what happens when I take a photo? A two second delay. I need to remember to switch the drive mode back to high-speed continuous. It can be very frustrating.
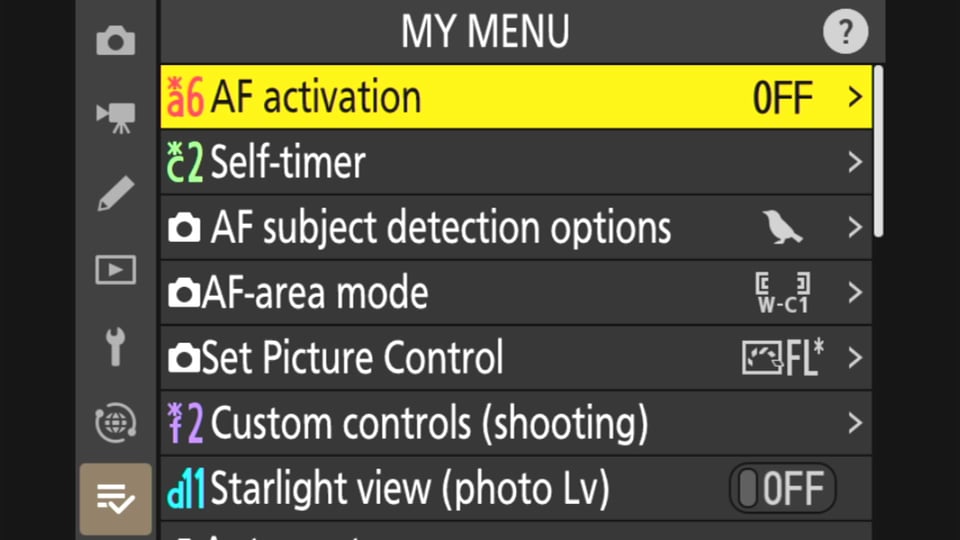
Apart from that, I will mention again that any camera settings in your Setup Menu or your Custom Settings Menu are not saved to the shooting menu banks. If you find yourself changing any of these frequently – for example, AF activation or Starlight View – I recommend saving them to the top of My Menu to quickly recall them.
Confusingly, Nikon has a separate menu bank option within the Custom Settings Menu (the pencil menu). These are called custom settings banks. As with shooting menu banks, there are four options – A, B, C, and D. They are not tied to the shooting menu bank that you’ve chosen. However, they function similarly, allowing you to quickly recall up to four different states of the Custom Settings Menu. In that sense, they are just like the shooting menu banks, but for a different portion of Nikon’s menu.
Personally, I believe that this gets out of hand quickly. I recommend staying in Custom Settings Bank A the whole time and not worrying about making more of them. It’s the shooting menu banks, not the custom settings menu banks, that are important.
However, if you have a good grasp of Nikon’s menu banks in general, and you find yourself changing a lot of the settings in the Custom Settings Menu, you may eventually decide to make some banks here, too. But I don’t recommend dealing with these until you are totally comfortable with the (far more useful) shooting menu banks first.

Conclusion
Nikon’s shooting menu banks may seem confusing at first, but they are very useful and straightforward once you understand them. They are by far the quickest way to switch dozens of camera settings all at once, allowing you to capture photos that you otherwise might have missed.
There are some limitations and things worth knowing, though. As I discussed above, Nikon’s shooting menu banks do not reset back to your originally-chosen settings; instead, they stay however you set them most recently. Also, they don’t encompass every setting on a Nikon camera – they focus on just your exposure settings and most of the Shooting Menu.
While these limitations may frustrate some photographers, Nikon’s shooting menu banks still make for a very useful tool. I can think of many times that they saved me from missing a photo. Not just that – they’re an integral part of how I approach wildlife photography. For example, I will use Menu Bank A when a bird is perched on a branch, then immediately flip to Menu Bank B (my bird-in-flight settings) when the bird takes off – capturing both photos in under a second with sharp results.
I hope that goes to show how useful Nikon’s shooting menu banks can be, even if they are a little confusing at first. If you have any remaining questions about these menu banks, please let me know in the comments below!
Thanks for a very good explanation of the banks and settings. I have one thought though; if you have a signed all four banks for different, and a bit specific, purpose – then suddenly you want to take a couple of astro shoots, or indoor, or macro, and of course need to make the applicable changes in settings. From what I understand you are always in one of the banks and this will of course ruin most of the initial settings.
What I’m aiming for is if it is more suitable to use only three of the banks and leave one for all “other” scenarios to play with.
Rhoughts?
I notice that the metering mode is not saved in the photo menu banks. If one changes the metering mode in one bank it changes in all four banks. I would prefer it was saved separately in each bank
Thanks for this. I’m used to U1 etc on my Z5 and D7500. I’m now confused by my newly-acquired D500 and need some help.
Thanks for this, bookmarking for possible future reference!
I’ve never been able to get comfortable with the U1/U2 settings on my Nikon DSLR. It’s astounding that there is absolutely zero information on which settings are included in these profiles anywhere in official Nikon documentation. Or, even better, a list of applicable settings listed in a separate submenu so you can craft a complete set in one place.
None of my paid work is time sensitive, so it’s not a big deal. But still, it’s a prominent feature – even having multiple dedicated buttons on the body – that’s surprisingly haphazardly implemented. For all their technical progress, the big camera companies still haven’t learned much from all the advances in usability pioneered on smartphones.
I actually have had huge huge issues with DSLRs and shooting banks. For motorsport purposes, I have bank A for something with wide open aperture or thereabouts and high shutter speed, and then Bank B will be slow shutter speed (1/30th) and ISO 50. On my D5 i have a button on top plus dial to switch between them. But my D5 , after say 1,000 shots, which is what it limits each folder on the memory card , too, not the 10,000 newer Z cameras seem to hold, is each time you switch banks, you are very likely to trigger a memory card full error as the shooting bank looks back to what the files and the original destination to save the files , and if you switch and it looks back to folder 101 or whatever and it’s full, the camera goes brain dead for 5-10 seconds while it then creates a new folder, and then banks will start saving to different folders, so your pics are all out of chronological order by placing in random folders and so forth. And it freaking sucks lol. It’s cost me many moments and basically prohibits me from using them now if you’re in a situation where you’re going to be switching often.
example of issues shown here. And it seems my Delkin power g4 128gb CFe cards also work pretty slow on the 5 as well even though their highly rated from the manufacturer and by others.
www.youtube.com/watch…Qqqp0GBZ10
I’ve found it irritating that my D800 creates different folders for different memory banks. I would prefer my files to be numbered consecutively up to the maximum of 9999, but “file numbering continues from the last number used or from the highest number in the current folder”, so unless I take the trouble to align folder numbers, if, shortly after rolling over to 1, I switch to a bank where the last file number was near 9999 it will soon roll over again instead of increasing steadily. However, this is just a nuisance when checking file sequences; it hasn’t interfered significantly with my photography.
Why can’t we Recall shooting setting so that we can move to desired setting instantly instead of banks ?
Only because Nikon stubbornly avoid the U1,U2 and U3 on their top range , Z6 and z7 have theese settings !
Downside of setting banks is they are not consistent and any changes you made from your origin settings must be set back manually if you don’t want to continue with your new changes .
I hope this excellent article will encourage others to get the benefits of the memory bank system. I got round to setting Menu Banks a couple of years after buying my D800, and have found them very helpful.
I have 3 key banks:
For normal hand-held shots, Aperture priority with ISO sensitivity control set to the inverse of focal length;
For static subjects from a tripod, Aperture priority and native ISO (100);
For flash, manual aperture, shutter and ISO, so that the camera doesn’t expose for available light.
I set the remaining bank to Aperture priority with ISO sensitivity control set to the fastest, for stability from moving vehicles, etc, but on reflection, recently I’ve made more use of the slowest setting, to take full advantage of image stabilization for better results in low-light situations such as within historic rooms which are kept dark to avoid colour fade. On the D800 changing the Auto ISO sensitivity speed is fiddly, and can’t be done from ‘My Menu’, so the memory bank is the easiest way to change it.
My only setting in the Custom Bank is to turn exposure delay on for static tripod subjects, to reduce mirror shake, and off otherwise; I find changing the setting this way when changing the Shooting Bank is the most reliable way of remembering to do this.
For most hand-held available shots I like to bracket the exposure, whereas from a tripod I usually take a single shot, check the histogram and adjust (I wish the camera could show over-exposure in RAW files!) I appreciate that the memory banks can’t adjust settings such as Release Mode, set by position on a physical dial, but I have two major frustrations with the D800’s memory bank system. Firstly, it doesn’t include bracketing, although this is set by button and command dial, and stored electronically. All too often I find my tripod exposures aren’t adjusting as I intended, until, either on site or back on my computer, I realize that they were also being adjusted + or -⅔EV by exposure bracketing. Secondly, I would like the option of being able to set the two banks to be linked, so that my Shooting Bank ‘Tripod’ setting would automatically apply the matching Custom Bank 5 second exposure delay.
Hello, I write from Brazil. Great article. I have a Z6 II and a Z8. When setting your options for a specific Shooting Menu Bank (B, for example) shouldn’t it have the same relationship to the Custom Settings Bank? That is, choosing B in the Custom Settings Bank, as done in the Shooting Menu Bank? Thanks.
This is a very helpful article. Now I can enjoy my Z8 even more. Being a new Nikonian, I got lazy due to frustrations about too many menus and banks, and decided to defer reading some sections of the manual for now. I’m a slow-paced photog, so I didn’t miss much yet by not understanding everything. But this article helps a lot! And it’s good timing.
Thank you for adressing this subject; personally i never used the banks for i never really understood what would change and what not.
Reading all this I think there must be a more clever way than these separate banks for shooting en menu settings…
Using a Z8- Z9 properly takes a year study!
I’ve read from somewhere that Nikon wants to make things easier for photographers so that we can concentrate more on artistic aspects or having fun – something like that. Let’s hope that they work on it in earnest! (;-)> Also, make the next gen Z8 (or a stacked sensor Z7) 8 ounces lighter.