What makes night sky photography so appealing? Is it the hues? Is it the sheer number of stars? Part of it is surely because a long exposure of the night sky is something the naked eye does not see. The possibility of photographing something like that is, in itself, a reason strong enough to woo a lot of photographers.
A lot of photographers consider “night photography” to be synonymous with astrophotography. But in reality, there are countless photography opportunities when the sun sinks. In this article, I will cover nighttime landscape photography in general, not just photographing stars. In fact, much of this article involves how to take advantage of moonlight.
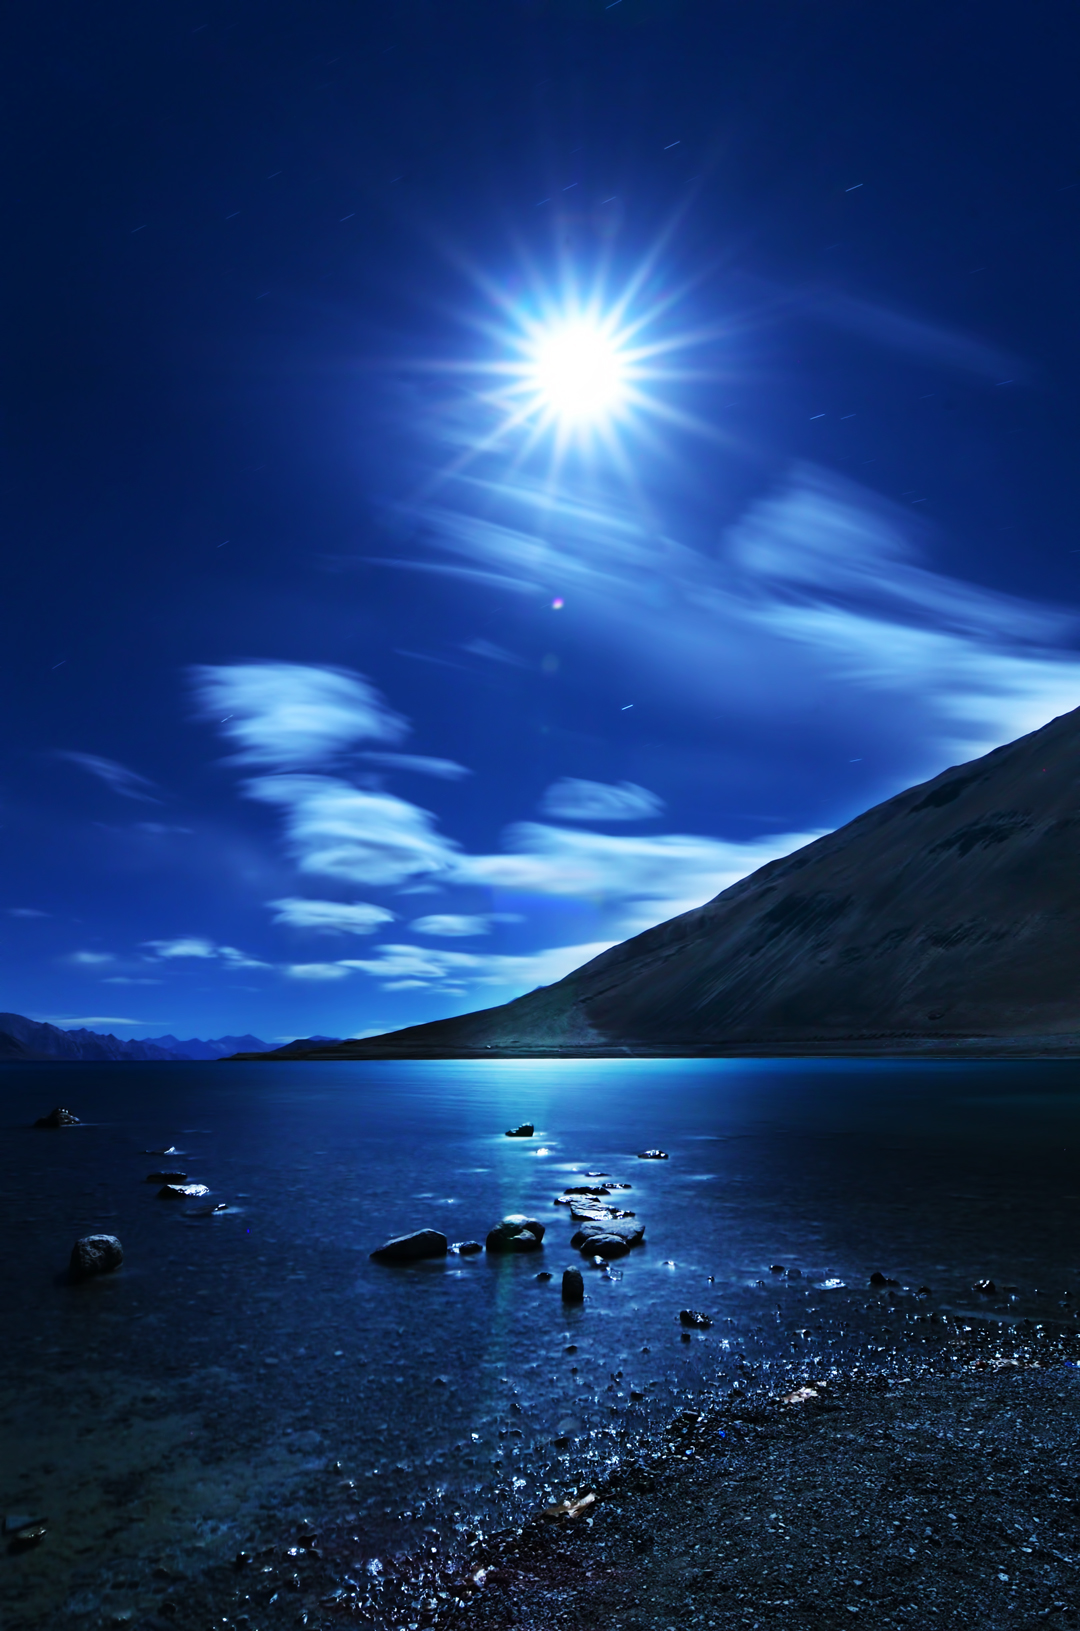
Moonlit Sky
Table of Contents
Equipment Recommendations
Since night photography involves low light and long exposures, specialized equipment becomes mandatory. Listed below is what you need to capture these dark situations:
1. Tripod
Some of you might wonder why a tripod is the first thing I mention, even ahead of a camera or lens. It simply is because it is the most important gear you’ll need to shoot at night.
Make sure that you don’t pick any old flimsy tripod, but a stable one. I have been photographing the night sky extensively in the last decade. I can remember that at least 70% of the time, I was photographing against pretty strong wind. Often, you’ll be taking pictures in areas without structures to block the wind, and a sturdy tripod becomes a necessity. It doesn’t matter if you have the best low-light camera in the world. You’ll still be shooting multi-second exposures that will look blurry without a solid platform for the camera.
There is usually a direct relationship between a tripod’s weight and its stability. Heavier tripods are more stable, all else equal. But no one likes carrying lots of weight, especially in remote areas for nighttime photography. Since stability is still the primary concern, I have two possible recommendations for your tripod. First, for a normal budget, go for a heavy-duty aluminum tripod. It won’t be lightweight, but it will be very stable and not too expensive. I personally have used the Manfrotto MT055PRO3 for over 6 years with good results. It would take a Titan to wreck it. But it’s hardly lightweight.
The other option is to get a midrange carbon fiber tripod. Don’t get an ultralight version, but a basic high-quality carbon fiber tripod will do well. Carbon fiber is lighter and more stable than aluminum, but it’s also more expensive. You may be paying upwards of $500 for something like a Gitzo Series 2 tripod or similar.
As for the ball head, you’ll again want something heavy-duty that remains stable in the wind. A budget option that should be stable and gets good reviews is the Sirui K-40X, although I haven’t tried it myself. I use the heavy-duty Really Right Stuff BH-55. At about $500 at the time of writing this article, that ball head will possibly out-last any of us. Mine has seen rain, hail, sand, and storms yet looks and works like it did on day one.
2. Camera Body/Lens Recommendations
In terms of the camera, the thing that matters the most for night photography is high ISO performance. Full-frame DSLRs and mirrorless cameras are the weapons of choice here. It doesn’t mean that APS-C crop sensors can’t cut it, but you’ll definitely run into more challenges in low light with a crop sensor than full frame.
Beyond that, you may need to look at reviews to see which cameras have the best high ISO performance. A general rule is that camera sensors with fewer pixels have better high ISO performance, assuming both cameras are otherwise similar (such as same sensor tech and generation). For example, the Nikon Z7 II, which has 45 megapixels, is not as good at high ISO values as the Nikon Z6 II, which has 24 megapixels. However, the differences are usually small if you’re dealing with cameras of the same generation, so don’t worry about this too much.
When it comes to lens selection for night photography, it is pretty straightforward. The widest and the fastest possible prime makes the cut. One of the best designs is a 20mm f/1.8, of which there are several on the market from different companies, like the Nikon Z 20mm f/1.8 S. Similarly good options are the Sigma 14mm f/1.8 DG HSM Art and the Sigma 24mm f/1.4 DG HSM Art. And if you want really wide-angle perspectives, anything that goes to about 14mm or 16mm on the wide end at f/2.8 is always a good choice. The Rokinon 14mm f/2.8 and all the various 14-24mm f/2.8 zooms are examples of that. If you have a DX camera, it’s hard to beat the Tokina 11-20mm f/2.8 or Tokina 14-20mm f/2. (Nikon shooters may find our “Best Night Photography Lenses for Nikon” article useful.)
3. Remote Trigger
With shutter speeds over a second, pressing the shutter button on the camera will induce shake, however steady our fingers are. It also negates the use of a tripod in most cases. You can always set the camera’s self-timer, but on a lot of cameras, that maxes out at 30 second shutter speeds.
The easiest solution most of the time is to buy a basic remote shutter release. I personally use a cheap $5 Chinese wired trigger, and it has been working for the past 5 years without a problem. I would always advise buying wired or radio triggers as compared to the ones that work with in-camera WiFi. The ones with a shutter lock are great because you don’t have to keep pressing it. For timelapses at night, you may want a higher-end remote with more advanced features including an intervalometer.
Milky Way Chasing
Since astrophotography is the most sought-after sub-genre of nightscape photography, let’s cover how to photograph the Milky May. Since photographing Andromeda and nebulas would demand an article on their own, I shall focus on more traditional subjects this article. The first challenge is to find the Milky Way.
1. Finding Darkness
I’m sure you’re aware that finding a place away from light pollution is a must-do for astrophotography. The Dark Sky finder map helps to a certain level. The map gives a fair idea of how dark a particular location is, but it takes at least one scouting trip to know for sure. Below are a few pointers in finding dark skies:
You should be at least 30 miles away “as the crow flies” (straight line) from the nearest city/town.
The galaxy is generally best around the southern sky. If there are any cities or even towns on the southern horizon, the sky will most likely be polluted.
A small town/village with a south-facing seashore/beach is a good potential location.
Take note of the size and position of the moon. Anything more than a half moon will usually flush the night sky (a crescent moon will do the same if it’s humid out). Using apps like The Photographer’s Ephemeris helps a great deal in keeping track of the moon-rise/set times and its relative position in the sky.
Take a look at the images below to have a fair idea of how the night sky differs with respect to light pollution.
Heavily polluted sky
The above image was photographed on the outskirts of my hometown. This is a processed image, and the original would have the Milky Way nothing brighter than a faint cloud. The camera was able to record only the core, and that too, even after adding substantial contrast, appears pale, with a distinct color cast. The number of stars is way less than what one would expect from a typical Milky Way sky. Compare the image above to the one below:
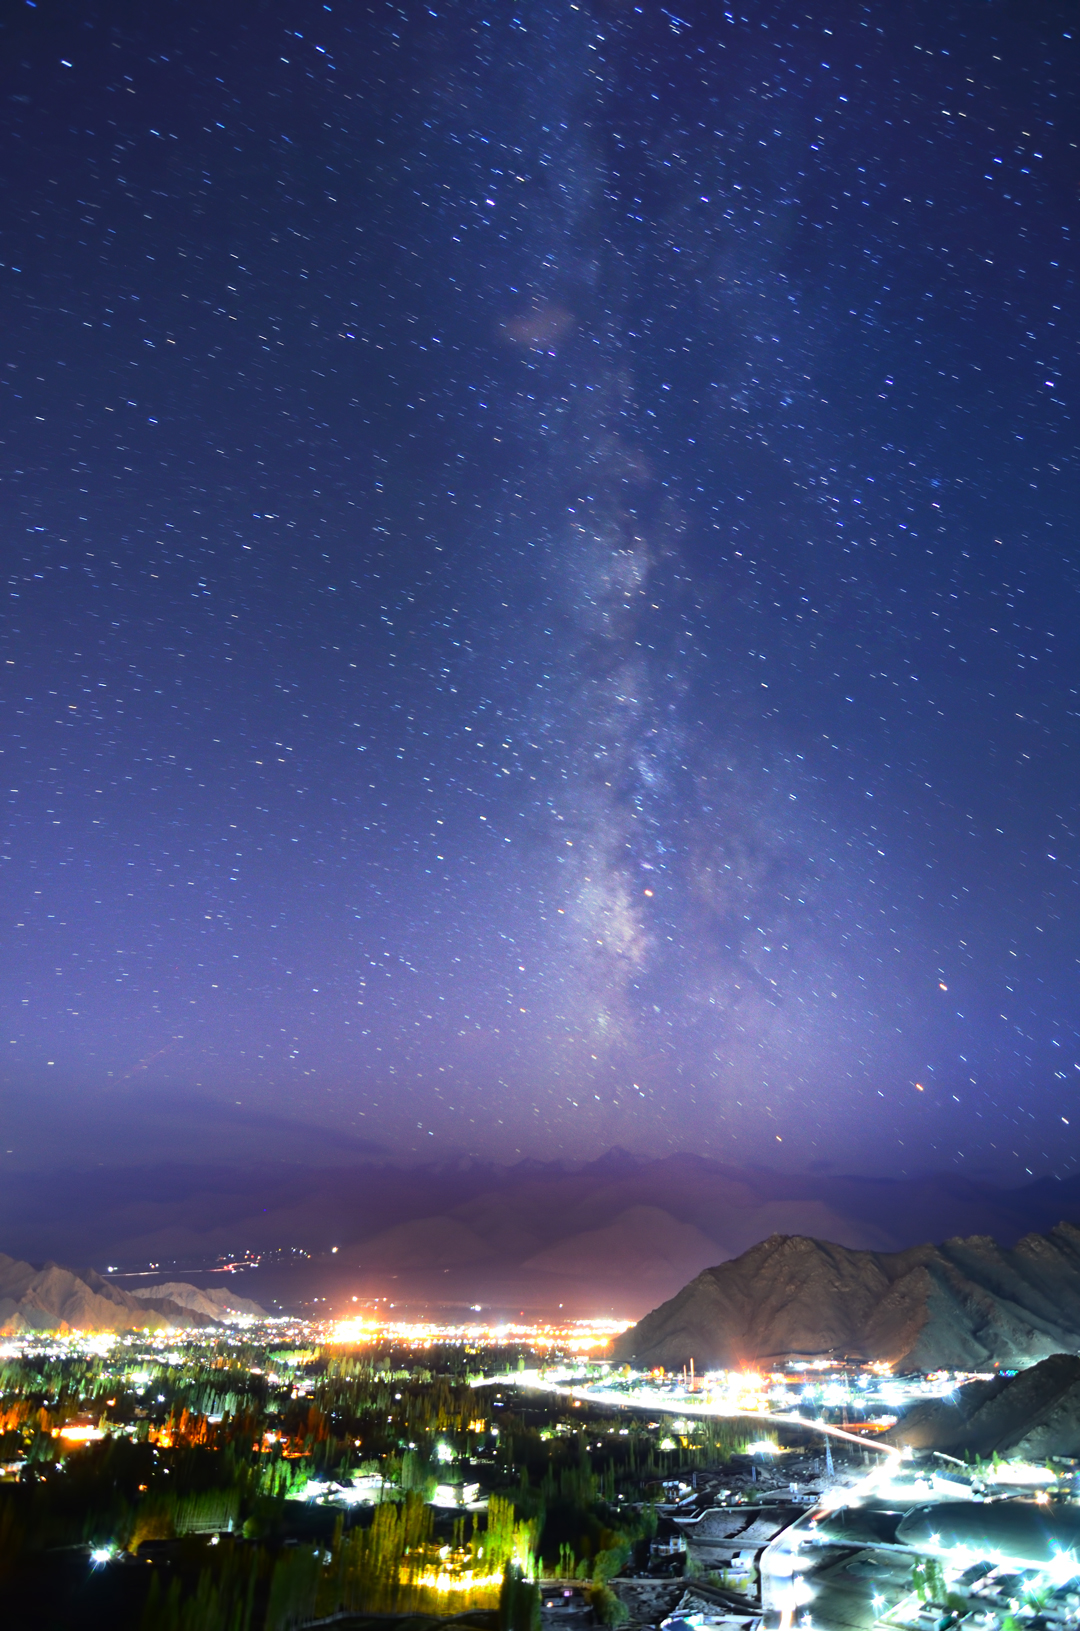
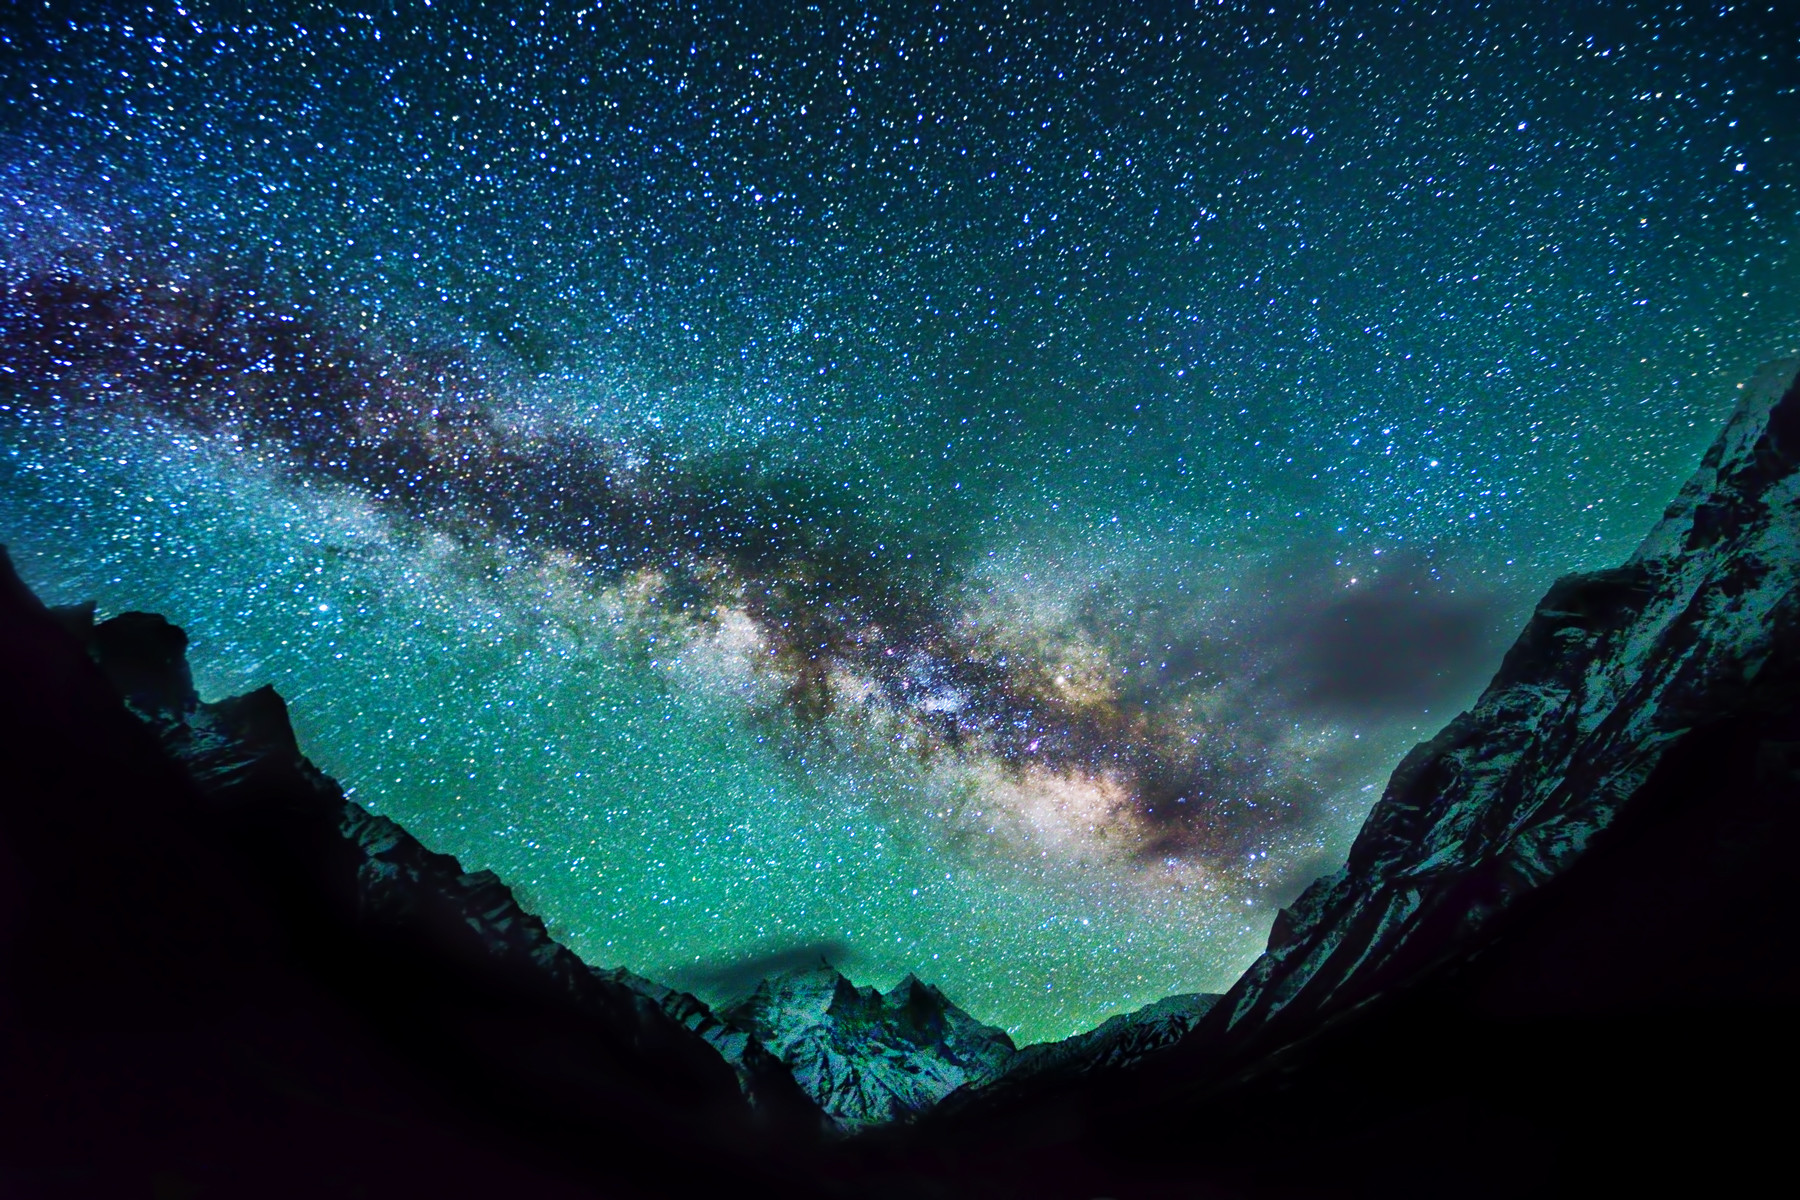
Galaxy with lights on
The photograph above was shot in Leh, Ladakh (a town at an altitude of 10,500 ft high up in the Himalayas). Even though the frame itself has city lights all over the foreground, one can notice that the Milky Way is comparably more pronounced than the heavily polluted one. Why is that? The reason is that Leh itself is a small town that does not stretch beyond a couple of kilometers in radius, and there aren’t any other towns nearby for about 200 miles. It’s also very high altitude, which means there are fewer particular in the air for light pollution to bounce off. So, the lights weren’t strong enough to flush the Milky Way.
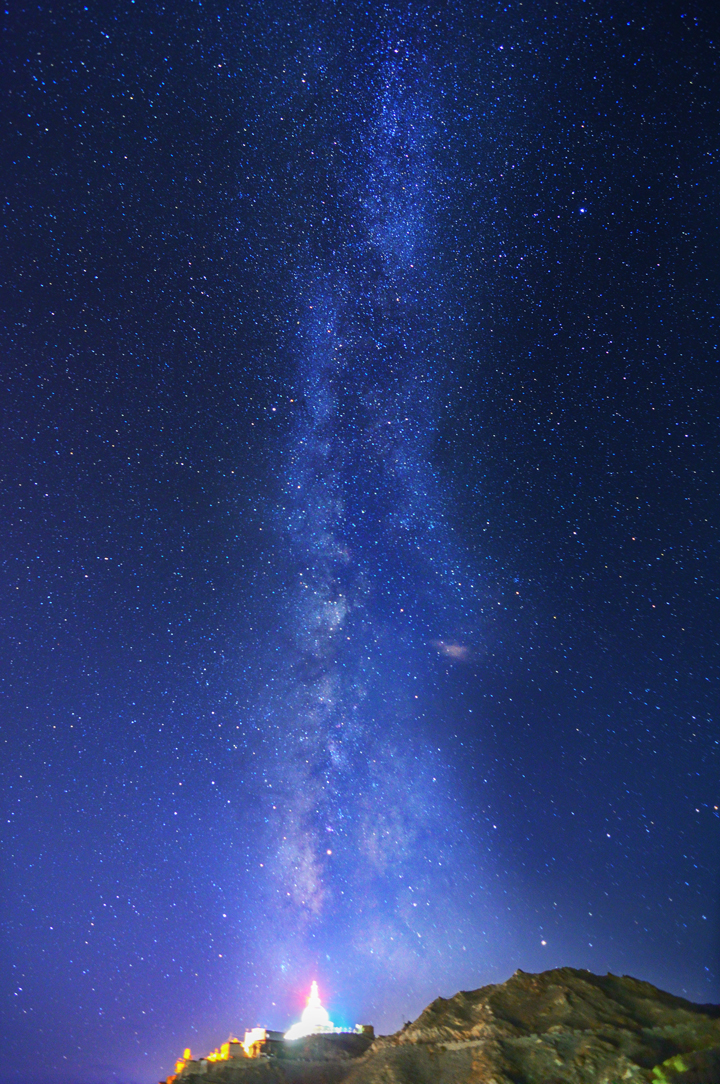
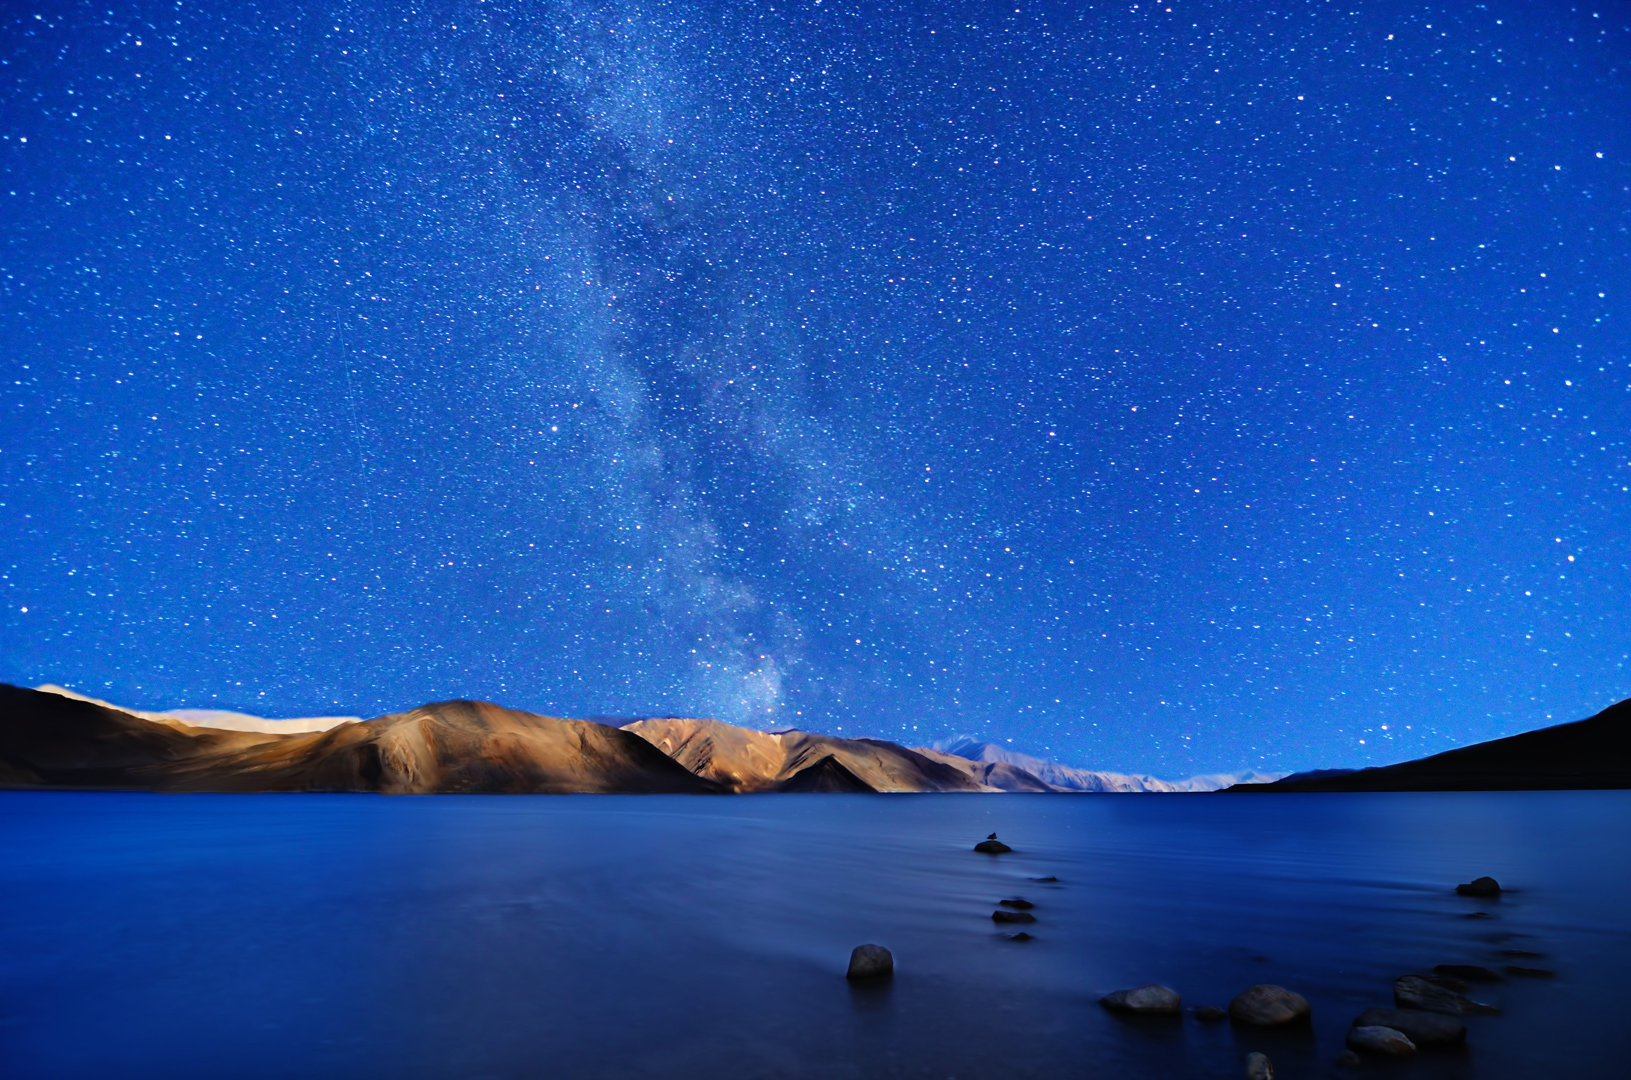
At a right-angle to the previous image
I waited for about an hour for the Milky Way to traverse 90° towards the southwest. Now the town of Leh was behind me, and this time we see even more stars.
During my early days in photographing the Milky Way, I would often give up when the horizon had strong light pollution. It was only with multiple visits to the same photo spot did I realize a shift in the angle of the Milky Way could give better results. In other words, one location may be good for Milky Way photos in some directions and not others!
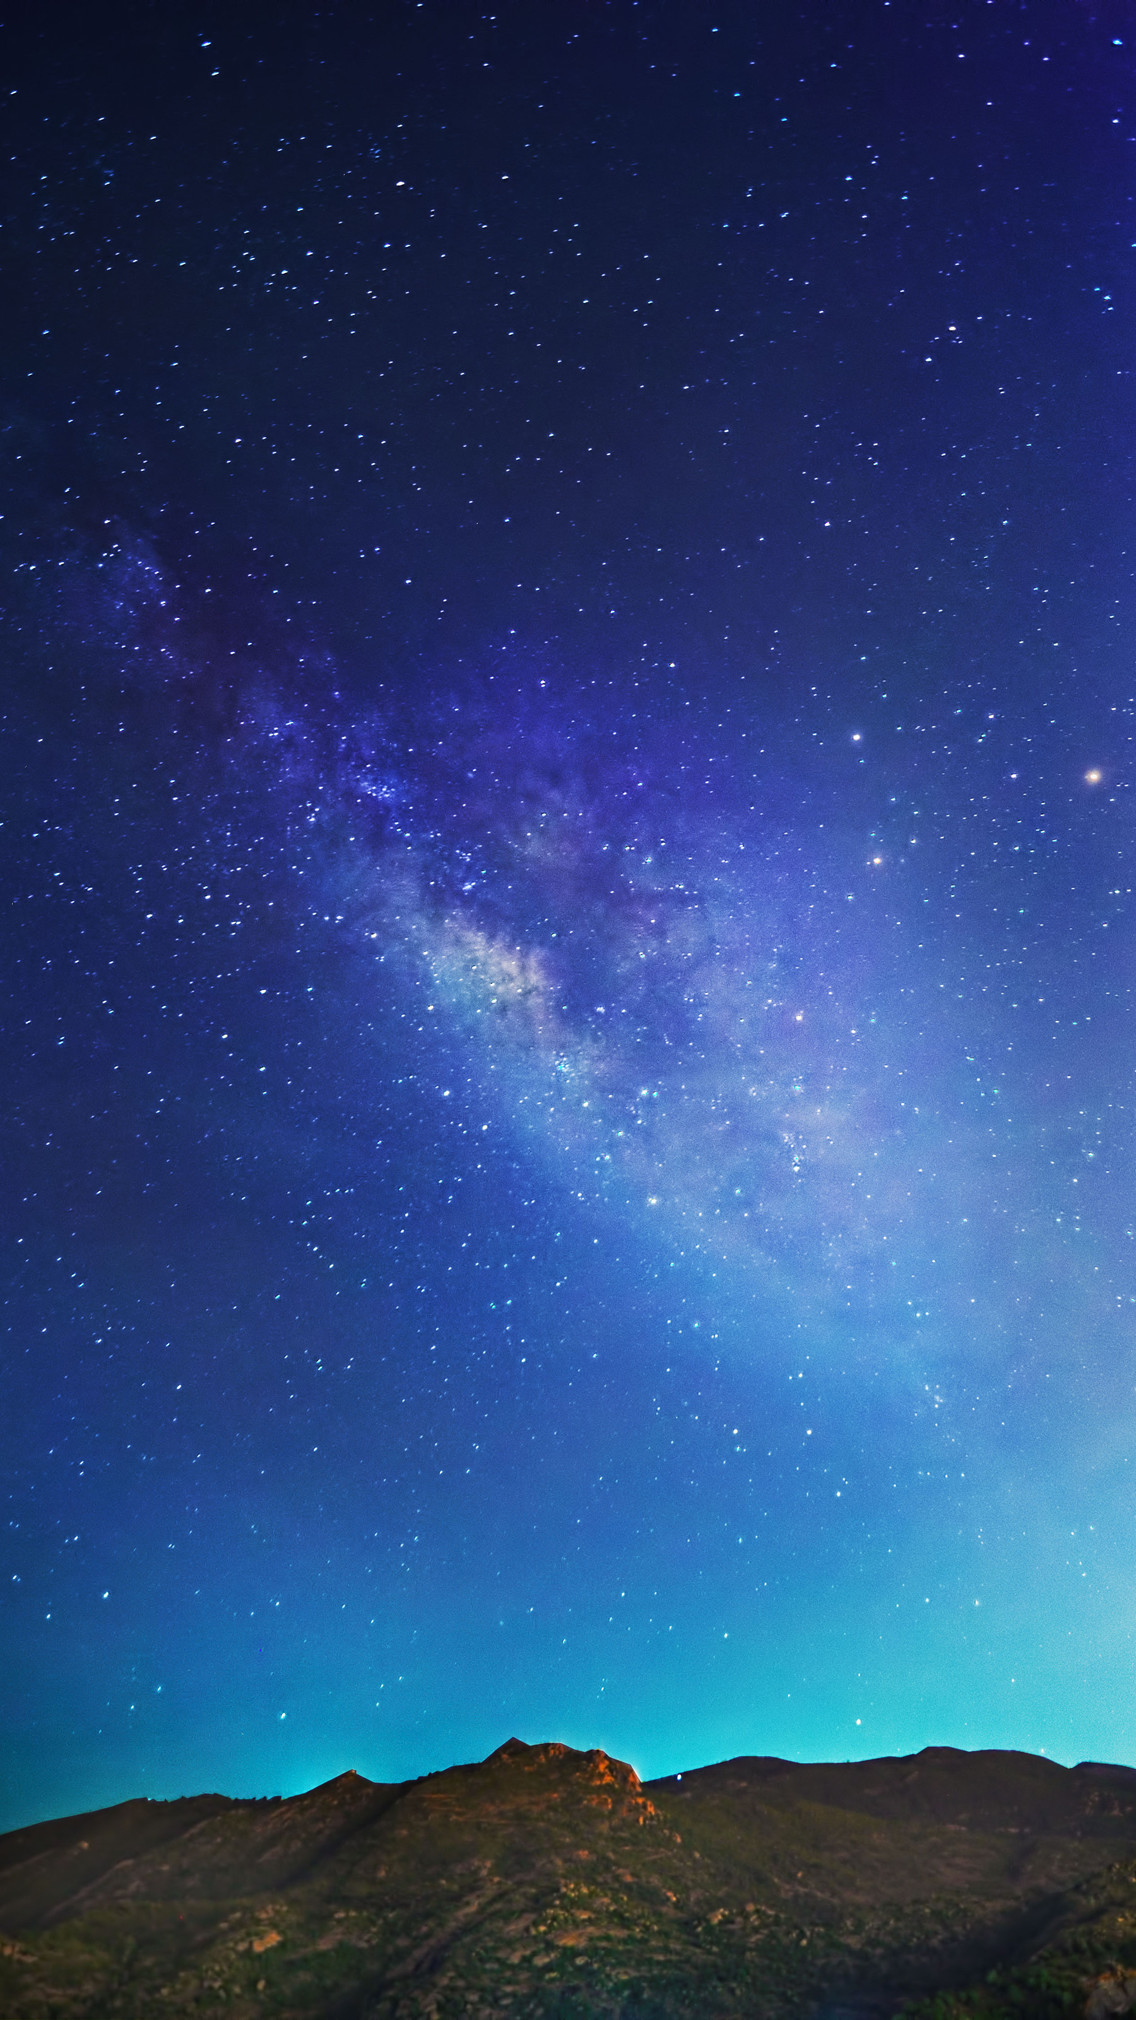
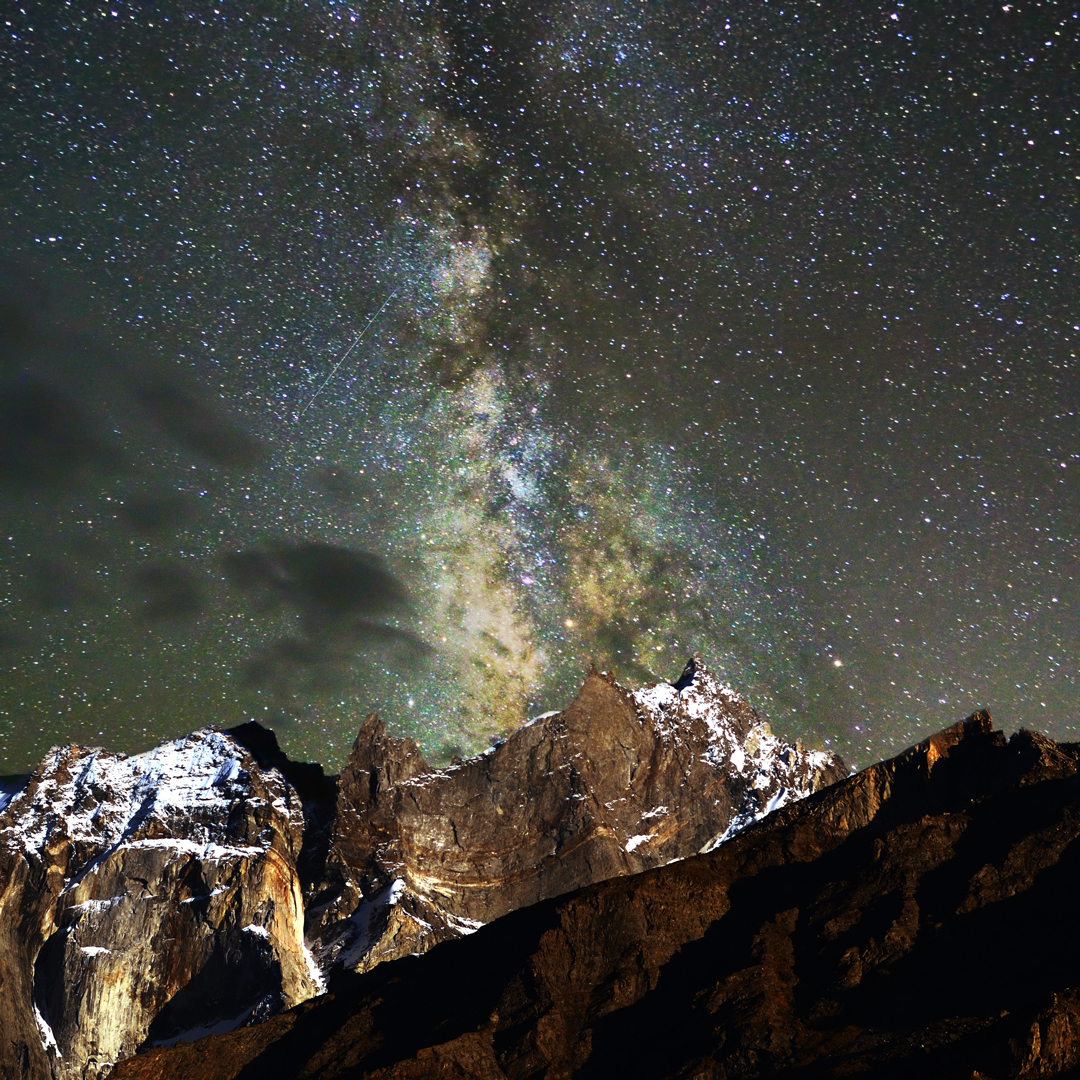
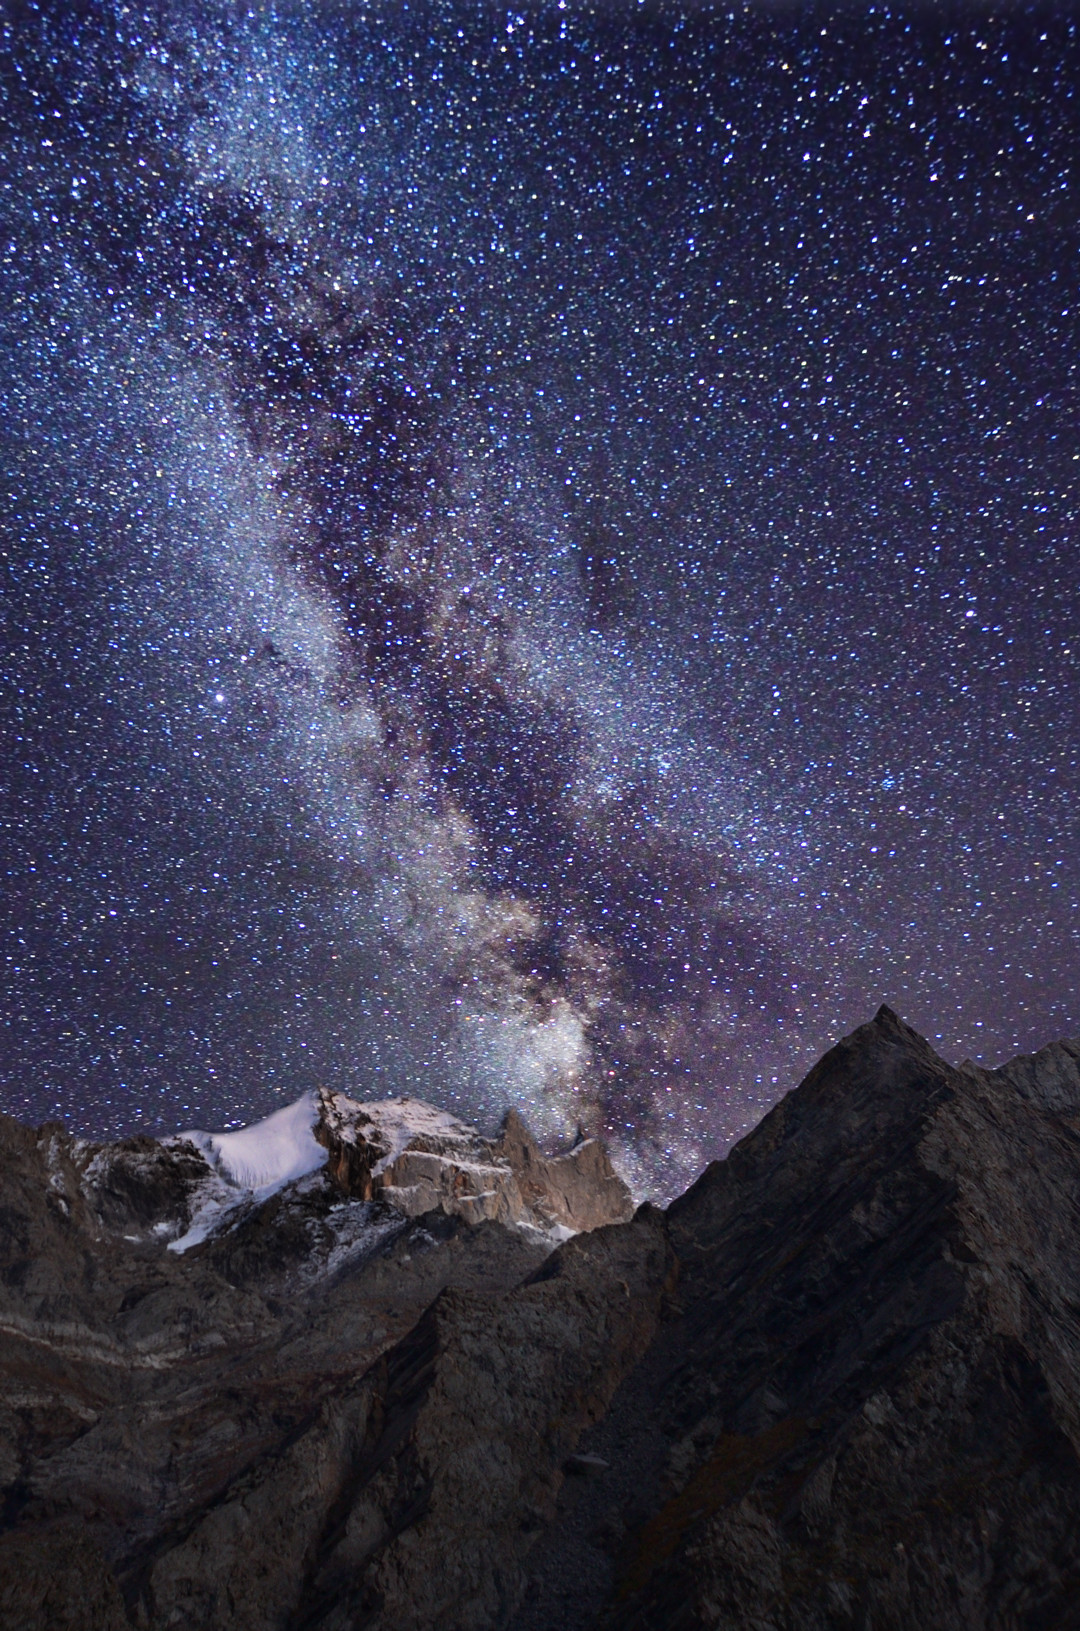
The darkest skies bring out the best milky way shots.
The picture above was shot at an extremely dark sky. I photographed it deep in the Himalayas, where the nearest village was a 30 km hike. Compared to the prior pictures, there are many more features like dust clouds that are easily visible.
Light pollution isn’t the only important thing. As I said earlier, the moon and conditions like humidity also play a role. Like in this photo:
The galaxy flushed by the moon.
This was in an area with very low light pollution, but we still don’t see many details in the sky because of the bright moonlight.
That’s why the position and the size of the moon are major factors when deciding on when to photograph the night sky. It is best to plan the galaxy shoot when the moon is at a quarter moon or less, on a low humidity night. It’s also generally true that as the moon approaches closer to being full, it stays longer in the night sky, so you can’t always just wait for it to set.
The galaxy keeps changing its azimuth throughout the year. That includes where it aligns to the horizon and the direction in which it spreads through the sky. Apps like Stellarium come as great help to plan a lot of things. Compared to most other photography genres, nightscapes demand quite a lot of planning before we even make the trip. A combination of apps like Stellarium, the Photographer’s Ephemeris, and Photopills can yield great results, especially if you re-visit the same spot. The best thing about Milky Way tracking is that it follows a constant and regular pattern, so if you miss the shot once, you can always come back again later, even several years down the line.
Last but not least come clouds. In a country like India, where we have the peak monsoons align perfectly when the galaxy view window peaks (June & July), the greatest challenge is to get clear skies. A few clouds would be fine, but for a good Milky Way shot, close to 100% cloud-free sky is usually preferable. Shooting slightly off the peak time of the year or just hoping for a lucky clear day is about all you can do.
Galaxy Tracking
Below are a few pointers that will help you find and track the Milky Way easily. While you can rely on apps, it’s always best to have actual background knowledge on a topic like this.
The Milky Way is most visible between summer to autumn in the northern hemisphere. In November through January, the core of the Milky Way isn’t visible at all. Photographers in the southern hemisphere can more easily photograph the Milky Way year-round but especially March through October.
The galaxy cruises around the southern sky. It looks like a pale white cloud that’s the fattest around the galactic core and tapers on both ends. The galactic core is often low along the horizon. If you can’t see the Milky Way, you can try taking photos pointed roughly south to see if it shows up in your photos.
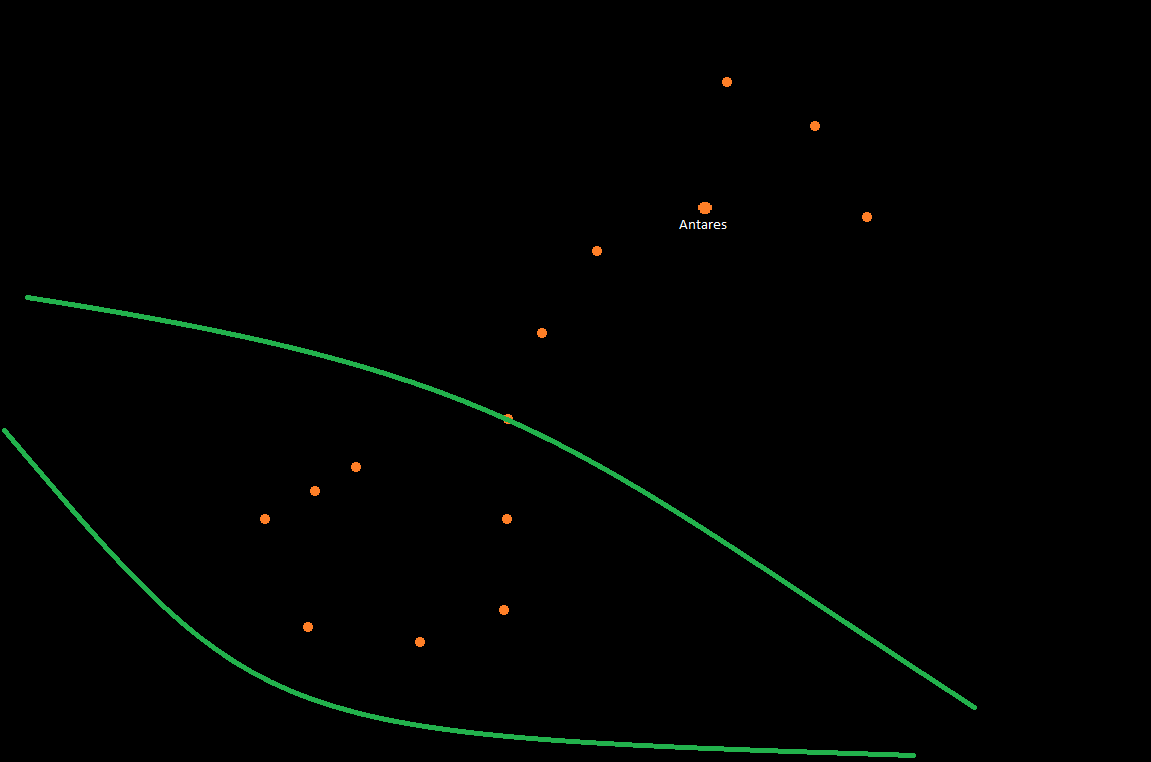
Another easy way to track it is by looking for Antares. It is one of the brightest stars visible to the naked eye. In a dark sky, the star is so bright that my Nikon D750 coupled with a 20mm f/1.8 will autofocus on it! Antares is part of the Scorpion constellation. Antares (labeled), Scorpion constellation (in orange), and the Milky Way band (green)
As you can see in the above image, Antares form the neck of the constellation, and you can perhaps picture the scorpion shape. On the other side of the scorpion, there is the “teapot” constellation with Sagittarius (not shown in the image above). The band of the Milky Way galaxy is between the two constellations and very close to both, as you can see in the image above. Even though the location of the Milky Way can move depending upon the date and time, at all times, if you can spot the scorpion and the teapot, you can spot the galaxy.
In the northern hemisphere, the galactic core won’t be visible for most of the night during March but will rise over the horizon shortly before sunrise. In April and May, it will rise closer to midnight. During its peak season (June-July), it stays visible almost throughout the night. In September, it rises prior to sunset and dips below the horizon only shortly after blue hour.
In the southern hemisphere, the Milky Way is higher in the sky at all times, but otherwise the descriptions above remain accurate.
Galaxy Shooting Tips
Now that we know how to spot the Milky Way in a location with minimal light pollution, the next challenge is to photograph it. Below are pointers that will help make things easier.
Considering that you are at a focal length of 24mm or less and a maximum aperture of at least 2.8 or wider, the galaxy shot generally demands an exposure between 10-30 seconds. Please go through Spencer’s article to calculate the required shutter speed.
Many galaxy images you see online and in print form are composites. It means they are a result of two or more images blended. Take this photo, for example: Composite of a milky way with foreground The image above is a composite consisting of two primary exposures, one for the foreground and one for the Milky Way. That evening had a crescent moon, and I photographed the mountains illuminated by the moon and some residual light shortly after sunset. It was an ISO 200/45-sec exposure to capture the foreground. The second shot was clicked almost 3 hours after the first, when the galactic core aligned to the highest peak of the mountain. The exposure for the galaxy was again a composite of its own. I clicked 6 consecutive shots and then blended them to reduce noise with the technique of image averaging. The final image was a composite of a total of seven images.
Remember that stars don’t trail equally throughout your image at a given shutter speed. The stars around the North Star (or South Star region if you’re in the southern hemisphere) trail the least.
Everyone has a different preference, but I always say to do whatever shutter speed gives you enough exposure even if it leads to star trails. I would rather take a brighter 30 second photo even with a bit of trailing than a darker 20 second exposure. This also lets me use slightly lower ISO values.
Try to compose in a way that would not require any cropping later. As you crop, the stars get larger, and any blur will be exaggerated.
Tips for Focusing
If you have a camera capable of gaining autofocus at -4 EV, you may be able to autofocus on bright stars like Antares. That is with the assumption that you have a fast, ultra-wide-angle lens mounted on it. You may need to align the star to the center of your image and then recompose after you’ve focused. If autofocus isn’t working well, use the techniques we covered here to get sharp focus on the stars. Once you get the focus, lock your lens to manual focus. Make sure you do not touch the AF ring after that. Even spinning the focus ring a millimeter can make your subjects really soft.
Generally, the infinity marker on most lenses isn’t accurate. You cannot align the focus ring to the infinity mark in your lens and expect razor-sharp focus. Instead, it’s better to focus manually by magnifying the stars in live view if autofocus isn’t working. You can also look for bright subjects like the moon to make focusing at night a piece of cake.
Exposing the Foreground
Many beginners make a common mistake – they try to extract shadow details out of an image that was exposed for the stars. Even though the stars are dim, they are much brighter than a night landscape that’s only illuminated by starlight! There’s just not enough detail in foreground silhouettes to recover anything except more noise.
Unfortunately, exposing for the foreground isn’t a great option either, because then you’ll overexpose the sky and probably end up with too much star trailing. Your best options are to leave the foreground as a silhouette, wait for a bit of light (like moonrise or very early pre-dawn light), or make a composite photo. Here’s an example of a composite nighttime photo:
One shot for the Milky Way, one for the foreground
In the picture above, the Milky Way was shot at ISO 1600 with a shutter speed of 30 seconds, whereas the foreground was exposed for 3.5 minutes at an ISO of 400.
There are a couple of points to remember when we plan a composite image. Firstly, both the foreground and the background should have balanced color temperatures. If either is warmer or cooler than the other, then the composite looks unnatural. Secondly, even though it’s best to expose to the right, one needs to take care of the lighting in the result. For example, if the foreground is too bright compared to the background, it would seem that the foreground has been copy-pasted from elsewhere. On the other hand, if your background is too bright, your picture might end up looking flat. To fix this, you need to darken or brighten the images in post-processing so they match one another prior to compositing.
Photographing subjects illuminated by the moon had always been one of my favorite things in photography. I personally love the blue tones that the moon brings about, although just as often I’ll convert the picture to monochrome and make it almost look like daytime.
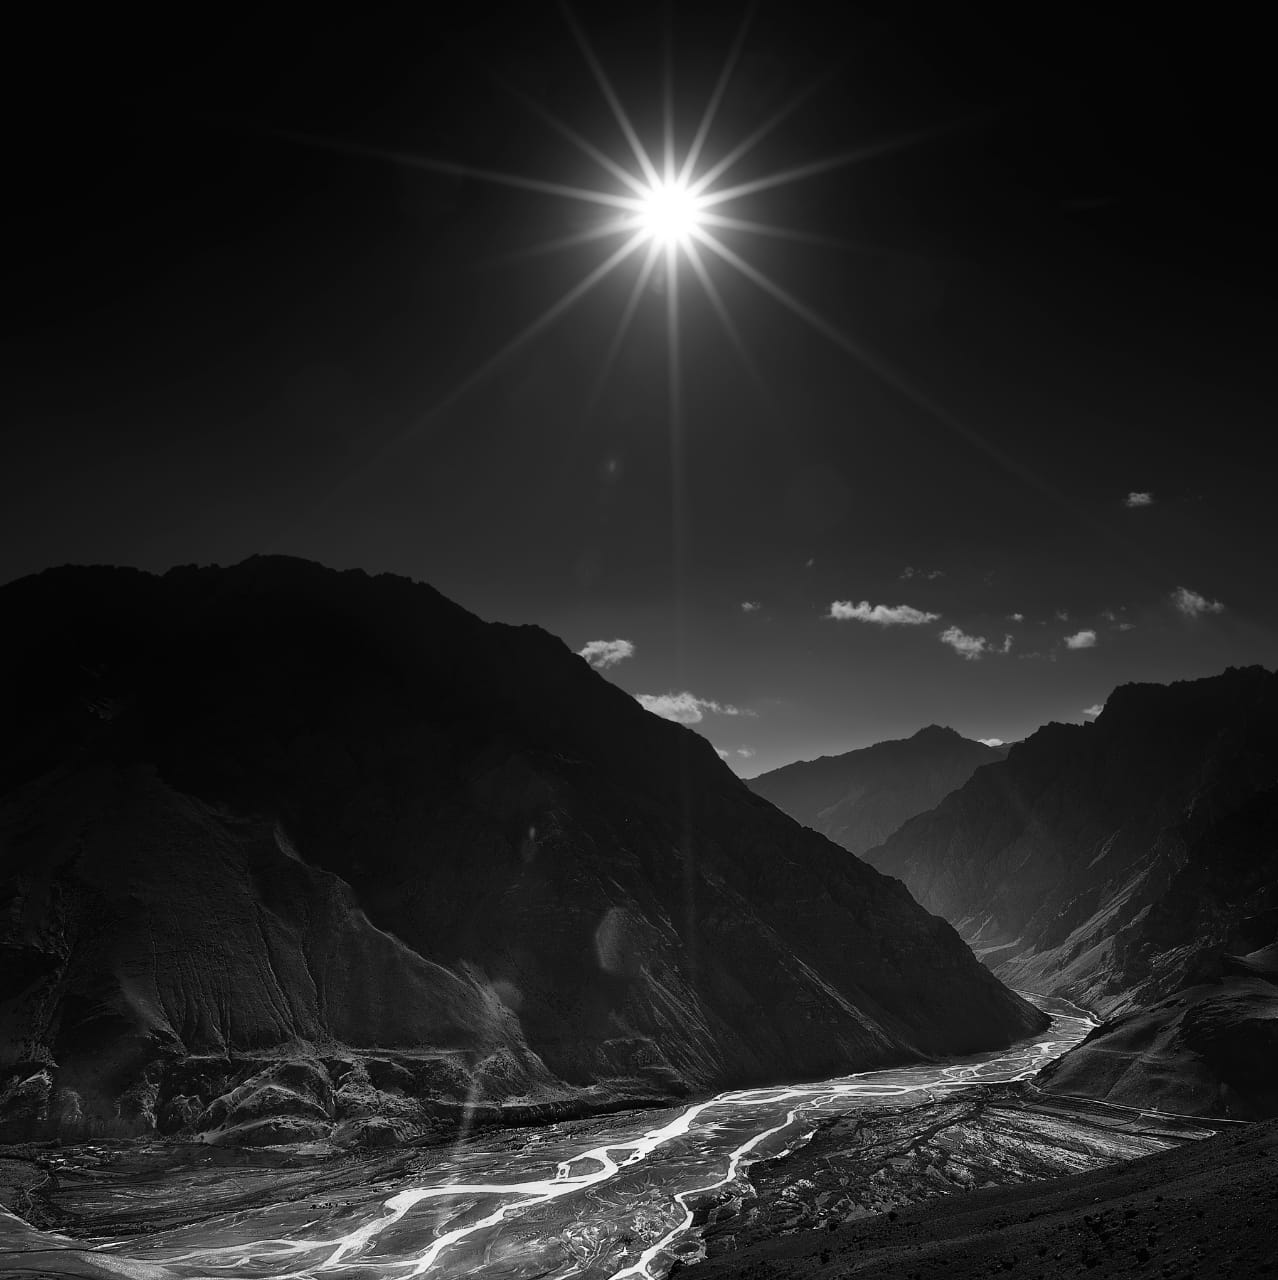
There are two approaches in which one could go about photographing moonscapes. The first one is to include the moon in the frame, and the other would be to focus on the rest of the landscape instead. Very often, I see images of a large full moon included in a landscape (usually composites where the photographer pastes and enlarges the moon in the shot). At least to my eyes, it usually looks unnatural. Instead, I usually prefer to shoot moonscapes with the starburst effect, as such:
Moonscapes with the starburst effect
Tips to Keep in Mind When Shooting Moonscapes
The starburst effect is basically light diffracted from the aperture blades. To enhance it, one needs to choose a narrow aperture, in most cases somewhere between f/8 and f/11. With narrow aperture like that, you may think the photo would be too dark, but the moon itself usually looks good at that aperture. It’s the rest of the landscape photo that might look a bit too dark. So, just like Milky Way photography, you may sometimes need to make composites. In this case, a simple two-image HDR (one for the sky, one for the foreground) tends to work well. Long exposure shot with a narrow aperture to get the starburst effect in the moon.
One of the most beautiful aspects when shooting moonlit scenes is the tones of blues. So obviously, a cooler daylight setting is desirable for your white balance. I personally find something between 4200-5000K as the sweet spot. If you’re shooting RAW rather than JPEG, you can change this in post-processing and don’t need to worry about getting it wrong in the field.
Even if the moon isn’t in your photo, it tends to illuminate the landscape enough that you can use autofocus, at least with most modern cameras. Manual focus is also easier because of the extra light, if you need to use it instead. Moonlit Landscape
If you’re focusing at infinity (i.e. on the stars or moon), keep in mind that nearby foregrounds will likely be out of focus. This is going to be a bigger problem as you zoom in. If you are over 55mm, you may have to choose between a sharp foreground or a sharp moon. In this case, I always recommend the sharp moon. (Or you could again create a composite, this time a focus stack.)
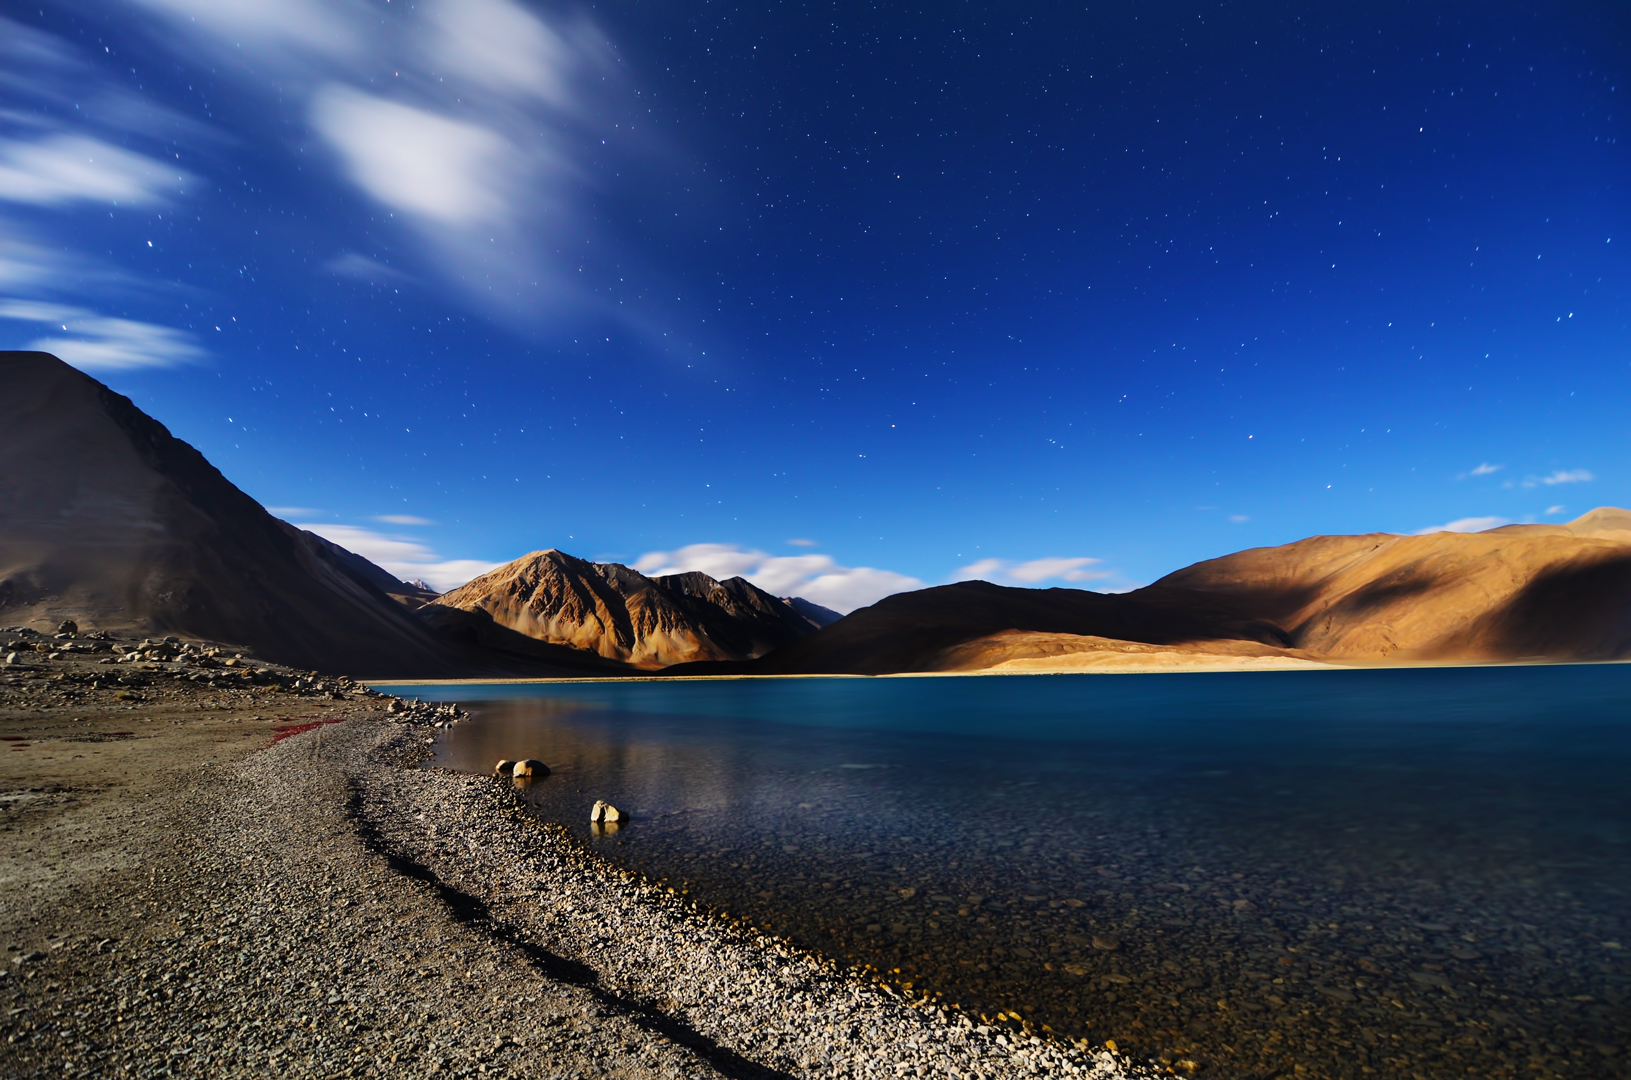
Moonscapes and moonlit images come alive with bodies of water in the frame. Since most night shots are long exposures, the ripples generally are blurred out. If you want a longer exposure to smooth it out further, you can choose a lower ISO or a narrower aperture. A semi-blurred water surface does affect the feel of an image by a good deal.
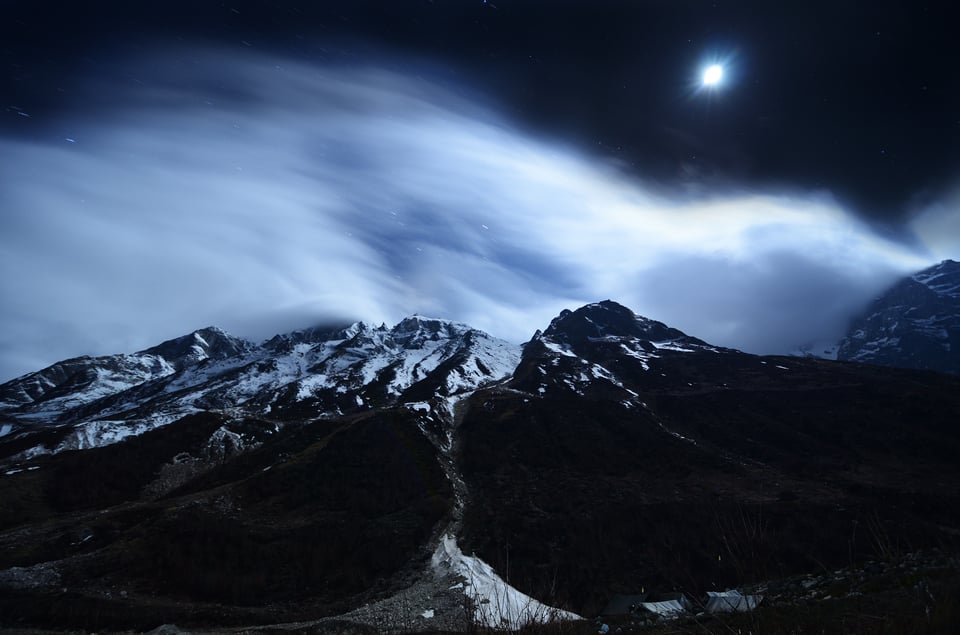
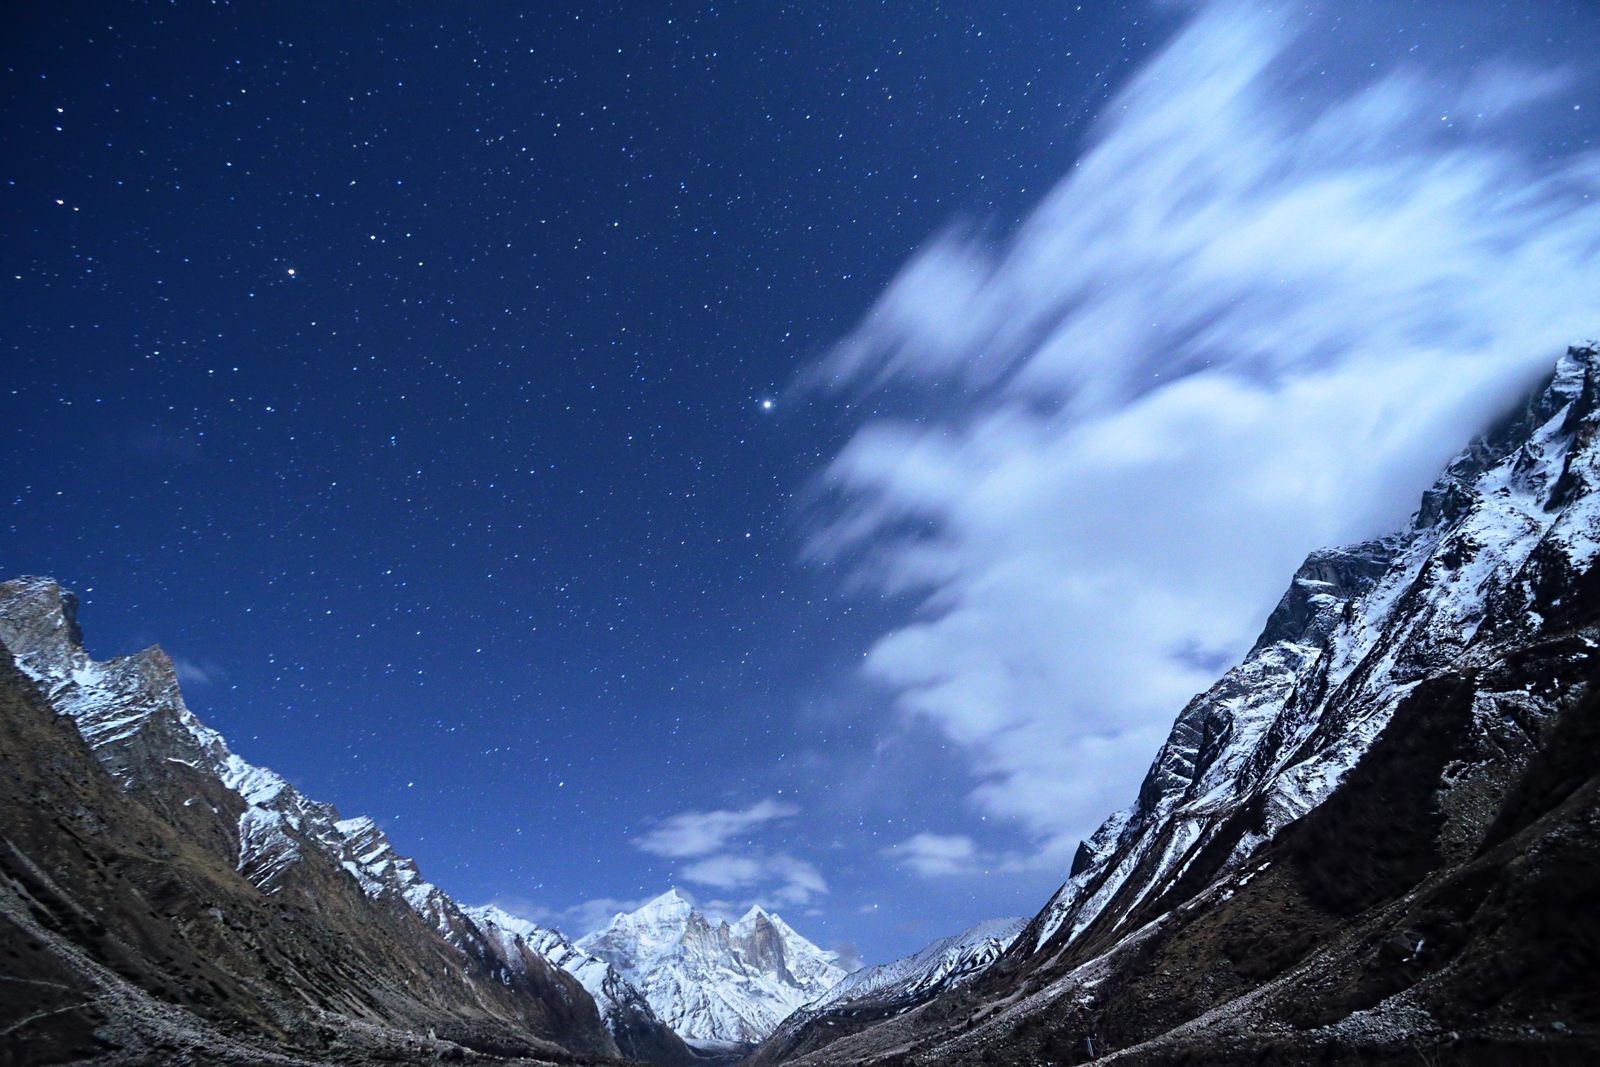
Unlike photographing the galaxy, moonlit shots do not tend to demand a sky totally void of clouds. In fact, a blurred/smokey cloud often adds to the overall feel of the image, contrasting with the sharper areas of your photo. Try experimenting with various lengths of long exposure images to get the right feel. Smoothed out clouds add to the feel of a nightscape
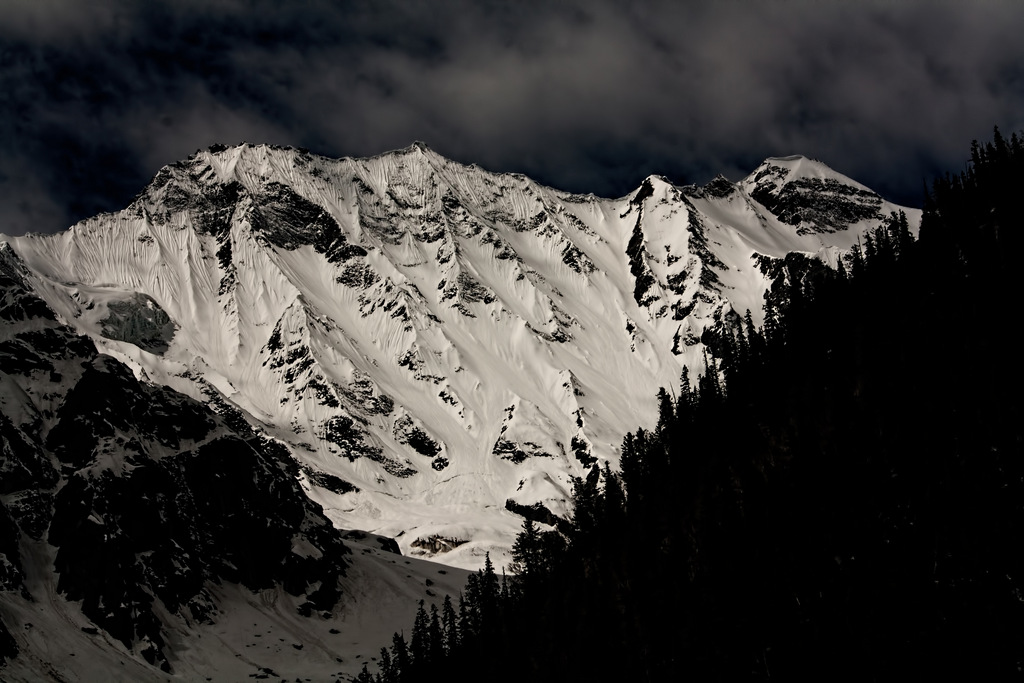
It isn’t mandatory that night sky photography should include a considerable area of the sky. Moonlit landscapes have amazing contrast and tones. With suitable gear, moonlit subjects make great, contrasty images. Especially if you are photographing snow-clad mountains or glaciers, the moon illuminates snow in a way that the mountains appear to shine. Moonlit subjects have high contrast and dynamic range.
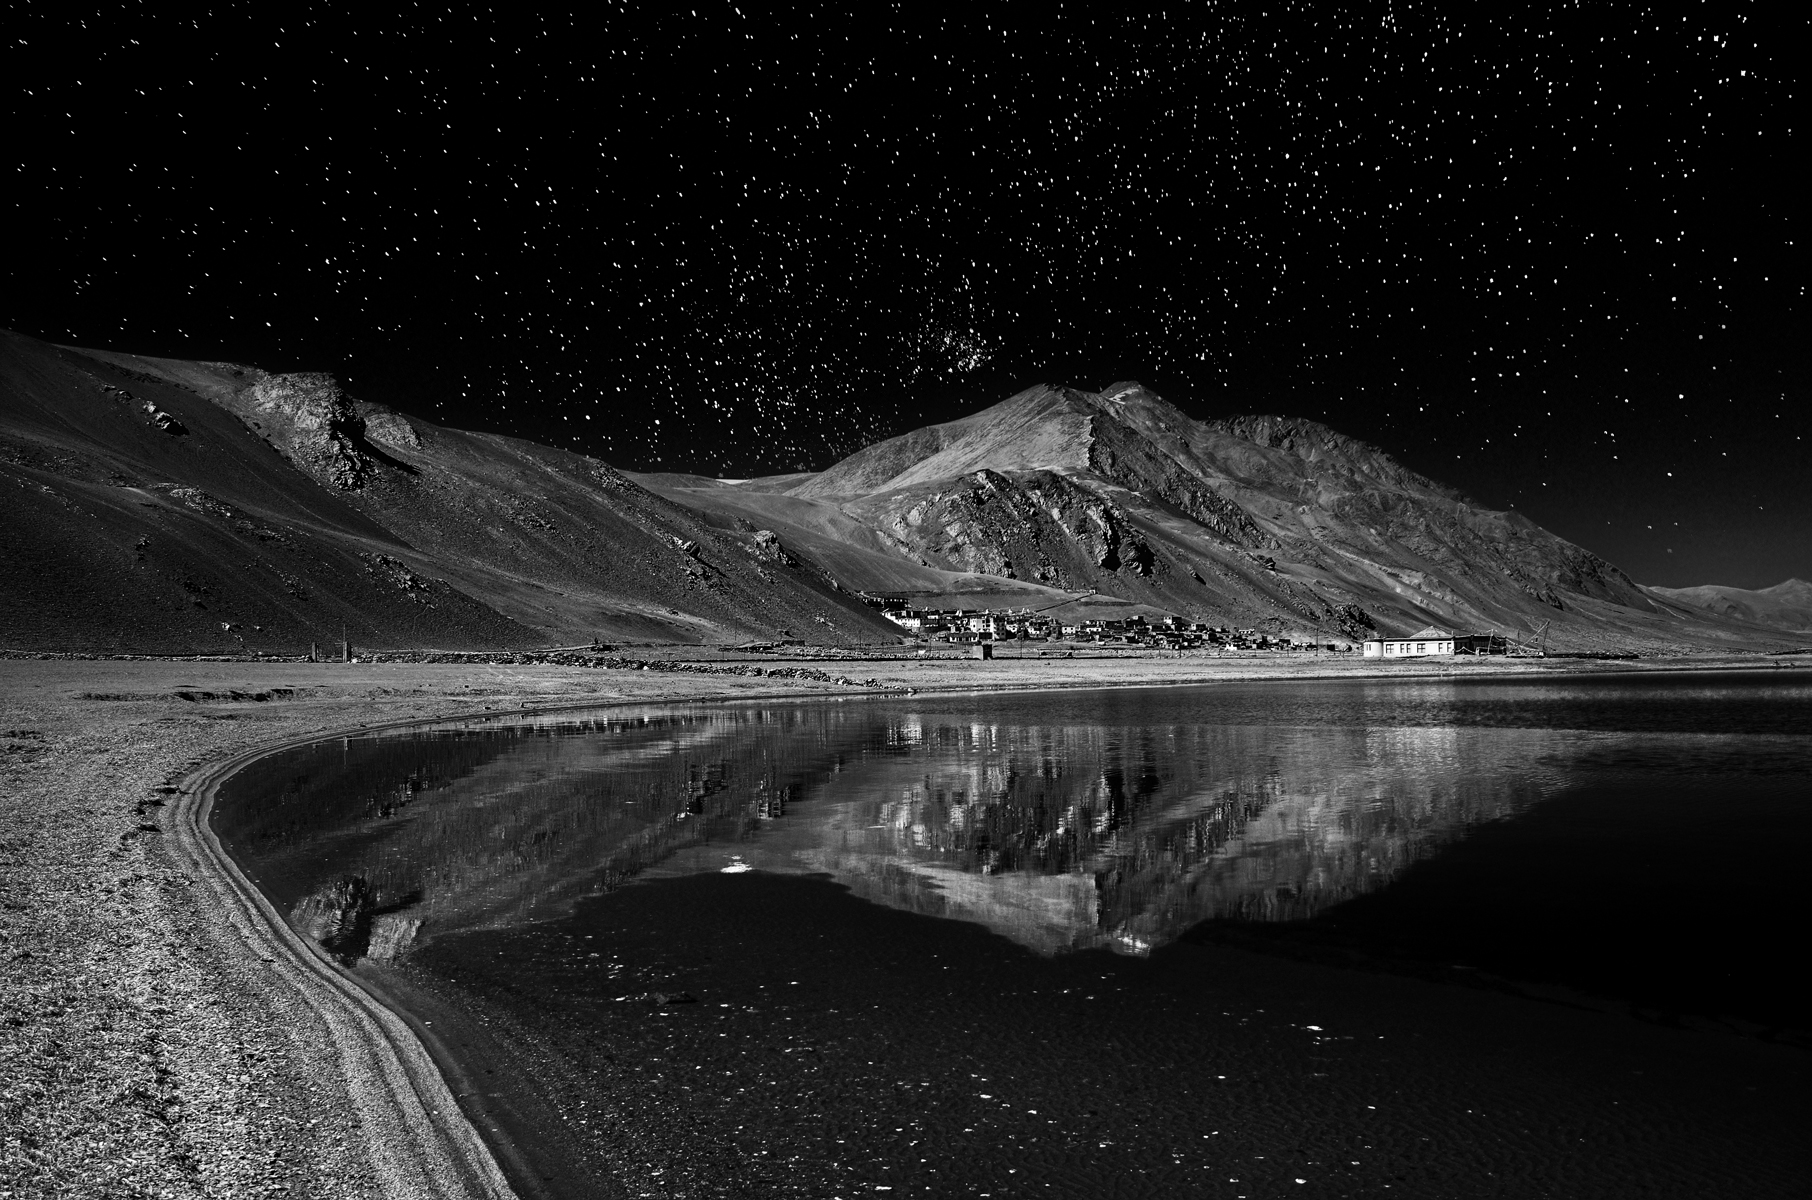
Last but not least, I love making monochrome images when there’s a sky with stars. Once you have sharp focus on your subject and the stars, landscapes lit by the moon make black and white photography with a beautiful and surreal mood.
Otherworldly black and white photography lit by the moon
Conclusion
In this article, I have covered most of the things one needs to do to shoot nighttime photos of landscapes, the Milky Way, and moonscapes. A lot of planning goes into making a nightscape image, but the results are worth the effort.
I tried to include the most prominent tips and tricks that I tend to use, but everyone has different approaches to this sort of photography. If you have anything to add, please do so in the comments section so that our viewers can benefit from it. As always, in case you have any queries or need clarifications, feel free to ask. I shall try to respond to it as soon as possible. Stay safe and happy clicking!
14 Comments
Newest
OldestMost Voted
Inline Feedbacks
View all comments
sterin
July 2, 2021 10:50 am
Beautiful article.
Anand B
June 30, 2021 1:21 am
I googled night landscape photography and reached here. Perfect article for me because i am visiting the same locations in September and am learning about photographing the same at night.
I am more interested in beautiful landscape pictures (pangong tso, tso moriri, chandratal, hanle) than of the stars and milky way. What moon phase and time would you suggest will be best for it? First quarter is on 14th Sep, Full moon on 21st and third quarter on 29th Sep.
Also this is my first time trying this and my cameras will be limited to Sony Rx100m5 and a s21 ultra. I am not expecting dslr pics but still will it be possible to get good pictures?
As mentioned in the article, if you aren’t particular about the night sky, planning it around a full moon will be the best choice.
Dino
June 29, 2021 2:47 pm
Good evening, silly question here. What about the new Nikons that allow up to 900s for shooting? Could one use – say ISO 50 or 100 for 900s instead of 30 sec at 1600 ISO – accepting star trails? Or something more relevant could step in and spoil the shot?
If the stars are moving, obviously the milky way does so. Any exposure longer than about 10% of the 500/600 rule will eventually result in a soft galactic core.
Satyaa
June 26, 2021 10:35 am
A good article. It’s hard for beginners to grasp everything in this article in one or two readings. They need to read several times, focus on each point at a time, then practice, practice, and practice.
Thanks.
Vukashin
June 25, 2021 1:48 am
Good article. There’s definitely space for more night photography to explore, but astrophotography seems to be extremely popular these days.
DavidB
June 24, 2021 12:26 pm
This is an excellent beginner’s guide — well done.
My advice is to know your camera: menus, buttons, dials, everything! You are working in the dark and will have to make adjustments by touch. Practice at home with your eyes closed.
Very nice, Madhu! I’m distressed to see the amount of light in Leh. I visited there for the first time in 1992, going subsequently to Ladakh 7 more times. It seems to have expanded since then.
Seems like one of your pictures has the Bhagirathi group (from between Gangotri and Gaumukh)?
Spencer Cox
Admin
June 23, 2021 10:32 pm
Madhu, I’m always a fan of your photos, and the last picture in this article is one of my all-time favorites! What a great shot with such a cool atmosphere.
I’m really glad it’s your favorite as well Spencer. That, along with two other shots from the same location has been my all-time favorites as well. Year after year I kept failing to get what I pre-visualized. Sometimes it would be windy, sometimes the milky way would align behind those mountains, sometimes it would be cloudy. But I guess after about 4-5 years I got it exactly as I visualized. This picture along with a few more was a pivotal point in my photography journey that made me drift from wildlife to high-key black and white landscape photography.


Beautiful article.
I googled night landscape photography and reached here. Perfect article for me because i am visiting the same locations in September and am learning about photographing the same at night.
I am more interested in beautiful landscape pictures (pangong tso, tso moriri, chandratal, hanle) than of the stars and milky way. What moon phase and time would you suggest will be best for it? First quarter is on 14th Sep, Full moon on 21st and third quarter on 29th Sep.
Also this is my first time trying this and my cameras will be limited to Sony Rx100m5 and a s21 ultra. I am not expecting dslr pics but still will it be possible to get good pictures?
As mentioned in the article, if you aren’t particular about the night sky, planning it around a full moon will be the best choice.
Good evening, silly question here.
What about the new Nikons that allow up to 900s for shooting? Could one use – say ISO 50 or 100 for 900s instead of 30 sec at 1600 ISO – accepting star trails? Or something more relevant could step in and spoil the shot?
If the stars are moving, obviously the milky way does so. Any exposure longer than about 10% of the 500/600 rule will eventually result in a soft galactic core.
A good article. It’s hard for beginners to grasp everything in this article in one or two readings. They need to read several times, focus on each point at a time, then practice, practice, and practice.
Thanks.
Good article. There’s definitely space for more night photography to explore, but astrophotography seems to be extremely popular these days.
This is an excellent beginner’s guide — well done.
My advice is to know your camera: menus, buttons, dials, everything! You are working in the dark and will have to make adjustments by touch. Practice at home with your eyes closed.
Looks like Pangong Tso or Tso Moriri!
You got it right sam. Tso Moriri it is!
Very nice, Madhu! I’m distressed to see the amount of light in Leh. I visited there for the first time in 1992, going subsequently to Ladakh 7 more times. It seems to have expanded since then.
Seems like one of your pictures has the Bhagirathi group (from between Gangotri and Gaumukh)?
Madhu, I’m always a fan of your photos, and the last picture in this article is one of my all-time favorites! What a great shot with such a cool atmosphere.
I’m really glad it’s your favorite as well Spencer. That, along with two other shots from the same location has been my all-time favorites as well. Year after year I kept failing to get what I pre-visualized. Sometimes it would be windy, sometimes the milky way would align behind those mountains, sometimes it would be cloudy. But I guess after about 4-5 years I got it exactly as I visualized. This picture along with a few more was a pivotal point in my photography journey that made me drift from wildlife to high-key black and white landscape photography.