Lifepixel, perhaps best known for its high quality infrared digital camera conversions, recently added a new service to its list – removing your DSLR’s anti-aliasing filter. The price varies between $400-500 depending on your specific camera model. The notion of removing a DSLR’s anti-aliasing feature is not new. Maxmax.com has been doing this for years. Anti-alias filter removal, in the digital camera arena, has been thought of in a similar manner to overclocking your PC (before some manufacturers eliminated this capability) or perhaps souping up your car’s engine via a special engine conversion kit – a bit risky but capable of producing good effects. Why is this “risky” with respect to your DSLR? Voiding the warranty for one. Benefits? A sharper image.
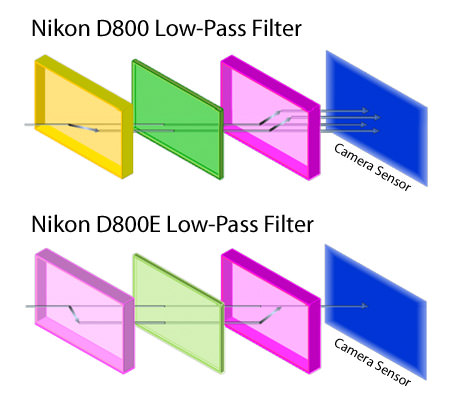
With the non-stop onslaught of higher megapixel sensors and technology price reductions, I suspect many people lost interest in the idea of removing their DSLR’s anti-aliasing filter, if they ever contemplated it to begin with. As you may recall from some of the D800 articles on Photography Life, the anti-aliasing filter was introduced to reduce the effects of moire created when photographing subjects with fine, repeating patterns. The anti-aliasing filter accomplished this by slightly diffusing the image, which also slightly reduced sharpness. With the introduction of the Nikon D800E, however, Nikon once again raised this issue to the forefront by offering a camera model with the anti-aliasing filter removed as a product – not as a after-market service. Lifepixel, being one of the premier camera modification service providers, saw an opportunity to capitalize on the new-found interest and market for an anti-aliasing filter removal service. So for a mere $400-$500, you can have your DSLR’s anti-aliasing filter removed and be assured of maximizing your sensor’s resolution. Below is an example discussed by Nasim in his review of the D800 and D800E.
Chasing Sharpness
I know what some of you may be thinking, “Gee, that seems like a lot of money to gain a bit of sharpness.” Perhaps. But if life has taught me one lesson, it is this – never, ever underestimate people’s willingness to spend money to get a bit of an edge, however slight. That is not a criticism of my fellow man, but merely an observation regarding human nature. I recall when some of us found out about the ability to overclock our PCs. Despite the warnings about “frying” our machines, many of us marched ahead anyway. We were determined to soak up every speed advantage we could find. And while I never ended up turning my PC into a smoldering hunk of silicon and metal, quite a few of my DIY colleagues that were not so lucky!
Of course, having your DSLR’s anti-aliasing filter removed is not quite as dangerous as overclocking your PC. The only real downside (gulp!) is the invalidation of your DSLR’s warranty (not insignificant to some, but certainly less dangerous than too much power toasting your PC’s innards) and some additional moire when taking photos of subjects that have very fine repeating patterns of detail, such as fabric, buildings, and some products.
Lifepixel or DIY?
Why rely on Lifepixel to remove your anti-aliasing filter vs. doing it yourself? First, there is a real fear of damaging your DSLR (think “interesting paperweight”). Secondly, you need a very clean environment for such operations, since hair, some dust, etc. may invalidate the very effects you are attempting to achieve. You don’t want to be attempting this operation on your DSLR only to find that your home’s heater kicks in and starts blowing air and dust into the room and inside your DSLR. Lastly, some DSLR models have their anti-alias and infrared blocking filter (also known as “IR cut” filter) fused, thus requiring a new infrared blocking filter be inserted into the camera after the original combination filter set has been removed. None of these operations are for the faint of heart, let alone those with serious caffeine addictions! You need to be very precise, have significant magnification, and a squeaky clean environment. Danger, Will Robinson, Danger! As the infamous warning label suggests, “Don’t try this at home!” I am sure I will hear from some that have successfully completed such operations in the comfort of their home offices. To you, I say, “bravo!” You dodged a bullet… this time. For the vast majority of others? I would would strongly suggest leaving such efforts to the pros. Save your penchant for DIY projects for lower-risk endeavors such as creating a low-cost flash snoot! ;)
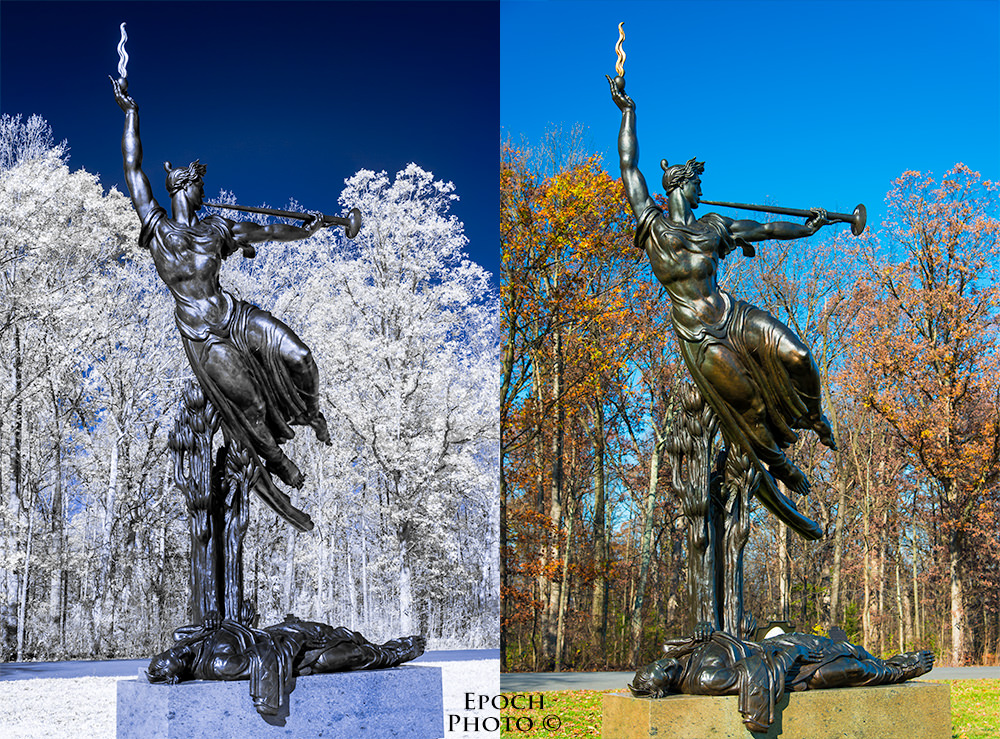
As I wrote in my article on Infrared Photography, I have had Lifepixel convert two of my cameras (brand new, BTW) for infrared-only photography in the last few years. I have never had an issue with either camera. The staff of Lifepixel has been very generous with their time, knowledge, and advice. As such, I have the utmost confidence that they will do an excellent job in removing the anti-alias filter, just as they do for their other DSLR alteration services. Below are two photos I recently took of the Louisiana State Memorial in Gettysburg, PA, with my infrared D90 and D800.
The Value Proposition
“Is it worth it?” The ultimate question, is it not? Well, that all depends on… you. There are other no-cost and low-cost alternatives to improve sharpness without spending money on an anti-alias filter removal process. Nasim has an excellent article outlining how to take sharp images. It is worth checking out and goes into more detail than I offer here.
Here are some no-cost (or pretty darn cheap!) methods of improving sharpness:
- Improve your ability to hold the camera – Cheap and easy. With a bit of practice, this alone can improve your photos’ sharpness more than anything else. In-camera or in-lens stabilization is very helpful, but it isn’t meant to overcome sloppy habits.
- Shoot at a lower ISO – Noise is a killer, particularly since the noise removal process inherently reduces the sharpness of any image. Always make sure you check your ISO setting and select the lowest ISO suitable for the situation. If you have it set to Auto ISO, check your ISO setting from time-to-time to ensure that it is adjusting to changing conditions. And if you have the opportunity, re-position your subject in more favorable light.
- On Camera Flash – Using a flash in a low-light situation enables you to shoot at lower ISOs.
- Clean your lenses and sensor – It makes little sense to spend gazillions on DSLRs and lenses only to enable something so trivial as dust specs negatively affect the outcome. Splurge on a few rocket blowers and always have one handy. It literally takes seconds to give your camera’s sensor and lenses a few shots of pressurized air. Carry some lens cleaning solution and wipes to handle any fingerprints or sticky dust particles. Make sure that your DSLR’s setting for dust removal menu item is set for startup/shutdown, as this will maximize your DSLR’s opportunity to keep its sensor clean. There are far better ways to spend your photography time than wasting hours attempting to clone dust spots out of sky of beautiful landscape photos.
Care to spend some additional money on something other than an anti-alias conversion to improve the sharpness of your photos? Here are a few more ideas:
- Buy a better lens (preferably with VR/IS/OS stabilization capabilities) – If I were to advise people where to spend their scarce/finite photography resources, I would put the purchase of good lenses at the top of the list, since sharp lenses (along with good technique) will help get the most sharpness out of any DSLR. DSLRs come and go (and drop in price!), but good lenses last a lifetime and retain their value. “Better” encompasses lenses that are sharper and/or faster. Faster lenses enable you to shoot at lower ISOs and higher shutter speeds, both of which contribute to cleaner, sharper images.
- Monopods/Tripods – Even a well-made economical legs/head combination will allow you to shoot at a lower shutters speed and lower ISO.
- External Flash – More powerful than on-camera flash but helpful for the same reasons as listed above.
- Buy a camera with the anti-alias feature already removed – Your options are pretty limited on this front. If you are contemplating a new Nikon D800, you may wish to consider the D800E and save $200 ($300 cost difference between the D800 and D800E vs. Lifepixel’s $500 anti-alias filter removal process) if ultimate sharpness is your priority. Pentax recently announced the K5-IIs, which, at $100 more than the base K5-II model, can be had without an anti-alias filter. I suspect that Nikon and other DSLR manufacturers will take note of how the D800E and K5-IIs sell compared to the their sister models. If the percentage of DSLRs sold without their anti-alias filters is high enough, look for Nikon and other DSLR manufacturers to introduce additional anti-alias filter models in the future.
My Humble 2 Cents
I looked over quite a few examples from the D800 and D800E before placing my order for a D800. I wasn’t quite as impressed with the sharpness difference between the D800 and D800E. I share the opinion of quite a few people; photos taken with the D800, with just a bit of sharpening via Photoshop’s Unsharp Mask tool, are able to achieve a similar level sharpness as those taken with the D800E.
Of course, I am well-aware that many others, including some of the contributors to Photography Life, hold a very different opinion on this matter. The simple truth is that many serious amateurs and pros crave every bit of extra sharpness that can be wrung out of their DSLR – even if that may require them to spend $400-$500 on an aftermarket alteration process. Thus, despite my personal opinion, I can easily see owners of higher end camera models, such as the Canon 5D Mark III, Canon 1DX, and Nikon D600, opting for this service. I suspect it won’t be quite as popular for entry or mid-level DSLRs, costing between $500-$1,200, since the value proposition isn’t quite as strong.
Would you send your DSLR in to have its anti-aliasing filter removed? What are your thoughts regarding the value of such a service? Weigh in with your thoughts below.
You can find more information on Lifepixel and its services here:
http://shop.lifepixel.com/3-AA-anti-aliasing-filter-removal-for-sharper-photos-c18/
I would never ever think about getting the AA filter of my D800 removed. The D800 is plenty sharp for every thing as it is. With a good lens like for instance the new cheap Nikon 85mm f/1.8 it is almost too sharp, but the sharpness can just be turned down a little.
I think people have an idea that “if just my photos are sharp” then everything will be ok, but that is of course pure nonsense. Sharpness has never saved a bad photo.
Anders,
Well, if practicality was the only criteria for buying, I doubt if any sports cars that can go 135-165 mph would ever be sold, since their speeds are illegal and their handling characteristics can rarely, under normal circumstances, ever be used. There is always a market for some product, however impractical or “unnecessary” it may seem to some of us! ;)
Bob
Hi Bob,
cancel your doubts on illegal and speed.
There is a guy on the hills here that “collects” Army Tanks (don’t ask me why) he has more than 40, so far; one can see them from the top of the mountain in his open-space garage. I don’t think he can drive them either, even if the speed will be O.K. in this case :-)
Everything is possible, sometimes. Cheers,
lorenzo
Lorenzo,
One can never have enough tanks, megapixels, sharpness, or speed! :)
Bob
Hi Bob,
Great Site, great advice, great comments thanks.
For Anders-
Some people prefer a model T Ford or a Brownie box camera etc etc. I prefer the D800E for the extra ‘quality’ of picture with the ‘fuzzie’ removed. For fuzzie read anti-alias filter.
Cheers have a good one.
Bob:
I don’t see your reply here, just got it on my email instead.
My awful experience with LifePixel was about two years ago; I dealt directly with the president, can’t remember his name now. I asked for a full conversion IR/UV/Visible.
It took twice the time they advertise and when the camera arrived there was no UV and a completely blurred IR with any focus compensation for IR.
Despite in my first request i clearly wrote to send me back my original AA filter they never did so.
At that point I decided to ask for a conversion back as it was originally: they wanted more money.
In case you don’t know Nikon sensors and AA filters come in a pair, you can’t put any AA filter on any sensor, but they did; they didn’t put mine back. The sensor (not the AA) was also scratched and covered by specks, I had to send the camera to Nikon repairs, pay $586 to replace the sensor but even after all this the camera, as I said before, has a blue cast that can’t be corrected with the WB; LifePixel ruined it. Even without any experience in replacing AA filters I would have done a better job by myself.
I was so mad that I deleted all the test photos, so I can’t send you any, sorry. It might be my usual luck but if anyone asks me about LifePixel I will say “You better give your camera to charity, so you don’t get upset”.
lorenzo
FYI: these people ruined me a Nikon, converting it to IR/UV; they also wanted more money to put it back. SInce then the camera has a blue magenta casting and has become trash. I won’t recommend them.
Lorenzo,
Sorry to hear about your experience. Lifepixel has a pretty solid reputation. Did you speak with Vitaly or Daniel? I have always found them to be very reasonable and good to deal with. Can you send me a photo taken in RAW from this camera?
Bob
DPReview published studio shots from Pentex K5II et K5IIs… The K5IIs shows a lot of moiré on the enlargement of the coin (there is nearly none with the K5II). We can add the Nikon D800E to the comparison, and it shows no moiré at all… Even more surprising, Canon 5DMarkIII also shows moiré ! May be due to the difference in resolution between the 3 cameras (16 vs 36 vs 24 Mp ? )
May be the risk of moiré decreases with the increase in resolution ? I remember the Nikon D70 (6Mp) was supposed to generate a lot of moiré despite its AA filter, although I never saw any (may be because of the type of pictures I took, and I was not looking for it…)
Laurent,
You are indeed correct – the more detail the sensor is capable of capturing, the less moire you will see. Moire happens because the details of the image are beyond what the Bayer pattern associated with a given sensor can capture. Since medium format cameras were capable of capturing much more detail than FX or DX DSLRs, they produced less moire. Thus the importance of the anti-alias filter on FX and DX cameras.
One of the issues with the conversion is estimating what impact it will have on any given camera. It is hard to tell just how much improvement in resolution you will receive vs. the headaches you may encounter via additional moire.
I looked over the Pentax K-5II, K-5IIs, and Nikon D800/D800E. IMHO, the differences between each of the cameras with/without their anti-aliasing filters is extremely slight. But as I mentioned, it might be just enough to convince some to opt for the anti-alias removal model or Lifepixel service.
Bob
Bob— Your article, and what you have done yourself, raises an interesting tactic for photographers pursuing ultimate sharpness relative the manufacturers’ stock construct of a camera’s sensor assembly, i.e. the D800E vs. third party modification inby R&R the anti-aliasing filter. So the question begs to be answered, in your opinion or through any testing you may have performed, which camera is producing sharper images, your modified D800 or a stock D800E?
Doug,
I didn’t have my D800 modified by Lifepixel, but rather my D90 converted for infrared use. I am curious to see a stock D800E compared to a Lifepixel anti-alias converted model. I am wondering if the results are the same? I will have to reach out to Lifepixel and determine if they have tested one of their conversions next to a D800E.
Bob
Bob, I am sorry to have misunderstood what you had, and/or did not have, modified on your cameras- I must be more attentive when reading & responding- my mistake.
I too am curious, very curious in fact, as to what the result might be inby removing a camera’s anti-aliasing filter (via a third party source) compared to, in the instant case Nikon’s D800E in-house treatment, and those resulting comparisons… good stuff to consider for sure.
Please keep us informed if you learn anything more from Lifepixel or similarly, somewhere else for that matter- thank you for your work on the subject! Doug
Doug,
No problem. You got me thinking about the notion of there being a difference between the Nikon D800E and a Lifepixel-altered D800. The filtering system is pretty sophisticated and I began to wonder if Lifepixel may (for $200 more than Nikon’s D800E cost) offer some superior results. I will reach out to Lifepixel to get an explanation of this. If there is no difference, one has to wonder why someone might opt for a D800 anti-aliasing removal service if they can simply buy a new D800E and get the same quality. Will let you know if/when I get some feedback from Lifepixel.
Bob
People who bought the D800 and crave more sharpness, can buy that from lifepixel. I wonder why it is such an expensive service. How much time does it take a skilled mechanic to fix a camera anyway?
Rick,
They charge this fee because taking a DSLR apart, ensuring that no dust or other contaminates get inside, and putting it back together in perfect working order does require some level of investment.
Or you can simply buy a D800E? But then why does Nikon charge you extra to not give you something people are getting standard with the D800? :)
Bob
I’m debating the D800E/D800 right now; this article is timely for me. I have heard the debate about adding sharpness to the D800 via unsharp mask or selective brushed in sharpness via PS/Aperture/LR. The debate says you can do that easier than remove moiré (which people tell me doesn’t readily show itself in the 800E files). But what about the random colour bits? That aspect hasn’t got much press in the debate. Wacky AA colour chunks (as seen in Nikon’s kimono shot www.nikon.com.hk/tmp/A…Kx/Ky6.jpg) is what is making me lean towards the plain jane D800.
Jason,
I think the D800 is plenty sharp for any application and it is indeed a bit less prone to moire. But as I indicated, people will always seek a bit of an edge, so I understand their opting for a model that isn’t quite as appealing to me.
Bob
Great article – again !
I did have a D800, and changed it for a D800E. I agree that the difference in sharpness between the 2 is subtle, and that sharpening a D800 image bring it close to what you get with the D800E.
However, sharpening an image sharpens everything, including areas that do not need to and noise. So an image that is perfect with a D800E with no sharpening will become a slightly noiser and “rougher” image once sharpened on a D800.
D800/D800E are very sensible to motion blur, so I sometime has to increase ISO, and appreciate not to have so sharpen images any more – this sharpening increases visibility of the noise.
This is visible if you crop a lot and/or print big enlargements : if you just print your full frame to A4 or A3, you probably won’t see any difference.
Another consideration is that you do not loose anything chosing a D800E vs a D800 — except some $, I still have to see any moiré on my pictures.
Just my 2 cents…
Laurent,
I have seen some increased moire in some shots of fabric taken with the D800E. Not terrible per se, but more noticeable than those taken with the D8o0. I am still blown away by my D800’s sharpness so don’t feel like I am missing much by not having a D800E. Of course, that is as of today… ;)
Bob
Hi Bob Vishneski,
I thought what a wonderful idea once the guarantee has run out !
I am just a keen amateur photographer.
I am a Leica man. Have you ever compared Leica binoculars with ALL others? I compared them with ALL leading brands some years ago before opting forLeica. Up until a year ago when I decided to part with my treasured Leica Digilux 3 (bought new which I believe did not have an anti aliasing filter anyway) and move over to Nikon wanting a D700 replacement. (I do not have a professional wallet). So when the D800 & D800E were announced I did a lot of research to find out just what difference that filter would make.
I came down solidly in favour of the ‘E’ which I then bought. Other than the fucus issues which I could not have forseen I fail to understand why the majority of lovers of good pictures ever go for the D800. I guess the cost perhaps? Certainly fashion photographers will find it easier & quicker to get good pics.
Even if less than 5% of my pics are more clear or even less than that, & I do not believe that to be the case, I will never regret my decision.
I only have one regret. That I cannot afford the D4 particularly for low light photography. But that IS less than 0.1% of my pics anyway.
Thanks so much for your site. I love it.
Chris,
Thanks so much. I never begrudge anyone from seeking an advantage. When I saw some of the moire and the minor differences in sharpness, I thought the D800 would be a better fit for me. I do enough in post processing not to want to add getting rid of moire to the list!
Others, such as you, come to a different decision. The good news is that we have such options and can enjoy such technology at such an attractive price point.
Bob
Great article Bob.
No, I am totally happy with my D800 which has no issues (of course I have issues but that is for my therapist to sort out). If I wanted the filter out I would have ordered the D800e. Now once again though, you have me thinking of taking my D300s into the I.R world.
John,
I am sure that if we were to coax the information out of Lifepixel, we would find out that some people actually had their D800s converted!
I strongly recommend Lifepixel for their IR conversions. Good value and they do an excellent job.
Bob
Very interesting article.
It is quite amazing what some of us are willing to do just to get that very tiny bit of additional sharpness. Even with camear’s such as the D7000 you can get very sharp images right out of the camera. For sure if one zoomes in at 100% you could notice some room for improvement. But what is the point? For normal image uses, the sharpness generated by decent camera’s is more than adequate for most image usages. I bet that the vast majority of the non fotographers couldn’t even see the difference between an image shot with a D7000 and a D800 (or D600 for that matter).
Here’s a funny video on how to select a good lens for your DSLR. Notice what all those tiny differences mean in real life shooting. Of course, pro fotographers might look at this differntly for understandable reasons. But for us amatures this make a lot of sense. Don’t go overboard with the tiny differences!
www.youtube.com/watch…at-cF1Aess
Pascal,
Excellent video!!! I agree with you and the “host” of this segment – we do agonize far too much over trivialities! Thanks for sharing!
Bob