While I was photographing the beautiful scenery of the Glacier National Park at sunrise, I realized that some filters are pretty much required to get good results when photographing landscapes. While many photographers think that some of the built-in tools in Lightroom and Photoshop can simulate filter behavior, making filters redundant in the digital age, some filters in fact can never be simulated in software, while others help in getting even better results in post-processing. If you do not know what filters are and what they are used for, I highly recommend reading my “lens filters explained” article before you continue to read this one.
1. Polarizing Filter


A polarizing filter is a must-have tool for landscape photography. It is typically the first filter landscape photographers buy to instantly improve their pictures and and add vividness and contrast to them. A polarizer can reduce reflections from objects such as water and glass and can be used to darken the sky, bring out the clouds and even reduce atmospheric haze, making the scene look much more vivid. For all normal lenses that have a filter thread in the front, you can get a circular polarizing filter, also known as a “circular polarizer”. A circular polarizer is very easy to use and once you attach it on the front of your lens, all you need to do is rotate it clockwise or counter-clockwise to get a different amount of polarization. Polarizing filters work by blocking certain light waves from entering the lens. Rotating a polarizer allows certain types of light waves to pass through, while blocking other ranges of light waves. Thus, you could turn a sky from light blue to very dark blue or increase/decrease reflections by simply rotating the filter.
The effect of polarization cannot be reproduced or simulated in post-processing, especially when dealing with natural reflections. Take a look at the below before / after images:
Note how different the images are – the one without a polarizing filter has reflections and lighter colors, while the one with a polarizing filter has more saturated colors and no reflections. This is just one example of what a polarizing filter can do. See my article on “how to use a polarizing filter” to see more image samples.
I have been using B+W Circular Polarizing Filters for many years now, but have been recently using Singh-Ray Warming Circular Polarizing Filter for my landscape work. I find both to perform very well – these are excellent filters optically and they are slim, which reduces the chance of getting vignetting in your images.
2. Neutral Density Filter

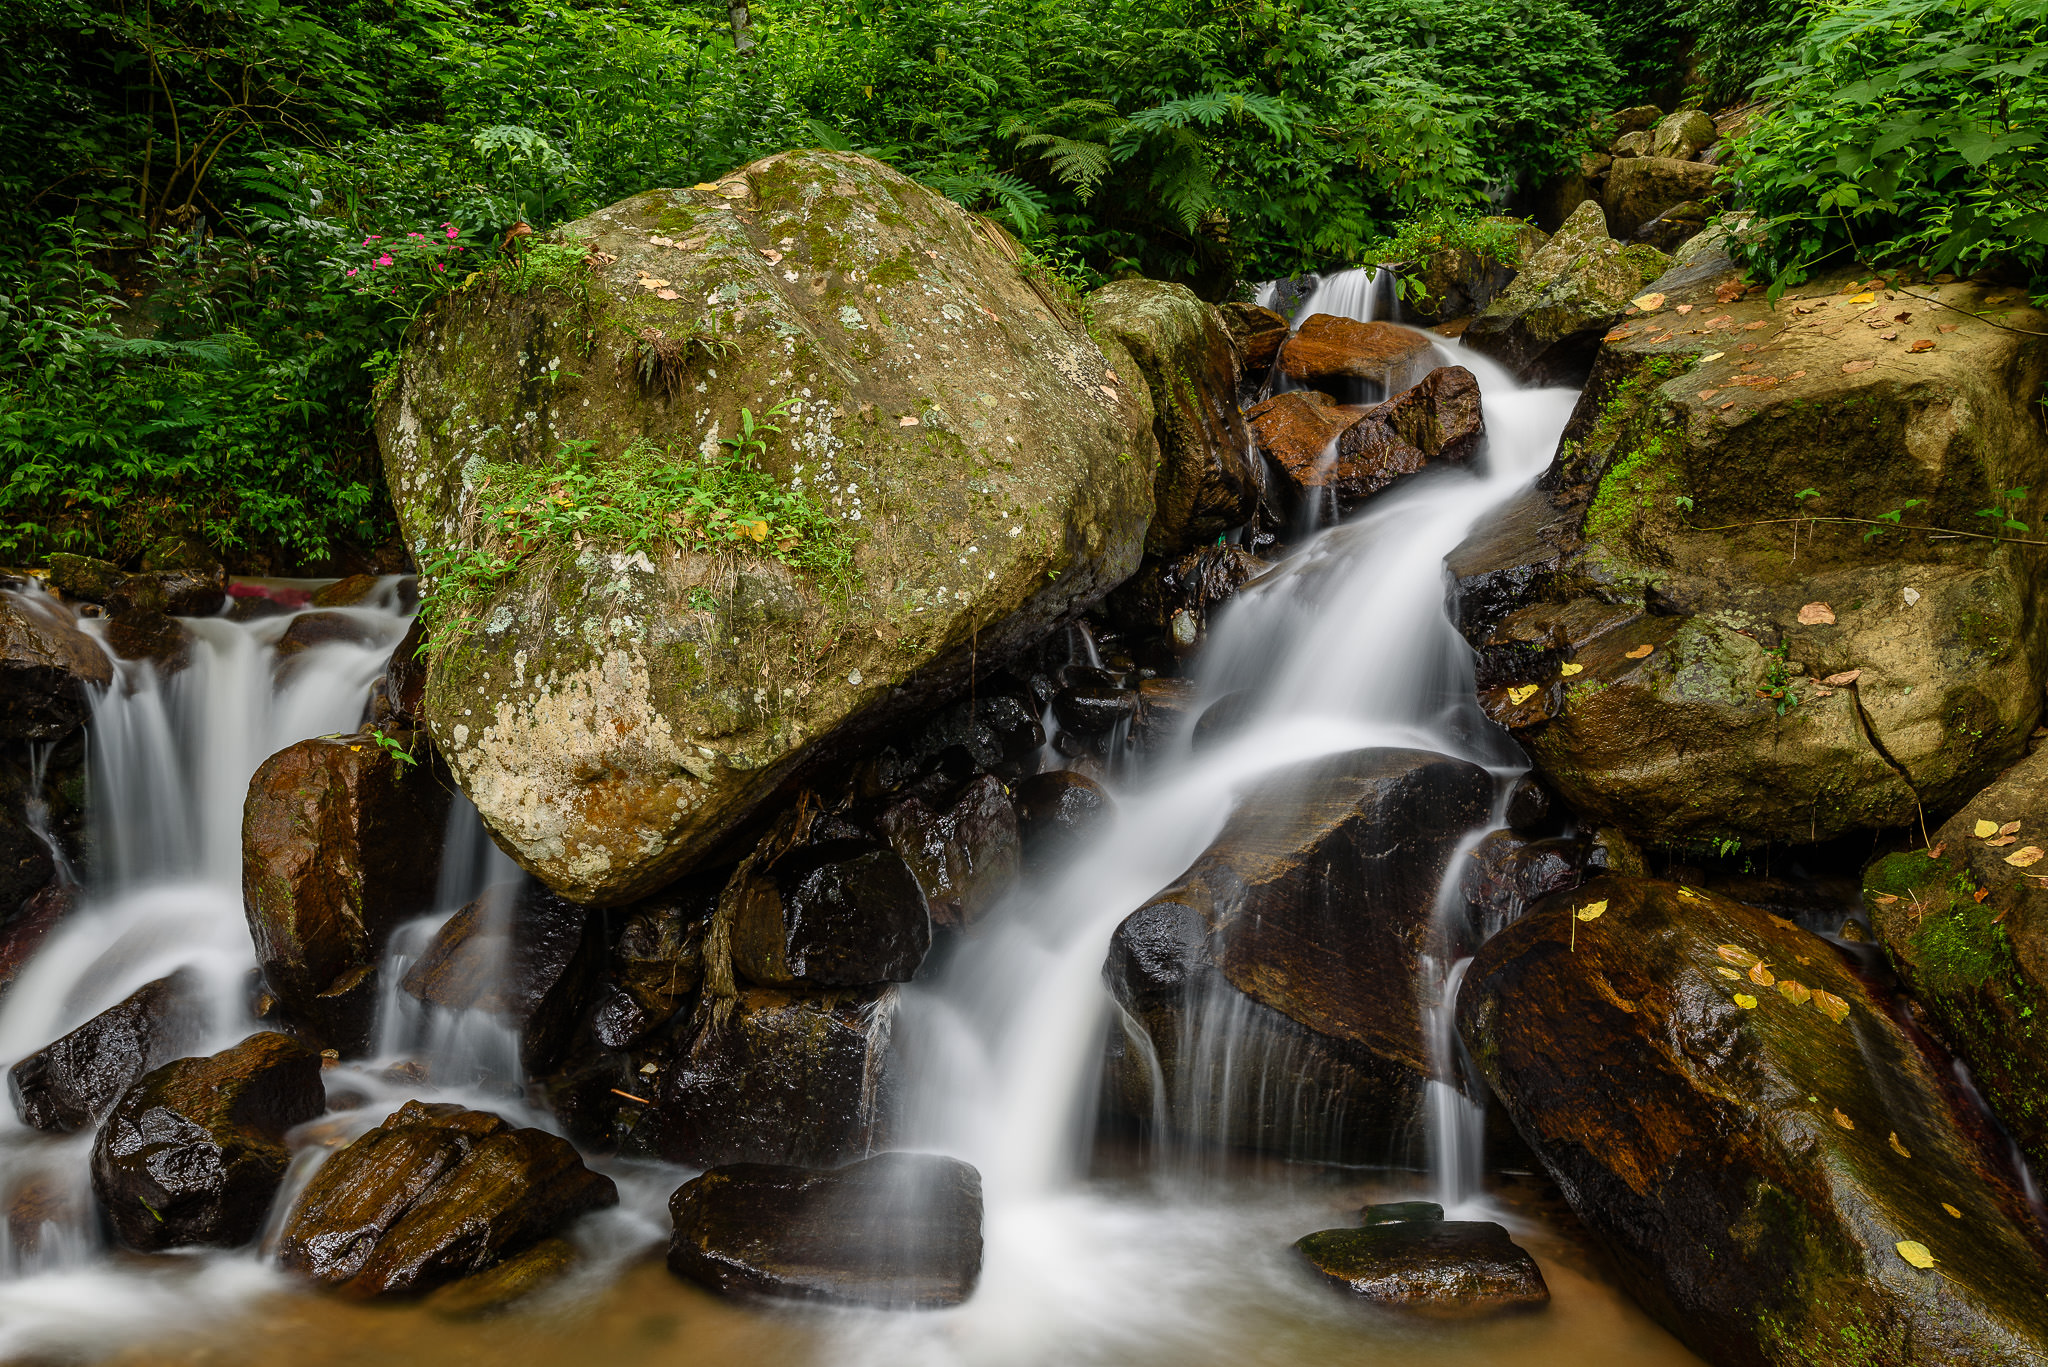
You have probably already seen images of running water and waterfalls that look very smooth and dreamy/foggy. This look can only be accomplished when your camera is mounted on a tripod and the shutter speed is very slow. In daylight conditions, decreasing ISO and increasing the F-number does not typically lower the shutter speed enough. The only solution in those situations is to decrease the amount of light that enters the lens and that’s where a neutral density filter comes into play. Neutral density filters reduce the amount of light that enters the camera lens and thus decrease the shutter speed and increase exposure time. Just like a polarizing filter, the effect of a neutral density filter cannot be reproduced in post-processing. Here is a sample image of a waterfall that I captured with a neutral density filter:
There are many different types of neutral density filters. Some transmit less light than others, defined in F stops. I have used a number of different filters in the past and I find Singh-Ray’s Vari-ND Filter to work the best, because you can change the amount of light that passes through the lens by rotating the filter. It is not a cheap filter though. If you are looking for a lower-cost alternative, the B+W 77mm 1.8 ND MRC filter is a great option that I have used in the past.
3. Graduated Neutral Density Filter


Graduated neutral density filters are necessary in those situations, where the sky is much brighter than the foreground/background. Because the size of the sky versus the foreground/background can change depending on the composition, most graduated neutral density filters are made in a rectangular shape. Therefore, these filters must be either used with a filter holder system, or must be held by hand in front of a lens. The advantage of using a filter holder is that you can stack multiple filters and you do not have to worry about alignment issues. The disadvantage of using a filter holder is that it can add vignetting, so you have to be careful when using wide-angle lenses with focal lengths below 35mm. Here is an image shot with a 2 stop (0.6) GND filter to darken the sky:
There are many different types of filter holders on the market that are designed for both full-frame and cropped-sensor cameras. For many years, I used the Lee filter holder system, which worked out great overall. After testing out the NiSi filter holder system, I realized that I like NiSi much better in comparison, since it is easier to use with a polarizing filter.
Speaking of filters, there are many choices of rectangular filters available to use with a filter holder, such as soft-edge graduated neutral density filter, hard-edge graduated neutral density filter and reverse graduated neutral density filter, in various intensities from different manufacturers. If you are not sure which one to get, I would recommend the 3 stop (0.9) soft-edge graduated neutral density filter from Formatt-Hitech. A 3 stop filter is going to be the most versatile filter for landscape photography – it is the one I typically use the most when the light is much brighter than the foreground. NiSi filters are great, but if you don’t take a good care of them, you can easily scratch the coating off the glass surface – the Formatt-Hitech filters are better in this regard.
I personally recommend glass filters for the best image quality, because glass is optically superior to resin. As I have shown in my glass vs resin filters article, there is a noticeable difference in sharpness when using glass and when it comes to color casts, you want to avoid using resin filters like a plague!
A much cheaper filter holder system with filters is made by Cokin, which offers three different size systems: A, P and X-Pro/Z-Pro (from small to large). I would recommend to get at least the Cokin P filter holder, although I would never use anything less than Cokin X-Pro/Z-Pro on full-frame. Cokin makes great and affordable filter kits for both Cokin P and Cokin X-Pro/Z-Pro series. Keep in mind though, that these are resin filters, so I would only recommend to use the graduated filters if you do not want to deal with nasty color casts.

Now here comes the big question – can the effect of a graduated neutral density filter be reproduced in post-processing. Yes and no, depending on the light intensity and whether you are employing any HDR/blending techniques. In situations where the sky is not completely blown out and you shot in RAW, you could use a neutral density filter in Lightroom and recover plenty of details – up to two full stops can be recovered in most cases. But what about situations where the sky is completely blown out? A lot of people claim that graduated neutral density filters are not needed even in those situations, because they can bracket their shots and get very good results with HDR and blending techniques. That’s true, but blending and HDR do not always work well, especially in windy conditions. And I personally try to stay away from HDR, because it is tough to get results that look realistic. So my preference is to use filters rather than spend time in post-processing to try to recover blown out details. But everybody is different and I know that some photographers will disagree with me on this.