Just like Romanas, I love my Microsoft Surface Pro 3 (in fact, I was the one who convinced Romanas to get one after my experience with the Surface Pro 2 and eventually 3rd generation). Although Romanas has already put a lot of great information in his excellent in-depth review, there is one big reason why I personally strongly prefer the Surface Pro over a laptop – I can work with it on my lap and it does not make me uncomfortable, as it does not generate any heat. But despite all the good things about the Surface Pro 3, there is one issue that can be particularly problematic for photographers: to extend battery life, Microsoft actually modified Intel’s graphics card drivers and reduced the number of colors that can be displayed by the device. For most people this might not be a problem, but for us photo geeks, this “hack” is actually quite a big issue, as it introduces banding / posterization to images. It also makes it hard to distinguish between some shades of colors, which is rather sad, since the high resolution screen is the number one selling point of this device (turns out Apple employs a similar trick on its MacBook Air machines). Another inquiry we have received from our readers is on calibration – is it possible to calibrate the Surface Pro 3 screen? In this article, I will provide detailed information on how to fix the banding issue and provide detailed instructions on how to properly calibrate the Surface Pro 3 screen.
How to Fix the Banding / Posterization Issue on Surface Pro 3
The process of addressing the banding / posterization issue involves replacing the Microsoft-provided graphics card driver with Intel’s driver. Although per Microsoft, this removes the “optimization” of the graphics card driver from the system and they cannot guarantee the same battery life, I have been using Intel’s driver for a while now and I can honestly see no difference in battery life consumption. So if you are wondering if it is worth doing this or not, in my opinion, it is definitely worth replacing the driver no matter what Microsoft says. I really hope that Microsoft addresses the banding issue soon with a proper driver replacement, so that we do not have to manually update anything going forward. It is certainly rather annoying that one needs to go through this process just to get the best out of their equipment…
As of today (12/09/2014), the latest Intel graphics driver for the Surface Pro 3 (which has 4th generation Intel processor with Intel HD Graphics 4200, 4400 or 5000 depending on model) is version 15.36.7.64.3960 that was released on 10/03/2014. The driver can be downloaded from Intel’s website. Since we have to manually force-install the Intel driver, you should download the ZIP file instead of the EXE file. Once you get the ZIP file downloaded, go ahead and unzip it into a temporary folder, like C:\Temp\Intel. From here, follow the below instructions:
- Open Device Manager, expand “Display adapters”, right click on “Intel(R) HD Graphics Family” and click “Update Driver Software”
- Select “Browse my computer for driver software”
- Instead of searching for the driver, click on “Let me pick from a list of device drivers on my computer”
- Click “Have Disk…”
- Click the “Browse” button and navigate to the folder where you extracted the ZIP file. Underneath the folder, find the “Graphics” folder and double click on it. You will see a single file that says “kit64ics” here. Double click that file, which will open that folder location
- After you click “OK” you will have a single selection that shows “Intel(R) HD Graphics Family”
- Click “Next” to begin driver installation. During the installation, your screen will turn on and off temporarily several times, which is normal
Once the driver is installed, you should now be able to verify that the correct version is installed. In Device Manager, right click the same “Intel(R) HD Graphics Family” icon and click Properties. Under the driver tab, you should see that the driver version is 10.18.10.3960 from 09/24/2014, as shown below:

Now if you look at images with gradients, you should not see any banding / posterization problems, so the issue is taken care of. It is a good idea to keep the latest drivers in your computer, just in case Microsoft overwrites them in the next update. If that happens and the banding issue is still there, just repeat the above steps to restore Intel’s drivers. As I have already said above, I hope this banding problem gets addressed soon!
Surface Pro 3 Display Calibration
Once you address the banding issue, it is a good time to calibrate the Surface Pro 3 screen. I am happy to say that the Surface Pro 3 screen can be calibrated quite effectively – my Surface Pro 3 now looks pretty close to my calibrated Dell monitors, which is great news. Since for my calibration needs I use the excellent X-Rite i1Display Pro, I used the same device for calibrating the Surface Pro 3 screen.
Here are the step-by-step instructions on how I calibrated my screen using the X-Rite i1Profiler software (make sure to select “Advanced” from the calibration screen first):
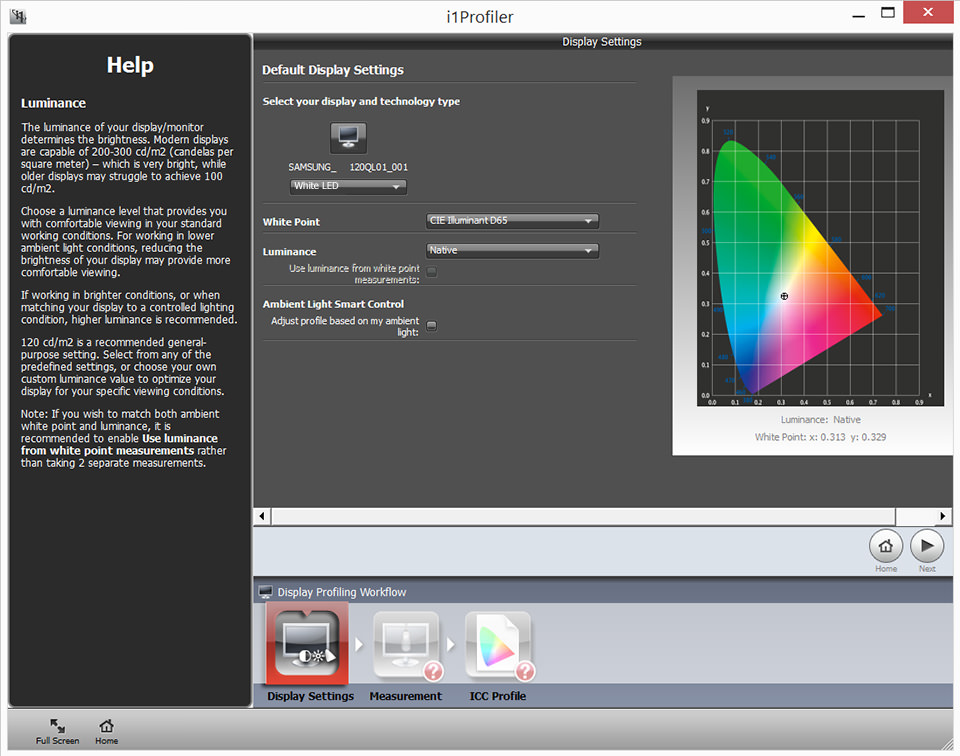
The first screen is the most important one, since this is where you set the display type. I have tried a few different configurations and found “White LED” to work the best for the Surface Pro 3 screen. I went with the Native luminance level, but you can target specific luminance level like 120 cd/m2 if you prefer.
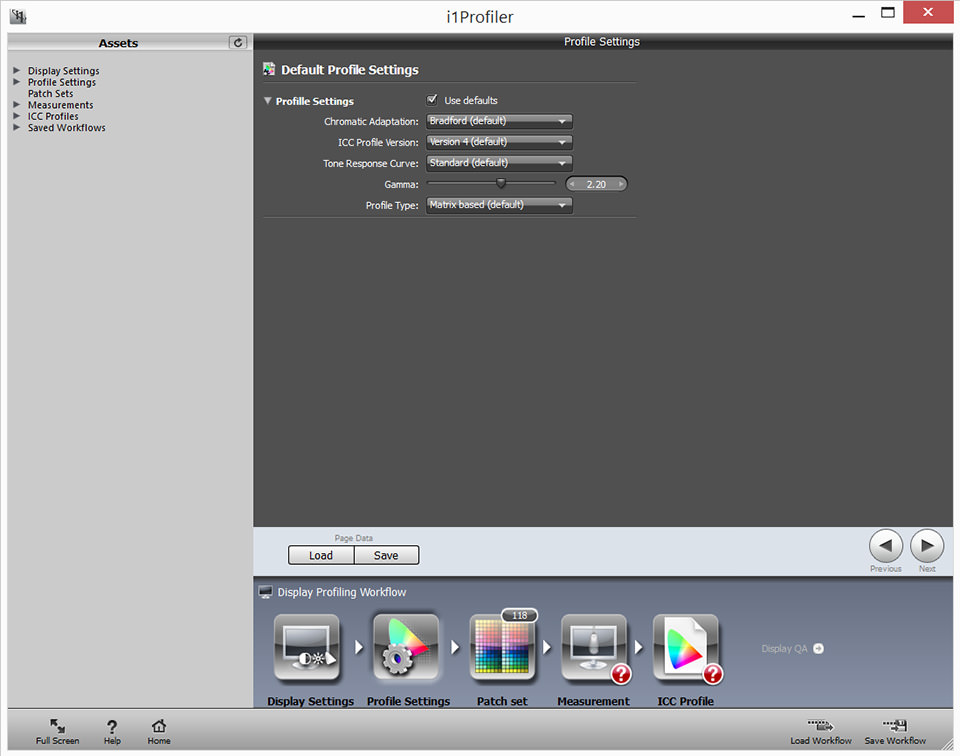
I left everything at default for the next screen.
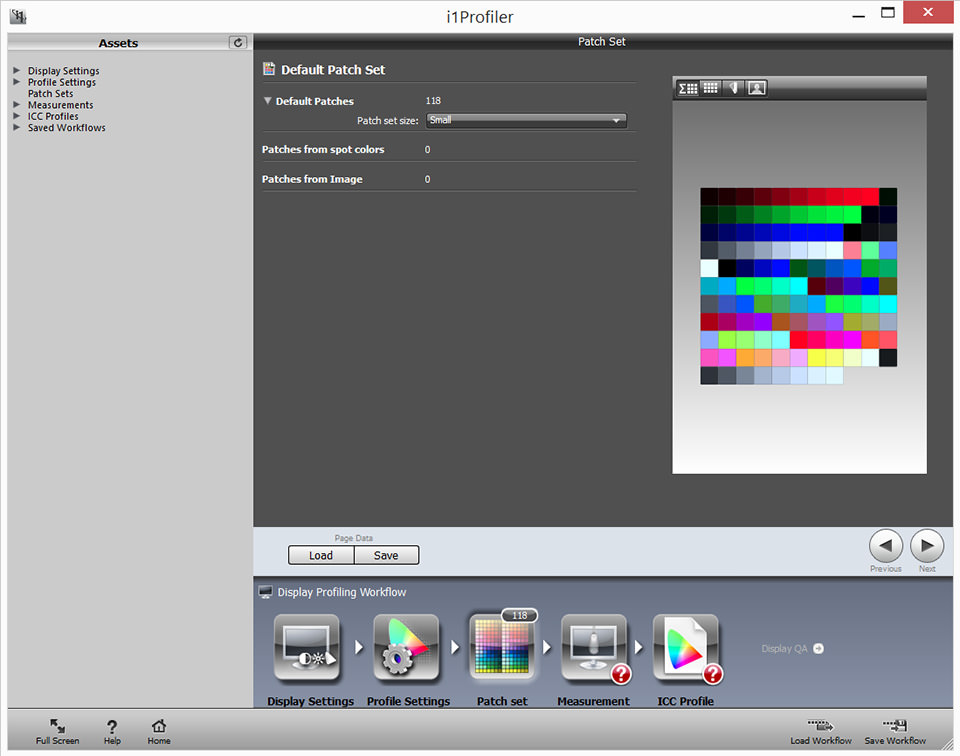
Left the patch set size at Small.
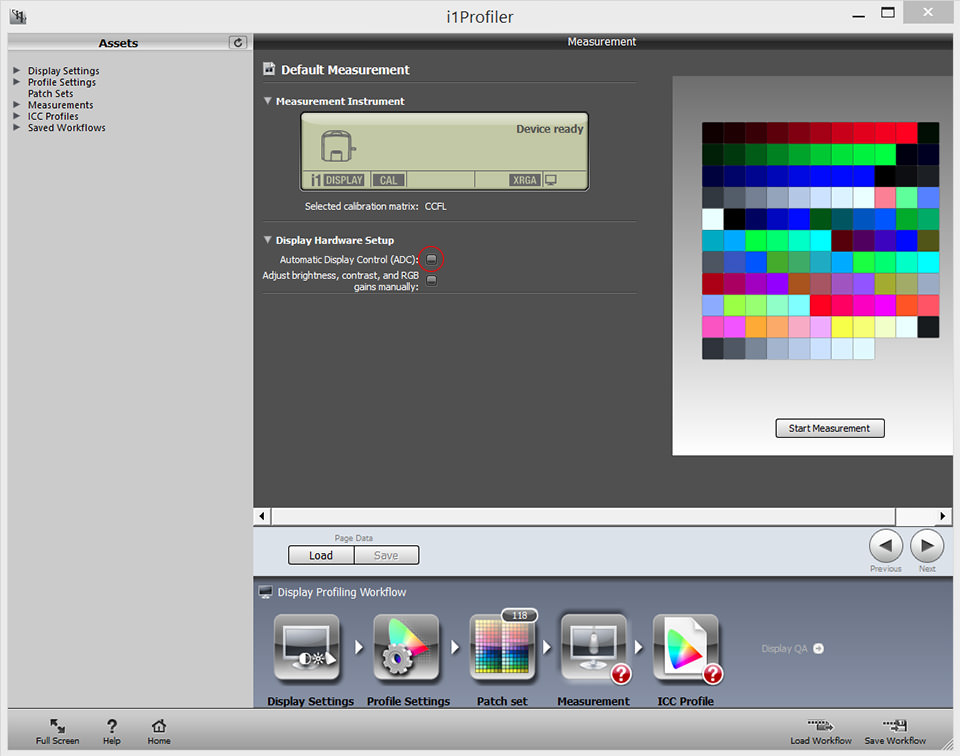
This one was a bit painful at first. Since ADC was turned on by default, the software would crash immediately upon probing for ADC at the beginning of calibration. I thought it was an issue with the latest version of i1Profiler, so I downloaded earlier versions and tried them – every single one crashed. After I unchecked ADC, it went smoothly from there, so I went back to the latest version. To avoid these crashes, just uncheck ADC in this screen and calibration will start without any issues.
After calibration is done, compare the before and after results and you will see the colors change rather drastically. So far, I am pretty happy with the colors on my Surface Pro 3 after it has been properly calibrated!
Does this contradict what displaymate.com says about the Surface Pro 3? They made no mention of banding, and put displays through rather vigorous tests…
Hi there, great article Nasim! Can anyone advise me after calibration how much they would advise raising the brighness for prints? I send photos away for print so can’t do this by trial and error. Many thanks
1-You CANNOT get rid of banding with an intel GPU unless you DO NOT calibrate the display using GPU LUTs. It is not posible. PERIOD.
>iGPU or gammer nvidia and identity tables loaded in LUT (“no calibration”)= smooth gradients (if driver is not broken, maybve is what you are trying to expaein)
>iGPU or gammer nvidia and VCGT tables from ICM profile loaded to GPU LUT = BANDING, ALWAYS. I mean A-L-W-A-Y-S. The severity of banding/color maks on grey gradient will depend on how much correction does it need to apply, but IT WILL BE THERE, ALWAYS, unless you load an indentity LUT (no calibration) in GPU LUT.
The ONLY way to modify freely GPU LUTS without banding is an AMD GPU or a Quadro.
2-An ICC4 profile is a BAD idea since you cannot actually test what did whatever program you choose to do this task. And of couse ArgyllCMS will perform better than i1Profiler.
BEST ADVICE is to stay with ICC version2 profiles… unless you “trust” as an act of faith what i1Profile says (and it won’t say too much.. and mostly WRONG for things as uniformity test)
Hi Colorconsultant,
I agree with what you have stated but have some additions/comments.
For years both AMD and NVidia have used internal 10 bit LUTs so unless large corrections must be done, banding probelsm are not a big issue.
The main problem lies in LUT loaders such as the one windows is using; it loads an 8 bit corredction LUT.
For calibration sw; freeware is available dispcalGUI. It uses the very good argyllCMS but adds a userfriendly GUI. Just google dispcalGUI download , use it and be a happy calibration bunny :)
Yes ICC version 4 support is at best very flaky; v2 has better support (use firefox as browser but make sure colormanagent is on! read up on this online)
Xrite makes an axcellent pro-sumer calorimeter ( i1 display pro) BUT thier sw is not that great (coughs). use dispcalGUI instead.
Good luck trying all out
Dear Nasim, did you try to fix the January patch released by Microsoft, overwriting the manually added graphic driver? Ever since January 17th I can see some nasty shadow clipping and color banding again. Grrrrr.. Does this driver solve the problem?
Dear Nasim, Have you also solved the flickering issues after the installation of New Intel Driver?
Many Thanks
Dear Nasim, many thanks for this tip. It will make a huge impact for me. The display of surface is great, bright with enormous detail, but the colour banding (especially in shadows) was annoying to me.
I bought i7 version of Surface Pro 3 several days ago with the daunting idea of making it my main wokrhorse including my Lightroom workflow. It is slower than my previous laptop with dedicated graphics, but acceptable. Other advantages of this devices are so far a sheer joy (especially the pen). I will be gratefull to you and Romanas for further tips how to process images using Lightroom with Surface.
Nasim, Good article, thanks for the tips. What if you have the Dell 2413 monitors paired with a surface? In your Dell 2413 calibration article it says that you have to uninstall any previous instances of the X-Rite software and use the Dell version. I’m asking because I’m sitting here with 2 Dell 2413’s hooked to a Surface and would like to calibrate all three, but not sure that I’ll be able to calibrate the surface with the Dell software. Any insights before I begin?
This is a useful post for me Nasim because I did not succeed in profiling my similar Samsung Notebook/Tablet a while ago using iProfiler and i1DisplayPro. I’ll have a look again soon and see whether i missed something then.
Nasim, can the Surface Pro 3 operate as a dedicated laptop or is it too small for all applications as well as photo post processing. I’ve been looking into a new laptop to replace my aging Dell PC and HP laptop both of which are very slow. What would you recommend?
Romanas did cover these questions in his overview of the machine, if you’re interested.
The TL;DR answer is : it’s a neat little machine that can do a reasonable amount of work, and even some photo post processing using tools like Adobe LR/PS, with a pretty good screen and a well thought-out design. However, don’t expect it to perform as well as a regular workstation, a decent desktop computer, or a professional grade laptop.
Thank you Pierre. I’ll keep that in mind.
Been using it for a few weeks now Mike, and my answer would be Yes.
It can replace your laptop, though it does have some disadvantages. It will run hot, and the fan can be quite loud when you’re doing work. If, like me, you listen to music when working though, not really an issue.
It won’t replace a desktop for resource heavy work, but it’s not a million miles away.
I am very excited for future iterations of the surface pro.
Matt, thanks for your input. I’m tired of lugging around my ancient heavy laptop when I travel. Although it has huge battery life, it just adds weight to my camera back pack and at 70 I’m looking to save some weight. Can you tell me how many USB ports it has?
This is extremely useful material. I doubt I’ll buy a Surface Pro but if I do, this post would be what would keep me from returning it because of banding. This opens up a bunch more questions (Should I be savvy enough to find this research on the Internet? Should everyone? What should Microsoft use as defaults?…) and I don’t know the answers but thank you very much for posting this.