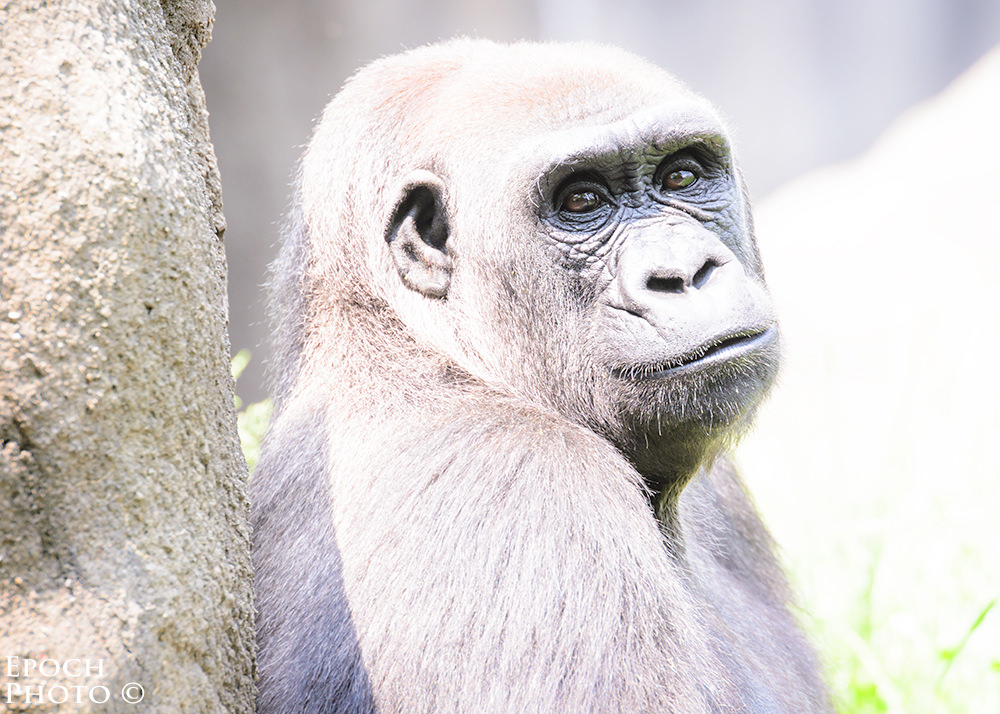
The more time I spend in my photography pursuits, the more I appreciate cameras that capture and photos that exploit their maximum dynamic range potential. Digital cameras have undergone dramatic improvements over the last 12+ years, but they still don’t come close to the human eye’s dynamic range capabilities. By some estimates, the human eye can distinguish up to 24 f-stops of dynamic range. Higher end DSLRs such as the Nikon D800 by comparison, can capture up to a theoretical max of 14.4 f-stops of dynamic range. The usable dynamic range of most DSLRs, however, is closer to 5-9 f-stops, considering the impact of noise, which can render some of the DSLRs’ f-stop range impractical to exploit. Thus your eyes – at least for now – are still far more capable than the best DSLR relative to recognizing various tonal gradations. As I will demonstrate via my new model, “Doris” (shown below) of the Pittsburgh Zoo, even photos taken with high quality DSLRs sometimes need a bit of extra processing to match what your eyes can see. The photo below is the result of a processing technique I often employ to boost dynamic range when it is apparent that my camera’s sensor failed to capture what I remember seeing.

Table of Contents
1) Good Dynamic Range Starts With A Good Camera
The first step in maximizing dynamic range is to have a camera that scores high in this category. DXO Mark can provide a good understanding of how DSLRs stack up against each other in this regard. The results from the D800 dynamic range testing have been amazing, clearly showing that it has the capacity to pull significant shadow detail while still keeping noise levels relatively low. If and when I actually get my hands on a D800, I will be able to determine this for myself! For this tutorial, I used my trusty Nikon D7000, which despite its modest price, has a very good dynamic range score.
But even with a D800 or other DSLR that excels in the dynamic range category, your photos are still likely going to need some additional processing to maximize their potential. For extreme lighting conditions, the only way to capture the full spectrum of exposures is with exposure bracketing and combining multiple images as done with high dynamic range software. In less dramatic lighting conditions, however, you may simply need to modify your exposure values using copies of a single image and combine them to create the optimal exposure for each part of your image. This need not be very cumbersome or time consuming, since with a bit of experimentation, you can quickly spot opportunities to enhance your photos’ dynamic range and make the necessary post processing modifications using Lightroom, Photoshop, and other software.
2) Variety Of Techniques
I chose to do most of my processing using Lightroom and Photoshop, my primary tools along with the full plug-in suite from NIK Software. I have no doubt that I could have used a variety of other photography processing software and techniques to achieve similar results.
3) Assessment Of Lighting Conditions
I knew this photo and lighting were going to cause an issue for my D7000, despite its respectable 13.9 DxO Mark dynamic range score. It was just shy of 1:00 PM on Sunday on Memorial Day weekend, and the sun was high and bright. I was taking a photo of my new model, Doris, who had ditched her fellow Pittsburgh Zoo gorillas and for some reason made her way over toward me in a little-visited portion of the park, where we were little more than 35 feet apart. She looked at me rather quizzically, decided I seemed harmless enough, sat down with her back up against a stone post, and proceeded to pose to me – or so I imagined…
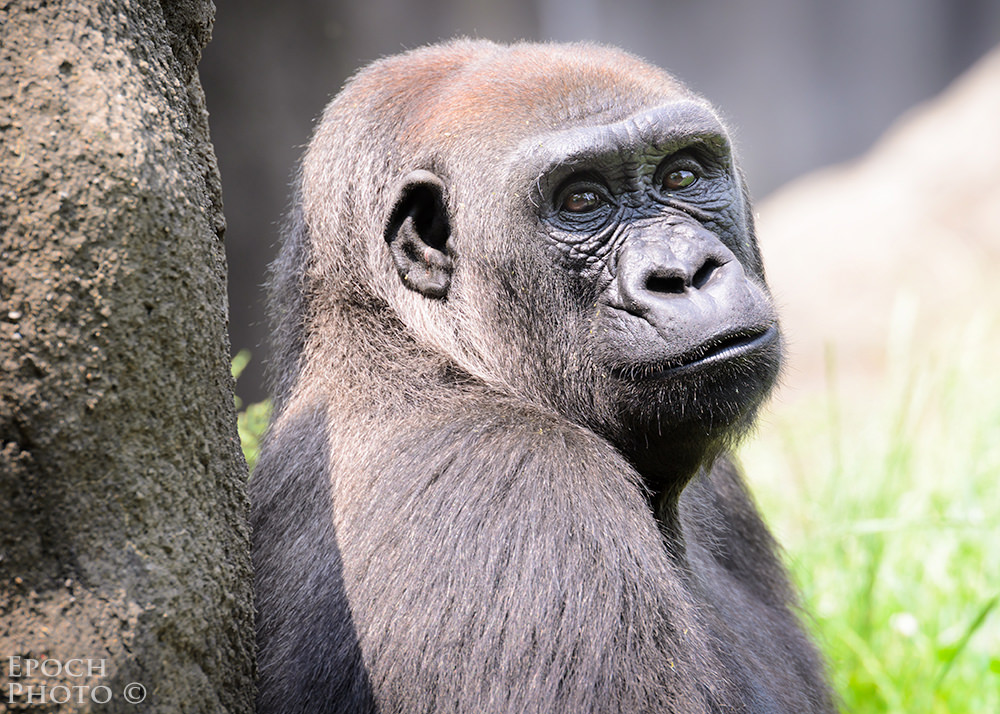
Given the D7000’s tendency to overexpose a bit and the fact that Doris was a mixture of dark gray and black, I thought it wise to dial-in an exposure compensation of -.3. Even though I could see Doris’ beautiful brown eyes very clearly through my Nikon 70-200mm VR II and Nikon 1.4X teleconverter, I knew the camera’ sensor was not going to be able to accurately render the diverse tonal range, and that upon returning home, I was going to have some work to do in order to represent the dynamic range that my eyes saw. The picture below is the RAW file as it was brought into Lightroom 4.0 without any adjustments. As you can see, the D7000 did a respectable job, particularly with Doris’ silky fur coat, but her eyes are barely visible. And as with most RAW files, the image was pretty bland and boring.

4) Auto Adjustment In Lightroom 4
Based on my D7000’s characteristics and my understanding of the elements of a “good” photo, I created a number of Lightroom presets I apply to my photos that address exposure, contrast, shadows, color, contrast, highlights, sharpening, lens adjustments, etc. I almost always use a single preset that gets me 85-90% of what I expect a photo to be. The rest of my adjustments are made in Photoshop. After I applied a preset which I ingeniously named, “D7000 Preset”, which also included the use of Auto Tone, Lightroom 4 produced the image below. This preset improved the dark shadows associated with Doris’s pretty brown eyes and other body parts, but made her coat a bit too light. Admittedly, this is tricky image to get right with the Auto Tone adjustment feature. Lightroom 4’s “Shadows” control is a huge improvement over Lightroom 3’s “Fill Light” capability, as it has the ability to boost the exposure of the shadow regions without negatively impacting the rest of the photo. Fill Light often had the tendency to quickly “wash out” a photo and make it look as if a thin coat of gray paint had been dumped on it. Lightroom 4’s Shadows eliminates the unwanted color cast by only impacting those areas that are truly shadow areas, and represents a huge leap forward. Lightroom 4’s Auto Tone feature has also improved quite a bit over that of Lightroom 3. Lightroom 3’s Auto Tone button would almost always overexpose my photos, to the point where I stopped using it altogether. In contrast, Lightroom 4’s Auto Tone does a much better job, producing much more realistic mid-tones and blacks. But as good as both the Auto Tone and Shadows features are in Lightroom 4, you can see that Doris still needed some work. Her beautiful eyes simply weren’t showing their sparkle as of yet!

5) Boosting Exposure In Lightroom 4
The next experiment I performed was to boost the Exposure setting of a copy of this photo in Lightroom to see how much I could improve the shadow regions of Doris’ eyes beyond what the Shadow feature would allow. As you can see, my D7000 captured quite a bit more details and dynamic range than either the RAW or adjusted Lightroom 4 file suggested. And since I shot at ISO 100, I had a bit more latitude of “usable” dynamic range to play with, since RAW files shot at lower ISOs are not affected as much by noise as photos shot at higher ISOs. Had I taken this photo of Doris at 3200 ISO, I doubt that could have made the corresponding adjustments shown here without significantly boosting the noise levels of the shadows, and thus reducing the overall quality of the photo. So while the rest of the photos looked terribly overexposed, Doris’ eyes were clearly brighter and showing much more detail, color, and contrast than the other versions. Now you can begin to sense why the male gorillas of the Pittsburg Zoo melt under her gaze!
6) Combining The Exposures
As I mentioned, there are probably a variety of ways I could have achieved a similar result, but since I am very comfortable and familiar with Photoshop (I used version 6), I decided to bring in the original Lightroom photo into Photoshop, and then add the overexposed copy as a layer. Using layers, masks, and brush tool, I then combined the best of both photos, the results of which are much closer to what my eyes saw through the viewfinder. Not bad, but I thought Doris had a bit more potential.
7) Final Modifications
The last steps involved adjusting exposure, contrast noise reduction, sharpening, and color vibrance. In order to put more of the focus on Doris’ beautiful face and soulful eyes, I added a vignette using a Levels adjustment layer to darken the surrounding areas. Photo processing techniques, much like photos, are very subjective. The RAW file processing you see here produced something that is appealing and pleasant to my eyes. Your technique and preferences might take you down another path and result in an image that looks different than mine. Doris happened to like this picture so much, however, she made it her facebook profile photo. She tells me that she now receives dozens of messages each day from male gorillas around the globe, as well as female gorillas seeking to understand how they can achieve a similar look! :)
8) Summary
Maximizing the dynamic range in your photos starts with a DSLR that scores well in this category. And armed with some post-processing knowledge and experimentation, you can go a long way toward exploiting your photographs’ potential.
I hope that you got a model release form from your new model Doris.
Geof,
Funny you say that. Doris saw the “selfie” of the monkey that has been in the news as of late. Doris has since retained the services of an attorney and is suing me for disseminating her image without authorization. ;)
Bob
please state step by step process of the part “I decided to bring in the original Lightroom photo into Photoshop, and then add the overexposed copy as a layer. Using layers, masks, and brush tool, I then combined the best of both photos,”
Jayatu,
I created a copy of the photo within Lightroom so had a normal exposure as well as a copy which I had an adjusted histogram that showed the highlights as over exposed and the darker sections to be much lighter than the normal exposure. The rest was simply using basic masking/exposing techniques in Photoshop. Such tutorials are abundant on youtube as well as Adobe’s site.
Bob
Hello Bob
Thanks for an informative and subject specific article.
Inspired by art of Ansel Adams I was trying to achieve the similar effect of dramatic sky and clouds, however the effect was flat and boring.
I assume the key is
Any idea what was his technique? Is it about the film dynamic range vs digital matrix? Or maybe some kind of post production with multiplpe exposure layers done in the darkroom?
Thanks
Tigran
Tigran,
My technique here is simply taking the best parts of the photos exposure and combining them, not unlike what Adams did. This technique only works up to a point, however. If you attempt to boost shadow details too much, your photos can indeed look grey and washed out. You can find many article regarding Adams’ technique easily enough with a bit of searching on the net. It does take a bit of practice.
Bob
Thanks Bob, got it!
I did some preliminary research on the subject. Agree, Adams used a totally different approach, (zone system etc) which is more applicable to a negative film rather digital matrix. However his approach to exposure measurement worth understanding and trying to implement in the digital world.
Thanks again
Tigran
Bob,
Excellent article and great results!
Thanks, Edward.
Bob
Actually the human eye cannot capture such high dynamic range in a single “shot”. The human eye is more like “video”. The DSLR takes a single frame and in this frame the D800 gets around 14 stops. The human eye in a single frame gets less than this, it’s only the fact that the eye uses various trickery to get a better range – it is essentially processing images over time by the brain into. But it’s not much better. I shoot my D800 into the sun and other extremely high DR scenes, when I check the images the camera see’s ALOT more into the shadows and highlights than I did at the scene, and I’m only in my 20s with very good eyesight.
Quick question, wouldn’t an adjustment brush a Lightroom just do the same trick as well?
Just pull up the exposure and shadows around the eyes and you’d be done as well. This would have the advantage of keeping history and having just a single file, instead of two files of which one is a heavy photoshop (tiff, dng, or psd) file. I’m always a fan of keeping my storage requirements to a minimum.
Robin,
Potentially. I delete the multiple exposures and/or collapse them for the final image, so my technique doesn’t negatively impact my storage requirements. As a general rule, I only use Lightroom to set the broader settings for a photo. IMHO, Photoshop continues to offer quite a bit more flexibility relative to masks, detailed adjustments, etc. over those provided by Lightroom.
Bob
well Jeorge I’ll think what to do, maybe I’ll buy 70-200mm because I heard so much about this lens and I want it but the camera later I can’t buy it now is too much for me.
Alena, the 70-200 VR II is an excelent investment and you can use it with your D7000. You must not run to buy a FX camera. There are solid rumours about a new budget FX Nikon camera that is coming soon; so it is good for you to wait.
Can someone please tell the difference between DX and FX body.
Hi Alena,
I will give you a very simple explanation, because it is the only one that I know. A “DX” camera is one that is equiped with a “DX” sensor. A “DX” digital sensor does the work that a negative (traditional film) does in an analogic camera, but the frame of a “DX” sensor is smaller than the frame of a 35mm traditional film.
By its side the “FX” body carries an “FX” digital sensor. The frame of the “FX” sensor is the same as the one of the 35mm traditional film, and of course, bigger than the one of the”DX” sensor.
What is meaning that size diference between the “DX” sensor and the “FX” sensor ? Well, because the “FX” sensor is big, it can be filled with big megapixels (the bigger the megapixel is, the more light it captures) to obtain a better quality picture, with low “noise”. By it’s side the “DX” sensor is filled with small pixels (smaller than the “FX” pixels). For brands like Canon, and lately Nikon, the number of pixels is a serious marketing consideration, because people that doesn’t know too much about photography use to be impressed with the number of megapixels, and they prefer to buy small sensor cameras that are stuffed with a lot of small megapixels, even when those cameras are not going to produce good image quality, specially in low light situations.
So, in very short words: An “FX” sensor is a big one (captures more light) , and a “DX” is a small one (captures less light). Greetings, Jorge.
Hello George thank you infinitely for your explanation was very clear to understand the difference from “DX” to “FX” body. Anyway thanks that you told me I do better photo than you but as you know so much and have good quality equipment and you must always be better. Now I think to cancel the 18-300mm and buy the 70-200mm but how if my camera is “DX” body and lens is “FX” what to do, to buy it or I need to change my camera too ?
Hi Alena,
The FX lenses work perfectly mounted on DX bodies (you can’t say the opposite), but you must consider that the 70-200mm f/2.8 FX, mounted on a D7000 DX body, is going to work as a longer tele; I think like a 105-300mm (perfect for portraits), but I’m not sure. However, if later you decide to invest on a FX body you woud be happy of having an FX marvelous zoom.
So, if you buy the 70-200mm FX you don’t need to change your DX camera . Only if you are looking for a wide lens it is not going to make sense to buy an FX zoom to use it on a DX camera.
There are a lot of wildlife shooters that use “FX” teles mounted on DX bodies in order to have more reach. Greetings, Jorge.
Postdate.
If you want to buy an FX body the D700 could be a good option. Now that new Nikon updates came to the market, the price of the D700 must be low and it is a super camera, perfect to do photos without flash in dim enviroments.
Hi Jorge,
I already order 18-300mm lens,now I’ll wait for it because is not available in the store I read a lot of commentary and think it’s good lens. I told you I think you doo better pictures than me, with a 70-200mm lens who does not take good pictures :)
Alena,
I saw your photos and now without a doubt I can say that you do better photos than me.
A zoom like the one you just ordered is a “convenience” tool. It is a very practical lens that you can take with you on holidays or when you want to do photos of a kindergarten party. You will have good quality pics. The VR II is going to allow you to do sharp photos of stationary subjects in low light.
But to do those photos with creamy bokeh and and a magic touch, there is nothing better than a big aperture prime. Until now I did my most beloved children photos with my 50mm f/1.4 AF-D (I think the 50mm are the best children lenses) Unfortunately I didn’t use my 50mm very much, because I have other more expensive glass that I want to give a try, and I have not very much time to take photos (but I have time to read blogs).
The 70-200 f/2.8 is indeed a fantastic zoom that produces great bokeh. I’m not a rich man, and still now I’m saving money to fill the hole that the 70-200mm opened in my wallet, but I don’t regret my aquisition a single minute. However, the big 70-200 is not the lens that you want to have when you are running behind your children at the park. In those circumstances a 50mm is a better choice.
One fantastic an expensive prime that in terms of bokeh is superior than the 50mm is the 85mm f/1.4 G. I have it. The 85mm is an specialized head and shoulders portrait’s lens, but the 50mm is a more practical prime.
So, don’t be frustrated when your new zoom doesn’t produce portraits comparable to the ones you do with your 50mm, opened at f/2, because when you need to go wider to do a groupal photo, with your zoom opened at f/8 (to have everybody in focus), your new zoom is going to serve you well. Also when you photograph landscapes, or you need the 300mm focal lenght to do photos in the zoo. Greetings, Jorge.
Jorge,
thank you very much jorge I like what you write it helps me a lot. I do not know that 28-300mm lens is FX lens :) . I have to buy another lens anyway because I rushed and I already sold my 18-200mm. I can not decide which lens to take now that I will not be sorry. I believe in you as you take pictures better than me but I’m learning and learning :)
Alena, I had good news for you. The 18-300mm DX just hit the markets some weeks ago. So you could buy this lens. It’s price is 1000 dollars.
I red that the 18-300mm DX VR weighs even more than the 28-300 FX. Note that the DX zoom goes wider than the FX version (18mm vs 28mm). I found the next comment in internet:
” I can see why a pro would dislike this, but for most people you could stick one of these on a reasonably cheap body like a D7000 and have it be your to go lens. Most people don’t want to switch lenses (even pros, which is why you’ll often see them with one body per lens) – it’s slow (shot is gone), leaves you open to getting dust on the sensor, or accidentally damaging something.”
You could use always your 50mm f/1.4 for your low light photos, artistic portraits an even some landscapes (I did it), but when you need something that can go wider and longer, the 18-300mm DX would be a quite good solution. The FX 28-300mm is very sharp, and when you shoot portraits at the 300mm range you can disappear the background. The VR works perfect in my FX version, and really helps when you do low light photos of stationary subjects.
The 50mm is not a complicated lens to take it with you. One thing is to swap your 50mm with your 28-300 DX, and another is to carry and continually change a 24-70mm F/2.8 FX and a 70-200mm f/2.8 FX. In the last situation you really risk a bad accident, specially when children are running beside you.
Another thing. I’m an early amateur as you, so don’t expect my photos to be that good. I’m sharing my experience with you because I have the 28-300mm FX zoom, and also the 24-70mm and the 70-200mm zoom, so I can compare them. Greetings, Jorge.