As all previous versions of Adobe’s popular photography management and post-processing software, Lightroom 4 offers catalog system. Such a choice has both positives and negatives. One of the positives is non-destructive editing, which basically means the original image file remains intact no matter what you do to it within Lightroom environment (you can, however, delete the file entirely if you wish so). A side result is a very useful feature called Virtual Copies. In this Mastering Lightroom series article, I will explain how to use Virtual Copies. By the end of the tutorial you will learn how to copy, delete and compare them, as well as see different situations when creating a Virtual Copy can be very useful.
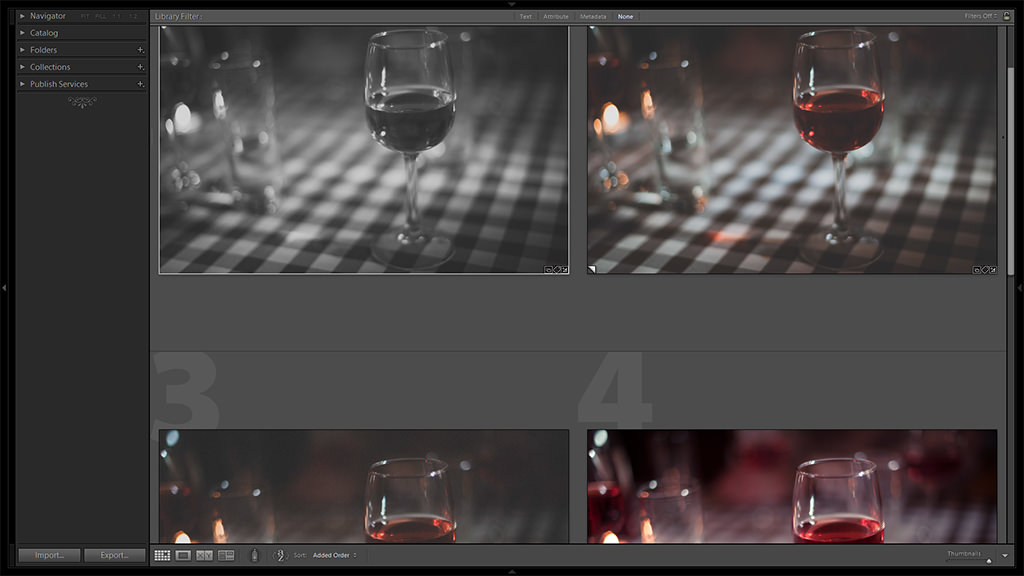
Table of Contents
1) What are Virtual Copies and Why Should I Use Them?
As the name suggests, Virtual Copies are copies of an image file created virtually. In other words, they are copies created within Lightroom environment only. Creating a Virtual Copy does not copy the source file physically. Lightroom only stores editing information within its catalog. Among other things, such an approach also saves disk space (you only need to store information about the adjustments, not both that and a copy of the RAW file itself).
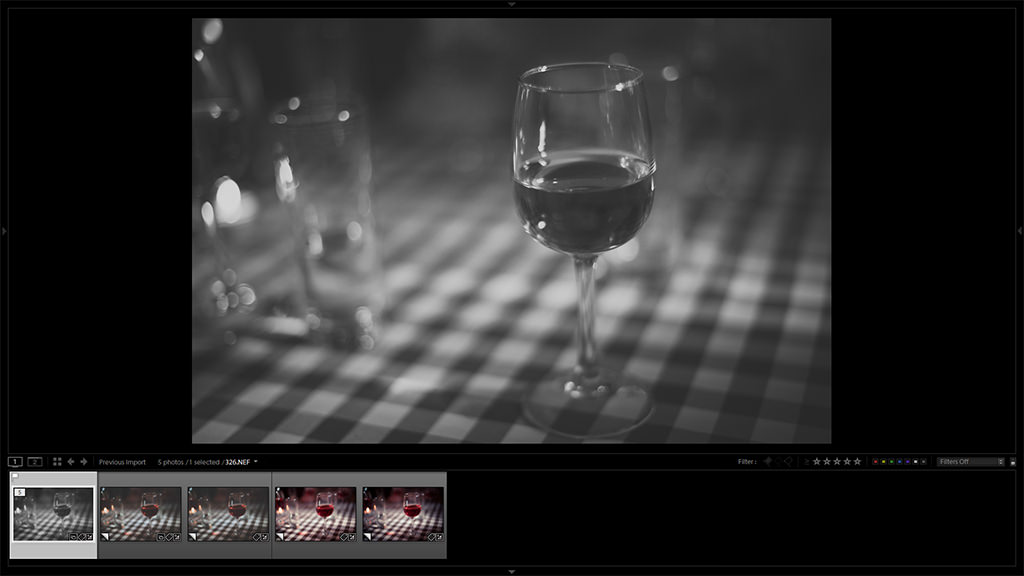
What Virtual Copies allow photographers to do is create several versions of a single photograph, post-process them differently and compare them or export both. Before taking a photograph, I often know whether I want it in color or B&W, but sometimes I prefer to see the end result before deciding which approach works best. In some cases, I will keep both images as I feel either processing adds something different to a photograph. These are just two of the cases when Virtual Copies are life-savers, because they are so easy to set up and compare. Take a look at the following image. In the Filmstrip, you will see 5 Virtual Copies of a single photograph, all processed differently:
I also prefer to use Virtual Copies while working on new presets for my images. As I’ve already mentioned in one of my previous Mastering Lightroom articles, presets allow one to process images much more quickly. In turn, Virtual Copies allow me to fine-tune settings before saving a preset much more efficiently. Why? Well, eyes tend to become less sensitive to color and tone the longer you work with photographs without taking a break. Thus, noticing subtle adjustment differences progressively becomes more difficult. One way to counter such an effect (to an extent) is to compare adjustments directly. So, Virtual Copies are useful when choosing between final photographs or particular adjustments.
For those of you interested in HDR photography, Virtual Copies allow you to export several images with different exposure settings made out of one RAW file simultaneously.
2) Using Virtual Copies
Now that we know what Virtual Copies are for and how they work, let’s see how to actually manage them in Lightroom 4.
2.1) Create a Single or Multiple Virtual Copies
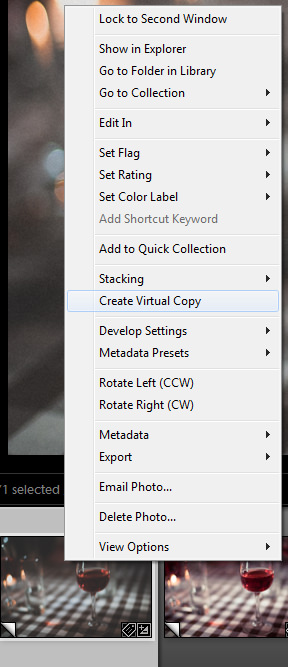 In order to create a Virtual Copy of a particular image, all you need to do is right-click on that image in the Filmstrip panel and choose “Create Virtual Copy” as shown in the screenshot. Alternatively, you can right-click on the enlarged photograph in the Develop and Library module or even the thumbnail in Library module. For those of you used to hotkeys, combination of Ctrl + ‘ does the same thing, only quicker. To create a second Virtual Copy, just repeat the action. You can create as many Copies as you like. The number of Copies created will be shown at the upper left corner of the image thumbnail in Library module or Filmstrip panel. Left-click the number to stack Virtual Copies for a more tidy view, left-click again to return to previous view.
Creating Virtual Copies of several different photographs is just as straightforward – just select the photographs you want to copy and repeat the above described action.
Now, let’s say you’ve already achieved a desired B&W look, and then one in color using a Virtual Copy of that same image. The one in color looks nice, and you are debating whether it’s good enough as an end result. At this stage, if you want to keep that color image, but also work from there and see if you can do better, creating a Virtual Copy of that color version and using it as a starting point makes sense. If you want to copy an existing Virtual Copy and then proceed from there with further adjustments, you should right-click on that particular image instead of the first one, which is called Master photograph, within the Filmstrip. This is especially useful when you want to be able to go back to an already achieved look quickly and revise your changes if something doesn’t go as you hoped. All you need to do is go to History Tab on the left-side Panel and choose the bottom-most entry. Your Virtual Copy will once more look like the image it was made of so that there’s no need to apply initial settings again on your own.
2.2) Removing Unnecessary Virtual Copies
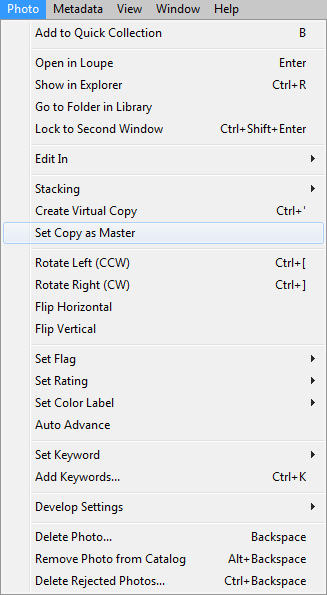 On one hand, deleting Copies is very simple. Just select the photograph you don’t need and hit “Delete” on your keyboard. Alternatively, you can right-click on it and choose corresponding option from the menu. There is one caveat, however. While you can remove Virtual Copies in basically any order, you can not remove Master photograph and keep the Copies. Master photograph is the original imported image. If you remove it, all Virtual Copies will be removed as well. You can change which Virtual Copy acts as Master photograph. Go to your Library module, select the Virtual Copy you want to set as Master, choose “Set Copy as Master” from the “Photo” drop-down menu. Upon removal of Master photograph, Lightroom will ask whether you want to remove it from Lightroom catalog only, or delete it altogether from your hard drive. Master photograph is always the first one and is marked “1 of #” (where # is the total number of that photograph’s Virtual Copies) in the upper left corner of a thumbnail image, as described in previous section.
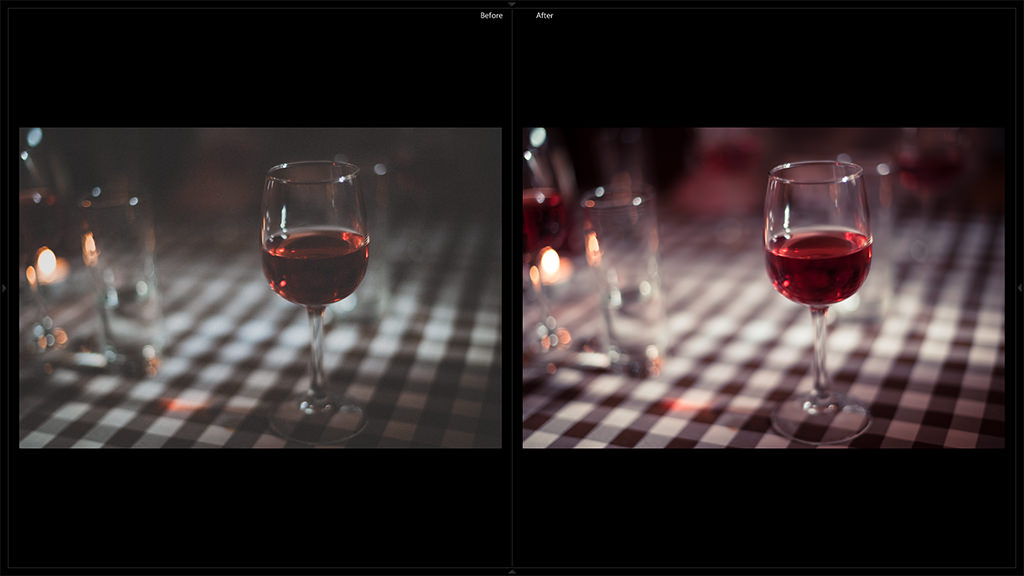
2.3) Compare Virtual Copies
If you created a Virtual Copy using an already edited image as a starting point (as, for example, in situations described in last paragraph of “1) Create a Single or Multiple Virtual Copies” section), pressing “Y” on your keyboard will engage “Before/After” view mode. On the left side you will see the image as it was when the Virtual Copy was created, be it an already processed photograph or a raw, unedited one. On the right side of the screen you will see current image with the latest adjustments. This is especially useful if you are not sure whether you liked the previous adjustment more. Pressing “Y” with Master photograph selected will show how an image looked like upon Import in comparison to how it looks with current adjustments.
Placing two images within the screen in “Before/After” view will, of course, make them smaller. If you’d prefer to keep maximum image size within your screen so as to better judge it, you may press “\” on your keyboard to switch between the two views.
Obviously, you can simply scroll through Virtual Copies and compare them, but such an approach is just not nearly as convenient in many situations.
3) Final Words
Creating Virtual Copies is one of the most flexible and easy ways of comparing and/or exporting different image looks within Lightroom. They are also highly useful when working on new presets, because you get to see subtle changes to the image and compare them without having to cancel out any settings. Not sure if you like a particular image in B&W or color? Make a Virtual Copy and compare. You may even find that both images work just as well and export them together. It is a quick and efficient way of working with several image versions with different adjustments within Lightroom environment and makes experimenting with different looks that much easier.
As a beginner to Lightroom, whenever I see a menu item/feature I want to find out about and understand, your page always comes up with the answers. This is going to be so useful understanding virtual copies when it comes around to experimenting with editing features and settings and comparing and understanding how they affect your images.
Thanks
How come every time I make a virtual copy, it makes the copy and then puts it at the beginning of the album? I want the copy to be right next to the original. What am I doing wrong?
Hello! Great source of info! I’ve got a question, though. Recently I had to restore an older catalog and now have VCs for around 2000 images recently edited. What I now want to do is set all the VCs as Masters (that is, the photos with the new, changed settings) and then get rid of the (now) copies (that is, the photos with the old settings LR automatically set as masters upon restoring). However, (and this is so absurd that it makes me wonder WHY Adobe hasn’t implemented this option by LR6) you apparently can’t set multiple copies as Masters… you have to do it one by one… Am I correct in this terrible discovery? If so, is there any other way? A workaround or plugin? Setting 2000 copies to Masters one by one will severely ruin my month! Thanks in advance for any help you can give me!
How do you move virtual copies along with the original to a new folder?
Great post – thanks for sharing!!
I have problems viewing my virtual copies…. I don’t see any number in the described corner (in Library).
I see some different versions in the filmstrip below, but I don’t think I see all my virtual copies of a certain image that I have been working with for a while = made several exports to which I would now like to find the right development settings for. Can you help me?
My toddler was playing with my keyboard and now every photo I edit in Lightroom 5 in the Develop screen makes an auto virtual copy. How do I get LR to stop making virtual copies of every photo I edit?
I have the same problem as KatWalsh, which you never really answered: when working within a collection, how can you make a virtual copy and have it available within the collection. (The copy is going in with the originals, but not into the collection.)
Larrych,
if you create the copy whilst in Collection, it will be part of that Collection. Otherwise you can always drag-and-drop it to wherever you like.
Your “Otherwise” case did not work for me. When I select and drag a copy to another folder, LightRoom moves the Master and all copies, while I only wanted to move one copy. Is there a workaround?
Hi! Great article on virtual copies, which I love. I’ve run into a problem though, I am trying to get more organized with my workflow and I started following Scott Kelby’s tips, one of which was to immediately go through the photos and either hit “p” for pick, or “x” for trash. Then select your picks and put them in a collection to make it easier and more organized. It has worked and I kind of love it. BUT… I went into the collection, picked all of the photos I wanted to make virtual copies of, and hit “make virtual copies” and it wouldn’t do it. ?? Any ideas? Is it because they are in a collection?
Thank you and happy holidays!
Kat,
how many images did you select to make Virtual Copies of?
I was thinking about a quick way to select (and export) a selection of virtual copies. There is an option “select virtual copies” but if you create 2 or more versions of each photograph, say 1 BW and 1 sepia, and keep the original file in color, how can you quicly select the BWs or sepias ? I do apply the LR blue color filter to BW virtual copies, then create sepia copies with the red LR color filter.. It does work but it feels quite DIY approach . Haven’t find anything smarter yet.. Do you have any ideas friends ? Bonjour de France
I never even knew this existed. Especially annoying as I often give clients both B&W and Colour copies and reprocess them all.
Haha! Thanks for sharing, will definitely be doing this in future!