In every Mastering Lightroom series article, I mention certain strengths of this, in my opinion, superb piece of software. Only every now and then do I find something small to complain about, as I have in my “How to Manage Presets” article. I strongly believe Lightroom offers more or less everything needed to process a well captured image and offers plenty of powerful yet simple photographic tools. However, as our readers have wisely noticed in the comments section of my “How to Use the Spot Removal Tool” article, on rare occasions these tools may not be powerful enough. Here comes another strength of my favorite photo processing application – flexibility. You can use other programs to do what Lightroom can’t, and then go back with the processed image to its familiar and simple environment. In this Mastering Lightroom series article, I will show you how to use external editors with examples provided using the most popular and capable you can buy – Adobe’s own Photoshop.

Table of Contents
1) What Software can be Used with Lightroom 4?
A good question, this. As of late, I’ve found my photography changed in such a way I rarely, if ever, need to use something other than Adobe Photoshop Lightroom 4, but if such an occasion does present itself, I know I have enough choice. First and foremost, Lightroom supports the all-powerful Photoshop, which itself is likely enough to satisfy your every need when editing images. If Photoshop alone is not enough, remember the huge library of amazing specialized plug-ins you can find for it, including Google’s very capable Nik Software and the (rightly) popular Topaz Labs products (which we have plans to review). In other words, you may use Photoshop and, through it, all the plug-ins you can find and purchase or download as freeware.
If you find such an approach tiresome, Lightroom also supports plenty of plug-ins directly, without the need to open your photograph in Photoshop first. Surprise surprise, among these plug-ins the awesome Nik Software products are also present, as are Topaz Labs, DxO, Alien Skin and Photomatix Pro for your HDR images. Need more? Follow this link to read what Adobe has to recommend, or simply Google “Lightroom Plug-ins”.
2) Any Restrictions?
In fact, yes. Not to say I am happy about them, but if you are a RAW shooter, certain restrictions are quite unavoidable. You see, RAW images are just that, raw. And, as such, they can not be edited and overwritten, yet remain raw at the same time – the only way is to save a copy in a different format with the adjustments. As I’ve mentioned in my “How to Use Virtual Copies” article, Lightroom only stores information about the changes you make to RAW and other file formats without actually modifying them, as it employs none-destructive editing. But it can only keep track of adjustments it supports. In other words, Lightroom has no way of describing what kind of noise reductions Nik’s Dfine applies, for example. Which means Nik’s plug-in has to apply it directly to the image (can also be explained the other way around). In order for a plug-in to affect an image directly, it must be of some other format than RAW, one that can be changed.
In short, if you want to edit your photograph with another piece of software, Lightroom will have to export it to that software as an editable file and then import it back again as TIFF, for example. After the image is imported, you lose some of the RAW file’s flexibility and adjusting certain settings, like white balance, becomes not as simple as with RAW files. This also means that, once your photograph is imported back into Lightroom with new adjustments, everything you’ve changed before – exposure, contrast, sharpening – all these settings will be shown at default values as if they were never changed. Basically, Lightroom imports the image as it is without keeping record of what was changed before you used the external editor, so you can’t reverse adjustments. For example, if you’ve already sharpened your photograph before tweaking it in Photoshop, once your back to Lightroom with it, any sharpening settings applied by you or Lightroom itself will provide additional sharpening to the one set before the image was edited in Photoshop.
Still, all is not lost and, if you make a mistake, anything can be easily fixed. Remember, the RAW file is where you left it with all the information about the changes you made. New file is imported as a copy and is displayed next to the original. You can always tweak it and send to an external editor again for further adjustment. In any case, think carefully which settings you want dealt with before you use the external editor. Most of the time, these will be RAW-specific adjustments, such as white balance and exposure. Consider sharpening and color adjustment, too. It will be most simple if you use external editors as the last step with all other changes already made in Lightroom beforehand.
A side note: in the case with Photoshop, Lightroom will export the image as RAW, because both Lightroom and Photoshop use Adobe Camera RAW and share settings. For this reason Lightroom can export adjustment description to Photoshop. However, once you make graphical changes, the image will have to go back to Lightroom saved to another file format, TIFF by default.
3) Using External Editors
With all the above mentioned caveats in mind, we can finally move to the actual instructions on how to use external editors. The process is quite simple and fast, so there aren’t all that many points to note.
Firstly, select the image you want to edit with Photoshop (other plug-ins are just as straightforward, so once you read these instructions, you shouldn’t have any problems whatsoever). You may also select several at the same time. Next, right-click on one of the images – it doesn’t matter where you do it, works either in Library or Develop module, both enlarged and thumbnail. Next, move to “Edit In”, where you will find several options presented to you. I will list them and comment on each further on. I don’t have any other photo editing applications or plug-ins installed apart from Photoshop. If you do, you may be presented with more choices in the menu. I will explain what to expect if you prefer to use other plug-ins.
3.1) Edit in Adobe Photoshop
Once you click on Edit in Adobe Photoshop, your image will be opened there for you to make further adjustments. Once you are done with whatever it was you wanted to do – using Clone Stamp Tool to dispose of larger, more complex object Lightroom’s Spot Removal Tool is unable to handle, for example – just close the window and save image when prompted. It will be automatically imported into Lightroom as TIFF. That’s it! You now have your original file with Lightroom adjustments only as well as the one you’ve just edited using Photoshop, all in one place.
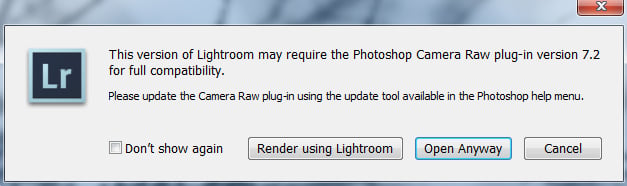
A side note: If your version of Photoshop uses an older Adobe Camera RAW plug-in than the one in Lightroom, a warning message may come up prompting you to update Camera RAW for Photoshop. You will have a choice of opening your photograph without updating, but in that case, you risk losing some of the changes you made in Lightroom, as Photoshop may not be able to understand them if they are not present in its Adobe Camera RAW version.
3.2) Edit using Other Software
If you want to use specialized plug-ins or other software that doesn’t have Adobe Camera RAW, you will be presented with the following window:
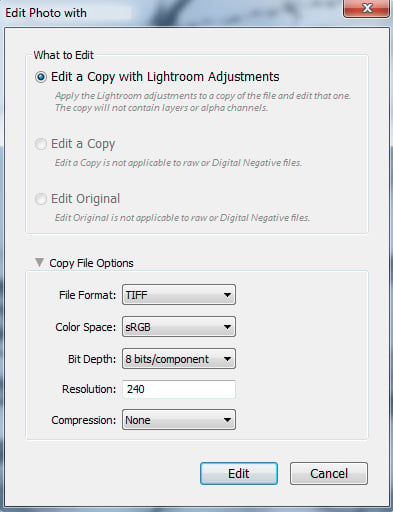
- Working with RAW filesIn the “What to Edit” section of “Edit Photo with” window, only the first option is available if you are working with RAW files. “Edit a Copy with Lightroom Adjustments” option will export a copy of the file with Lightroom adjustments applied. The next two options only work with other formats because they export files without Lightroom adjustments, and in the case of “Edit Original” option, the original image file would be overwritten. None of that can be done to RAW files, as they are not entirely images, rather – information which needs to be decoded to be seen as a photograph.
With “Edit a Copy with Lightroom Adjustments” option selected, you will have the chance to specify other settings, such as file format to be used, color space, bit depth and resolution (dpi). In the case of TIFF format, you will also be able to specify compression settings.
- Working with JPG, TIFF and other filesIf your photograph has not been imported into Lightroom as RAW, all three “What to Edit” options will be available. Select “Edit a Copy” to be presented with copy of the original file and no Lightroom adjustments visible. Useful if you want to compare results.
Select “Edit Original” if you want external editor to overwrite the original file within Lightroom. Be cautious as there is no way to reverse this action once you save your image and close the external editor you used.
3.3) Open as Smart Object in Photoshop
Select this option to open your photograph in Photoshop, only as Smart Object. Do note that most Photoshop functions will be unavailable until you Rasterize it.
3.4) Merge to Panorama in Photoshop
This option is only available if you select several photographs. Naturally, because several photographs are needed to stitch a panorama. Very useful if you prefer to edit your images through Lightroom. You will get your final panorama images imported back to Lightroom for further adjustment, so that you can apply Vignetting or any other settings. Selecting this option will open the usual Photomerge window within Photoshop with all the settings at the ready. Remember Brenizer method? Handy!

A side note: if you like panoramas, read our comprehensive “Panoramic Photography” tutorial.
3.5) Merge to HDR Pro in Photoshop
Also only available with several images selected. If you only have a single RAW image for your HDR and want to use Lightroom’s Exposure slider instead of several separate photographs, use virtual copies. Once this option is selected, you will be faced with the usual HDR Pro window in Photoshop for further work.
3.6) Open as Layers in Photoshop
The last of the options presented. This, again, is only available if you select several images. Want to do some overlaying? This option will open all the selected files into one project in Photoshop, and place them there as separate layers for you to work with.
4) Final Words
There you go, more or less all there is to know about how to use external editors with Lightroom 4. As powerful as it is, Lightroom doesn’t have all the functionality in the world, nor should it being about speed. Even if you do run into its limitations, however, Adobe has thought of a very simple way of eliminating them – by using other software. With plenty of high-quality plug-ins available, you are unlikely to ever be stuck with an unsolvable editing task when using Lightroom 4.
I gave lightroom 5 and use plugins for some editing. About a year ago, after using all the same software successfully for some time, I began to have a problem. After I edit in the plug in, get it the way I like it, and save it back to lightroom, the saved image is garish. It is highly saturated, has too much contrast and too much black. I have to adjust all of those each time. What is going on?
Great article. You answered 95% of the questions I had. Still, I am not clear on where the tiff file that is created is placed on one’s computer/hard drive. Can one specify where it is placed? I may want to delete the tiff at some point, or possibly backup some of the tiff files. I use LR4 and my files are saved in dng format.
thank you.
Joe,
TIFF files are saved at the exact same directory as the source RAW file (DNG, in your case). You can delete, rename or move them all within Lightroom, too.
thank you for the reply and clarification. take care.
You just saved my butt !! lol
Thank you xo
Lindsay,
you are most welcome :)
Can you comment/compare your experience and preference for dodge and burn tools in Photoshop CS5 vs. Lightroom 4? Are these similar in their capabilities? What do you give up moving from CS5 to Lightroom from this standpoint?
David,
I don’t use Photoshop but the Perfect Photo Suite from onOne Software which offers some tools very similar to PS (or PSE) so while I can’t describe all differences I hopefully can illustrate you the biggest advantage of LR:
– In LR you utilize the correction brush and change brightness in a given spot (or whatever the brush function allows you to) and you can *always* come back and change the amount of change by simply moving a slider (so, for example, you can dodge it stronger) or get rid of the applied brush because you decided that you don’t like it. This is possible because LR does not work on the pixels directly but always executes a list of commands that work on a fixed set of pixels (this command list is of course created by you when you move the brush as LR records where the brush is applied).
You can also always come back and easily deleting the applied brush and thus deleting the list of commands LR stored in the background.
– PS or other pixel-based image editors in fact change the image file. Even if you use layers – and you would have to use a lot of layers to be able to recreate this functionality. What people normally use is one layer for such changes and paint in various strenghts (=different brightness offsets) on them. Then they use more layers for more effects etc.
You can still get to the very same result using PS but what you can’t do easily is modifying your changes, for example changing the brightness on a given spot to another value. In LR you simply create several brightness brushes and you can set the brightness indivually for each one at any time. In PS you may have to redraw your layer mask with another brush if you haven’t done a layer for each individual brightness area (as far as I know you can change the opacity of each layer in PS so you may want to create a layer for each element…).
There is also a major disadvantages to the LR approach:
– LR gets slower and slower the more tools you use. This is because LR has to do everything again and again and every brush stroke (and all effects applied to them) costs time and there will be a point where LR gets sluggish, regardless how fast your computer is. Keep in mind that LR can also rotate and image, crop or magnify it (or portions of it thanks to the lens correction), apply sharpness and color corrections etc. and all of these effects have to be factored into the calculations.
Using the delete brush makes this even worse – so it’s better in LR to *only* paint what you want to modify with the correction brush and use the delete brush very sparingly! And don’t paint several times over the same spot as this will result in overdraw as LR doesn’t care what is already drawn – it just records your brush strokes!
– PS on the other hand lets you usually work faster with a brush because it changes the pixels in a bitmap (the original image or a layer) and then it’s done with it. When you then apply another effect on them the calculations run faster because these pixels are “fixed”.
PS is also pretty much consistent in the way of speed here. Do a hundred brightness brush strokes in LR and it gets slower, do them in PS and the last is as quick as the first. Obviously, PS is slower in other regards but that’s a different story.
Personally, I use LR as much as possible when working on images and only work locally on pixels in external applications if the changes are too massive or I can’t get the same effect in LR (using faster and more comfortable correction brushes for combining two or more images – or rather parts of them).
Obviously some external editors are very powerful so there are a lots of tools that you may employ but you should always consider if you may want to get back to work on an image.
Sometimes you may indeed only need LR and have all the freedom to step back. Working in an external editor, however, is always a bit like creating a unique image – similar to do a sculpture. When something is chipped and chiseled away it can’t be easily reattached, can’t it? ;-)
One final advice: There are hundreds of videos on Youtube that show how to work with external editors in LR and what to use them for. These are often very informative.
However, sometimes they show that the instruction hasn’t fully grasped the concept of LR: I have often seen an instruction using the same correction (or delete) brush to paint several times on the same spot – which results in massive overdraw with no advantages whatsoever. Then he excuses the speed of his machine or is downright complaining about the slugglishness of LR – just because he doesn’t fully understand how LR works. ;-)
Hope that helps you decide what tool is better suited to your needs!
I really appreciate all the thoughts and insight. It helps clarify a number of questions I had. Like anything, there are trade-offs. ;-) But this helps me think through the best choices for me. I see the value of both LR and Photoshop. But as an enthusiast I’m less inclined to spend on both programs going forward. I’ll check out Perfect Photo Suite as well. Thanks!
Hi,
As a professional photography I rely on Lightroom for 95% of my retouches, with the other 5% being absolutely essential to my workflow as well. They are activated in different ways though:
– Photoshop (cmd+E to open the file in Photoshop)
– NikSoft HDR (select multiple files -> right click Export -> custom field Edit in HDR Pro)
– PTGUI for stitching panoramic images (select multiple files -> convert to TIFF, select TIFF files right click Edit In -> Edit in PTGUI)
– Portrait professional (select file -> right click Edit In -> Edit in Portrait professional). Don’t tell people I use this! ;)
How do you like Protrait Professional? I am thinking about purchasing it.
Thanks!
Portrait professional saves a lot of Photoshop time. It has good controls and works especially well with faces. I usually edit a portrait in around 15 minutes. I usually wind back the master control once I am finished so that the character of the face is retained. The feedback is often ‘that is the best photo anyone has ever taken of me’. Well worth it, just don’ t overdo the glamourisation aspect.
I really liked PP as well. I used it for about a year, but I had the exact opposite experience with it as Martin. I actually found that the more I used it, the more “Photoshop stupid” I became. The only reason why I quit using it was basically I was forgetting everything I’ve learned about PS in the past 15 years. I wanted to get back in touch with my creativity and technical expertise, rather than have someone else do it for me. Besides, I was neglecting my Wacom tablet for retouches. ;-)
Thanks for the artikel , Roman!
I was wondering how you simply view photos from the Lightroom Catalogue? Say like I want to present the shots of my last holiday all at once in fullscreen mode (wich is not really available in LR, right?) with some sort of lightwight picture viewer. Do I have to export the whole bunch? If so I would not be able to do this ad hoc as exporting like 300 pictures just takes a while…
Any thoughts?
David,
Lightroom *does* have a full screen mode – but not in the “work” modules like library and development.
There you can only get a nearly full screen mode with hitting the F-key to get rid of the window elements and drop down menu and hitting “F5” to “F9” to get rid of the LR menus at the four sides.
To get rid of the rest of the user interface hit the L-key twice to blacken them completely. This results in a nearly full screen image and you can still manouevre normally in LR to get to the next image etc.
However, you can indeed present your images in full screen mode in the slideshow module!
Just follow these steps:
1 – Sort your images like you want to present them (LR of course lets you do that exactly like you want with attributes, text and metadata)
2 – Go over into the slideshow module
3 – Set the slideshow preferences to maximize screen size (reduce the border to 0%, no contour, overlays at will, background color = black) and how you want to present it (ending screen, the time span for each photo and no repeats, perhaps). You usually only change these settings once so in the future you can omit this step. The next time your only work is sorting your images.
4 – Hit play (or how the button in the lower right is called in the English version of LR – sorry, but I have the German localized version). Remember, that you can progress through your images manually, too, so you are not confined to the automatic slideshow.
This is how I show a large group of images on the same computer. In fact I only export to work on them in external applications or when I want to transfer them to another computer/device.
Hope that helps!
Hi Calibrator,
thanks for pointing this out! It seems like I missed that model completely till now. I gonna give it a spin than :)
Thanks again and cheers,
David
I am trialling Lightroom at the moment. I can see its appeal to PC users. I use external editors with Aperture on the iMac. They are useful. I will continue to evaluate Lightroom because you push it so heavily. It has some good features but is more expensive than it should be given the competition. When the free trial runs out I will consider my options. So far it seems a good basic RAW editor.
Adobe’s attitude to updates when a new camera comes out is not good. My CS 5 will not import NEF files from my D800, it requires me to use the cumbersome Camera Raw process which I detest.. The aim is surely to force me to upgrade more quickly than I would otherwise do. I am trialling Lightroom to see if it is an alternative route. At least Apple immediately offered support for my D800. Aperture seems more powerful for the money but it is only available for Mac.
Hopefully Adobe will drop the price of Lightroom to match Aperture so that PC users will have access to an equivalent program for the same price. I also hope they change their file import and camera support update policy. Mac owners should keep these two things in mind when looking for image management and RAW editing software.
I agree. I am a Mac guy myself(mac pro) and I find that many times for my photo editing,I have to use CS5,Lightroom 4 and aperture 3 to get the final result I am looking for. CS5 is great for changing backgrounds and I love their patch tool. Lightroom 4 is great for basic editing. And,Aperture 3 beats all of them with their fine and many useful hand brushes. If you know what for and how to use each program, you get the best of all worlds with those 3 programs and can do any photo you want to with excellent results. All 3 combined have the complete kit that anyone would ever need.
Lightroom also needs MUCH better book design tools. The one in Apertures is brilliant. Adobe should take a look at it. Most of Lightroom obviously owes a lot to Aperture anyway.
The point of the article is that being able to use specific features of other programs via an external editor is well worth the effort. I have not done this in Lightroom yet, but I will now try it. I have always found the ability to use photoshop as an external editor and Noise Ninja as a plug in, very handy. Good to see Lightroom has external editing capabilities too.
Like you I am not interested in which program is best, just which set of features can help me best.