Lightroom is a very flexible image management and processing software, but apart from powerful tools and settings to enhance your photographs, it also offers features that help you during the actual process of photographing. Have you ever felt that, even with the constant resolution and physical size growth, camera LCD screens just aren’t big enough for comfortable image viewing in the field? Luckily, Lightroom offers a way to import photographs and review them as you shoot. This function, called Tethered Capture, is especially useful for studio photographers who don’t tend to move about too much. It can be equally useful for landscape photographers, too. In this Mastering Lightroom series article, I will explain how to tether your camera. This allows you to import images directly into the Lightroom 4 environment for quick and comfortable revision as you photograph.

Table of Contents
1) When Should I Use It?
The best time to use Tethered Capture is when working in a less active environment. For example, studio and landscape photographers, who tend to bring their laptop computers along on a shoot, will find it to be very simple and fuss-less. However, wedding photographers, who tend to move all the time and change their shooting position, would find Tethered Capture to be annoying at the very least. Who’d want to photograph a wedding with a USB cable strapped to the camera constantly, and through it, a laptop? You’d need an assistant just to have that laptop lugged around behind you! In many other situations, Tethered Capture can make reviewing images that much more pleasant.
If you have your Develop Settings set accordingly, you may also import images with your favorite settings already applied. In other words, you get the final image as you shoot, save for exposure and other minor tweaks, all within Lightroom without the need to import photographs manually after your photography session.
2) How do I Tether my Camera?
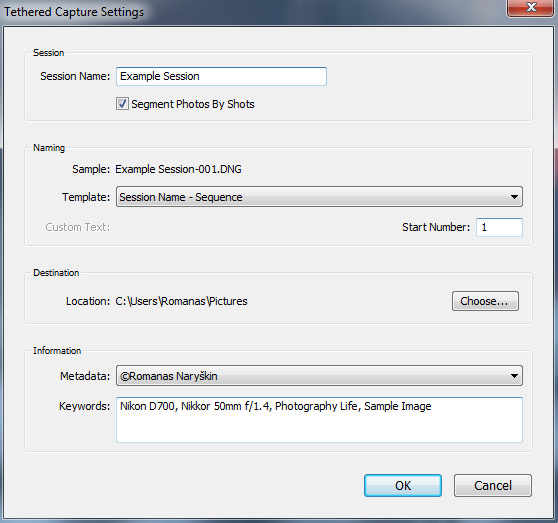 First and foremost, you will need a USB cable to connect your camera to your computer. Plug it into both devices and turn on your camera. Now, open desired Lightroom catalog in which you want to import your photographs as you capture them, and choose “Start Tethered Capture…” from File->Tethered Capture menu. A “Tethered Capture Settings” window will pop-up. Let’s go through the given settings one by one.
A side note: if, once you’re done with all settings listed bellow, your camera is undetected by Lightroom, try connecting it (turning your DSLR on) after you’re done with the settings, not before as instructed previously.
2.1) Session Settings
Enter the name of your session in Session Name field. Keep it brief, but easily understandable. Further on, you will have the chance to use session name as image file name as well. The “Segment Photos by Shots” option allows you to group similar images into separate subfolders as you photograph (for example, by model or pose). The first subfolder naming option appears once you click “OK” in “Tethered Capture Settings” window. To create a new subfolder (or Shot, as Adobe names its grouping), press Ctrl+Shift+T (Windows) or Command+Shift+T (Mac OS) during Tethered Capture session.
2.2) Naming Settings
Choose from different naming presets, or create your own if you like. This naming will be applied to RAW files as they are saved to your computer during your tethered shooting session.
2.3) Destination
Choose where you want your images saved as you photograph.
2.4) Information Settings
These settings will help you find your images within Lightroom. Specify keywords depending on the shoot and, for example, gear used, as seen in the image above. Specify Metadata preset to be used if you have any saved. You can choose to create such a preset from the drop-down menu.
3) Tethered Capture Window Controls
Once you are done with all the settings in Tethered Capture Settings window, Lightroom will proceed with the session. A Tethered Capture window will appear on the screen. It’s quite small and discreet and doesn’t detract attention from the images. If you would like to hide the window, press Ctrl+T (Windows) or Command+T (Mac OS). Use the same keys to bring it back up again (I sometimes hide it accidentally). In any case, you can now start photographing and images will appear on screen once imported (it may take a few seconds sometimes). You can take images by using either shutter release button – one found on your camera or in Tethered Capture window. Should you want to revise Session Settings again, all you need to do is select Settings button in the lower-right corner of the Tethered Capture window, just below the close button.
 During the process of your Tethered Capture, you can pre-apply any desired Lightroom preset (read our “How to Manage Presets” article). In other words, save for certain exposure and WB tweaks that may be necessary, you can evaluate captured images in their final look.
You will often notice that certain settings may not be included in a specific preset. For example, I don’t include sharpening in my presets, but rather have a separate one for that adjustment. It’s a pity one can’t select several presets to be used on import. Even so, using Develop Settings pop-up menu allows you to see near-finished image as you photograph. In order to assign such a preset, choose Develop Settings and select the desired preset as shown in screenshot.
As you photograph, Lightroom will display the latest image enlarged. If you prefer to select which image is displayed yourself and don’t want Lightroom to jump to last image taken, go to File->Tethered Capture and deselect Auto Advance Selection from the options list. Choose Stop Tethered Capture to end session. Alternatively, you can simply close the Tethered Capture window.
4) Things to Consider
Tethered Capture is a convenient feature, but with a small caveat. Not all cameras can be Tethered through Lightroom 4. The three supported manufacturers so far are Canon, Nikon and Leica (with their medium format S2). Here is the full list of supported Canon and Nikon cameras (according to Adobe help website):
4.1) Supported Canon DSLRs
- EOS 5D Mark II
- EOS 1D Mark III
- EOS 1Ds Mark III
- EOS 1D Mark IV
- EOS 5D Mark III * (read our review)
- EOS 550D (Digital RebelT2i/EOS Kiss X4 Digital)
- EOS 500D (Rebel T1I(EOS /Kiss X3 Digital)
- EOS 450D (Rebel XSI/EOS Kiss X2)
- EOS 1000D (Rebel XS/EOS Kiss F)
- EOS 600D (Rebel T3I/EOS Kiss X5)
- EOS 1100D (Rebel T3/EOS Kiss X50)
- EOS 7D
- EOS 40D
- EOS 50D *
- EOS 60D *
- EOS 1D X *
As you can see, four of Canon DSLRs – the 50D, 60D, 5D MkIII and 1D X – have additional notes to them.
- If you are a Canon 50D owner, be careful not to extract or insert CF card during Tethered Capture session. In such a case, images may not be imported into your computer. If you do need to swap CF card, start a new session.
- For the rest of the cameras – the 60D, 5D Mark III and 1D X – it is necessary to have a card inserted during Tethered Capture for it to work properly. Other cameras can import images directly to your computer without the need for a card to be in your camera.
We can only guess if Adobe is working on eliminating these inconveniences.
4.2) Supported Nikon DSLRs
- D3
- D3s (read our review)
- D3x *
- D4
- D90 *
- D300
- D300s
- D700 (read our review)
- D800 (read our review)
- D800E
- D5000 *
- D7000 (read our review)
There are additional notes to Nikon cameras.
- When using shutter trigger button within Lightroom Tethered Capture environment, the captured image must be saved to computer before next exposure can be made. When using shutter button on the camera itself, there are no such limitations.
- Images are not saved to CF card, only to the computer.
- You can Tether only one Nikon camera at a given time.
- Windows 7, Windows Vista and Mac OS X 10.6 are not officially supported for Nikon D3x, D90 and D5000. They may still work, but are not guaranteed to.
Adobe is likely working on officially supporting other Nikon cameras, too, such as the D600 and D5200.
It seems strange that there is no way for the image also to be kept on at least one memory card on the camera. Why does it have to skip to Lightroom only, leaving no backup on camera? Surprised there isn’t a way to do that still.
I have a cannon 6D and using lightroom to tether capture. when i go to file>tethered capture setup in settings then hit ok the app disappears as if i never logged on. It doesn’t go to the screen where lightroom recognizes my camera. please help!
I would like to know if there is Live View in LightRoom using a Canon? It seems like it should be quit simple these days? lol If it’s doable, how? Thank you in advance for any help. I can’t believe I have to ask, should be a no brainier! lol
Thanks
One additional thing I forgot to add….
If you are tethering a Nikon camera, Lightroom will save your pictures straight to the computer ignoring your cards. It will however “check” your cards so if you have a ton of pictures on them everything slows way down leading you to think something is wrong. It’s best to either make sure your cards are empty or just remove them completely while tethered.
I believe this doesn’t happen with Canon. I think with Canon, Lightroom will save to the computer and your cards.
Make sure to update Lightroom 6. It finally recognized my Nikon D750 once I updated.
It works fine with a couple of quirks:
1. No Live View. Very annoying. Having a live view for product photography would be great and I hope they add this feature at some point.
2. The shutter trigger in Lightroom ignores any timer delays set in the camera. Need to use camera shutter trigger to use timer delays.
Other than that, Lightroom works fine for tethering. Saved me from paying $300 for Capture One!
HI, my Lightroom does not have “Tether and capture” option….I’m using the latest CC version and my camera is 100% connected.
Thanks
I had the same problem! I downloaded de Lightroom Classic version and it worked. However, it doesnt has a live view.
Very helpful article. I had a question about basic workflow as I’m still a newbie to this area of shooting. Typically, I convert my canon raw files to dng (I heard this was a smart thing to do?) on import from the compact flash card. With tethering, the session automatically becomes part of your library. Is it common practice to just have a section of your library with the tethered sessions as is or do people prefer to officially import the completed session’s photos into the library like you do from the card? I don’t believe Lightroom allows you to do this as it already thinks the photos are imported. I’m used to seeing my photos organized in folders by date so it’s new for me to have another section of my library with the sessions. I imagine I could convert them to dng once the session is complete. Again, I apologize if this is really basic stuff. But, hopefully you can enlighten me as your blog is an extremely helpful source of information. Thank you!
I HAVE A 5D MARK1 . LIGHTROOM IS NOT RECOGNIZING THIS CAMERA FOR TEATHERING. IS THERE A WAY TO GET THIS CANON 5D MARK1 TO TEATHER TO LIGHTROOM?
As of today, Pentax K3 is still not supported by Adobe Lightroom and most of other software for tethering. I wonder why, Ricoh also did not release any software that would do this, even Camera Utility 5 does not support this option. Guess only option for now is to use FluCard…
I am trying ti use my Canon 70D with dslrBooth, but not able to connect it through HDMI Out > HDMI cable or through USB Cable. In above article Canon 70D is not in list. So does it mean it is not supporting tether feature? If anybody can help me for this … it will be great.
The Canon EOS 70D is supported and requires at least Lightroom v.6.0.
Also, I think you must use the USB cable. I would guess that the HDMI cable is for playback only.