One of the biggest advantages Lightroom offers over some other RAW converters, such as Camera RAW found in Adobe Photoshop environment, is speed and flexibility while working with tens, hundreds and even thousands of photographs at a time. However, it wouldn’t be quite as fast if we didn’t have a way of applying a set of our own settings to any amount of images we choose with a single click. For this, Photoshop offers us Actions and Batch processing. Lightroom, in turn, gives us Presets.
In this tutorial, I will show you how to manage an ever-increasing amount of presets. You will learn how to save new presets and remove those you don’t need anymore, how to export, import and organize them into different folders for simpler browsing. You will also learn how to update existing presets with new settings and how to remove certain settings so that they are not affected by presets.
Table of Contents
1) What Are Presets and Why Would One Use Them?
Changing settings in Lightroom is very easy and intuitive. Adobe designed it with a very thought-out, photographer oriented workflow, suitable for most professionals and amateurs alike, and it offers an uncluttered, none-distracting interface. However, with such a huge amount of settings available (and, as a consequence, an immense amount of different looks you can achieve to your photographs), it would be very hard to memorize your favorite setups so that you could use them again and again. That is what we have presets for. Basically, presets are files that contain specific setting information you applied to a photograph. You can save a preset that will set the Temperature of the photograph you have selected to, say, 7300K degrees, or adjust Exposure to +1,15. While these would be very basic presets containing only one adjustment, you can save a preset that will change Temperature, Highlights, Blacks, Vibrance, Tone Curve, Color Luminance and add Vignetting and Grain to your image. This way, you can achieve a particular look with just one mouse click, and save lots of time you could then spend with your family or photographing.
Without presets, it’s impossible to experience all Lightroom has to offer, so it’s vital you learn how to use and manage them.
2) Download, Buy or Save Your Own
With Lightroom being so popular, Internet has been flooding with various user-made presets available for download. There are many free presets and even preset packs, and if you spend a little time searching, you may be surprised at what you find – there are plenty of great looks out there. For those of you interested in more professional b&w and color looks, there are also plenty pro-made presets for Lightroom to buy – usually they are sold in packs and prices may range from several dollars to well over a hundred.
Whether it’s expensive or not, depends on your personal priorities. Personally I think that, if you’re not capable of creating a preset you’d be satisfied with yourself (there’s nothing wrong with that – creating presets involves as much technical knowledge as creativity, and not all people want to waste time on any of the two), buying such a pack even for a hundred dollars can be an amazing investment for your business and save you a lot of post-processing time. On the other hand, you need to be very careful when you purchase such presets, as you may end up with something worse than you originally thought. It’s best if you look through sample images posted by the author very closely and see if you really like the look. Also, make sure they are compatible with the version of Lightroom you own, as Lightroom 3 and Lightroom 4 can differ greatly in their processing.
Myself, I tend to spend quite a bit of time working on my own presets, those I use for both my personal work and wedding business. Many of them are very advanced and require an immense amount of time and effort to get right. I’ve seen some expensive preset packs I am thinking of purchasing, too, as at this time I have no idea how to achieve that look on my own.
3) Which Settings Can You Save?
Any setting can be saved in a preset, with any value Lightroom supports. Here is the full list:
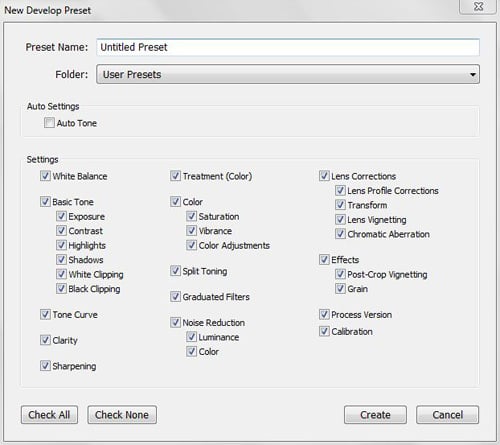
- Auto Tone – when contained within a preset, Lightroom will use Auto Tone function to each separate photograph you apply a preset on and adjust Exposure, Contrast, Highlights, Shadows, Whites and Blacks automatically
- White Balance – a preset will change both Temperature and Tint of your image
- Basic Tone – here, Lightroom will let you choose if a preset should alter Exposure, Contrast, Highlights, Shadows, White Clipping, Black Clipping or all of these. If a particular setting is set to 0 when you save a preset and you include it in the list of affected settings (in other words, you haven’t adjusted it), and you apply that preset to an already edited photograph with that setting having a different value applied, the preset will overwrite it. For example, if you have a preset saved with Exposure value set at 0,00, and you apply that preset on an image with -0,85 adjusted Exposure value, the final image will have its Exposure at 0,00, as that is what the preset is set to do
- Tone Curve – a preset will adjust the Tone Curve to a saved value
- Clarity – a preset will adjust the Clarity slider within the Basic Tab to a saved value
- Sharpening – a preset will adjust the Sharpness slider within the Basic Tab to a saved value
- Treatment (Color) – if such adjustment is saved, a preset will set the Treatment of your photograph to Color or Black&White accordingly
- Color – Lightroom lets you choose if a preset should adjust Saturation or Vibrance found in the Basic Tab, or Color Adjustments found in HSL/Color/B&W Tab. You may have it alter all of the mentioned settings if you choose so
- Split Toning – here, a preset will apply or, if checked but set to 0 values, remove any custom image toning
- Graduated Filters – here you choose whether a preset should contain and apply information about Graduated Filters to your photograph. If the option is checked, but the preset contains no Graduated Filters, it will not remove any filters applied to the image directly before the preset was used. However, if there are Graduated Filter settings in the preset and a different Graduated Filter has been applied to a particular photograph before the preset is used, additional filter will be removed and overwritten with one saved in the preset
- Noise Reduction – if checked, a preset will apply either Luminance or Color noise reduction, or both. If left at default values and checked when saving the preset, it will overwrite any settings you may have made to the image directly
- Lens Corrections – Lightroom lets you choose if a preset should contain information about Lens Profile Corrections, Transform, Lens Vignetting, Chromatic Aberration setting, or all of these, so that you can correct lens imperfections with a single click. You will need a different preset for each lens you use, however
- Effects – if checked, a preset will apply Vignetting or Grain settings to your photograph, or both
- Process Version – Lightroom has different Process Versions. This check box lets you choose if a preset should apply a specific Process Version to your image, or, when not checked, if it should leave the one that was set by default or by you before applying the preset (Lightroom 4 uses 2012 Process by default, but can be used with 2010 and 2003; Lightroom 3 has 2010 Process set by default and does not support 2012)
- Calibration – when checked, a preset will change the Profile within Calibration Tab to a chosen setting; if left unchecked, default Adobe Standard profile will be used, unless changed by you before applying the preset
4) Save a New Preset or Remove It
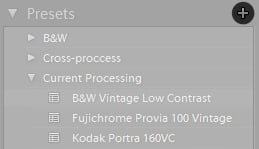
In order to save a preset, you first need to apply desired settings to a particular image. Memorize the settings you want your new preset to affect, or at least memorize those you don’t – if you plan to stack presets on top of each other, you don’t want them to discard one another by affecting the same settings or applying zero values to them. Once you have the changes applied to your photograph, click “Create New Preset” button found at the very top of Presets Tab on the left side of the screen (“+” symbol). Name your preset. Try to keep it short, yet easily recognizable, as your preset library will likely grow with time and you don’t want to get too confused. Then, choose a Folder you want to put your preset in and check which settings it is supposed to affect. Click “Create” and you’re done!
Removing a preset is an even easier task – just right-click on it and choose “Delete” from the menu.
5) Edit Your Favorite Presets
Editing existing presets is as simple as creating new ones. All you need to do is use the preset you want to change on a photograph and adjust settings the way you want them to be affected by the updated preset. You may skip this step and start from scratch, too. Either way, once you have all the settings, like Temperature, Tone Curve and Effects, the way you want them to be, right-click on a preset you want to edit and choose “Update with Current Settings”. Then, check relative settings and click “Update”. That’s it!
6) Import/Export
Did you recently download or buy a set of presets? Or maybe you want to back up your library? Importing/exporting presets is a great way to add more creative looks or share them with your colleagues and friends, and is very simple.
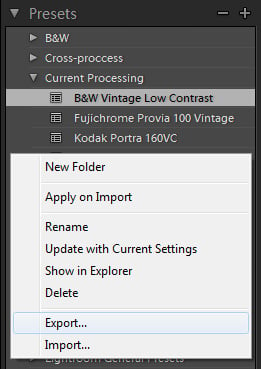
- Import – to import a single or multiple presets into your Lightroom environment, you first need to right-click (Windows) anywhere in the Presets Tab. A menu will appear – choose “Import…” option, which should be at the very bottom of it. “Import Presets” window will pop up – find presets you want to import (normally *.lrtemplate files), select them and click “Open”. Done! You should now find the imported preset/s somewhere in the Presets Tab. You may find Lightroom has already applied the imported presets to your selected photograph on import – don’t worry if it does, just click “Reset” on the bottom of the right-hand panel to get back to where you were if you don’t want that preset applied yet.
- Export – exporting presets is just as simple as importing them into Lightroom. To export a preset, first right-click (Windows) on it and choose “Export…” in the menu, which should be second option from the bottom. Choose where you want to export your preset and name it, then click “Save” and you are done! A *.lrtemplate preset file should be easily found at the destination you chose.
You can’t export multiple presets at a time in Lightroom – if that is what you want to do, you’ll have to find where they are located and manually copy them to a new location. By default, they should be located (Windows 7) in C:\Users\your_user_name\AppData\Roaming\Adobe\Lightroom\Develop Presets. You may need to enable “Show hidden files, folders, and drives” in Folder Options menu, “View” tab.
7) Organize them Into Folders
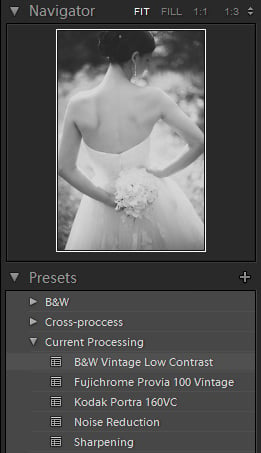
If you’ve ever found yourself getting lost among your photographs, do note same thing could happen with the amount of presets you are going to have to handle. In time, they may add up to quite a collection. Some of your presets will be used more often than others, and some will not be used at all, eventually. Whatever the case is, it helps keeping everything neat and tidy so that you don’t spend precious time searching for a particular look among tens or even hundreds of different presets. Lightroom developers thought about such an issue and, rather ingeniously, gave us the choice of different folders.
In order to create a folder, right-click anywhere in the Presets Tab and choose, you guessed it, “New Folder”. Name it! That’s pretty much all you need to do before simply dragging presets with your mouse cursor into corresponding folders. Be sure to keep the names of folders specific and logical. For example, create a folder called “B&W” for your black and white looks, “Effects” for Vignetting and Grain settings, and “Detail” for noise reduction and sharpening presets. I’ve also found that if there are several presets you use most often – say, a sharpness preset, vignetting preset, tone curve preset, black&white look preset and color look preset, it saves some time and effort to put all of them together into a single folder called, say, “Current Post” or “Weddings”. This way, you save yourself unnecessary mouse clicking which, when working with a large amount of photographs, can become irritating.
8) Can You Stack/Use Several Presets at One Time?
In short, yes, you can do that. Moreover, to make them even more versatile, you should. However, when saving/updating a preset, it is best you make sure unnecessary check-boxes are not checked – you don’t want different presets overwriting irrelevant settings. For example, if you are creating a sharpening preset, the only relative options you really need to tick are those concerning sharpness. If you also tick noise reduction settings, for example, but not set the preset to apply custom noise reduction and only intend it to apply custom sharpening values, such a preset will discard any changes you may have made to noise reduction sliders and return them to default values, or overwrite the effect of a special noise reduction preset you may have used before the sharpening preset.
Here’s another example – lets say you have a custom vignetting preset you just saved with the relative Post-Crop Vignetting checked. Lets also say that, while saving the preset, you checked Exposure, but left the value at 0,00 as your photograph was well exposed. Now you want to apply this preset to a different photograph, one that needs Exposure adjustment of +0,65. After adjusting the Exposure slider, you want to add Vignetting and use the preset you just saved. Remember having left the Exposure setting check-box marked? Instead of just applying Post-Crop Vignetting settings to your image you’ve also just set the Exposure slider back to value 0,00 which means you end up with an underexposed image, which, in turn, means you need to adjust the exposure again. You lose time, and that’s not what Lightroom is for.
9) Are Lightroom 3 and 4 Presets Compatible?
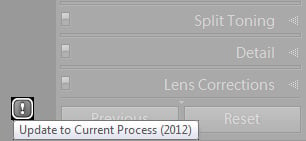
Many, after upgrading from Lightroom 3 to 4, faced a problem of preset compatibility. While you can safely use Lightroom 3 presets in Lightroom 4, doing so will change the Process Version to 2010 effectively forcing your Lightroom to act as version 3 instead of 4, which runs Process Version 2012 by default. But not all is lost – Lightroom will then offer you to update your 2010 processing of that photograph to current 2012. In order to do that, you must click on a “!” symbol at the bottom right side of the screen, which will appear right after you use Lightroom 3 preset. “Update Process Version” window will pop-up and ask you if you want to update just the one photograph, all the Filmstrip photos or Cancel. Lightroom will also warn you that the resulting image will not be identical, but I’ve found that in many cases, it can actually look a little better. In any case it’s not too difficult to figure out a way to make them look the same, if that is your choice.
Once you’ve updated your photograph back to Process 2012 and made whatever changes you thought were needed, you should proceed to updating your Lightroom 3 preset with new settings.
10) Are There Any Flaws in Presets?
As versatile as they are, I’ve found that not everything with presets is as well thought out as it could be, with one particular missing feature, in my experience, being also extremely important. Lets call it Relative Value.
Lightroom presets let you save an absolute value and apply it to your images indifferently of what value has been set before. In other words, you can not save a preset that will adjust the Temperature of your image to a warmer color, by, say, adding +500K degrees on top of what the technically correct value is captured by your camera, they only let you set an absolute value to replace whatever Temperature has been set before.
Lets imagine you have two different images you need to process – one taken outdoors, and one taken indoors. Both are captured at a technically correct Temperature by your DSLR – at, say, 5300K and 3200K degrees respectfully, but you would like them to have a slightly warmer color cast. With a Relative Value Preset, you would be able to adjust the value by any amount (or percentage) – again, lets say by +500K degrees to keep it simple – with one click, so the preset would change the value of the indoors image to 3700K and the outdoors image to 5800K degrees. Right now, without such a feature, you’re stuck at changing the Temperature separately for each image by yourself, and that’s fine if you only have two images to process. What if you have twelve hundred with different Temperature values? Saving a preset with an absolute value (of, say, 4550K) would make the outdoors image too cool, and indoors image too warm.
That is the main criticism I have towards Lightroom presets, otherwise they are an extremely versatile and time-saving feature. Hopefully Adobe will implement something similar to Relative Value Presets in upcoming versions of Lightroom!
Any chance of updating this information now that Lightroom Classic 2019 has changed everything to do with presets, such as removing the ability to export them?
Not a complaint but a requst as there doesn’t seem to be any information about the new processes.
Great info – thank you!! And I completely agree about the temperature flaw in presets. It doesn’t seem to be that way in the app, just the desktop version – which stinks, because it doesn’t seem as though we can export presets from the app. *sigh*
Thank you so much for this!! Really helped me out, awesome job
I don’t think the preset export settings you’ve mentioned are available anymore
Hi Romanas,
there is one thing I am not sure about when it comes to Presets in Lightroom. Since not all photos are taken in same lighting conditions, would it make sense to first edit all photos a bit to get them to the same perfect condition and only then apply Presets? Because if the preset is applied to raw images, it will just do it’s magic, eg. increase or decrease some values, but if the starting levels were not the same in all photos, you will end up with very different feel in these images. At least that’s what I thought.
Could you please tell me if my logic is right and how I should apply the Presets in the right way?
Thank you very much.
Thanks for this! Only thing is I am having a problem exporting my presets out of Lightroom. I am trying to export to save to my desktop, but I don’t have the “export” tab when I right click. Any ideas?
Is it possible to put folders of presets inside other folders? If not, can it possibly be done thru Windows Explorer at the file location of the actual presets?
with so many settings to remember from Photoshop, AfterEffects, Premiere, Audition…wow…nice that you put this info up…thank you..
Not the nice window with the checkboxes, but you can see the interior as follows:
(Goes wit user presets or imported ones.)
– rightclick the preset
– choose show in finder (mac) / explorer (windows)
– open it there in textedit (mac) / notepad (windows)
Then you see something like:
s = {
internalName = “1. Full Auto”,
title = “1. Full Auto (J)”,
type = “Develop”,
value = {
settings = {
AutoBrightness = false,
AutoContrast = false,
AutoExposure = false,
AutoShadows = false,
AutoTone = true,
ChromaticAberrationB = 0,
ChromaticAberrationR = 0,
Clarity = 85,
ColorNoiseReduction = 65,
ConvertToGrayscale = false,
Defringe = 0,
EnableColorAdjustments = false,
EnableDetail = true,
EnableGrayscaleMix = true,
EnableLensCorrections = true,
EnableSplitToning = true,
HueAdjustmentAqua = 0,
HueAdjustmentBlue = 0,
HueAdjustmentGreen = 0,
HueAdjustmentMagenta = 0,
HueAdjustmentOrange = 0,
HueAdjustmentPurple = 0,
HueAdjustmentRed = 0,
HueAdjustmentYellow = 0,
LuminanceAdjustmentAqua = 0,
LuminanceAdjustmentBlue = 0,
LuminanceAdjustmentGreen = 0,
LuminanceAdjustmentMagenta = 0,
LuminanceAdjustmentOrange = 0,
LuminanceAdjustmentPurple = 0,
LuminanceAdjustmentRed = 0,
LuminanceAdjustmentYellow = 0,
LuminanceSmoothing = 25,
ParametricDarks = 11,
ParametricHighlightSplit = 75,
ParametricHighlights = -13,
ParametricLights = -13,
ParametricMidtoneSplit = 50,
ParametricShadowSplit = 25,
ParametricShadows = -6,
Saturation = 4,
SaturationAdjustmentAqua = 0,
SaturationAdjustmentBlue = 0,
SaturationAdjustmentGreen = 0,
SaturationAdjustmentMagenta = 0,
SaturationAdjustmentOrange = 0,
SaturationAdjustmentPurple = 0,
SaturationAdjustmentRed = 0,
SaturationAdjustmentYellow = 0,
SharpenDetail = 40,
SharpenEdgeMasking = 0,
SharpenRadius = 1.5,
Sharpness = 40,
SplitToningBalance = 0,
SplitToningHighlightHue = 0,
SplitToningHighlightSaturation = 0,
SplitToningShadowHue = 0,
SplitToningShadowSaturation = 0,
ToneCurve = {
0,
0,
32,
22,
64,
56,
128,
128,
192,
196,
255,
255,
},
ToneCurveName = “Medium Contrast”,
Vibrance = 13,
VignetteAmount = -30,
VignetteMidpoint = 0,
WhiteBalance = “As Shot”,
},
uuid = “BA34A8F8-A4FE-49CD-A6E2-AE367BD426E5”,
},
version = 0,
}
Hi,
Thank you for the informative article.
I’m using LR 5.3 and I always wondered if there is a way to see in advance which settings a preset will affect (which checkboxes were checked when the preset was saved)? This would be a usefull feature to see if one can stack multiple presets.
Another thing I would like to see is the protocoll of the preset or at least of my own presets.
I find it hard to remember what excactly I have done in my different presets.
One can see the changed sliders after applying a preset, but what about gradiate filters, healing brushes and the other effects?
Presets are great, but there are some things Adobe can improve!
Maybe I oversee something, but I could not find the requested features.
Thanks for any hints :-)
Nils,
perhaps the History tab on the right-side panel can help you with some of those issues?
Thanks for your answer.
But the history tab doesn’t really help.
THe only way of helping is when I remember from which photo I saved my own presets and look up in that history. Otherwise it does not help at all.
So I guess there is no solution for my problem yet.
Doesn’t anybody else is missing this feature?