With mainstream days of film long gone, one would expect all the disadvantages it had on offer to be rid of for all times, as well. Digital is all about clean, high quality images now. Contrary to such an assumption, however, film has not left our everyday lives without a trace. A trace that is even more noticeable now that photographers got used to the differences between the two “religions”. Now, I say “got used to”, but the truth is plenty of photographers got bored of the sterile digital look and thus would seek ways of livening it up (instagramed anything lately?). One notable featured of photographic film has always been grain. Although, like high ISO noise in digital world, it was a result of increased light sensitivity and as such, an undesirable degradation of image quality, film grain was loved even during the past era of photography. Reasons behind it would make a fine discussion – in short I would say that grain was simply organic and beautiful – but one to be had with a pint of beer in hand and complimented by laughter and warm fire light. Instead, we will concentrate on actually applying film grain, or what is closest to it, with digital photographs. In this Mastering Lightroom series article, I will explain how to add film grain to your images. You will learn how to increase the size of grain, make it rougher or smoother and also hide high ISO noise (or make it more appealing) with it without the need of applying noise reduction.
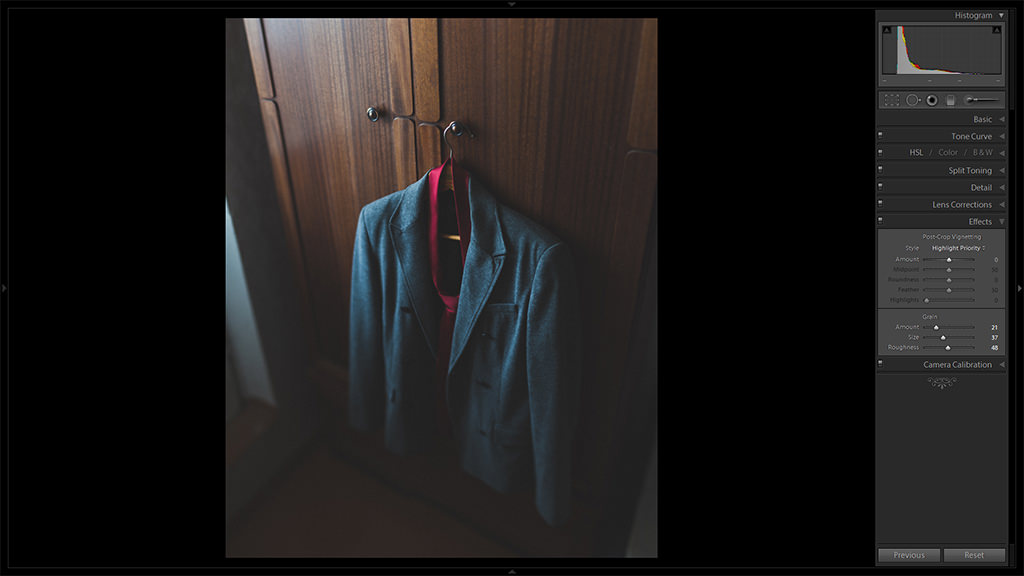
Table of Contents
1) What is Film Grain?
In essence, it is the chemical equivalent of digital high ISO noise, or, rather, the other way around. As film sensitivity went up, the amount and character of grain increased, just as ISO noise levels increase as you push sensor sensitivity to light up. Noticeably, film grain became visible at much lower sensitivities than current digital noise. Certain film of 400 ASA/ISO would already show visible graininess, and producing fine-grain film of 400 value was no small feat. Understandably, there weren’t any ISO 12800 equivalent films. One of the most sensitive films, the wonderful B&W Ilford Delta 3200, rendered so much grain, it would be thought quite unusable by some all-modern, technical quality junkies of digital era who have never been familiar with film aesthetics. Some prefer to see Delta 3200 as 1600 film pushed one stop during development. Think underexposing an image and correcting exposure by one stop in Lightroom with Exposure slider.
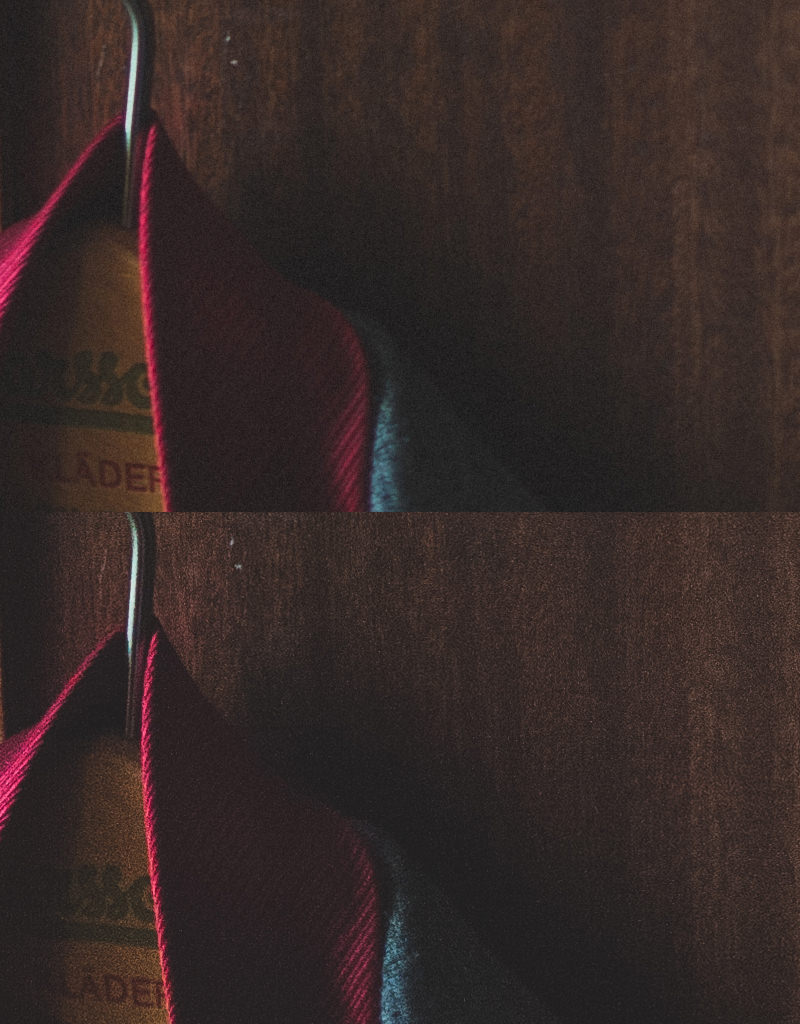
Here is a close-up of a hastily scanned Shanghai GP3 negative film showing grain. It’s not nearly the same as looking at an enlarged photograph and lacks dynamic range of such as well, but see if you notice any difference between grain and regular digital noise.

But that is not all grain is – an equivalent of digital ISO noise. It is also, at the same time and to an extent, can be seen as the chemical equivalent of the pixel itself (though, as mentioned by our readers, it’s not strictly true, but for our purposes such a basic explanation is more than enough). In other words, an image captured on film is made of grain. The finer the grain, the more resolving potential the film has, and thus the sharper the image itself is at a specific print size. You can compare this to sensor resolution. The smaller (finer, more defined) the pixel (grain) is, the more of it fit in the sensor (film) area, resulting in more resolution/megapixels (detail captured). For this reason, sharpest films were of very low sensitivity – sometimes 50 or as low as 25 – and had extremely fine grain. These were also usually slide (positive) films with punchier color and much less dynamic range than the mainstream negative films.
2) How is it Different from High ISO Noise?
To put it simply for our purposes and not dive in too deep in film versus digital discussion, film grain is beautiful, high ISO noise is not. That is not to say all cameras produce ugly noise at higher sensitivities – it can be somewhat more appealing with some cameras and less with other. For example, most Nikon DSLRs are thought to render somewhat grain-like noise, one that looks less artificial than that of other manufacturers (on most occasions, I tend to agree). But such differences usually arise when comparing something that’s not exactly nice to look at to something that’s even less pleasant. So, some cameras produce noise that is less ugly than others, but is still not particularly flattering. Film grain is, on the contrary, often used to enhance an image, strengthen the feeling and emotion captured, make it more organic in many senses of the word. Photographers found many ways of changing how film grain looks during their time in darkrooms by using certain chemicals and different kinds of light, and would often choose film based on grain for different occasions. In many ways, it was as important as a favorite lens.
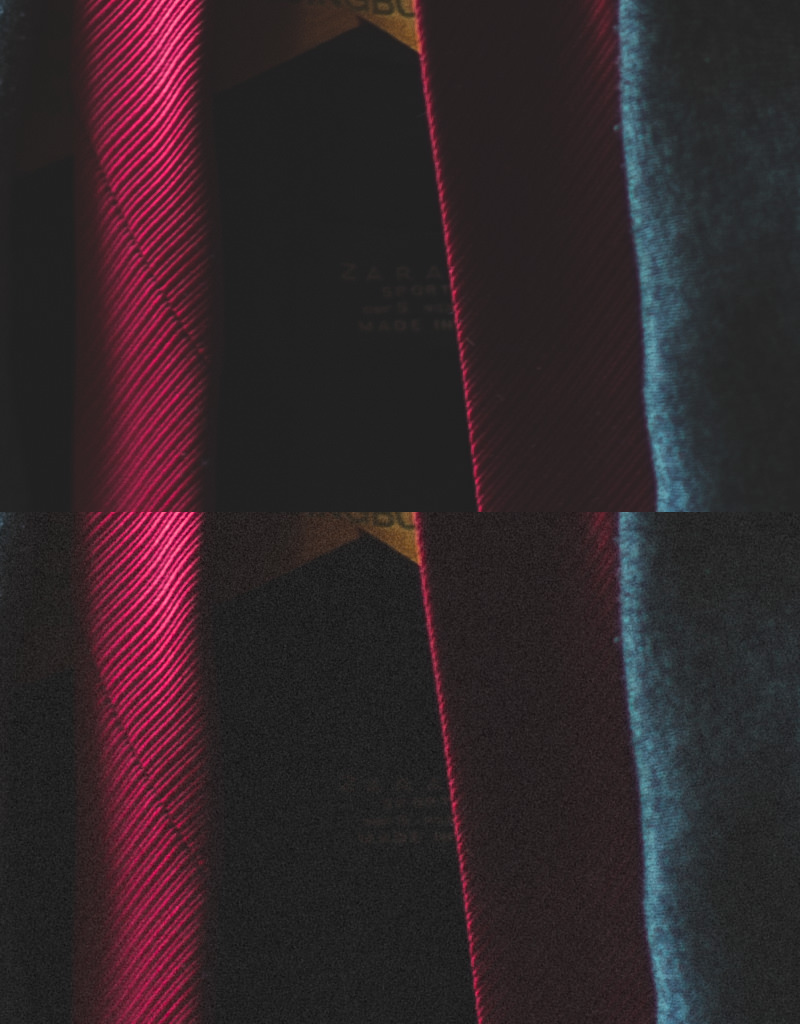
 Take a look at this comparison. The image above was taken at ISO 400 and had a little bit of soft grain added in Lightroom (Amount 14, Size 17, Roughness 57). The image below was taken at ISO 6400 and had no grain added. Don’t mind any slight focus differences you may notice, we are to compare the pattern. You will notice the high ISO shot to appear much sharper. That is because sharpness settings also sharpen up any noise present, while grain is overlaid over the sharpened image – you can make the image and grain either sharp or soft separately. I used the same sharpening settings. The high ISO image looks artificially sharp, it’s jagged and full of artifacts and lacks smoothness to it. I find it to look almost dirty, although as a ISO 6400 shot, I would not hesitate to use it and even print big with some careful noise reduction and possibly the addition of film grain. The image with grain is much smoother, but appears to be less sharp – mainly because of focus differences, mind you (I was shooting hand-held). But the soft grain also covers a very small amount of detail. Even so, I find it to look more flattering, less artificial, less numeric and digital. It is possible to make the grain sharper, and thus the image itself visually more detailed – all the matter of taste. Changing how ISO noise looks, however, is not nearly as simple, and in this case, grain results in a softer, smoother, less intrusive yet visible pattern, which I think is preferable.
 I urge you not to take this as a fact. Make no mistake, film grain, whether digitally added or a “natural” one, does degrade technical image quality. My claim of grain being beautiful is more of a general belief and taste, which may be very different from yours. I’ve found situations where I prefer a clean image or would not mind high ISO noise at all. In other words, it can be just as, or nearly just as, stimulating as film grain (as a matter of fact, I actually like how my D700 renders photographs at high sensitivities). In many cases, however, noise is avoided, especially with very high sensitivities as it can induce ugly patterns, such as banding.
3) Adding and Adjusting Film Grain within Lightroom 4
Working with film grain is a very straightforward process and involves just three sliders in the Effects tab.
3.1) Where do I Find It?
 Grain settings can be found within the Effects tab in Develop module. You will find the three sliders – Amount, Size and Roughness – located just beneath Vignetting settings. Both Vignetting and Grain are turned off be default (Amount set to 0).
3.2) Adjusting Grain Amount
The Amount slider can be set between values of 0 to 100. The default setting is 0, and results in no grain added by Lightroom. Change the value to 1, and a barely noticeable pattern will be added. You will need to look very closely even if you set the other two sliders to extreme values. There’s a chance one will fail to notice anything change with such a small Amount set. Move the Amount slider to 100, though, and the situation is quite different – you will end up with a very grainy image. Usually, I find value of around 20 to work rather well, so you may use that as your starting point. Remember, it’s not just the Amount slider that matters. Don’t be surprised if you find yourself readjusting these settings more than once or twice before you’re satisfied, as each setting will change the way grain looks and affects your image very noticeably.
3.3) Grain Size
Do you want it big, or would you prefer to keep more detail and leave it small? Size value will depend on image resolution, but even more so on tones and the content of a photograph in question. I often change the size of grain and it may vary through almost all the scale, with values between 20 and 80 selected most often. Larger grain, at least for me, works better with B&W images. My final decision is usually made while looking at the full-sized photograph, not zoomed in to 100%. I don’t want to pixel peep. I want to see how it affects the whole picture. As a matter of fact, that is how I check all the Grain settings within Effects tab.
3.4) Grain Roughness Adjustment
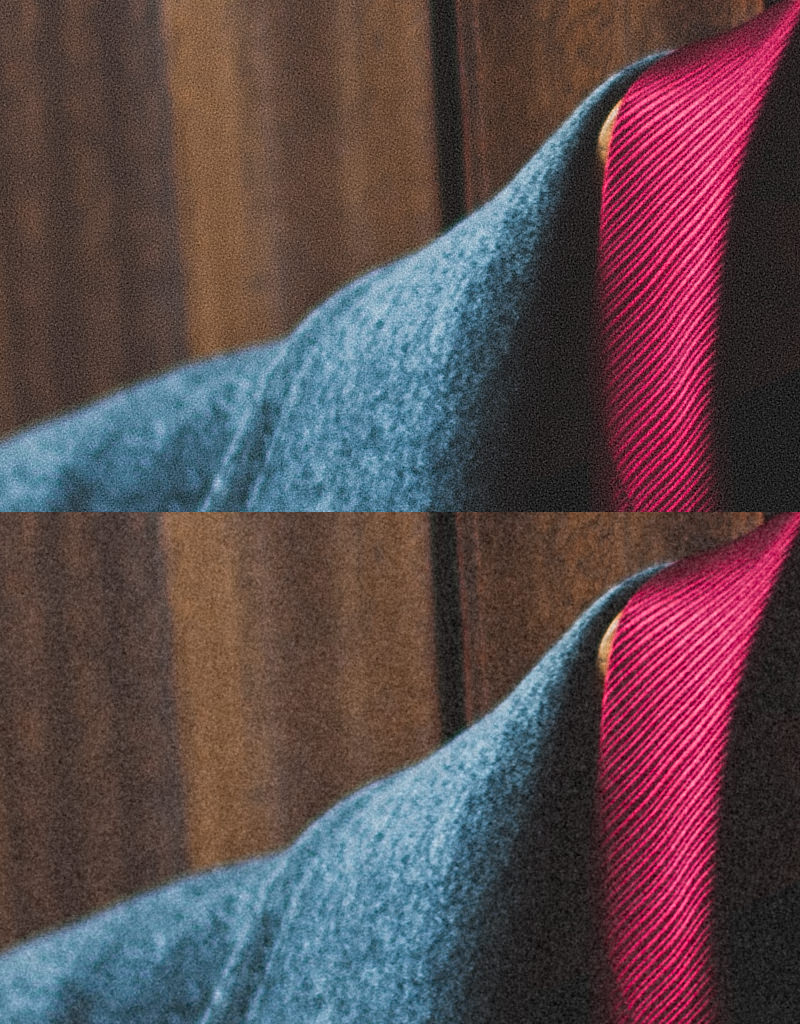 This setting defines the character of Grain. With film, grain can be very well-defined and sharp, or it can be much softer and smoother. The default Roughness value is 50, which, as you may have guessed, creates a mildly rough grain. It looks natural, yet is not exactly soft. Move the slider to the left and you will see it become less organic and somewhat repeating, noise-like, especially if you decrease the size as well. Move the slider to the right to make it less defined with each piece harder to tell apart. Either approach is good as long as you like it that way. As before, these settings are a matter of taste and are subject for experiments. Refer to the sample on the left to compare values 20 and 80, which is a little extreme.
4) Will it Make My Photographs Better?
In short, no. Grain – or lack of it – is just part of the photograph. It either helps create the mood, or deteriorates it. You either like it, or you don’t, and neither choice will make you better or worse for it. It is a matter of taste. If you feel adding film grain, and especially artificially created by clever software, is just a silly way of degrading technical image quality, don’t bother with it. Me, I prefer my images less sterile and livelier, and thus often add a little grain, a sort of texture to overly smooth tones. If that’s something you would rather not do, if you enjoy perfectionistic approach to quality digital embodies, there’s no need to play with Film Grain settings. If you actually prefer how digital noise looks, even in the sample provided above, that’s fine as well! As always, experiment to find what works for you best.
Thanks for sharing this very informative article. Have a beautiful (and grainy :-) day.
Good tutorial, many thanks!
I own DSLR and I like grain effect. Your article will be very helpful for me.
In case of video, I found free film grain overlay here: vegasaur.com/film-grain – also very useful!
Nice post. this effect is a bit underrated and not mentioned enough. i find LR’s grain effect to be very natural, and can be used to good effect. I’ve used it on occasion and it has always pleased me!
When I first read the title I thought, “I know how to add grain. Suck at lighting in a low light setting.” At least that was my experience in video. Nice read, nice ideas.
I enjoyed this article. Thank you for posting it. It is nicely thought out, and presented a part of lightroom that I have never explored. You are an excellent writer and I look forward to more articles by you.
Why not just use the real thing “film”? One of the criteria that I leverage for my images is the grain type and structure and how that manifests in my print. Adding film grain to a digitally captured image is like putting lipstick on a pig… :) All joking aside, thanks for the article.
Tim
Hi Romanas,
Thanks for the article. I hope this article will move this site a bit more to write about creativity instead of writing about technical “perfection” of photo’s. Although I follow your site and I often read here interesting things I think there is too much attention for gear, technique and equipment. Maybe this has to do with sponsorship or other commercial goals but all modern camera’s and lenses are good enough to get your photographic messages alive. Let’s talk about content, creativity and aesthetics. Sharpness, grain, vignetting, distortion ca’s , equipment will never be perfect but be creative and use the “imperfections” (like grain or noise that is not so bad at all)!
Hello there, Flax. Thank you for your comment.
I can not wholeheartedly say that I agree with you, however. It is a difficult task to balance between too much technicality, and too much “creativity”. Both are needed. I do my best to, once in a while, post something inspiring or none-technical, and those articles suit my own preference very well. But too much of something isn’t good. Should we shift focus from reviews and comparisons completely, and it will be as if they don’t matter at all. They do matter – more to some, less to others, but they do matter.
In any case, I feel we have had quite a bit of technicalities lately and my need to write something different arises. I promise, there will be other kinds of articles. That’s why I’m here. :)
Thanks you!
Great article Roman!
I have always looked at film grain as almost a signature of the film itself. I do miss the uniform chaos of drying emulsion layers and the grain it produced. I miss pushing that old Tri-X 400 up to 1600 just to get a different “look and feel”. We are left now with digital processers that have yet to discover the numbers of chaos. Eh … well at lest we have programs to make the effort!!!
Sometimes I wonder though if I remember it all so differently.
What I find amazing is that some folks still use the “clean” and “sterile” nonsense to describe “absence of grain” in digital images. It smacks of bad quality detergent advertising…
Grain is not “dirt”, never was and never will be. Not anymore than it equates to “pixels”.
The whole “dirt” thing was subliminal advertising used by digital spruikers during the “film is dead, move to digital” days.
To now attempt to add it with digital processing smacks of lunacy!
First of all: grain is randomly distribution by nature. No digital filter will ever be able to mimic that, although some may approximate it.
Second: grain is not the same as pixels. Far from it.
Third: what you see in scanned images of film is 99.99% of the time scan aliasing of irregularities in the surface and thickness of the emulsion layer, which have nothing to do with real grain. 4000 dpi does NOT show real grain – the ONLY way to see it is to use an electron microscope, at MUCH higher magnifications. With a quality scanner, scan a modern film such as Fuji Xtra-400, with both sides smooth and no signs anywhere of an “emulsion side” and you’ll see no “grain” anywhere.
Fourth: the fact that a LOT of scanned images of film are of low quality is as much a reflection of the low quality of the original image as it is of the low quality of the scan.
Fifth: any modern film image scanned with a modern, high quality scanner is worlds apart from the dross that was the norm 5 or 10 years ago.
Oh, and before I get the usual nonsense about “moving on”: I use BOTH digital and film. Quite happily and successfully and will continue to do so for the foreseeable future. What I also do is use QUALITY film gear and films, as well as modern lenses. Not some banged up clunker loaded with fungus-ridden glass…
Hello, Noons, and thank you for your opinion.
I’ve never described grain as dirt, though I did compare digital noise to it. By “clean” and “sterile” I also mean “lifeless”. Lacking in character.
And if someone were to call me a lunatic because I prefer to add some liveliness – even if by, as you mentioned yourself, using inferior, artificial digital means -, no matter how little it has to do with the real, beautiful thing of the film era, well, I will be happy to be called as such by those people and will be equally as happy to keep my own opinion of such people to myself.
You are completely right in saying no digital filter can ever match the “live” phenomenon of grain, of course. But that will not stop me from using it so as to achieve at least a tiny part of those aesthetics with my digital files.
You are also right in saying grain is not the same as pixels, but to an extent, they act the role (fine grain usually means more resolution just as smaller pixel to an equal area does). Such a comparison is valid when taking into account the context and purpose of this article, which is first of all to teach beginners how to use the function, and secondly give them a basic understanding of what grain is. To be completely honest, basic understanding is more than enough, in my opinion. I’m not really a chemistry person, not a scientist – I am a photographer. I care more about how grain helps rather than what it is. For this reason I will never intentionally try to see film grain through a microscope. I’d rather embrace it in my photographs, ones made on film, preferably.
I usually scan only for previewing purposes, to see which images I would prefer to enlarge, and then do so in a darkroom myself if possible. Quality of preview scans does not concern me much, they are just for a quick, raw glimpse.
Finally, I don’t care much for quality film gear and films, either. I have a Kiev 4AM, it has a terribly soft lens wide open, but is a beauty to use and gives me images I really like. I’ve seen people make masterpieces with cans or lomo gear or, as you mentioned, fungus-ridden lenses, sometimes even self-made. I’ve shot a 30 year old soviet black and white film that was kept in room temperatures all the time. The film was covered in heavy mold. I loved it, and loved the results. That is despite the fact I shoot Portra and HP5 as well.
To each his own, I think. :)
Have a great day, Noons.
Great article my friend :)
Thanks, mate. :)