This essay is for amateurs who have been shooting a while and feel the desire to push the envelope by going to manual mode. Manual Mode is a method by which you enter all your settings manually, hence the name. Why go manual mode? Well, there are some very good reasons to do so. I believe that all the fun is in manual shooting, and I also believe that you can unleash your creativity by shooting manual.
I was a JPEG shooter for many years, because I somehow found manual camera settings to be scary. I don’t know what I imagined would happen if I set my camera file format to RAW and the dial to “M”. I had a photography friend who encouraged me frequently to try manual mode, and I kept promising to do it but somehow never did. Until one day I just did, and I never looked back. I was instantly and permanently hooked. So if you feel that way yourself, I have walked in those shoes and know exactly how you feel!
The five settings that one has to master to shoot manually are:
Camera ISO, Shutter Speed, Aperture, White Balance and Metering method. Piece of cake, right? HA! Well, in a way it is. The big thing is that you just have to get used to those settings. You can do so with some basic understanding of them and how they impact your photograph.
Nasim and the gang have written dozens of articles about all these settings, what they mean and how to use them. These articles are important and if you haven’t read them, please do so using the links below, as they will make it easier to understand how each works individually. Also, don’t forget that Photography Life has a large library of great photography tips for beginners, so if you feel like you want to learn a lot, check all the articles out – there is a wealth of knowledge there.

Table of Contents
Set Your Camera to Manual Mode
 Now we can jump to where to start. It’s a bit like decorating your home – you have to start somewhere. Pick a wall color, pick a carpet color, pick a color out of your furniture, and go from there. In photography, you have to pick a setting to start with and all the rest go from there. So, to begin, set your camera to Manual Mode. It is very easy to do it. Most cameras have a “PASM” dial on top of the camera where you can change your camera mode. Simply rotate the dial to the letter “M”, as shown in the picture to the left. That’s all there is to it – your first step is accomplished!
Set Your White Balance
Next, I will help you out with some background settings. These will probably not change during your shoot unless something about your environment changes. As you get comfortable shooting in manual mode, you will be able to decide when a change is necessary. We will start with White Balance (WB), which has to do with the color of light. Your sensor setting should match the color of the light that you are shooting. I will give you one to start with, but white balance is purely a matter of personal taste. There are no wrong white balance settings. As a matter of fact, as you shoot manually for a while, you will begin to see the color of light yourself and will begin to know that you need to change your WB depending on what you see. Let me give you an example of this. My sister’s living room has a golden wallpaper which made the light in the room very gold colored. Every Christmas my pictures had an ugly yellow (gold) cast and I never understood why. Until one day I realized that my WB could affect these pictures and I figured out the correct setting for yellow light, and bingo! My pictures came out looking normal.
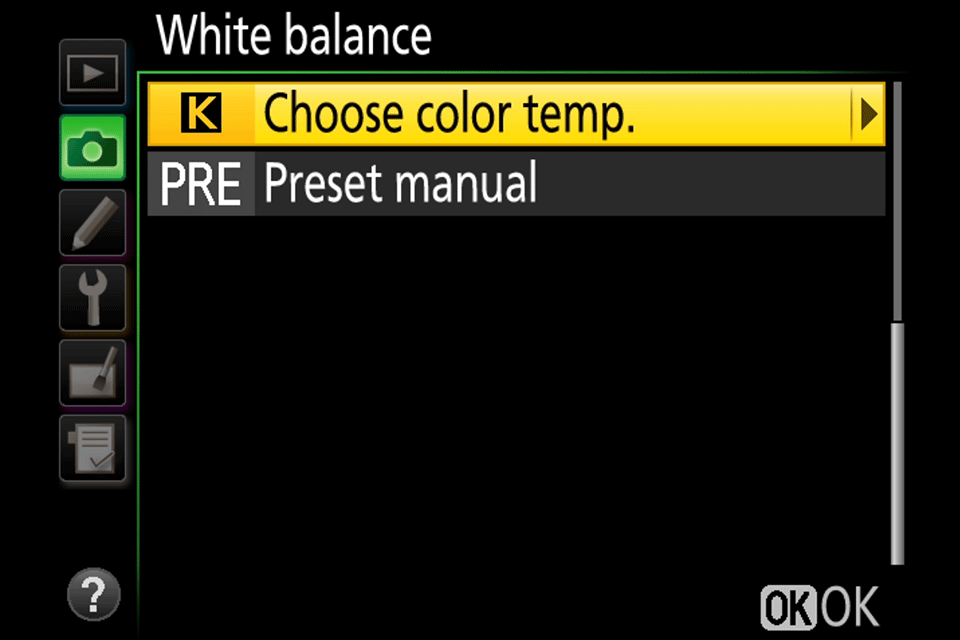
White balance is very important, but there are general settings that can work in many different outdoor scenarios. So set your WB to 5260 (daylight) to start with, and as you discover whether or not you like that setting, you can set it to something more to your taste. Later on, if you like your pictures to look a little bluer, set your WB to a smaller number like 5000. If you want to move to warmer tones, set your WB to a larger number like 5860. As you get used to WB, you will start to understand it and not be intimidated by it. And as you use your WB settings, you will want to start reading all about it to increase your understanding, which will then make you better able to set different white balances. If you struggle with WB and want to understand it in detail, check out PL’s excellent Understanding White Balance article for more details.

Set Your Metering Mode
The next background setting is the Metering Mode. This can also change during a shoot, but usually you develop a favorite metering method and stick with it until circumstances call for a different one. For a beginner, a nice general metering method is “Matrix” metering, which does a nice job at evaluating the whole scene and giving you fairly accurate metering readings. Nasim’s article on Metering for Beginners will explain all about that and why it is a nice general method. So for now, set your metering method to “Matrix”. You can change it to something you like better later on.
Camera Exposure
Now we come to the non-background settings. They are the “big three”: Aperture, Shutter Speed and ISO. They are all interdependent, but as I’ve said before, you have to start somewhere, so it becomes necessary to pick one and go from there.
Set Your Camera ISO
I am going to advise you to start with your Camera ISO. You have to pick an ISO based on the light conditions of where you are going to be shooting. So, for example, take your camera and step out the front door. Assess the light. Is it a bright sunny day? Is it a cloudy day? Is it a dark and gloomy day? Let’s say it is a bright sunny day. In that case, set your ISO to the lowest number, such as ISO 100. If it is a cloudy day, you might need to set your ISO to a larger value such as ISO 400, and if it is a dark and gloomy day, you might need to push it further to ISO 800, or even ISO 1600. These are just numbers to start with until you get the hang of ISO for yourself. If the conditions stay the same throughout your shoot, you can set your ISO and forget about it. So…one down.
Set Your Aperture
Next decide on your lens Aperture. Do you want close-up pictures with those nice blurry backgrounds with the strange name of bokeh? Do you want pictures that are sharp from front to back? Do you want something in between? Let’s say you want a closeup picture with nice bokeh. Set your aperture to the lowest f/ number that your camera has, such as f/2 or f/3.5. Do you want a nice sharp landscape photo? Set your aperture to f/5.6 or f/8 to start with. Do you want something in between those two? Set your aperture in the mid range, maybe f/4. You get the idea. For now, don’t try f/16 or smaller…yet. Instead, start with a midrange like f/5.6.
Aperture can get a bit confusing for beginners, because a small number like f/2 represents a larger aperture, whereas a large number like f/16 represents a smaller aperture. Check out the aperture article I linked earlier for more details on why this is the case.
Being able to control how much you have in focus is important and you can read about Depth of Field in more detail to understand how different variables impact your images. Most importantly, don’t underestimate camera to subject distance – that’s the biggest variable of them all!
Set Your Shutter Speed
The third and the last of the big three is Shutter Speed. This one should always be set last, as it is so dependent on the other settings. Both Camera ISO and Aperture settings that you set earlier have told your camera how much light to let in through the lens and how your camera sensor will capture it. Now you have to control that light with how fast your camera shutter opens and closes when you take the photo. When you set your camera to manual mode, your shutter speed indicator will appear in your viewfinder as a bunch of little vertical lines bisected with one single bigger vertical line right in the middle:
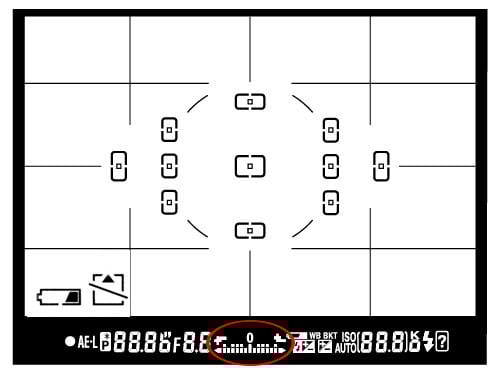
There are also little lights that appear that will tell you if you are choosing an exposure that will work, but for this moment we will not pay attention to that light. If you have read the other articles about shutter speed, you will know that all the little lines to the left will make your picture darker, because the shutter speeds are faster and will restrict the light coming into the sensor. The little lines to the right will make your picture brighter, because the shutter speeds are slower and will let more light onto the sensor. What I will have you do is set your shutter speed to the center vertical. That will give you a good exposure to start with. As you practice more and more, you will be able to decide how you want your pictures to look and will be able to go off the center with increasing confidence. Three complete!
Putting it All Together
Well, here we are with all the settings for your camera ready for you to try a manual photograph. Pick a sunny day to start. To recap, we have chosen WB of 5260, Matrix Metering, ISO 100, Aperture of f/5.6, and Shutter Speed on the center vertical line. On this sunny day that shutter speed might read around 500 (which is 1/500 of a second), but it could be larger or smaller in value. It all depends on whether you are shooting into shadows or bright light, dark trees or light colors. Don’t shoot into anything white just yet – it is too soon. Shooting white things has a special challenge where you might be overexposing or underexposing, so pick something else to aim at.
Take a deep breath to steady your nerves. Ready, set, focus and shoot!
How did you do? If you got a terrible picture, don’t despair. Digital photos don’t cost anything to develop. Just try again.
One more thing. You should be shooting in RAW format so that you can adjust your photos when you make mistakes. If you don’t have any software for post-processing, I recommend using your camera’s own software to do your exposure corrections with (mine is Capture NX-D). From there, you should be able to do basic edits, such as cropping, straightening your image or tweaking colors, and convert to JPEG file format. For those who think that post-processing is a PITA (pain in the a**), you should know that correcting mistakes in post is where all the learning happens. Post-processing makes you a better photographer. Say you find yourself shooting dark all the time and constantly have to lighten your pictures. Eventually, it will dawn on you to slow down your shutter speed in the camera, or tweak your camera’s ISO to make your image look brighter. Say you keep shooting your pictures off center. Having to constantly crop your photos will teach you to start composing pictures better. Say your pictures always come out a little too blue. You will figure out through correcting your white balance in post what white balance to try in the camera that will be more satisfying to your eye. Post-processing is your friend and you will soon come to see its value as a tool for you to become the best photographer that you can be. So please, always shoot in RAW format and learn to post-process!
This method will work. Just persevere and discover the fun of shooting manual. After a while, you will discover that you have lost all your fear. All these settings will become second nature to you, and you will get really good at choosing what settings you need for whatever situation you find yourself shooting in. Just keep on shooting and don’t stop. And have FUN! Before you know it you will stop thinking of yourself as an amateur and start thinking of yourself as an advanced photographer, or a semi-pro and maybe even someday a pro!
Good deal!
Best camera for manual use?
I learned using manual 35mm cameras, and really don’t like the ‘manual’ modes of cameras today, the lack of an aperture ring on the lens, and the hair trigger focus rings on most lenses. This was all done to appease ‘automatic’ users. I especially dislike the focus LED in dslr’s (mirrorless cameras use a different system). So what cameras (dslr or mirrorless) provide the best manual experience? Where can on find lenses that are manual? Thanks!
Dave
Hi Dave, I am afraid that you can only choose from what’s out there. Modern dslr’s are what they are, and I think that any good genuinely manual camera, which will have automatic settings but will have all the fully manual ones, will give you a good experience. I myself am a Nikon shooter, and I love my D800, D810 and my D850 for manual shooting. There are more reasonably priced manual Nikons, however. Your camera store staff should be able to steer you to a good manual camera, whether Nikon or not. The most important thing is that all the manual settings should have buttons on the outside of the camera so you don’t have to access the menus in order to shoot manual. That is key. All the rest you can get used to, and then I believe that someday you will love dslr shooting. I am afraid that I don’t have any experience shooting mirrorless, so that I can’t offer any advice there, but insofar as I understand it, you must be willing to use an electronic viewfinder to shoot mirrorless.
IF you want to shoot with what would now be known as an antique camera, you can still find a fully manual non electronic camera and non electronic lenses, all used of course. Your camera store would be able to help you find them, or you could comb ebay and amazon to see what they have. There is a lively market in used camera equipment. I used to use the Nikon F3 in the olden days before dslr’s came out, which was a fully manual camera that used manual lenses, though it had a few automatic settings but no electronics. It was a great camera, but I think that the modern dslr cameras give you a better shooting experience.
What brand would I recommend? Well, Nikon, of course. :)
Elaine,
Thanks for the reply. I started life with a Nikon FM – fantastic camera! It is manual only. I now have a D3300, and it frustrates me to no end. Too many menus, too many choices, too few dials, and the LED focus indicator just is not adequate. I am looking at a mirrorless because they are said to be easier to do manual focusing. Still, there will be the issue of menus and buttons/dials.
Of course that leaves the issue of today’s lenses that are optimized for automatic use. I love the trombone style zoom lenses, but they are no longer made.
So why not get the FM repaired? Parts availability, film availability, and film processing availability are all big issues.
Isn’t progress great! By the way, the nearest camera dealer is 80 miles away. I don’t consider Best Buy, Wal-Mart, etc. camera dealers.
Dave,
I remember the FM! It was the camera that first turned me on to photography. A friend had it and let me try it, and I was hooked. Have you tried sending your FM to a Nikon service center? I had my F3 reconditioned a long time ago, I think in 1990 just before the digital cameras started. I grant that that is not relevant to getting a repair done now…but maybe they can still do something to fix yours.
Since you don’t have a camara shop to get advice from, I wonder if you might try B&H that Nasim recommends. They will talk to you about what camera may meet your needs. I hesitate to recommend a particular model because I am only familiar with the ones I mentioned above. But I will tell you that in the used market, the D800 and the D810 are pretty reasonable now. I have not bought used camera equipment, but Nasim has said that B&H is very reliable for their used equipment. You could write to him and ask him directly about it. I get a lot of happiness using my D810, and all your manual lenses can be used on it. I have the old Nikkor f/1.2 manual lens, and I have had no problems using it. It is fully functional and you can program its details into the menu so that the camera will recognize it. From the first moment I used the D810, it has been a love affair for me. That is a camera that I can truly recommend. The D850, possibly the best dslr ever made, is also an amazing camera to use. I understand that you can get decent prices on it now, too. Hopefully, you won’t give up and will find something that you are comfortable using.
An extremely well written article which addresses a really important issue of any beginner. Will try these tips the next time I go outdoors…
Sandeep.
Thanks, Sandeep!
I hope that you have fun learning to shoot in manual mode. I believe that you will find it to be very satisfying. Just remember that learning manual mode is a process that takes time and patience. Best regards, Elaine
Hi Elaine. Let me join in. To my view pictures you have shown do really look little bit dark and I may understood you do it deliberately so.
The reasons can be following for that you either:
1. like the darker images and it is not to me converting you
2. You set the camera to Manual and make its settings so (intentionally) making it to pass less light allowing for smaller apperture or faster shutter to keep much richer details in the bright parts of the image.
It is a common technique that used for the RAW photography. However you do not have the necessity and neither software capable regaining shadow parts of image data you preserved by doing that to look them brighter and full of life again.
3. Your monitor is set to brightness level exceeding human comprehension at normal light environment conditions, at higher brightness or at lower contrast, or you are using LCD screen on a laptop, that is deliberately brighter tnan mine and Eugene’s and Jan’s and many other use to time. The LED screens, for example, do not have such a feature.
(You may be also unware of color and brightness calibration of the screens, which is de facto for Mac users and Adobe software).
The previous commenters did not consider option 3, so maybe it is all the source of this discussion.
Your boy scene rather is appealing and very nice and lovely but few other shots require some extra light in them.
Why would we use the RAW at all ? For thou it able to store much greater information camera hass seen than JPEG does.
It offers greater lattitude (ability to capture dark and bright at once) and quality. This information can be then regained and mapped to the JPEg medium for viewing.
To me the greatest advantage of Manual is that the settings stay consistant and the same irregards to the particular subject you point camera on. In Auto mode the Exposure settings change as one would recompose the image. Thus, if you photograph series of shots, it will produce undesirable effects, such as under- and over- exposed images in series. Therefore if you photograh subject such as kid on a particular background and under certain light condition you will NOT WANT the exposure settings to jump for every shot you make because the light won’t change and will remain the same. You do not want to loose the photograph because some pose of kid (or pair in wedding photos) has more or less of his/her black/white dress. Then you use Manual.
Preserving same exposure settings for the entire series of shot is a necessity for photography applications. Initially, the settings you would set in Manual, can be obtained using camera’s own meter set in spot from graycard, external light meter or allowinf camera to matrix meter the scene (you zoom it out a bit for better results).
Altough we work in Manual, the camera will meter stil as in the Auto, and will advise you on over- and under- exposition in viewfinder. (you have it written in your essay)
This information can be stymulus for actions if light condition changes.
With time one will be able to learn to automatically tweak the exposure settings (like compensation) when zooming to the scene.
When you photograph kids or people on an assignment – you wan’t have much of time thinking about all aspects of exposure, and also will be willing to produce not only images of a particular format and size, such as the human standing full size, but some of photographs will show only his only face, shoulder portrat, or maybe some details of dress or maybe something he is holding in hands. Then you would zoom in to this part of scene to show it in greater details. Would this be in the shadow you will need to add some extra stop to exposure. It’s usually enough.
To newbie I would say, remember paying an attention to the subject and make the settings in advance. There is simple not enough time to keep a track on them and even checking the back of camera for shot evaluation.
Elaine, would you like sharing some RAW imagery data, I would analyze its matrix and telling you in private whether your image needs some extra threatment or not.
Sorry for my English. Hope you understand.
Hi Mari,
You make some very good points in your comment. I’ll see if I can address them. To eliminate the simplest, I did have a little laugh at the monitor comment. As it happens, my eyes are very sensitive to light, and so I have my ASUS Pro-Art monitor (which is an extremely bright monitor) set to its lowest possible brightness that lets the photos look normal. I have actually worried at times that when I lighten photos, on other people’s monitors they might look too light and washed out. I should tell you that the pictures are not quite as dark on my computer as they are in this essay.
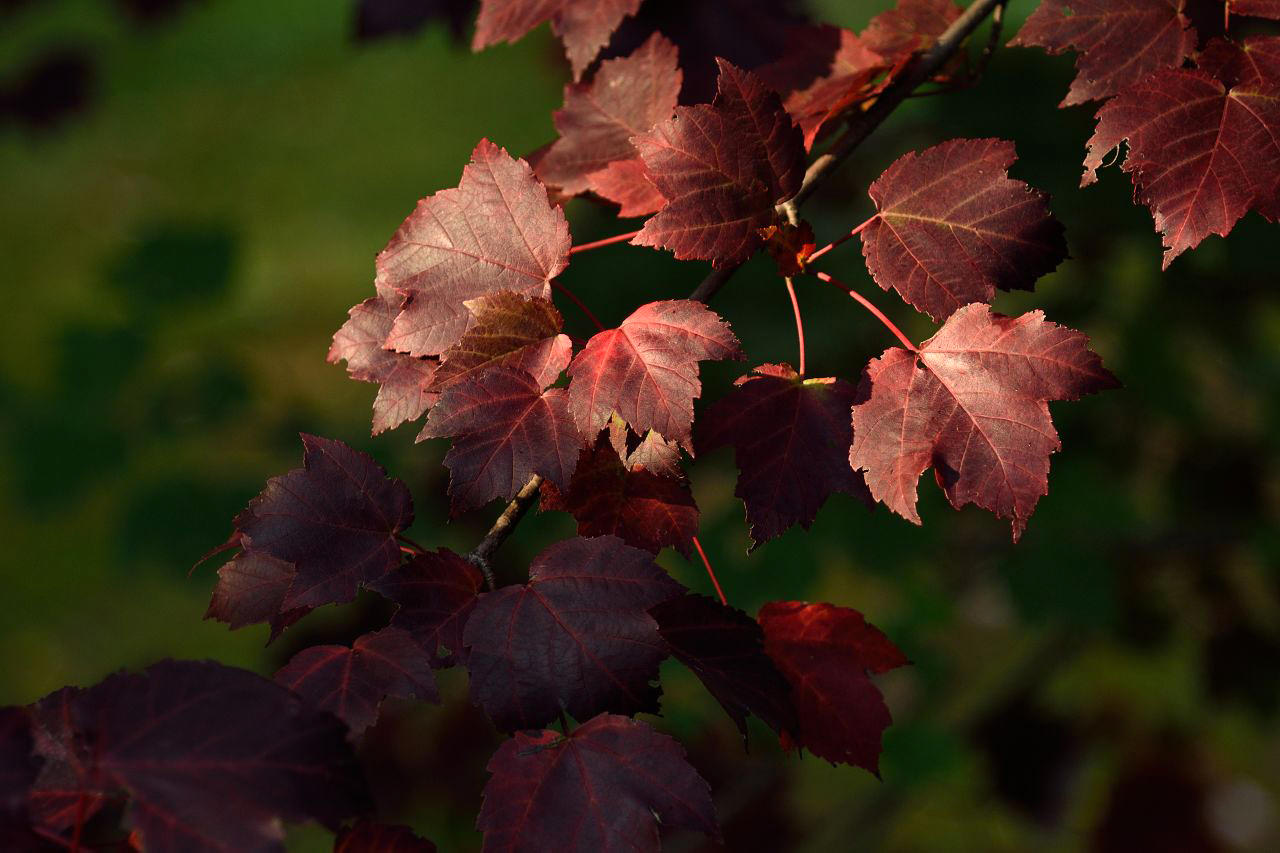
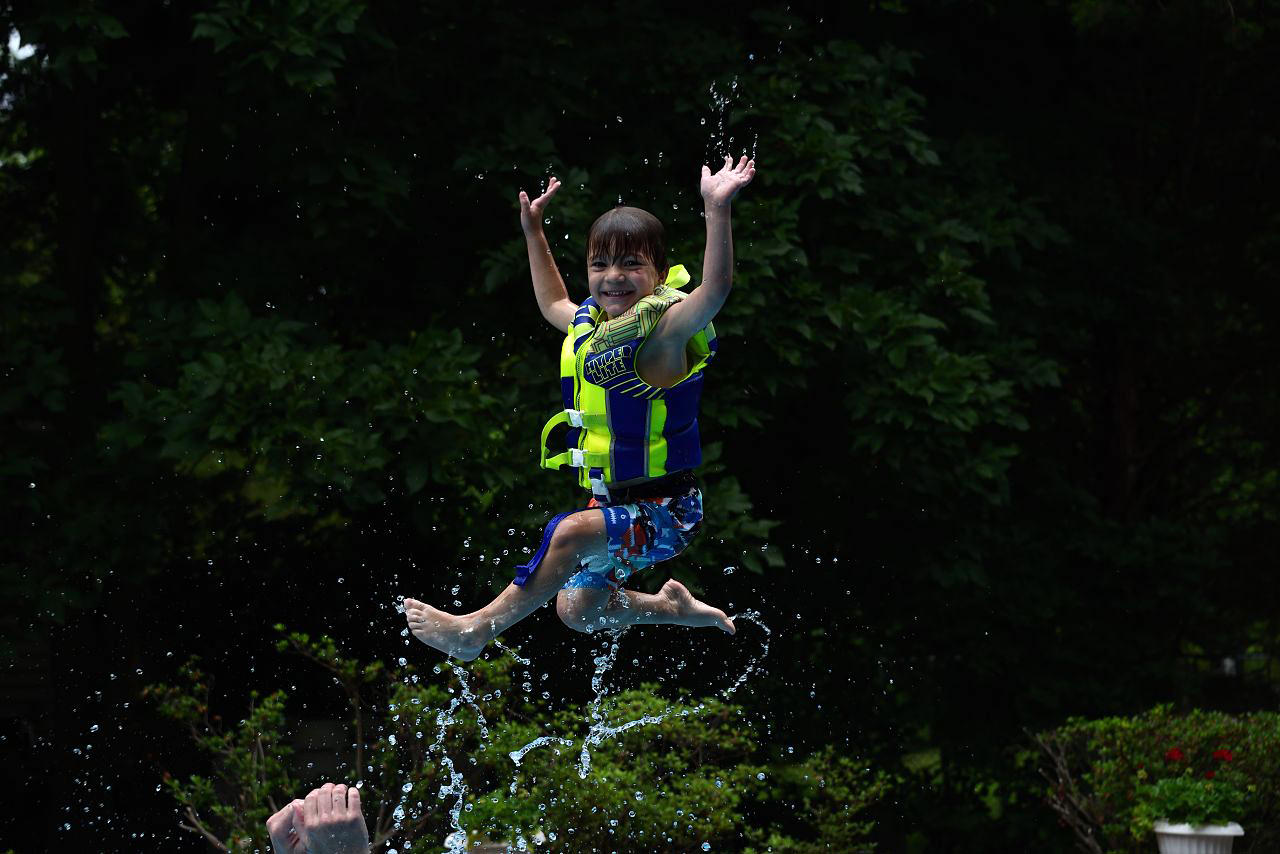
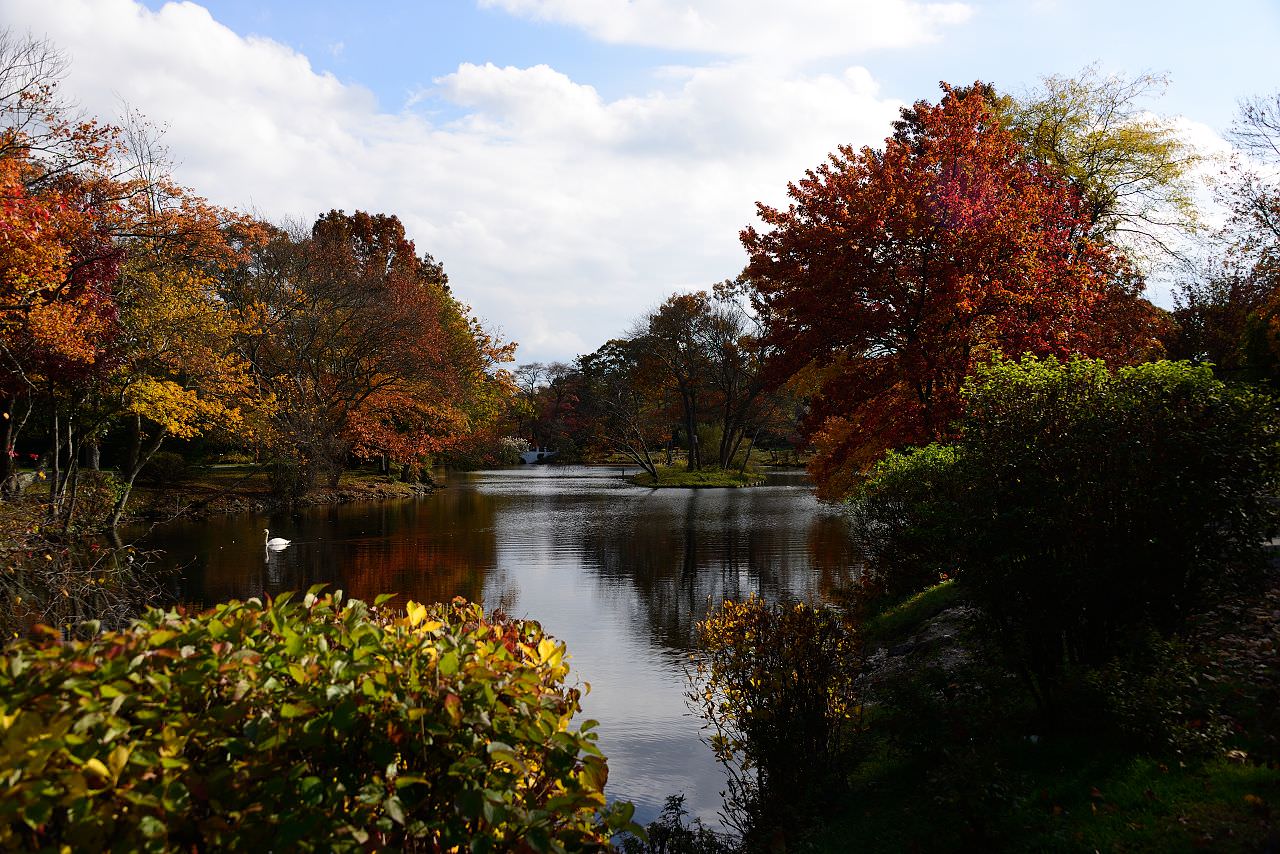
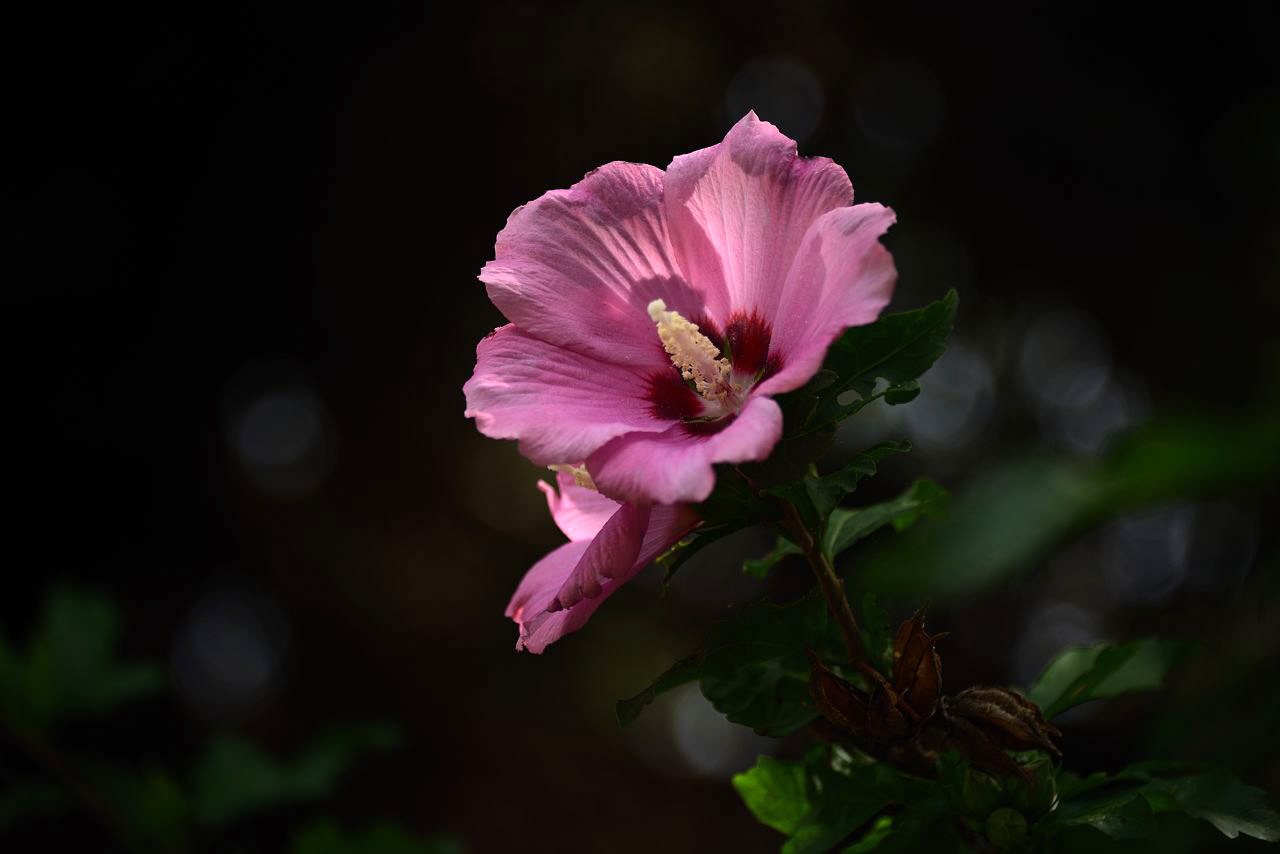
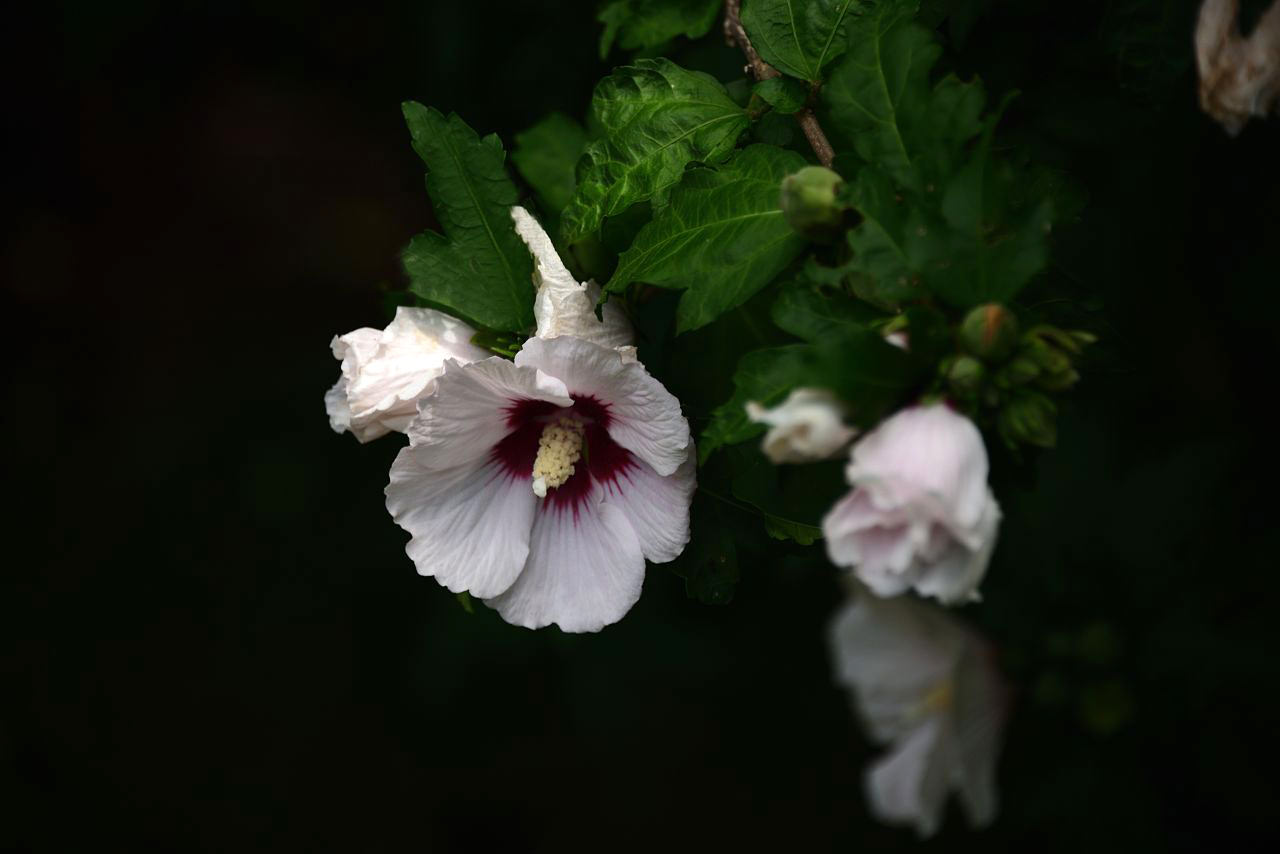
Years ago, when I first started shooting in manual and RAW, I shot much darker than I do presently. My taste evolved in a lighter direction. The RAW pictures of the autumn scenes are really that color rich. Autumn is very very colorful where I live. The best judgment of how good the exposure is, is the sky. I learned long ago how to toggle my exposure so that both the sky and the scene come out well exposed. The photo of the little boy did come out in RAW the way you see it. I experimented with lightening the dark areas, but the drama of the picture is best enhanced with the dark background. The trees behind the little boy if brightened would make the background unpleasantly busy. The skin tones would be too pale also. I was trying to recollect whether that was a sunny day, but unfortunately I cannot. It probably was cloudy out, which is reflected in the ISO of 500 that I was using. I undoubtedly also used that ISO because I wanted shutter speeds high enough to capture those water drops, which is also reflected in the f/stop of 6.3 that I used. This highlights, by the way, the value of shooting in manual over auto. Any auto exposure method may have chosen that combination of settings with its algorithm, but I doubt it would have coincided exactly. With manual exposure, I got to judge exactly how I wanted my picture to come out. I see that you are in agreement on that issue. With regard to the black backgrounds on my flower pictures, it first happened by accident years ago when I was first using manual settings. I loved the look, and continue to love it to this day. Nothing brings out the flowers as beautifully as that background does. As you can see, I often let the foliage show or peek through, depending on how intact it is, to support the flower. As you have seen, my taste runs to rich color. But I think that my color and vibrancy choices are well balanced, and do not look fake as so many pictures I have seen that have been ruined in post processing. I process minimally. I had no idea that some people might find my color that disturbing. But my goal is artistry above all other things. I will make the shocking confession that I do not consult the histogram when I shoot. I do it all by judgment. Through experience, I have learned what works best for the type of photography that I do.
I have begun to notice some cultural factors at play. Several of the people who have thought my photos are too dark all have northern European names. I am aware that Mari is often a Finnish name (I have a Finnish friend named Mari). If you happen to be Finnish, you may be having the same cultural feeling about the brightness and darkness of my pictures as the others have done. I have seen this with many different cultures. Some pictures that look gaudy to me, in the photographer’s culture look perfectly exposed. In English we say this is what makes the world go round. I hope you enjoyed my essay. Best regards, Elaine
> The thing you must understand about Jan is that he likes to go on all the essays and find something wrong with them to tell the authors about. This requires that the authors defend what they wrote,
Luckily we have such a Jan who is not afraid to ask.
I am at my 80s. I used to teach math to students over decades, With time I learned that if some student asks some stupied question it means there is something missing, interesting or unknown behind it. The teacher remains always right, which is the axiome, an apriori assumption. But the misleading and the lack of knowledge of the student, which is the source of the question, became the teacher’s headage (if not his fault). With time I learned not to defend myself but trying getting in the heart of subject, dig it out and explain. I understood that I was again always correct as teacher but was wrong for not giving students some basic information they would need, otherwise they would not ask the stupied questions at first. Same I see with yours and Janes dispute. You both remained right from your own perspective. You do not need to defend yourself, Elaine, and Robert and Eugene, both my proud sons, did have a good job of sortening things out and explaining everybody source of this question.
So, Elaine, I will repeat the question of your student Jan. Why do your pictures look underexposed? You do not need to answer it here, just think.
Regards, Igor, ass.prof of math, PhD, the author of 6 patents and hundreds of articles, 80 year old man, over 50 years in photography.
Hi Igor,
Are Eugene and Robert genuinely your sons? I enjoyed the dialog with them very much, and I believe that at all times we were all respectful of one another. I even enjoyed the dialog with Jan at the time, which we also carried on in a respectful way, though it was not appropriate for him to tell me to advise my readers to shoot in auto, which caused a polite argument and incited two very different people to start attacking my essay. My essay was the wrong place for that whole thread. However, I did not show good judgment making the remark that I did about Jan in this recent exchange. Those sort of thoughts are better left out of a public forum. Now I would not debate such people. I have learned not to engage with such commentary that is only aimed to provoke.
To answer your question as best I can, I believe that my pictures look underexposed because all the people who said they thought so are Finnish or otherwise Scandinavian. I happen to have a Finnish potography friend with whom I exchanged photos for a while with the purpose to critique one another’s work. He always thought my photos were underexposed. I thought his work was overexposed. Once I had the dialog with Jan, and then later Eugene and Robert and Mari which confirmed my idea, in addition to the exchanges with my friend, I began to realize that there was a cultural factor at work, and I still believe it. In reality, my work is not underexposed at all. The color tones in my photos are all realistically represented. No subject matter looked different in real life than it did in my photos. I don’t count the dark backgrounds, which are an expression of my artistic taste. I hope you can find my answer satisfactory. Best wishes, Elaine
> I am a minimalist when it comes to post processing. I do not like over processed pictures. I seldom need to do much correction beyond the usual slight bit of lightening or darkening.
So am I. As Eugene has correctly pointed out the waste of IP tools and algorithms existed to day are far from being perfect and really make more harm to images than help. This is why we say: “do not touch, you only make it … you know” I do like simplicity and style. Style grows with experience and trial. Understanding to what you do is a major source of help.
> It is important to remember the audience for which I wrote. … Under that criterion, certain softwares are just too sophisticated for them to use until they are no longer newbies.
Then go with RawTherapee. It is as simple and equally as intelligente as it just can be. I would recommend it to every single newbie who want to try RAW photography (and it is also FREE and opensource)
Why to go RAW? JPEG file format simply cannot satisfy the needs of moden photographers. Yet in 2000 it was promised by Kodak that every camera will use their new JPEG2000 format, which is in any way superior to a common JPEG. We are at 2018 and still using old JPEG. I also cannot fit my image in 8-stop capable JPEG form. I will go with 14 bit RAW and compress it to 8 bit JPEG with help of tool that I can trust. I have found the software Robert has advised to be really easy and friendly to use.
An old film shooter, now trying some RAW photography.
Hi Igor,
The need for photographers to use RAW format in their work cannot be overemphasized. If a photographer wants to advance in this field beyond the point where they may have gotten interested as a snapshot taker or point-and-shooter, shooting in RAW is essential. I believe many fear it because it means post processing. But as you indicate, post processing is just something that one must accept and get used to doing. Like most things, once you master it, it becomes an entirely natural process, which yields amazing results that cannot be achieved in any other way. Thanks for writing!
I want to add to above discussion. Just one advice, when printing home or in the lab try to match the resolution of your image to the paper size using 300 DPI resolution rule. Rescale (resize) the image using best possible algorithm you have (i.e. Lancoze) and apply unsharp-mask filter for the result. Then you will ensure that no extra manipulation will be done with your image in the lab or in the printer software. Calculate the target image dimensios as follows: paper dimension (in inches) * 300 => image dimnsion you need to send. Sometimes it helps to “sharpen less” the result and increase the contrast for half. I made my weddings photos this way and was not disappointed even though images were looking a bit strange on screen, they come out well made from the lab. Same aplies to your home printer.
Hi Anna,
Many people do not understand enough about printing to know about the DPI issue. They think that the higher the DPI, the better. They do not understand that increasing the DPI to let us say 600 instead of remaining at 300, resizes the picture and makes it smaller. I myself have not paid a lot of attention to printing in recent years. I had a really nice Epsom printer that became outdated, so I bought an updated Canon printer, with which I have had terrible success. I so far have not taken the trouble to master it as my need for printing has diminished. I recall that the software that came with the Epsom was superior to the software that came with the Canon. This may contribute to the issues that I had. Having no need, I have not used an outside printer so cannot really comment on that issue. Thanks for writing!
Hi Eugene and Robert,
I’ve enjoyed the discussion very much, but I feel that we’ve wandered a bit too far from what the newbies among us will be able to garner from it. They are already fearful about post processing, and I would not want to scare them away. It is a very necessary part of learning to be a good photographer.
What I tried to convey to Jan, aside from the fact that my essay was not the proper forum to tell me how auto shooting is better than manual, was that most of his complaints were a matter of taste. The thing you must understand about Jan is that he likes to go on all the essays and find something wrong with them to tell the authors about. This requires that the authors defend what they wrote, which is very tedious and boring, especially because they always prove themselves to have been correct in the first place. The same is true for all the other insecure critics whose first and only need is to be considered right. It is an error to give what they say much credence. When a person is truly interested in helping others understand something, it shows, as in your case. One thing I want to convey, however (as I also have an ego to protect) is that I don’t consider anything to be wrong with the way I processed my pictures. If you saw the RAW versions of these jpegs, you would not see very much difference from the way the photos were shot. I am a minimalist when it comes to post processing. I do not like over processed pictures. I seldom need to do much correction beyond the usual slight bit of lightening or darkening. When I originally wrote this essay, I advised the readers to do their basic exposure and color adjustments with Capture NX-D (or their own brand’s native software) and then use their favorite software (Lightroom, whatever) for the rest of their editing. That was changed a bit by Nasim when he published my article. I still believe that for a person new to shooting RAW, thus new to post processing, mine was a very good method for them to try. Capture NX-D is rather cumbersome for anything more than exposure and color adjustments. Cropping and horizon, and all those things that are known as editing, are better done elsewhere. The greater complexities of RAW processing must wait for these newbies to gain understanding and experience. It is important to remember the audience for which I wrote. Under that criterion, certain softwares are just too sophisticated for them to use until they are no longer newbies. It is not certain how many people will ever read our discussion here, but perhaps someday they will be able to benefit from it, as I have. Thanks again to both of you for writing. Best regards, Elaine
You are welcome, Elaine
> is very far beyond my experience level.
Luckily Robert has tried to make it simpler. RAW processing and Manual shooting are in a way two parts of the same cake. Once you go Manual you will have to face the limitation of JPEG and shoot RAW, therefore you need to develop it. To Jan, I will tell that issue you have pointed out is not the underexposure but the way the RAW data is converted to JPEG image. The picture itself was exposed correctly and Manual technique is well explained. The reason why the pictures looks somewhat different to what one is used to see is explained by the RAW shooting process instead of JPEG shooting. It does not mean that RAW is worse, just it needs some extra attention and extra tools to work it out. Another mistake of Jan is trying to apply exposure compensation to JPEG image. It is not the correct way to do but he must have original RAW for that process. The RAW-processing software will apply some half-stop exposure compensation to original RAW but will do it in a clever way. Please wait for my pictures. I will show this to sorten things out.
> the information lost in conversion is something like extra data that the eye can’t see anyway
It is not true. The bright areas will be lost and JPEG artifacts will appear. They are very well seen on ink-jet home-made prints.
The following picture shows what you loose: rawpedia.rawtherapee.com/File:…125_ba.jpg
> color correct with levels, tones and curves but it is still a difficult process for me
It is difficult because you do not have a concrete goal for that. They are needed for particular purpose. The best looking image is the image as it was seen by your eyes. If you can recall it and picture looks similar, then it is fine and correct and you do not actually need to play with tones, colors and such. In fact, when working for my image processing research for my PhD, I have tried and teached people a lot of these techniques, and I can assure you, I would use myself (or, say, take to a new millenia) only few carefully selected algorithms. So, do not worry about that you did not learned to master them all. (I remember here citation from “Space Quest games” : “do not touch that. you only make it worse” :)
At the end, I would like say about myself
My best effort is to make things looking naturally not better. Since the “better” is somehow vague and often misunderstood notion. “Naturally” goes little bit beyond “human perception”. Metameric colors will look differenr under different lighting. You have seen it when in the shop your suit is perfectly black/white, and home, you figure out that jacket and trausers do not match and shirt has some tint. I tell that to cheer you up a bit. There are stil many things in the World we do not or not capable to comprehend, and we do not need to spend our all effort to make it way better than the Mother Nature has to offer. We constantly learn from it and trying to adapt to it and represent its natural beauty in our works. That is the main goal of phpotographers naturalists. Artists go beyond that (i remember here Nasim’s photo of the valley captured at night that is looking like the day, it is in Low-light photography article) but this is another story :-)
I hope that all this information we have been writing here will be the source of knowledge for new-commers and the food for thinking for veterans. Would you have some question, please do not hesitate to ask. One cannot know its all and somebody will definitely answer.
Robert,
I do basic post processing (exposure, WB, a little contrast adjustment, and whatever else the program offers that I may need) using Nikon’s own Capture NX-D software. After conversion I do further editing on the jpegs with Zoner Photo Studio, where I crop, correct horizon, edit, and otherwise polish my photos. I get very satisfactory results in this way, because as with all camera makers, the WB information is proprietary. If you want the best color representation, Nikon’s own software is going to be best for NEF files. I won’t use DNG or any other software that irreversibly changes my native RAW format. I also don’t shoot RAW/jpeg right out of the camera. I always convert to jpeg after post processing the RAW image.
You may have slightly misunderstood something I wrote earlier. My normal jpeg conversion compression is at 95%. I was thinking out loud that I may try using a lower compression, perhaps 80%, on a particular jpeg photo when I want to print it, to see if that makes a difference to the quality of the print. I have heard that one can print straight from a RAW photo, but I have never tried it, seeing no reason to do something that I regard as so silly. Also, if you are referring to the NEF codec as your Nikon plugin, I have had it installed for years and update it regularly.
Lastly, I agree with you that jpegs look brighter and more vibrant than corrected RAW files do, which is always a happy surprise when you see the converted picture.
New photographers, or photographers new to shooting in RAW, must feel a bit intimidated by this discussion, and at the thought of trying post processing, but the reality is that it is a necessary part of modern photography, and provides many opportunities to learn and understand the technical side of producing photos.
Thank you for your reply.
I have been using Nikon’s software believing it would convert NEF data better than anything else. Unfortunately it is only partially true. Yes, it contains a better tweaked de-mosaic algorithm which is tailored for Nikon cameras. Perhaps a separate thread in FORUM can be started discussing the better de-mosaicing options for Nikons and user experience in that. For those who do not know what that means just ignore this part. For you, I would advise you taking a look at the software I offer, it would enrich your experience and try to solve some problems Jan has pointed out on your final images. Jan has called them underexposed though the problem here lies in a bit different plane. The pictures might (again) look really some underexposed but the technique and camera settings to which you adresse your essay were correct (period). The answer to Jan and to you Elaine is to continue working with the images, like swan photograph or the photograph with shadow in the building to apply some clever exposure compensation technique which would not wash out the brighter parts after the exposure being raised. The RAWTHERAPEE software does offer such a facility called range compression that reader may read from the link Robert has provied. Reading that link will solve on many misunderstading issues that would raise from this discussion. I have not seen such RANGE COMPRESSION option in NX-capture, which is otherwise quite good software. Maybe I am using some older version or maybe it simply does not exist, I do not know.
Futher, I try to addresse all the situation you have written about in your reply to Robert.
I do not personally use much of DNGs unless I need to give it to the customers who request “original” images over JPEGs and newspapers do so,
New Manual and RAW shoters should learn from this post that it is not enough just to use Manual mode to get proper results. (((The lattitude of JPEG image data is not simply enough to capture all the variation of the color and brightness change. 256 gradations (8 bit per color) is too few. Therefore RAW is used and with RAW we can solve the issue Jan was talking about getting “better exposed images” as Jan has requested with details kept in the bright areas ))) One would need to learn working with RAW image data. Manual mode gives you better options to preserve in your image data a larger amount of information about the scene and it is up to RAW imag processing software to dig this information from the RAW data and store them in DNG, TIFF, PNG or JPEG (2000 and common) data format. Once more, JPEG data format does not simply offer all capability to capture (store, gather) all the details of the scene you and your camera sees. The RAW image format is not the image format but the data stream directly from the camera sensor. It needs to be processed or “developed” in order to be shown to viewers. The development process includes de-mosaicing, exposure and black point compensation, gamma conversion, tonal (white balance) conversion, picture enhancement (contrast, sharpness, vibrance, and you may add some tonal curve processing and restoration in terms of noise, lense distortion, vignetting, perspective, rotation, alas cropping, and whatever else you and authors of the software may imagine.
The Nikon camera will intentionally underexpose your images for RAW shooting in order to gather more details in light areas and making you to perform some postprocessing as well. It is a feature not the defect neither the error. It means that nearly all NEF “images” will undergo the exposure compensation procedure before they will appear the observer. The camera does it, the NEF plugin does it, the RAWTHERAPEE does it. It is a must. Again, I will provide the images to illustrate on the issue after weekend. The software Robert is talking about does the exposure compensation in a clever way so he advised it to give it a try.
Answering your other questions:
“After conversion I do further editing on the jpegs” – working with JPEG is always a loss of information and limitation of 24 bit processing and 256 bit per channel. Therefoe, the entire process is better (if not “shall always be”) kept in non-destructive manner, i.e. eliminating JPEG data on all the processing steps and using it only on the final step for storing the image. Quite a little of pro-level photographers do keep their images in JPEGS. Some keep “developed” images in TIFF, some perform initial development and save the data in DNG (which is somewhere in between of RAW and final image) and some do keep only original RAWS, whereas the software such as RawTherapee remembers internally the settings for all the processing steps making it possible later to repeat the process would you need to generate JPEG or other viewable data again. Luckily Windows is able to show NEF data as images internally using Nikon’s plugin and GoogleDisk is able to process NEF data and show it (actually it does it quite good and even better than my Windows does). Result is not the same as you would do with RAW image software yourself but is very very good and useful for viewing archived images.
Recall here also that RAW image processing software (Lightroom, Rwatherapee, other, you name it) works internally in 48 bit L*a*b color space, which is indeen faaaar more superios to 24bit color space of JPEGs. You won’t get you skies burned and image looking dark or gloomy easily in 48bit L*a*b. There is plenty of room for all the inforation to keep.
“I was thinking out loud that I may try using a lower compression, perhaps 80%,” – The JPEG quality factor will not change the density neither the exposure of the image. Images compressed with 80% quality will look have more blocking artifacts, meaning you will see the 8×8 pixels square areas will similar colors, and all pictue will obtain the look of mosaic would you push this quality factor even more to smaller values. Indeed it wolud not help you printing better images and on a home printer there would be really better print from RAW image processing software or from the software that saves images in TIFF. Remember – JPEG is lossy, blocking, and it has limitation of 24 bits (256 gradations per color).
Some technical information – The lattitude of JPEG image data is not simply enough to capture all the variation of the color and brightness change. The 256 gradations (8 bit per color) JPEG offers compare to 8 stops lattitude of the first digital SLRs. Therefore RAW shooting is (and has to be used) in order to solve the issues Jan has correctly pointed out on your pictures. For the bright sky, you need at least 1024 brightness values (at least 10 bit per color, or 10 stops), meaning you need at least 10 bit to represent it in the image, entirely it needs a set of 4096 gradations to preserve all details, it will push the demand further to 12 bit per channel. Modern camera sensor has a lattitude of 12 steps, which is in fact about 12 bits per color, not the 8 !!!
“I have heard that one can print straight from a RAW photo, but I have never tried it, seeing no reason to do something that I regard as so silly.” – You do not print from RAW “picture data” (not photo) but print within the RAW processing software eliminating the need to store image in a destructive manner (in JPEG).
The necessity to convert the image to JPEG exists only for WEB sites and fotofinishers demanding JPEG image data. After you convert the image to JPEG you lose some data. To compare with music it is as to convert WAV (read RAW) data to MP3 in order to burn it to CD just because your burner takes MP3 as an input. IMO, it is precisely “silly” doing such an obstructive an destructive conversion for a finishing results. Everybody will record CDs from WAV or directly from the Audio-processing software working on RAW audio data, which would be internally sampled on a much higher rate than WAV and (of course) MP3 would permit.
“perhaps 80%” jpeg compression will not improve you pictures.
“I agree with you that jpegs look brighter and more vibrant than corrected RAW files do, which is always a happy surprise when you see the converted picture” – It means the camera internal procesor does (in fact) a better job than your image processing in NX-capture + Zoner combo.
“but the reality is that it is a necessary part of modern photography,” – New Manual and RAW shooters should learn from this post that it is not enough just to use Manual mode to get proper results. One would need to learn working with RAW image data. Manual mode gives you better options to preserve in your imagery data larger amount of information about the scene and it is up to RAW imag processing software to dig this information from the RAW data and store them in DNG, TIFF, PNG or JPEG (2000 and common) data format.
Once more, JPEG data format does not simply able to offer all the capability to capture (store, gather) all the details of the scene you and your camera sees. The RAW image format is not the image format but the data stream directly from the camera sensor. It needs to be processed or “developed” in order to be shown to viewers. The development process includes de-mosaicing, exposure and black point compensation, gamma conversion, tonal (white balance) conversion, picture enhancement (contrast, sharpness, vibrance, and you may add some tonal curve processing and restoration in terms of noise, lense distortion, vignetting, perspective, rotation, alas cropping, and whatever else you and authors of the software may imagine. A good software offers pretty automatic sequence for this entire process making it no more complicated than photography in Manual mode. In good hands these tools will give such a beatiful photographs that woul be otherwise lost if shoot on JPEG in the full-auto mode.
I hope these explanations helped you and other, regards Dr. Eugene Ageenko, PhD in Image Compression.
And, again, thank you Robert for your wise comment, and thank you Elaine for your essay.
I have rewritten the fifth paragraph later in the post, so just disregard it please, sorry for that.
Hi Eugene,
I thank you for all this in-depth information. It is not beyond my understanding level but it is very far beyond my experience level. Usually I am very happy with the way my photos come out. I do have one photo (RAW) that I have never been able to correct in the way that I would like, and have concluded that the information is just not in the picture to recover. As I gain in learning and experience, I always go back to it to see if I can do more with it. As for jpegs, I have been told that the information lost in conversion is something like extra data that the eye can’t see anyway. I do sometimes appreciate the smaller file sizes of jpegs when I consider storage issues (and by the way I have plenty of storage but I hope to be shooting and saving for a long time to come. I should mention here that my archive consists of my RAW files and my ‘viewing’ files are the jpegs, so I never discard my RAW files). I have long been attempting to teach myself to color correct with levels, tones and curves but it is still a difficult process for me. I have mentioned that I do not print very often, but now when I do I will certainly not try the idea of reducing my compression level, since it will not help the printer produce a better result. I thank you for telling me that. As for my photos that I have published in this article, I like them the way they are and do not want to change them. I did not really agree with Jan’s analysis of them.
I have two main principles that I strongly believe in and use as my guide. One is that learning never stops and is life long, and the other is that ‘good enough’ is never good enough. One’s best effort is the only worthwhile goal. Therefore I very much appreciate all that you have taught here, and thank you for taking the time to teach it to me and all who read it. Best regards, Elaine
Thank you Eugene for your technical in-depth information. Let me try to rephrase it in a less scientific manner.
The lattitude of a modern digital camera (in other words its capability to capture the scene of different brightness) is about 12 stops, which means it needs 12 bits per pixel (and per color) to store this information. It means that the camera’s tonal range is broad. If you look at RAW pixel values using hex viewer, you will see, that they go way beyond the 255 for bright areas reaching nearly 4000 or even more if 14 bit is set in camera.
The JPEG image file tonal range is narrow and is capable to represent only 8 bits per color, which equals to 8 light stops.
When you produce JPEG images or simply show the photograph on screen (which is also only 8-stop-capable device) then original imagery data must be somehow fitted to these 8 bits. If dark areas are mapped exactly as they are. the bright values (sky, reflections, sun, bright skin, etc) will clip-out or wash away from your picture. To prevent that from happening, the range compression is applied by the processing engine no matter where it is (in software, in camera processor, in Photoshop. and so on). If the entire range of brightness data is shrinked to fit within the JPEG file, then the bright pixels will not clip-out, but shadows will look much darker, as in your photographs, Elaine.
Even more simpler explanation, RAW image histogram is about 4 stop wider than JPEG image histogram, period!
Every RAW capable software will have to deal with this tonal mapping issue and it is up to the software to decide how it works.
You can use the camera own in-built RAW to JPEG conversion, it works finer and better. The algorithms in NX capture softare are from the era of D700, whereas D800 and never D850 use better processor engines that makes better JPEGs than ever possible, try that. Try also ADL option in the conversion, it maps the entire scene correctly!
Rawtherapee software makes it possible to control over that conversion proces preserving the bright areas from being clipped-out. It also gives you ability to control BLACK point making photos look denser as you like (for example it will make otherwise dark-gray fence looking real black)
All professional tools use internally 48 bit processing that gives you 16 bit (or 16 light stop) lattitude. This information is there even though you cannot see it on the screen.
And, finally, this is why JPEGs (8/24 bit in sRGB) will look better and more appealing on a 8-bit (24 bit in total) sRGB monitor, unless you use 48 bit monitors. If you tweak your RAW-to-whatever_is_8_bit_(PNG or JPEG) conversion procedure, you will be able to get even better and even more appealing images, JPEGs or prints.
Try this software and save your image as PNG, which is lossless comparing to JPEG, in order to print it or post-process (crop, sharpen or saturate). Use JPEGs only as a final step for sending images to a Web gallery. Be sure, web-server does not recompress your JPEGs as Google does. Sometimes 95-JPEGS will be recompressed to 80-JPEGs by the servers, and will look not good. Use adaptive Huffman table for storing JPEGs if possible. Print from a PNG image, not JPEG. That’s all.
And, please, please, please have some fun when photographing.
Come home enlighted not bored.
Learn to see and not to shoot.
Thee are not hunters ain’t ya.
The mother
Hi Valentina,
An interesting poem! I would just like you to know that the study of photography does not take away from the enjoyment of the art. It enhances the person’s ability to fulfill their artistic vision. It makes taking pictures more fun, not less. As for the word ‘shoot’, I’d much rather see it used in the way photographers use it than in the way the rest of the world uses it. Thank you for writing.
Hi Robert,
I have not heretofore given much thought to printing these very high resolution photos. I do a little printing on a home photoprinter, but find the results to be mediocre. I have not given much attention to why this may be so nor how I can correct it. I don’t have much present need to print my photos. Perhaps I will try making jpeg copies from my RAW files with lowered compression to make the photos less dense when I want to print them. I never thought of doing that until this recent exchange of comments. One big disadvantage of home printing is the size of the print one can make on a simple home photoprinter. I’ve had no need to invest in one that can make large prints, so am stuck with a size that probably compounds the density problem. This gives me much food for thought. Thank you for writing.
Yes, of course, you will need to convert your image to JPEG first to print it in the lab. The 8bit JPEG has only 256 grads per channel making it quite limited in term of lattitude, though you may tweak your images to what you want before you send it to the lab. My lab does A3 size pro prints for less than 9 dollars. Pro means here they use calibrated environment and print on pro paper. They accept only sRGB JPEG,
Try RAWTherapee free software that is the most advanced RAW prcesing tool to time. There is much that can be done with images but only few you really need. It is more convinient than Adobe’s products and oriented to photographers at first.
When you look at RAW images aside with JPEGs your camera produces (at least it is that way for my Nikon D300) you will find out that all RAW images have darker shadows and unless you subject is in the bright side of histogram you will need to make something in that software to make it look a bit brighter, otherwise all details will stay in shadows. It is not the error but the way the camea sensor sees images and similarly stores them in RAW data file (which is the sensor’s vision unprocessed)
When you look at your images as JPEGS (if you shoot double RAW/JPEG as I do) then you will see that JPEG images have somewhat brighter appearance, in other words when the darkest point looks identical but shadow region looks much brighter. This is because the camera processor applies some Gamma correction to the image. Same does NIKON RAW image plugin, a shell extension for Windows that makes it possible to view NEF files as JPEGs.
Using RawTherapee is possible to process images without loosing details in shadows and bright areas alike, meaning that it is possible to capture entire scene correctly and not burning the skies, The software does quite a good job using auto settings but can be tweaked to whatever result you want.
Thus shooting RAW + postprocessing in RAW therapee and similar programs is in a way superior to a standard JPEG shooting from every perspective. This is the information for beginners and those who wonder about RAW photography,
More information can be found here
rawpedia.rawtherapee.com/Expos…uto_Levels