With spring arriving in the Northern Hemisphere, it’s time again for many of us to go outside in humid, buggy areas in search of creepy-crawlies. Macro photography is… peculiar, I admit that. But anyone who’s tried this genre also knows its allure. Navigate some technical hurdles and heed the mosquitos, and you’ll find whole universes of photographs to capture in your backyard. If you’re just beginning macro photography, the following tips will show you where to start.
Table of Contents
1. Learn Bug Behavior
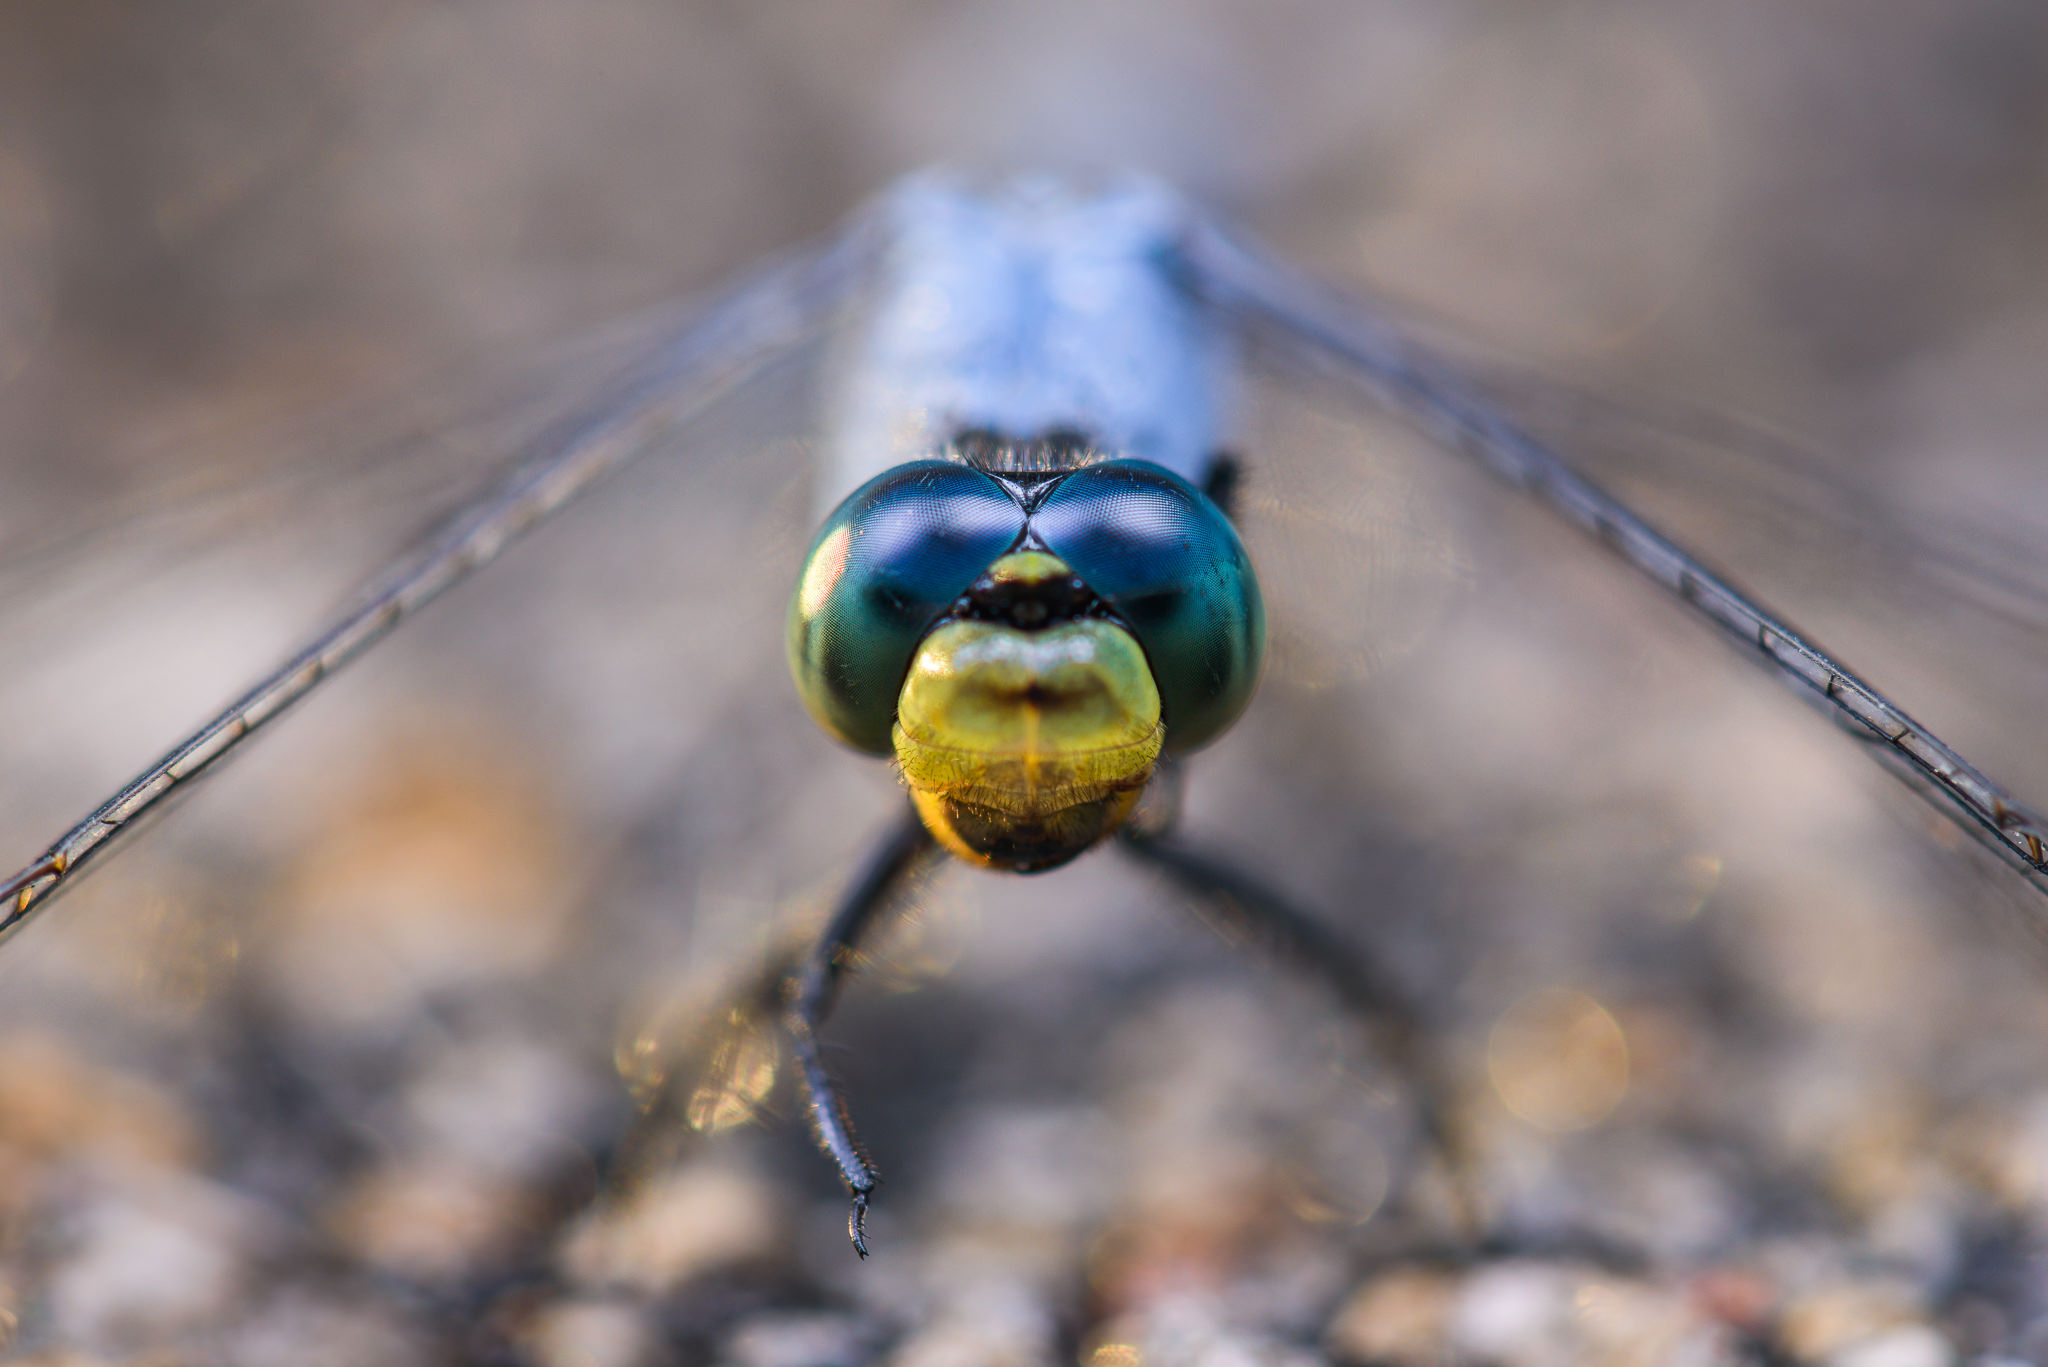
You should understand your subject if you want to photograph it as well as possible. What, for example, is the easiest way to approach a dragonfly without scaring it off? By knowing the answer, you dramatically improve your chances of getting the photo you want.
Some bugs fly away when you get near, or when your camera’s flash goes off. Others need a few minutes to get used to your presence, but they’ll ignore you in time. Still others don’t have the slightest care about people. In that way, macro photography is like the broader genre of wildlife photography. You need to work with your subject’s natural behavior in order to photograph it successfully.
The best way to learn bug behavior is simply to take a lot of macro photos. The more you photograph one particular insect, the easier it will be for you to predict what it’s about to do. This tip extends to other animals like lizards and spiders, of course.
Now, to answer the question I posed a moment ago:
The best way to approach a dragonfly, in my experience, is to do so gradually. Approach slower and slower as you get nearer and nearer. Pause for a few seconds every so often. Lastly, never make sudden movements. These steps work almost flawlessly for me. Once, I accidentally touched the dragonfly with my lens hood and didn’t scare it away.
2. Start at Sunrise
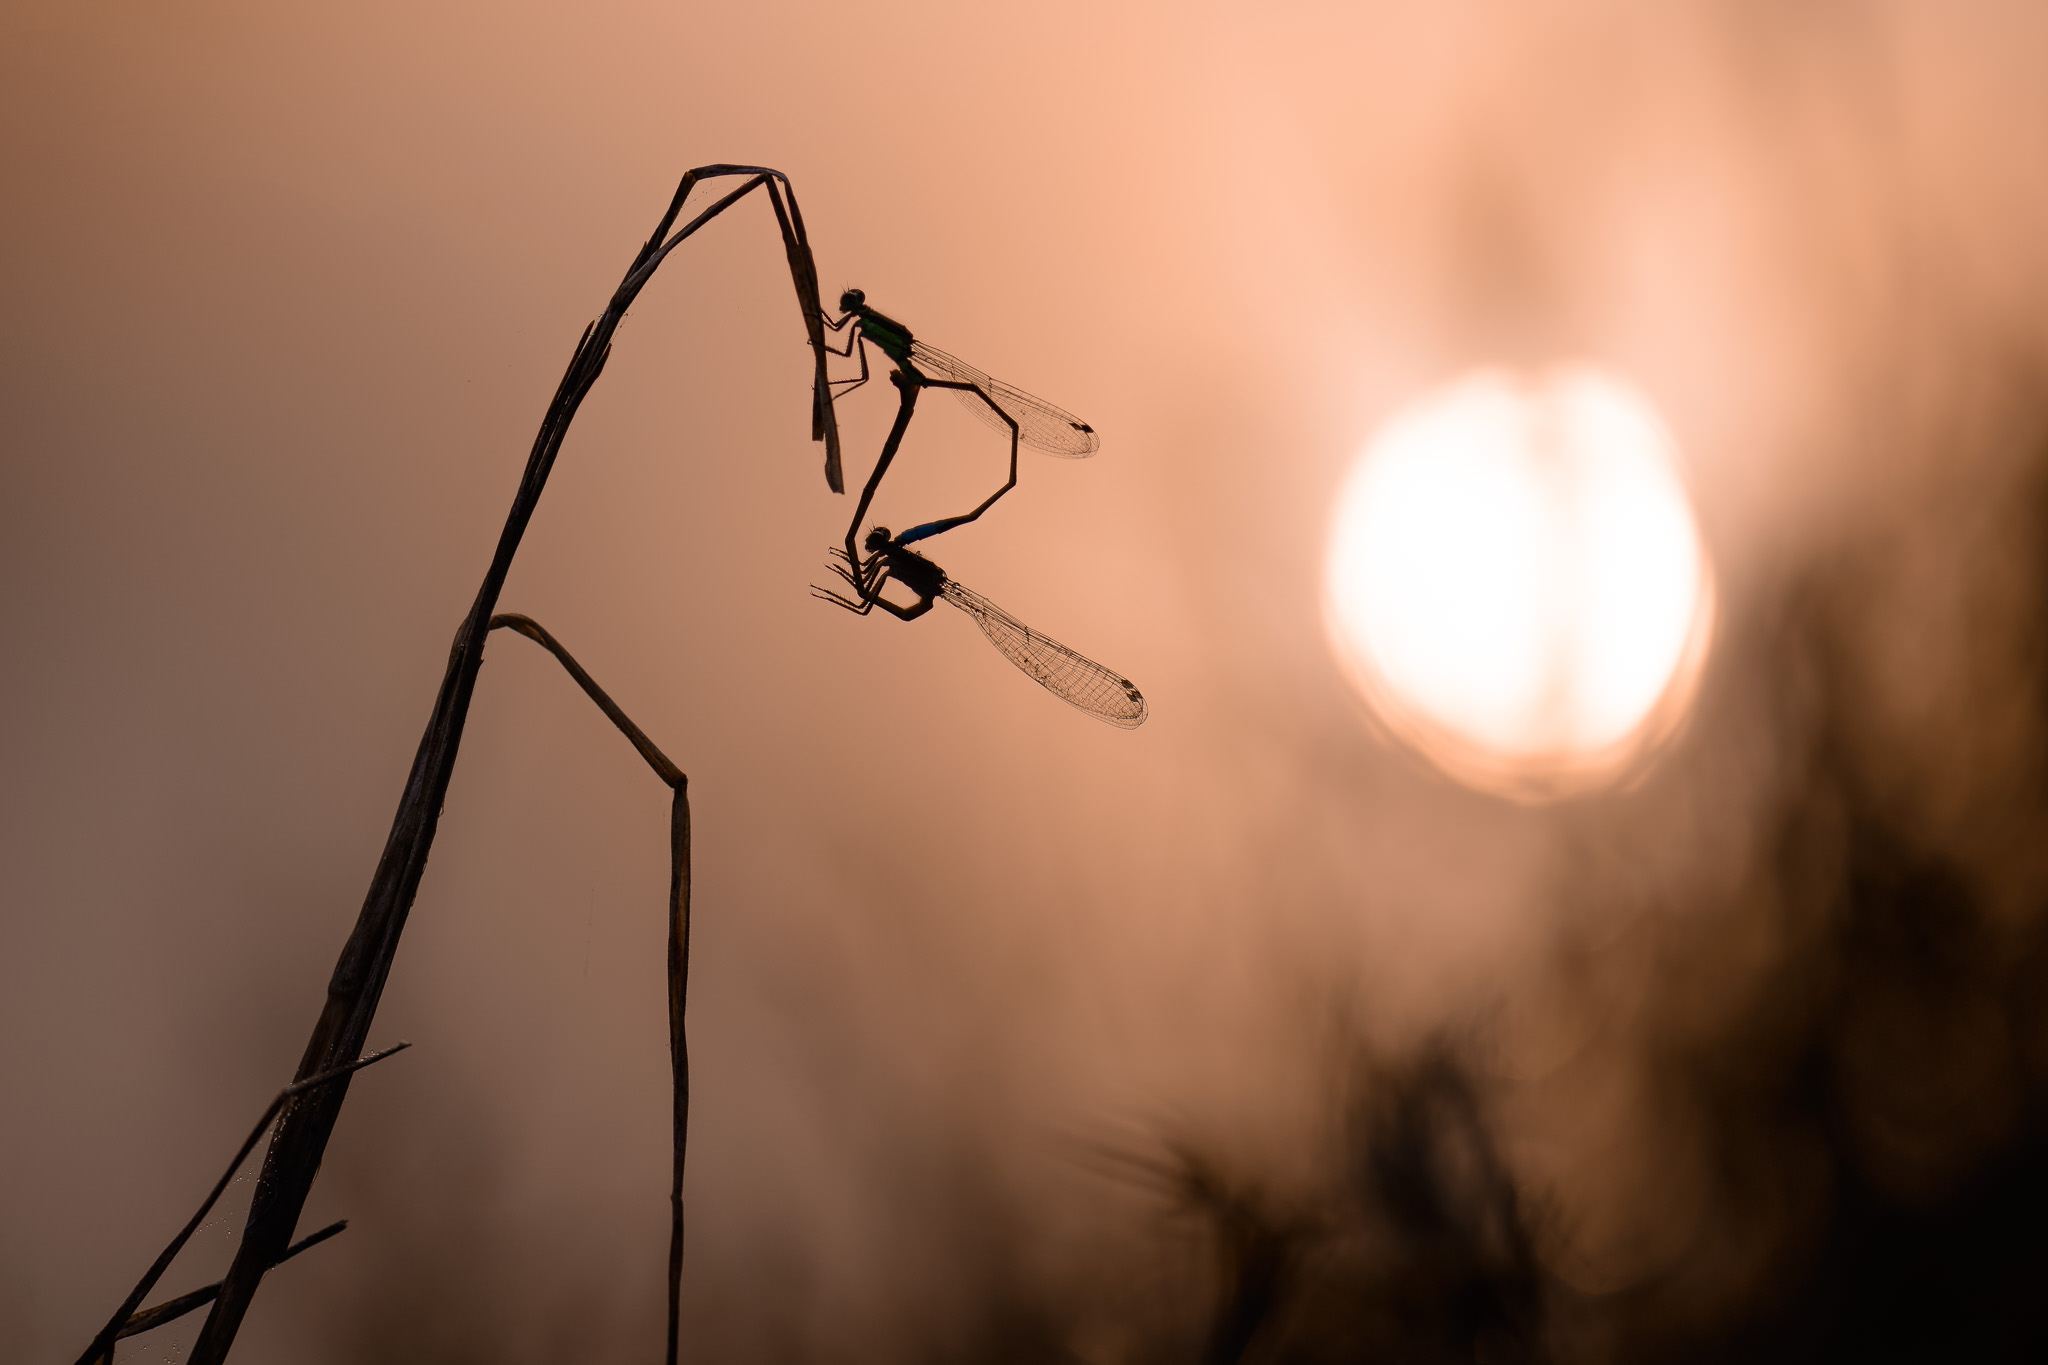
A number of photographers have asked me when I prefer taking macro photos. My answer is always the same: sunrise, ideally on a warm, humid, windless, sunny day.
- Sunrise, because bugs are likely to be more sluggish from the night before.
- Warm, because you are more likely to find a lot of bugs out in the first place.
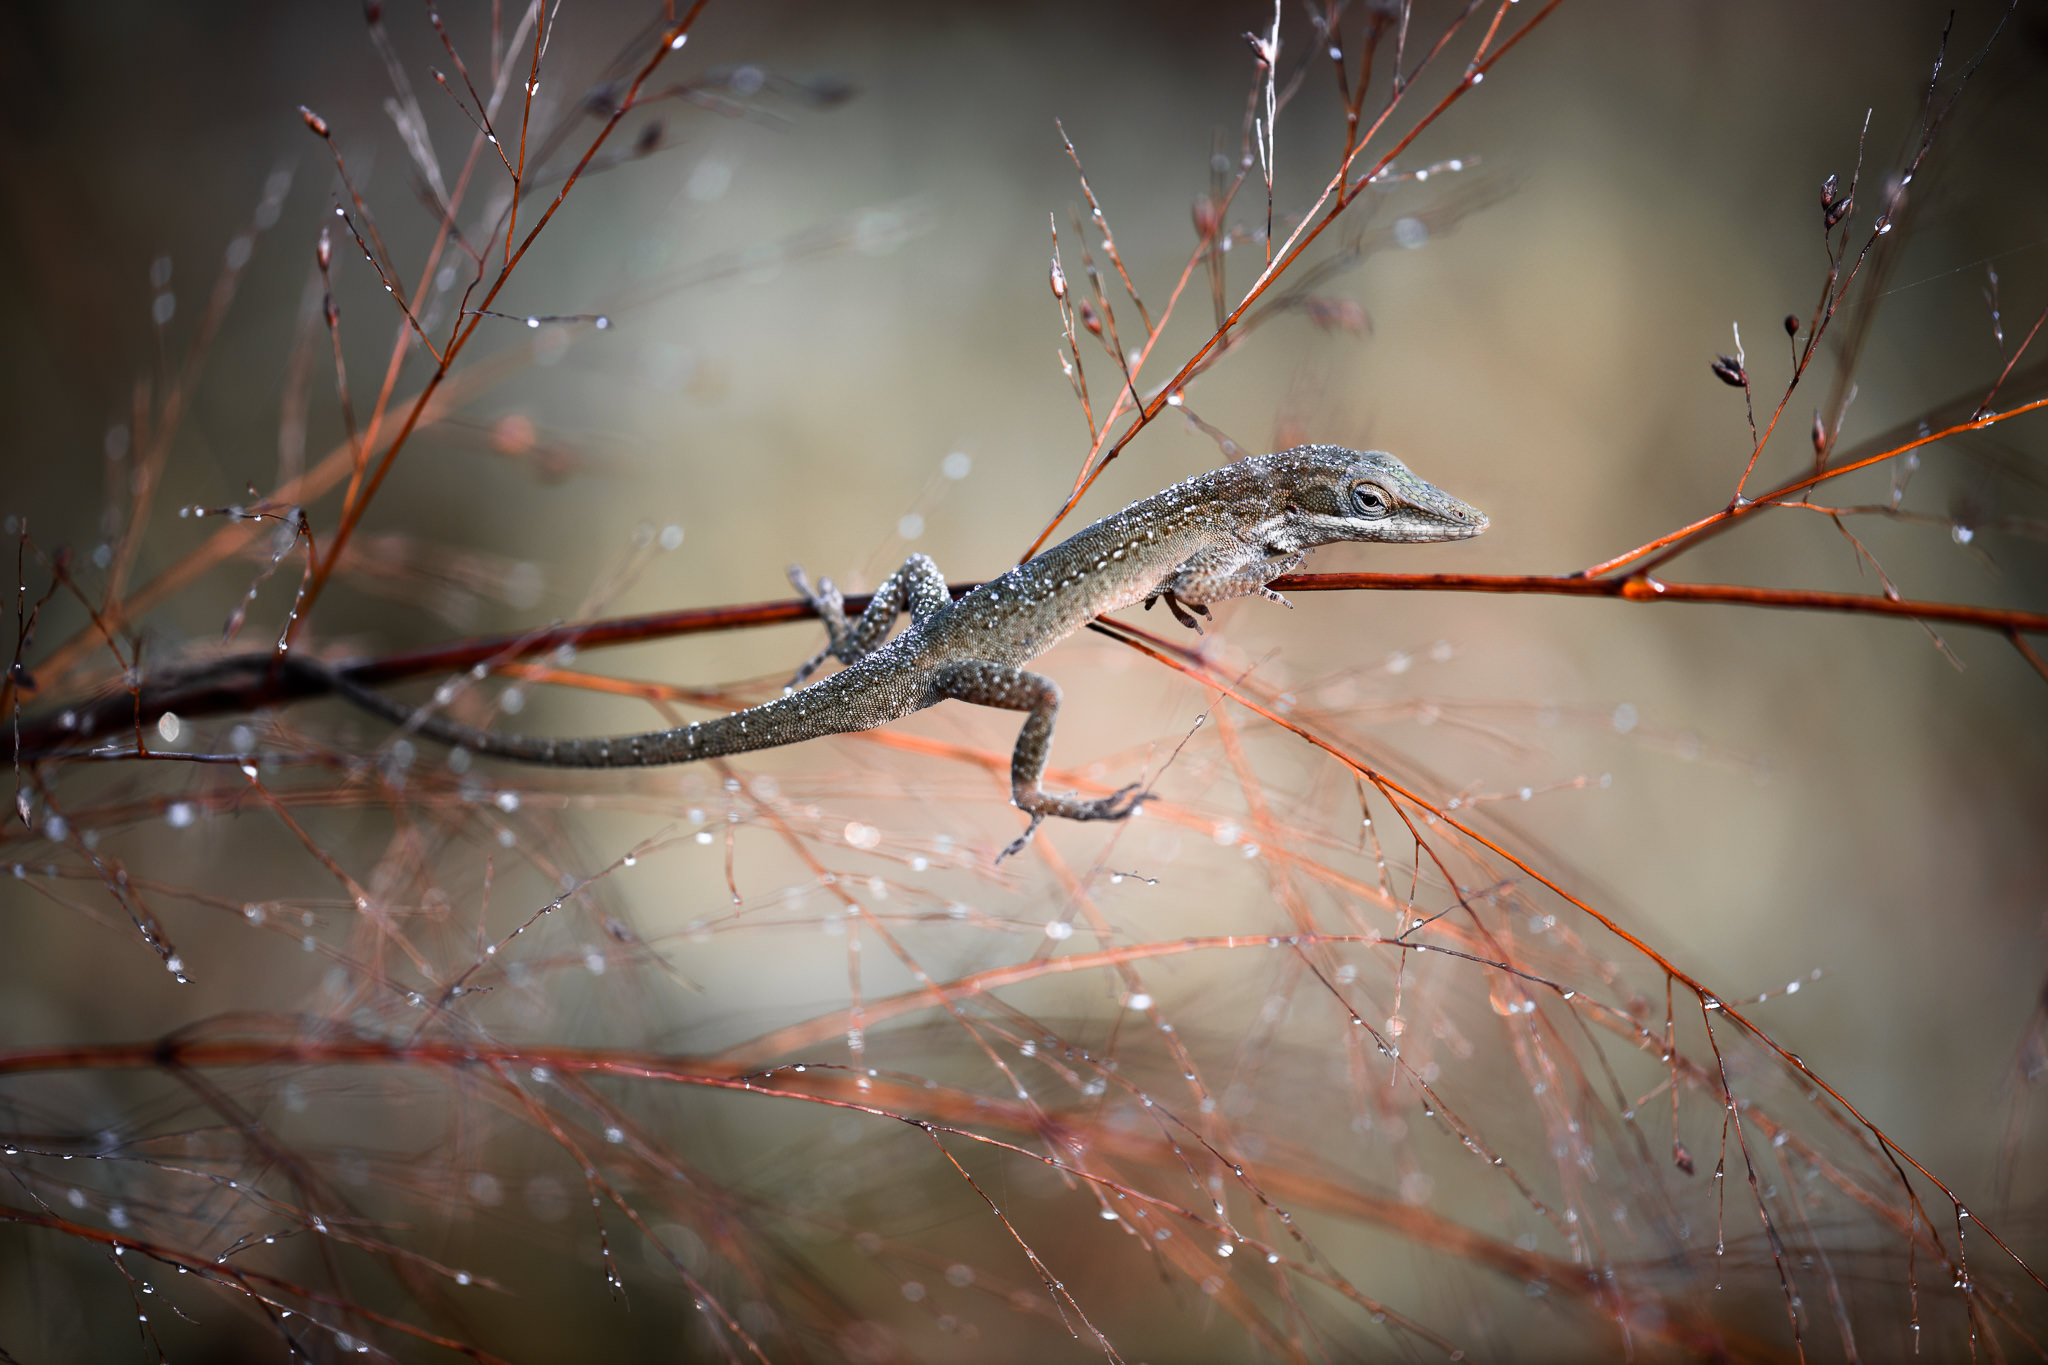
- Humid, because dew droplets look beautiful in photos. Water also slows down many creatures (making them sit still and dry off).
- Windless, because it is very difficult to focus on a macro subject when plants are moving in the wind, and more bugs are usually out on calm days as well.
- Sunny, because it makes for good light and attracts more creatures.
The common denominator here is sunrise; the light is great, bugs are slow, and water droplets are more likely to decorate the world.
Of course, sunrise isn’t the only time of day that works for macro photography. If you use a flash, your lighting will be similar regardless of when you take pictures. So, it’s all about finding an interesting subject, no matter the time it happens.
However, if you’re starting from scratch and you want the best chances, sunrise is my recommendation.
3. Tell a Story
The best photos work well because they resonate with our emotions. In the field of macro photography – or any genre of photography – one of the best ways to convey emotion is to tell a story.
Most of my favorite macro photos do not just show a subject. Instead, they show a subject doing something. A bug is reaching for a nearby leaf, or waiting for something. It’s playing with the light and background. Rather than looking at a photo of a bug, you are watching a story unfold.
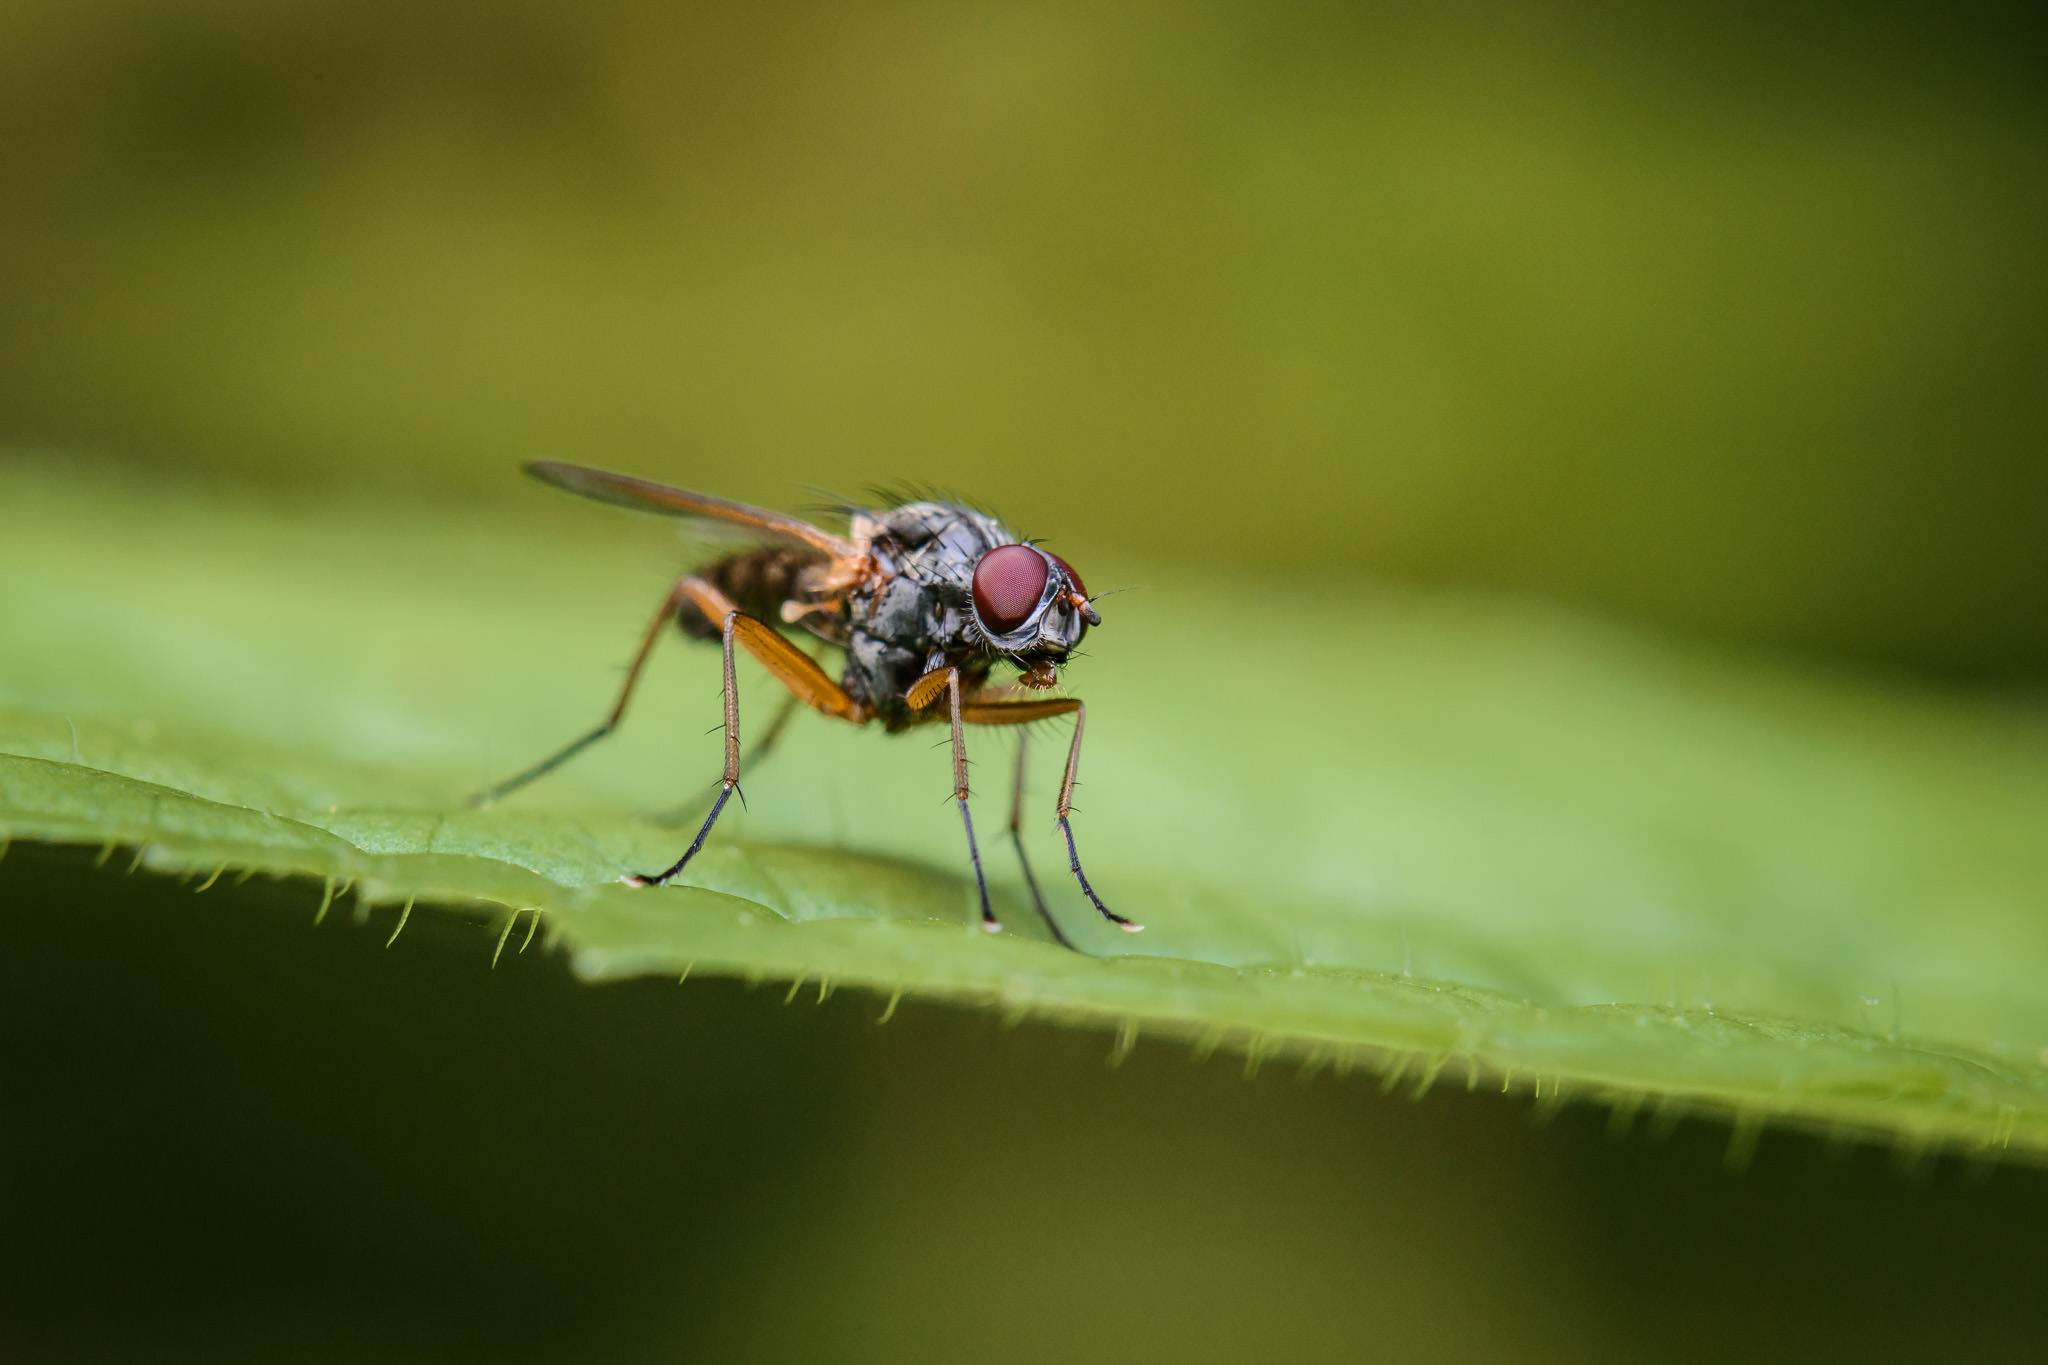
Macro photography is at an advantage when it comes to telling a story. Because your subject is so far outside what people ordinarily see, you can get away with a more “plain” and literal style while still retaining a sense of wonder in your work. For example, you might capture an ordinary bug like a housefly, magnifying it through a microscope to show remarkable detail in its eyes.
Unfortunately, the importance of telling a story is also the reason why some macro photographers stage photos without telling their audience. To convey a whimsical mood, they find an interesting bug, put it in the freezer, and then manipulate it manually in a studio into unnatural positions. This sort of photo is easy to identify in many cases because it looks completely unrealistic, like a praying mantis on top of a mushroom with a perfect background and studio lighting.
4. Use a Flash
One of the primary challenges in macro photography is capturing enough light. There are three reasons:
First, you’re focused at extreme magnifications, which reduces your depth of field down to just a hair’s width. Unless you’re shooting a stationary subject and using a tripod (at which point focus stacking is an option), it will be a huge challenge getting enough of your subject sharp. Your best option is to use a small aperture like f/16 or f/22 (full frame), and that makes your photo extremely dark.
Second, the close focus not only magnifies your subject, but also motion blur (and blur from camera shake). The old “1/focal length” rule is not nearly enough to capture sharp macro photos handheld. Vibration reduction helps – as does standing a bit farther from your subject to magnify it less – but you’re still dealing with heavy blur even in the best of cases.
Third, the closer you get to your subject, the more natural light you will block. Even on a bright day, the wrong angle can cover everything with your shadow, cutting down the light by several stops. Not only does this make it even harder to get a bright enough photo, but it means that the quality of light itself may be quite poor – with your subject dark and the surroundings bright.
The easy solution – use a flash. It fills in all the light you could want, and the duration of a flash is so quick that it will freeze any motion in your scene instantly. Some photographers use constant lights for macro photography, such as ring lights, but I don’t recommend these because they only add a couple stops of light to your images. Flashes, when placed so close to your subject, actually outshine sunlight.
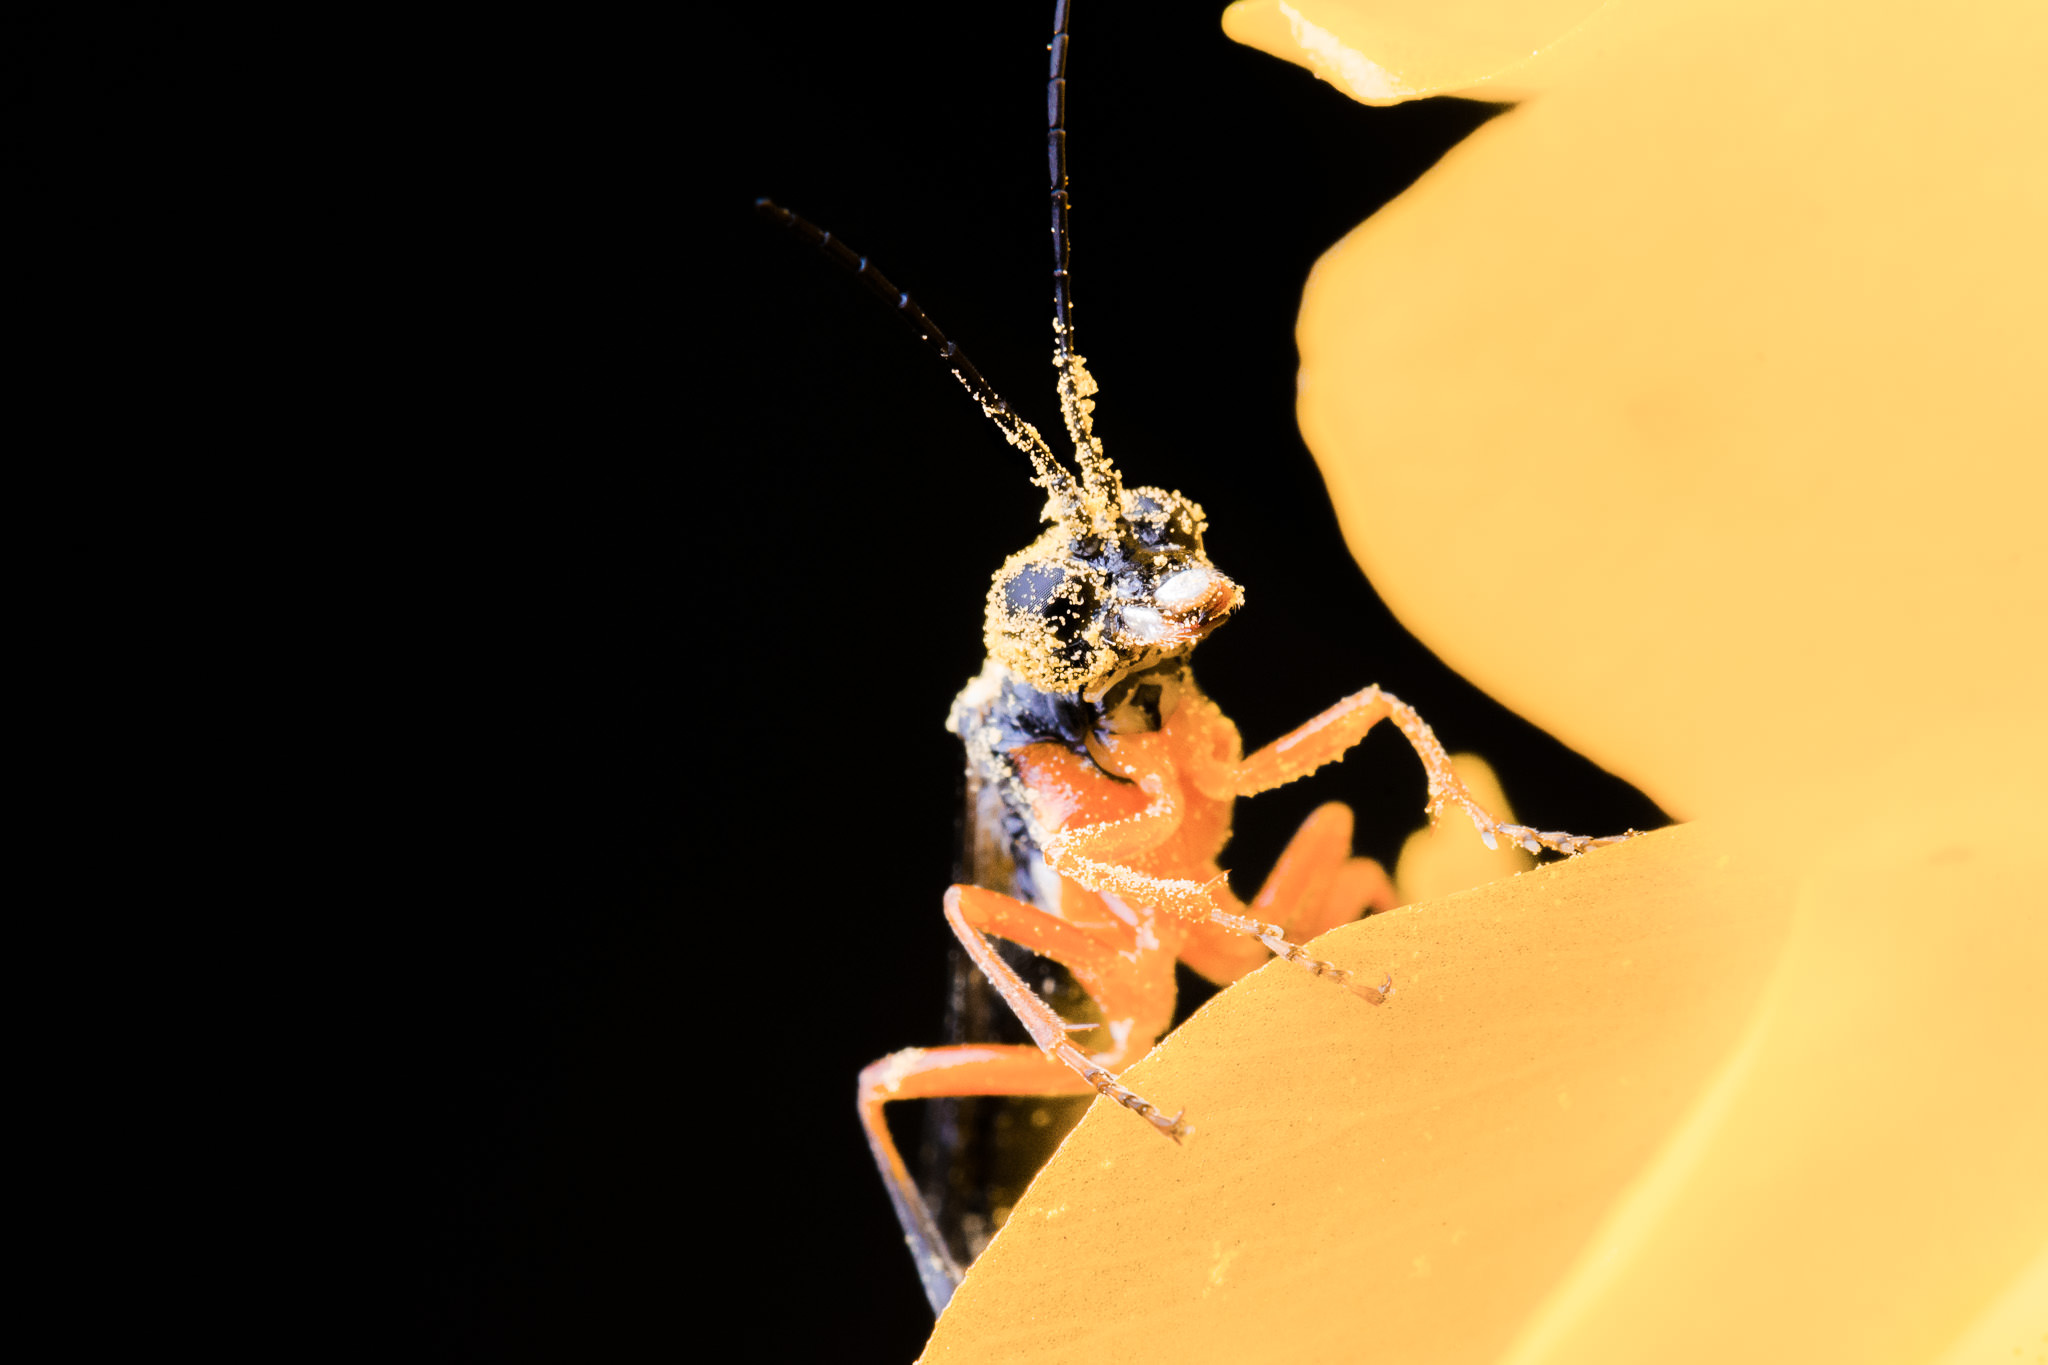
5. Diffuse Your Light Source
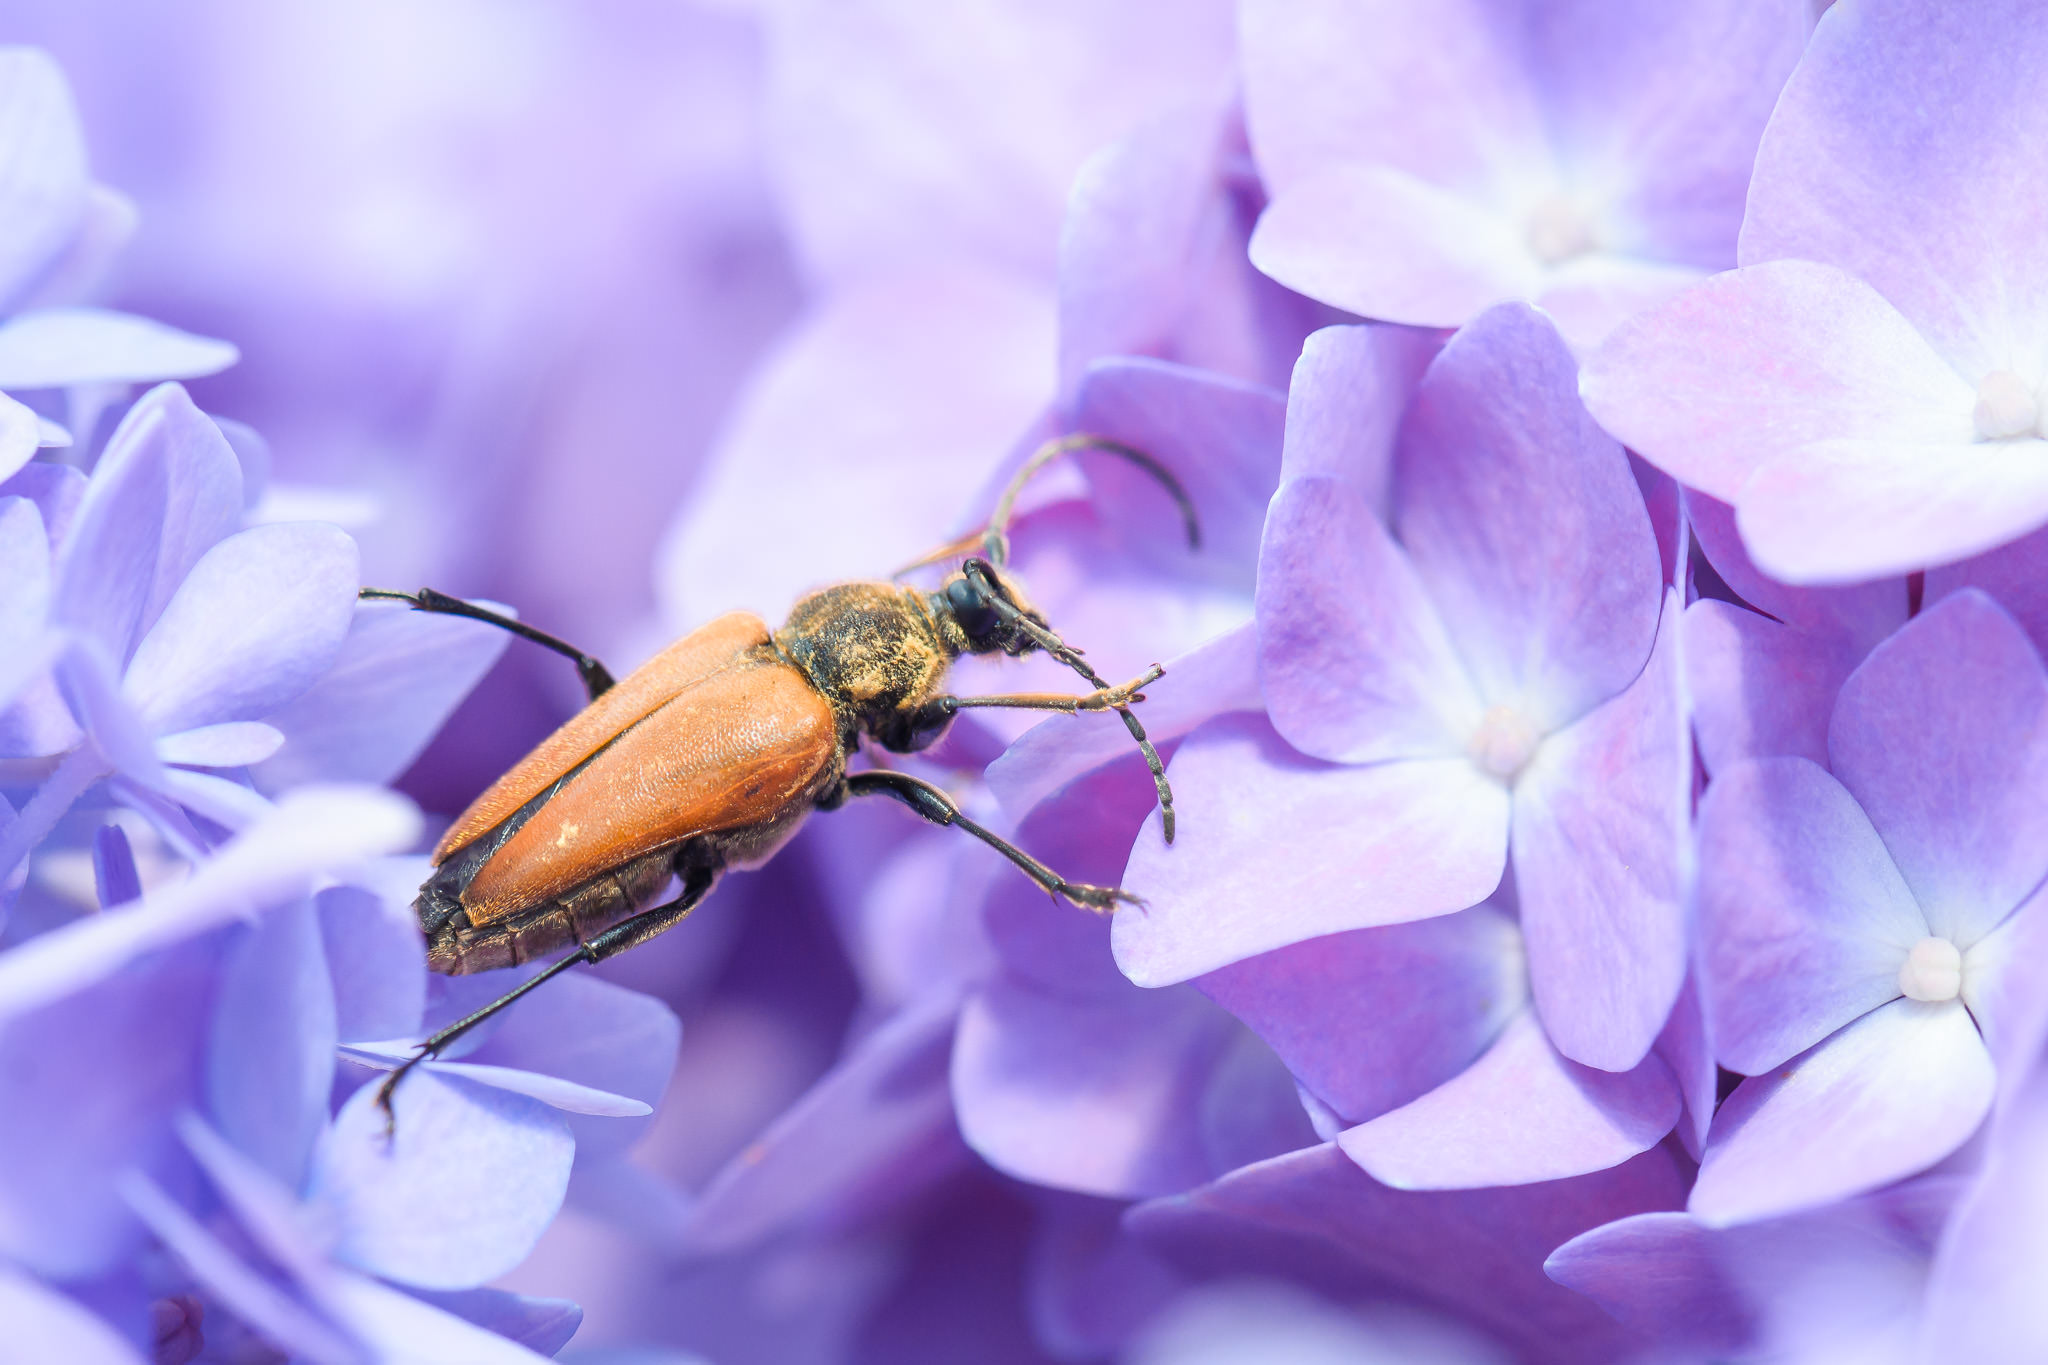
As valuable as a flash is for macro photography, they do come with some considerations. On one hand, they aren’t always necessary. For lower-magnification macro photography, like photographing butterflies, flowers, and dragonflies, you can get away with wider apertures and more normal shutter speeds, so you have plenty of natural light to work with.
More importantly, when you do use a flash, it is very easy to end up with harsh light and bright specular reflections that make your subject look ugly. Macro photography lighting is so complicated and important that we have a full article on the subject. The takeaway is simple, though: diffuse your flash.
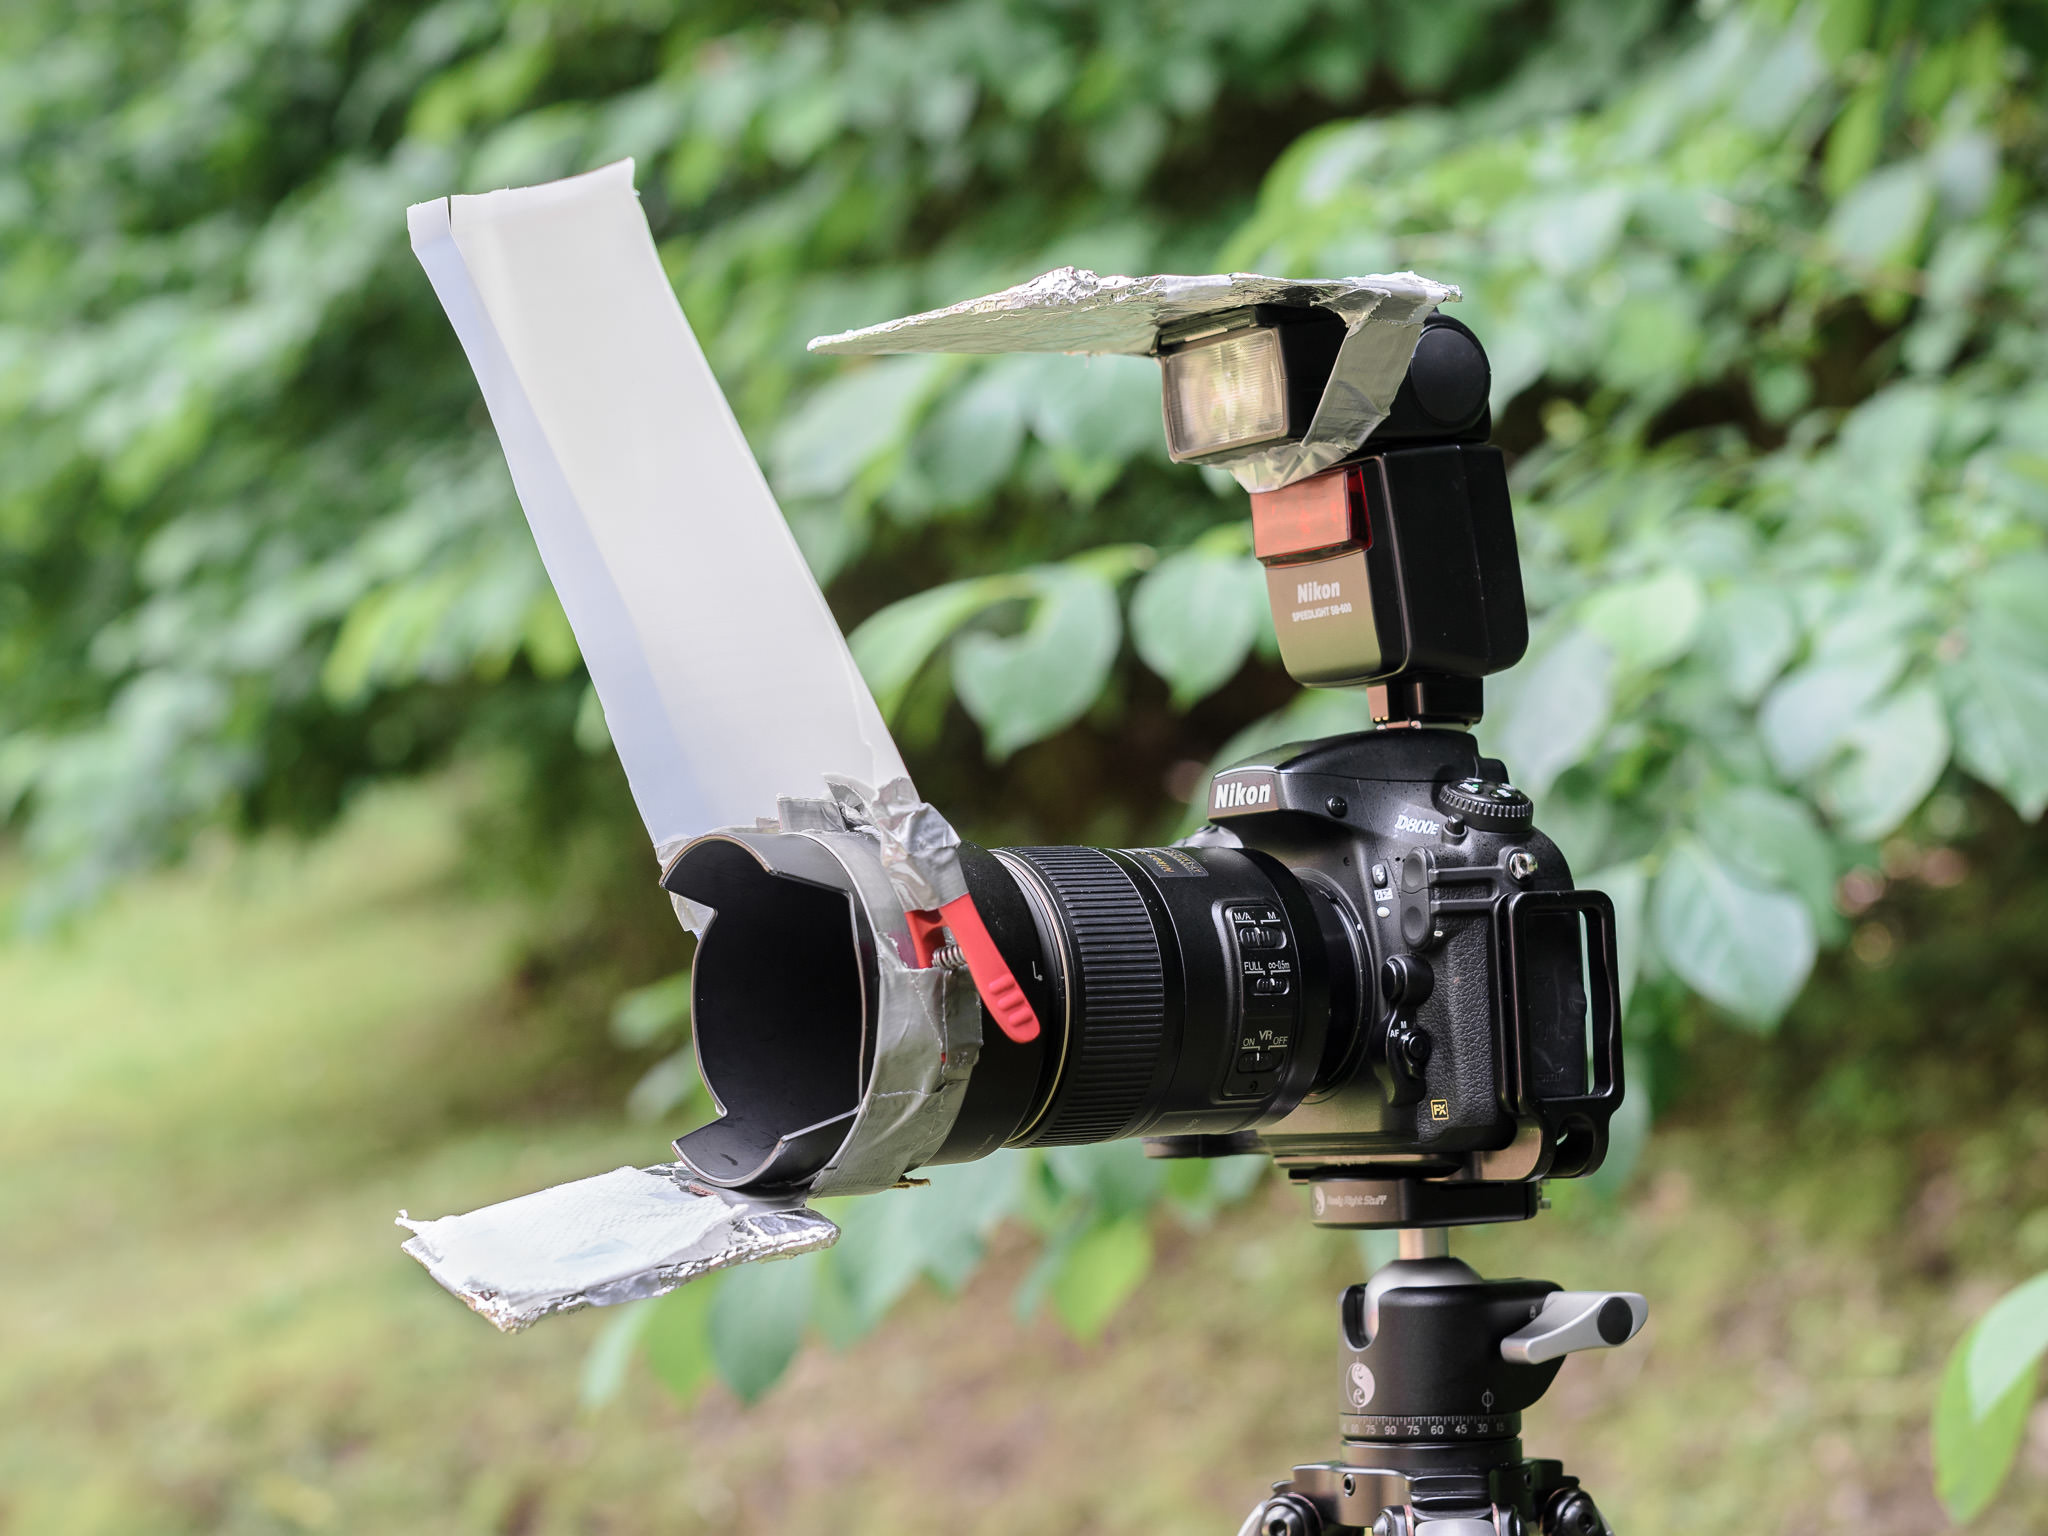
Use a simple diffuser to spread out the area of your flash and make the light much softer. Done properly, you shouldn’t even be able to tell that you used a flash. One option is the $7.50 Vello Mini Softbox, or you can experiment with making your own. But this is a critical step that you shouldn’t skip if you’re just starting macro photography. If you’ve ever taken a photo of an amazing moment and beautiful subject, but the lighting is horrible and harsh, you’ll know how frustrating it can be.
6. Tone Down Your Flash
When I say to tone down your flash, a lot of photographers might expect that my reasoning is similar: make the light less harsh. But that’s not the case at all. The brightness of your flash doesn’t really affect its harshness – that’s more to do with how well it is diffused. Instead, my reason for recommending a lower flash power is simple: It will recycle more quickly.
At full power, even higher quality flashes can take a few seconds to recycle after each shot. This means, at a minimum, that you won’t be able to take bursts of macro photos in a row. And in the worst case, you might miss the prime moment of action simply because your flash doesn’t fire, or fires too weakly to matter.
Instead, I recommend shooting most of your macro photos with the flash at 1/4 to 1/3 power. This is a good balance between a bright output (so you don’t need to raise your ISO too high) and fast recycle times. Of course, “1/4 power” isn’t the same on all flashes, but these recommendations will get you in the right ballpark.
7. Set Auto (TTL) Flash Correctly
For flash-lit macro photography, my recommendation is to set aperture, shutter speed, and ISO manually, in combination with an automatic/TTL flash. You want your flash to hover around 1/4 power, increasing or decreasing slightly based on the reflectiveness of your subject. How can you make this happen?
It’s fairly easy. First, set your aperture to get enough depth of field. The ideal value depends on how far away your subject is. For high-magnification macro photography, I recommend sticking to f/16 or f/22 (full frame equivalent). You can use much wider apertures if your subject is farther away. I use f/4 and even f/2.8 for close-up photos all the time.
Then, set your shutter speed to its sync speed. For a lot of cameras, this is 1/200 or 1/250 second – the fastest shutter speed that still works with a speedlight. Since you’re lighting the image artificially with flash, you’ll want to cut down on natural light (and the motion blur that comes with it). Setting the sync speed is the way to do that.
Next up is your flash. For now, just manually set 1/4 flash power. Even though you will eventually make this automatic, the goal at the moment is to find the combination of other settings that allows good flash exposure around 1/4 power.
Lastly is ISO. Now that you’ve set everything else, gradually increase your ISO from its base value and take sample photos of a normal leaf up close. Stop increasing ISO when your photos look the proper brightness. From here on out, keep aperture, shutter speed, and ISO to the manual values you’ve set. Turn the flash to Auto/TTL. Now, even though it’s an automatic flash, it will always be around 1/4 power.
8. Focus Manually (Sometimes)
I’m a big proponent of autofocus even in genres like landscape photography where some photographers recommend manual. However, in macro photography, you might not have a better choice.
For extreme close-ups, autofocus simply isn’t fast enough to track all the movement going on. My recommendation is to set manual focus instead. Then, very slowly rock forward and backward until your subject looks as sharp as possible in the viewfinder or rear LCD. When it does, immediately take the picture.
This is not a perfect technique, but I have yet to find one that works better. For handheld images at full 1:1 magnification with a macro lens, and a stationary subject, this method will get anywhere from 25% to 50% of your photos perfectly sharp, depending on your technique.
You can improve your keeper rate significantly by avoiding maximum magnification on your lens and photographing larger subjects. In that case, autofocus becomes perfectly feasible, and it’s what I recommend.
Maybe the takeaway from this whole article is that macro photography is hard, but you can make it easier by photographing larger subjects! “Close-up” photography is simply easier than extreme macro photography. Both are worth doing, but anyone who is just starting out in macro photography will have more success and get less frustrated with less extreme magnifications.
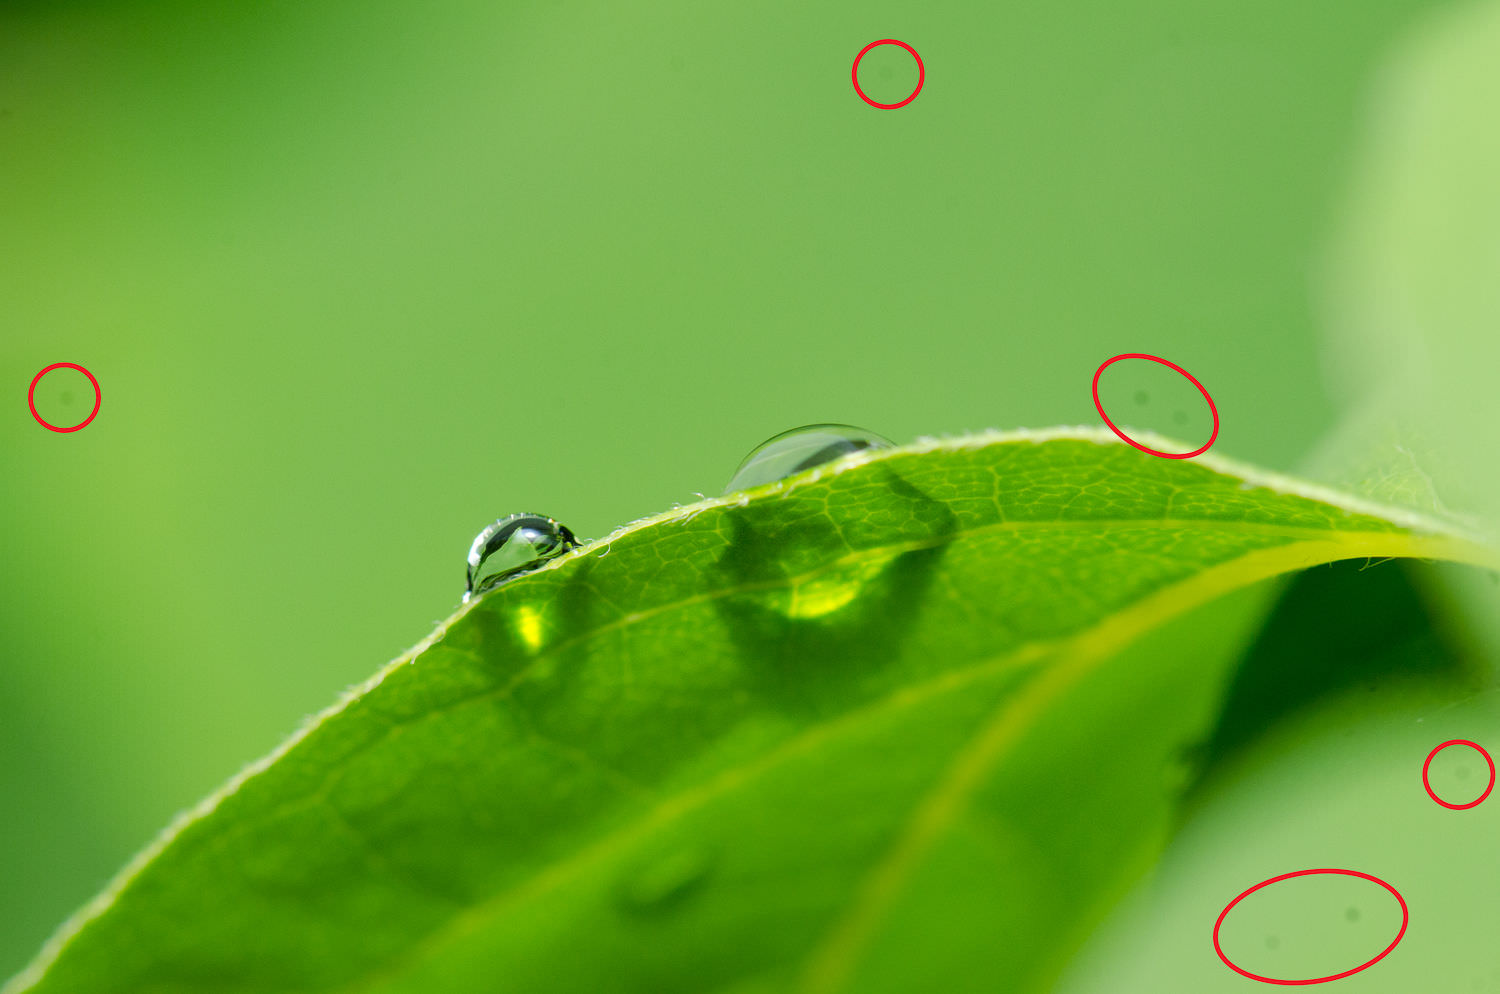
9. Get Rid of Dust Spots
Lastly, it’s important to edit your macro photo well, and part of that includes removing dust spots in your images. The smaller your aperture, the more dust spots you’ll see, and the darker they will be. This will be immediately distracting to a lot of photographers who look at your images – and it still amazes me how often I see dust spots in published macro photos, whether online or in print.
Dust spots are easy to remove in most post-processing software. You can also use an “envision dust spots” tool in software like Lightroom and Capture One to notice dust that is a bit more subtle at first glance. There’s no excuse not to do this; it only takes a minute, and it elevates photos to their full potential rather than distracting a seasoned viewer.
If you enjoyed this article, you may want to check out the other following tutorials on Photography Life:
Fantastic shots, congratulations!!!
Great tips! I can add another for dragons and damsels besides not letting your background ruin the images. 90% of the time when I go out for them I am only going with them in mind which means tripod, release and 90 and 150 macros. Watch them for awhile. The better part of their day is spent hunting and the perching types will often return to the same perch over and over again. You have time to use that interlude when they are off a a short hunt flight to really get close and get the background right in relation to whatever they may be perching on and get your focus point down. It’s then easy to manual it a fraction when the thing returns. Often you will get the added bonus of catching them return with their catch.
With some species in particular I have ‘camped out” at the same perch for 20 minutes easily catching dozens of arrivals and departures from the same dragon or damsel.
Awesome tip, Glenn, thanks for adding this!
I use an old school alternative that you might get a chuckle out of.
I use a Nikonos V (amphibious film) camera with a pair of Ikelite sub-strobes and extension tubes with framers. Only because I already have that gear for underwater photography, of course. Handheld and f22. Magic results.
I agree with all your reasons for getting out at sunrise, but in addition, because there is usually less wind early in the morning. I’m typically shooting for the first couple of hours in the morning if the conditions are sunny, because after that it tends to get windy and the light gets harsh. Bright overcast can be good for shooting macro and I am often able to extend shooting times by photographing in shady areas. I like natural looking light for the most part and so shoot a lot of natural light macro and if I’m using a flash its typically for filling in shadows. I have some luck with the Nikon SB-300 on an arm that can be moved into different placement and the Vello mini-softbox.
Great article with stunning examples – thanks in particular to the lighting/flash tips, now to this information into practice.
I have found that diffraction blur becomes noticeable to me at apertures smaller than f/8, but I will go to f/16 sometimes (Canon 100mm Macro). What you say about light is important, too – especially at true macro magnifications (x1 M or greater). And, usually, one need go no farther than one’s own back yard to practice, unless you are after subjects that can’t be found there.
Thanks for another great article! In one point I have a different opinion: I’m often using AF at magnifications close to 1:1 successfully, so i would not say in general, that it doesn’t work. Maybe it depends on the lens used?
Spencer,
I am a big fan of yours and like your articles very much.
I have almost the identical setup: Nikon D-810 + Nikkor 105mm F/2.8 D.
I have taken many very good macro photos of insects in motion. But, have the following problems:
Focus: can not use autofocus. It locks onto something other than the subject and won’t let go. I always use manual and rock back and forth as you describe.
Artificial lighting: Have given up until this article. My results are either black or blown-out white.
I own a Flashpoint Zoom TTL. Can not make it sync with my camera.
The battery recycle time is too slow – can not do say 1 shot every second for say 30 seconds continuous.
Am afraid that the flash will drive the insects away – possibly not so for a hummingbird moth but possibly yes for a hummingbird.
I would like to do much better and learn macro flash photography. But most instructors/friends use Canon and know nothing about Nikon.
I am reluctant to throw more equipment at my problem. I Just need some solid guidance.
peter
Macro at sunrise is a lovely time, even if just looking at the flora! Nice tips, thanks Spencer
Absolutely, Jon. In muggy areas in the summer, it’s also the nicest time of day just to be outside in general. Happy to hear you liked the tips.
With respect – change the article title relative to your focus in the article: bugs. In truth there are a world of subjects for macro photography and the tips for capturing macro shots of bugs may or may not apply to those other subjects, and since I’ve shot quite a bit in other areas, I can express the opinion that some of these tips are mute for other subjects. Last gripe – four of the tips all have to do with the use of flash, so really it should be five tips and the options you offer regarding how flash is used are related. Lastly, I would offer a key help regarding the use of an external source of light – not having it on the camera will often yield more contrast and depth than having it on the camera.
All this stated, in my captures of bugs, the simpler the better and I’ve almost never needed flash, as existing light – for me – has always been more than adequate – especially if you’re shooting in good light (from good angles) AND telling a story. AND this less is more approach means less to distract or concern a live subject, meaning it’s a lot easier to capture, and keep capturing interesting behavior, if your not flashing it with external light.
Thanks for your feedback. This article certainly focuses on higher magnification macro photography – “true macro” of 1:1 or more magnification. A lot of the flash tips don’t really apply to close-up photography in general (1:4 magnification or less), which is often better in natural light. I made that editorial decision because a reader who understands how to do macro photography can extrapolate to close-up work fairly easily, but a reader who understands only close-up photography cannot easily go the other way.
I do disagree that these tips are only for bugs, even though that is a majority of the sample photos I used. Any 1:1 macro subject, even something like a flower, has the same considerations involved – flash and all – assuming you are shooting handheld.
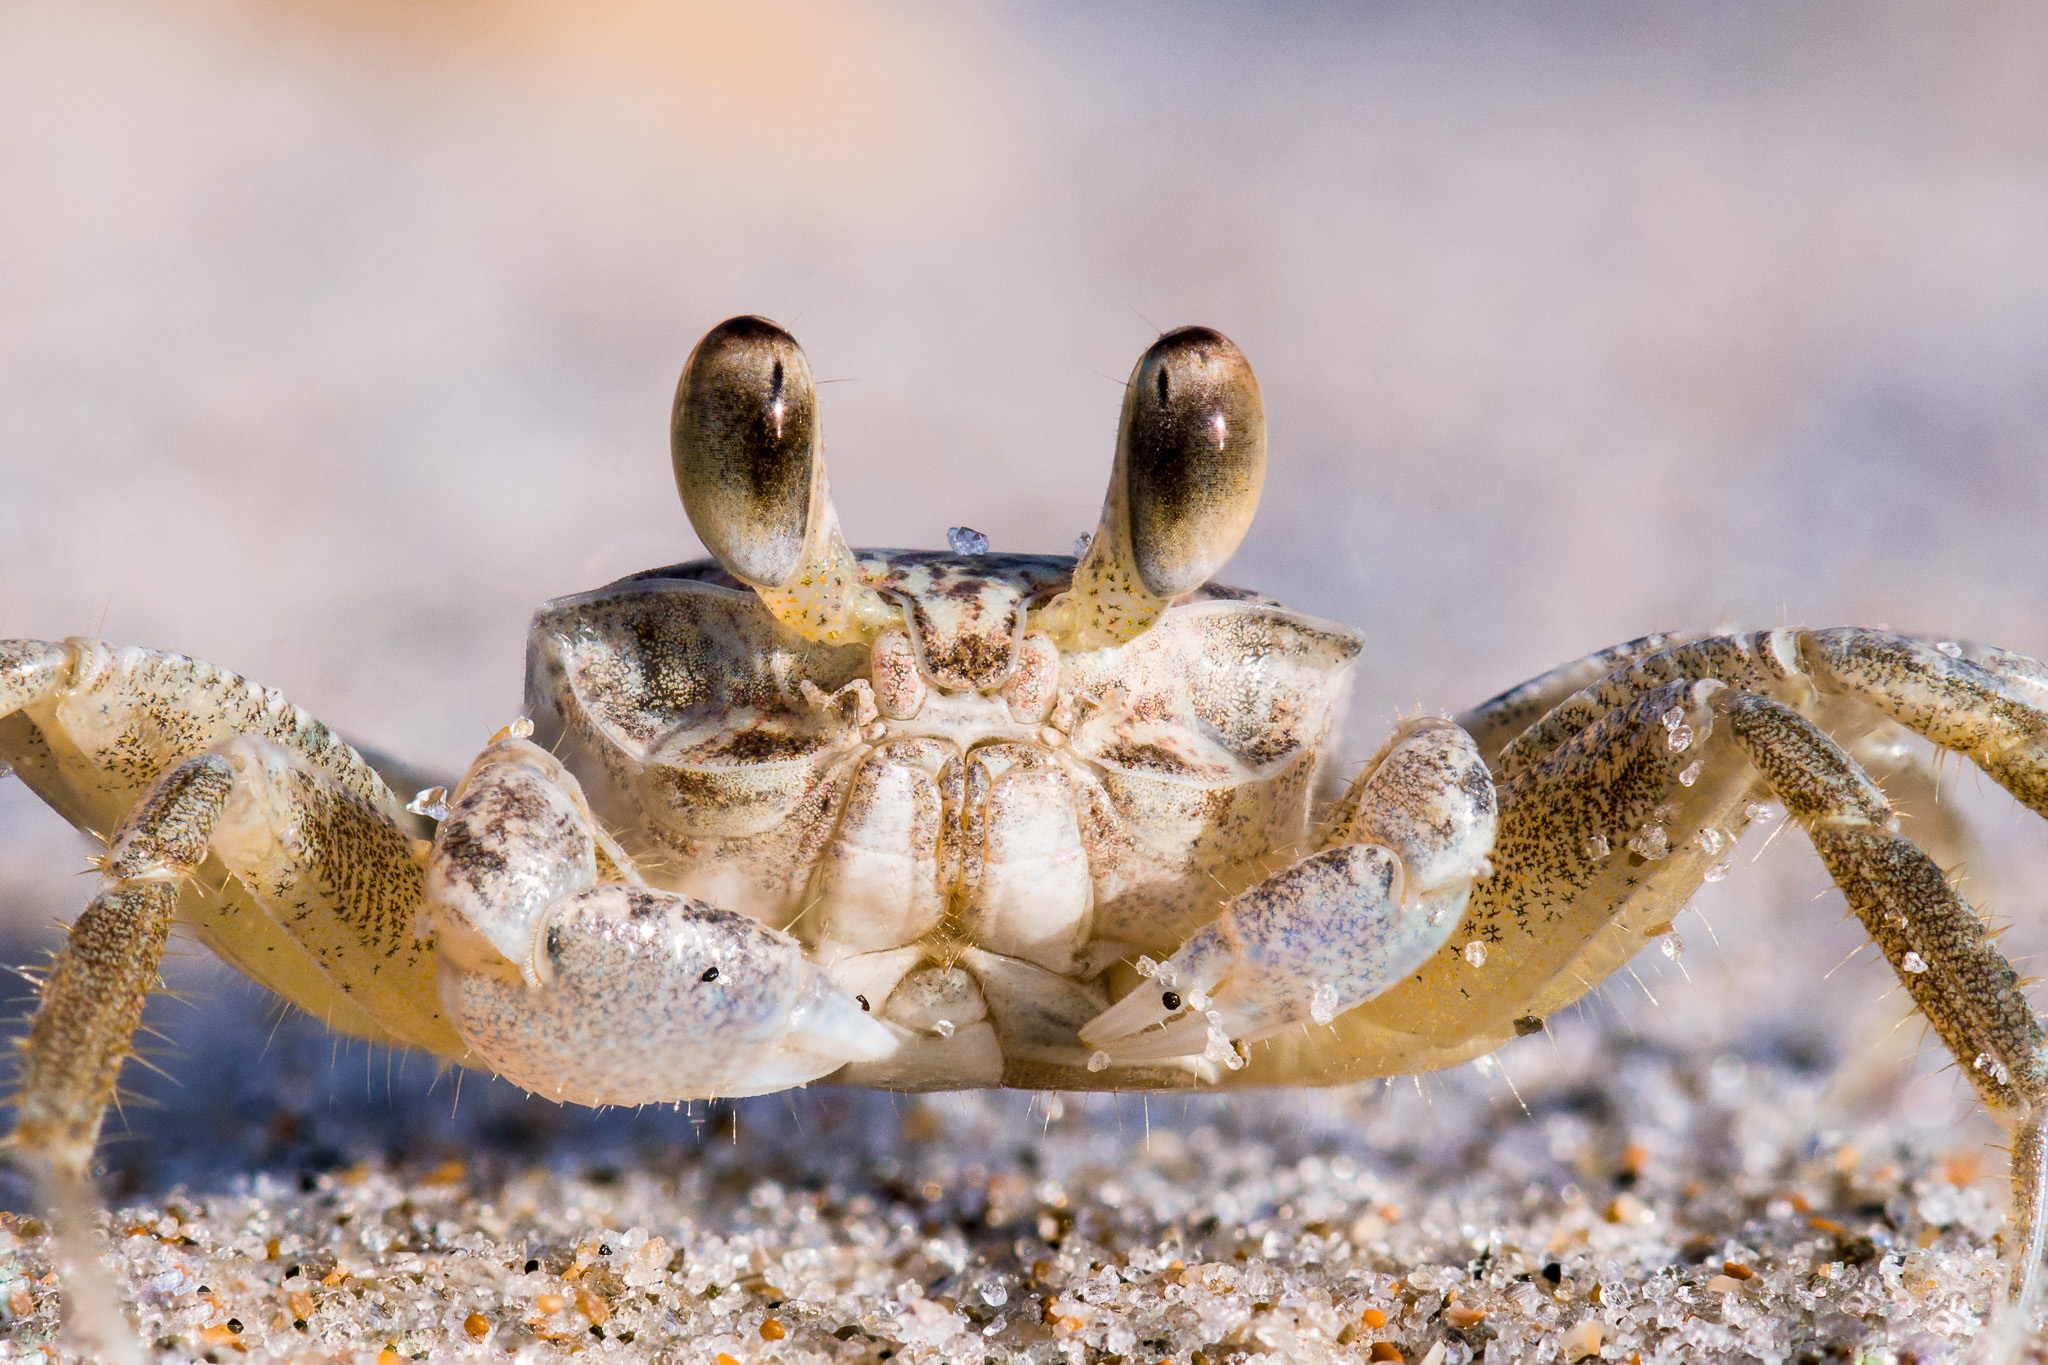
Not that I disagree with the approach you suggest overall, for work without a flash. The first three images in this article were shot without flash using the method you describe, and so was the crab photo at the bottom. Those just were less magnified images, aside from the first, where I didn’t need flash because I could rest my camera on the ground and have more leniency in my focusing and exposure.
Mr. Cox:
Thank you so much. Not only are you an expert photographer, but you’re also a gentleman and a scholar.