There are many ways to select an area of an image. In this article, we will take a detailed look at what luminosity masks are, how to create them and how to use them effectively in Photoshop.
Luminosity masks are one of the most powerful tools when it comes to selection. If you are new to Photoshop or unfamiliar with layers and layer masks, we have a comprehensive beginner’s guide to Photoshop. This article requires an understanding of layers and layer masks, both of which are covered in the beginner’s guide.
Table of Contents
What is a Luminosity Mask?
As the name applies, a Luminosity Mask is a selection made with respect to luminosity in an image. We can understand it better with an example:
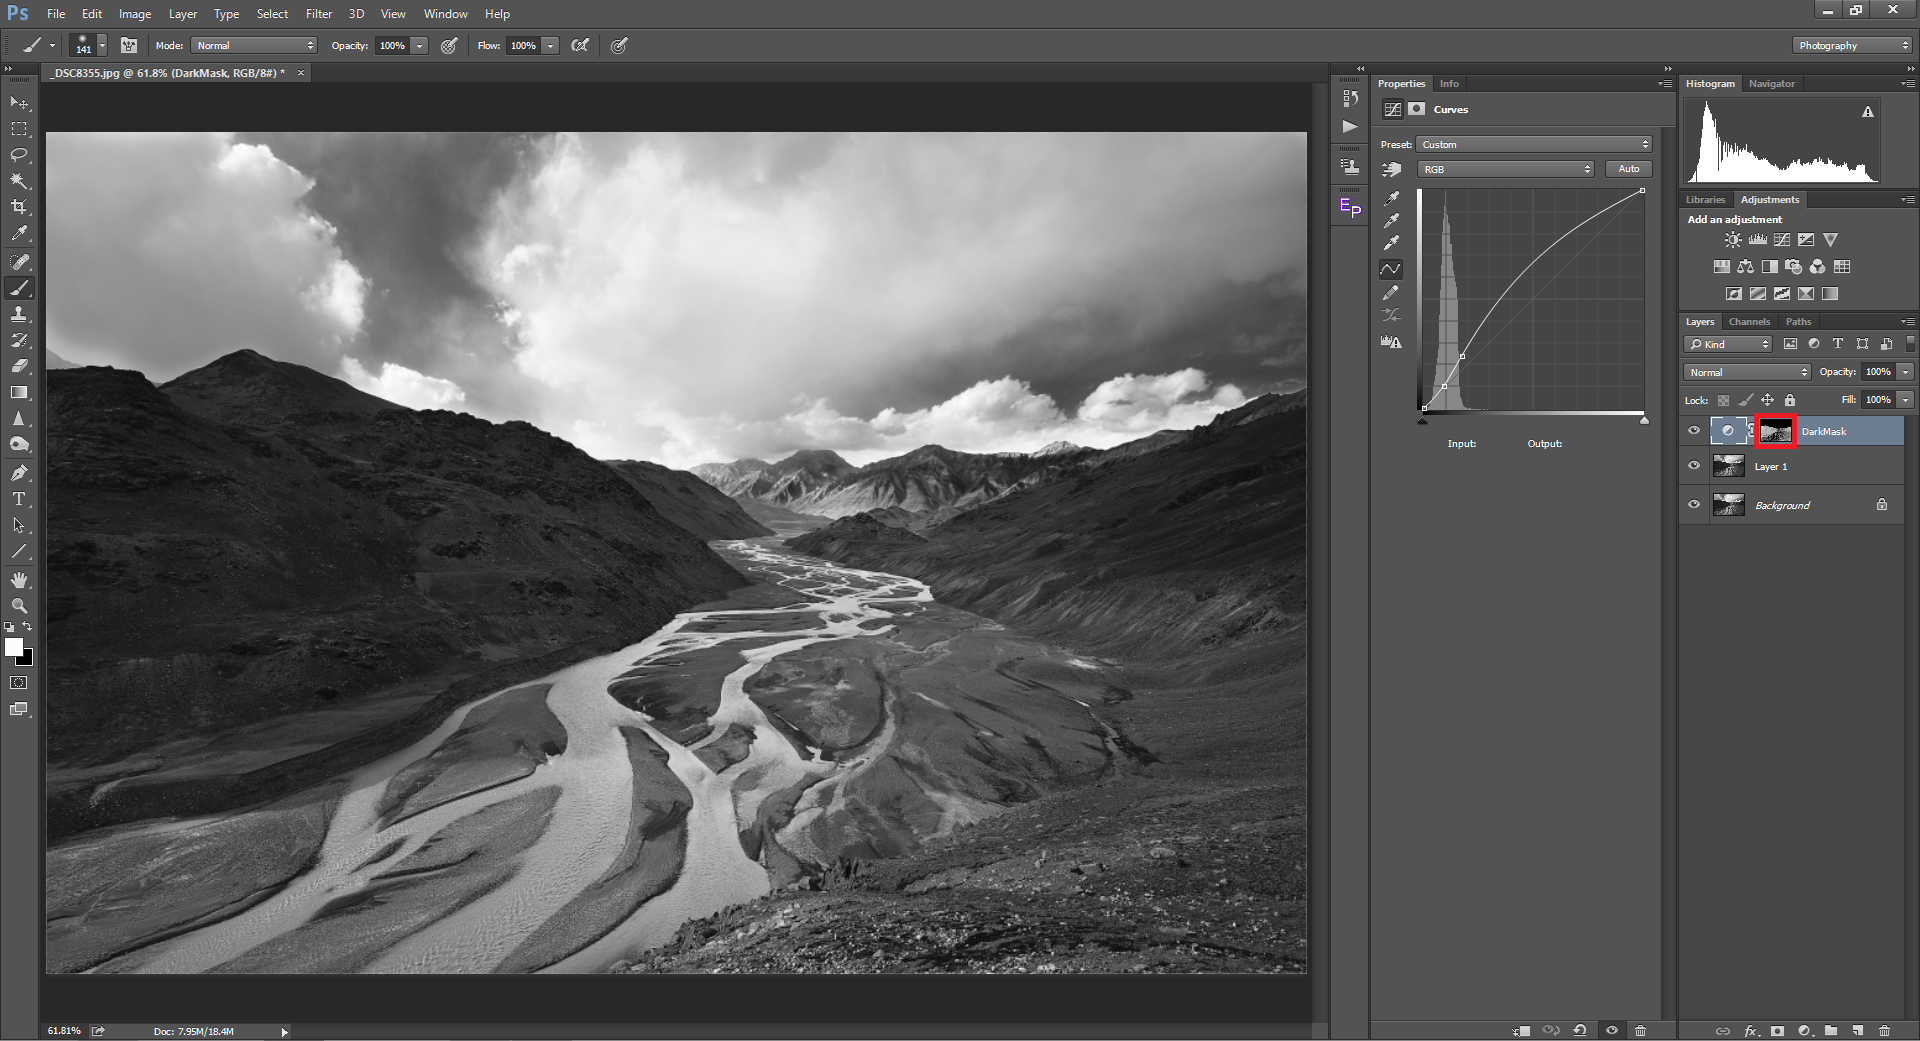
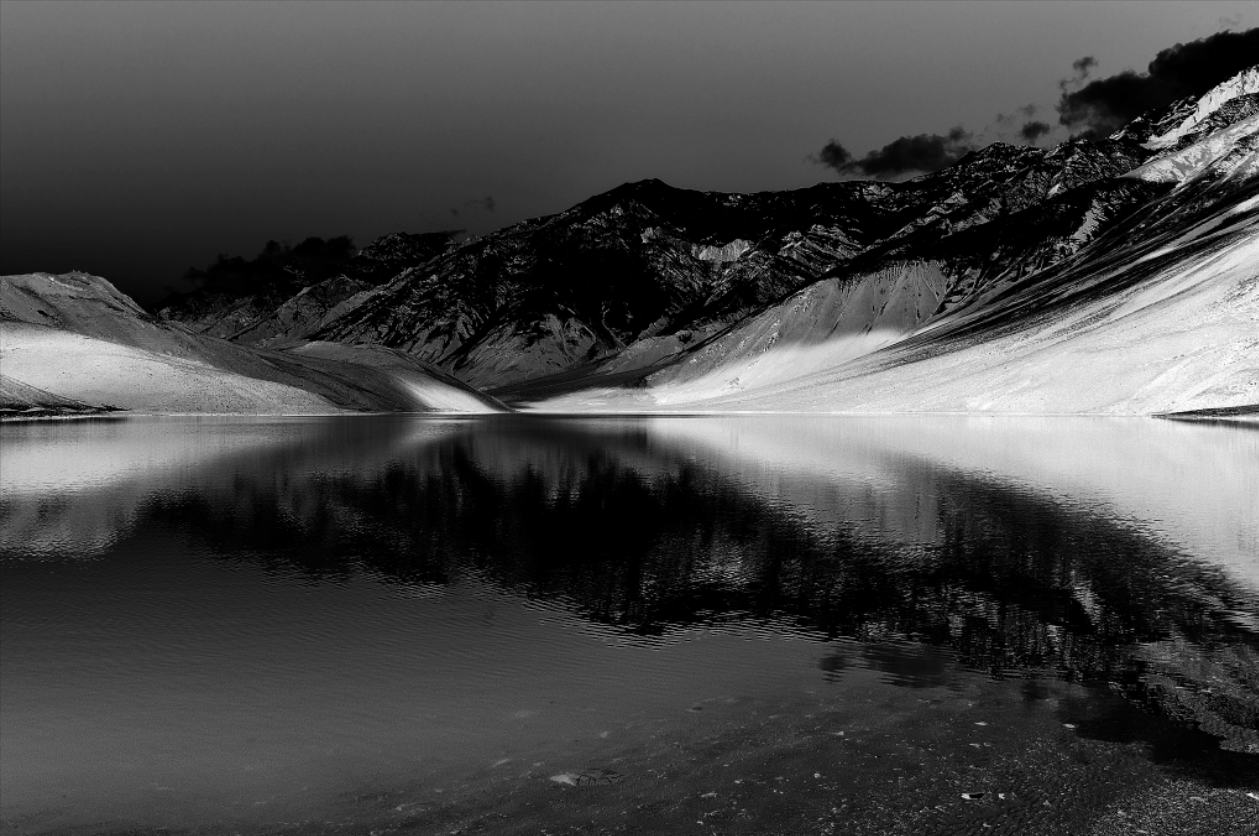
In the above image, the foreground on the left falls into the shadows. Let us say I want to add a Curves adjustment layer to pull out more details from the shadows. In the layer mask linked to the curves, I want to mask out all the highlights, because including them will eventually blow them out. To select the darks and the shadows, I can just use the brush tool to paint over the mask with a desired opacity.
But using a brush tool has a few drawbacks. First, if we are not extremely careful while painting on the areas to show or hide, we might end up with halos around extreme contrast selections. Second, it is practically impossible to make a complex selection like the illustrative image below:
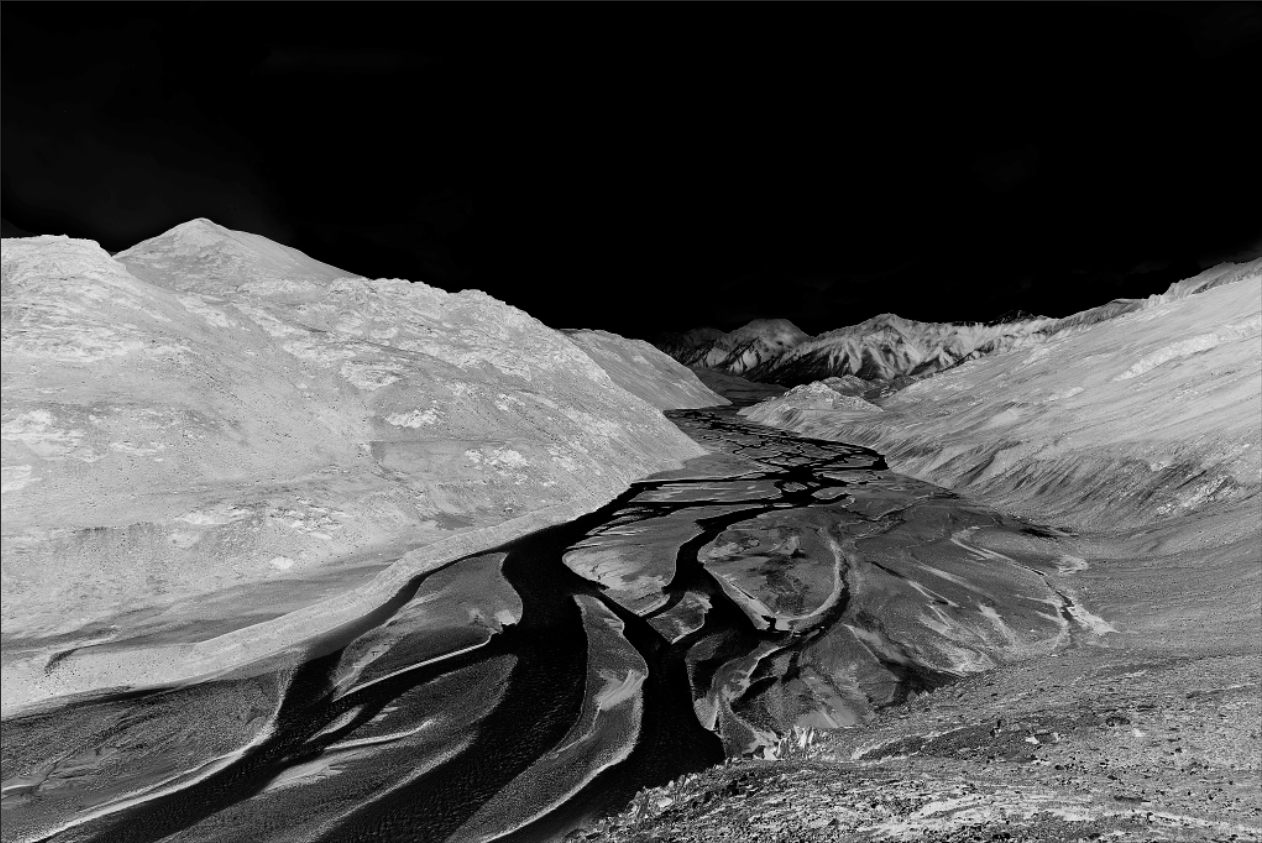
When we look at the selection above, we can understand that such complex selections are not possible with simple selection tools. The above image is the layer mask view of the image. With layer masks, we know that whites show, blacks hide, and the opacity changes with respect to the amount of grey in the selection.
You can see that the darks are the brightest with varying degrees of brightness between the darks and the shadows. You can also see that the bright clouds are almost completely masked out.
By adding a curves adjustment layer with a luminosity dark mask applied, we can easily bring out the details in the shadows without affecting the highlights. Take a look at the image below – we have seamlessly brightened the shadows. Doing so with the help of luminosity masks would take only a few minutes:
How to Create Luminosity Masks
We will start with 50% grey and create masks based on luminosity, all the way to selecting only the brightest of the brights. Generally, six different masks or channels would do the job. Similarly, we will create six different masks for darks starting from middle grey. Finally, we will create six masks for mid-tones.
Creating Bright Channels
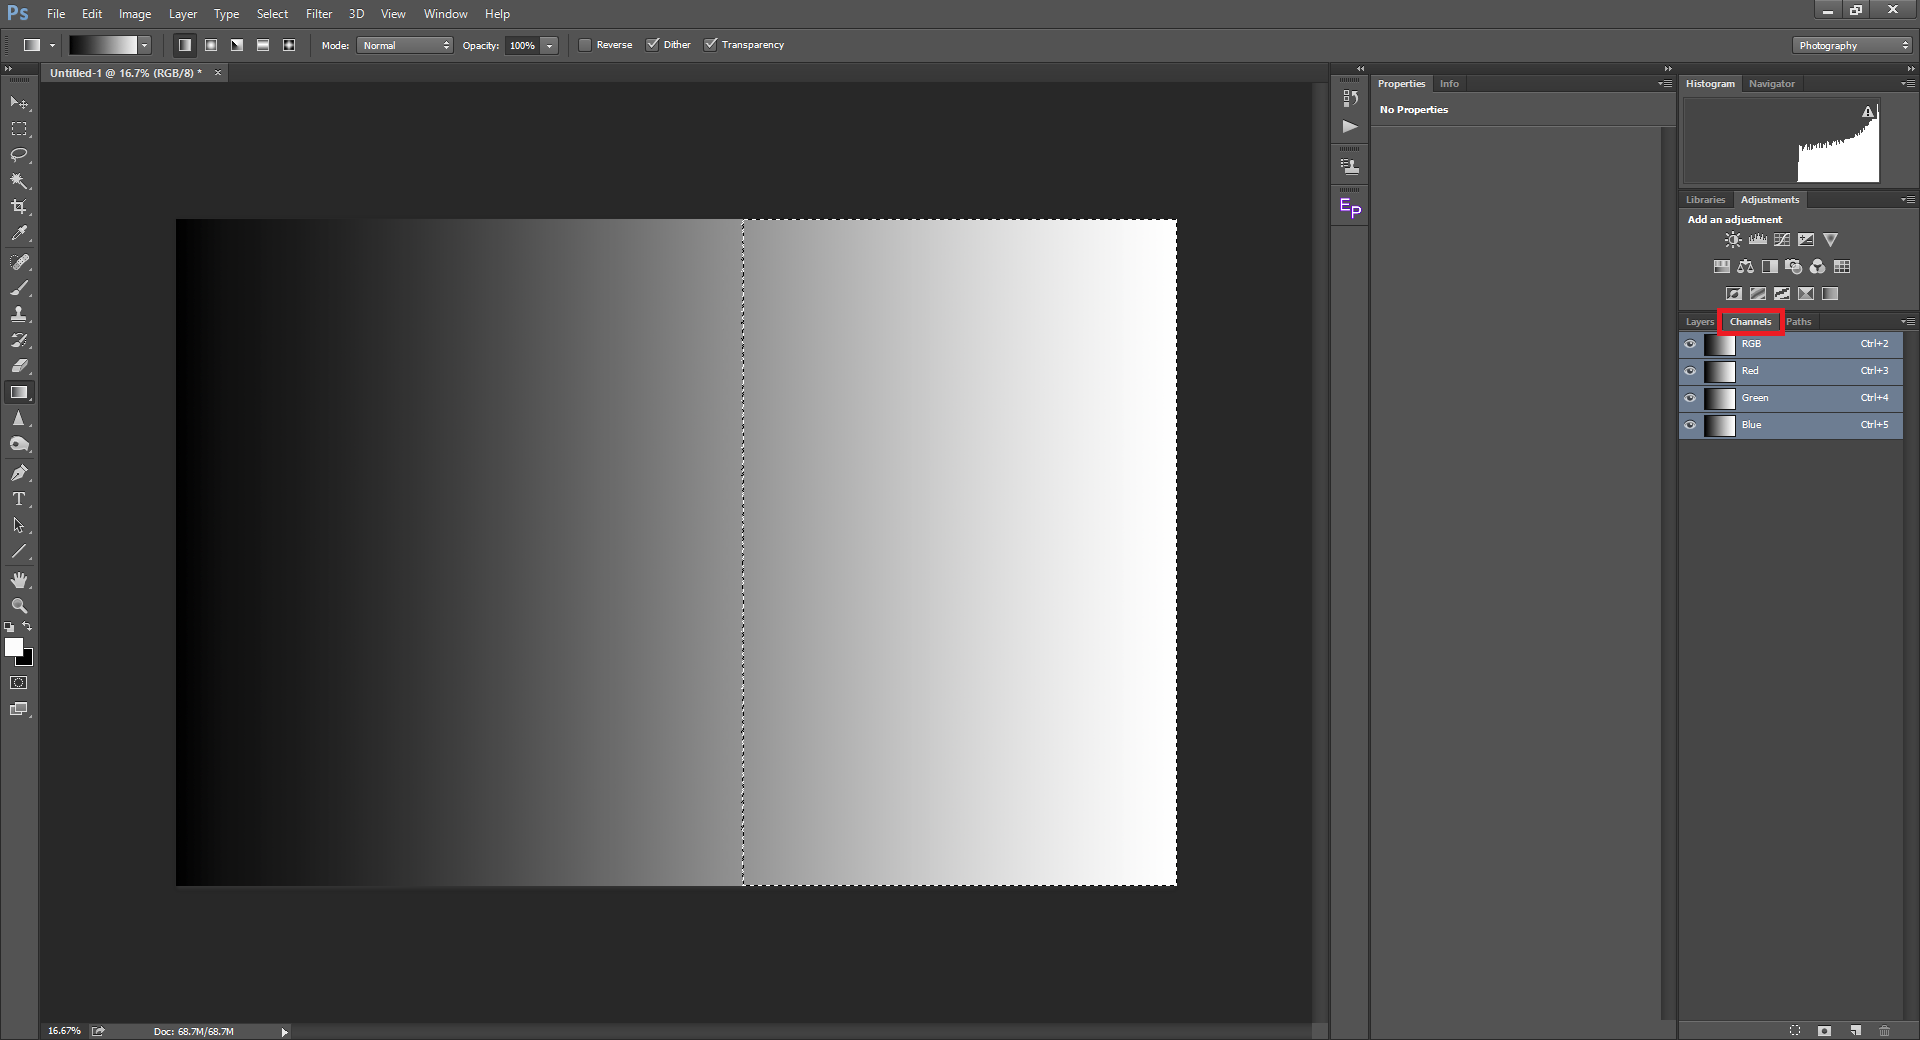
Now let us take a step-by-step approach of creating bright masks. To make it easier to understand, I have taken a gradient image as an example, so that we can clearly understand which areas are selected and which areas are masked out.
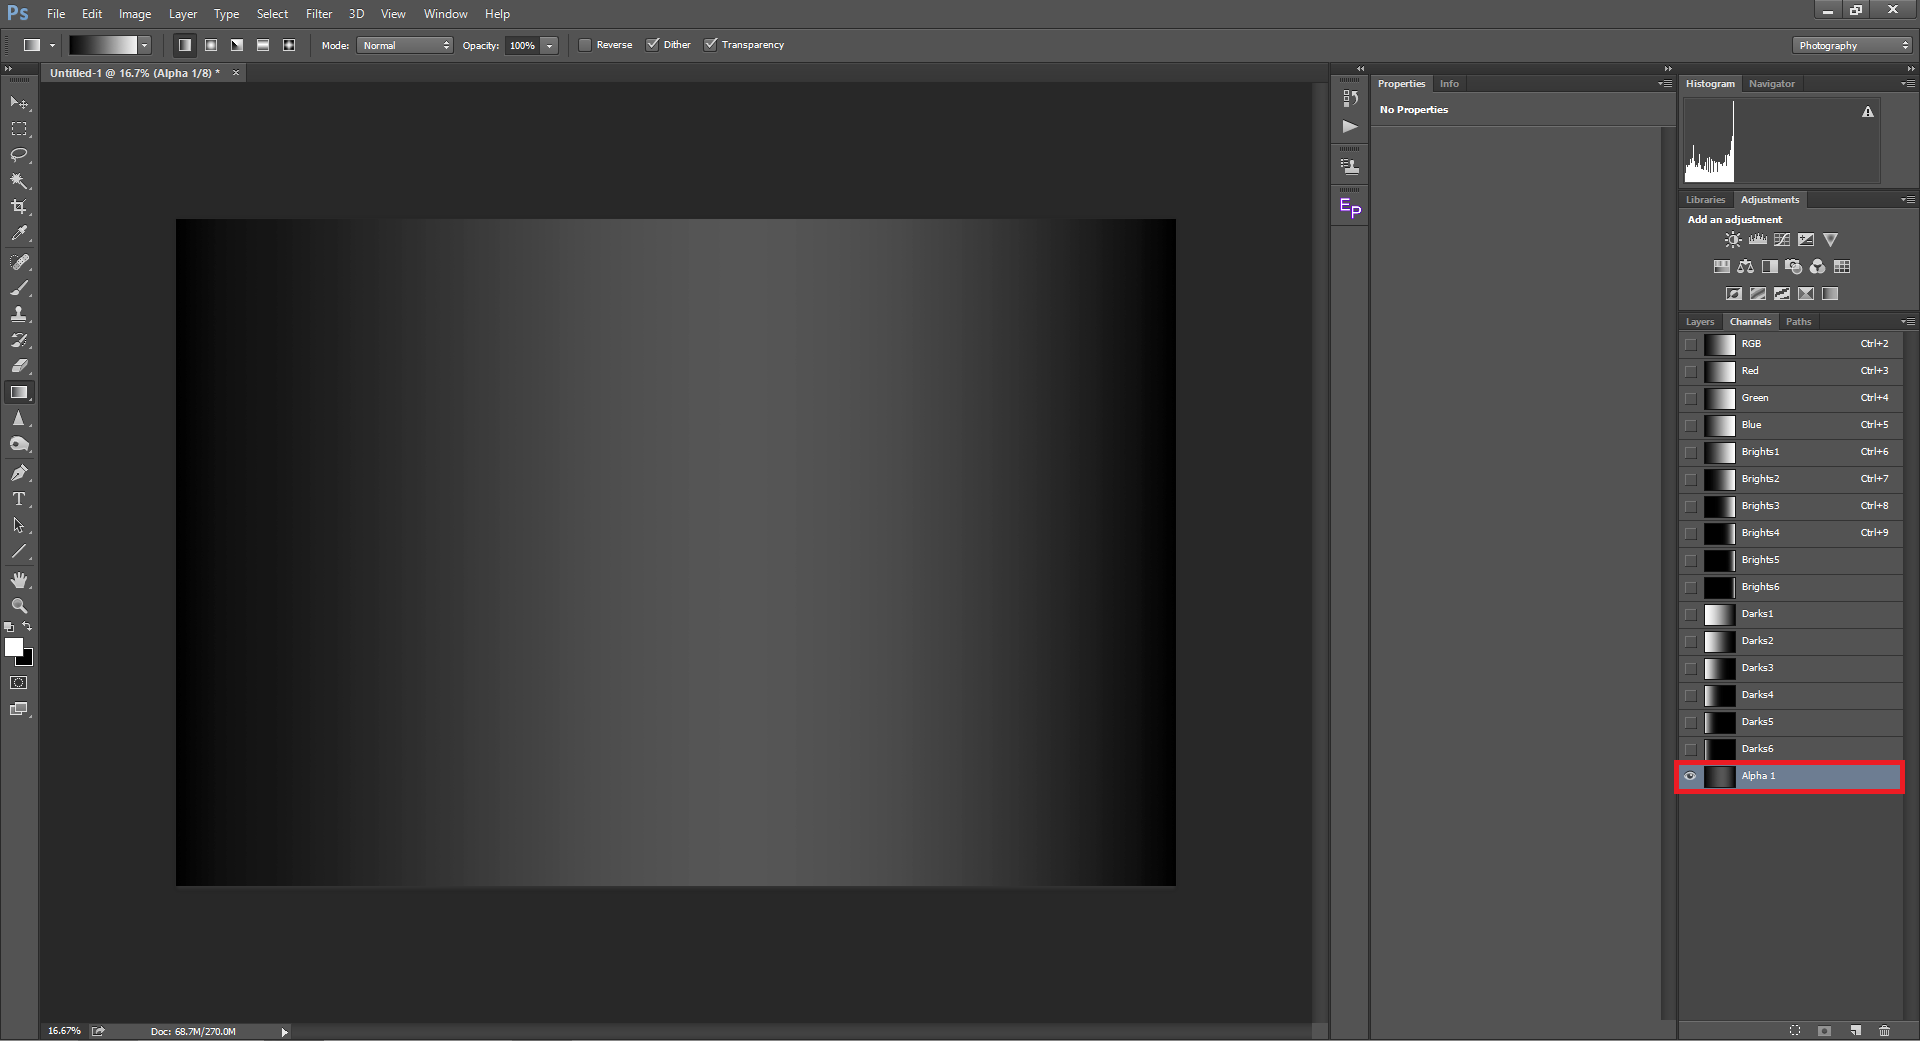
Step 1:
Go to the Channels tab (marked red) which is placed right next to the Layers tab. You can see the default channels. The first one is the RGB Channel, which is the composite of Red, Green & Blue channels below. Make sure that the RGB Channel is selected and you will see all the four channels selected.
Step 2:
With RGB selected, left click on the RGB channel while pressing Alt+Control+Shift in PC or Option+Command+Shift in Mac. Please keep in mind that if you check any of the Red, Green or Blue channels, only that channel will be selected. Whereas when you select the RGB channel, you can observe that all four default channels are selected. When you make the selection, you can see the marching ants appear around the selected area. In the example, you can see the selection of brights starting approximately from 50% grey.
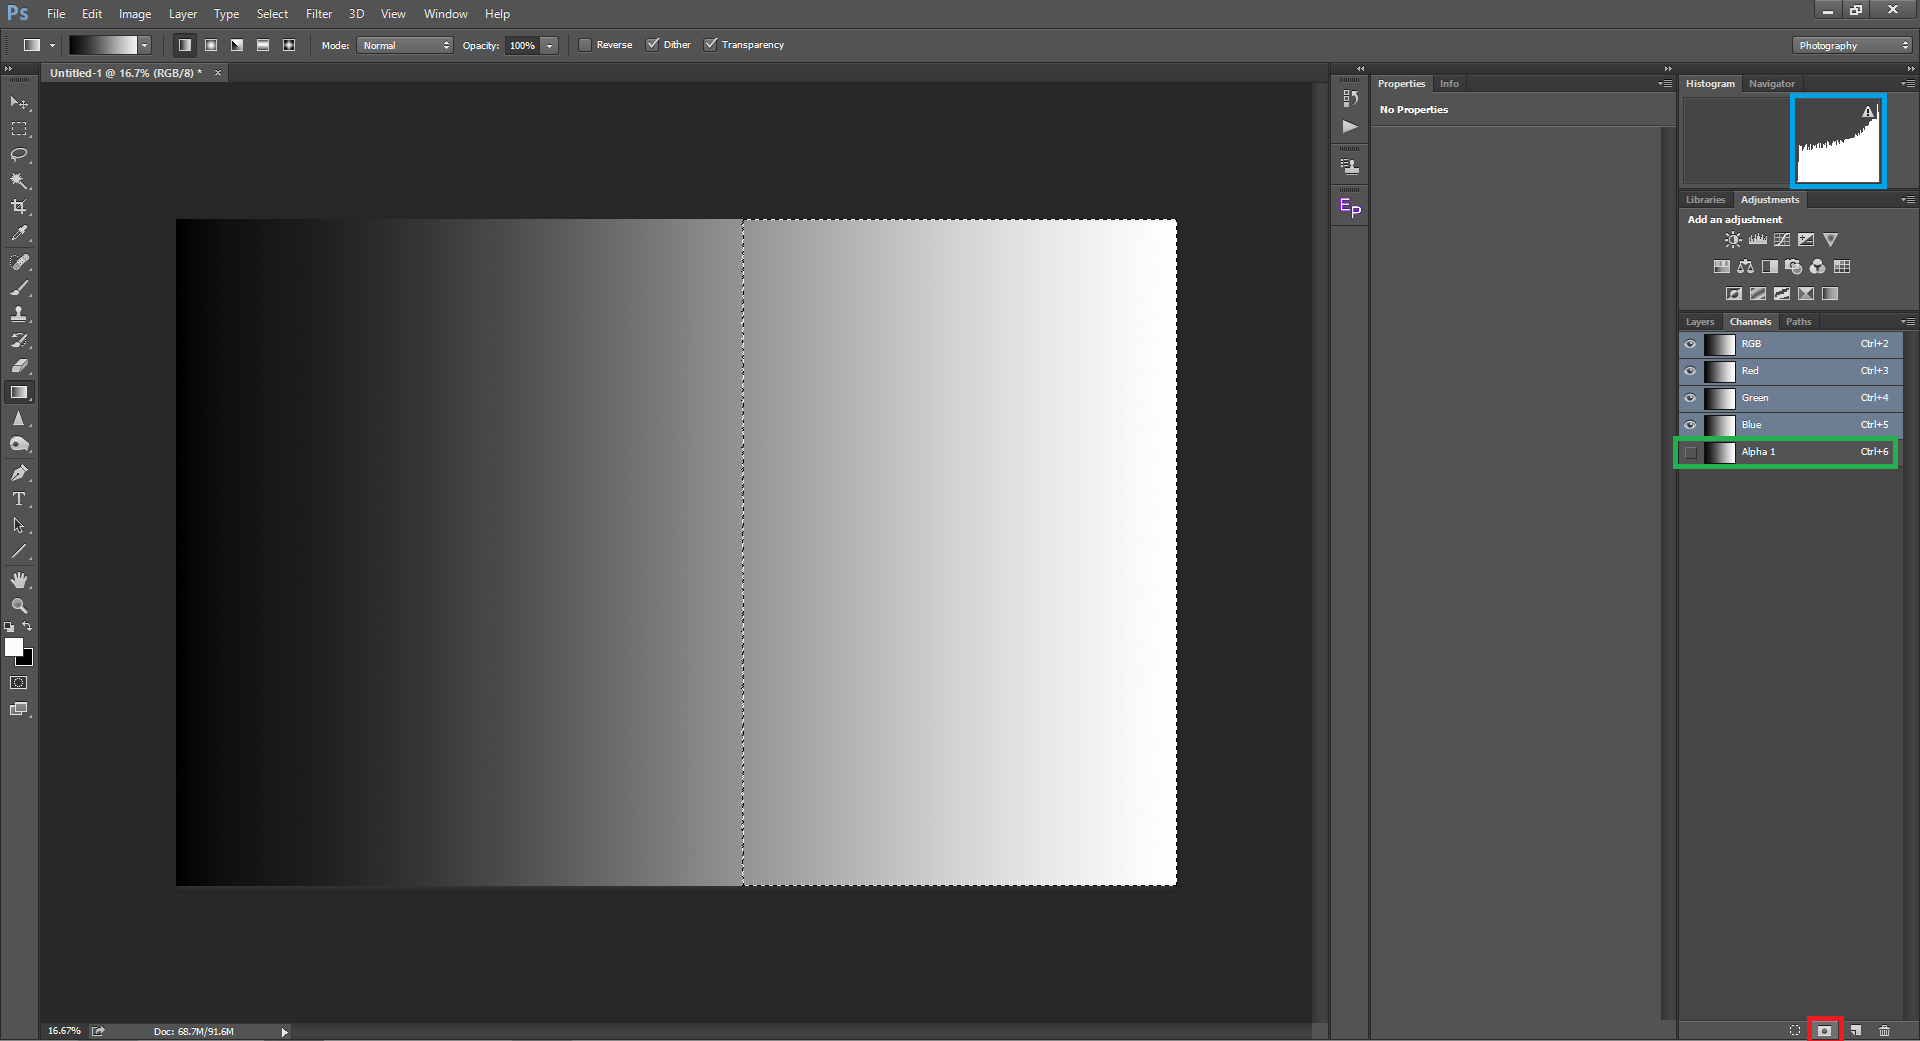
Step 3:
Now with the selection made, click on the Save selection as channel Icon (marked red in the illustrative image below). Now you can see a new channel called Alpha1 (marked green). Rename it as Brights1 for Convenience.
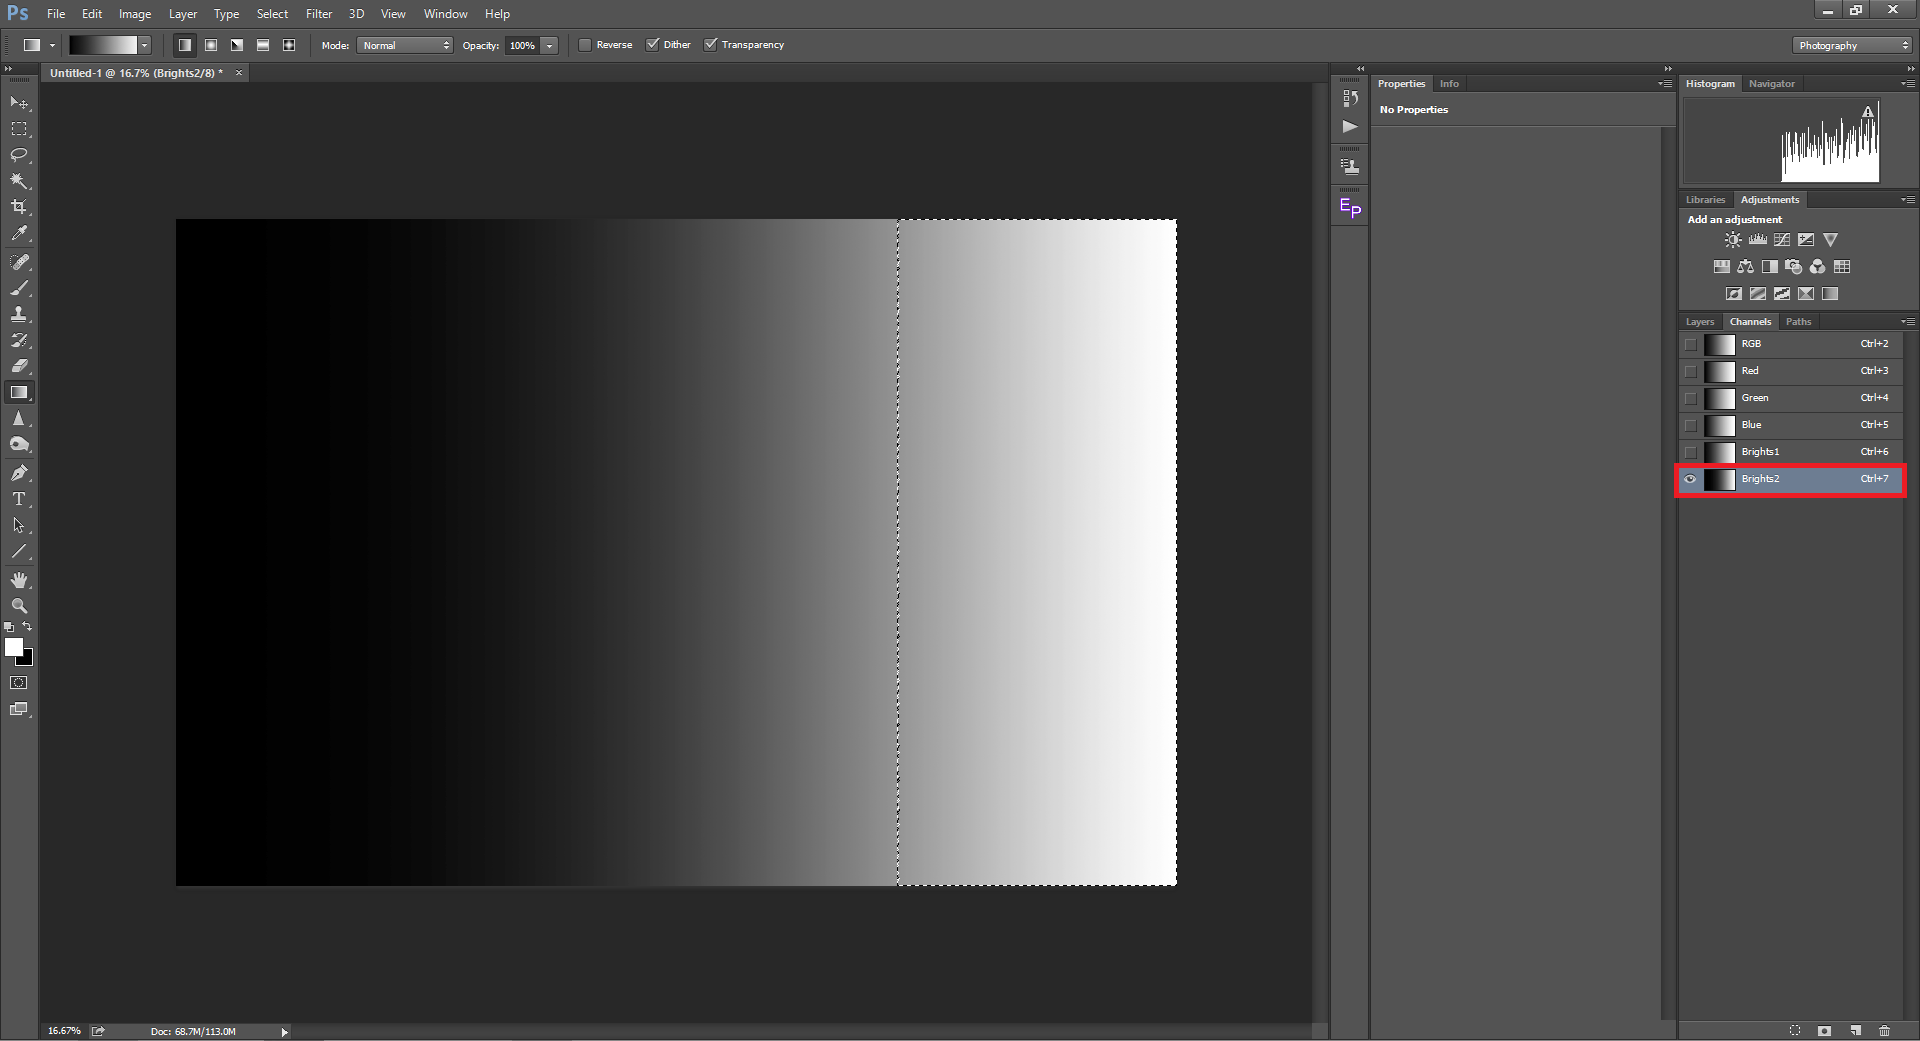
Step 4:
Now, select the Brights1 channel. Make sure the selection of Brights1 is still highlighted by the marching ants. Left-click on Brights1 while pressing the Alt+Control+Shift/Option+Command+Shift as we did in Step 2. You will see that the selection changes. In this example, more mid-tones are ignored in the selection. Now, we save this selection as a Channel. Since we have renamed the previous channel as Brights1, this new channel will be named Alpha 1 by default. If we don’t rename, every consecutive channel will be named as Alpha 1, Alpha 2, Alpha 3 and so on. Rename the new Alpha 1 as Brights 2.
Step 5:
Let’s repeat the same. Now by selecting Brights2, hit Alt+Control+Shift+Click, save this selection as a channel and rename it as Brights3. A selection with an area smaller than the previous channel can be seen.
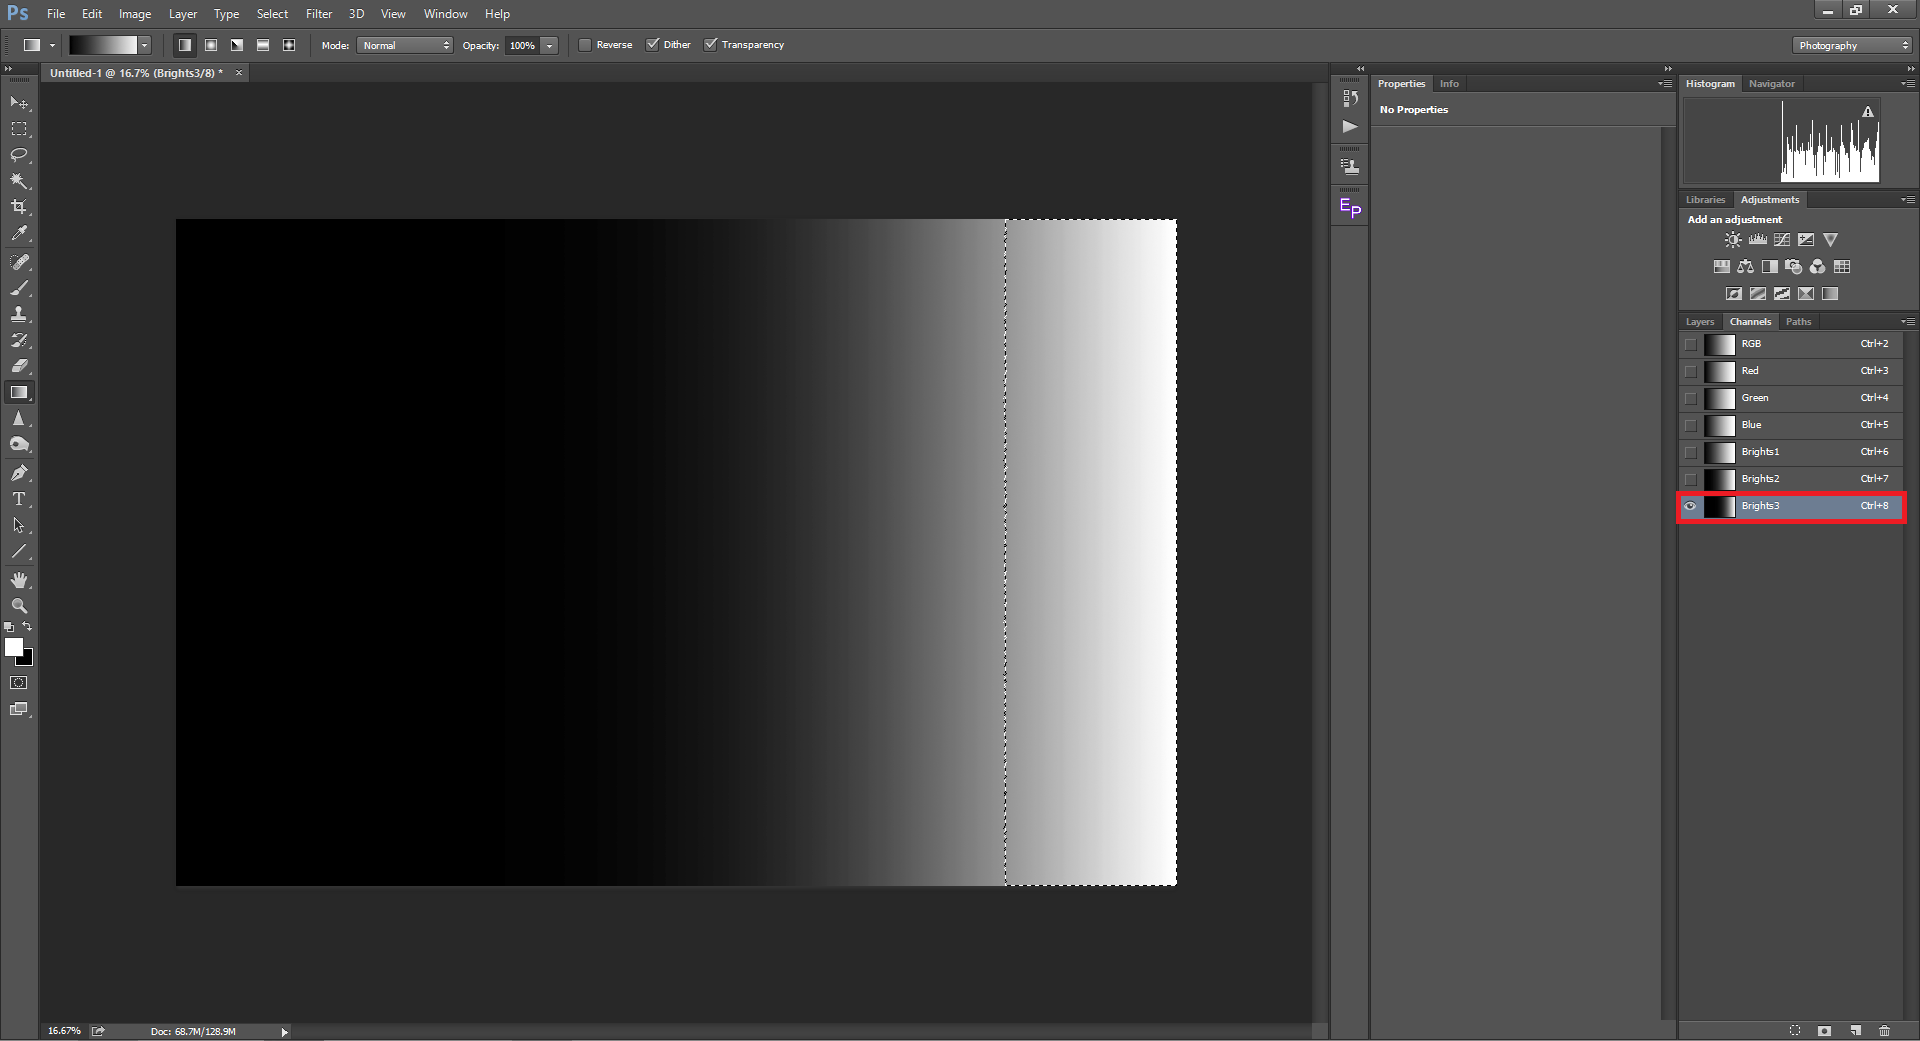
Step 6:
Repeat the above procedure until we get to Brights6. If we look at the selected areas starting from Brights6 to Brights1, we can see that we have made progressive selection from extreme brights to almost middle grey progressively.

Creating Dark Channels
Now that we are done with the brights, let us get to creating the dark channels. Dark channels are basically the opposite of brights. There are two ways in which we can do it. We can just inverse the selections of the respective brights. Invert the selection Brights1 as Darks1, Invert the selection Brights2 as Darks2 and so on. Another way of doing it is by reversing Brights1 and then progressively refining it all the way to the darkest of the darks darks as we did with the bright channels. Below is a step-by-step procedure to select the darks.
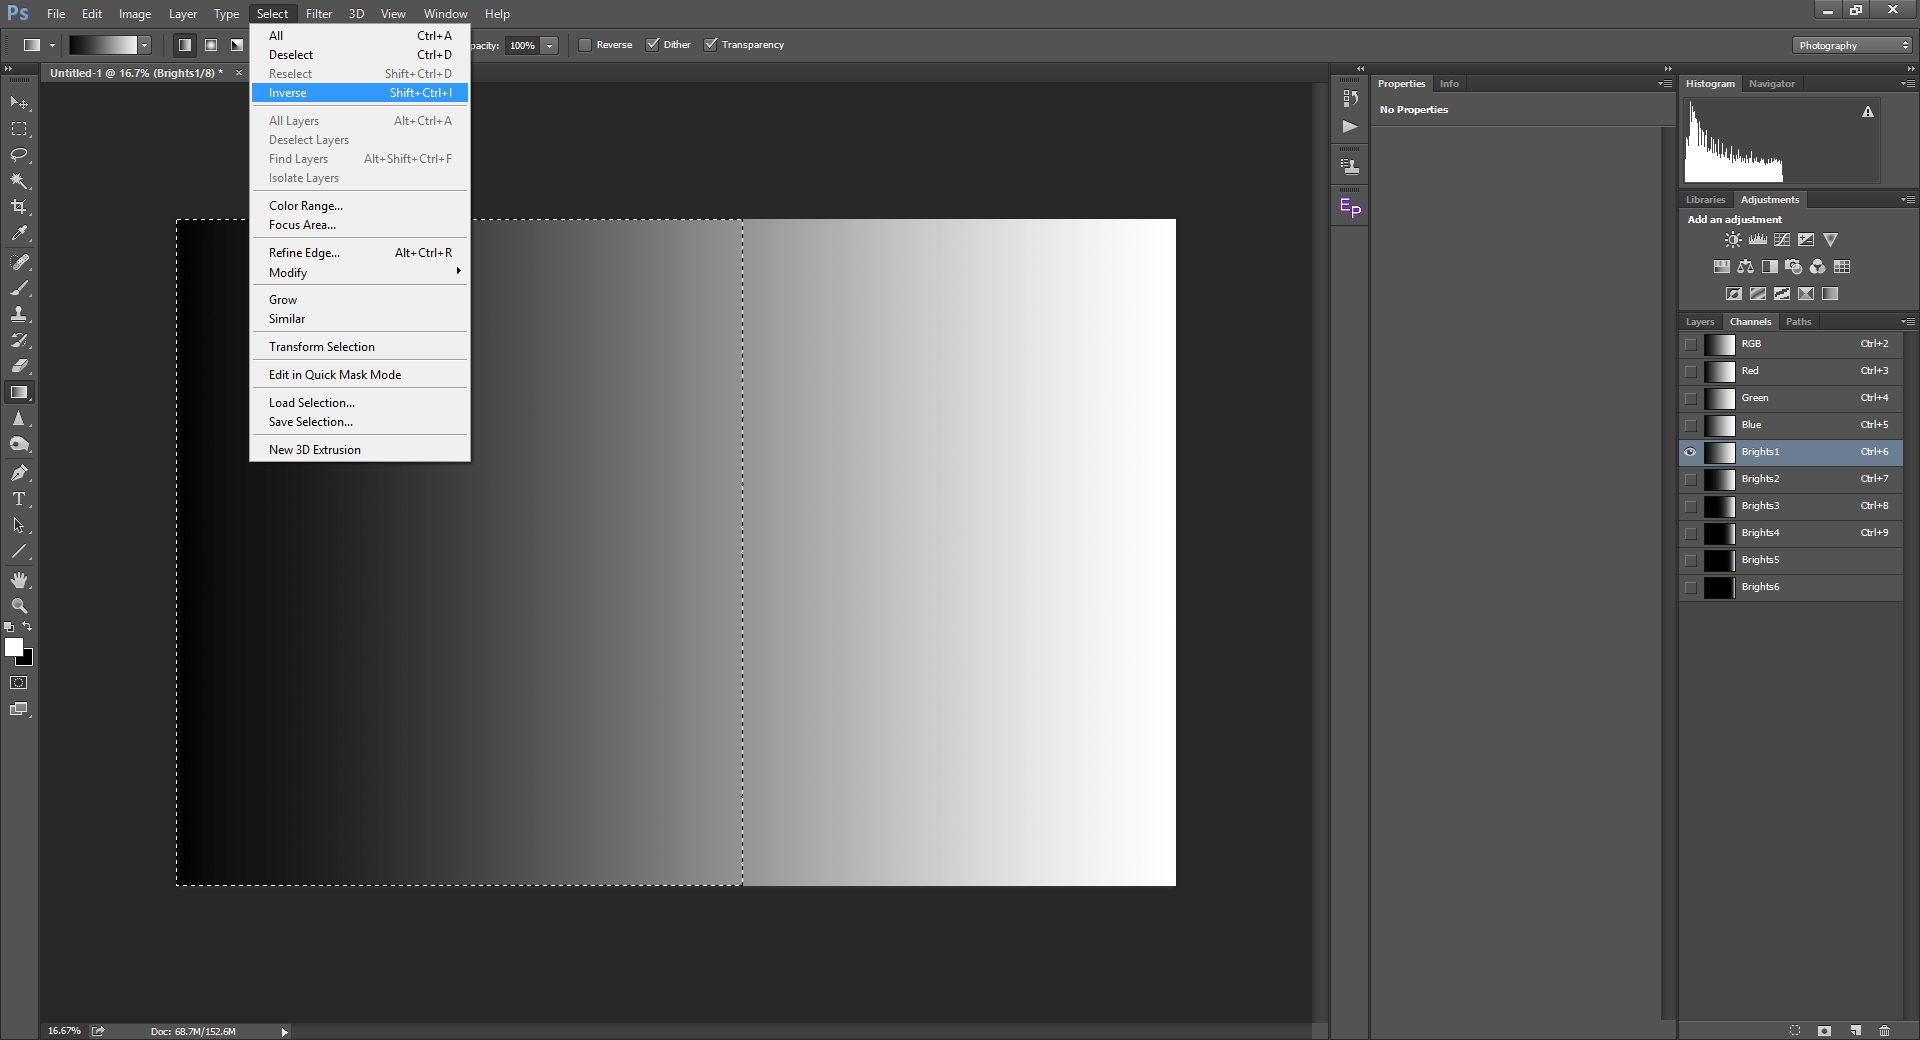
Step 1:
Select Brights 1 by left-clicking on it while pressing the Control / Command key. You can see the marching ants around the selection. Now invert the selection by selecting the menu option Select->Inverse. You can also use the shortcut key combo by Brights1 as your selection and then pressing Shift+Control / Command+I. You can see that the selection has been reversed.
Just like how we did for the brights, we save the selection as a channel and name it Blacks1.
Step 2:
By selecting Blacks1, we repeat step 4 through step 6, creating six channels for blacks.

Creating Mid-tone Channels
We now have a total of twelve channels (selections) made, starting from extreme brights to extreme darks. We are going to create mid-tones by subtracting the highlights and shadows from the image.
Step 1:
First, select the entire frame by pressing Control / Command+A. The marching ants appear around the entire frame meaning the entire image has been selected. Click on Brights1 while pressing the Alt+Control/Option+Command keys. The mouse pointer will have a minus sign below it. You can see the selection change. With the current selection, click on the Darks1 while keeping Alt+Control/Option+Command keys pressed.
What we have done here is, we have selected the entire frame and subtracted the highlights from Brights1 and shadows from Darks1. This leaves us with mid-tones between Brights1 and Darks1.
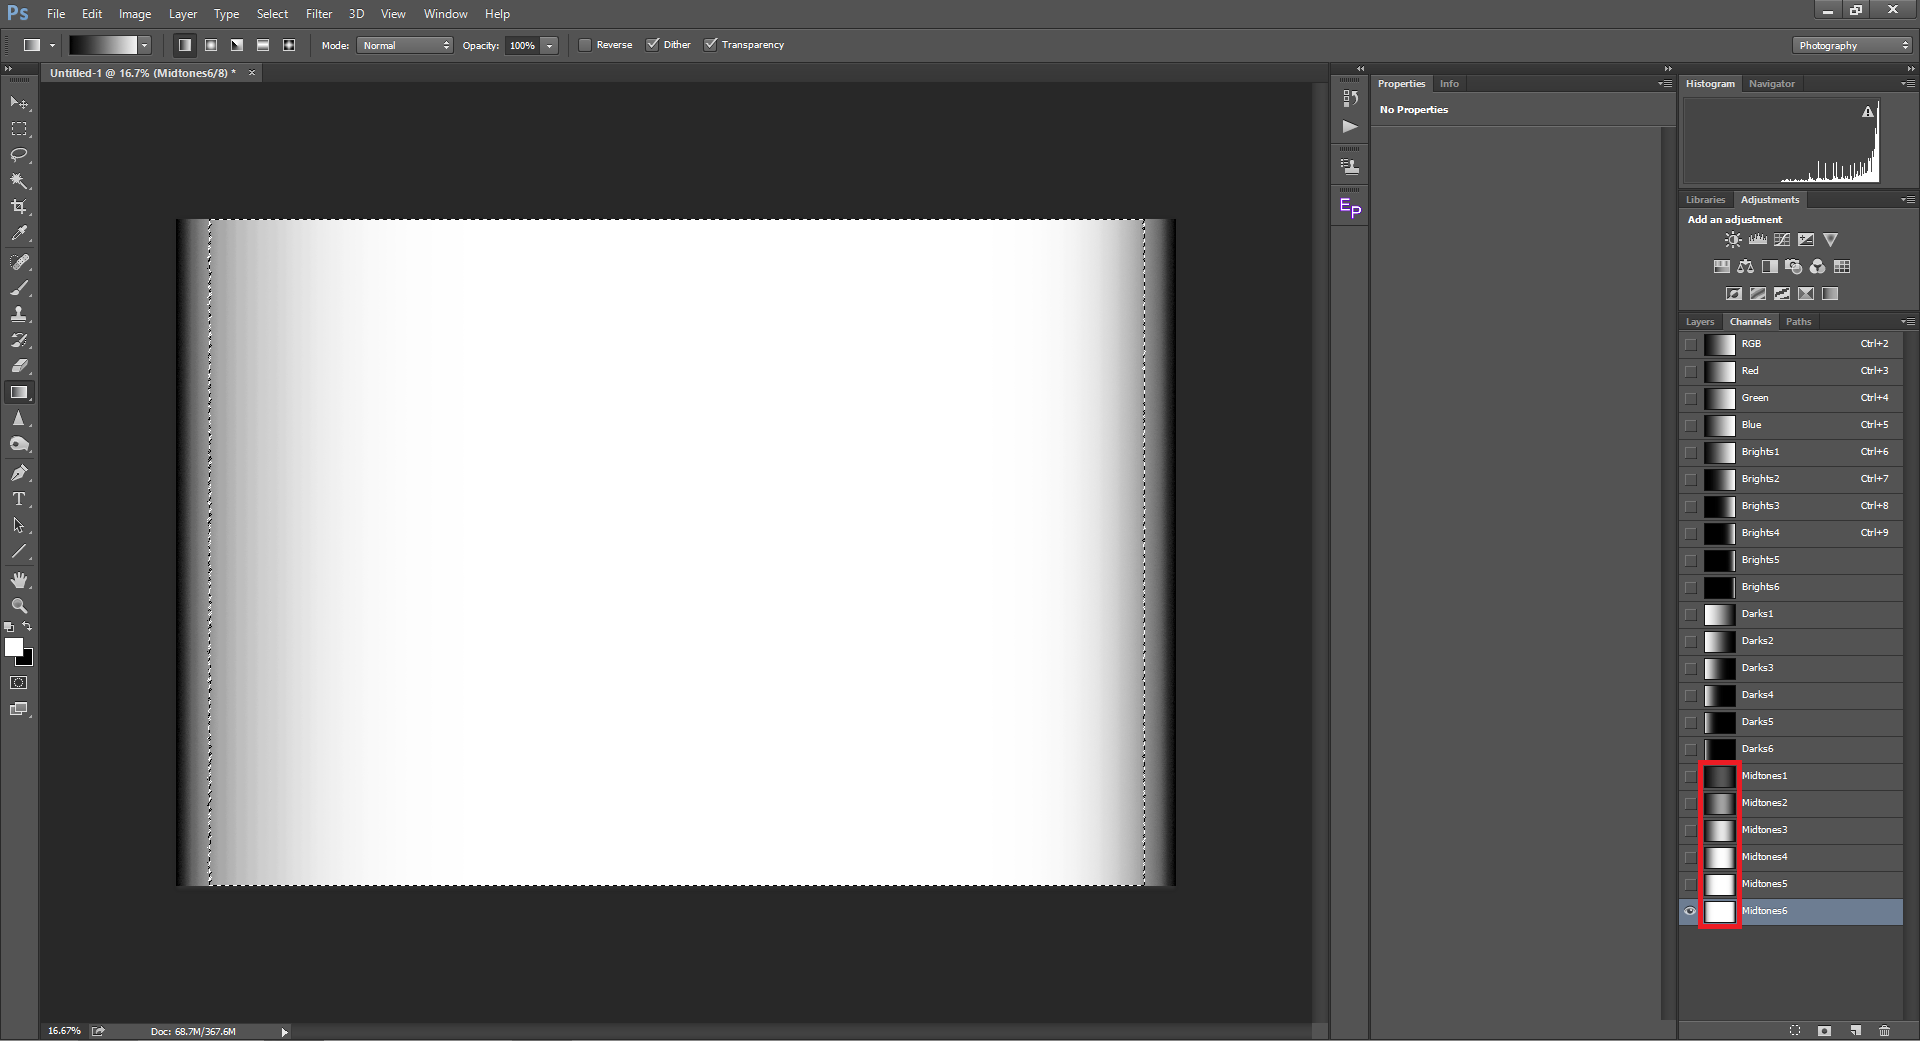
Step 2:
Now that we have Midtones1, we are going to make five more channels. Again select the entire frame (Control/Command+A) and then while pressing Alt+Ctrl click on Brights2 and Darks2. This will give us Midtones2. Similarly we can create Midtones3 by subtracting Brights3 and Darks3 from the entire frame. We can go all the way to Midtones6 this way. Now we have all the eighteen channels: six brights, six darks and six mid-tones.
Creating Layer Masks using Channels
Once we are done creating the channels, applying them as a layer mask is pretty simple. Select the channel which you wish to apply by left clicking on it while pressing the Control or Command key. You can see the selected areas outlined by the marching ants. Go to the Layers tab and click on an adjustment layer or create a layer mask. You can see the layer mask with the channel selected.
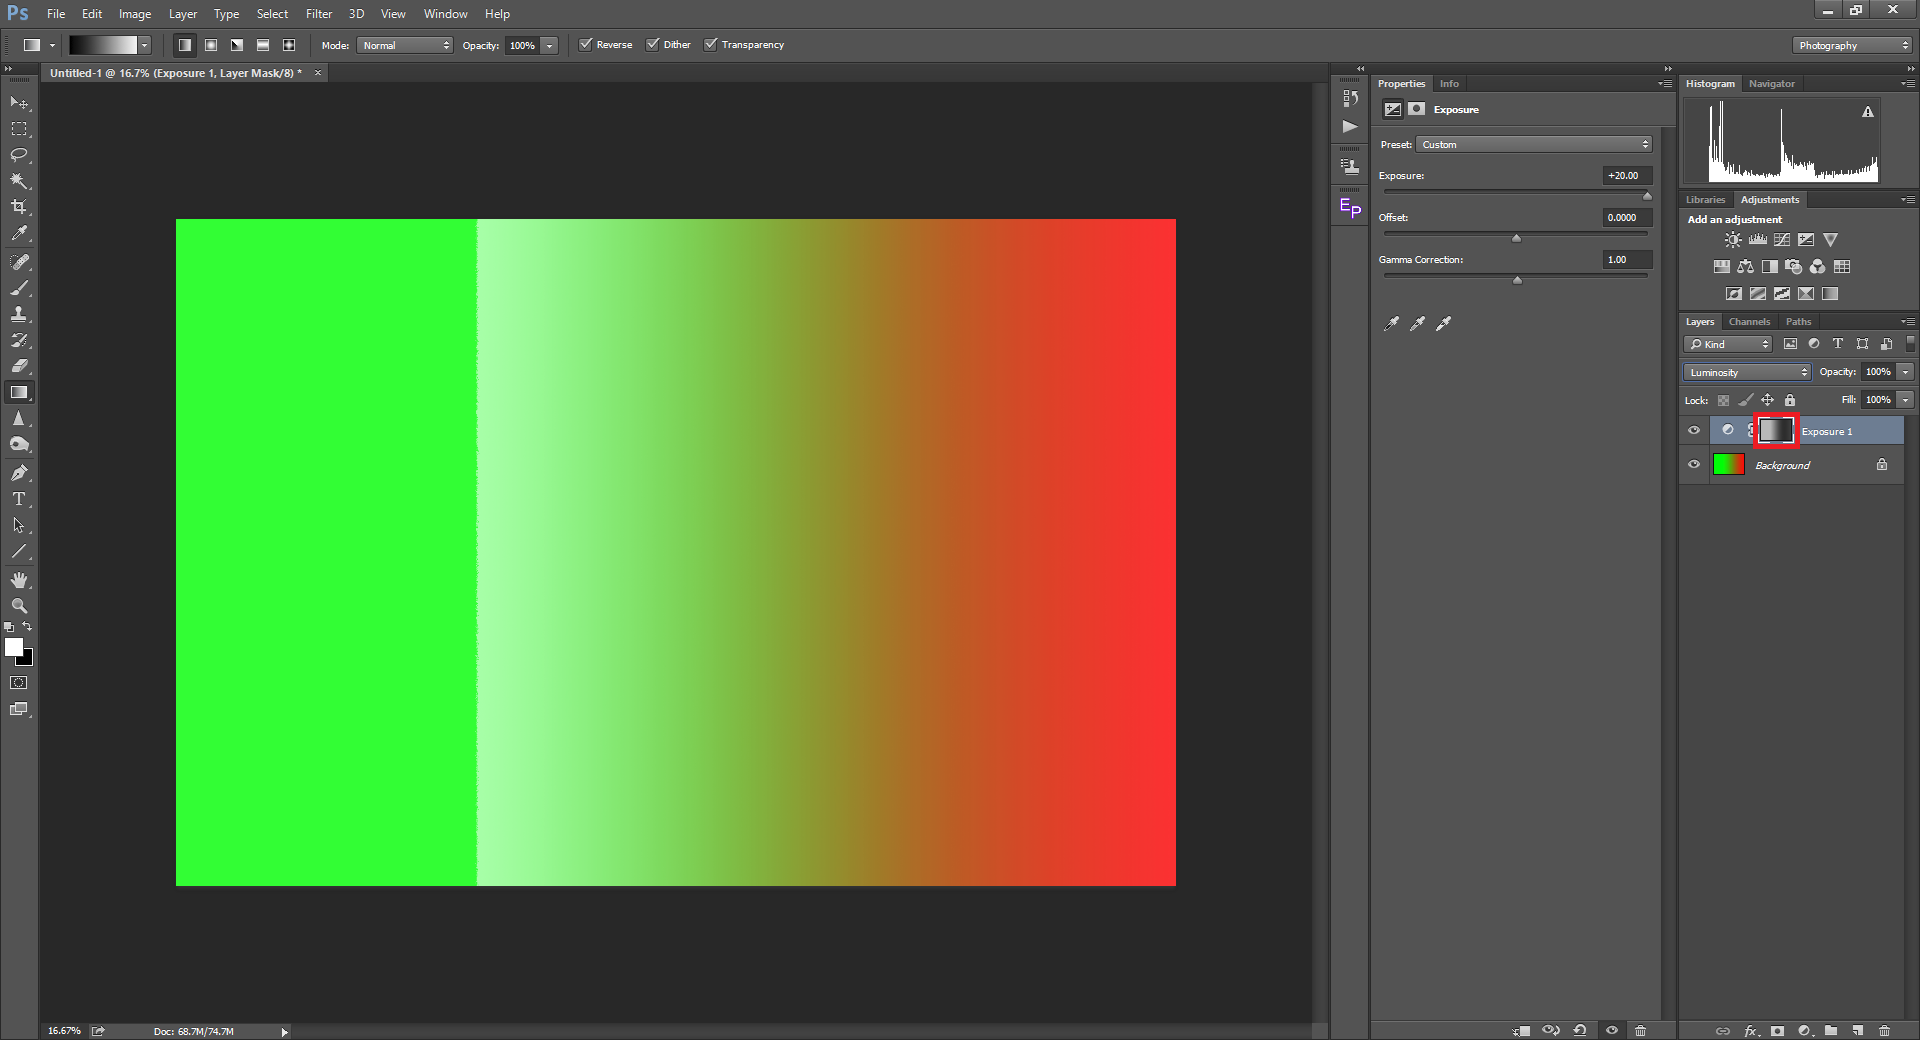
In the above example, I selected the Brights3 channel. Then I created a new Exposure adjustment layer. Brights3 channel is applied to the layer mask linked with that adjustment layer. Now when I push the exposure all the way up to +20 you can see only the brights get affected (greens) whereas the mid-tones are affected less and darks are pretty much unaffected.
Once you are done using the channels, you can delete the ones you did not use. Keep in mind that creating channels multiply the file size considerably.
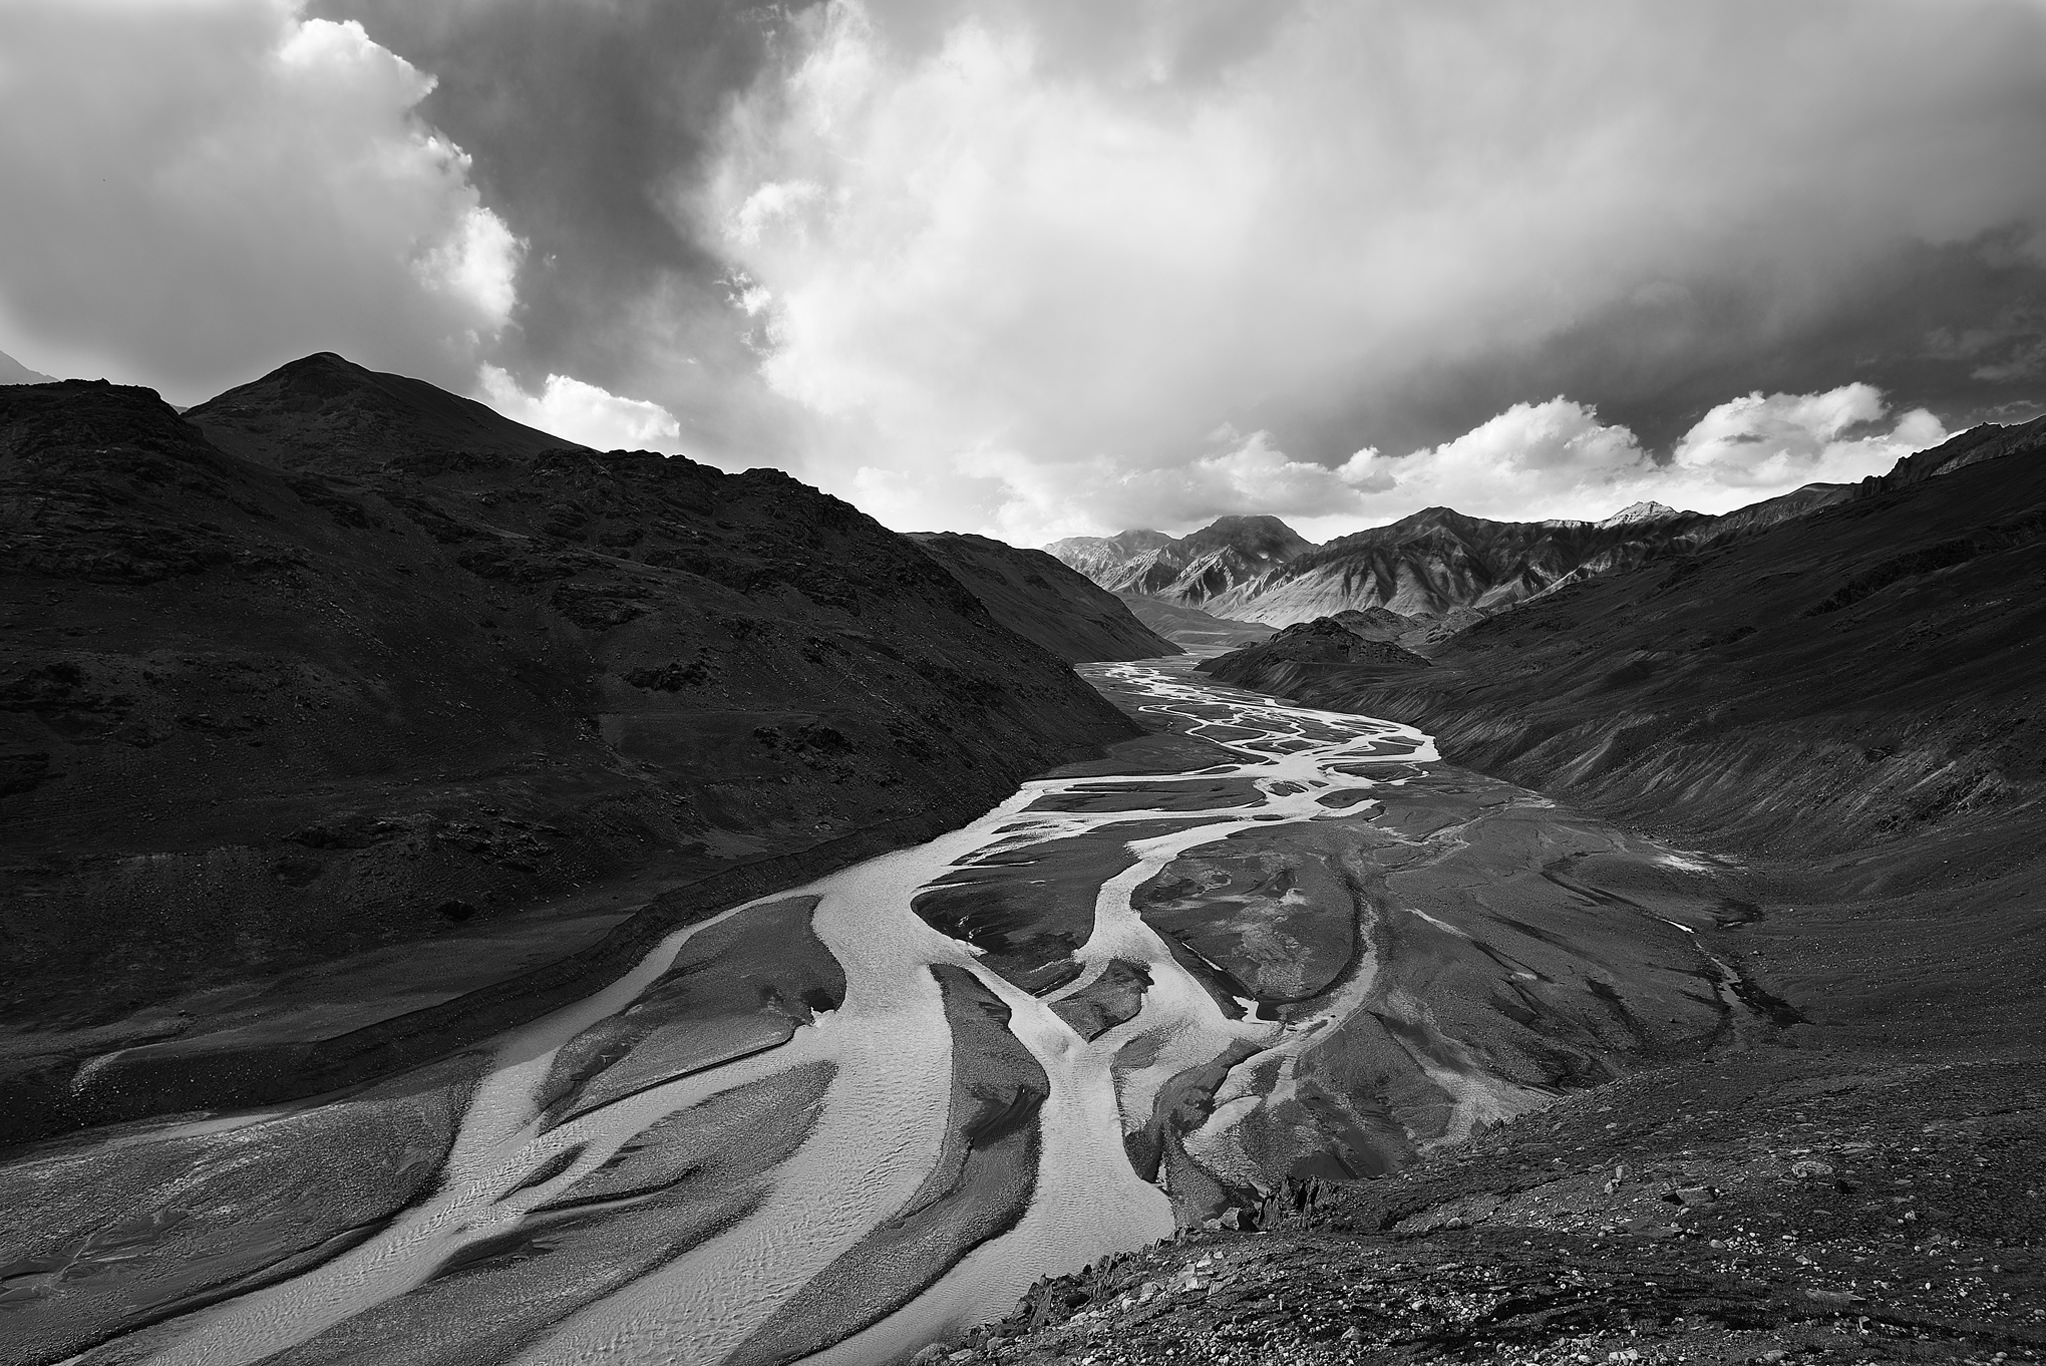
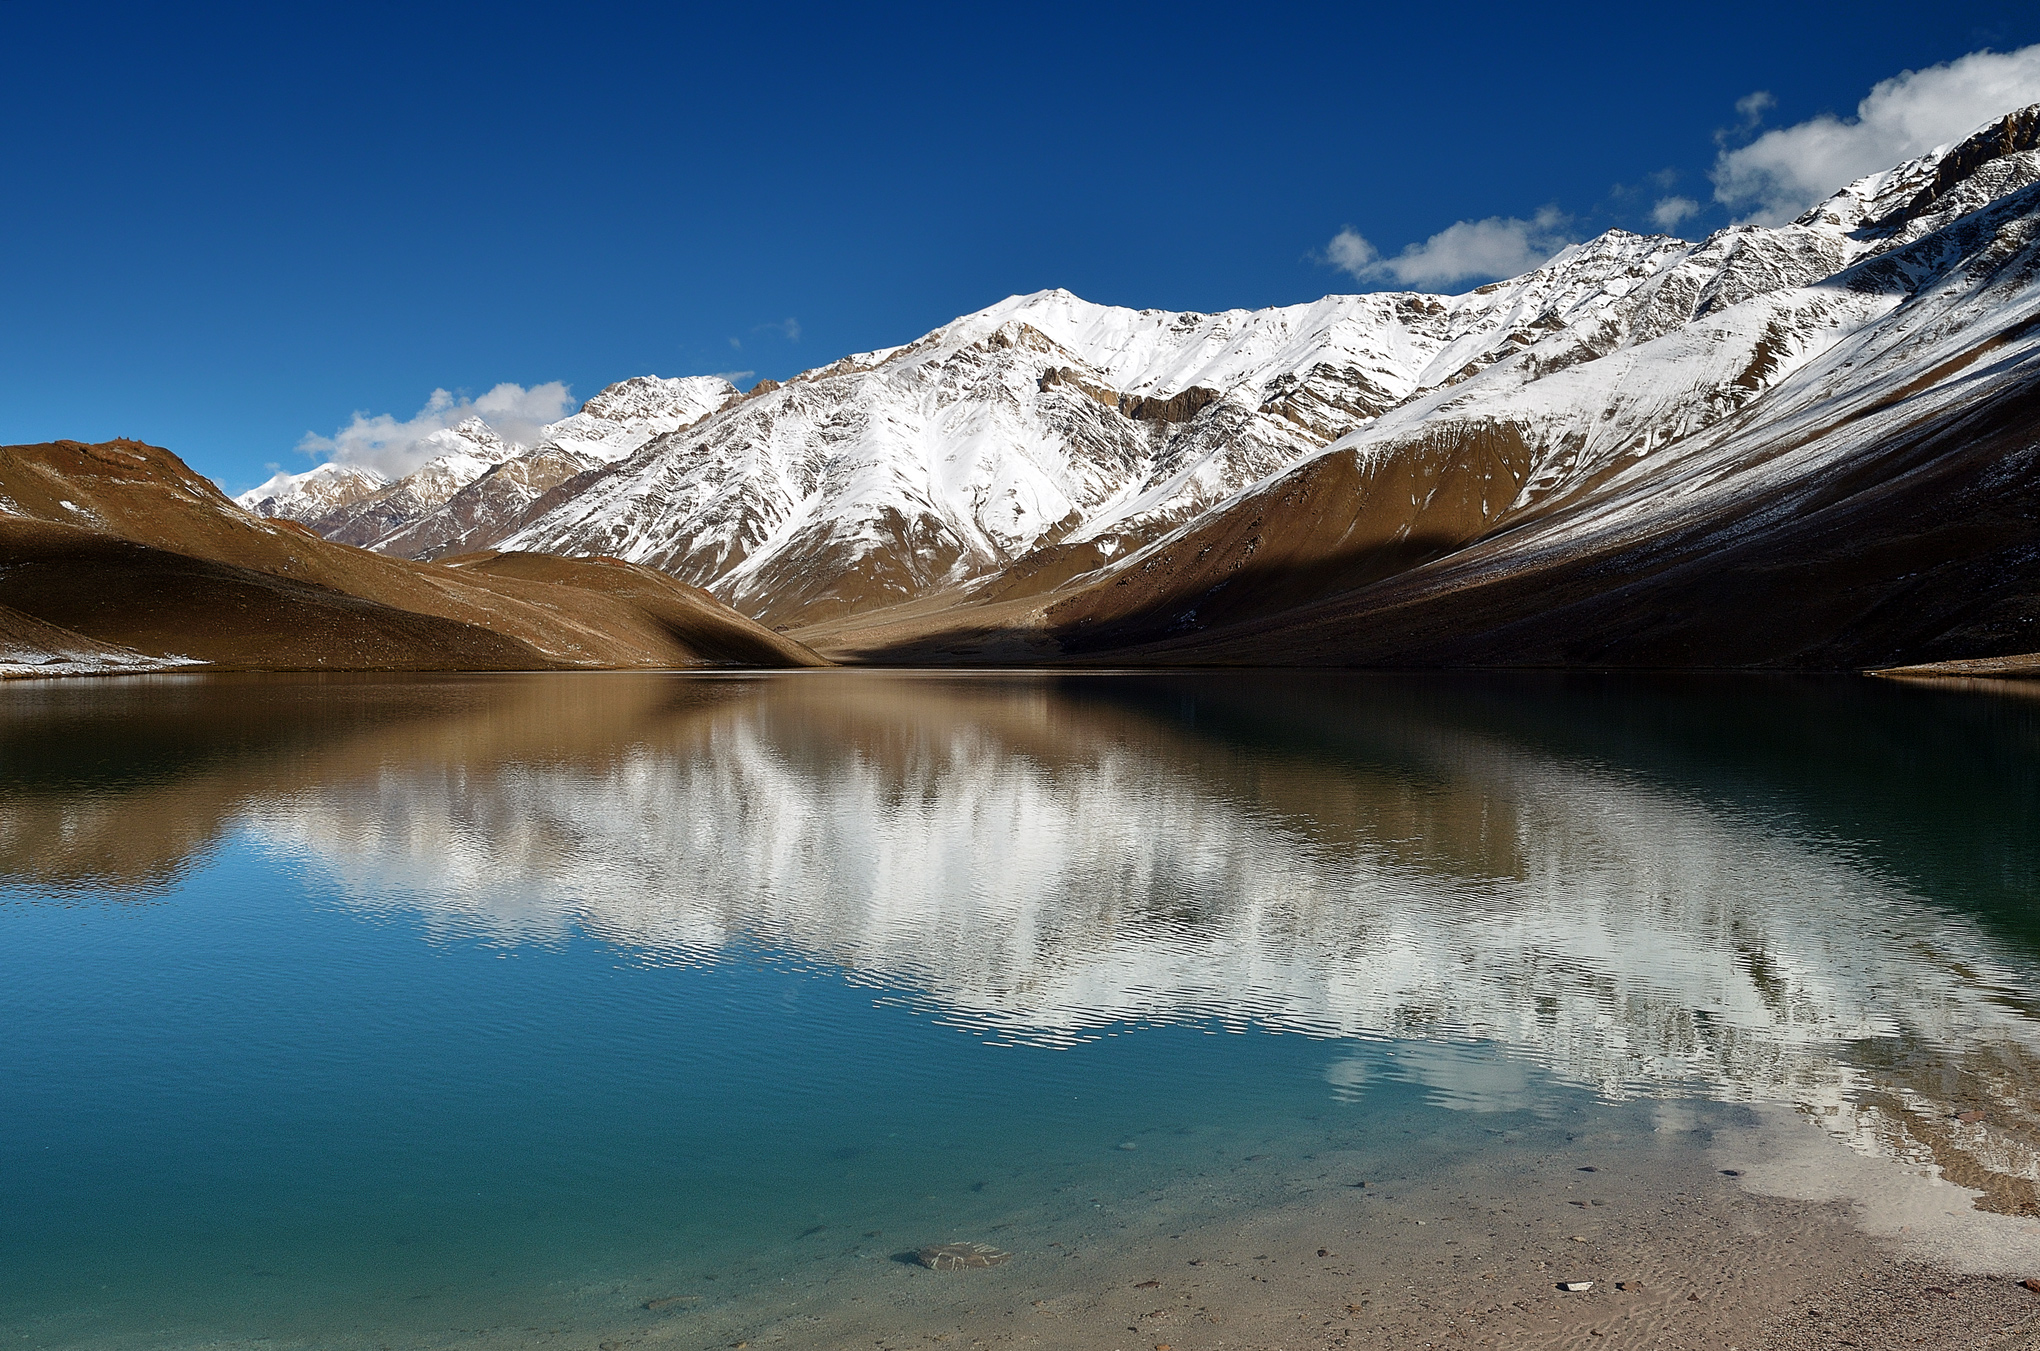
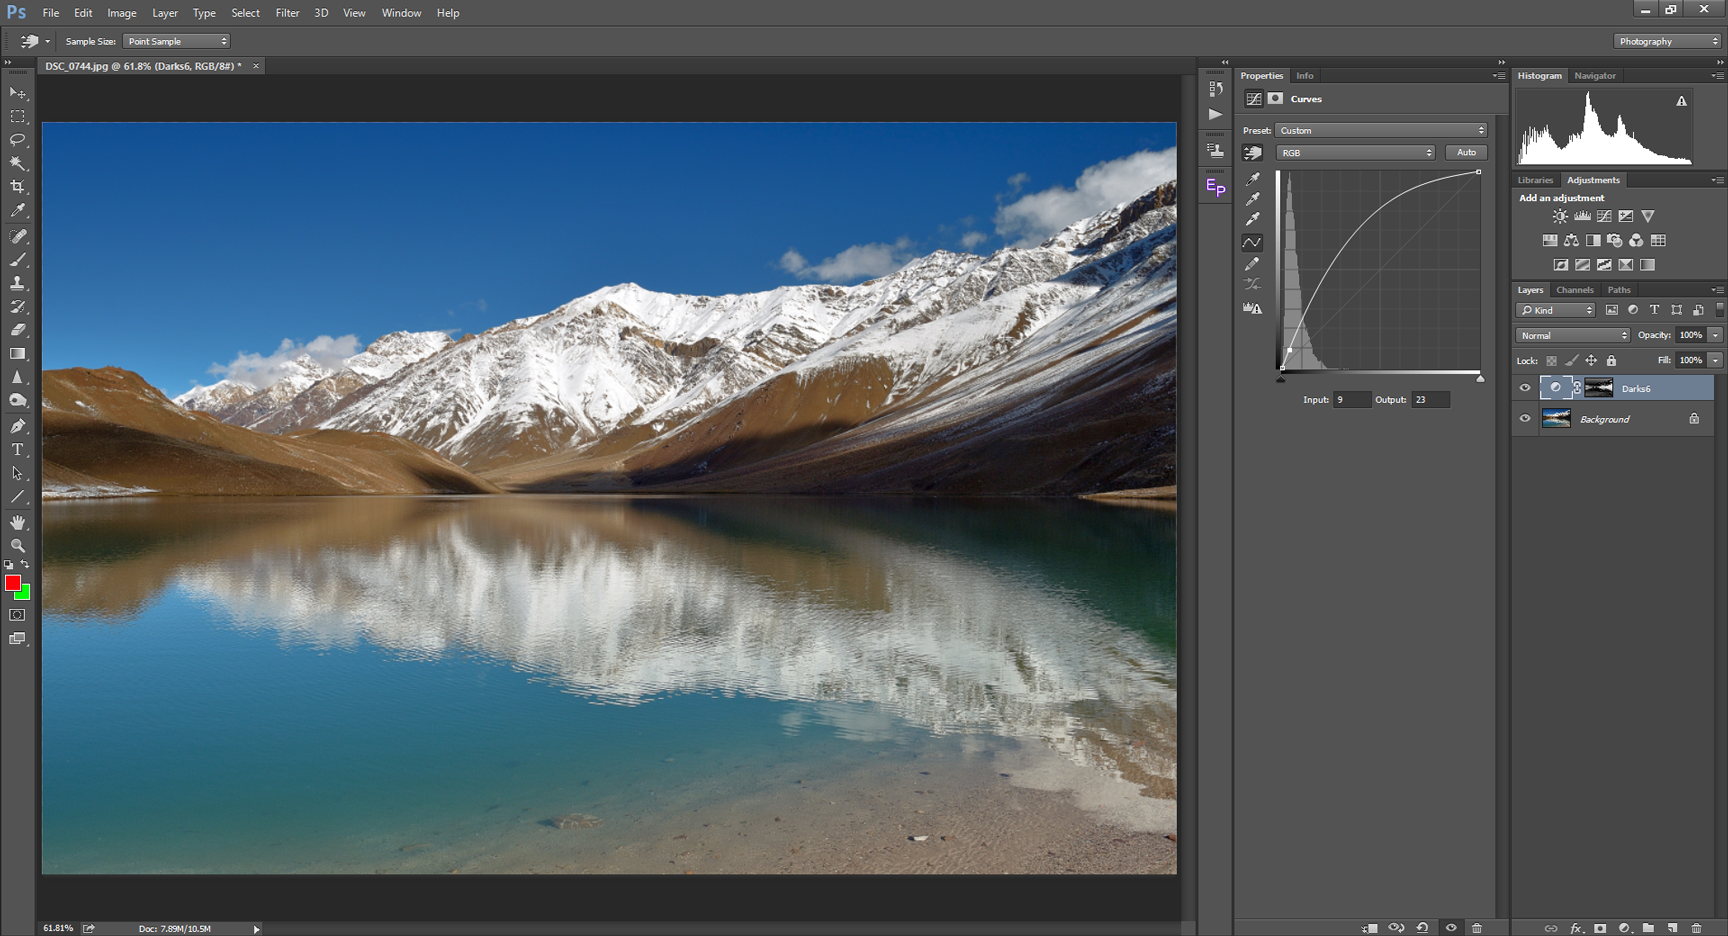
Most of what we did until now was for illustrative purposes. Let’s now consider an example with a real image. Take a look at the picture below. In the image, you can clearly see the shadows on the right with almost all the details lost. We will brighten the shadows and add contrast to the image using luminosity masks.
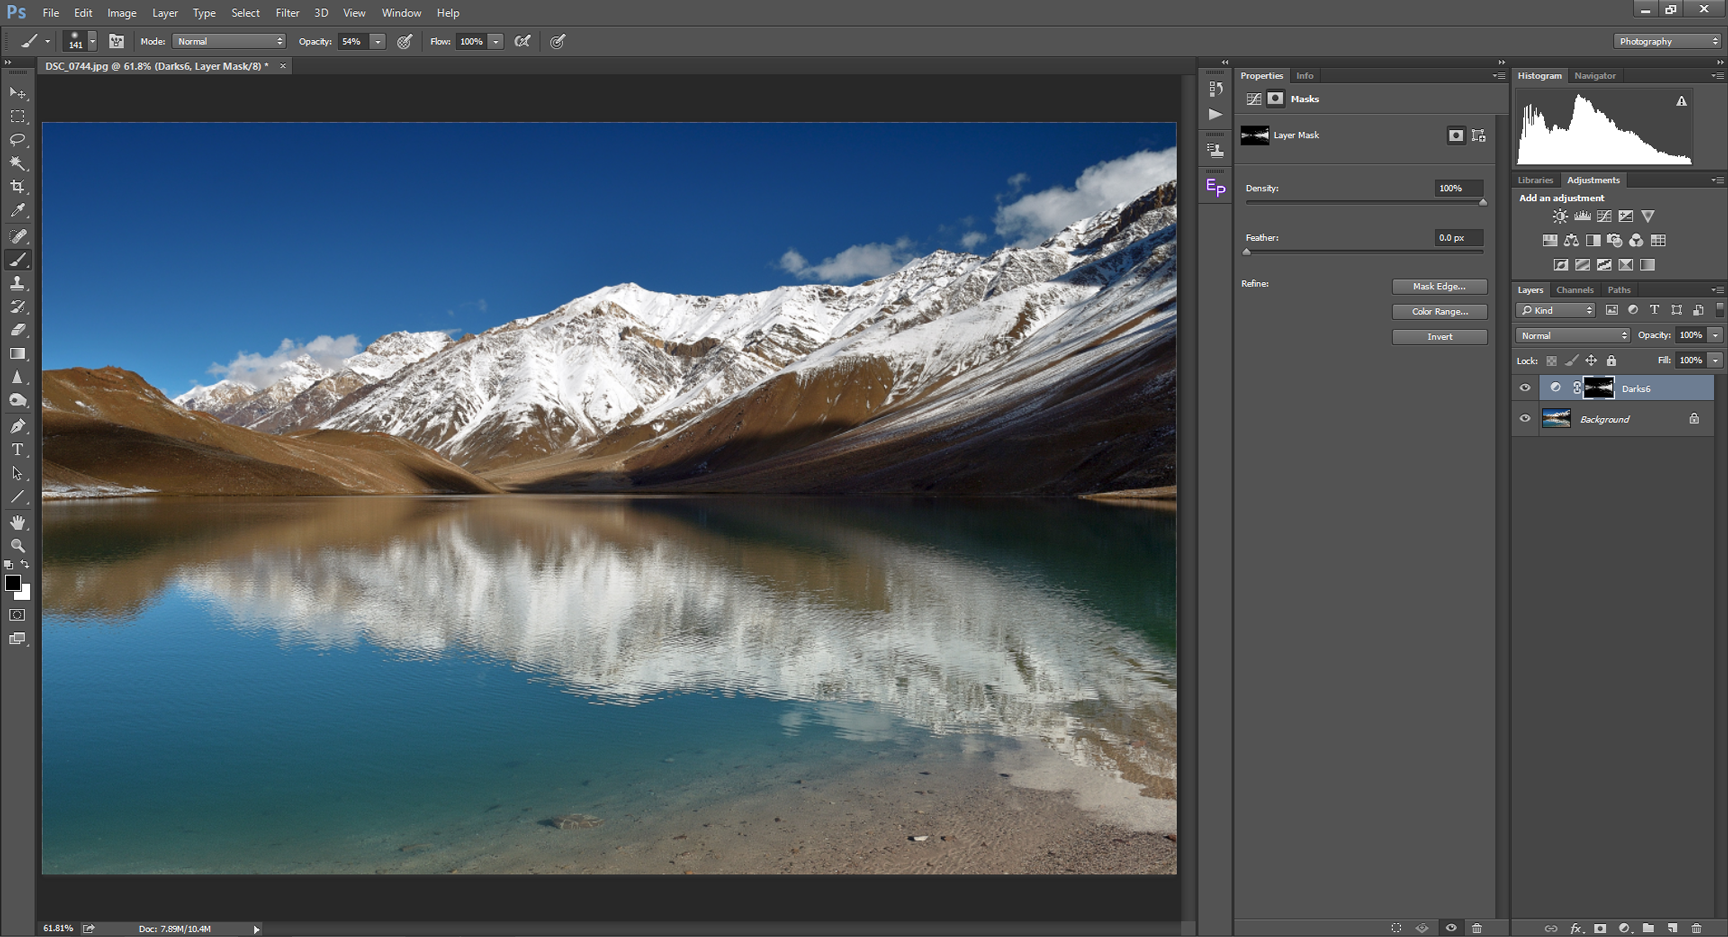
I created luminosity masks and selected Darks6. Next, I selected the mask in the layer mask view by clicking on the layer mask while pressing the Alt / Option key. The mask view is as shown below:
In the mask view, you can see that the extreme darks are selected as the whites / highlights (snow) on the mountain are completely masked out (black in the mask).
The advantage of using luminosity masks over the brush tool is that they select varying degrees of darks and highlights depending upon what channel we select. This gives a seamless look, and above all, it does not create halos as soft brush does when extreme care is not taken.
From there, I increased the shadows in the curves adjustment layer – you can see the difference below. Note that the highlights are untouched and mid-tones take comparably lesser effect.
The mid-tones (the sky and the foreground) look a bit too bright for me. So I selected Midtones4 and brought the curves down. The result is a seamless, natural looking image:

Combining Luminosity Masks with the Brush Tool
There might be times where luminosity masks, or the brush tool are not particularly helpful when used separately. In such cases, you can get the desired results by combining both tools. Let’s revisit the mask view of the image that we saw in the previous example. You can view the mask by clicking on the layer mask while pressing the Alt/Option Key.
You can see that the shadows are white, but the sky is grey. This means the curves that we applied would affect the sky as well, to a certain extent. What we can do now is go to the mask view, take a soft brush and paint the sky and the foreground completely black.

Now when we apply the same amount of curves, the sky and the foreground will be unaffected and the curve will be applied only to the darks in the mountains.
Conclusion
In this article, we went through the basics of luminosity masks, how they work and how you can create them for brights, darks and mid-tones. The applications of luminosity masks are almost endless. It does take some practice to understand the concepts and decide which mask works and which doesn’t. But once we get through the learning curve, luminosity masks can help you make great images.
Landscape photographers in particular, find luminosity masks to be extremely powerful for seamless edits of bracketed images, resulting in images that do not have that distinct HDR look.
If there is anything you are confused about, please let me know in the comments section below!
I appreciate your explanation, but have a question. It’s easy to paint a sky out of the mask, but I want to do some more careful painting around objects. The problem is that I can’t see the original image. Is there any way to see both the original image and the mask at the same time?
Great lesson – THANK YOU!! One question … is it possible to create an action in PS that will create all 18 masks without going through the entire mask creation process for each photo?
It is possible Bob and in fact there are lots of pre-written actions for creating the channels. In this article, I wanted to show how to create one on your own if you wish to do so. But of course you can write an action.
Thanks again! I tried creating an action (my first) following your steps exactly and it worked flawlessly! However, it did take a 23 meg dng file up to 333 meg! You weren’t kidding when you said it would increase file size!! My biggest decision when buying my first pc was a 10 or 20 meg hard drive!! Things sure have progressed – now I have FILES 15X to 30X that size! LOL
thank you very helpful
This article makes no sense.
“There are two ways in which we can do it. We can just inverse the selections of the respective brights. Invert the selection Brights1 as Darks1, Invert the selection Brights2 as Darks2 and so on.”
I don’t think that works. If you invert Brights6 (i.e. the brightest brights, i.e. 1/(2^6) of the image, i.e. ~1% of the image)… you won’t get the corresponding darkest darks. You’ll instead get the other 99% of the image, which is really Darks6 + Mids6.
The other method state does work (starting at Darks1, iteratively refine your selection).
Thank you so much! I have been using luminosity masks for sometime but never understood the basics..
It is so powerful to realy know what you’re doing !
Clear article , great!!!
Thanks
This is beyond frustrating! Please explain how I get a Midtones1 channel from this info. I know how to select the entire image but the instructions that follow do not make sense.
“First, select the entire frame by pressing Control / Command+A. The marching ants appear around the entire frame meaning the entire image has been selected. Click on Brights1 while pressing the Alt+Control/Option+Command keys. The mouse pointer will have a minus sign below it. You can see the selection change. With the current selection, click on the Darks1 while keeping Alt+Control/Option+Command keys pressed.
Then you say,
“What we have done here is, we have selected the entire frame and subtracted the highlights from Brights1 and shadows from Darks1. This leaves us with mid-tones between Brights1 and Darks1.
Where is the Midtones1 channel and how do you create it from 2 channels?
I was with you up to Creating Midtone Channels. You say: Step 1:
“First, select the entire frame by pressing Control / Command+A. The marching ants appear around the entire frame meaning the entire image has been selected. ”
Which entire frame are you referring to? The RGB channel? Brights1? I don’t follow.
I selected-all in Brights1 then did option-command click, but then you say,
“With the current selection, click on the Darks1 while keeping Alt+Control/Option+Command keys pressed.”
When I do that it tells me that no more than 50% of the pixels are selected and when I say okay Darks1 just reverts to what it was. I’m missing something here.
I think there is a small error in Midtones1 explanation. And that’s the reason you can do that. Bright1 covers everything from 50% to 100% luminosity. Dark1 covers everything from 0% to 50%. If you subtract from whole image 0-50% (Dark1) and 50-100%(Bright1) from there is nothing to rest for “Midtones1”.
Typo alert! At the end of Creating Dark Channels, Step 1 and at the beginning of Step 2, you name the channel as Blacks1 but refer to subsequent channels as Darks.
Thanks for pointing it out Ian. Will be more careful next time.
Moving on … I’m puzzled by your method for creating the Midtones.
You suggest creating Darks1 by selecting Brights1, then inverting with Ctrl + I (Windows) and saving that selection as another channel. That’s fine but to create the Midtones1 channel your instruction is to select all (Ctrl + A), then subtract (Ctrl + Alt-click) both Brights1 and Darks1. When I attempt that, Photoshop warns “No pixels are more than 50% selected. The selection edges will not be visible.”
Isn’t this because Brights1 plus Darks1 represents a 100% selection of the image, which you are then asking to be subtracted from 100% of the image (Ctrl + A), which is impossible?
Ian,
The most important aspect of masks are, they don’t see things as black or white. Everything is a shade of grey. With luminosity masks, you are selecting areas with concentration of greys. Let us take the example of creating midtones1 by subtracting brights1+darks1 from the entire frame. You can see that midtones1 selection is grey instead of white, which translates to 50% opacity on the selection. Instead of using a gradient, if you use black and white, as you told the subtraction will result in 0%. But that is not the case. So its not binary. There are different concentrations of grey which you can see from the 6 midtone channels we have created in this article.
It is true that Photoshop warns you when you get below 50% pixels selected. Infact that is one reason why mostly we can’t go beyond 6 channels for each (brights, darks & midtones). You can see this bottom out (6 channels) with most action panels as well. As mentioned, it does have a steep learning curve. We can use panels with one click. But understanding which one to use for which image is where practice comes to play.
Great article, thank you for sharing.
However I was told about Lumenzia and may try it too.
Cheers,
Waldemar
Thanks Waldemar. I’m glad you found it useful.
There are quite a lot of presets and actions for doing this as the steps involved are pretty static.