No matter how good cameras get, it can be very difficult to take high-quality photos in low light! That’s true of every camera, from a cheap phone to a high-end DSLR or mirrorless camera. Simply put, low light photography is hard.
The purpose of this article is to “lift the veil of darkness” as much as possible and make low-light photography a lot easier for you. By the end, you’ll know exactly how to take great photos even in very dark environments with limited light.

Table of Contents
The Two Levels of Low Light
Before we go any further, let’s first identify the two different types of low-light conditions for photography.
The rest of this article is divided into two sections based on these different conditions. These aren’t scientific categories, just rough guides.
- Normal Low-Light Conditions: Includes sunrise, sunset, and indoor spaces with the lights on
- Very Dark Conditions: Includes nighttime photography, Milky Way photography, and indoor photos with extremely dim lights
This article explains both of these scenarios, starting with the first one, to gradually build up your techniques for low-light photography.
1. Normal Low-Light Conditions
Low-light photography is not just about taking photos in the dead of night. In fact, even indoors in the middle of the day is usually “low light” as the camera sees it. And you can get really bad image quality in those situations unless you know what you’re doing.
Luckily, there are many ways to fix this, starting with your camera settings.
Camera Settings #1: Shoot at Faster Shutter Speeds to Avoid Blurry Images
Have you ever noticed that your pictures in low light come out blurry? Maybe the images on the rear LCD of the camera look OK, but when you view them on the computer screen, they are a little blurry up close.
The reason for this issue is that your camera used the incorrect shutter speed. If you haven’t read that linked article, you should do so. However, to summarize, shutter speed is the amount of time (in seconds) that the camera spends taking a photo.
In everyday light, the camera’s automatic mode might aim for 1/100th of a second or 1/200th of a second. But in low light, it may push the shutter speed longer and longer. It’s not uncommon to see shutter speeds that are several seconds long, which will make your photo brighter, but they will also be blurry if anything is moving (even if your hands shake slightly).
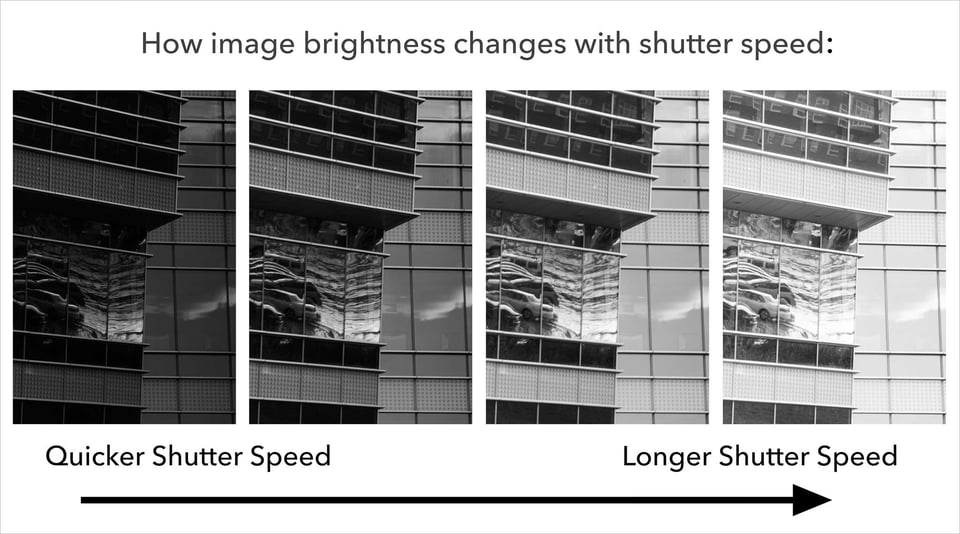
The problem is that shutter speed is always a balance. Maybe your photo will be bright enough with a 5 second shutter speed, but here’s a question for you: Can you hold a camera perfectly steady for a full 5 seconds? It’s basically impossible!
In fact, the rule of thumb is that most photographers can only take sharp photos at about 1/50th of a second with a normal lens. If your subject is moving quickly (like wildlife photography) or if you’re zoomed in (like with a telephoto lens), you’ll need an even faster shutter speed. For example, a lot of wildlife photographers will stick to a rapid-fire 1/2,000th of a second.

Nikon Z9 + Nikon Z 400mm f/4.5 VR S lens @ 1/2000 second, f/5.0, ISO 5600
Simply put, you need to override your camera! Don’t be afraid to switch to manual, or “M” mode. Then manually set the shutter speed that will give you sharp, bright photos.
And… what shutter speed is that? Well, it depends on the photo. Again, your bird in flight settings will be different from your landscape settings. Really, it just takes some practice. Every photo needs a different shutter speed, but the good news is that you’ll get a very good sense of things with just a bit of practice.
However, a simple guide to get you started is the reciprocal rule, which works if you’re shooting handheld and your subject isn’t moving too much. Again, you don’t want to go beyond 1/50th of a second with a normal lens, and it’s safer to stick to 1/100th of a second if possible.
Camera Settings #2: Set the Widest Aperture
As important as shutter speed is, it’s not even the most critical camera setting. Instead, that honor goes to your lens’s aperture!
Aperture is particularly important in low light conditions. It’s especially important when you’re using fast shutter speeds because your subject is moving.
Since you’re already in manual mode, now’s the time to set your lens’s aperture to the widest possible value (AKA the maximum aperture). This is just whatever f-stop is written in the name of the lens. For example, with the Canon, Sony, or Nikon 50mm f/1.8, the maximum aperture is f/1.8.
Basically, in low light, you should use that aperture by default! Most photographers will shoot at an aperture of f/1.8 in low light if their lens has an f/1.8 maximum aperture.
However, not all lenses have a very good maximum aperture. In fact, most consumer zoom lenses are considered “slow” lenses because their maximum aperture does not let in a lot of light. It’s much better to use a “fast” lens for low-light photography.
Fast lenses have a maximum aperture of f/2.8, f/2.0, f/1.8, f/1.4, f/1.2, and sometimes even wider! Meanwhile, slow lenses have a maximum aperture of f/3.5, f/4, f/5.6, f/6.3, and sometimes even narrower. (Certain zoom lenses will change their maximum aperture as you zoom in, like the old Nikon 24-85mm f/2.8-4 or the Canon 18-55mm f/3.5-5.6 kit lens. Even then, it’s best to use the fastest possible aperture in low light.)
The good news is that fast lenses don’t have to be expensive. Most camera systems have amazing and affordable fast-aperture lenses that will make low-light photography easier. The only tradeoff is that they usually have fixed focal lengths and are not zoom lenses. For example, here are some inexpensive fast lenses for each major camera system:
- Canon RF: Canon RF 50mm f/1.8 STM
- Sony E: Sony FE 50mm f/1.8
- Nikon Z: Nikon Z 40mm f/2
- Fuji X: Fujifilm XF 35mm f/2 R
- Micro Four Thirds: Panasonic Lumix G 25mm f/1.7
- Canon EF: Canon 50mm f/1.8 STM
- Nikon F: Nikon 50mm f/1.8G
- Pentax: Pentax DA 50mm f/1.8
Notice the abundance of f/1.8 and f/2 written in the lens names? That’s what you want to see! Those are nice and fast lenses.
The wider the maximum aperture, the faster the lens is considered to be. Some specialty and exotic prime lenses can go all the way to f/0.95! But if you want a good balance for how expensive the lens is, you’ll usually find that f/2 or f/1.8 is a happy medium.
Camera Settings #3: At This Point, Use Auto ISO
So far, you’ve set a shutter speed that will give you sharp photos (nice)! You’ve also set the widest aperture of your lens, something like f/1.8, to maximize how much light you capture (double nice)! Now what?
It’s down to the third variable of the triangle – your camera’s ISO.
Raising your ISO is a lot like brightening a photo in Photoshop. Basically, if you go too far, you’ll start to see extensive grain and discolored pixels called noise. However, modern cameras are so good that you need to be at some extreme ISO values (usually involving very low light) before this is a big problem. Modern cameras are good up to about ISO 6400, and high-end full-frame mirrorless cameras can shoot at ISO 12,800 with decent image quality.
You could set your camera’s ISO manually like you did for shutter speed and aperture. However, to make your life easier, it is usually best to use Auto ISO in low light, at least if you’re taking pictures handheld.
In Auto ISO, the camera will judge how dark the scene is, then raise or lower the ISO accordingly. Even in the dimmest light, the camera will simply boost ISO to the point that your photo looks bright. Maybe this will be ISO 1600, ISO 3200, ISO 6400, or even higher.
Again, this isn’t without a tradeoff. Lower ISO values like 100 or 200 have the best image quality if you can use them. But in low light, you usually won’t have that luxury. Your photos could turn out pitch black unless you raise the ISO.
The good news is that if your ISO climbs too high, at least you can do noise reduction in post-processing software and fix a lot of this grain/noise.

Use Image Stabilization
Does your lens or camera have image stabilization? (It’s also known as “IBIS” in cameras, or “Vibration Reduction,” “Vibration Compensation,” and “Optical Image Stabilization” in lenses.)
If no, that’s too bad, because it truly does work! Modern image stabilization technologies from different camera companies are rated at six, seven, or even eight full EVs (exposure values) of compensation. This is a huge help when shooting hand-held.
In particular, it helps with shutter speed. According to camera companies, if you were stuck at 1/100th second previously, you might be able to use a shutter speed of a full second and still get sharp photos!
However, keep in mind that the benefits in practice are definitely not as big as camera companies say. You should still try to stick to 1/50th of a second or quicker, even with a stabilized lens. Maybe you can push it further if you’re able to take 4-5 photos of the same subject, then pick the sharpest photo later.
But to be clear, image stabilization definitely helps in low light, and you should keep it turned on whenever you’re shooting handheld.
Nikon Z7 + Nikon Z 24-70mm f/4 S @ 1/13 second, f/4.0, ISO 3200
Or… Maybe Use a Tripod!
It’s great when you can shoot beautiful handheld photos in low light. All the photos in this article so far were taken handheld, so it’s definitely doable. However, if you really want to conquer the dark, there is no substitute for a tripod.
Tripods do take up more space and can be annoying to carry around, but for low-light photography, they are worth their weight in gold. So long as the scene in front of your camera isn’t moving too much, a tripod gives you complete flexibility with your camera settings and lets you get infinite image quality. (Well, as close as possible, anyway…)
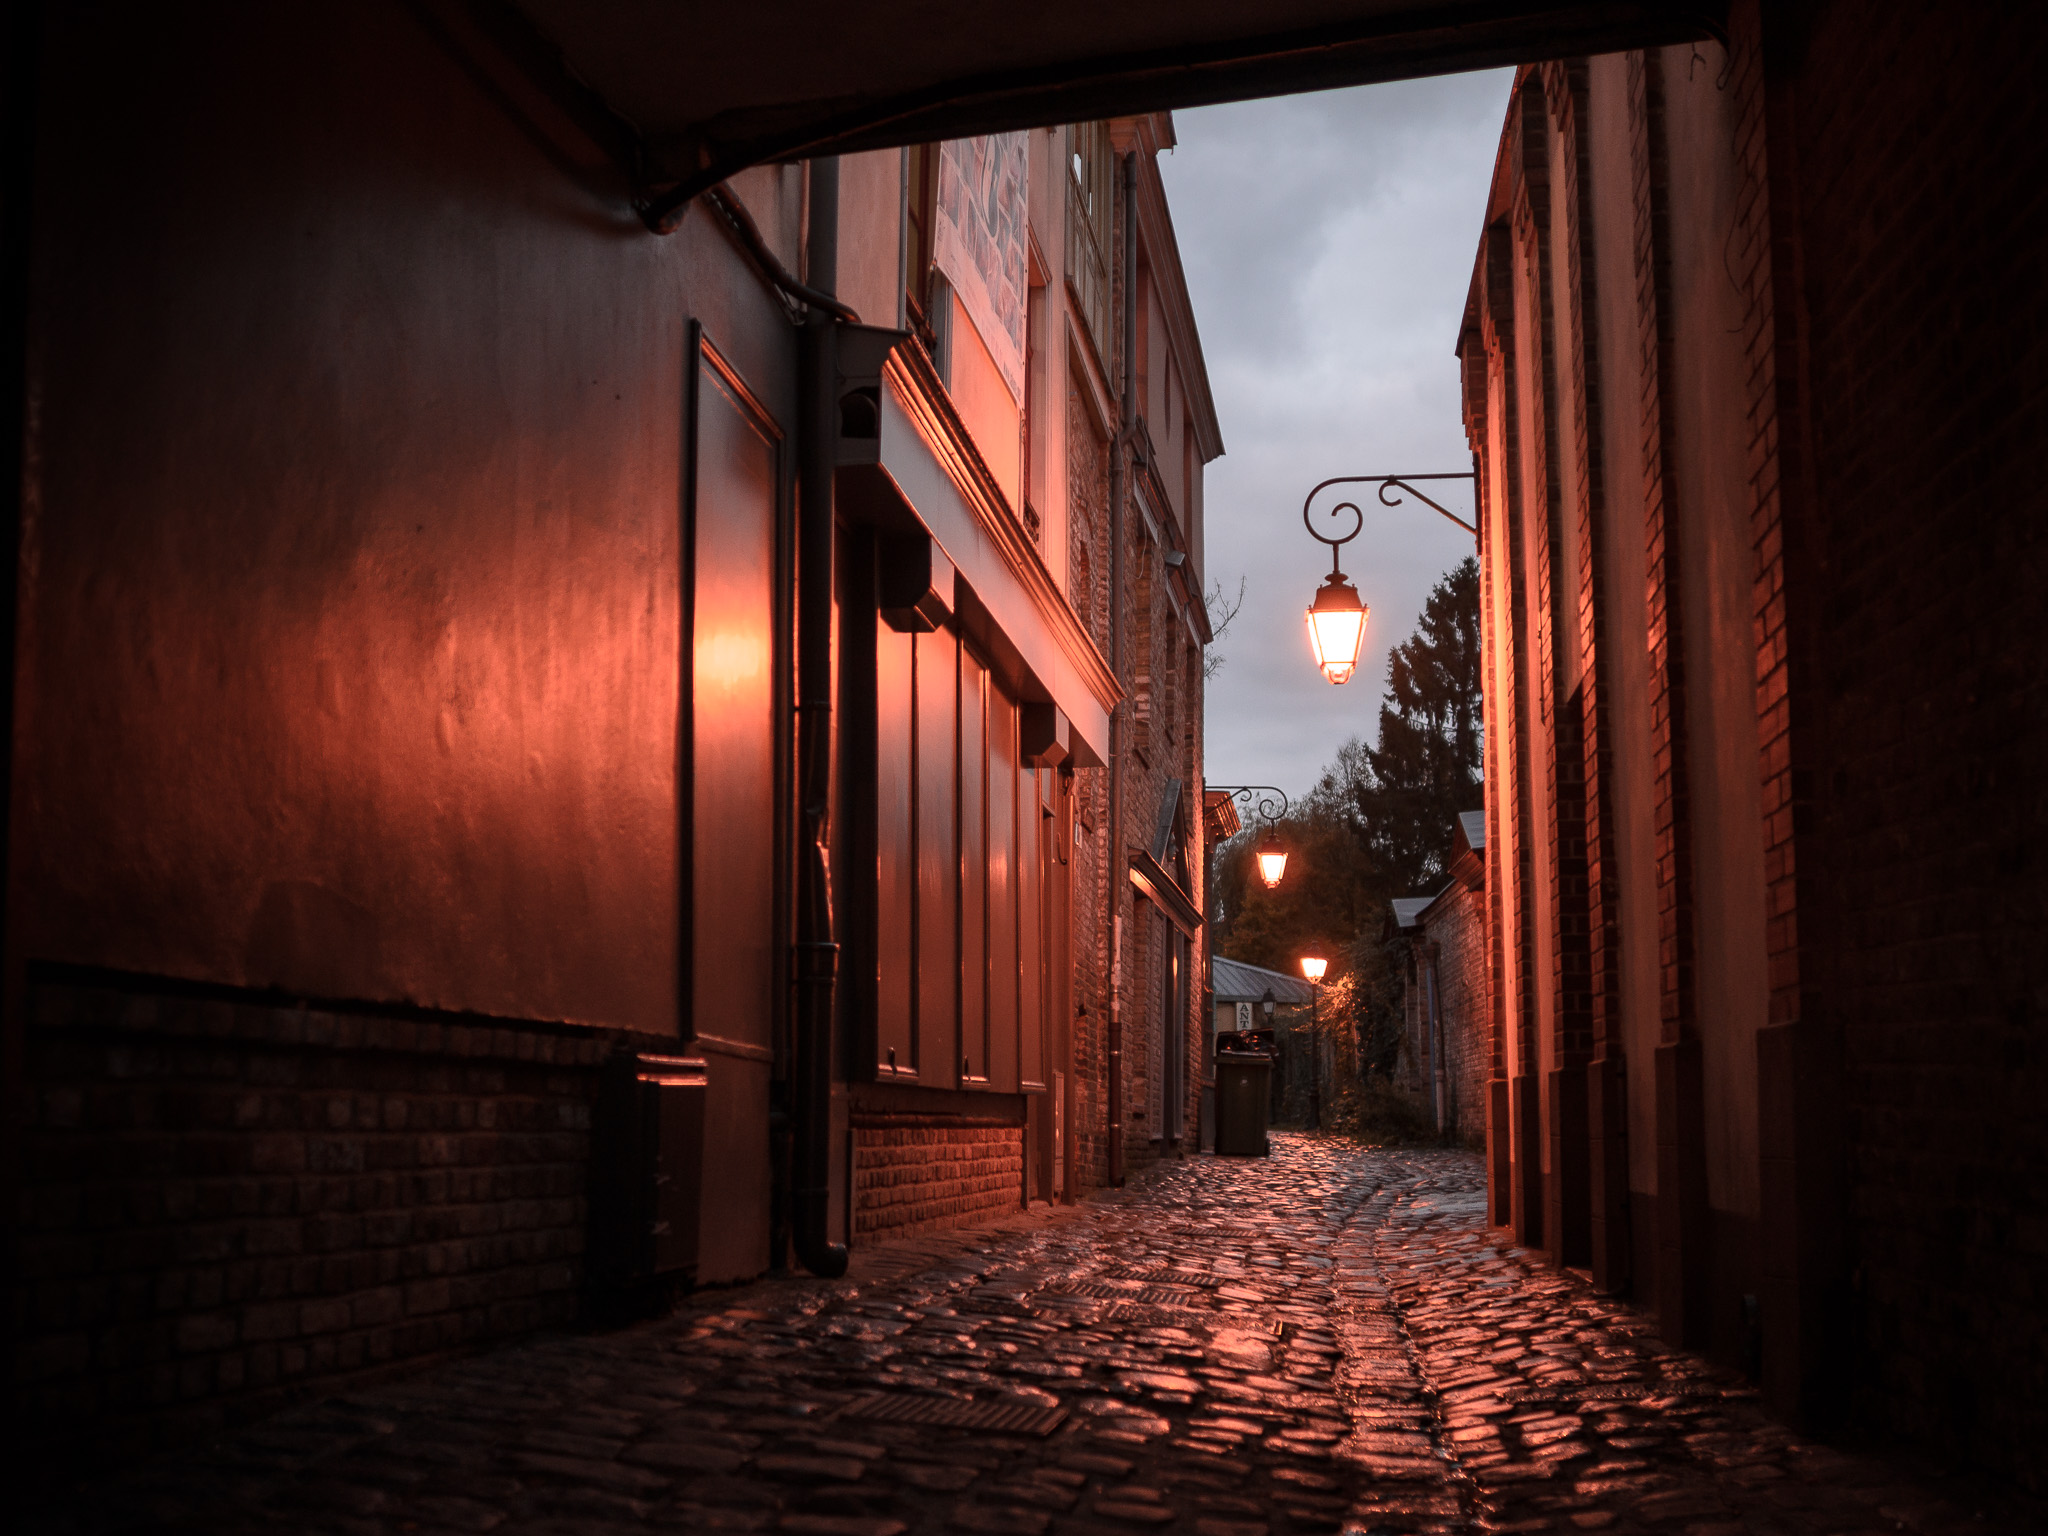
Simply put, a tripod’s big contribution is that lets you use extremely long shutter speeds. The following photo was taken with a long shutter speed of 0.8 seconds, and it’s totally sharp, which would have been almost impossible handheld:
But you haven’t seen anything yet. The following photo was taken at 6 seconds:
Still not enough for you? What about 2.5 hours!?
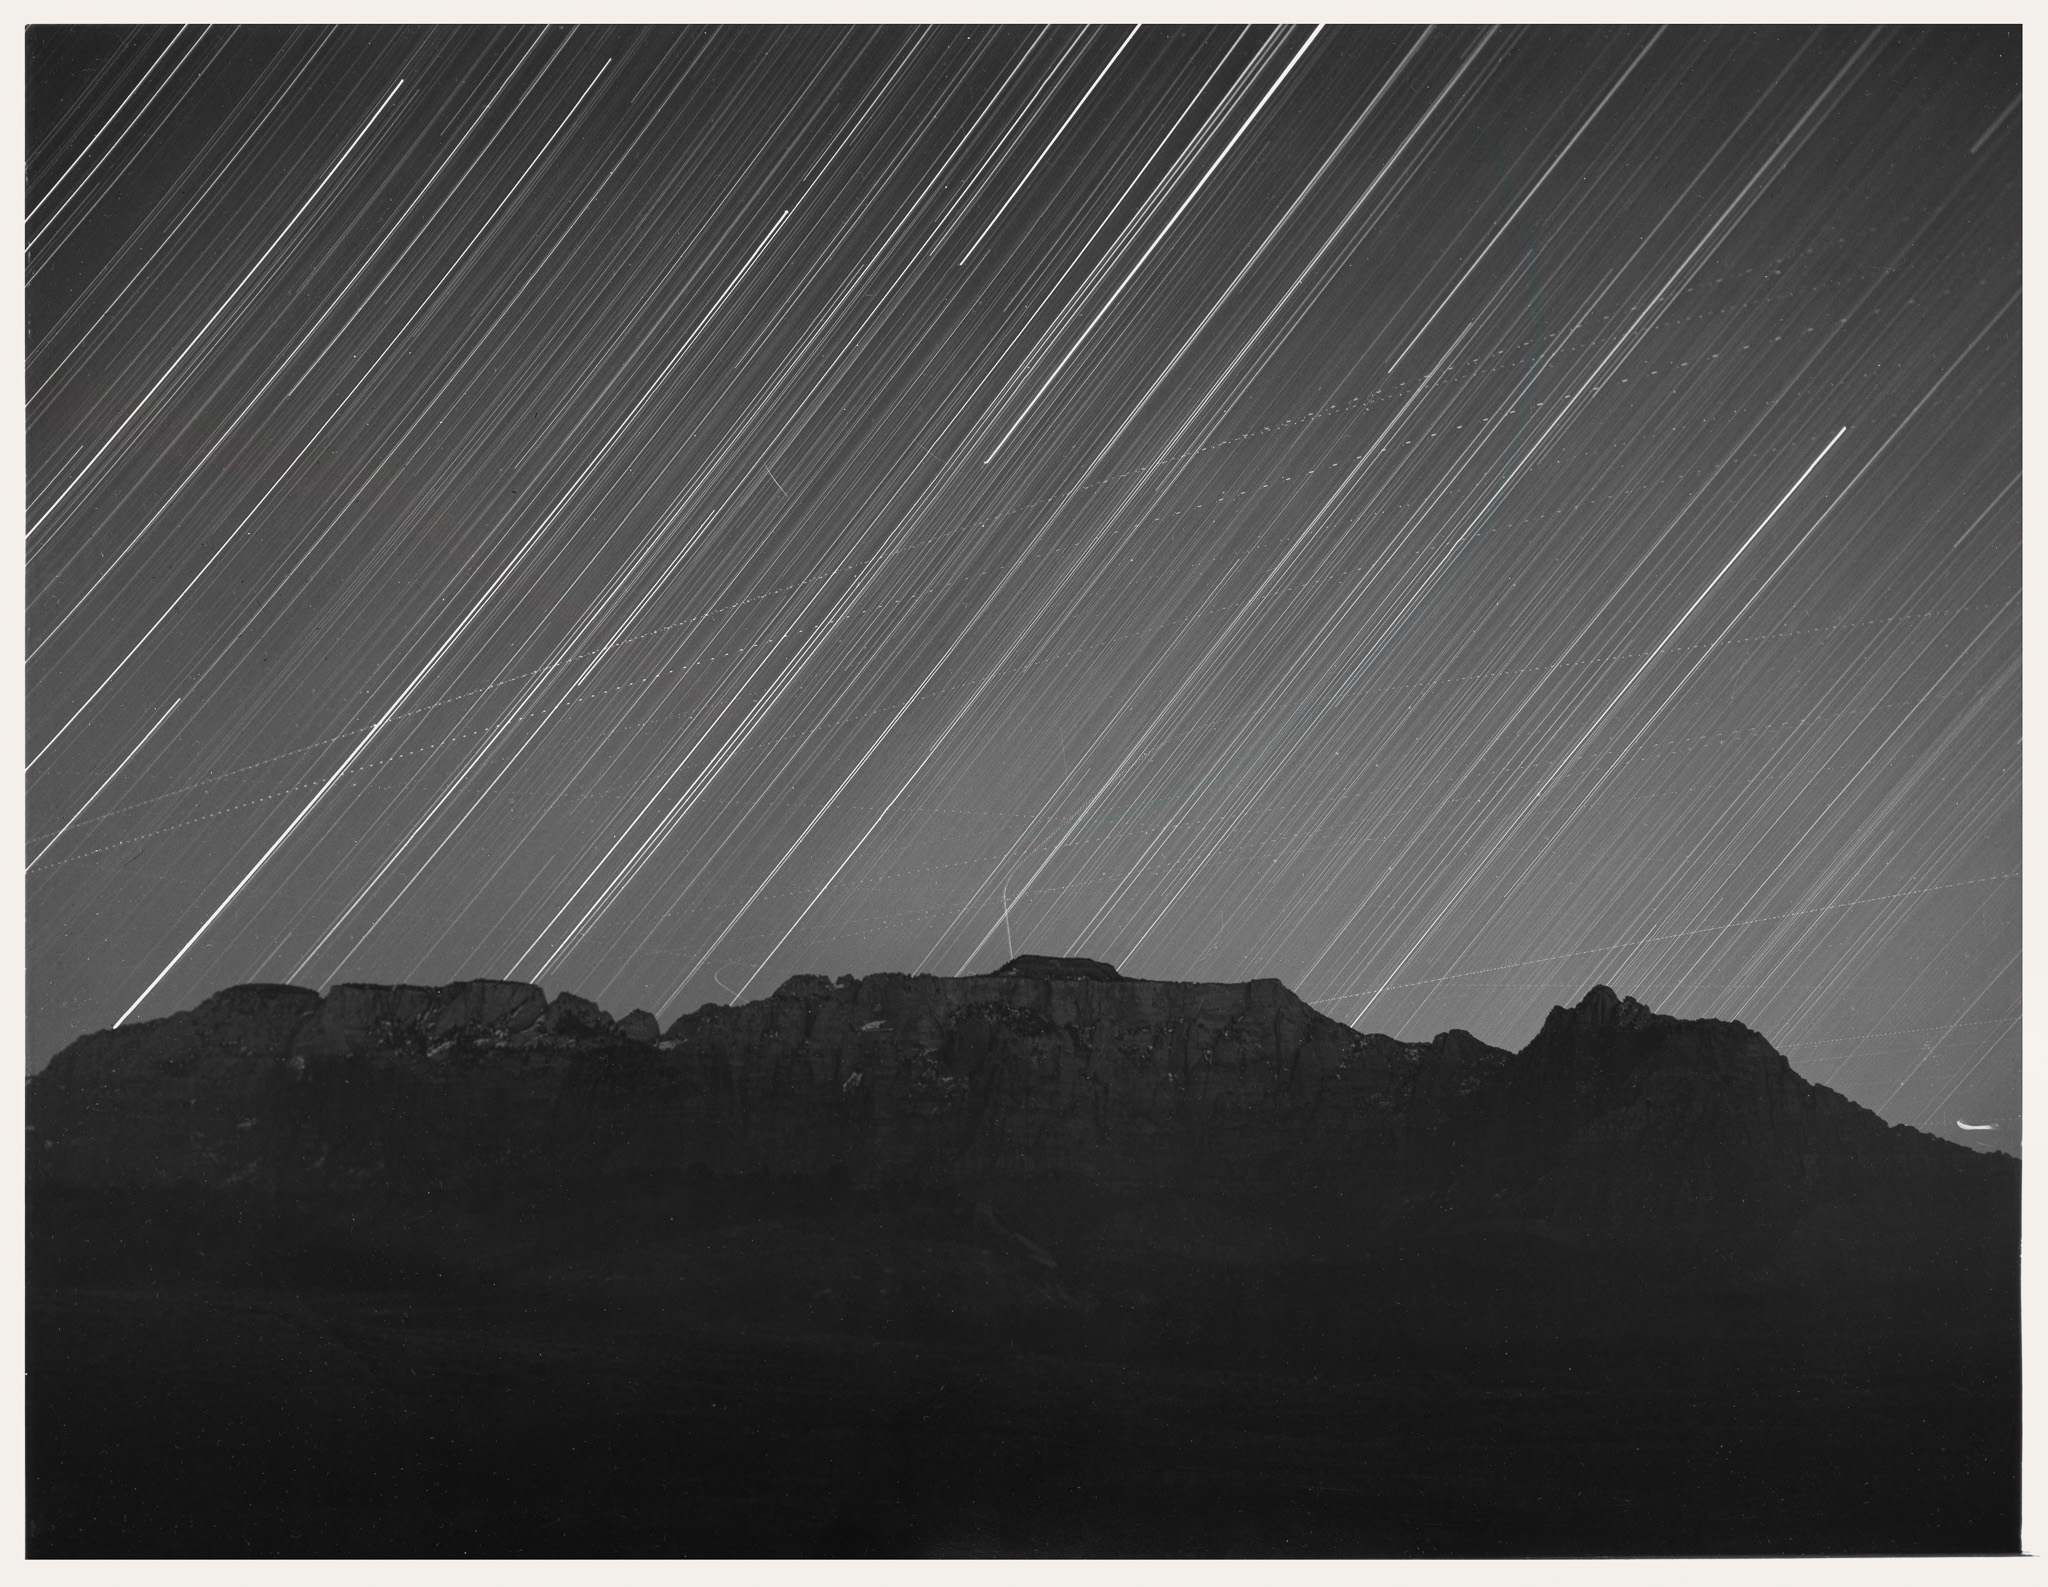
Granted, that last example photo probably belongs in the next section instead (“Very Dark Conditions”) since it’s a photo of star trails in the night sky. However, because that photo was taken from a tripod, every nonmoving part of the image is completely sharp. Only the stars themselves are blurry streaks of light, which was the goal of the photo anyway.
The point is, with a tripod, you effectively have no limit on your shutter speed. You can use a low ISO value like ISO 100 to get maximum image quality without a problem. You also have full flexibility in your aperture, so you can shoot at good landscape apertures like f/11 instead of using f/1.8 all the time.
Tripods are essentially a cheat code of low-light photography. No wonder people are still using them today, even with the most modern, high-end cameras available.
2. Very Dark Conditions
Some of the best photography happens in extremely low light, where even the tips above don’t go far enough! Milky Way photography is a really exciting genre, for example, and you can do it with almost any modern camera (even some smartphones). But you need to push things to the limit. Here are the most important tips you should know.
Tripods Are Required
Earlier, for “normal low-light conditions,” we said you could use a tripod. Right now, for very dark conditions, we’re saying you must use a tripod.
To maximize sharpness when using a tripod, it helps to use your camera’s self timer or the exposure delay mode. If your camera is equipped with an electronic shutter, I recommend enabling that in order to eliminate vibrations originating from your camera, such as shutter shock. And finally, you should also consider using a remote control or a cable release system in these situations.
Sony a1 + Sony 20mm f/1.8 G @ 30 seconds, f/5.6, ISO 200
Use a Flashlight for Light Painting
If your subject is too dark, use a flashlight to add some light to it. Light painting is pretty cool, and you can get some really nice shots by painting with the light, especially if you use different colors.

Use Manual Focus
When it’s too dark, autofocus will not work at all (or, at best, it will function badly). One tip is to use a flashlight to illuminate your subject and allow your camera to focus, then turn off the flashlight before you take the photo. However, if your subject is too far away or you do not have a flashlight, you will need to manually focus on your subject.
On modern cameras, this is usually pretty easy. Set the camera on your tripod, compose the photo, and magnify the image on your camera screen to the highest magnification. Finally, turn the focusing ring on your lens back and forth until the preview looks as sharp as possible.
After you’ve acquired focus, make sure to turn off autofocus so that the camera does not attempt to focus again. Obviously, do not touch your zoom ring after focus is acquired, since focus usually has to be adjusted separately for each focal length.
That’s all there is to it! Although, Spencer Cox has written a dedicated article on focusing for Milky Way and star photography if you want a full guide.
Artificial Light
What do you do if the environment doesn’t have enough light? Bring your own!
Some photographers find the idea of flash photography to be intimidating. Other times, it’s not possible to use artificial light at all, like for Milky Way photography (since the stars are way too far away)!
Even so, if conditions are dim, see if you can find a way to add more light somehow. For portraiture, a flash is one of the most important tools you could ever get. The same is true for studio photography, macro photography, event photography, and more. Some sports photographers will rig complex artificial lighting setups in a basketball arena in order to avoid the low-quality arena lights.
A simple tip for better-quality artificial light is to get any flash that has a variable-angle head. Point the flash head at the ceiling or a wall to bounce the light. The result is very high-quality, diffuse light that looks professional. (By comparison, a pop-up flash pointed straight at your subject will give a deer-in-the-headlights look that is usually best to avoid.)
Along with bouncing the light, another good alternative if you have more space is to use a diffuser. You’ll often see studio photographers and portrait photographers working with large umbrella-shaped diffusers because of how beautifully it bounces the light.
Of course, you can also use more complex multi-flash setups, plus all kinds of flash modifiers, which can give you even more control over the light. But even a single flash is a great asset so long as you soften the flash somehow – either by bouncing it off the ceiling or firing it through a diffuser of some kind.
One thing to keep in mind about flash photography is that you need to balance the white balance of the flash with the color temperature of the environment.
Flashes output white light. This is usually good if your photo is completely lit by flash. However, if you are balancing the flash against ambient light, you’ll get the most natural results when the two color temperatures are close to one another.
For example, at sunset, an unmodified flash can make your subject look way too blue/white when the surrounding environment is gold/orange.
The easy solution is to get a set of color gels that fit your flash. These are colorful strips of transparent plastic that alter the color of your flash. A few warm-tinted flash gels is all you need to get started. Put the appropriate gel over your flash to match the ambient light, and you’ll immediately get better-looking flash photos in any conditions.
Other Low-Light Photography Tips
So far, this article has covered the most important camera settings that will make your photos shine even in low light (and ultra-low light). However, there are also a lot of shorter tips we’ve picked up over the years, which you’ll find really helpful. Let’s go through them one-by-one below.
Position the Subject Closer to the Light Source
The closer your subject is to the light source, the more light there will be for your camera to use.
Large windows are great sources of light, so open up those curtains and blinds and let the light get into the room. To photograph the group below without using a flash, it was as easy as asking them to stand near a large gate and let lots of exterior light in:

Stabilize Yourself
Another helpful tip is to learn how to stabilize yourself and hold your camera better. Use your left hand to support the camera by putting your palm in between the camera lens and the camera body (or wherever the center of the weight is). Pull your elbows towards your body. If you can, sit down and use your knee as support by resting your left arm on it.
All of this will allow you to push your shutter speed beyond the usual limit. That said, if you’re really pushing your shutter speed, make sure to take multiple photos of the subject in front of you, then pick the sharpest one later.
Nikon Z7 + Nikon Z 24-70mm f/4 S @ 58mm, 1/8 second, f/6.3, ISO 64
Shoot in RAW
It is always best to shoot RAW files in low light, because it lets you maximize image quality and recover plenty of detail from your pictures if they’re underexposed. By comparison, with an 8-bit JPEG image, you have worse image quality which will be especially visible in low light.
See Photography Life’s RAW vs JPEG comparison to understand the differences between the two image formats. But basically, if you aren’t shooting RAW yet, take this as the sign to start right away!
Change Your Autofocus Settings
In low-light environments, the camera might start to lose its autofocus capabilities, since it has a hard time differentiating between objects.
However, if you’re just in regular low light rather than extreme low light, you should still be able to autofocus. There are a few things you can do to improve your odds.
First, many modern digital cameras are equipped with an “AF assist” light in front of the camera that lights up just like a flashlight when there is not enough light to illuminate the subject. If you have such functionality, definitely turn it on in dim environments.
Second, switch your camera away from continuous focus mode (“C”) to single focus mode (“S”). Continuous focus is convenient when your subject is moving, but in low light, it will start to hunt back and forth a lot, and ultimately fail. Single focus is more reliable in these conditions.
Finally, when you focus on a subject in low light, don’t just immediately take the photo when the camera is done focusing. Instead, pay attention to how sharp the preview of the image looks. If it’s even slightly blurry, you should re-acquire focus. Furthermore, you should periodically review your low-light photos and zoom into them to make sure they’re sharp at a pixel level.
Use a Larger Sensor Camera
Cameras with a large sensor can be expensive, but they’re very helpful in low-light situations. The larger your camera sensor, the better your images will look at high ISOs, so moving up in sensor size truly does make a difference.
For example, if you shoot with a basic point and shoot camera (or with your phone) you will inherently get worse image quality in low light. There is simply no way around it – that’s physics. Phone companies are doing a ton of software tricks to get as close as possible to “real” cameras, but they will never fully catch up. Larger camera sensors can simply capture more light.
Don’t worry about camera resolution or megapixels, especially when you’re at high ISO values. Sensor size is what matters the most for low-light photography (well, that and your lens’s maximum aperture).

Sony RX100 IV @ 10.15mm, 1/13 second, f/11.0, ISO 200
Use Software Corrections
Most post-processing software like Photoshop, Lightroom, or Capture One have built-in noise reduction options. They’re never perfect, but they can certainly expand your ability to shoot in low light if you know how to use them well.
Machine learning or AI software tend to be better than traditional noise reduction algorithms. More and more companies are adding these algorithms to their post-processing software these days, for good reason.
Software definitely isn’t a replacement for good technique like using a tripod, but it can at least help salvage photos with lots of noise, or improve the image quality of high ISO photos.

Conclusion: Practice, Practice, and Practice!
Now you know the ropes! It’s a carefully-choreographed dance between shutter speed, aperture, and ISO… and you can tilt things dramatically in your favor by using a tripod.
All that’s left is to practice. There’s not much to say beyond that – just practice as much as you can, and you will get better in no time.
Low-light photography is a lot of fun, and it’s extremely rewarding. Hopefully this article gave you a good understanding of the process involved in taking high-quality photos in low light. If you have any questions, feel free to ask in the comment section below, and Photography Life’s team of professional photographers will work hard to provide an answer.
If you can’t afford the cameras being used in these examples : Look how good that Sony Advanced Compact photo is, wonderful.
Micro Four Thirds with the Olympus 12mm-45 f4 and the 17mm f1.7 is a good compact combo – as is the Panasonic 12mm – 35mm f2.8 and the 20mm f1.7.
Hi Nasim,
I’m going on a holiday from Australia at the end of the year to Finland/Norway. Partly wanting a white Christmas (we don’t get them where I live) partly Northern Lights experience and partly to spend time in an environment that is completely different to what I am used to.
Due to the time of the year, there will be a lot of low light photography so I’ve been researching camera equipment and low light photography.
Thanks for your article, very informative.
I am not a professional and am looking at getting something a bit better than my “point and shoot” which I can use on my kayak etc, but can’t afford the other end of the scale of the latest and greatest DSLR.
I’ve been looking at some of the mirrorless micro four thirds cameras, as their light weight and the available lenses seem to cover a lot of bases and make it affordable to get quite reasonable photographs in low light situations.
One of the lenses I have been shown is a 14-150mm f4-5.6. I was told it would be a good all round lens because it could cover landscapes, portraits and wildlife. The advantage is that I wouldn’t have to be trying to change lenses while “out in the field” and could enjoy the whole experience more. The other lens I could consider is the 17mm f1.8 or the 25mm f1.8 specifically for their wide angle capabilities.
It is understood that a tripod is an essential part of the kit.
Interested in your thoughts.
Thanks
Malcolm, to be honest, I am not a big fan of the “do-it-all” superzoom lenses like the 14-150mm. It is a pretty slow lens on Micro Four Thirds and although it is plenty sharp for most situations, it is not a particularly great lens for low-light photography. Personally, I would recommend to take two lenses – one that is going to be suitable for low-light situations and portraiture (such as the 17mm f/1.8 or the 25mm f/1.8), and one zoom lens that you can use for those brighter days. If you cannot afford two high quality lenses, I would start out with a prime and a cheap kit zoom.
Thanks Nasim,
I appreciate your comments.
Sales people in camera stores are sales people after all, and if they sense a sale, they will sell you anything to make another $1.
There’s always the “Would you like fries with that?” and yes, I do understand I will need a memory card and maybe even another battery, but that’s a given.
You’ve convinced me to look at getting the 17 or 25mm f1.8 and a zoom.
The cheap kit zoom they offer here is a 40-150 f4.5-5.6 (generally coupled with a 14-42 f3.5-5.6 EZ) as a package.
I’ll do some more looking around and see what I come up with and what sort of deal they can do.
Thanks
Nasim, some photographers weep & wail & gnash their teeth, about “noise” in digital photography – especially when they need to crank up the ISO speed rating. But IMHO (oops – I’m a Leo, I don’t have one of those – start again!). IMO (there, that’s much better!) the noise is no worse than grain was, in the analogue era. And also we now have much better ways of dealing with it, anyway. Personally, I often leave some there, because I spent half a century with analogue photography, and a bit of noise or grain “looks right”.
There are numerous advantages with digital, over analogue, that apply in the area covered in your article. Here are just a few:
One – nobody talks about “reciprocity failure” any more.
Two – we have exposure meters with sensitivity that was unheard of half a century ago.
Three – the fastest film speed I ever found was 1000 ASA (AKA 1000 ISO, I believe). There are cameras out there right now which shoot acceptable images way beyond 4000 ISO.
Four – the fastest lens I had in those days was f 2.0. I now have several f 1.4, and you can get faster lenses.
I’ve found available light photography absorbing and fascinating since my late teens, nearly 60 years ago. Yes, I always took reciprocity failure tables with me, whenever I went out at night, for all the different films I used to shoot with (I had 3 magazine backs on my cams, in those days – it’s quite different, now, being able to switch back & forth between colour and B&W, or to change the ISO rating at the click of a button). Sometimes, I didn’t like the “milky” look for some elements in a time exposure, and at times even a time exposure couldn’t hit the target, so I also used to use a monstrous great Graflex press photographer’s flash gun, which fired single use bulbs that were larger than a 100W household electric bulb – and heaven help you, if you were fool enough to cop the blast from one of those, in the face – you wouldn’t be able to see properly for well over half an hour afterwards.
While I was busily admiring the first of the photos you used to illustrate the article, the starry sky gave me a slight start. I hope the trolls out there don’t attack you over it. I’m afraid I will have to let you down. I can’t pick a “my favourite” from all these photos.
The only things I can add are “thank you” and “I would have wanted a tripod for practically all of them”.
I think one of the biggest problems is not even noise and not even grain (both can be used creatively unless you shoot with a cam that has those really tiny sensors in it). The largest problem is the ruined image because of the lens/camera shake. You want know it almost until the final stage unless you go 100% zoom right after the shot and look really carefully.
And using 1/400 is not enough for 400mm lense to eliminate the shake, and mirror stresses the camera making it shaking much as well. Maybe, Wendell, for a bird photography you better go with Sony or similar mirrorless camera, capable to stream pictures at high speed, otherwise it is really difficult to make a decent picture.
If one has a decent sturdy tripod that can be weighted with a 3 -5 lb load hanging from the center point a DSLR like Canon EOS 80D using mirror lock up for single shots should eliminate all camera vibration especially if coupled with a wireless shutter release. Many folks forget to cancel IS on their lens when the camera is tripod mounted & the lens will induce vibration because it is actively working. I read this question & i shuttered because I capture images of Screech Owls in diminished illumination with a tack sharp EF 70-200 f4/L USM set@ 200mm 1/60 or 1/40, f/4 ,ISO 12500-16000 handheld & realize I need a different idea since I cannot afford faster glass at f/2.8 so I will attempt to enlist my old Bogen tripod that weigh 5 lb use my wireless shutter release, manually focus on the Owl when there is sufficient illumination & hope it doesn’t move. Then maybe I can lower the shutter speed to 1/20 or lower. Since I am positioned about 8 feet from the Owl using mirror lock up is somewhat noisy. I capture decent sharp images but as illumination goes to near dark I have maxed out my equipment & pixel luminance noise becomes apparent.
Pete, thank you for your feedback, I really appreciate it!
I agree, noise is not as bad as many people think it is. However, I warned against it in the article, because many beginners get confused on why they even encounter it in the first place and what they can do to minimize it. For me, it is OK to have a noisier image that is in focus, than a cleaner image that is blurry due to camera shake. One exception to this is landscape photography – in challenging light, pushing ISO higher than base ISO can result in significantly reduced dynamic range, which can make highlight and shadow recovery very painful in post.
So what do you consider “base ISO’? I recently upgraded from an EOS 50D I used for 8 years to a EOS 80D. The 50D would collect Luminance noise at 1600 or higher depending on conditions, the new 80D has a still image range from 100-16000. This evening I placed the camera with EF 70-200 f4/L USM & wireless shutter release on a tripod for near dark Owl imaging. When the screech owl appeared it was just light enough to manually focus with Live View. I collected the best shots at 200mm with f/4 1/6s ISO 16000. It was so dim that I could not see what the Owl was doing so i took a shot every 5 seconds. Some shots had motion from the Owl moving but most were sharp especially the eye or eyes depending on where the Owl was facing. In the absence of pricey “fast glass” a slower shutter is all that is available..
Great article. Thank you. I been practicing. You are right low-light photography is a lot of fun and you trip are great.
Thanks!
You are most welcome Ziggy!
I didn’t see any advice about “underexposing a little bit.” The whole point was to not underexpose by using fast lenses, tripods, and so on. An underexposed image will create noise when you post process.
Tamron has a years longer warranty compared to Tokina, and several testers report the Tamron slightly sharper.
Phil, there were some references to that in the older version of the article, but I updated it with new info that is more accurate. There is no advantage to underexposing, unless you have an ISO invariant camera and you know what you are doing…
I think a smaller sensors do have an advantage in low light as well. They give you more depth of field. In other words taking pictures at 1.4 or 1.8 don’t look like a “special effect” (depending of the focal length DOF can be just one or two centimeters and very precise focus is extremely critical). This makes photo’s taken with a wide opening with a cropped sensor more usefull for general photography.
Cees, smaller sensors also look significantly worse at higher ISOs when compared to large-sensor cameras, so you might gain more DoF, but at the cost of high ISO performance…
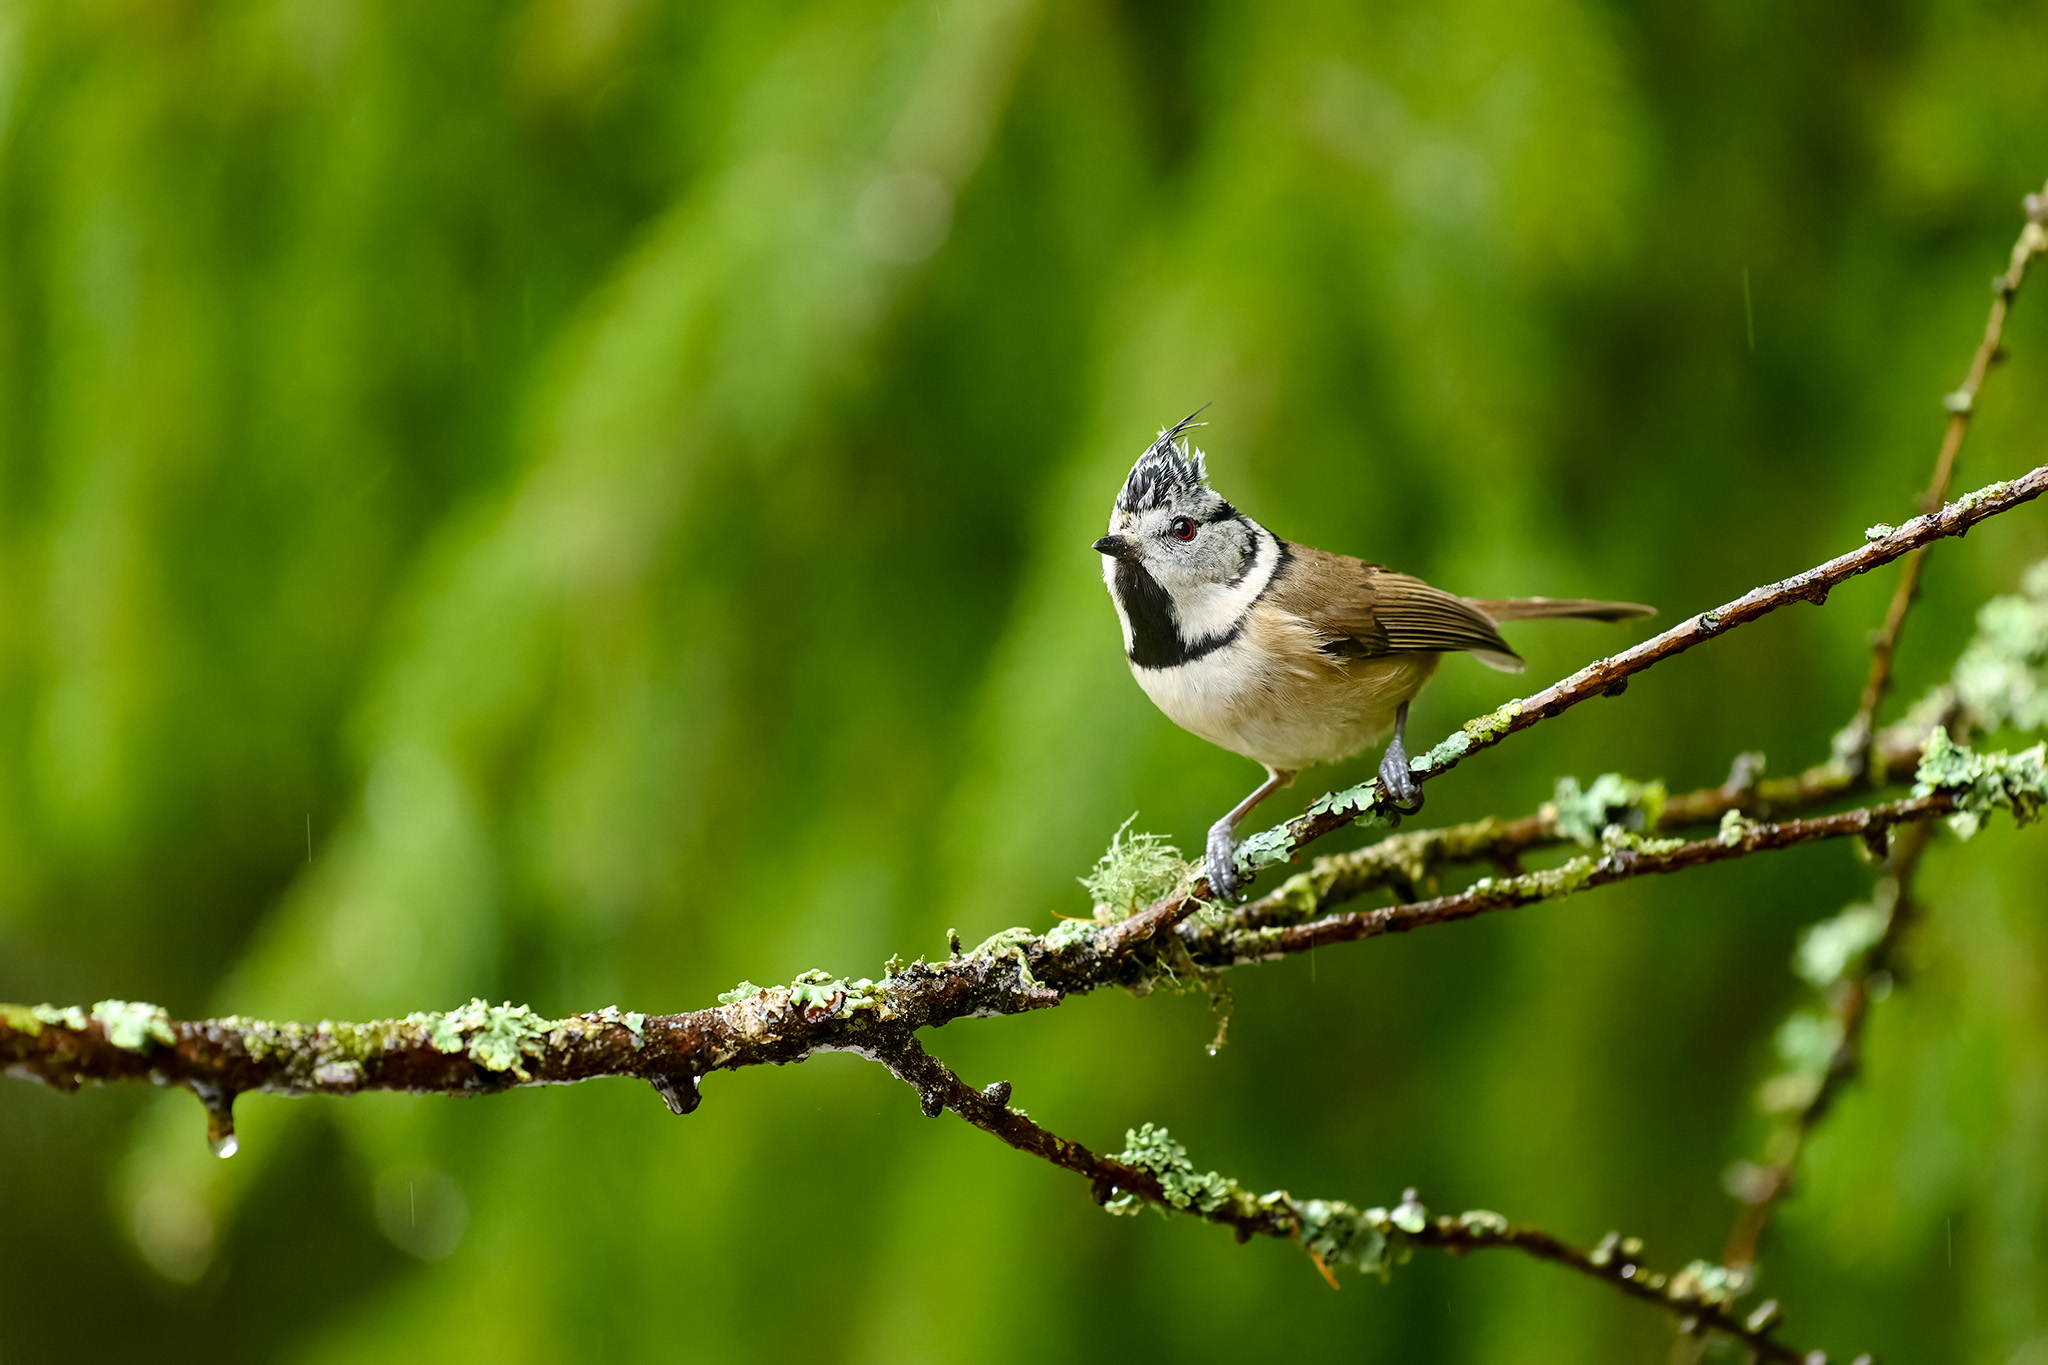
Great article. Thank you. I am a bird photographer. So many photographers I meet in the field consider your site their top source for information. Your site and contributors are consistently excellent. Very frequently small birds are hiding in poorly lit environments (in bushes or on the ground under them) or in trees where they are often backlit. Since small birds are constantly moving, shutter speeds must be reasonably fast. We are forced to use slower telephoto lenses to get close to the birds. There is also the problem of glare if shooting into the trees with a mix of leaves and sky as background. Autofocus is difficult and manual focus unrealistic. I delete most every shot I try in these conditions. I shoot at 1/400, 400mm, f5.6, auto ISO with an A7R3 but no amount of corrections in post give a decent result. Slower shutter speeds are problematic because small birds seem to always be moving something. DOF is already tight at 5.6. I can’t imagine to go f2.8 even if my lens allowed it. I do not see how the problems with contrast and color in particular could be fixed by a faster lens anyway. Your thoughts? Thanks!
Buy a Nikon and wait for the birds to move to better positions!
But seriously, no amount of camera ‘technology’ will make a poorly lit subject look good. Despite the dynamic range improvements in sensors, if, when looked at with the naked eye, your subject is in the shade or in other difficult light, you will never realise a deep colour depth and range of contrasts. The colour information just isn’t there, and you don’t want to artificially simulate it with HDR etc on natural subjects. This is one of the things they don’t mention on most internet sites, where they shoot test cards with studio lighting. Every one of Nasim’s great bird shots, I am fairly confident, resulted not just from good technique but also from waiting until the lighting was ideal for the subject.
Those are excellent points Burghclerebilly, thank you!
Wendell, to be honest, after testing a number of Sony mirrorless cameras, I do not find any of them particularly usable for bird photography. Sony cameras are great for portraiture and they do track subjects nicely, but bird photography, especially with busy backgrounds, is a whole different ballgame. That’s where DSLRs continue to reign and probably will for a while, until Sony and other mirrorless manufacturers introduce super telephoto lenses and start optimizing their AF systems for fast, erratic subjects like birds.
Another thing to keep in mind, is that photographing birds in trees, with busy backgrounds and bushes is often a difficult task on its own. Instead of focusing on camera gear, I would recommend to find or create better opportunities. For example, you could set up a blind next to a bird feeder or a small pool where birds like to come and drink. You could scout for areas that have lots of birds and visit bird sanctuaries, where you will find them in abundance with all kinds of nice backgrounds. That might be worth looking into… Check out our in-depth article on wildlife photography – you will find a lot of answers to many questions you might have…
Hope this helps and good luck!
Thank you, Nasim for such excellent article. I learnt a lot from your blog. I’m not a professional photographer but yes, it’s helping me for my hobby.
You are most welcome Sun and thanks for being a reader!
All my photography is done in low light. I mostly shoot two types of photos. Group photos where everyone poses in extremely low light conditions in a night club or photos of groups of people dancing (crowd shots). There are no windows. I am using a Nikon D5200 camera with a Tamron Auto Focus 17-50mm F/2.8 SP XR Di II VC lens. I am unable to use a tripod but can use a monopod whenever possible. I use an external flash for every shot, otherwise, the photos will come out to dark. Even with the external flash, the photo can came out too dark. What is a good starting point to use? It was recommended to change my aperture from a 2.8 to 4.5 or 5.6 since I did not need the lower aperture setting since I have an external flash. Keep my ISO at around 400 and the shutter speed I use is usually 1/125. If I go below 1/80, there is too much shake and I can’t take the shot. I am trying to get clear crisp shots with no blur. Thanks!
Arlene, I apologize for a late reply. An external flash is definitely going to help out in a darker environment, but you have to be able to properly balance flash with ambient light, or your photos will look too “flashy”. I would recommend the following technique: shoot in manual mode and set your camera ISO to a larger number like ISO 1600, so that you are letting more ambient light in. Set your aperture to a desired value – something like f/4 should be sufficient for sharp images. From there, keep your shutter speed at your comfortable range, but keep in mind that flash actually helps freeze subjects, so it should be OK to lower it. Then add flash, set it to manual mode and start with low power – maybe 1/32th of power or so. Adjust it accordingly, depending on how far away your subject is. TTL also works, but it often results in inconsistent power, so I would keep it on manual as well. Set the camera to AF-S mode and use the red light that is built into your flash (if you have it) in order to acquire better focus.
Hope this helps!
Hi Arlene.
I have photographed crowd and dancers in a club some decade ago and I would say you need a really powerful external flash gun. I would recommend SB900 nothing less will help for your Nikon.
Setting ISO above 400 on D5200 I would not recommend because of the grain of its sensor. Maybe 800 is a maximum if you will not enlarge the photograph. Otherwise there is no much changes.
Other advises are
* to shoot landscape not portrait so that the flash is above and not on the side in terms of side shadows
* use flash exposure compensatoin if your shots look too flashy (meaning if flash ttl makes consistent mistakes).
* cover flash gun with diffuser, it will make the light acceptable.
* shoot RAW, you will be able to regain about 2 extra stops.