In many photographic genres, it’s important not only to have powerful lighting gear, but also to minimize the gear’s weight and keep it portable! Old-school lights were pretty hefty, but thankfully, advancements in batteries and LED tech have made it more practical than ever to build a lightweight lighting kit. In this guide, I’ll take a look at some of the best lighting options for different types of photography, with a focus on portability.
Table of Contents
Strobes / Speedlights
Even though continuous lights are a good choice for both photography and videography, using a strobe system instead has a lot of benefits, too. I’ve already covered the differences extensively in my continuous vs strobe light article, so check that out if you haven’t already.
How do you go about making a lightweight kit of strobes? The good news is that there are a ton of lightweight strobes on the market. Advancements in lithium batteries and wireless triggers have made small lights incredibly useful.
At a broad level, you should aim for a kit with 2-3 strobes. Strobes range from super-compact, 100Ws lights, through larger studio-style strobes that can output 1200Ws. You really don’t need the upper end of that range for most photographic applications. For most photographers, the right balance will be something that’s powerful enough to use even in sunny conditions, but small enough to pack multiple units at a time. I find that the right balance between output and portability is around the 200 Ws mark – something like the Godox AD200 or the knockoff Neewer Q3.
For photographers who need to cut every ounce of weight, or just need a super compact source for things like small product photos, smaller alternatives like the Godox AD100 are also available. In my testing, however, I have felt that these lights lose too much power without cutting enough size/weight to make them worthwhile.
Another approach is to stick with an on-camera flash, while rotating the head to bounce it off ceilings or walls. The quality of light usually isn’t what you can get from an off-camera system, and the power output is lower, but it certainly makes you more mobile. For something like wedding photography, I would stick with an on-camera strobe for exactly this reason – whether a name-brand flash from Nikon/Canon/Sony/etc., or a third-party lighting company like Godox.
Of course, the flash itself is not the only part of a lighting kit that matters! If you’re trying to go nimble, you’ll also need to choose your lighting modifiers carefully. The right modifiers depend on your genre of photography, but some large diffusers can be very unwieldy and difficult to bring on location.
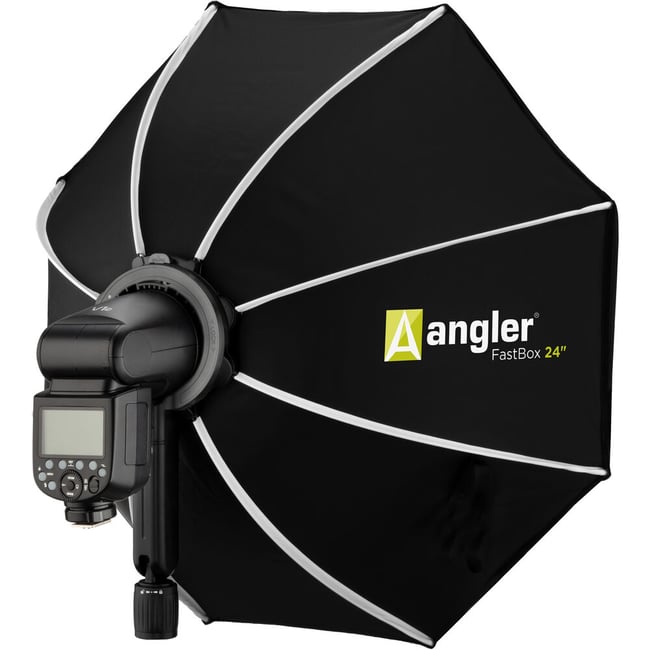
Broadly speaking, the lightest and most portable lighting modifiers are reflectors and umbrellas. However, they also offer the least control. I usually prefer to bring along a compact softbox instead – I particularly like Angler’s 24in softbox, as it’s a useful size for products and individual portraits. The 24″ mark is a pretty good balance between the quality of light and the portability of the softbox, and this particular softbox is compatible with my various Godox strobes.
Moving into larger softboxes and parabolics really moves away from the lightweight kit style, but I think they’re still worth mentioning. A parabolic umbrella can offer a wide variety of looks while wasting very little light, which is always nice when shooting with 100 Ws or 200 Ws strobes. Meanwhile, a tall stripbox is an excellent alternative for certain product photos. I still think that a foldable softbox is a better general-purpose choice, but it really comes down to what type of photography you do.
By the way, when you’re trying to keep things lightweight, don’t forget that some accessories can pull double duty! A scrim with diffusion can be lit to make a huge softbox, for example. Meanwhile, a reflector can also serve as a neutral bounce surface even in rooms with magenta walls. I usually bring a few poster boards in the car, and while these are a bit bulky to carry around, they can act as V-flats, backdrops, bounce cards, and more. Creativity can save you more weight than spending lots of money.
Continuous Lights
I love strobes, but I’ve found continuous lights are increasingly the first tools I grab for a wide range of shoots. This is partly because they work so well with video as well as photo, and I do both for a lot of clients. Also, however, the instant feedback (without needing to take a lot of test photos) helps me work faster and collaborate with the client better.
Lightweight continuous lights are not going to pump out as much light that a strobe can; that’s just the reality. However, modern LED continuous lights are not slouches. I’ve previously reviewed the Zhiyun FR100C on Photography Life, which fits 100 watts into a portable form factor. Others are even smaller – the size of a softcover book or even less. For continuous lights, I’ve really enjoyed using the X100, as both the form factor and power output fit really naturally into what I shoot. A popular alternative is a video panel light – something like the ikan Onyx, the Aputure MC, or any of a million alternatives of different sizes.
RGB vs RGBW vs RGBLAC
When you’re deciding on a continuous light, one of the first things to think about is the availability of RGB features. With the right continuous light, it’s very easy to add a splash of color to your lighting setup, which can be useful for more experimental looks.
However, not all RGB lights are equally good, so make sure you get the proper setup. The very cheapest models may have three colors of LED: red, green, and blue. In order to (try to) get white light, the RGB panel will turn on all the LEDs at the same time. However, this results in sorta-white light, with poor color rendering and saturation.
Moving up the ladder, RGBW products add a dedicated white LED. This is obviously a big improvement and would be my baseline suggestion if you intend to get an RGB-type continuous light. However, it can still can leave some of the white balance range off the table, because it achieves “warm white” and “cool white” by blending the white LED with the RGB LEDs.
RGBWW tech is where things really start to get interesting. These lights are more expensive, but offer both better output and color quality. This time, there are two white LEDs, one cool and one warm. By blending these together, RGBWW LEDs give much better coverage of the white balance range, without introducing unwelcome tints.
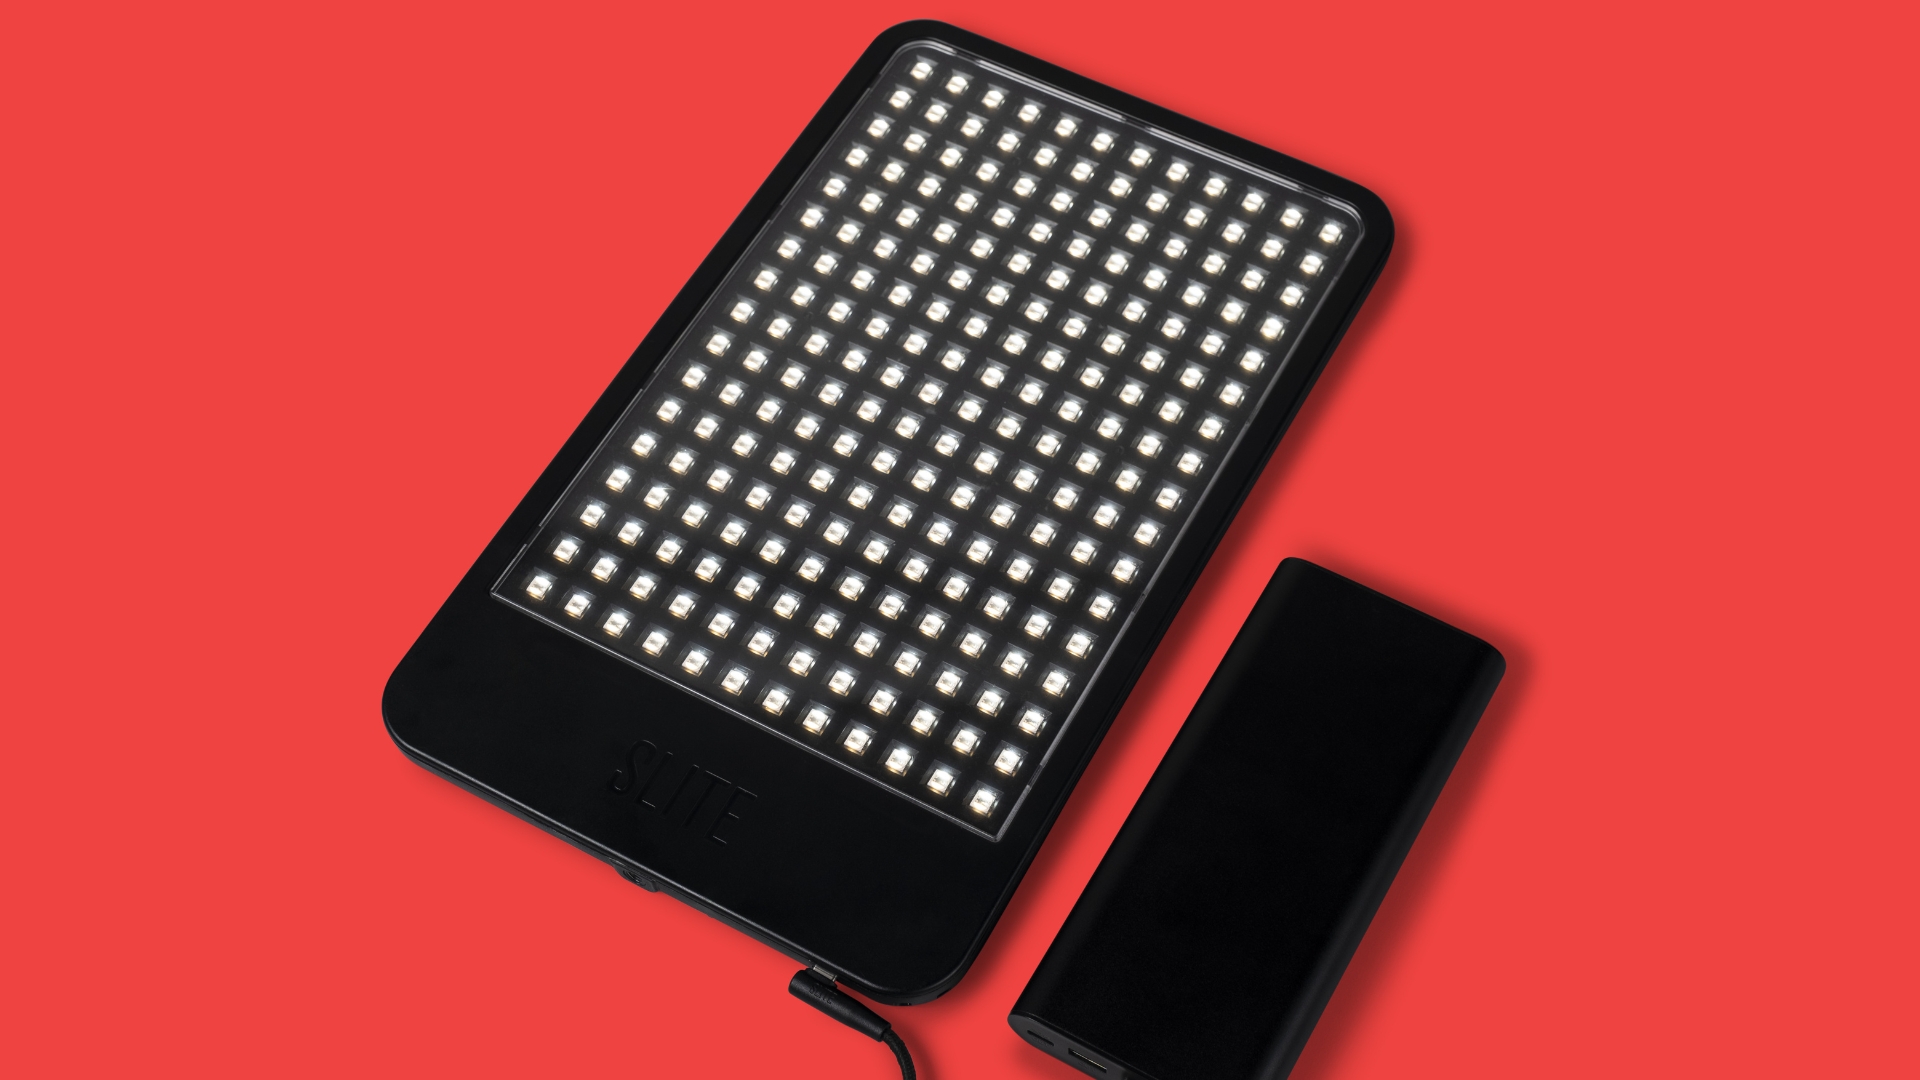
For instance, Slite’s LED panel uses this tech to deliver 98.9CRI and 99+TLCI ratings, ensuring incredibly accurate and flattering light, along with the creative possibilities offered by 16 million color selections.
At the top of the tech stack, and with a correspondingly high price, is RGBLAC. The addition of lime, amber, and cyan LEDs enable stunningly vibrant colors, picture perfect daylight balanced light, and a massive CCT range. I saw lights that use this tech in person at the NAB Show earlier this year, and even on a chaotic show floor, I was surprised by how full-bodied the color was.
The Nanlite Forza 60C is a perfect example of the strengths and weaknesses of this tech, coming in at around twice the price of the bicolor version, but offering so much more in terms of creative possibilities. The build quality, while impressive, does work slightly against the lightweight aim of this guide, but given this light can replace a white or bi-color source and RGB or gelled source, I think it’s worth it.
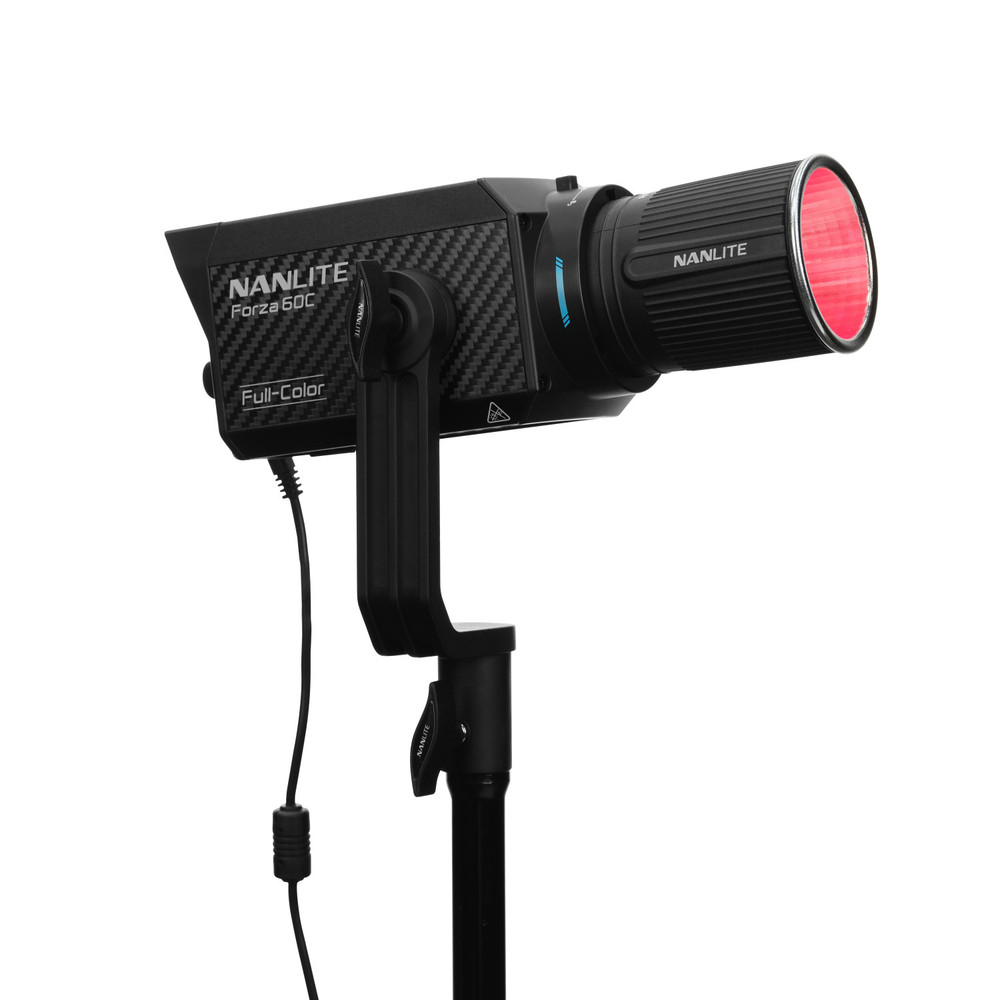
Is this level of color accuracy and fidelity necessary if you’re just using it in lieu of a gel on a background light? Definitely not. If, however, you’re going for a vibrant, gelled look, the rich color is a perfect compliment to the high end color science modern cameras are capable of.
Furthermore, I’d consider both it and Slite’s products to be an example of buy once, cry once – they’re amazingly well built, make use of relevant standards like USB-C or V-Mount, and can be used across anything you shoot. Photos, videos, social, live streams, and more can all be accommodated with just a few of these lights, and you’re unbound by creative restraints. Need crisp whites to match existing sources in your scene? Easy. Going for a creative, gel heavy look? You can quickly experiment with a variety of styles from behind the camera, thanks to first class app support.
Example Lightweight Lighting Kits
If I was starting from scratch, I’d consider the following two kits: one for strobe work, and one for lighting work. If you know you won’t shoot any video, sticking to the strobe only kit, or even expanding it, can be a great lighting setup for a diverse range of subjects. I’ve shot portraits, events, and products big and small, all without issues.
My strobe kit would be built around 3 Godox AD200 lights and one V1 speedlight. You’ll also want to pick up a trigger, like the XPro that is relevant to your camera brand. The V1 can act as a flash master, but the heavy on-camera weight can be a bit of a pain compared to the compact triggers. A pair of softboxes and a stripbox would be my starting point for modifiers, as these work for a wide range of subjects. You can easily add snoots, beauty dishes, or other modifiers based on your needs. Thanks to the tiny lights, you can get away with small light stands, instead of bulky c-stands, saving a ton of weight here. The last addition I’d suggest would be some gels, leaving you with a lighting kit that occupies about as much space as a single mono-block style strobe, but with far more creative potential.
It’s a bit trickier to be prescriptive when it comes to continuous lights, owing to the variety of viable form factors. If you’re shooting video extensively, and need high output over a long period, COB monoblock style lights are the best bet. These can support battery operation, but work best when plugged in, giving them unlimited run times, even at high outputs.
For lower output needs, like lighting a single portrait subject or products, the super-compact LED options I’ve mentioned would all be viable. I’d consider something like a pair of Slite panels, if the RGB functionality is useful. For dedicated white-light use, bi-color COB LEDs are also viable, and even overlap well with strobes thanks to the typical support for Bowens modifiers. Lastly, the more creative LED options are also worth considering – supplementing a strobe kit with something like the Slite panel or the Forza 60C can be an unconventional choice that gives you more flexibility with mounting, modifying, and coloring the lights.

Having good control over lighting conditions can really set your photos apart from others, and thanks to the wide range of lighting options available, it’s easier than ever to make a portable lighting kit. Throwing even two flashes and a trigger into your bag only takes up as much space as a single zoom, but it gives you a ton of creative possibilities. I hope this article gave you a sense of what you’ll need if you want some lightweight lights! Let me know if you have any questions or comments below.
The Strobist website is a good place to pick up tips on lighting, especially if you’re and beginner and building a kit on a budget.
Although primarily dedicated to the use of flashes — mostly shoe-mounted devices such as Nikon and Canon speedlites — it’s still great resource. They have a list of recommended items along with links to discounts at vendors they work with.
strobist.blogspot.com/2013/…-gear.html
Nice story! My lightweight, portable kit is for very fast, 1-light location headshots. The other day, I was asked to do a studio-style headshot instead. Lit to match existing ones! So, my AD-200 became a key in a 3′ Softlighter, the fill was a 5-in-one on the white side, close to the subject, and the background light came from my speedlight set to optical slave/manual. Somewhat surprisingly, it looked EXACTLY like the ones we did in a location-studio setup. The wall, however, was off-white instead of my seamless Dove gray. Thank you, Photoshop select subject feature.
My portable kit contains 3 lightstands (1 short), an AD-200 with radio and swivel umbrella adapter, a 3′ Softlighter and a 4′ Angler Parasail (a round umbrella with two round sides cut away. Great for low ceilings). The speedlight lives in my camera roller bag. Don’t forget gel: A 1/2 CTO mixed with a 1/4 PlusGreen balances office lights beautifully.