There is always a second fiddle – a silver medalist who chases after gold, a challenger just half a step behind the leader. In the world of RAW post-processing software, the undisputed champion is Adobe Lightroom; competing products enjoy nowhere near its popularity. But that alone doesn’t make Lightroom the best. Arguably its biggest rival, Capture One, includes several features that Lightroom lacks (and vice versa). Below, I’ve tested both side-by-side to see which comes out ahead.
Keep in mind that I’m comparing the newest version of Capture One Pro 12 versus Lightroom Classic CC, updated in November and December of 2018, respectively.
Table of Contents
1. Where Lightroom Beats Capture One
1.1. Organizing Photos
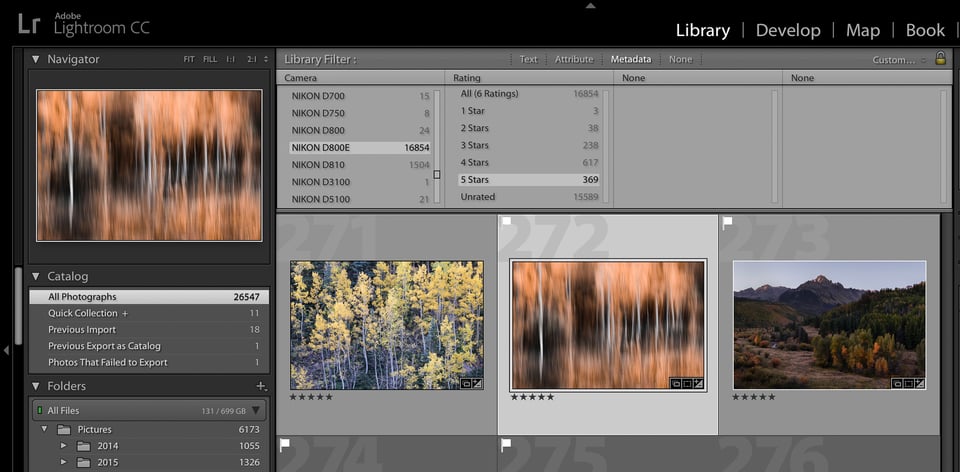
Assuming you’re using the newest version, Lightroom has some useful features for organizing your photos that don’t appear in Capture One. Specifically, Lightroom’s face detection feature is very useful for event photographers, sorting photos of people with impressive accuracy. The same is true of Lightroom CC’s automatic artificial intelligence keywording. Although this feature is only in Lightroom CC, while most photographers are likely using Lightroom Classic, this keyword tool has a lot of potential to be the organizational system of the future.
Aside from those shiny new features, the two programs are similar. You can use Capture One’s “filter > search” tool to sort through your images by a wide range of criteria, akin to Lightroom’s filter bar. This surprised me; it seems common knowledge in the photography community that Lightroom is better for organization, but aside from the face detection and automatic keywording, that doesn’t appear to be true. Instead, both programs have very similar feature sets for organization overall.
1.2. Third-Party Resources
Lightroom is far ahead of Capture One in terms of third-party resources – everything from tutorials to plugins and presets you can buy.
For starters, Capture One didn’t even allow third-party plugins until their November 2018 update, and only a handful exist at the moment. That compares to hundreds of Lightroom plugins that expand its capabilities beyond the standard software.
And by virtue of being the more popular option, Lightroom’s tutorial and preset ecosystems are much larger than those of Capture One. Although you’ll be able to find answers to typical issues that arise in either program, if you have a more obscure question, it’s almost always easier to find the answer online for Lightroom.
1.3. Panoramas and HDR
We’ve raved above Lightroom’s built-in panorama and HDR features before, since it’s the only software that creates these files as DNGs rather than enormous TIFFs. The HDR conversion in Lightroom also looks far more natural than that of almost any other product on the market.
Capture One, by comparison, doesn’t have a built-in panorama or HDR feature at all. You need to use third-party software if you plan to make either of these edits, no other way around it. Personally, as a landscape and nature photographer, this is one of the features I missed most in Capture One.

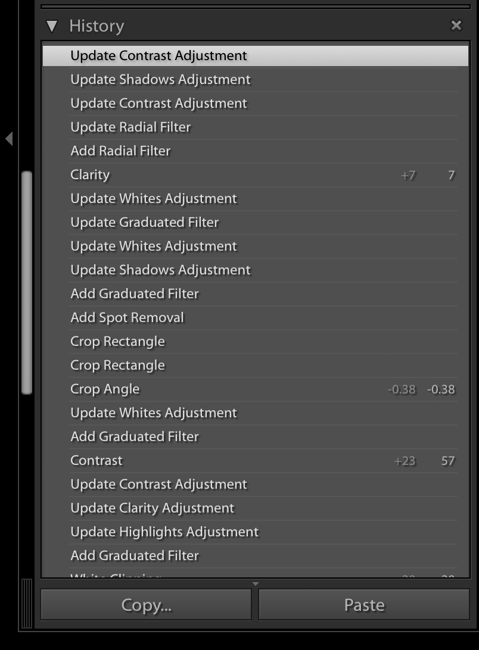
1.4. History Panel
It seems that most photographers aren’t nearly as bothered by this as I am, but Capture One doesn’t have a history panel in its post-processing tabs. Although you can undo edits to your heart’s content – and reset adjustments, including local edits, more easily than in Lightroom – I miss the ability to look through a photo’s entire edit history at once. Personally, this is one way in which I make sure that my edits haven’t gone too wild over the course of editing an image.
Some Capture One users create Clone Variants at different points while editing the photo, making for a slightly easier way to compare stages in history, but it’s not really the same. This isn’t a dealbreaker for me, but it’s up there with HDR and panoramas in features I’d most like to see in future versions.
1.5. Adjustment Max Strength
It’s not a big deal, but some of Capture One’s sliders aren’t as intense as Lightroom’s at their maximum settings. The most obvious example is Capture One’s Highlights slider, which falls well short of what Lightroom’s can do.
Then again, you can compound the effect of Capture One’s weaker sliders by adding new adjustment layers and pushing each one’s settings as far as possible. I find that one new layer is all it takes for Capture One to adjust highlights just as strong as Lightroom at its maximum.
1.6. Camera and Lens Support
Lightroom is almost always faster to support new cameras’ RAW files than Capture One. Just take a look at the Nikon Z7, for example. Lightroom supported it since October 15, 2018, while it took Capture One until November 29 to do the same. Lightroom also has support for more lenses in total, particularly more obscure options or older versions.
This isn’t a big deal to most users, since almost every camera out there gets Capture One’s support in the end (including medium format cameras from other brands, although that’s a new development). And chances are good that your lens has a profile in both software packages without issue. Still, this is a win for Lightroom, and one that makes a difference to some users.
1.7. Price
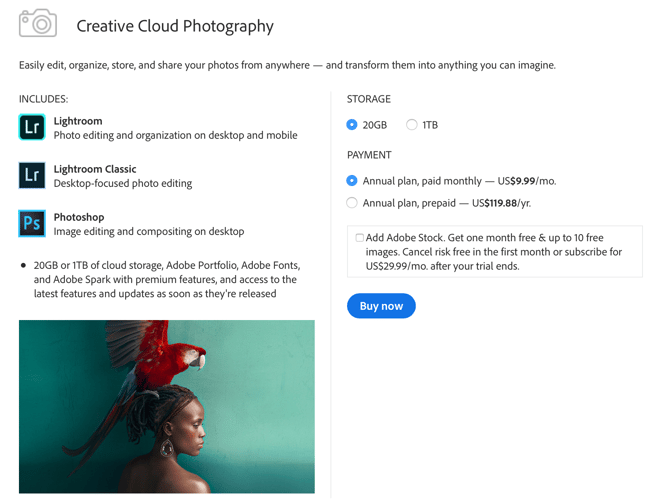
There are two versions of Lightroom today, CC and Classic (see: what’s the difference?). Both are sold as part of Adobe’s subscription model for $10/month. That bundle also comes with Photoshop CC. Adobe charges an added $10/month for every terabyte of images you store on their cloud, although most photographers just keep images locally instead.
For most users, Capture One is more expensive. If you prepay for a yearly subscription of Capture One, it’s $180, working out to $15/month. Or, you can buy a standalone version of Capture One for $300, then upgrade if you want a future version for $120.
Either way, Capture One works out to be more expensive in the long run, unless you buy the standalone and rarely or never upgrade to the newest version. Then again, you might prefer to buy from a company that has a standalone option simply because it’s easier to switch if they go a direction you don’t like – and upgrade only when you feel that it is worth the money.
2. Where Capture One Beats Lightroom
2.1. Interface
Capture One and Lightroom simply have different interfaces, and you’ll get used to either over time. But Capture One has two big advantages that Lightroom does not: customizability and assignable keyboard shortcuts.
Unlike Lightroom, you can change around the layout of Capture One almost any way you want. I started out by setting mine up specifically to mimic Lightroom as much as possible, making the transition easier, and I’ve gradually changed things since then. As of December 2018, Lightroom now lets you rearrange the Develop tools as you want, but that’s about the limit of its customizability.
Equally important is that Capture One lets you create keyboard shortcuts from scratch, or reassign the ones that appear by default. Are you used to Lightroom’s shortcuts and think it will be difficult to change? Just set the same ones in Capture One, or create your own entirely.
2.2. Layers
Capture One has layers! This has been one of the most requested features in Lightroom for ages, although it seems unlikely at this point to appear. Instead, Lightroom has adjustment points for brushes or gradients, which isn’t really the same.
First, Capture One still lets you do brushes and gradients (as part of layer masks), but their implementation isn’t nearly as slow. Lightroom starts to lag a lot once you add a handful of local adjustments, while Capture One hardly slows down at all. It still works like a charm in photos where I’ve added a dozen layers or more.
One top of that, far more adjustments are possible with Capture One’s layers than Lightroom’s local edits, including nearly every adjustment that you can make to the base layer itself. That’s much better than in Lightroom, which only has a slightly expanded Basics panel to work with.
Lastly, the layer system lets you change the opacity of your local adjustments if you realize you want to tone them down. It’s also much easier to toggle the adjustments on and off, saving you quite a bit of time at this stage. Big win for Capture One.

2.3. Color Adjustments
Capture One’s color editing capabilities are far beyond those of Lightroom and its HSL panel. As much as I like those sliders, Capture One’s are much more flexible, with boundaries you can adjust freely. Do you want to affect the greens in your photo – but not the yellow-greens at all, and not the cyans even a little bit? That’s impossible in Lightroom and trivial in Capture One. I’ve also grown to love the “pick color correction” eyedropper that lets you pin this down even further – far better than Lightroom’s comparable “adjust HSL by dragging” tool.
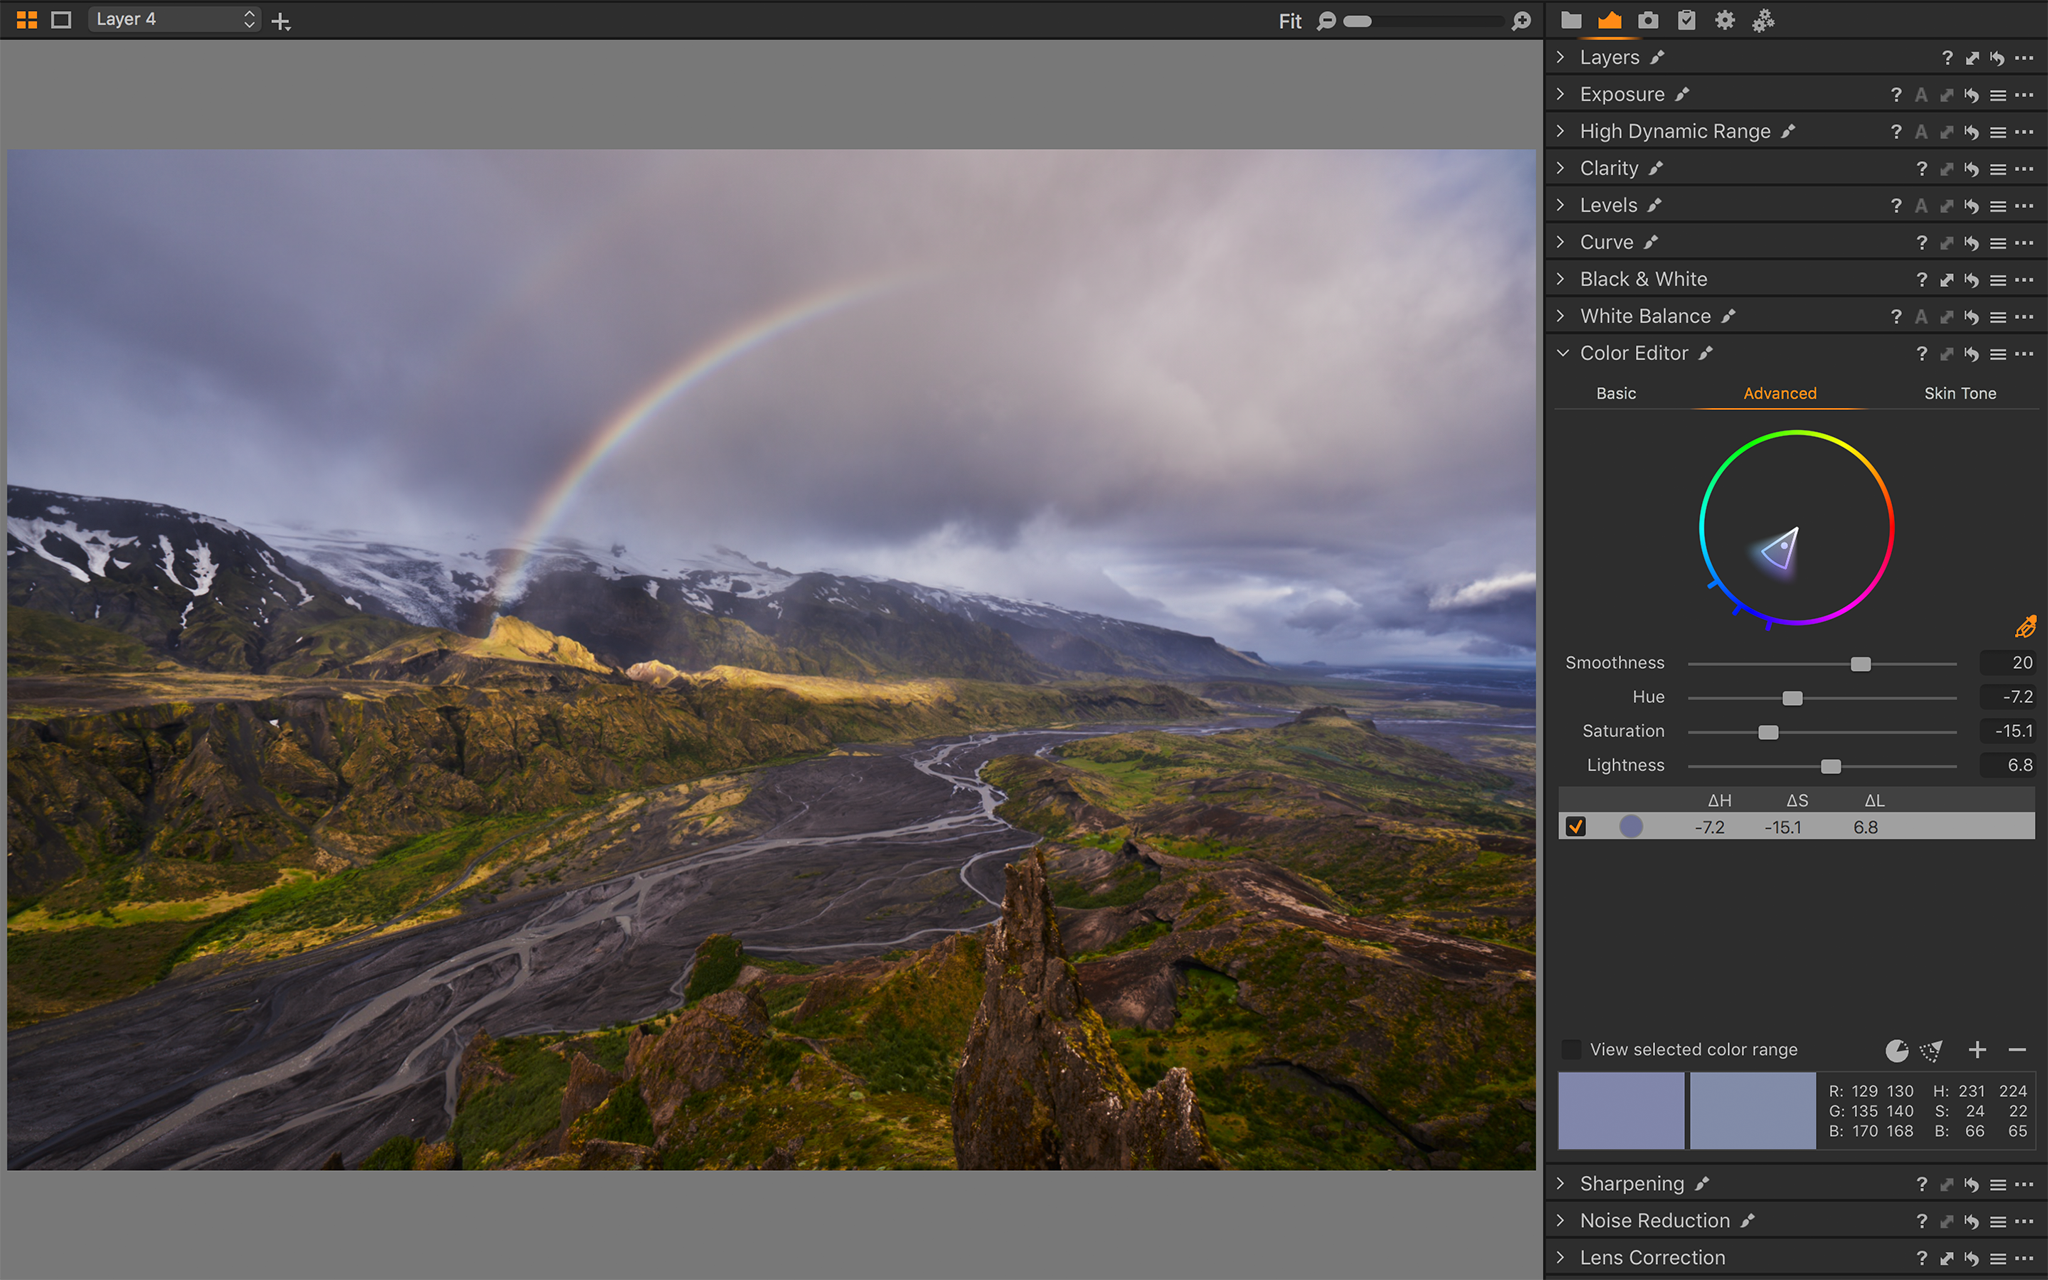
That’s not even mentioning the shadow/midtone/highlight categories for Capture One’s “Color Balance” tool (similar to Lightroom’s split toning), while Lightroom only has shadow and highlight adjustments.
Especially in combination with layers, all these extra color adjustment tools make Capture One far and away better for dealing with tricky lighting conditions. They take some time to learn, of course – but the results are worth the effort.
2.4 Spot Healing
Capture One’s built-in healing layer adjustment is better than Lightroom’s spot heal brush for a number of reasons. First, it simply is quicker; Lightroom can lag significantly when you heal large areas of an image, while it is a relatively quick process with Capture One. Second, the healing points don’t overlap as they do in Lightroom, making finer adjustments easier. Even ignoring those points, it tends to look more natural than Lightroom’s tool on balance, nearly at the level of Photoshop’s spot healing brush.
2.5. Tethering
I almost never shoot tethered, but photographers who do praise Capture One’s implementation nearly universally over Lightroom’s. Capture One lets you output your camera’s live view image to your laptop, while Lightroom does not. Capture One also has far more ability to control your camera settings (even details as small as flash curtain sync mode), while Lightroom is nowhere close.
Tethered shooters probably already know all this. Frankly, tethered shooters are probably all using Capture One already. But if you aren’t, it’s a big positive in Capture One’s chart.
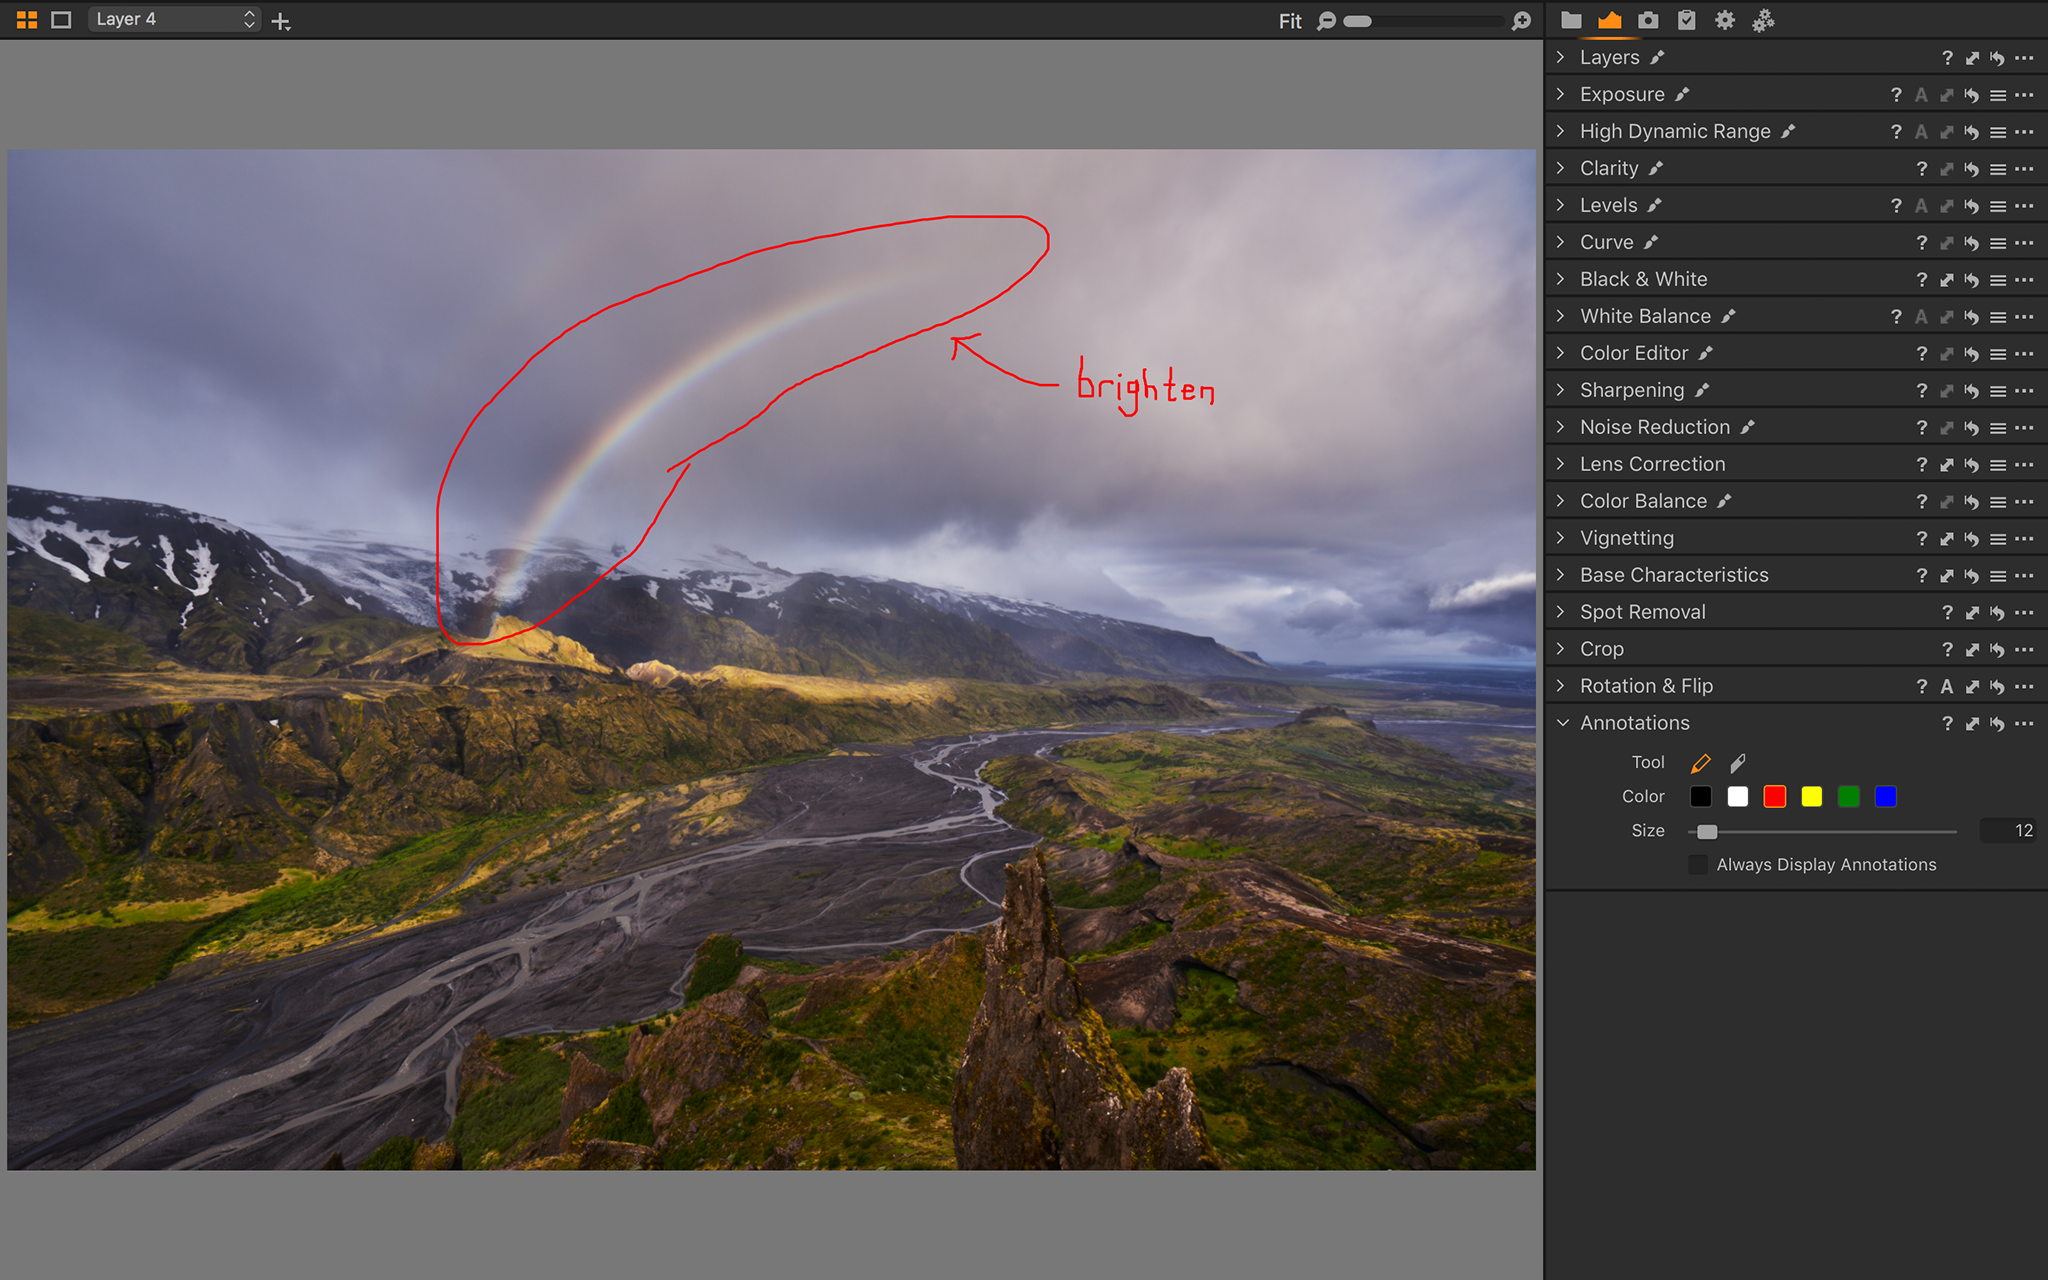
2.6. Annotations
If you shoot studio sessions and send your work to other photographers to edit, Capture One has a great annotations feature that doesn’t exist in Lightroom. You can add notes directly to the photo, making it obvious which edits you want your team to make. That’s another big boost for studio photographers using Capture One rather than Lightroom.
2.7. Choice Between Sessions and Catalog
If you don’t like working with catalogs, or if you go through too many images for a catalog system to be viable, Capture One also has a system of sessions. This organizational method puts all your edits in a sidecar file next to your original image, rather than centralizing everything in a single database file.
Sessions are great for photographers who do a lot of individual shoots and have a good hard drive file organization system. Personally, the catalog setup is better for my own work, but that’s not true for everyone – especially a lot of studio pros for whom Capture One is a popular choice.
Either way, it’s good to have options. Lightroom only has a catalog system, and Capture One gives you a choice.
2.8. Speed and Performance
When browsing photos, Capture One is significantly snappier than Lightroom overall (referring to Lightroom Classic). This is especially clear if you magnify individual images while culling your work, or when applying a large number of local adjustments. Here are the specific times I measured for various tasks, working with 36 megapixel RAW files:
| Lightroom Classic | Capture One Pro 12 | |
|---|---|---|
| Import 45 Images | 72 seconds | 72 seconds |
| Generate 45 Previews | 218 seconds | 74 seconds |
| Export 52 JPEGs | 178 seconds | 217 seconds |
| Single Image, 1:1 Render | 9.3 seconds | 1.2 seconds |
It’s worth mentioning that even though Capture One was slower about 20% slower than Lightroom on export, Lightroom froze completely on my computer while exporting the 52 images for this test. As far as I noticed, Capture One didn’t slow down at all doing the same thing.
3. Ties and Mixed Results
3.1. Learning Curve
Lightroom is a bit simpler and more lightweight than Capture One. The extra customization options of Capture One’s layout are useful, but they also add to some complexity that Lightroom doesn’t have. Between the two, by a small margin, I’d say that Lightroom is easier to learn from scratch.
However, if you’re migrating from Lightroom to Capture One (or vice versa), the learning curve isn’t as bad as people say. You can arrange Capture One to mimic Lightroom in the most important ways, including for sorting and culling your images. And although the post-processing tools are a bit different overall, you’ll get the hang of them in a matter of weeks, maybe just days, if you play with them enough.
So even though Lightroom is perhaps a bit quicker to learn overall, this one is essentially a tie.
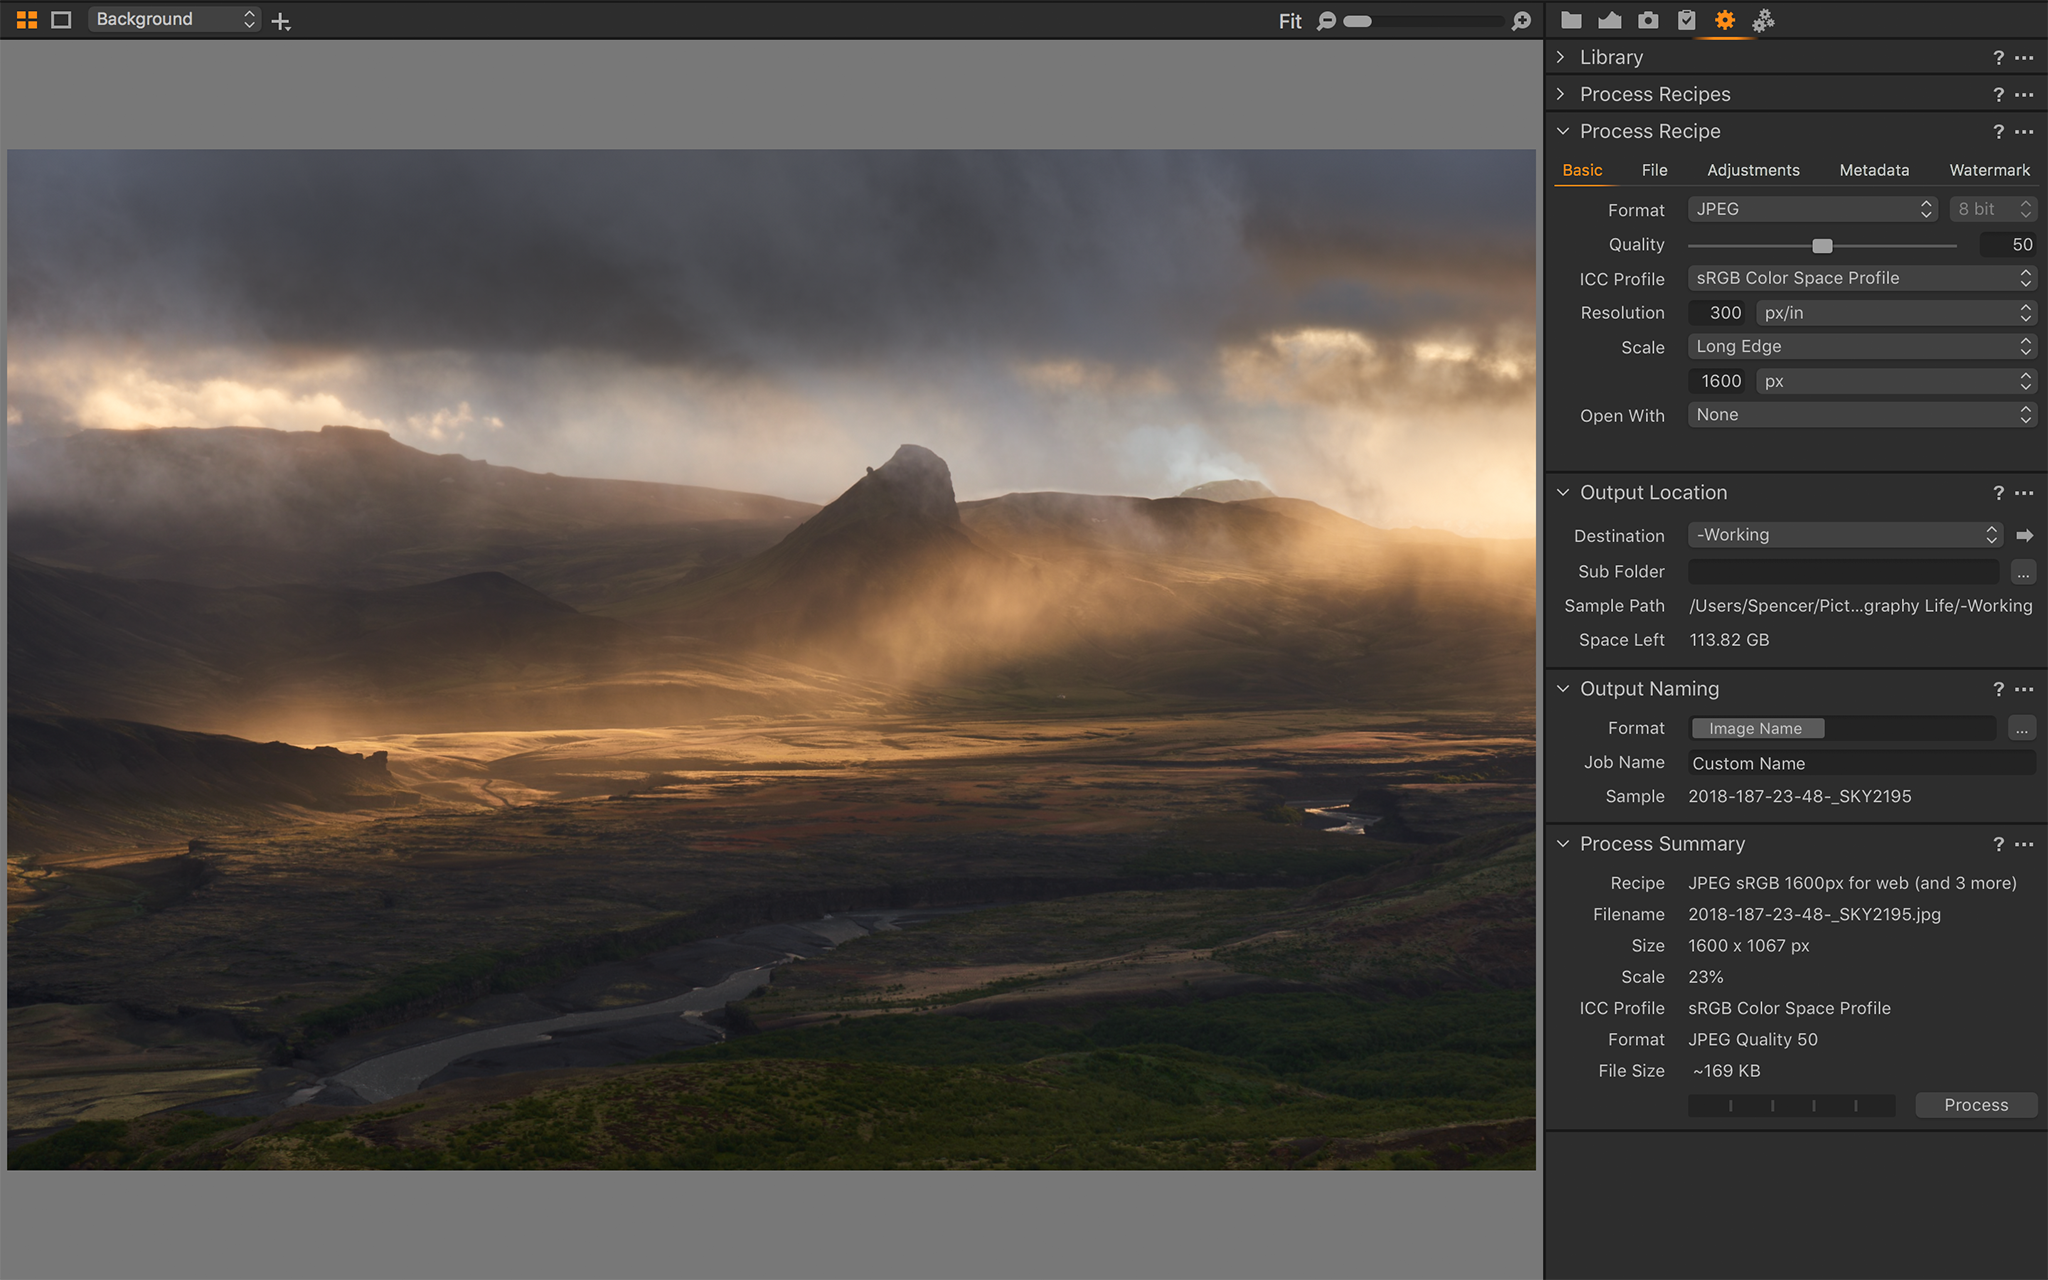
3.2. Export Options
At first glance, Lightroom looks better for exporting than does Capture One. If you follow the standard “right click > export” path, you can’t access any export presets on Capture One, while it’s trivial to do so in Lightroom.
However, it turns out that Capture One’s export tools are just in a different place than those of Lightroom. Rather than a single export dialog, they’re contained in five tools that you need to add to your export tab: Process Recipes, Process Recipe (yes, those two are different), Output Location, Output Naming, and Process Summary. When you do, Capture One and Lightroom have almost complete parity in export options.
Capture One even leads if you want to export several different versions of a given photo (or photos) at once, without re-entering the export dialog. It also lets you pick more output sharpening settings if you so choose. However, Lightroom’s export options can be improved with several third-party plugins that don’t currently exist for Capture One.
3.3. Default Color Quality
Color rendition is a critical topic, and it’s often considered a solid win in Capture One’s corner. But is that really true?
On one hand, Capture One has better color adjustment tools, and it’s more flexible overall in this department. On the other hand, the default colors are a bit trickier to analyze, and the advantage could go other way. Both programs certainly have different colors by default, but I wouldn’t go so far as to say that one is better than the other.
Part of that is simply because each program gives you several choices for the default color processing. Lightroom isn’t stuck just with Adobe Standard; you also have Camera Standard, Camera Vivid, and so on. Capture One, in turn, has an Auto Curve but also several other options, like Portrait and Film High Contrast.
To make things simpler, let’s just compare the standard options from both – Adobe Standard for Lightroom, and Auto Curve for Capture One. How do the colors look side by side in a sample landscape photo? The photos below are completely unedited, all settings at their defaults. Lightroom is the “before” image on the left, and Capture One is the “after” image on the right:


There are differences in the images above – the Capture One file is more magenta, despite both files using out-of-camera tint and white balance – but it’s hard to say which one is better. Maybe a photo with a person in the scene will clear things up. Again, Lightroom is on the left:

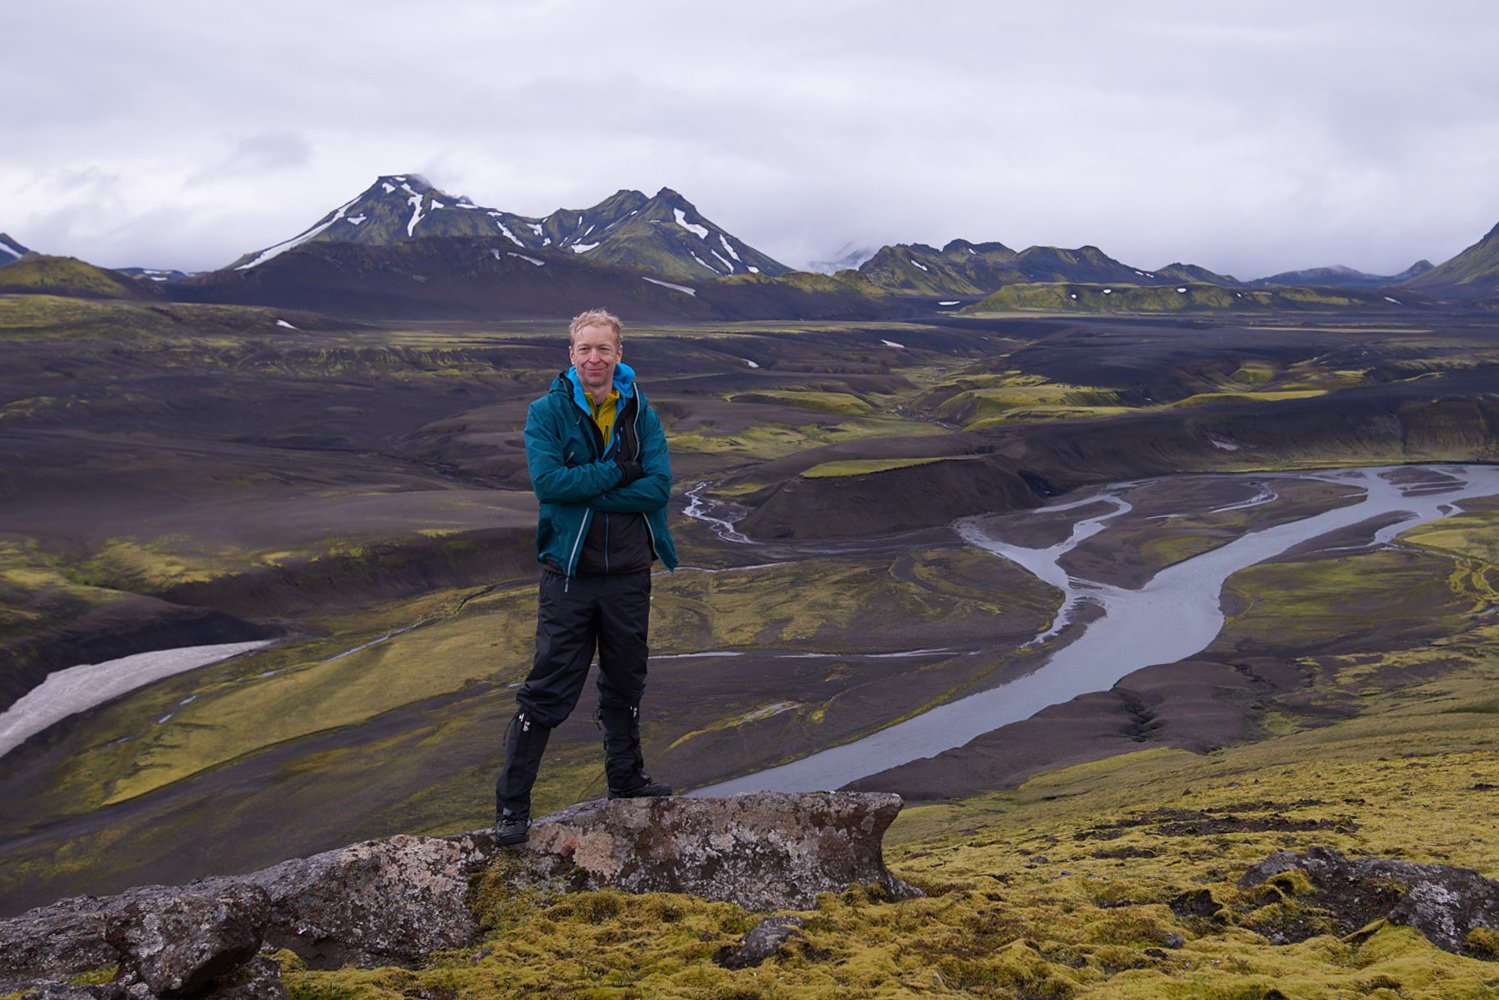
Now we see some very useful differences. Immediately, you can tell that the Capture One file is more saturated and colorful. The greens look more alive, and the subject also has more color in his clothes and face. So, Capture One wins – or does it?
In truth, the extra saturation is not necessarily a good thing (or necessarily bad). Although the Capture One file is more “finished” by default, my impression is that the colors in the Lightroom file are a bit more accurate, and perhaps easier to adjust with further post-production. The hardshell jacket is, in reality, a teal color more than than blue – and the yellow mid-layer is nearer to green than orange. Both of those match closer with Lightroom’s interpretation than with Capture One’s.
Then again, I’m confident that a bit of editing in either program could get the files to match almost exactly. And if color accuracy is your game, you’ll be working with custom profiles in either software anyway, making it almost a non-issue.
So, the Capture One photo might look better out of the box, but the Lightroom image has strengths of its own. Depending on your needs, either one could be ideal for the work you do.
4. Switching from Lightroom to Capture One
Although Capture One theoretically can read Lightroom catalogs to make it easier to switch, it is very limited in the adjustments it can import – mainly cropping and certain metadata tags like star ratings and collections. Personally, transferring is an all-or-nothing issue for me, so Capture One’s ability to read Lightroom catalogs isn’t very helpful to my work. Of course, it’s not like any other RAW processing software can do better.
The simple fact is that switching from Lightroom to Capture One isn’t going to be easy – although it might not be as bad as you think. You can still export images from your Lightroom catalog even when the software expires, which really is a lifesaver. Do that for your older, edited photos, and use Capture One to process your new ones. (You can always re-edit old photos from scratch in Capture One, of course, or export TIFFs from Lightroom to pick up where you left off.)

5. Summary
Here are the areas in which Lightroom is ahead:
- Face detection for photo organization (and AI keywording in Lightroom CC, but not Lightroom Classic)
- More third-party resources, by a wide margin
- Inclusion of panorama and HDR features
- Inclusion of history panel
- Stronger adjustments at maximum strength
- Quicker to support new cameras’ RAW files and various lens profiles
- Better price, especially factoring Photoshop into the mix
And the categories where Capture One wins out:
- Highly customizable interface and keyboard shortcuts
- Inclusion of layers
- Better color adjustment options
- Quicker and more flexible spot healing adjustment
- Stronger tethered shooting capabilities
- Inclusion of annotations feature
- Ability to choose between sessions and catalog systems
- Faster and more stable overall
We also have a few ties and mixed cases:
- Learning curve – Lightroom is somewhat easier to learn, but both are easy enough if you’ve used something similar in the past, and both are tricky if you’re starting from scratch.
- Export options – Lightroom has perhaps a bit more flexibility due to third-party plugins, but Capture One has some extra options by default, such as more advanced output sharpening.
- Default color rendition – Capture One’s photos are more saturated and “finalized” without any edits applied, but that’s not always what you want.
6. And the Winner Is…
Capture One.
I could say there is no real winner – that either choice might be the right one depending on your needs. But even if some users need Lightroom for their particular work, Capture One is better than Lightroom overall. Its color editing features are unparalleled, and the layers capability is a clear step above Lightroom. On top of that, Capture One’s extensive customizability lets you match it more closely to your individual needs, and its added speed and stability over Lightroom are big time savers in the long run.
That’s my takeaway, and I believe that most photographers who try both side by side for a long enough time will agree. The differences may not make or break a typical photo, but they do exist.
Of course, this doesn’t necessarily mean you should get Capture One. It’s missing certain features that some photographers may consider a dealbreaker, like built-in panoramas and various third-party resources only available for Lightroom. It’s also more expensive. The $10/month deal for both Lightroom and Photoshop is an excellent price, making it much harder to justify Capture One’s $300 price tag by comparison (and $120 upgrades). Capture One isn’t just competing against Lightroom – it’s also competing against the vastly larger feature set of Photoshop.
Then again, this article is just about Capture One and Lightroom. In that comparison, Capture One is ahead, although I wouldn’t call the margin extreme. If you’re a satisfied Lightroom user, don’t switch; it’s not worth the learning curve and new start to your library. If the price difference looks like an issue, don’t switch. But if you’re starting from scratch or leaving Adobe’s ecosystem no matter what, keep a sharp eye on Capture One. It might just be the best Lightroom alternative out there (we’re testing more, too).
You can read more information about both products on their respective websites: Capture One and Adobe Lightroom.
Personally, I’m in the process of making the full switch from Lightroom to Capture One. Let me know below if you have any questions or have made such a switch yourself. I know that many of our readers are contemplating something similar – or have decided against it – and I’m interested to hear your perspective either way.
We’re also testing Skylum Luminar soon (which now has DAM capabilities), as well as ON1, DxO PhotoLab, and others. So, let us know which possible Lightroom alternatives should be our top priority for review. Also, see our Alien Skin Exposure review and comparison with Lightroom.
I know this article is a bit old, but one thing I should point out (that is still a limitation in CaptureOne that could become a problem for some people) is their limitation of only 16 adjustment layers. Even in the latest version (23) it is still 16. Some adjustments require their own layers, or for example, if you’re editing a photo with multiple people and want to edit parts of the body separately, you may have to create several masks on different layers to achieve the desired results, and this eats into your 16 layer maximum. With LIghtroom, there is no real limit that I can see in terms of masks and local adjustments, although adding too many in the latest version (I’m talking like 30+) may slow things down a bit as mentioned, but on the other hand, Adobe has made speed and stability improvements in the last few versions of LIghtroom classic.
And there are many features in CaptureOne that I like that would make me switch, but the Layer limitation is going to be a deal breaker for some people because it will limit how refined of edits they can make in some cases, especially with complex images or instances where you legitimately will need many layers to complete a task without having to resort to something like Photoshop. Of course some careful planning can help reduce the number of layers you need, but again, this may be a limitation that will hinder some people’s work. People have been asking for an increase in layer count for years and I’m surprised why they haven’t honored this request (Even an increase from 16 to 24 or 32 would probably suit most people’s needs).
I’m a wedding photographer for 24 years using Lr since v3 but 3 years ago i bought C1 and On1 to test the diferences then i got a bit sick of the pay plan since C1 and On1 have a one time pay plan. Last year i got stuck with Lr after an update where i could not update because my trusty machine couldn’t go any further than Mojave so i could not edit in my iPadPro Lr Mobile because it would not sync anymore and this made me think, why? I will not buy a new machine just for Lr. How about my entire Lr Catalogs? Will i be able to use it in a near future? So will ON1 and C1 deliver me a more future proof edit capabilities in a relatively old machine even if i decide to upgrade let’s say each 2 ou 3 years?
The newest version of Capture One, 22, due out in December 2021 will have native panorama stitching and HDR merge. As an intermediate-skilled LR 6 stand-alone user, I refused to pay the monthly hostage fee. I made the switch from LR6 to Capture One 21 very easily. If I can do that, anyone could. My image-editing skills, especially for local adjustments, have grown exponentially, and continue to do so! Layers are extremely easy to learn and use in CO and don’t need to be collapsed when finished.
CO 22’s new panorama stitching and HDR merging capabilities were important enough for me to pre-pay at reduced pricing to upgrade as I shoot HDRs -including HDR focus stacks, frequently and have shot some panoramas as well -no more exporting. CO has helpful tutorials as well as recorded hour-long seminars. Further, many of their “ambassadors” provide useful instructional videos via YouTube. I have found Paul Reiffer’s “Capture One Pro Tips” series particularly informative as well as his hour-long editing sessions, all archived on YouTube.
I wish these programs edited to some kind of ISO standard files so that edits and features could be transferred between programs and feel like images can get to a “done” point, instead of “done in one program”.
C1’s pay once without subscription is reason enough. But I really want better catalog management, facial search, & Excire AI plugin for keywording.
Thanks for the list. While it is a little out of date as I’m reading mid 2021, there is a key price difference that wasn’t focused on enough: you can buy Capture One. For LR/PS you have to subscribe, forever. Stop for whatever reason and you lose access to all the edits you did (as mentioned here in regards to switching). I detest the subscription only model.
A second item is that some of the camera-specific prices are lower. The Sony one is $200 for the perpetual license (or $150 for the subscription). That is a lot lower than the $300 mentioned.
I’m a fine art photographer, (I work one -two pictures a day 30mins + per image) So I’m looking for the highest quality image to import into PS to polish.
I’ve tried multiple times over the years to move to Lightroom as my go to raw converter and was always disappointed by the inability to arrange “customize” my “workspace”. Probably most noteworthy was the lag in performance if trying to make adjustments on my second monitor. So I stayed with Nikon’s software. I’ve tried a couple converters over the last few years and found Capture One to be my goto solution.
The ability to fine tune colors / exposure / tonality and the advent of layers similar to PS really work well for me. I’ve found I’ve reduced my PS time probably 25% because the images are closer to finished when they come in.
Again I only work ONE image at a time, (though that image my be a 16 shot dual row pano) the control provided by C1 pro is outstanding. I noted somebody complaining about stability of the program, I have not experienced that at all. My take is if you are really trying to get the most out of AN image C1 Pro is not a bad way to go.
VR
BJ Ramsay
This article needs to be updated, of course, as Lightroom (2020-2021) now has essentially copied the C1 color adjustment system and the differences between them are slight. Don’t you just love how tech companies feast on each other and market this as “innovation”?
I disagree strongly with the comment that the learning curve on each is similar. I teach both programs and my experience is that C1 retains its awkward and dated interface; this continues to bedevil people as so much of the program navigation is illogical and counter intuitive. It’s fine once you get it, but it can take a while to find things.
But the real deal breaker has got to be the insane databasing in C1. It’s like time travelling back to PC UX from the 1980s. It’s an absolute pig to use and the designers ought to hang their heads in shame. Lightroom has its own oddities, but these are less obtrusive and I say this as someone who has stood by and watched different groups of learners work through each programme.
Long and short of it is: C1 is slightly better than LR in processing results, but this is more academic than significant.
I’ve been using Capture One for three or four years now after using LR standalone v6 and ealier for years.
Capture One feels, to me, like the beter tool for editing photos. I find it easier to get the results I want and I like the color controls and can’t live without layers.
On the other hand, the catalog they use is incredibly slow. If I search my 17k image catalog for a specific file name, for example, I can walk away, make coffee, come back,. read a number of news articles, etc. and it will probably still not be finished searching. Searching in my LR 6.13 software always provides instant results. Even searching specific directories within the catalog are very slow and results my not show up for five or ten minutes sometimes.
I have also found that Capture One crashes and locks up regularly – nearly daily. I’ve had this problem using earlier versions of the software and on other computers so it seems to be their software.
The latest version of Capture One, v20, has a handful of small upgrades and I have considered upgrading but I’ve also read a lot of reviews of the latest version and I have seen many complaints. My experience has been that Capture One seems to have suffered from a lack of quality control in development over the years and the complaints about v20 suggest that nothing has changed there.
I doubt I’ll ever upgrade unless they really put a lot of work into improving the quality of their software.
I was also initially impressed after reading about by the distortion and lens controls on the Lens menu but found that they only can be used with raw files. The Lens Profile selection, Chromatic Aberration, Diffraction Correction, Light Falloff, and Distortion options are disabled for non-raw files. To correct for lens or other distortion in jpg files, I go back to Lightroom and use its tools which are not limited to raw files.
The other item of note is the keystone correction in Capture One vs Lightroom. LR has a Auto, Horizontal, and Vertical correction options at click of a button. Capture One requires you to draw two vertical lines on an image to show it how to correct vertical distortion or two horizontal lines to show it how to correct horizontal distortion. There is not automatic. click of a button, keystone correction as in Lightroom. Even with drawing the guidelines in Capture One it still is likely to only get you close to the desired result. I often have to tweak the manual silders for vertical and horizontal keystoning to get my final result. Sometimes Capture One simply cannot correct the distortion and I go back or LR again and use its keystone tools which usually will correct the distortion.
Do you know if the current version of Capture One handles Fuji Film Simulations in a diffferent manner than Lightroom? It seems that Capture One is has a more direct link to Fuji’s Fuji film simulations for some Fuji cameras. It turns out that the the 2 Fuji cameras I own, X-T1 and X-Pro1 are not included but later versions of these cameras are included.
Well, every lightroom adjustment “layer” (brush, gradient) has an opacity slider.
Look for downward facing dark triangle at the top of effect panel under the “Edit” text.