In our two previous Lightroom articles, I explained what Adobe Photoshop Lightroom is and how its catalog-based file management and post-processing system works. Now that we are done with the basics, it is time we move to something a bit more practical. In this article, I will introduce you to the Lightroom environment. You will learn to understand the most notable elements of its user interface – Lightroom Modules. I will explain what the seven Modules are used for and how to switch between them. This article will also outline some of the basic tools within each Module. Hopefully, this article will help you see Lightroom’s full potential and understand that it might be more than enough of a post-processing and image management software for most of your digital photography needs.

Table of Contents
1) What is a Module?
Adobe Photoshop Lightroom has a very extensive list of tools available. It may not be as powerful as Photoshop for certain things, but when it comes to anything photography related, the latest version of Lightroom has some of the best built-in capabilities for image editing. Naturally, Adobe had to figure out a way to ensure all the functionality is conveniently accessible, and yet not overwhelming at the same time. So instead of dumping everything into one place and creating a mess, they came up with the concept of Modules.
Basically, each Module is an independent section that contains a set of tools relevant only to that particular module. In other words, it is a way to group and organize different tools together. Within the Lightroom environment, you navigate between different Modules depending on your needs. For example, for organizing images and publishing an online photo gallery, you would switch to the Web Module, because the tools to create an online gallery reside in that specific module.
2) Lightroom Module Overview
Now that you know what Modules are, it’s time to talk about each Module individually. Adobe initially started with a set of core tools in Lightroom. Over years, it has been increasing the number of modules and enhancing their functionality with each new version. For example, the first three versions of Lightroom had five Modules – Library, Develop, Slideshow, Print and Web. Lightroom 4 and 5 added two additional Modules, Map and Book. Each module went through a number of rather significant changes as well – existing tools have been enhanced and new tools have been introduced. Let’s talk about each Module in more detail.
2.1) Library Module
The Library Module is one of two core Modules you will be spending the most time in. As the name suggests, Library is there to help you organize and manage photographs. Everything you need to help you find, import, sort and organize photographs is here. Navigation options are located on the left-side panel. This panel grants access to all images within the current Catalog. You can also choose to browse them by source Folder or Collection. To manage folders and physically move or copy image files, use the Folder tab. In addition to all of that, you can publish your images to online services with the help of “Publish Services” tab at the bottom of the left-side panel.
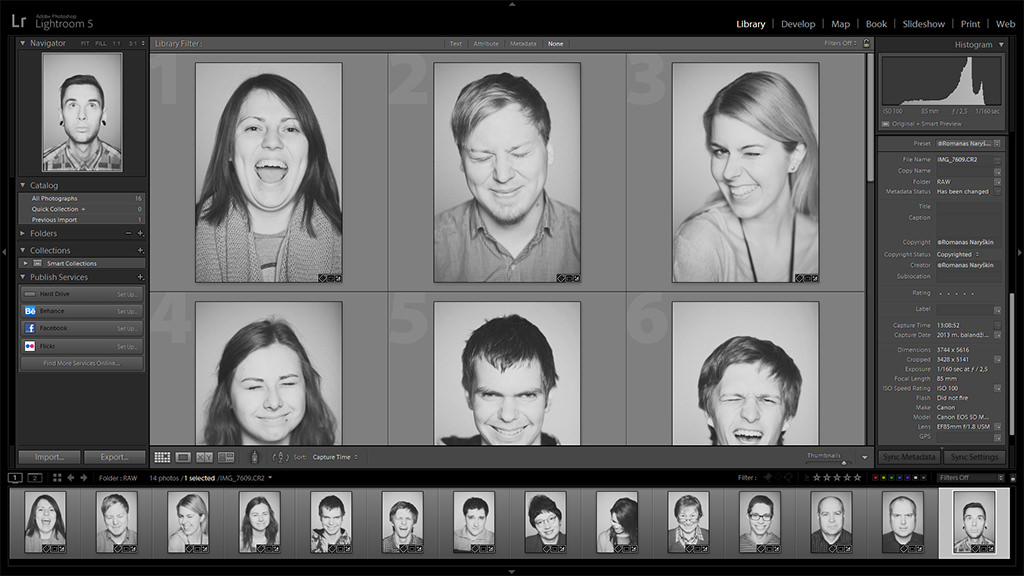
The central portion of Library Module is dominated by the image display. You can choose to view images in a resizable grid or one photograph at a time. These and other view options are located on a toolbar (hit “T” to toggle) above the Filmstrip. A few filter options can be found on the Filmstrip, such as Flags and Color Labels. For more filters, hit the “\” button to toggle the filter bar. It acts as a very powerful search tool. The filter bar allows you to search images by specifying lenses, focal lengths, aperture, camera, keywords or other criteria.
The right-side panel is your metadata tool. Here, you can add keywords and copyright information, as well as specify which metadata details to keep. Since you will most likely use the Library Module to sort through photographs and separate the good ones from the bad, the right-side panel also includes a small number of basic image adjustments. They are limited to Presets and basic White Balance, Exposure, Clarity and Vibrance controls. Do note that these controls are not suitable for precise fine-tuning, but for minor tweaks only. You can hardly ever use them for more than previewing purposes (approximate white balance or exposure correction, for example).
2.2) Develop Module
The Develop Module is the second most-used core Module in Lightroom. Plenty of photographers will rarely, if ever, go past it to other modules. But if you’re using Lightroom, there’s a good chance that you started using it because of the Develop Module. The Library Module is something you take time to learn to use and appreciate. Without a doubt, this is the most important Module of Lightroom where you will be spending the majority of your time. It has a set of very useful, powerful and ergonomically laid out tools that are specifically tailored for editing images.
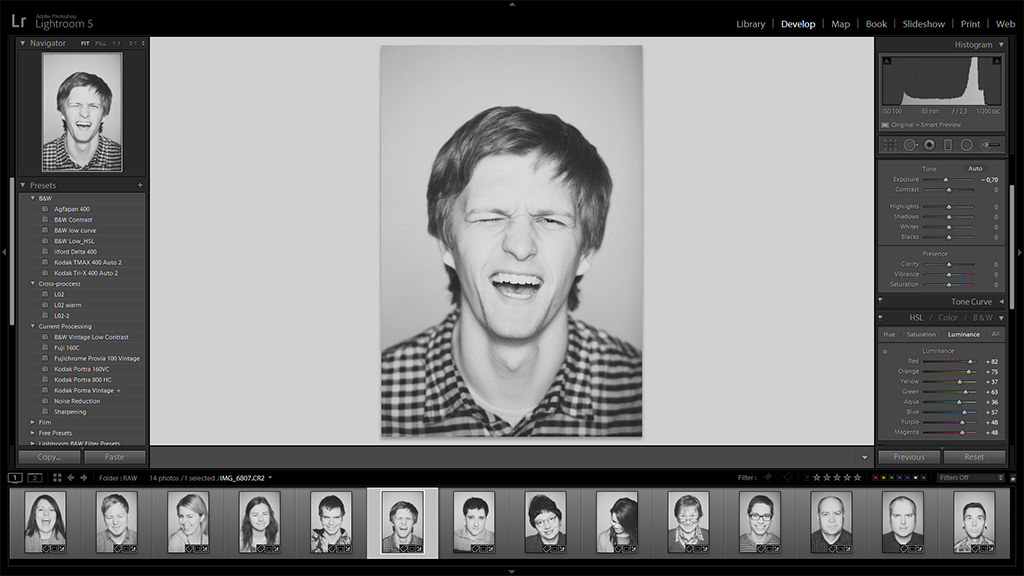
Starting off with the left-side panel, we have the Presets tab. Presets are extremely useful in speeding up your workflow. In this tab, you can create, organize and import/export Presets. To learn all there is to know about them, read our article on “How to Manage Presets“. The left-side panel also includes some basic Library Module functionality – you can switch between different Collections. This is useful in several ways. Most notably, it’s a very time-saving addition, much like the basic Exposure and White Balance settings in the Library Module. You see, these two Modules are both extremely important and you will find yourself switching from one to another very often. Thus, having them share a small amount of basic functions is time-saving. Once you’ve properly organized your images in the Library Module, you won’t have to switch to it just to select images from a different event to post-process. You can do that by choosing a different Collection from the Develop Module, provided that you use Collections to organize your images in the first place.
Filmstrip at the bottom of the screen includes the usual navigation. As in the Library Module, some filtering options are also available – you can view images by rating, flags or color labels. Assigning these filters to specific images is very easy with the help of keyboard shortcuts.
The largest number of tools is found on the right-side panel. In fact, nowhere else in Lightroom will you find such a huge amount of sliders and numbers to enter. This is where all the post-processing magic happens, from exposure tweaks to sharpening, noise reduction, tone curve, lens corrections, you name it. At the top of the panel you will find the ever-useful histogram and right under it, a list of area-specific tools for local adjustments and cropping.
2.3) Map Module
Once you go past the Library and Develop modules, you may find yourself using the rest of them much less often. Even so, these Modules provide some neat opportunities. As I have mentioned in my article about “Geotagging photographs in Lightroom“, the Map module is there for you to geotag your photographs. Simply put, geotagging images allows you to input location information where the photograph was taken, so that you know precisely where that particular image was taken at a later point of time. Some cameras that have integrated GPS units will automatically add location information to each image and this module has the capability to read that data and pin the exact spot on a map.
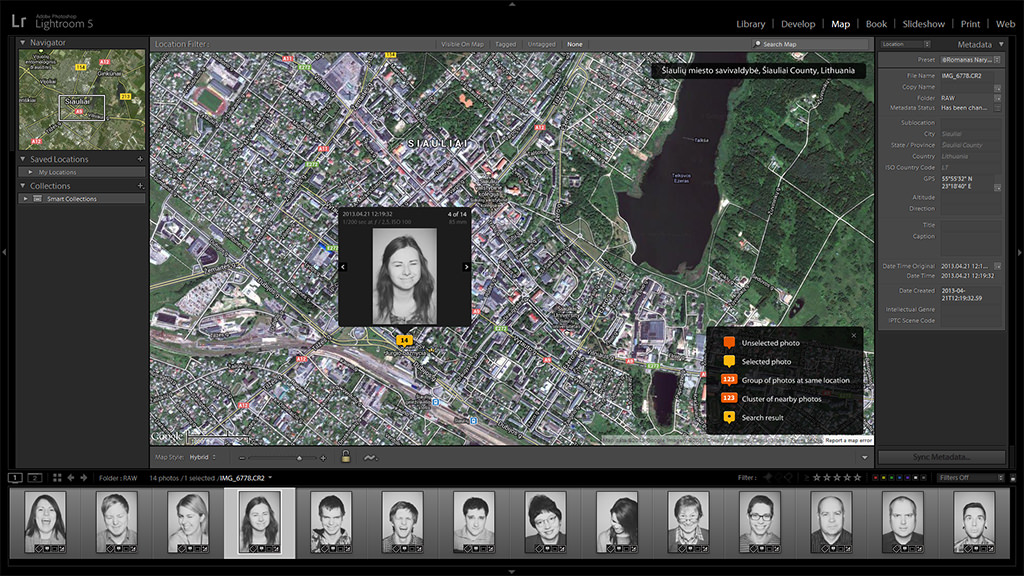
It is worth to note that Lightroom uses one of the best online map systems available by Google.
2.4) Book Module
Many photographers never print their books. But if you do, the Book Module is your best friend. It may not be nearly as flexible for creating interesting and sophisticated design as Adobe’s Illustrator or InDesign software, but still, it’s quite simple to use and gives plenty of control over the process.
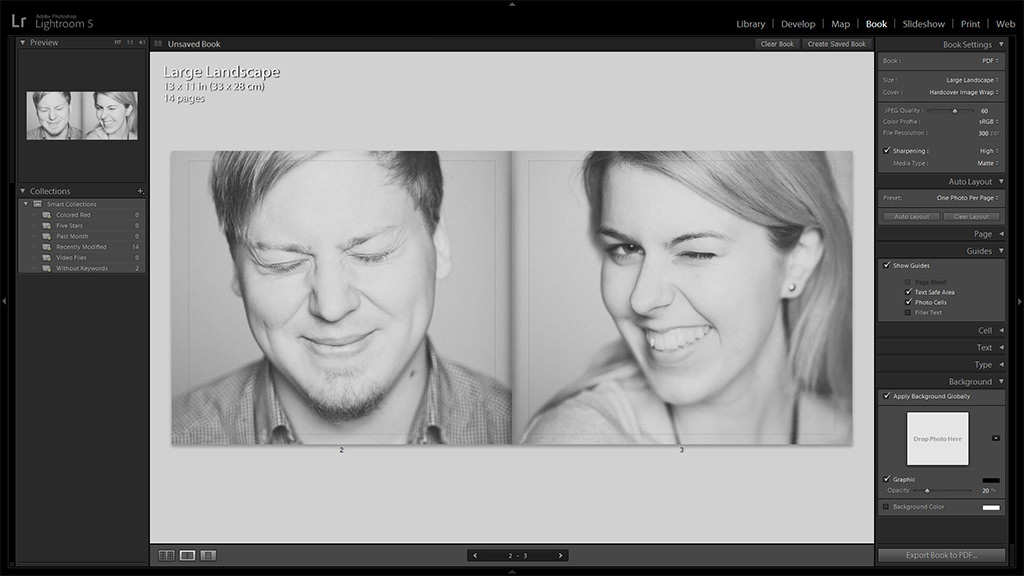
You can set up each page individually and add text where needed. You can choose to save the final output to PDF or JPEG formats, or publish it through the Blurb service.
2.5) Slideshow Module
This Module allows you to quickly set up a slideshow for your friends, family or clients to view. It can be especially useful if you are a wedding photographer and like to showcase some of the work that same day during the reception. You can choose to playback all photographs in the Filmstrip, selected images or flagged images.
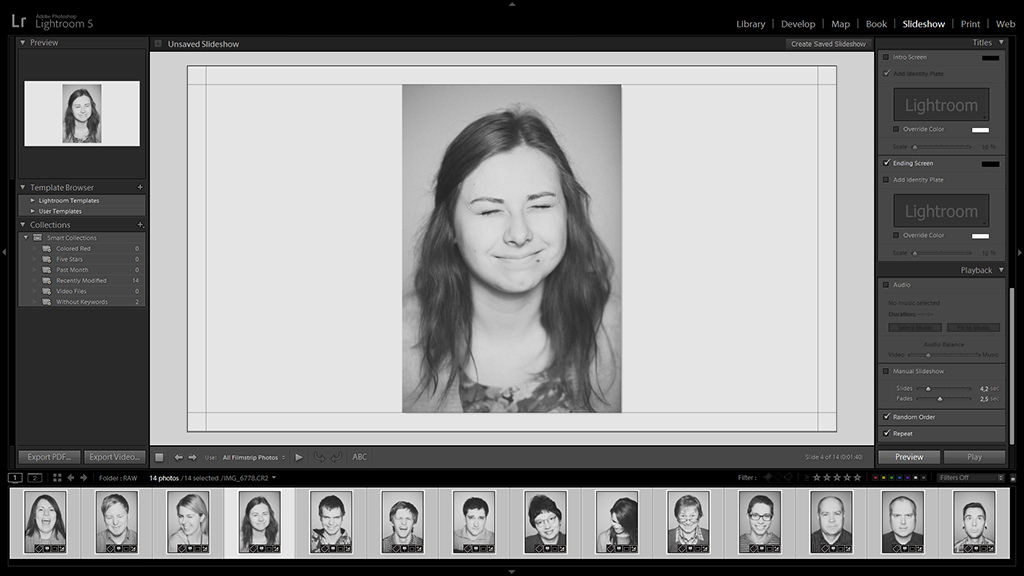
It is a relatively basic tool. There’s no way to adjust image movement and you can’t slowly zoom in, for example. Even so, for a quick and easy slideshow, it is quite sufficient. Other options include custom audio track, watermarking, random order and more. Once you set up your slideshow, Lightroom will play it back in full screen.
2.6) Print Module
If you are one of the few photographers who still like to print their work at home or at work, you will find the Print Module particularly useful. It will allow you to make sure that your image files are ready for print in the size and paper type you want.

Among other options, you have the ability to specify print size and location on paper very precisely – you can even use that creatively. You can also add watermarks and apply print sharpening. More importantly, you can specify color profile of your specific printer for greater accuracy. In addition to that, you may “print” to a JPEG file. Using the left-side panel you can save print presets. That’s especially useful if you tend to print often.
2.7) Web Module
Finally, we get to the last Module – Web. While this module is great for creating an online gallery in various formats, you have to know if your hosting company allows you to use such protocols as FTP to upload the gallery to your website. If you do not know what this means, just skip this module and use available websites such as Flickr, 500px, Facebook, Google+, etc. for sharing your photos instead.
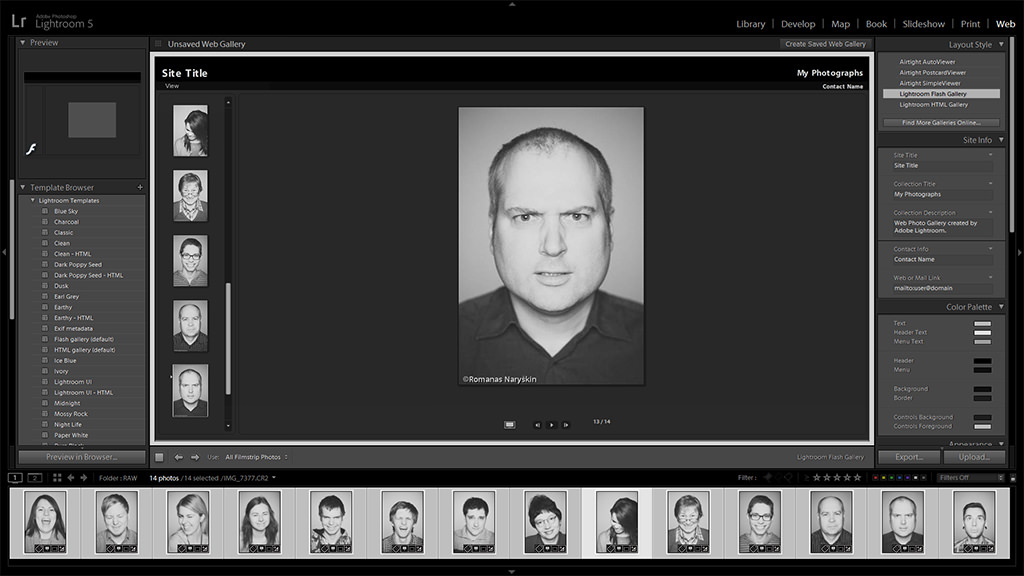
Otherwise, the web module has the capability to create a working gallery in HTML and flash formats. There are several layout styles as well as presets available for both, and each of them is decently customizable. Naturally, you can save your own presets/templates as well. Using the right-side panel you can specify the site title, collection title, description and contact information. Further on you can change a number of visual settings, including background color, shadows, borders and so forth. Finally, you can set up FTP server information so that Lightroom is able to upload the finished gallery for you.
In our future articles, we will be taking a much closer, in-depth look at all tools within each Module.
After all the discussion on this website about Adobe, here’s how I finally net it out.
– I am not going to pay Adobe $10/month for the first year and $20/month for the second year to use their new wiz-bang “Creative Cloud” version of CS Photoshop
– I am not going to buy Adobe Lightroom as an alternative. The catalog system they use is overkill.
GAME PLAN
– I will continue to use my Photoshop CS5 unless my hard drive crashes. I don’t know if I could reinstall given the new Adobe BS. If not, then…
– I will use View NX2 and Capture NX2 and hope Nikon comes out with a NX3.
– I will use Photomatix as a stand-alone for HDR
– I will go back to Adobe Elements from whence I started this journey 15 years ago. I have Elements 11 now and it does what I need based on recent usage.
– I will stick with my current cameras: Nikon D700 and Nikon Coolpix P7100 and I will stick with Nikon in the future.
Case very closed for me.
I know the d600 is a really good camera!! They are camera for different needs, each of them excel in there own way. I know the goal is to take picture with less processing, getting exposure right,white balance. When I shoot raw, I always like to play with it afterwards in LR. I like to play around with colors and different settings to make each picture look like the way I want which is not necessarily the ”right” way if there is such a thing!!! :P
But when you have the D600, the best camera of all time you don’t need photoshop or Light room because all the picture come out perfectly expose with no noise!! haha!! Just kidding, thanks for this article!! I have been using Light Room but didn’t get the chance to do a tutorial to get better.
Eric, I’m not sure whether I should laugh or bang my ahead against a wall. lol
Thank you for reading!
Eric,
I know you’re poking fun at the silkway guy who was trolling away the last few days.
Although the D600 is not the best camera ever as it has its limitations, you cannot deny that it is a great camera that if managed correctly, it will produce excellent results without the need of any post-processing.
There are quite a few photographers who are what you would call old-school if you like, who get everything right out of your camera and don’t post-process at all.
Can you use Lightroom modules without using their catalog system?
Using Windows 7, I download all my photos into a designated folder in “My Pictures” on my desktop. I then work out of this folder regardless of the software I’m using (CS5, Photomatix, Elements, etc.) and save all my images there afterwards. Later on I move the folder where these images are to a storage drive for future reference. I have my own library system which works fine for me.
So, can I still continue using my process or does Lightroom mandate that you must use their catalog in order to access all the other modules indicated in your article?
Peter,
Lightroom is a very strong image management tool, so I’m pretty sure that, if you spent some time learning it, you’d appreciate its convenience.
If you still don’t wan’t to use it for anything other than post-processing, there’s no way to bypass importing images. However, once you do that, you can just go on straight to Develop Module, post-process your images and remove them from Catalog once you’re done. Or you can even keep them there – there’s no harm in that, you can still physically move your files anywhere you want at any time. By keeping images imported you will save all the adjustments you’ve made so that in case you want to tweak one of the files later, all you need to do is link Lightroom to its new location. I describe how to do just that in my “Lightroom Catalogs Explained” article, section 3. photographylife.com/light…-explained
Thanks. based on your comment “you can still physically move your files anywhere you want at any time,” I think I can do what I want.
Yes, Peter, you can use it for post-processing only once you import images. Perhaps if you don’t need organizing tools, you ought to take a look at what competition offers, too. There could be something more suitable to your needs. I’d start with DxO Optics Pro and Capture One.
I like your series, very helpful Romanas, just starting to use lightroom and would like to know if there are any good teaching manuals that would help to learn this program. I have LR 4 and will be upgrading to LR5 soon.
Thanks
Patrick,
hello and thank you! I would offer you to take a look at our Mastering Lightroom series (photographylife.com/tag/m…-lightroom) There are a few article written already, as you can see. With these upcoming articles, I will be covering each aspect of Lightroom step by step, from start to finish. With this short introduction to Modules done, I will be explaining all the functions in Library Module in-depth first, and then move to other Modules one by one. :)
Hi Romanas,
I just recently got into Lightroom, and am finding this very helpful.
Thank you so much for sharing :)
Lawrence, I’m glad you found this of use, stay tuned for more :)
Thank you Romanas for this series, I find it really useful to revise my knowledge of Lightroom and to improve my skills in the modules I use less.
Keep up the good work!
Thank you, Alex!
This is a great series Romanas, the episode I am waiting for is how to move files and folders into Lightroom 4 when I have inadvertently placed them in other folders. I have loaded images into “Blog” when they should be in Lightroom 4. I can work on them in LR4 but really would like to have everything in one LR4 folder.
Do you mean physically moving files into a folder named Lightroom 4 on your hard drive?
Yes, Files and folders that I imported into LR$ but sent them to wrong destination. So I have folders that I can work on in LR4 but the import destination was desktop rather than LR4