In the previous Mastering Lightroom series article, “Lightroom Grid View Options”, we learned how to set-up Cells in Grid View so that they display the information of your choice. Grid View options are only available in Library Module, but that is not the only view mode available in Lightroom. In this article for beginners we are going to learn how to set-up Loupe View, which is available in Library Module and is also the default and only view mode in Develop Module.
Table of Contents
Lightroom Loupe View Information Overlay
As I’ve already mentioned, Loupe View is available in both Library and Develop Modules. In Loupe View, to overlay some information over image preview, simply hit “I” key on your keyboard. Such information overlay is called Loupe Info. Hit the “I” key once to go to Loupe Info 1, hit it again to go to Loupe Info 2. Hitting it the third time will hide any information overlay. To go to Loupe View Options dialogue, you need to hit “Ctrl+J” on your keyboard (same as in Grid View). Alternatively, you can select the appropriate option from the “View” menu or by right-clicking on the image itself. Both hotkeys – “I” to toggle Loupe Info overlays and “Ctrl+J” to open the Loupe View Options dialogue – work in Library and Develop Modules, but because the options dialogues themselves are ever so slightly different for both Modules, I will cover them separately. Let’s start with Library Module Loupe View Options.
A side note: the other three Modules that allow additional information to be overlaid are Map, Book and Print Modules. The latter two show print-specific info, such as page size, number of pages, preliminary cost or printer model depending on the Module, when toggled with the “I” key. Map Module will show the location that is being viewed at that time.
1) Library Module Loupe View Options Dialogue
The first thing we need to do is, naturally, go to the Library Module. Then, hit “Ctrl+J” to open the Library View Options dialogue. Once that is done, make sure that you are in the Loupe View tab, which is located at the top of the said dialogue. Switching to this tab will automatically toggle Loupe View. The following screenshot shows how the Options dialogue should look like if you are using Lightroom 5:
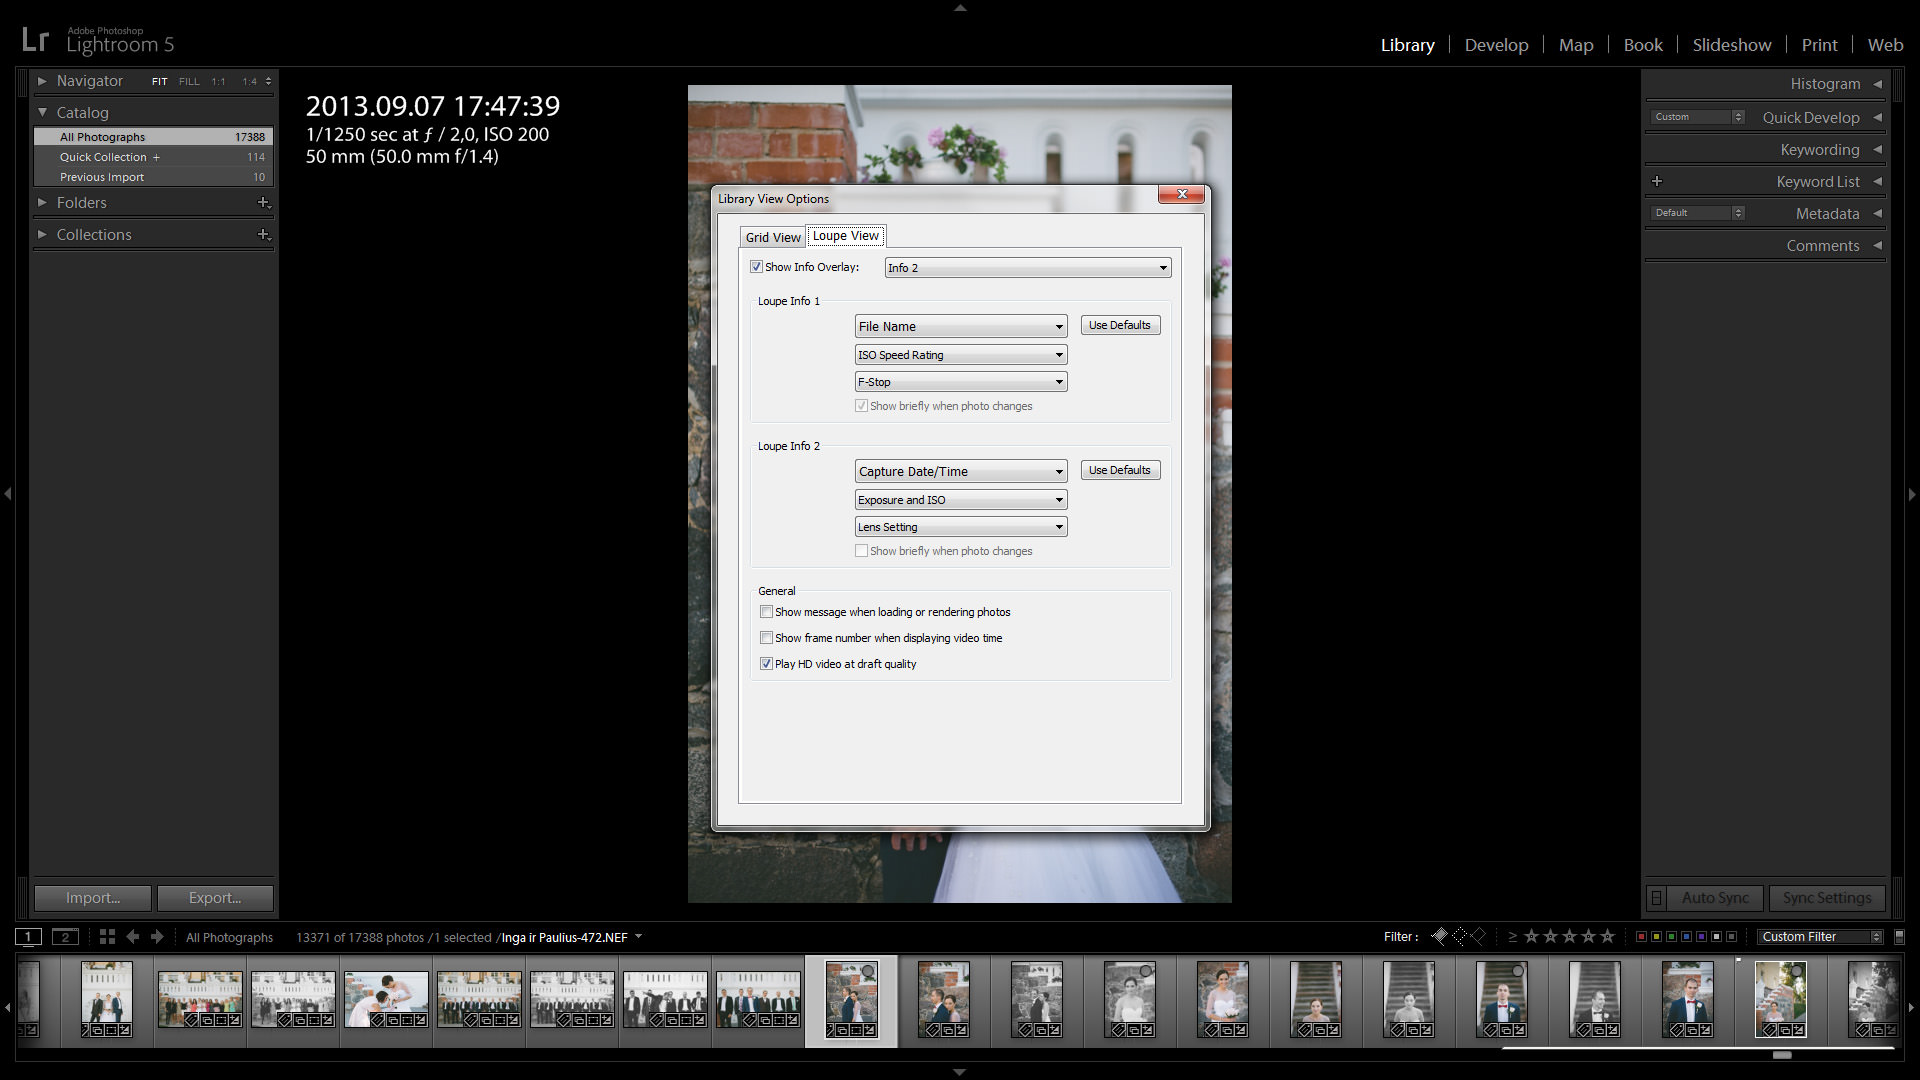
Now, let’s go through every option one by one:
- Show Info Overlay – select this checkbox to turn on Info Overlay in Loupe View and preview the changes you make in the Library View Options dialogue, Loupe View tab, in real-time.
- The Loupe Info 1/Loupe Info 2 drop-down menu – this drop-down menu is available only if the “Show Info Overlay” checkbox is marked. Toggle between Loupe Info 1 and Loupe Info 2 with this menu whilst in Library View Options dialogue.
- Show briefly when photo changes – if the “Show Info Overlay” checkbox is not marked, you will still be able to change the options in the Loupe View Options dialogue (contrary to Grid View Options, where it is mandatory to turn Grid Extras on). This is because Loupe View allows the information overlay to not be displayed at all times, but only for a few seconds as you go through the images. As you might have guessed, to do that, you need to select one of the two “Show briefly when photo changes” checkboxes. Naturally, only one such checkbox can be marked at a time.
- Loupe Info 1/Loupe Info 2 Options – the three drop-down menus in each section allow you to customize the information overlaid in Loupe Info 1 and Loupe Info 2. The top-most menu is also the most prominent, so it makes sense to assign the sort of information that you need to see at a glance to it more than anything else. It’s the file name by default, but if you expand the menu you will see a bunch of other options ranging from exposure settings (you can display all of them by selecting Common Photo Settings) to metering mode or copyright information. The same stands true for the remaining two drop-down menus in each section. Any one of these can also display no information whatsoever if you choose the top-most option from any specific menu (“None”).
Since both Loupe Info 1 and Loupe Info 2 work basically the same way, it would be a good idea to really think through what sort of information to overlay with each mode so that it does not duplicate. My suggestion is setting up Loupe Info 1 so that it shows the most important camera and exposure settings – shutter speed, aperture and ISO setting, perhaps metering mode and focal length, while Loupe Info 2 could be responsible for things like file name, image resolution after cropping and date of capture.
- Show message when loading or rendering photos – whenever Lightroom takes a while to load a preview of the image or render one – right after you’ve imported the image files into your Catalog, for example – it displays a message allowing you to know that it is still prepping that photograph for you. Here is how it looks like:

Unmark this checkbox if you’d rather not see the “Loading…” message.
- Show frame number when displaying video file – select this checkbox if you would like to see not only the playback time, but also frame number when viewing video files in Lightroom. Since I don’t post-process videos with Lightroom nor have any video files imported in any of my Catalogs, I just leave the checkbox unmarked and forget about it.
- Play HD video at draft quality – when dealing with high definition videos, this will lower the quality at which the movies are played back in Lightroom, but also increase the speed of processing. Again, not really relevant for us, so I leave it marked (in case I ever do work with a video file in Lightroom) and forget.
That’s it for Library Module and its Loupe View Options! Develop Module has an ever so slightly different and simpler View Options dialogue (called Develop View Options) as the Module itself does not support Grid View (if you engage Grid View, the Module will automatically switch to Library). So all that is left is discussing the slight differences in Develop Module.
2) Develop Module Loupe View Options Dialogue
First thing we should do is actually take a look at how the Develop View Options dialogue looks like. To do that, go to your Develop Module and, as always, hit “Ctrl+J” on your keyboard to open it.
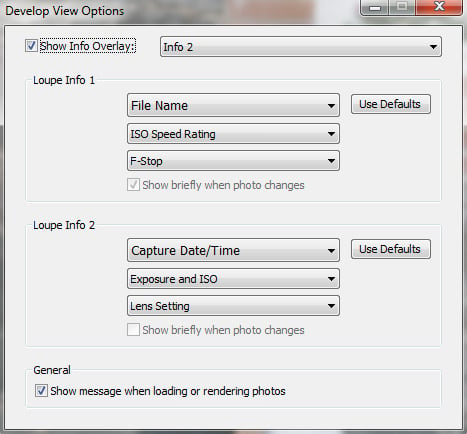
As you can see, the differences really are slight. If the Develop View Options dialogue seems more compact than its counterpart in Library Module, it is because, firstly, there are no Grid View and Loupe View tabs to choose from at the top of the dialogue and, secondly, no options for video. Other than that, they are completely identical. One important thing I should note is that whatever changes to Loupe Info 1 and Loupe Info 2 you make in, say, Library View Options, they are carried over to your Develop Module and vice versa. In other words, you can not have separate Loupe Info overlays for Library and Develop Modules. For once, though, I think that is a good thing – after all, there’s not that much information that you ever need at a glance and two Loupe Info overlays are plenty. More than that, I could hardly think of the sorts of information that would be useful in strictly one of the two Modules, but not the least in another.
A side note: if you’d like to know why there are no video-related checkboxes in Dvelop View Options dialogue, that is because you can’t actually do much with videos in Lightroom and the main functionality can be found in Library Module only.
Final Words
With this follow-up article to the previous “Lightroom Grid View Options”, “Lightroom Interface Customization Tips” and “Branding and Customization” articles, we’ve finally discussed pretty much all the ways Lightroom’s environment can be changed to suit the needs of individual photographers. Some of the advice provided affect only the way the user interface looks, while others can actually speed up your post-processing and image management workflow. If you follow the tips provided in all these articles, you should be able to make sure everything is as tidy and informative-at-a-glance as you need it to be. And, as always, I hope you found the article useful!
Little of track here, but can anyone help?
I use Lightroom 3, and my external hard drive that I was using to store my images was just about full. In fact, the drive failed, so I was lucky to get it backed up. I did and the drive is working fine now.
After doing so, I installed an additional external hard drive for more images. While installing, the old drive was drive F, and new drive was E. The library was synced fine at the time.
The next day after unhooking both drives from the night before, it was backwards, no matter what drive I hooked up first. Seems as though my library is messed up and not mapping to the correct drive. I can map it manually, but just connecting say drive F won’t find the F drive library, it finds the E drive. Then if I hook up both drives I can only use one library at a time.
I’m sure I did something horribly wrong, but it can’t be too bad as my images are safe. Just wondering, is there an easy way to tell one drive to connect to drive F and the other to connect to drive E and have Lightroom sync properly?
Should I have not added a second hard drive, can’t two be used at the same time, etc? Maybe I need to re-install Lightroom, not sure what to do. I hope my description is good enough to understand.
Scott,
let me make sure I understood you correctly. In a single Catalog you have imported images from two external drives – F and E. Later, when you connected the drives to your computer, they mixed up. The drive F is now E, and the drive E is not F, and now Lightroom can not properly sync photographs in the Catalog with files in either drive because of that. Is that correct?
You are correct, but go figure. It has now sorted itself out on it own. I did nothing. Maybe it needed a day or two to think about it. :) All is fine now, and you can delete this post. I didn’t mean to hijack the thread. Best regards and thanks for replying.
Well, if it does happen again, let me know, I will be able to help you out I think. :)
thank you, I didn’t knew about the loupe view option!! Very practical to know the cropped dimension before exporting. Keep up the good work!!
Yes, Eric, you are right – very practical :)
Hi,
Thanks for this informative article. One note – the instructions indicate using “ctrl+J” to bring the loupe view dialogue box up. On my Mac this only works with “Command + J”.
Thanks
Don
Thanks, Don! I do not own a Mac, so can not actually comment on MacOS hotkeys, but I do know that Ctrl for Windows = Command for Mac, or at least some of the time.
Absolutely Amazing what you guys put together here. This is the webpage I frequently visit when I need help on Lightroom, or want information about new gear.
I’d love to read more about photographing techniques.
Johannes, I promise there will be all sorts of articles for you to read in the future :) Thank you!
Hello,
Thanks for yet another very interesting article!
Speaking of metadata, I was wondering about the Flash information.
For example, it seems that I can only see in the Library Module whether the Flash did or didn’t fire.
Also, does anyone know if the information from the external flash is contained within the Metadata of the image?
For example, I’d like to know what Flash setting I used for a particular picture (TTL or manual, intensity of the flash, etc.). I’ve done a quick research on the web but it seems not many people are interested in that option.
Not many, indeed :) As far as I know, Lightroom does not store that sort of information, but if you really need to find out, try downloading a piece of software called PhotoME. It will show you pretty much all the metadata there is in a RAW image file (I use it to check my camera’s shutter actuation count).
Hi Romanas,
Thanks for the informative article. You mentioned at the end of your article “Lightroom loupe view options” that you could not think of any other information anyone would want displayed. How about showing in the photo the actual focus point for each individual photo as was taken at time of capture as it does in Aperture 3? I think that would be very helpful, because sometimes I actually import to Aperture first just to see where the focal point is then have to export them to lightroom which is inconvenient and time consuming especially when you have hundreds or thousands of photos to do.
Bruce Randall
Bruce, that is actually a very good idea and could already be done with the camera profiles that Adobe provides with Lightroom and ACR. When I said I can not think of any other information to be displayed, I, first of all, meant the actual text part – Metadata. And, secondly, out of the current list. I definitely think the AF point overlay would be a great idea for Lightroom 6, though, you have a point there!
Thanks!
There is one reason why this is not possible – Lightroom simply drops that information from each file! I don’t know why Adobe skips such important data, but it is something they should be doing.
Agreed!! I would really appreciate this also.
John