On our way to mastering Lightroom, we have already learned how to successfully Import images into your Catalog, work with Filename Template Editor and even understand how Lens Corrections work, among other things. Yet someone new to Lightroom will notice that we’ve missed several vital steps in our attempts to explain the software from start to finish, and so it is time to get back to those steps. In this article we will talk about one of the two most used Modules in Lightroom – Library. More specifically, we will overview the functionality of the left-side panel, the rest of the Module will be covered in two upcoming articles shortly afterwards.
We’ve already talked about the Library Module in our “Lightroom Modules Explained” article, where I gave a brief description of the Module’s functionality. In this and the two upcoming articles, I will cover it in greater detail, explaining the purpose of each section and tab. The second article will explain View Modes, Filter Bar and Toolbar, while the third part will be dedicated to the right-side panel and Metadata. Full functionality of some of the tools and tabs will be discussed in separate articles. Others, such as the Navigator, will be explained start to finish in this article.
Table of Contents
Left-Side Panel Overview
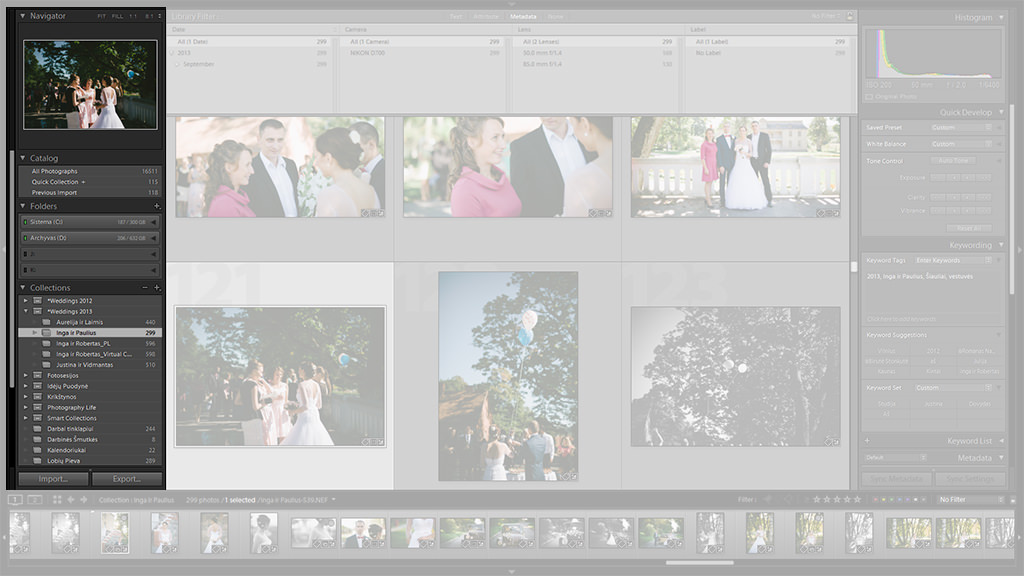
As I’ve already mentioned in the “Lightroom Modules Explained” article, Library is one of the two core Modules you will be spending most of the time in (the other being the Develop Module). This is the place you go to to manage and organize your photographs, Import them, assign keywords, search for specific captures or use Lightroom’s social integration tools as well as manage Metadata. All photographs Imported into the running Catalog can be accessed and filtered in the Library Module by all sorts of information, like the lens or camera used. You will find the Library Module to be very functional and capable of handling all your organizing needs. The left-side panel that we are now focusing on contains navigation, Export and Import tools, and is used to navigate folders and Collections that contain your image files.
At the very top of the left-side panel in Library Module, is the Navigator. This is one of the few tools that is more or less consistent across all Lightroom Modules – it switches to Preview tool in the last four, but the functionality and purpose remain largely similar. In the Library Module, the Navigator serves as a small preview of the selected image. More importantly and rather predictably, it is used to navigate the photograph when zoomed in.
The Navigator also allows you to specify zoom-in and zoom-out magnifications. Two settings are meant for the zoom-out mode in which you will be working most of the time in Develop Module – Fit and Fill. The other settings are for the zoom-in mode and consist of various levels of magnification. To set the zoom-in setting, click on either Fit or Fill option once. To set the zoom-out magnification, click once on the desired ratio. Zoom-in and zoom-out modes are triggered with a single mouse click on the photograph in the main view area, a single click in the Navigator or with the Space bar. Click-and-hold with your mouse button or press-and-hold the Space bar to engage zoom-in mode until you let go.
The following settings are available:
- Fit – the image is zoomed in so that it fits into the screen. Fit is the default “zoom-out” setting, and one you will likely choose to leave as such.
- Fill – the image is zoomed to fill the whole screen, edge to edge. This is the other possible “zoom-out” setting. Unless the image has an aspect ratio identical to that of the viewing area, part of the image will extend beyond the edge and you will need to use the Navigator to move around and see all of it.
- 1:1 – a very useful “zoom-in” position, 1:1 displays the image at 100% for closer sharpness and noise inspection, as well as critical local adjustment in the Develop Module.
- 1:2 – a 50% zoom setting for those occasions when 1:1 is just a little too close.
- 1:3, 1:4 – 33.33% and 25% zoom settings, respectively.
- 1:8, 1:16 – unless you have a low-resolution monitor, these settings will most likely display magnification that uses less than full viewing area. 1:8 is a 12.5% zoom setting, whilst 1:16 is a miniature 6.25%. Naturally, if you have a very high resolution photograph, the image will appear larger (for example, a Panorama image). Here is how a 12 megapixel image looks when set to 1:16 magnification on a 1080p monitor:
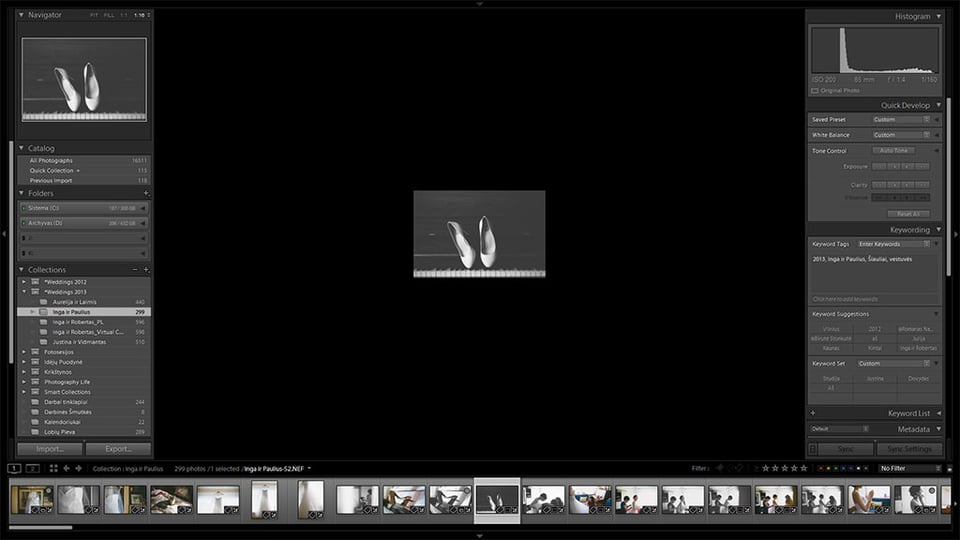
As you can see, it is no bigger than the Navigator preview. A 36 megapixel image would have four times the area. One might wonder who would even need such a magnification for regular photographs, and the answer is simple. When looking at such an image, it is easier to notice flaws in composition: while small details are not as visible in the photograph, it is much easier to judge the overall balance of the photograph, because the said details do not detract attention from general shapes and colors which, consequently, become that much more apparent.
- 2:1, 3:1, 4:1, 8:1 and 11:1 – these settings magnify the photograph beyond 100% size to (respectively): 200%, 300%, 400%, 800% and 1100%. These magnifications can be used for the most critical, precise local adjustments, and will hardly ever be needed for most photographers.
In the Develop Module, the Navigator also allows you to preview the effect of a specific preset by hovering your mouse cursor over it.
2) Catalog Tab
The Catalog tab has some general navigation options:
- All Photographs – this section contains all photographs from all the folders that are Imported in that particular Catalog. Useful when you want to find all image files using the Filter Bar (hit “\” to toggle) with, say, one specific parameter, keyword or other Metadata entry. Also shows the total number of Imported photographs.
- Quick Collection – displays image files that have been added to Lightroom’s Quick Collection (hit “B”), which will be explained in more detail in upcoming Mastering Lightroom series article.
- Previous Import – displays images from the last Import you performed and makes it easy to find them quickly without looking for the right Collections or folders you’ve put them in.
3) Folder Tab
This tab provides the main navigation and image management capability. It only shows drives and directories that contain Imported photographs, but also contains a whole lot of organizing and managing options.
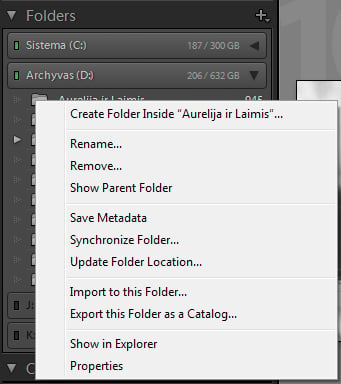
<br/ >Here is a quick overview of what the Folder tab allows you to do:
- Browse photographs by their location on your hard drive;
- Create, delete, rename folders and subfolders;
- Move folders and subfolders;
- Move image files from one folder to another;
- Sync folders;
- Import into specific folders;
- Export folders as Catalogs;
- Check folder properties;
- Check available hard drive space;
- See the number of photographs in each folder;
- … and more.
Because there is so much functionality and because this section is a vital part of file management in Lightroom, the Folder tab will be explained in much greater detail in a different article. Until then, you can read this short article with a video demonstration about image management in Lightroom, and also take a look at our “How to Organize Pictures in Lightroom” tutorial for more information about the Folder tab and general organizing functionality of the software.
4) Collections Tab
Collections are a key part of image organizing in Lightroom and work best when used in conjunction with proper folder management. In fact, Collections are very similar to folders, only they are not physically created on the hard drive and images that are assigned to collections are not physically moved anywhere. Collections provide a way to group photographs and one photograph can be in as many or few collections as you want. For example, if you have a Collection where you store all portraits, but also a Collection where you store all your B&W images, you could place a B&W portrait into both Collections. Also, if you select that image in your portraits Collection and then go to your B&W image Collection where it’s also stored, it’ll be already selected there as well. Once you sort through your photographs and remove the ones you don’t like, it’s best to put them into a separate Collection. What this does is allows you to easily find the images among all the thousands you may have in your current Catalog, but also prevents you from permanently deleting images from it accidentally. Removing an image while being in a specific Collection will delete it from that Collection, but not from the Catalog. You can also use Collections to effectively separate images you deemed to be good from those less successful, if you’d rather keep the latter in the Catalog.
To create a Collection, simply click “+” on the Collections tab which you can find on the right-side panel. A menu will pop-up – choose “Create Collection…” and name it. You can either select the images you want assigned to that Collection after you’ve created it and drag-and-drop, or you can select them prior to creating a Collection and tick “Include selected photos” check-box as you create a Collection.
Collections will be discussed in more detail in a separate article as they are such an important part of the image organizing workflow in Lightroom.
5) Publish Services
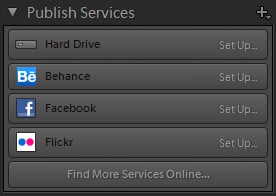
Lightroom 5 has some pretty decent social integration. My copy has Behance, Facebook and Flickr listed by default and there is an option to “Find More Services Online…”. Clicking on any of the services will open Lightroom Publishing Manager where you will enter your account information and specify the same sort of image parameters for exporting as you would if you were exporting to your hard drive: image quality, size, format, file name, metadata information. There is even the possibility to create a new album in Facebook.
Personally, I haven’t tried any of the Publish Services, but I wouldn’t mind seeing something for Google+, Drive or Dropbox, perhaps. In any case, there is not much to say about this tab other than it helps you upload your work online seamlessly.
6) Import/Export
The final bit of the left-side panel consist of two buttons – one for Import, the other for Export. Importing images is very easy and one of the first things you do when you first open Lightroom, as explained in this in-depth article. Exporting comes after you are done with all the post-processing. During the Export process, you can specify file names, image quality, size and Metadata information, save Export presets, among other things. It is a very simple process, much like Importing and will be explained in more detail in a separate article.
Final Words
Adobe team managed to pack a lot of functionality into such a compact set of tools. The Library Module offers all the organizing and image management functionality you could hope for and the left-side panel is a big part of that package with its ability to sort, preview, import, export and publish photographs online.
This is photographylife.com/light…side-panel very useful article! It will help me to deal with the panel
I am new to lightroom and I didn’t specify the resolution I wanted my photos to be exported at. Unfortunately that means my photos are all 240 dpi right now. They were originally taken at 350 and I’d like them to AT LEAST be exported at 300.
Are the photos that I have edited in lightroom automatically saved to my library? If so, can I go into my library and export them again at a higher resolution?
I am slowly dying on the inside thinking of how much work I possibly lost. HELP!
There are a lot of plugins available for Lightroom Publish Services other than the ones that come out of the box. Googling ” Lightroom Plugin” will find them if they exist. Many are available from Adobe (they seem to have ones for Dropbox and 500px, at least), and searching will also turn up third party alternatives. I prefer Jeffrey Friedl’s jf Flickr plugin over Adobe’s for a number of reasons.
Looking forward to the detailed article on moving stuff around in the Folder tab. I haven’t experimented very much with it, but it seems like it should be more intuitive than it is, at least in Lightroom 4.
Roman great article as usual. I have a question. I’ve been using Lightroom for years now. Starting at version 5.0 or 5.2 don’t remember when, Lightroom started to convert all my raw files (or renaming them) dng ending. Without any prompting from me by the way. Just decided to start doing it. Here are my questions
Does this slow down the import process
Does it help adobe to render previews faster when working with files
How do I turn the damn thing off? I’ve looked and looked and cannot find how to turn it off in import process
Does anything happen with raw files or does it simply renames the proprietary raw ending names from camera manufactures. Thanks
Hi Romanas,
Thanks for providing the article. As always, it is very interesting, easy to read and informative.
Given Adobe’s recent push to force people into the cloud and the security issues that have ensued, I decided to give the latest version of Paintshop (Pro X6) another chance. This got me wondering if maybe your team could do an independent review / comparison to Lightroom.
Its a surprisingly well priced and feature rich product that in my opinion slots in-between Lightroom and Photoshop. Anyway I’d love to hear your thoughts on this.
Thanks again
Mark
Hi Romanas,
Once again, a great article and more helpful and a learning tool for someone like me. I will keep this article and previous articles as a reference guide to help me learn more.
One question I have is, once I am done editing and exporting pictures in a designated folder, sometimes the image size becomes smaller than I intended.
How can I keep it larger size?
Thanks
Yogesh.
Yogesh, can you clarify by what you mean by smaller size? Is it the resolution of images that got smaller? If yes, then check your export settings – you probably resize images to smaller resolution when exporting.
Hi nasim,
thanks for your reply. Actually once I am ready to export the picture, in the image sizing tab, I have confusion as what to click and what not to inorder to retain a bigger size lets say, 2 mb or 5 mb, instead of 300 kb size.
thanks
yogesh