Since Lightroom version 3, Adobe has been providing a Lens Corrections sub-module within the Develop Module to correct various optical issues commonly seen on all lenses. It is a very powerful and complex tool that can be applied to one or many photographs with a couple of quick steps, potentially saving many hours of post-processing time. In this article, I will explain what the Lens Corrections sub-module is, how it works and how you can effectively use it to correct optical issues in your photographs. I will also show you a method of adding a lens profile manually if you have unsupported lenses in your arsenal.
Table of Contents
1. What is “Lens Corrections” in Lightroom?
Lens Corrections is a tool within Lightroom’s Develop Module (hence I often refer to it as a “sub-module”) that allows fixing such lens problems as distortion, chromatic aberration, vignetting and perspective correction “non-destructively”, without leaving Lightroom. The beauty of the Lens Corrections feature in Lightroom, is that just like any other setting, lens corrections can be copied from one image to another, applied to hundreds of images at once, or can be set up as an import template, automatically applying corrections to images during the image import process. Keep in mind that lens correction is not a simple fix that applies to any lens – corrections are lens-specific. Since each lens model is designed with a unique optical formula, lens corrections must also be uniquely customized for each model. For example, one could not take a lens correction from the Nikon 35mm f/1.4G and apply it to the Sigma 35mm f/1.4G just because they share the same focal length and maximum aperture. Adobe staff spends time working with a number of different lenses and they continuously add support to new and existing lenses when new versions of Lightroom are released.
How does Lens Corrections affect images? Take a look at the following image:
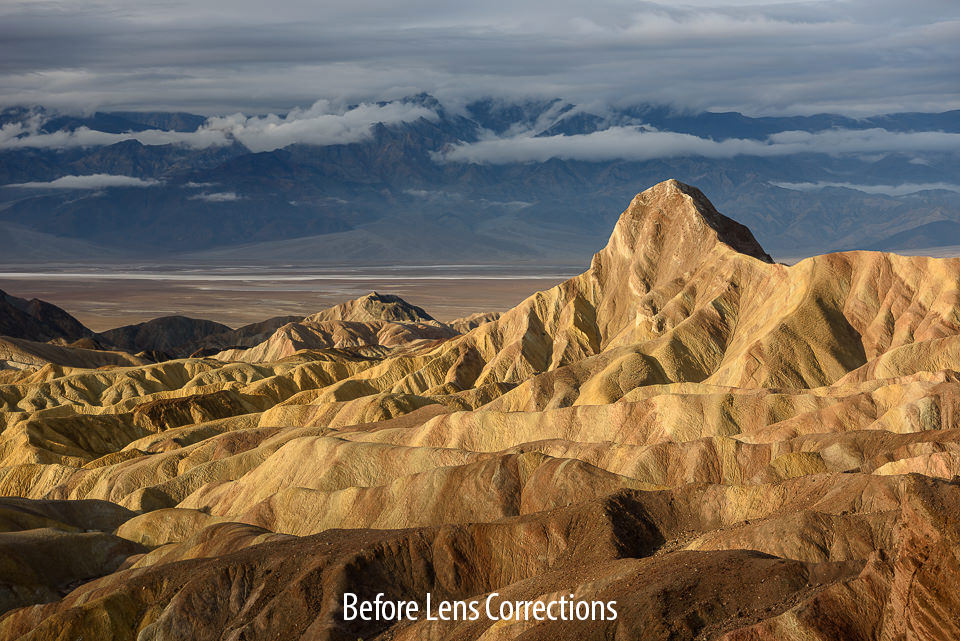

Move the slider to the left and the right sides to reveal how the image looked before and after Lens Corrections were applied to the image. As you can see from the above example, this feature can drastically alter the look of your photos and make them instantly look better. For the above case, I enabled correction that fixes distortion and vignetting, then enabled the removal of chromatic aberration and also made Lightroom apply Full level, horizontal and vertical perspective corrections. As a result, Lightroom not only fixed visible distortion and other problems, but it also aligned the lines in the image (perspective correction became available in Lightroom 5).
2. How to apply Lens Corrections to an Image
2.1. Basic Tab
Applying distortion and vignetting corrections to an image within Lightroom is very simple – just go to the Develop module or press “D” on your keyboard, then move the right window down until you get to “Lens Corrections”, and check “Enable Profile Corrections” under the “Basic” tab as shown below:
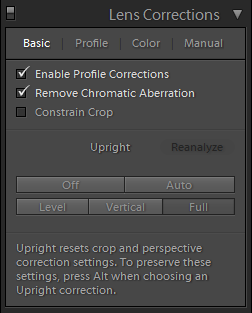
The same field can be located under the “Profile” tab. If you have an older version of Lightroom and you don’t see a “Basic” tab, you will have to enable it from the “Profile” tab.
In order to remove chromatic aberrations, you also have to check “Remove Chromatic Aberration”, which is also available under the “Color” tab.
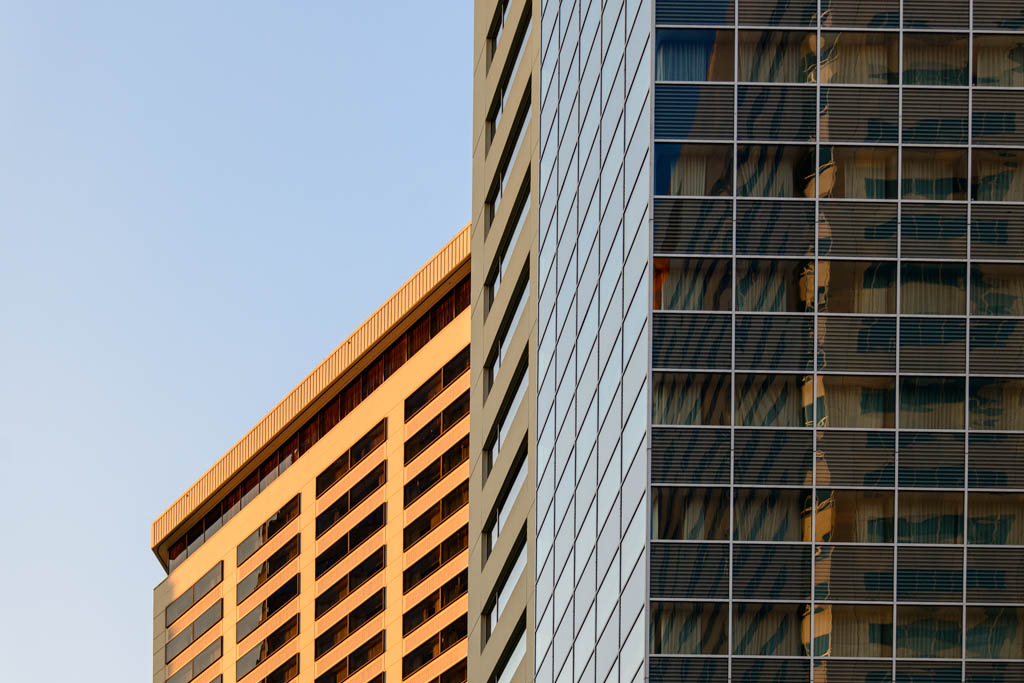
If you are using Lightroom 5, you will see some additional buttons under the “Basic” tab – “Off”, “Auto”, “Level”, “Vertical” and “Full”. These buttons are used to apply quick horizontal or vertical leveling and perspective correction. By default, all images will be set to “Off”, but you can manually trigger this behavior and apply it to an image by clicking on any of these buttons. Surprisingly, perspective correction actually works pretty darn well on images with defined lines, like buildings. Take a look at the following image:

Again, move your mouse over the image to see the image after perspective correction was applied. As you can see, Lightroom managed to straighten up a lot of lines in the image, resulting in a completely different image with straight lines. Note that the above “After” image has white lines to the left and the right of the image – that’s because there is not enough information to compile the whole photograph. If you do not want to see those white lines, you can either crop them out manually in Lightroom, or another option is to check the “Constrain Crop” field, which will automatically do it for you. Here is the same image after crop was applied automatically:
2.2. Profile Tab
If you want to go into more options to modify or fine-tune corrections, Lightroom provides additional tabs under the Lens Corrections sub-module. The “Profile” tab is the second tab after “Basic” and it contains fields that allow you to pick the lens of choice and apply custom distortion and vignetting levels, as seen in the below image:

The “Enable Profile Corrections” checkmark serves exactly the same purpose as the one under the “Basic” tab – it enables automatic corrections based on the type of lens used. If a lens is supported by Lightroom, as soon as you put a checkmark in this field, the three drop-downs under “Lens Profile” will be automatically populated. If a lens is unsupported, the drop downs will say “None”. From there, you can manually pick a lens Make, Model, and Profile, but I would not recommend doing that, since you do not want to apply a lens profile from one lens to another. As I have already pointed out above, lens profiles are lens model specific.
If Lightroom cannot find a profile for your lens, you have three options:
- Wait until Lightroom releases a profile for your lens
- Create a lens profile yourself as shown in the “How to add a missing Lens Profile using Lens Profile Creator” section below
- Use the “Manual” tab, from which you can fix distortion and vignetting issues by manually specifying the amounts / moving sliders (see below)
If automatic corrections are not good enough, you have two additional sliders for tweaking distortion and vignetting. If the effect of correction is too strong or too weak, you can tweak it from there. As for the “Setup” drop-down, I always leave it on “Default”. If you move the distortion and vignetting sliders, it will automatically change to “Custom”, which indicates that the default values have been changed. The “Auto” setting never worked for me, but I would stay away from it, since you probably do not want Lightroom to guess anything for you.
2.3. Color Tab
The “Color” tab allows removing/reducing chromatic aberrations. Again, the “Remove Chromatic Aberration” checkmark is exactly the same as the one under the “Basic” tab. Once checked, Lightroom will automatically remove any visible signs of chromatic aberration. However, there are situations where Lightroom will not do a great job in eliminating CA. For those situations, you can use the manual sliders to set custom purple/green hues and amounts:
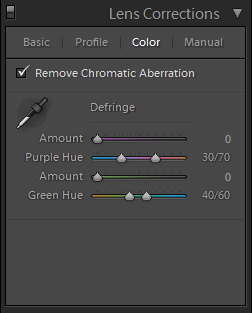
Alternatively, you can click the color picker to the left of “Defringe” and click the color that you want to neutralize. I love this feature (it was introduced in Lightroom 4.1), because it allows you to reduce not just lateral chromatic aberrations, but also nasty cases of longitudinal chromatic aberrations, better known as “bokeh fringing”.
2.4. Manual Tab
The last tab is called “Manual” and this one has been there since the first version of the Lens Corrections sub-module was introduced. Basically, if you have an unsupported lens, you can apply manual corrections of distortion and vignetting to your images. There are many different sliders available in this tab that allow you to fine-tune each setting, as shown below:
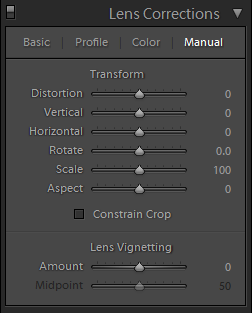
Personally, I rarely ever bother with this tab. In some rare cases when working on an unsupported lens, I might wander off to this tab and play with the distortion and vignetting amount sliders, but that’s about it.
3. Applying Lens Corrections to Multiple Images
Once you are satisfied with your settings, you can apply them to multiple images at once by copy-pasting the settings. Within the Library module (“G” key shortcut), simply right-click the photograph you worked on, then go to “Develop Settings” -> “Copy Settings…” and a new window will come up like this:
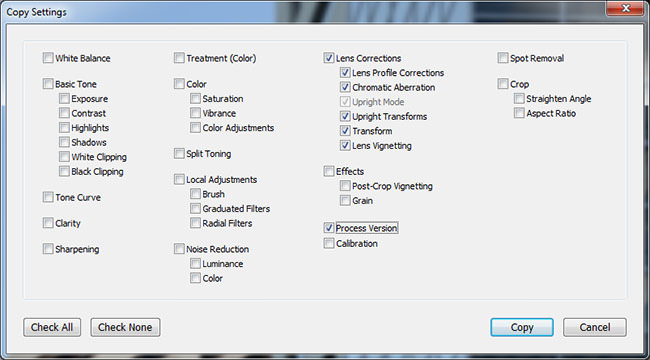
As shown in the screenshot, uncheck everything but “Lens Corrections” and “Process Version”, then click “Copy” to copy the settings into the Lightroom buffer. Then select other images that you want to apply the same settings to as a group, then right-click on one of the images in the group and go to “Develop Settings” -> “Paste Settings”. Once you do that, all of the modified settings will apply to the rest of the images that you selected.
4. How to add a missing Lens Profile using Lens Profile Creator
Correcting chromatic aberration and vignetting issues in your images by manually adjusting the sliders in Lightroom works fine for most cases because you can easily see CA and vignetting in images. Distortion, however, is not as easy to fix, because an image would have to contain straight lines from corner to corner in order for you to correctly fix them. If you shoot with fisheye or ultra-wide angle lenses that suffer from severe distortion, you might be able to visually fix most images, but the results might not be consistent from image to image.
If you want to have consistent results, the best thing to do is to either wait for Adobe to release your lens profile, or to create it yourself. The latter would obviously be much quicker than waiting for Adobe, but as you will see from the steps below, it would take a significant amount of time and effort on your side.

Here are the steps to this process:
- Download and unzip the Lens Profile Creator
- Go to the Calibration Charts folder, select a calibration chart to fit your printer and paper, print it out, and then mount it on a planar surface in a room with plenty of ambient light.
- Take pictures of multiple checkerboard images (a minimum of three images are required, but nine are recommended) for each camera/lens settings that you are interested in obtaining the lens profiles for.
- Convert your RAW images to DNG format and make sure that full EXIF data is preserved.
- Process the raw DNG images (or the JPEG/TIFF images if you prefer creating lens profiles for the non-raw workflow) through the Lens Profile Creator to create the custom lens profile.
- Save the lens profiles that you have created into the specific lens profiles folder(s) that Photoshop CS5, Camera Raw and Lightroom would be looking for them for lens corrections.
So, in order for you to be able to create an image, you need to print out a test chart, photograph it and then feed the images to Lens Profile Creator to create a profile. Bear in mind that if you shoot with multiple camera bodies with different sensors, you will have to create profiles for each camera/lens combination. For example, if you own Nikon D810 and Nikon D7200 cameras and you have a Nikon 24mm f/1.4 lens, you will have to mount the lens on both cameras and create two separate profiles. The reason why you have to do this is that different cameras/sensors handle lenses differently and in the case of FX vs DX, issues such as distortion and vignetting will appear less obvious on DX when compared to FX, because the corners are chopped off.
If you use multiple lenses or different cameras, I would recommend creating lens profiles for all of your lenses and cameras at once. The process is time-consuming but pretty straightforward and you should not have any problems with creating the profiles.
Once the profiles are generated (LCP file extension), save the files into the “C:\Users\All Users\Adobe\CameraRaw\LensProfiles\1.0” folder if you are using Windows Vista/7/8 (for other operating systems, refer to Adobe Lens Profile Creator documentation inside the documentation folder) and relaunch Lightroom. Once you do that, your images should be automatically recognized when you click “Enable Profile Corrections” within Lens Corrections in Lightroom.
By the way, there are other third-party software tools such as DxO Optics Pro and PTLens that contain hundreds of camera/lens combinations that you might not find in Lightroom. If you have rare lenses, you might want to give those tools a try, since they will probably have more lens profiles than Lightroom.
Hello,
My architectural thesis is about photogrammetry where we measure buildings inside a photograph.
What if I do not know what lens and camera type was used for the photo, can I correct its distortion in Lightroom? Can Lightroom identify the amount of distortion?
Thank you so much.
if I have lightroom 5.7.1 which doesn’t contain a lens correction profile for the tamron 15-30mm 2.8, but adobe now has a correction profile for the lens is there a way that I can download it? I see that it is available in lightroom 6, but I don’t want to buy it just for the lens profile. Thanks!
I would like to see Lightroom 5 have lens profiles for the two most common lenses that I seem to use nowadays – Nikon 16-35mm F4 & 70-200mm F4. I think that would be useful.
When I shoot a project, I am creating a independent library catalog for that project. The primary .lrcat file for my non-project based work contains the lens profiles found using the Adobe Profile Downloader, however, those profiles don’t show up when I launch a new catalog.
How can I copy and/or insert the lens profile(s) that I’ve used in my primary .lrcat file into each new catalog?
Thank you
Does lens to chart distance matter?
I am thinking that there is more apparent distortion if a short lens is held up close that farther away. I also do a lot of telephoto work and would like to create profiles especially with the horrid 2x convertor/er attached to the long lenses and this would require a long shooting range.
Thanks
Hi there,
Great article, thanks very much for posting the information – it is sure to help me as I upgrade to Lightroom 5.
One question though. I have a Canon 18-200MM lens that I use when I want to travel light. I have found the lens profile, but my questions is if the profile takes the lenses focal length into consideration during the correction. For example, a photograph taken at 18MM would need a different correction to one taken at 200MM, so I was wondering if the profile handles that conundrum or if I need to make manual adjustments to perfect the disortion?
I appreciate anyone who can point me in the right direction.
Regards
Matt
Lens corrections is a double-edge sword. For some images it maybe absolutely necessary, others, not so much. The flip side of being able to correct you lens distortion is loss of detail in the correction process. If you need or want to retain all the detail in your image, you’ll need to learn with the optical distortion in it.
This brings up another subject, and that is what appears to be an apparent laziness in lens manufacturers today to make less-than-optimal lenses and then “fix it in the mix”, to borrow an old audio slogan. There was a time when wide angle lenses (the type most prone to distortion) were made to tighter tolerances than their modern counterparts. The 28 f/2.8 and 15mm f/5.6 Ai Nikkors come to mind. Even lenses like the 18mm f/3.5, 20mm f/4 and 24mm f/2.8 Ai’s were relatively well corrected, suffering mostly at the edges. Not today.
When you see manufacturers incorporating correction into camera bodies today, I can’t help but feel they’re just dropping the ball in lens design. Even top tier lenses like the 14-24 and 24-70 Nikkors have dismal distortion, and these lenses don’t come cheap. granted, they’re zooms, not primes, but still, when you’re charging $2000+ for a lens, at least TRY to do it right!
Thanks for the tutorial. It was concise and clear. I use Aperature and have a PTLens plug in for distoration correction. If you have had any experience with PTLens, any thoughts you have one the performance of it compared with LR5 lens correction would be welcome.
You Wrote:
“Alternatively, you can click the color picker to the left of “Defringe” and click the color that you want to neutralize. I love this feature (it was introduced in Lightroom 4.1), because it allows you to reduce not just lateral chromatic aberrations, but also nasty cases of longitudinal chromatic aberrations, better known as “bokeh fringing”.”
Sounds good on paper… Unfortunately, when I have tried this LR feature with the 85/1.8G, it has very little or no effect on the typical green/magenta longitudinal CA that appears in highlights and out of focus areas at large apertures.
Excellent article, by they way. Thanks.
I tried this a couple of times and it actually did a great job. I think it depends on how severe bokeh fringing is in an image…
I’ve used the color picker only a few times, and as Nasim mentioned, from what I’ve seen, it has done a great job. I had one picture shot in the inside of a church, looking up at a dome with windows. There was all sorts of fringing up and down the vertical edges of the windows. I was able to get most if not all of that out using this color picker.
One other thing….I am no expert here, and you probably already know this, but in addition to using the color picker to the left of “defringe,” I also had to play with the “Amount” sliders a little bit in order to actually remove that color fringing. For an image I just looked at, I slid one “amount” slider by 6 points to the right, and I slid the other “amount” slider by 7 points to the right. In the few pictures I have tried this on, it really has worked well.