Lightroom is a key program for many photographers, and it has been for many years. Since almost the beginning, however, it’s been haunted by performance issues. If you’re looking to speed up Lightroom, or just want to know how to improve Lightroom performance in general, I’ll dive into a number of different settings and options that affect Lightroom’s speed in the following guide.
Lightroom’s performance depends on plenty of factors, including your computer hardware and camera resolution. The optimizations that I discuss below may range from helpful to irrelevant depending on your particular computer/camera setup. But in general, if you make these changes, you should end up boosting Lightroom’s speed no matter what setup you have.

Table of Contents
1. Pre-Render Previews
One of the biggest ways to improve Lightroom’s performance in use is for it work ahead of time. Pre-rendered previews, particularly 1:1 previews, can make almost everything in Lightroom feel snappier.
You can choose to render these previews at time of import, by selecting the “preview” option in the import menu. Alternatively, you could render them at your leisure by selecting the images and choosing Library>Previews>Build. My approach is typically to render standard sized previews at the time of import, then render 1:1 previews of my favorite images later.
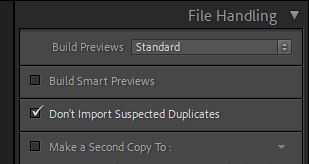
Admittedly, 1:1 previews take more space on your hard drive and Lightroom cache. But in terms of speed, rendering previews is one of the biggest changes you can make.
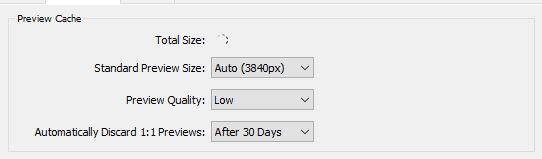
I’d also suggest setting Lightroom to keep your previews around for longer. In Catalog Settings, choose Never for automatic discarding of 1:1 previews. This, too, will eat up more disk space, but I feel like it’s worth it in terms of speed.
2. Change Your Resolution
Along with rendering previews ahead of time, smaller Standard preview sizes in general can help. This is particularly notable if you’re using a Retina or other high-resolution display. Older MacBooks are particularly problematic, as they combine high resolution with slow mobile processors.
Another option is to run your display itself at a lower resolution. For example, MacOS has a notable option that allows you to run Lightroom as a whole at a Low Resolution mode. (You can access it by right clicking on the Adobe Lightroom icon, selecting Get Info, and checking the “Open in Low Resolution” box.)
However you approach it, making Lightroom render for a 1080P screen, instead of 4K or higher, can mean significantly less load on your system. It wouldn’t be my first choice because it does make your display look more pixellated, but the speed tradeoff could be worth it.

3. Increase the Size of Cache
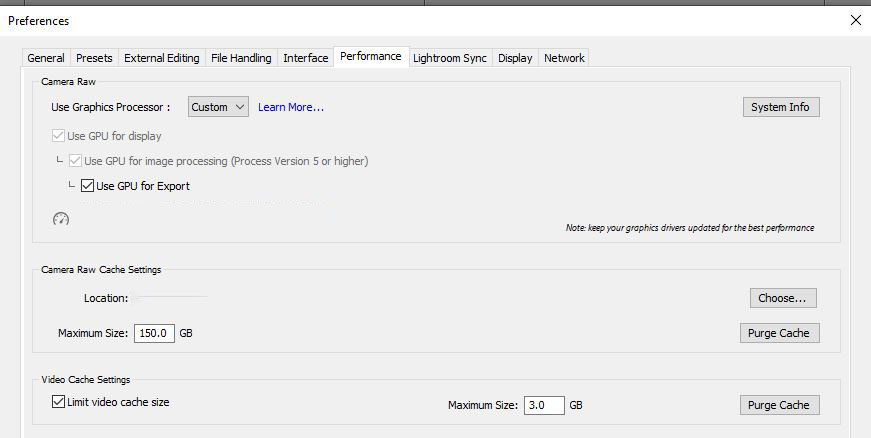
Lightroom’s default cache size is far too small for modern drives. By increasing the size of the cache in the Preferences>Camera Raw Cache Settings, Lightroom will retain more information about your photos. I’d suggest setting this to 50GB or higher, unless you’re really constrained in free disk space.
4. Use an SSD
For a more general speed boost, switching your catalog onto a fast SSD can help out across the program. The catalog, along with the previews that live in that folder, act as the reference point for all of Lightroom’s work. Speeding up throughput to those files, and even more importantly latency, can make everything feel better.
In my previous guide to computer upgrades, I laid out some of the best options for upgrading your storage. If you’re just looking for a quick recommendation, I’d suggest using a Gen 3 or Gen 4 NVME SSD, like the Samsung 970 Evo.
While you can also consult that guide for more information about processor or GPU upgrades, I wouldn’t suggest bothering with them for just a Lightroom performance bump, unless you’re on very outdated hardware. Lightroom tends to scale surprisingly poorly with higher end hardware.
5. Enable Your GPU
With that said, it is important to make sure Lightroom is making use of the hardware you do have. One of the biggest places where this applies is GPU support. Lightroom’s automatic GPU support can be a bit flaky.
You can help Lightroom out by making sure your GPU is installed correctly, with the latest driver updates. Beyond that, consider opening Preferences, then the Performance tab, and switching from Auto to Custom. Here, you can make sure the boxes are ticked, and Lightroom will use your GPU for any relevant process.
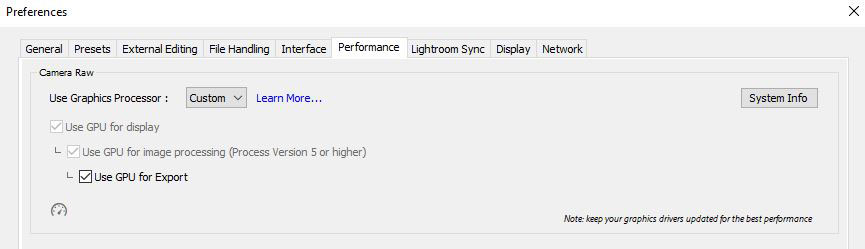
That said, this setting does depend on your GPU. Some GPUs may end up being slower than CPUs at some of these tasks, so certain combinations may end up requiring you to disable some level of GPU acceleration. Granted, if you have a reasonably balanced combination of CPU and GPU, the GPU should be better.
6. Use Smart Previews
Smart previews are another mixed bag. Smart previews essentially act as a mini-raw file, one that you can edit without access to the original. The downside is that as a mini file, if you don’t have access to the original, you also don’t have the full-resolution version for exporting.
This can speed up your process in Lightroom, especially in the Develop module. Specifically, in Preferences, then the Performance tab, you can select to edit preferentially from these smart previews, rather than the original raw files. (Don’t worry, when you export the photo, Lightroom still uses the full resolution photo to do so.)
My testing didn’t always show a meaningful speed boost this way, but it depends on your computer setup and the resolution of your original files.
7. Optimize Catalog
Optimizing the catalog is never a bad call. Since Lightroom’s catalog serves as a reference for all the images, all the edits, and all the metadata, you can imagine how things can get messy over time. Optimizing the catalog is a risk-free procedure that is designed to clear out some of this clutter.
It’ll be particularly helpful on big, old catalogs, which haven’t had an optimization in a while. I also like to do it if I’ve made a major change to a large batch of images, like moving, deleting, or resetting edits.
You can choose to manually optimize the catalog via File>Optimize Catalog.
8. Create a New Catalog
On older versions of Lightroom, it was quite easy for a catalog to get “too big” for Lightroom to work well with. That made using a single catalog for a year or even a body of work infeasible. While recent Lightroom versions handle things better – and I currently use a single catalog with no issues – don’t rule out using new catalogs if yours balloons to hundreds of thousands of photos.
If you’re a wedding photographer, for instance, having a single catalog per event can speed up Lightroom without really sacrificing your organization, since it’s unlikely you’ll need access to all those older photos frequently.
Down the road, you can always merge catalogs via Import from Another Catalog, if you find that you want to combine into a single reference catalog.
9. Minimize Unneeded Panels
Not every way to speed up Lightroom involves changing settings or using different hardware. Sometimes, it’s just about giving yourself a better user interface that you can breeze through while working.
For example, did you know you can collapse or hide a huge number of elements in Lightroom’s interface? These generally won’t improve Lightroom’s speed, but they will improve your speed working in Lightroom! Don’t underestimate the power of decluttering your screen.
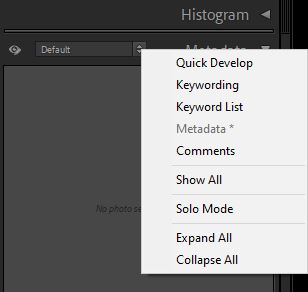
Panels can be hidden entirely by right clicking on the panel name and toggling the relevant panel. Modules, like the Map, Book, or Slideshow modules can also be hidden by right clicking and toggling.
And there is a potential performance boost here, too. The Navigator and Histogram both take some resources and need to be redrawn for every image. If you don’t find them necessary in the Library module, it could be smart to remove them.
10. Disable Grid Extras
If you want to speed up the scrolling experience in Lightroom (especially in the Grid View), try disabling the Grid Extras setting. Grid Extras are the little numbers and information that appears in your grid, such as the flag status, star ratings, and develop status.
These bits of info may not seem like a problem, but they still a moment to load for every photo. When you consider hundreds of photos at once, the Grid Extras actually make it very choppy to scroll down quickly in the Grid View, especially on older computers. You can quickly toggle them via Control+Shift+X, or via View>Grid View Style>Show Extras.
11. Recognize When To Use Photoshop
My last tip for Lightroom users is to recognize when it’s not the best tool for the job! Complicated image edits can still bog Lightroom down, even with their speed improvements over the years. In particular, the Healing Brush and extensive masking are very slow, and the same is true if you’re building a large panorama.

Some of these jobs are just better done in Photoshop. Most of you reading this probably have the Lightroom + Photoshop plan, so it’s just a matter of taking a moment to launch Photoshop and open the photo in question. It might be a slightly more involved workflow, but it’s also much faster for these types of edits.
And that does it for my tips to make Lightroom faster! Lightroom is still my go-to tool for image editing. While it can have its performance quirks, it’s great for organizing a library and editing raw files – and once you make some of these optimizations, it won’t act slow any more, either. By knowing some of the hidden ways to optimize Lightroom’s performance, you can get the most from the software! If you have any questions, let me know in the comments below.