With Library Module holding such a large collection of tools, tabs and panels, there is no other way to write a proper, thorough overview article but to split it into several parts. In the first article, I did my best to talk about the left-side panel (or the Navigation Panel, if you like) and all its capabilities in detail. In this article, we will focus on the center section of the Library Module – mainly the Image Grid/Loupe View, and the Toolbar.
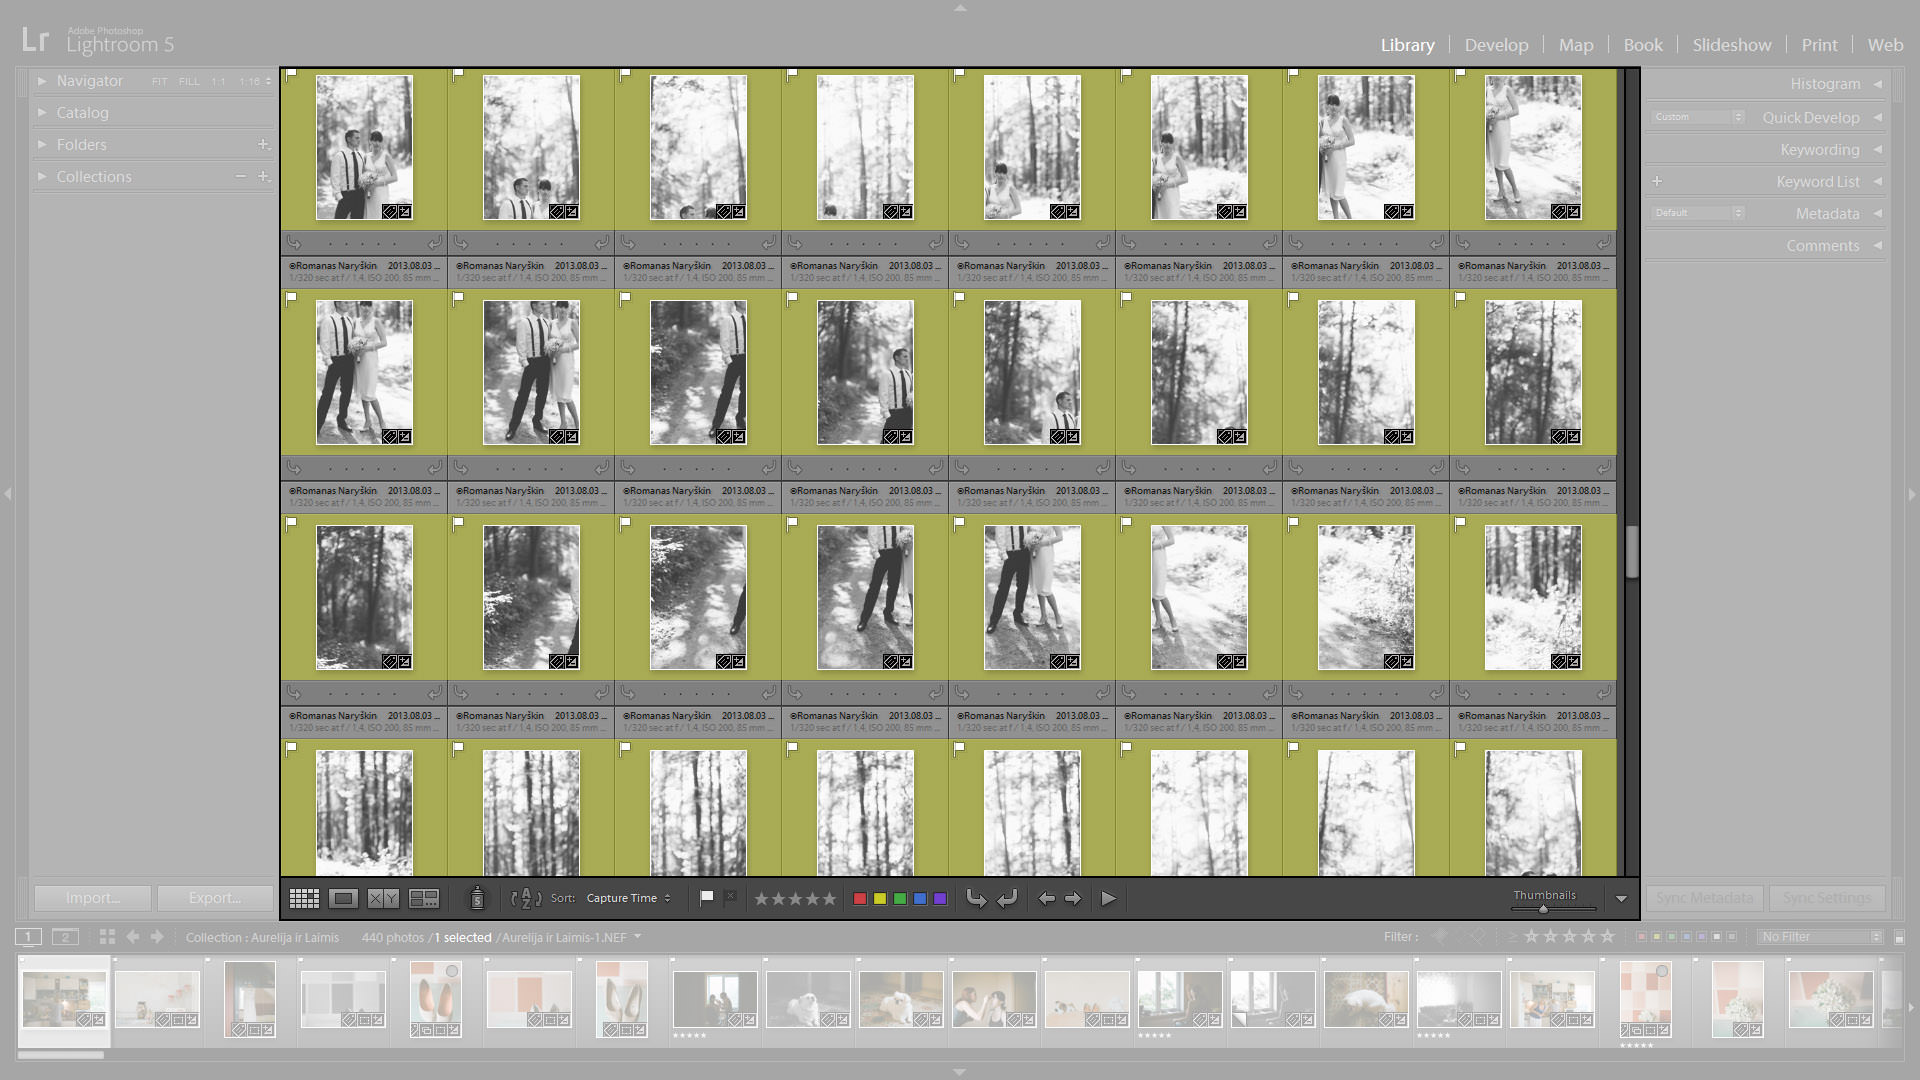
The center section of the Library Module shows the images that you’ve navigated to using the left-side panel, and provides the main way to review image files. There are a lot of things you can do using just this one section, so please bear with me while I try to explain it all. We start with the Image Grid, which basically dominates the center section of the Library Module.
1) Image Grid/Loupe View
This part of the Library Module is used to review the images, but its capabilities extend far beyond simple image display. One of the better things about it is the choice of Grid View and Loupe View modes. Loupe View is also present in Develop Module and basically shows a large preview of a selected image, but the Grid mode allows you to see several images at once and you can change the size of thumbnails to fit more images for quicker browsing, or less images to see them better. We will get to that a bit later. What matters now is that it basically makes the Film Strip redundant in Library Module as the Grid View is so much more practical to use.
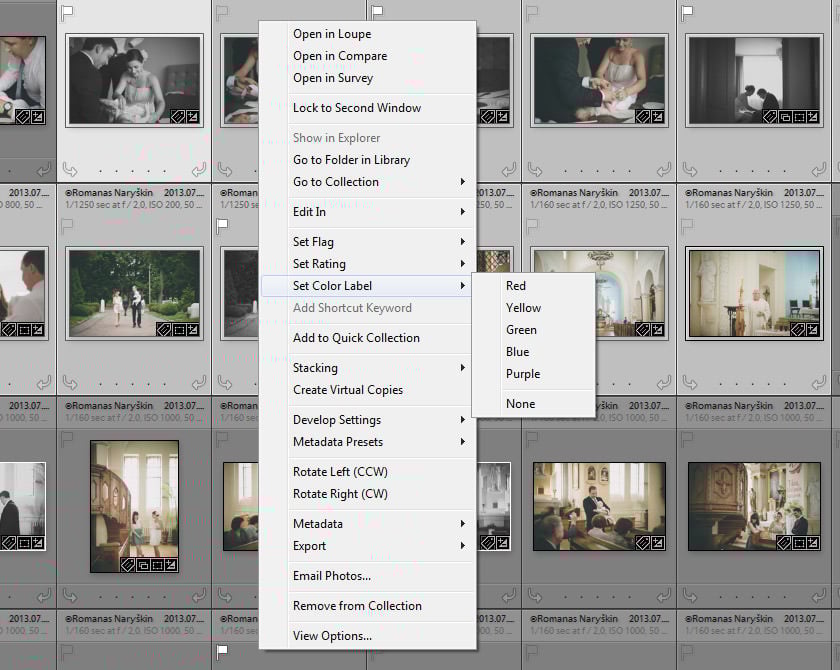
Here, you can select the images, drag them to a different folder or Collection in the left-side panel, and also Export selected images by using the “Export” button, previously mentioned in the first part of this tutorial, or by right-clicking on any one of the selected files and choosing “Export” from the menu. The same menu contains a lot of other functionality shared with Film Strip panel, which is at the bottom of the window. Let’s take a closer look at the said menu and examine each option it presents:
- Open in Loupe – only available whilst in Grid View mode, choosing this option will enlarge selected image file to fit the screen; it basically switches from Grid View mode to Loupe View mode. The same thing can be done by double-clicking on a photograph or choosing the corresponding option in the Toolbar, which is described further on. Double-click again to go back to Grid View.
- Open in Compare, Open in Survey – only available whilst in Grid View mode, choosing this option will open the selected image in Compare mode and Survey mode, respectively. These two modes will be covered in a separate article with more detail.
- Lock to Second Window – this option makes most sense when working with two monitors rather than just one, and allows you to open a preview of the image in a new window for comparison.
- Show in Explorer – in Windows, opens the folder in which the physical image file is located and automatically highlights it.
- Go to Folder in Library, Go to Collection – similar to Show in Explorer, but instead of opening the folder in your operating system, it opens the location inside Lightroom Library Module (Folder tab or Collection that image is part of, respectively of which of the two options you choose).
- Edit In – provides opportunity to use External Editors for tweaking in Photoshop, Panorama and HDR merging, etc.
- Set Flag, Rating, Color Label – filtering options are useful when working with virtual copies or b&w and color images in one folder/Collection, but there are much more ways to use them! An extensive topic, this, and will require a separate article. If you want to know a basic way in which I sometimes use these filters, read my “Basic Post-Processing Workflow” article where some of the filters are included as part of my simple workflow.
- Add to Quick Collection/Remove from Quick Collection – assigns selected images to Quick Collection or remove them if assigned previously. Both actions can also be done by hitting “B”. As I’ve already mention, Quick Collection will be explained in a separate article.
- Stacking – allows you to group photographs into a single “stack”, very useful if you have a number of similar images or would like to, say, group photographs in a Collection based on date of capture. There is an option to automatically stack by capture time in the sub-menu.
- Create Virtual Copy – predictably, this option will create a Virtual Copy for each selected image file.
- Develop Settings – allows you to copy and paste Develop settings, such as Exposure Compensation, Noise Reduction, etc., as well as apply Develop Presets. No way to do any sort of precise tweaking of the Develop adjustments in Library Module, though, only quick adjustments for previewing purposes. In case you do not yet know how to work with Develop Presets, read our “How to Manage Presets” article.
- Metadata Presets – copy, paste, sync Metadata, as well as apply Metadata Presets to your image files. Click here to read more about Metadata. We are working on a separate article regarding Metadata Presets and their management in Lightroom 5.
- Transform sub-menu or Rotate Left (CCW), Rotate Right (CW) options – rotate selected images counter clockwise/clockwise. In the case of Transform sub-menu, you will also find options to flip an image horizontally or vertically (only available in Loupe View).
- Metadata – choose from the sub-menu to save Metadata of the selected images to a separate file (*.XMP), update it (when working with DNG files) or load and apply Medatada from an external file.
- Export – choose “Export…” from the sub-menu to open Lightroom Export dialogue and save the image as JPEG, TIFF or other file format. “Export with Previous” will Export images with the settings that were used the last time you used the command. There is a list of saved Export Presets. Exporting image files will be explained in detail in a separate article very soon.
- Email Photo – as you may have already guessed, this option allows you to send selected image files by email through Lightroom. Read our “How to Email Photographs in Lightroom” article to learn more about this functionality and how to set it up.
- Remove Photo/Remove from Collection – delete selected photographs from the Collection, Catalog or hard drive. Removing from Collection can be done while the images are selected whilst browsing it and choosing this option will not display a pop-up dialogue for confirmation, but the photograph will remain in Lightroom Catalog.
- View Options – this option opens Library View Optios dialogue which you can use to specify what sort of information is shown in Grid and Loupe View modes. The process is very straightforward and there is a huge amount of all sorts of information that can be included. Read our “Lightroom Loupe View Options” and “Lightroom Grid View Options” articles to learn about Loupe and Grid View Options in detail.
- Background Options – only available in Loupe View mode, this option allows you to change the background color (some photographs are better viewed on a white background, while others on a black background) and add texture to it. It is one of the ways to customize Lightroom environment.
2) Toolbar
The Toolbar in Library Module is toggled with the “T” key. It contains a number of extremely useful tools for different view modes, filtering and sorting options, etc. Let’s take a closer look to each of them separately:

- Grid View – toggles Grid View mode, can be done by hitting “G” key or double-clicking on the image.
- Loupe View – toggles Loupe View mode, can also be done by hitting “E” key or double-clicking on the image.
- Compare View, Survey View – toggles Compare View mode, can also be done by hitting “C” and “N” keys, respectively. As previously mentioned, these view modes will be explained in a separate article.
- Painter – the Painter tool, which is only available in Grid View, can be used to quickly assign a filter to a number of photographs, or rotate them, or even use a specific Develop Preset on them. And these are just examples – there is a lot more options for the Painter tool. It is very easy to work with, too. Selecting the Painter tool will display a number of settings right next to it. The first drop-down menu presents you with a choice of settings the tool will affect once applied on a photograph.
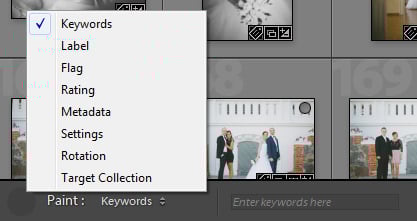
You can then tweak and fine-tune the setting. For example, if you wish to use the Painter to apply a specific Star Rating, first choose the corresponding option from the drop-down menu and then specify the rating itself, which will appear right next to the first drop-down menu. In order to apply the Painter tool, click and drag your mouse cursor over the images you want to be rated or otherwise affected in Grid View, depending on your settings (in other words, “paint them over” with that rating, etc). There is quite a bit of functionality available with the Painter tool, so it will be covered in-depth in a separate article soon.
- Sort Direction – specify the sorting direction (ascending or descending).
- Sort Criteria drop-down menu – specify how you want the images to be sorted, for example: by capture time, order in which the image files were added to the Catalog, time in which it took to edit the image files, rating, file name, etc.
- Flag as Pick, Flag as Rejected – yet another way to Flag images. Hit “P” on your keyboard to “Pick”, hit “X” to “Reject” and “U” to remove flag altogether.
- Star Rating, Color Label filters – assign a star-based rating or a specific color to all selected image files.
- Rotate photo left/right – as previously mentioned, this is a (yet another) way to rotate images clockwise or counter-clockwise.
- Select next/previous photo – these arrows do pretty much as they say, and that is move to the previous or next photograph.
- Impromptu slideshow – starts a slideshow with some basic, default settings for quick viewing. Mind you, all the photographs in the location that you are browsing will be included and not just the selected ones, so if you are in “All Photographs” of the Catalog tab of the left-side panel and there are thousands of images, the slideshow will take a while to start. This is where Quick Collection comes in handy, but I am not saying more! You will have to wait for a separate article to learn more about that. :)
- Zoom – only available in Loupe View, allows you to quickly zoom in and out to a specific magnification using the slider. Can also be done by holding the “Ctrl” key and scrolling the mouse wheel up or down.
- Show Grid – available only in Loupe View, selecting this checkbox will overlay the image with a grid. Very practical if you are worried about straight horizons and distortion, for example. The size of the grid can be adjusted using the slider underneath the checkbox.
- Thumbnails – available only in Grid View, this slider lets you adjust the size of image thumbnails. Can also be done by holding the “Ctrl” key and scrolling the mouse wheel up or down.
- Select toolbar content – the last drop-down menu is located on the far-right of the Toolbar and allows you to show/hide any and all of the above-mentioned tools and menus.
That’s pretty much all there is to know about the Toolbar!
3) Final Words
As you can see, there’s quite a lot of functionality hidden in the Library Module. And even with all these tools and settings described, we’ve barely scratched the surface. There are at the very least two more articles that need to be written to properly explain the functionality of the right-side panel (which we might also call the Metadata Panel) and the Filter Bar. I find it mind-boggling how complex Adobe’s software is when looked at this closely, yet how simple it is in actual use. Despite the fact there are plenty of things we’d like improved, now more than ever I understand just how much work Adobe’s team of developers put into Lightroom to make it as good as it can be. Better yet, they continue to do so with every new release.
I hope you’ve learned at least something new by reading this article. I assure you, there is more to come as we try to learn every little thing there is to know about the Library Module and the rest of Lightroom.
Nice work! I need help with this too! I mostly use AltoMerge to merge PDF files. You can easily merge your documents here www.altomerge.com/
Romanas,
One of the reasons I visit Photography Life is the diversity. Nasim and his informative, critical reviews, Bob V and his excellent photography and sometimes ill-fated humour (gawd, I loved his burberry DF!) and you with your ‘love affair’ with the emotional. Of course, all the guest writers are a big plus as well.
Lately you’ve been doing Lightroom. Having only dabbled with LR over the years, I used it mostly for creating slideshows (a nice byproduct was small files great for emails).
You’re now showing me all the tricks and treats of LR I missed out on.
A big thanks.