• Skip to primary navigation
  • Skip to main content
  • Skip to primary sidebar
  • Skip to footer

Photography Life

PL provides various digital photography news, reviews, articles, tips, tutorials and guides to photographers of all levels

  • Click to visit our RSS feed
  • Click to visit our Facebook page
  • Click to visit us on Twitter
  • Click to visit our YouTube channel
  • Click to visit our Instagram page
  • Reviews
    • Camera Reviews
    • Lens Reviews
    • Other Gear Reviews
  • Learn
    • Beginner Photography
    • Landscape Photography
    • Wildlife Photography
    • Portraiture
    • Post-Processing
    • Advanced Tutorials
  • Lenses
    • Lens Index
  • Photo Spots
    • Photo Spots Index
    • Submit a Photo Spot
  • Forum
  • About Us
    • Contact Us
    • Workshops
    • Subscribe
    • Submit Content
  • Shop
    • Cart
    • Support Us
  • Search
  • Log In
  • Sign Up
Home » Camera Gear Accessories

Must-Have Filters for Landscape Photography

By Nasim Mansurov 44 Comments

  • Click to share on Facebook (Opens in new window)
  • Click to share on Twitter (Opens in new window)
  • Click to share on Pinterest (Opens in new window)
  • Click to share on Reddit (Opens in new window)

While I was photographing the beautiful scenery of the Glacier National Park at sunrise, I realized that some filters are pretty much required to get good results when photographing landscapes. While many photographers think that some of the built-in tools in Lightroom and Photoshop can simulate filter behavior, making filters redundant in the digital age, some filters in fact can never be simulated in software, while others help in getting even better results in post-processing. If you do not know what filters are and what they are used for, I highly recommend reading my “lens filters explained” article before you continue to read this one.

1. Polarizing Filter

B+W Circular Polarizing Filter A polarizing filter is a must-have tool for landscape photography. It is typically the first filter landscape photographers buy to instantly improve their pictures and and add vividness and contrast to them. A polarizer can reduce reflections from objects such as water and glass and can be used to darken the sky, bring out the clouds and even reduce atmospheric haze, making the scene look much more vivid. For all normal lenses that have a filter thread in the front, you can get a circular polarizing filter, also known as a “circular polarizer”. A circular polarizer is very easy to use and once you attach it on the front of your lens, all you need to do is rotate it clockwise or counter-clockwise to get a different amount of polarization. Polarizing filters work by blocking certain light waves from entering the lens. Rotating a polarizer allows certain types of light waves to pass through, while blocking other ranges of light waves. Thus, you could turn a sky from light blue to very dark blue or increase/decrease reflections by simply rotating the filter.

The effect of polarization cannot be reproduced or simulated in post-processing, especially when dealing with natural reflections. Take a look at the below before / after images:

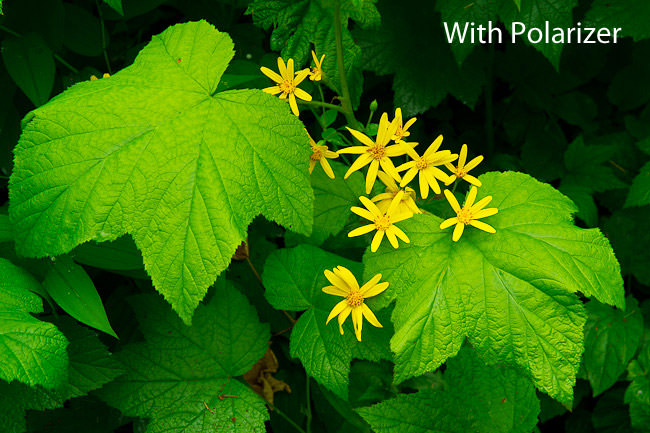
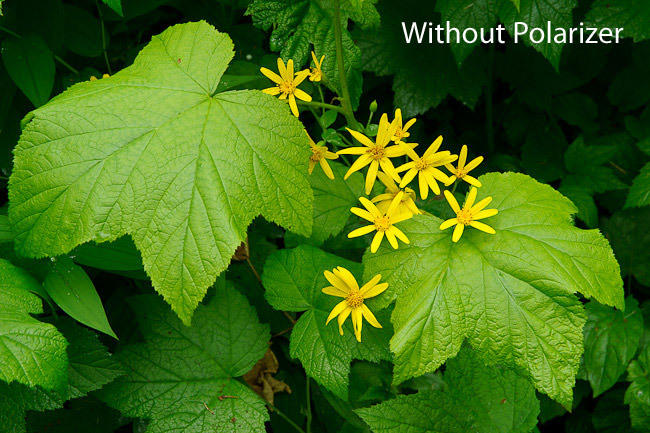
Note how different the images are – the one without a polarizing filter has reflections and lighter colors, while the one with a polarizing filter has more saturated colors and no reflections. This is just one example of what a polarizing filter can do. See my article on “how to use a polarizing filter” to see more image samples.

I have been using B+W Circular Polarizing Filters for many years now, but have been recently using Singh-Ray Warming Circular Polarizing Filter for my landscape work. I find both to perform very well – these are excellent filters optically and they are slim, which reduces the chance of getting vignetting in your images.

2. Neutral Density Filter

Singh-Ray Vari-ND Neutral Density Filter You have probably already seen images of running water and waterfalls that look very smooth and dreamy/foggy. This look can only be accomplished when your camera is mounted on a tripod and the shutter speed is very slow. In daylight conditions, decreasing ISO and increasing the F-number does not typically lower the shutter speed enough. The only solution in those situations is to decrease the amount of light that enters the lens and that’s where a neutral density filter comes into play. Neutral density filters reduce the amount of light that enters the camera lens and thus decrease the shutter speed and increase exposure time. Just like a polarizing filter, the effect of a neutral density filter cannot be reproduced in post-processing. Here is a sample image of a waterfall that I captured with a neutral density filter:

Sri Lanka Waterfall
NIKON D750 + 24mm f/1.4 @ 24mm, ISO 50, 5 sec, f/11.0

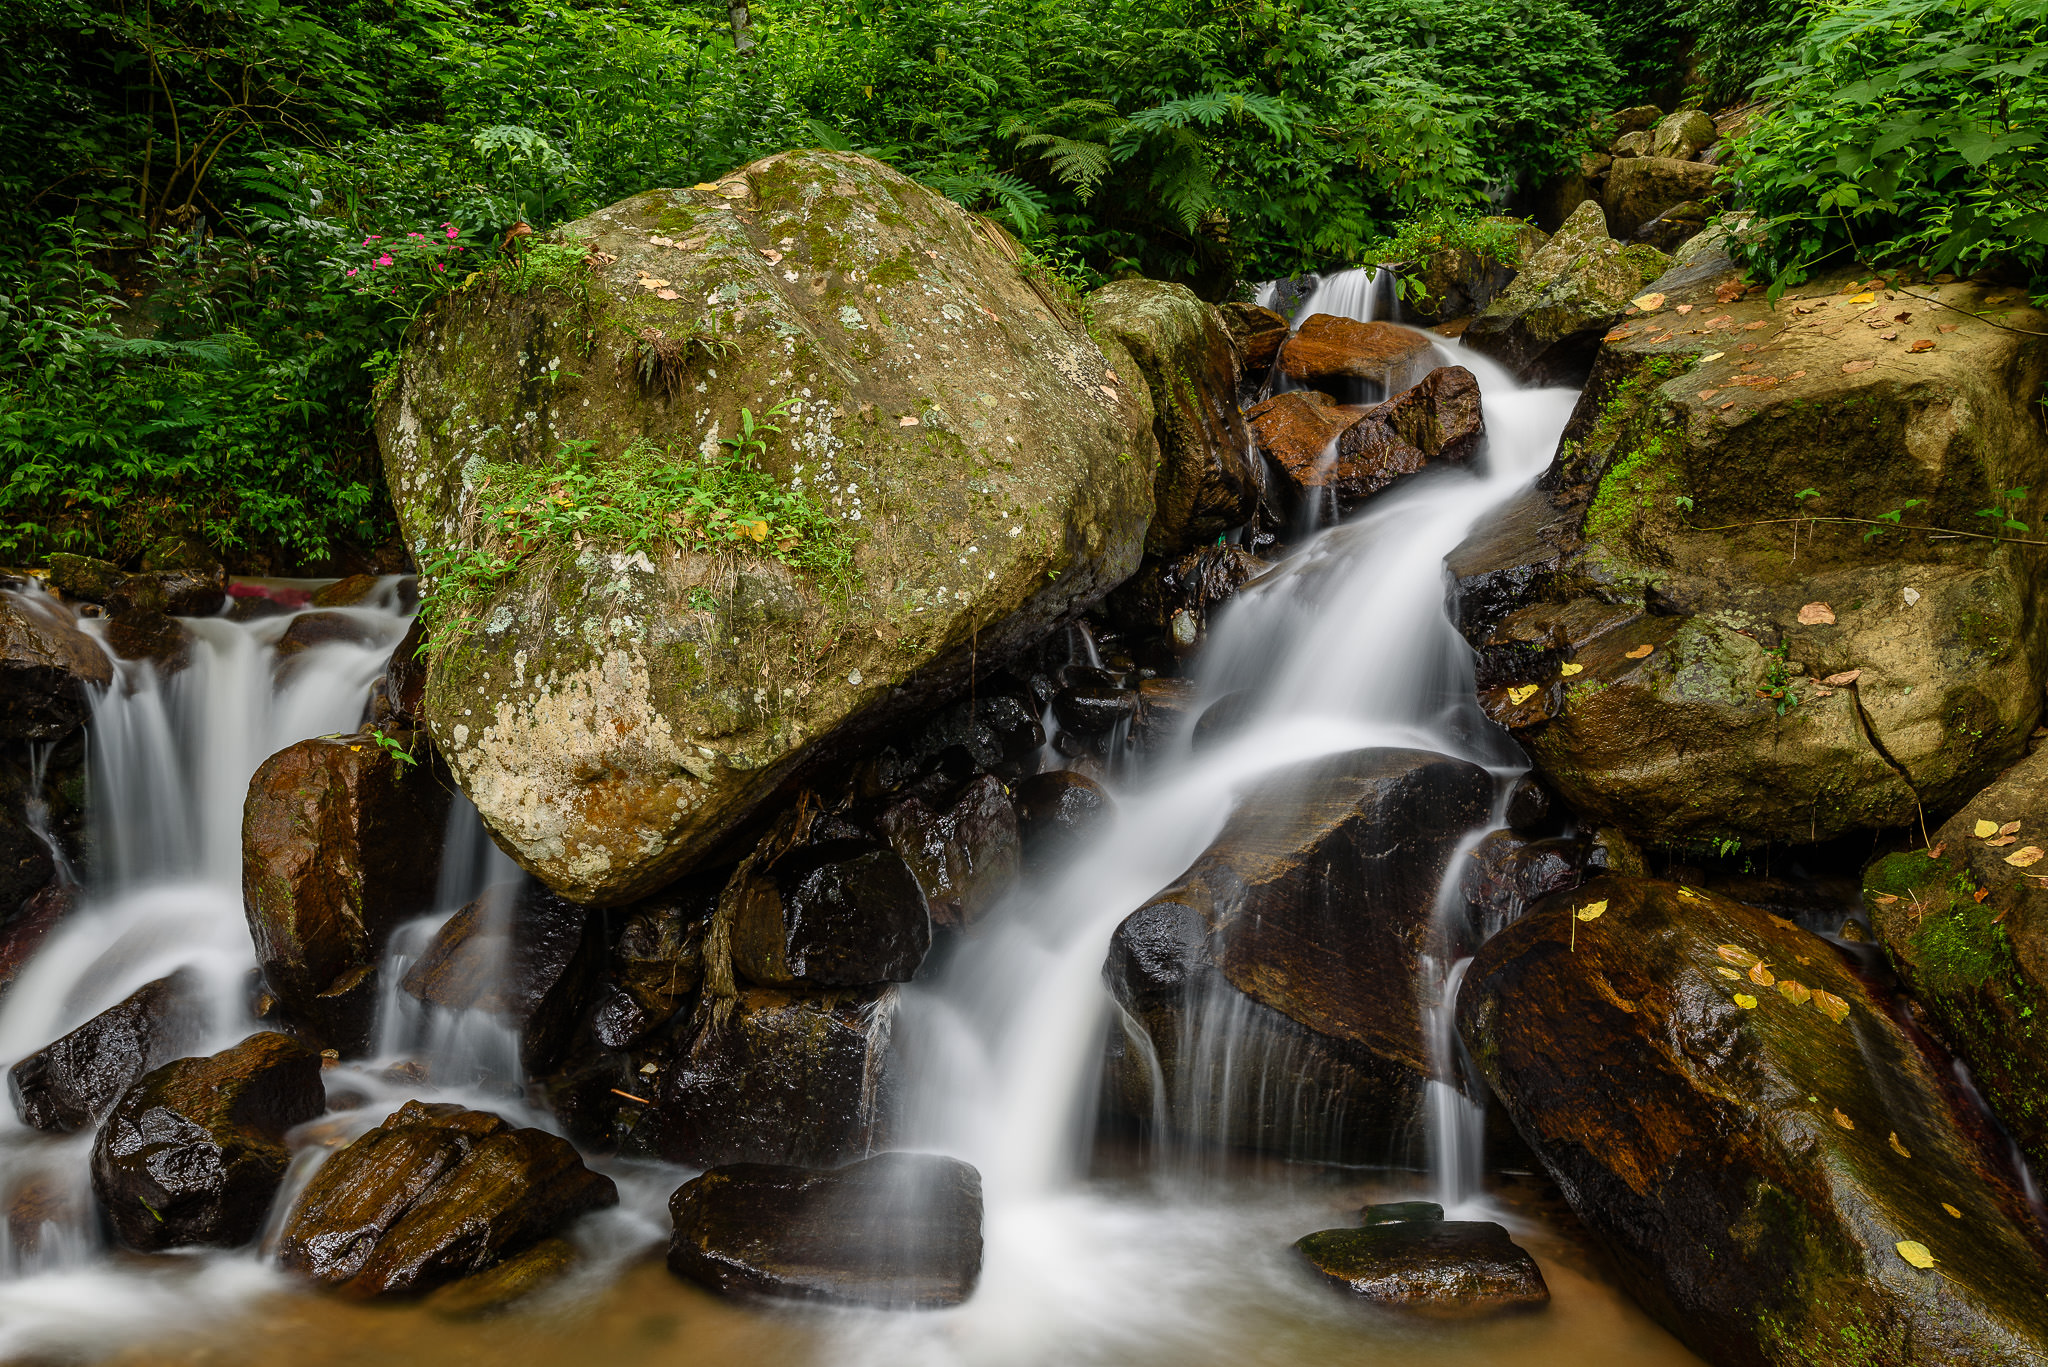
There are many different types of neutral density filters. Some transmit less light than others, defined in F stops. I have used a number of different filters in the past and I find Singh-Ray’s Vari-ND Filter to work the best, because you can change the amount of light that passes through the lens by rotating the filter. It is not a cheap filter though. If you are looking for a lower-cost alternative, the B+W 77mm 1.8 ND MRC Filter is a great alternative that I have used in the past.

3. Graduated Neutral Density Filter

Soft-Edge Graduated Neutral Density Filter 
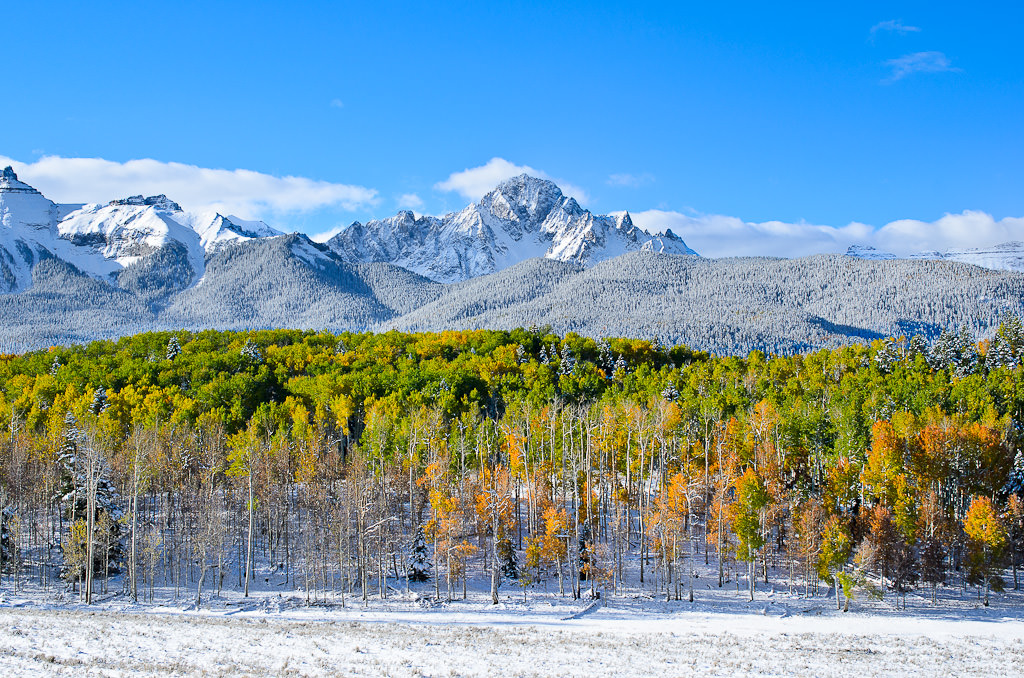
Graduated neutral density filters are necessary in those situations, where the sky is much brighter than the foreground/background. Because the size of the sky versus the foreground/background can change depending on the composition, most graduated neutral density filters are made in a rectangular shape. Therefore, these filters must be either used with a filter holder system, or must be held by hand in front of a lens. The advantage of using a filter holder is that you can stack multiple filters and you do not have to worry about alignment issues. The disadvantage of using a filter holder is that it can add vignetting, so you have to be careful when using wide-angle lenses with focal lengths below 35mm. Here is an image shot with a 2 stop (0.6) GND filter to darken the sky:

Nikon 40mm f/2.8 Sample #9
NIKON D7000 + 40mm f/2.8 @ 40mm, ISO 100, 1/200, f/8.0

There are many different types of filter holders on the market that are designed for both full-frame and cropped-sensor cameras. For many years, I used the Lee filter holder system, which worked out great overall. After testing out the NiSi filter holder system, I realized that I like NiSi much better in comparison, since it is easier to use with a polarizing filter.

Speaking of filters, there are many choices of rectangular filters available to use with a filter holder, such as soft-edge graduated neutral density filter, hard-edge graduated neutral density filter and reverse graduated neutral density filter, in various intensities from different manufacturers. If you are not sure which one to get, I would recommend the 3 stop (0.9) soft-edge graduated neutral density filter from Formatt-Hitech. A 3 stop filter is going to be the most versatile filter for landscape photography – it is the one I typically use the most when the light is much brighter than the foreground. NiSi filters are great, but if you don’t take a good care of them, you can easily scratch the coating off the glass surface – the Formatt-Hitech filters are better in this regard.

I personally recommend glass filters for the best image quality, because glass is optically superior to resin. As I have shown in my glass vs resin filters article, there is a noticeable difference in sharpness when using glass and when it comes to color casts, you want to avoid using resin filters like a plague!

A much cheaper filter holder system with filters is made by Cokin, which offers three different size systems: A, P and X-Pro/Z-Pro (from small to large). I would recommend to get at least the Cokin P filter holder, although I would never use anything less than Cokin X-Pro/Z-Pro on full-frame. Cokin makes great and affordable filter kits for both Cokin P and Cokin X-Pro/Z-Pro series. Keep in mind though, that these are resin filters, so I would only recommend to use the graduated filters if you do not want to deal with nasty color casts.

Polarizing-filter
Taken using a polarizing filter, which reduces glare and saturates the green color of the plants.

Now here comes the big question – can the effect of a graduated neutral density filter be reproduced in post-processing. Yes and no, depending on the light intensity and whether you are employing any HDR/blending techniques. In situations where the sky is not completely blown out and you shot in RAW, you could use a neutral density filter in Lightroom and recover plenty of details – up to two full stops can be recovered in most cases. But what about situations where the sky is completely blown out? A lot of people claim that graduated neutral density filters are not needed even in those situations, because they can bracket their shots and get very good results with HDR and blending techniques. That’s true, but blending and HDR do not always work well, especially in windy conditions. And I personally try to stay away from HDR, because it is tough to get results that look realistic. So my preference is to use filters rather than spend time in post-processing to try to recover blown out details. But everybody is different and I know that some photographers will disagree with me on this.

Subscribe to Our Newsletter

If you liked this article, please subscribe below to our weekly email to get more great content like this!

Related articles:

Disclosures, Terms and Conditions and Support Options
Filed Under: Camera Gear Accessories Tagged With: Landscape Photography, Photography Tips, Polarizing Filter, Lens Filter

About Nasim Mansurov

Nasim Mansurov is the author and founder of Photography Life, based out of Denver, Colorado. He is recognized as one of the leading educators in the photography industry, conducting workshops, producing educational videos and frequently writing content for Photography Life. You can follow him on Instagram and Facebook. Read more about Nasim here.

Reader Interactions

Comments

  1. Cirenk07
    November 16, 2011 at 3:41 pm

    Hi Nasim, I just bought singh-ray filters vario 77mm thin-n-trio and so far it works very good filters, one filter that I have not had the Graduated Neutral Density Filter, maybe I’ll try lee’s filter as you suggest, thank you .. . Btw, you have nice shoot ^ _ ^

    Reply
    • Nasim Mansurov
      November 17, 2011 at 12:41 am

      Cirenk07, thank you for your feedback :) Yes, try out the GND filter – it will make a difference in high-contrast scenes.

      Reply
  2. Kevin
    November 16, 2011 at 11:22 pm

    Hi Nasim, your site has quickly become my favorite because of articles like this one. I took up photography two years ago when my twins were born and you have helped greatly along the way, Thanks! In regards to the Singh-ray Vary-nd would there be any advantage of going with the thin mount version.

    Reply
    • Nasim Mansurov
      November 17, 2011 at 12:40 am

      Kevin, thank you for your feedback! The thin mount version is supposed to have less vignetting on wide-angle lenses, because it does not have the front threads; you cannot mount a filter in front of it (not that you would want to). Because it has no filter threads, you cannot put your standard lens cap on it either and you would have to replace your lens cap with a “push cap”. Because of this inconvenience, I do not use thin filters…

      Reply
      • Christian
        March 22, 2012 at 6:57 am

        Dear Nasim,

        Do you observe much vignetting on wide-angle lenses with the “regular” mount version? Which is the widest focal length you can use without vignetting?

        Regards,
        Christian

        Reply
  3. Callum
    November 19, 2011 at 3:46 am

    Thanks for yet another great write up Nasim!

    Reply
  4. Michael
    November 28, 2011 at 7:05 pm

    Hello Nasim,
    It is always very informative to read your reviews.
    Can you discuss the step up ring & its pros & cons.
    I have lenses at 77mm, 67mm & 58mm. Can I buy a 77mm Polarizer, ND and GND at 77 plus the step up ring to apply all?
    Michael.

    Reply
    • Nasim Mansurov
      November 29, 2011 at 12:32 am

      Michael, absolutely! That’s the only right way to do it instead of having to buy filters of different sizes. Get 77mm filters and step-up rings from 58->77mm and 67->77mm and you will be set. There is no disadvantage to using a step-up filter, except make sure to buy a higher quality version – otherwise you might have issues dismounting the filter from the ring.

      Reply
      • Benno Houver
        January 16, 2013 at 6:46 pm

        What brand of step-up ring are you suggesting that doesn’t have issue with dismounting the filter? thanks.

        Reply
        • Wendell McBride
          February 22, 2019 at 10:42 am

          Get a step up ring made from brass and from a reputable company. It should be hard anodized.

          Reply
          • Laura N
            April 19, 2019 at 12:27 pm

            Wendell, I’m fairly new to photography so I’m not as familiar with which companies are reputable. Would you be able to list some?

            Reply
          • Laura N
            April 19, 2019 at 12:58 pm

            Wendell, I’m fairly new to photography so I’m not as familiar with which companies are reputable. I found one by Sensei that was brass on B&H Photo. Is that a reputable brand? If not, would you be able to list some?

            Reply
  5. lee
    December 1, 2011 at 3:56 am

    Hi Nasim,

    Really enjoy reading you reviews and advise. Had a question. I have a 50mm f/1.4 and 70-200mm f/2.8. I shoot mostly my kids at home and their sporting events ( mostly daylight). Which filters would you recommend for these. Thanks for the help.

    Reply
  6. Nahz
    December 2, 2011 at 12:30 am

    Hi Nassim,

    Good insight review :) by the way, is there to differentiate for B+W and HOYA 77mm CPLs? I know they have big difference in pricing, but what is recommendable from your point of view?

    Reply
    • Wendell McBride
      February 22, 2019 at 10:45 am

      There are various comparisons online which include the brands you mention. In particular, look for reviews which compare the color cast and vignetting of the various brands.

      Reply
  7. mohammad reza alvandi
    December 16, 2011 at 8:22 am

    hi
    i want get graduated neutral density filter 4×5.65 in of b+w . can you help me , i get 2stop or 3stop soft- eage for landscape photography?

    Reply
    • mohammad reza alvandi
      December 17, 2011 at 7:48 pm

      hi
      i want get graduated neutral density filter 4×5.65 in of b+w . can you help me , i get 2stop or 3stop soft- eage for landscape photography?

      Reply
  8. Pohaku
    December 27, 2011 at 2:32 pm

    Hello Nasim,

    I’m very happy to find this website… THE most helpful instruction I’ve ever received fro an internet source, book, or individual…Thanks a million!

    I, too, question as the poster above…

    I just purchased a B+W CP filter….
    and I can only afford one other filter for budgetary reasons.

    For a “””new”””landscape photographer enthusiast on a budget
    what would you recommend.

    A 2-stop or 3-stop Soft-edged GND?

    I want to try and shoot before 10am in the mornings and in the afternoons no earlier than 3:30pm but still very contrasty conditions here in Hawaii .

    My plan is to screw-on my CPL filter and adjust/expose for the foreground [subject]
    and hand-hold a soft-edged GND filter…

    Thank you for help and advice!!!

    Pohaku8

    Reply
  9. daniel
    January 2, 2012 at 8:35 am

    Hi Nasim

    Thanks for your excellent advice. I’m consider getting a vari-nd or the vari-n-duo. I will be using it on dx with 24 1.4 and 85 1.4 mainly for travel. For portraits as well as landscapes. The people shots will be hand held, I believe the nd will help using the 1.4 lens wide open (say 2.0 to 1.4) in midday. Do you feel it is better to have the nd together with the polarizer ? My understanding is with the duo you can reduce the polarizer effect to zero. As always, I value your recommendations.

    Reply
  10. Sudhir Kochhar
    January 15, 2012 at 12:12 am

    Hi Nasim!

    Your articles provide an immense insight into all aspects of Photography, which is of great value to all photo enthusiasts. Thank you!

    I have a Nikon D90 with the following lenses; 105mm macro, 10:24mm wide, 18-200mm zoom, 80-400mm zoom; for Filters I have the B+W Kaesemann 77mm MRC circular Polarizing filter with a 77-72 step down ring. Is this configuration good enough for Macro, Nature, and, Wildlife ( including Birding ) Photography? If not, what other lenses and Filters would you recommend. Specifically, which model of Singh-Ray GND square or rectangular filter should I use, the specs of this filter confuse me and since I will be buying online I don’t want to make any errors. Also, which holders and adaptors do I need to use this particular filter on my lenses.

    Thank you very much!
    Regards,

    Sudhir Kochhar

    Reply
  11. Arthur
    March 2, 2012 at 11:08 am

    Nasim, I’m going to take a alpinism course in the Alps this summer, and I’m still in doubt wether I should use a polarizing filter (for the reasons you mention in this article), or a UV-filter anyway. There’s a lot more UV light higher up in the mountains than on water level, and that should disrupt the colours.

    What do you think? Or is that effect negligible and I can use a polarizing filter without problems?

    Reply
  12. Jeff Hobson
    March 20, 2012 at 4:42 pm

    I wanted to know which Polarizer Filter you used in your photo example with the leaves before and after? Was that the B+W filter or the Warming Polarizer filter by singray? Incredible difference it made!!!!!! Thanks, Jeff

    Reply
  13. Mayank Manu
    April 14, 2012 at 12:57 am

    Dear All
    can any one tell what setting I should take to shoot fire work and lightning

    i have D5100 with 18-55 kit

    regards
    Mayank

    Reply
  14. Madhukumar V
    April 18, 2012 at 2:00 pm

    Excellent article. Very helpful.
    So beautiful pictures

    Reply
  15. Prajakt
    April 20, 2012 at 3:35 am

    Hi Nasim,

    Thanks for such a wonderful article. It certainly helps a lot to newcomers to Photography arena.

    I have been using CPL in past and am getting good results out of it. Recently I have purchased ND filter ND8 (0.6) to create similar effect. After using this filter, the issue I am facing is the image is looking as if taken with sunglasses on (which is obvious due to ND), whereas in case of CPL the original colours and shades are retained as is. I tried by changing the white balance in post processing, but still unable to get similar results of colours as that of CPL. Is there any technique of doing it? I see many photos which are taken with ND but those photos look much natural coloured than one that I am getting. Can you please help here?

    Thanks in advance.

    Prajakt

    Reply
    • kumar varun
      July 2, 2012 at 4:27 am

      Hi Prajakat,

      I guess you are from India?
      Which CPL are you using?

      Reply
  16. Dipankar
    June 4, 2012 at 5:10 am

    What would you recommend for a novice like me? Keeping in mind I use a Canon 1100D with a Sigma 18-250mm lens.

    What basic things should I be looking to buy? Currently, I am quite interested in portraits & landscape photogrpahy.

    Reply
  17. Vicki
    July 13, 2012 at 10:21 am

    I’m confused about Lee SW150 filters. I order one SW150 and it’s so big I’m thinking about sending it back. I do have the 14-24mm lens but there has to be a better way….? Anyone want to comment on my dilemma or should I just suck it up. You can’t really hand hold this monster and I think the holder is going to be just a time issue putting it on and off different lenses. HELP!!

    Reply
    • Samatra Johnson
      June 28, 2013 at 6:06 am

      You need to get a filter holder. It attached to the front of your lens and you slide the filter in it.

      Reply
  18. Michael John Pappas
    July 25, 2012 at 7:44 am

    Thank-you for your wonderful website. It has opened up a new world of learning for me about one of my favorite subjects – photography. I was a photo-journalist in the Army and took pictures of the 173rd Airborne Brigade in Vietnam. At the time I used a range-finder Leica and and a Nikon out in the field. I still have many of my old pictures from the war on slides but have transferred them to digital format. I enjoyed taking pictures of the Vietnamese people, especially the delightful faces of the children there.

    Here is my question regarding your article on the use of filters for landscape photography – can I combine filters together? Specifically, can I use both a polarizer and a neutral density or graduated neutral density filter together. What would be the best time to use both together if at all?

    Thanks for your feedback and once again, your website is magnificent!!!

    Michael John Pappas

    Reply
  19. Julien Neron
    January 12, 2013 at 10:50 am

    Hi, I’m currently using a nikon D200 with Nikkor 28-105mm.

    I’m looking into buying a ulta wide lens such as a Tokina 11-16mm to shoot landscapes as my nikon is not wide enough.

    Do you recommend a polarizing filter on the Tokina? If so, I’ve heard vignetting on non-slim filters, should I pick a B+W slim one? Or should I buy other filters such as GND or ND that will get better result on the Tokina?

    I’m little confused about those filters on a DX UW lens.

    Thank you.

    Reply
    • Samatra Johnson
      June 28, 2013 at 6:09 am

      No matter what brand lens you use you’ll still need the filters to get the best results. For a lens that wide I would definitely get the slim filter. Just rememberyou attack another filter on top of it.

      Reply
  20. Benno Houver
    January 16, 2013 at 6:43 pm

    Hello Nasim and Photographylife.com team…

    this is far the best website I ever encountered. Very informative!

    Currently, I’m planning to buy two different ND filters, the normal one and the graduated one.
    As for the normal one, I’m still deciding which to buy, 1.8 or 3.0. My goal is to make nice movement of clouds and also milky and smooth water movements. In those cases, 3.0 is needed?

    As you said above, step-up ring should be used to avoid having filters for lenses with different sizes. I agree with that. As far I understand, graduated ND filter can be moved in circles like a CPL. How can you do that if having step-up ring?

    The last question, there are several colors for the dark part of graduated ND filter. Which one is worth buying?

    Thank you very much!

    Reply
  21. jayant
    October 5, 2014 at 9:30 am

    Good article, Sir and I found very informative.

    Reply
  22. Marco Waagmeester
    April 17, 2015 at 11:08 am

    Instead of GND, I will shoot a 3 shot bracket at 2Ev difference and blend the layers. GND is really something from the film era to me.
    When there is a steep high mountain reaching to the top of the frame and a low valley with lots of sky, how to line up a GND then?

    Reply
  23. Venkat
    August 3, 2015 at 9:19 pm

    Hello Nasim,
    Thank you cry much for detailed explanation. I bought 0.9 soft edge Filter for my Nikon 14-24 mm . I am going to Vermont to shoot fall colors in October 2015. What other filters would you suggest for 14-24 mm and 70-200 Nikon f 2.8 VRII lens?

    Thanks,
    venkat.

    Reply
    • Venkat
      August 3, 2015 at 9:20 pm

      Sorry I meant Thank you very much!!

      Reply
  24. Sun
    January 6, 2016 at 6:16 am

    Thanks for sharing with us. I have used that tachniqe and capture some of moments happy to share with you all > sunildodiya.blogspot.in/

    Reply
  25. inLighted
    July 4, 2016 at 10:01 am

    When it comes to ND filters, most pros seem to favor Lee, B+W, and Cokin filters; to a lesser extent Tiffen and Hoya also get significant attention. There are lesser known brands that come up when searching for reviews, and while some are quite affordable, they are of questionable quality. One brand that gets very little recognition is Haida. Some online reviews put Haida ND filters on par with the top-end brands when it comes to optical quality, and maybe a little better as they produce less color casting. They are not cheap but definitely more affordable than the big names. I’ve been using Haida screw-in and rectangular ND filters for a while now and I am extremely pleased with the results they produce. Just be sure to buy “authentic” Haida filters as counterfeits seem to abound.

    Reply
  26. Andy
    October 15, 2016 at 9:48 am

    I echo the comments of an early posting, this may well be my favorite site for photography tips and reviews, because of articles like this one. Thank you!

    Reply
  27. Ripu Singh
    January 5, 2017 at 11:37 pm

    Hello Nasim,
    Please accept my congratulations on such a well written article.
    I am new to photography, and have a keen interest in it. Have got a Nikon D5500 with 18-135mm, 55-300mm and 50mm Prime.
    Please suggest which is the one filter that I should buy. Can’t afford to take all three at once as I have put savings in Camera and lenses.
    will be grateful for your guidance.

    Reply
  28. MarkS
    February 21, 2017 at 7:20 am

    Great Article
    I would really like to be able to use a SinghRay color combo CPL in a system that also support GND 100x150s. But there does not seem to be a way to do that. Your review of the NISI system was great though when I connected with them I was limited to using their CPL. Your example above of a GND shot is very nice. Do have recommendation for my problem? Would Lee system work for what I’m trying to do? thanks

    Reply
  29. Richjal Muhammad
    April 23, 2017 at 4:23 pm

    I learn much from this article since the first time I fall in love with photography that made me written best ND filters on my blog and mention Nasim Mansurov’s recommendation “Singh-Ray’s Vari-ND Filter” I like that filter, but not really much because I find slight vignetting at wide angles and lens cap won’t work with the thin mount.

    Reply
  30. Tom Dibble
    August 17, 2017 at 3:31 pm

    On the three filters:

    Polarizing filter is a must have in your camera bag. I would be cautious about using it all the time, because you will not be capturing “what you see” but rather “what you imagine”. Goes to what your goal in photography is: if it is beautiful nature artwork the polarized effect is often desirable; if it is photojournalism or portraits, probably not. That said, “what you see” might be different from an unfiltered camera if you are wearing polarized driving sunglasses (but still might not match the polarized filter unless you rotate it to the same angle as your glasses).

    Full neutral density filter does allow for very-long-exposure without closing up your aperture beyond where you want (or can), and super-bright-subject captures without increasing your shutter speed beyond where you want (or can). Very useful. Can kinda-sorta be replicated by using other effects to get a “darker” shot, take multiple shots (on high-speed drive), and combine in post-processing with a ‘mean’ algorithm, but you may get “gaps” in constantly-moving objects (ex, a bright light moving will have a “ump” where the shutter closed and then reopened for the next frame in the composite), and it is obviously more post-processing work. I wouldn’t call an ND a must-have, but it would be the one I’d get after a polarizing filter.

    Graduated ND filters, though, IMHO, create a look that I just don’t like. I can almost always see the gradient in the resulting image, and it looks cheap and fake to my eyes. Properly bracketed exposures (and, yes, you might use a full ND filter to get the “dark” bracket photo) are far far superior because you can choose during post-processing, when the image is thirty inches diagonal in front of me instead of three inches diagonal, where the “gradient” should be, and if it should go across “straight” or follow the line of the hills/mountains, etc. So many many more options left for later in the process when I have more time and better tools to do it all precisely. Realistic HDR photos all depend on the tone mapping software; there are lots of packages out there that do a really great job of keeping the tone mapping realistic and just allowing you more latitude in your shadows/highlights adjustments as though your camera had captured with a 30-stop light range instead of a 10-14-stop range. You just have to use the tool lightly, and go away and come back to re-evaluate how “fake” it has ended up before finalizing things.

    So, of the three, I’d say that the purchase order is:

    1. Polarizing filter
    2. ND filters, ideally multiple (ex, a 6-stop and a 10-stop)
    3. Skip the graduated ND filters altogether

    Reply

Comment Policy: Although our team at Photography Life encourages all readers to actively participate in discussions, we reserve the right to delete / modify any content that does not comply with our Code of Conduct, or do not meet the high editorial standards of the published material.

Leave a Comment Cancel reply

Your email address will not be published. Required fields are marked *

Primary Sidebar

Categories

  • Composition and Art
  • Essays and Inspiration
  • Photography Techniques
  • Photography Tutorials
  • Post-Processing
  • Reviews

Photography Tutorials

Camera BasicsPhotography Basics
Landscape PhotographyLandscape Photography
Wildlife PhotographyWildlife Photography
Macro PhotographyMacro Photography
Composition & CreativityComposition & Creativity
Black & White PhotographyBlack & White Photography
Night Sky PhotographyNight Sky Photography
Portrait PhotographyPortrait Photography
Street PhotographyStreet Photography
Advanced PhotographyAdvanced Photography

Recommended Gear

  • Best DSLR Cameras
  • Best Mirrorless Cameras
  • Best Entry-Level DSLRs
  • Best Cameras for Landscape Photography

Support Us

B&H Photo Video Banner

Recent Topics

  • Can Lightroom 6 be used for Nikon Z files
  • Can’t get photos to be right exposure
  • HDR Bracketing + Interval Timer mode + Silent shutter not compatible
  • focusing
  • Fuji 16-55mm f/2.8 R LM WR sharpness
  • Your country is blocked
  • Shutter Repair Options
  • AF-S NIKKOR 24-120mm f/4G ED VR
  • High speed sync
  • Nikon Z6 save to clean with Eyelead?

Footer

Site Menu

  • Beginner Photography
  • Lens Database
  • Photo Spots
  • Search
  • Submit Content
  • Subscribe
This site uses cookies to improve your experience. To find out more, please see our Privacy Policy

Reviews

  • Camera Reviews
  • Lens Reviews
  • Other Gear Reviews

Copyright © 2019 · Photography Life
DMCA.com Protection Status