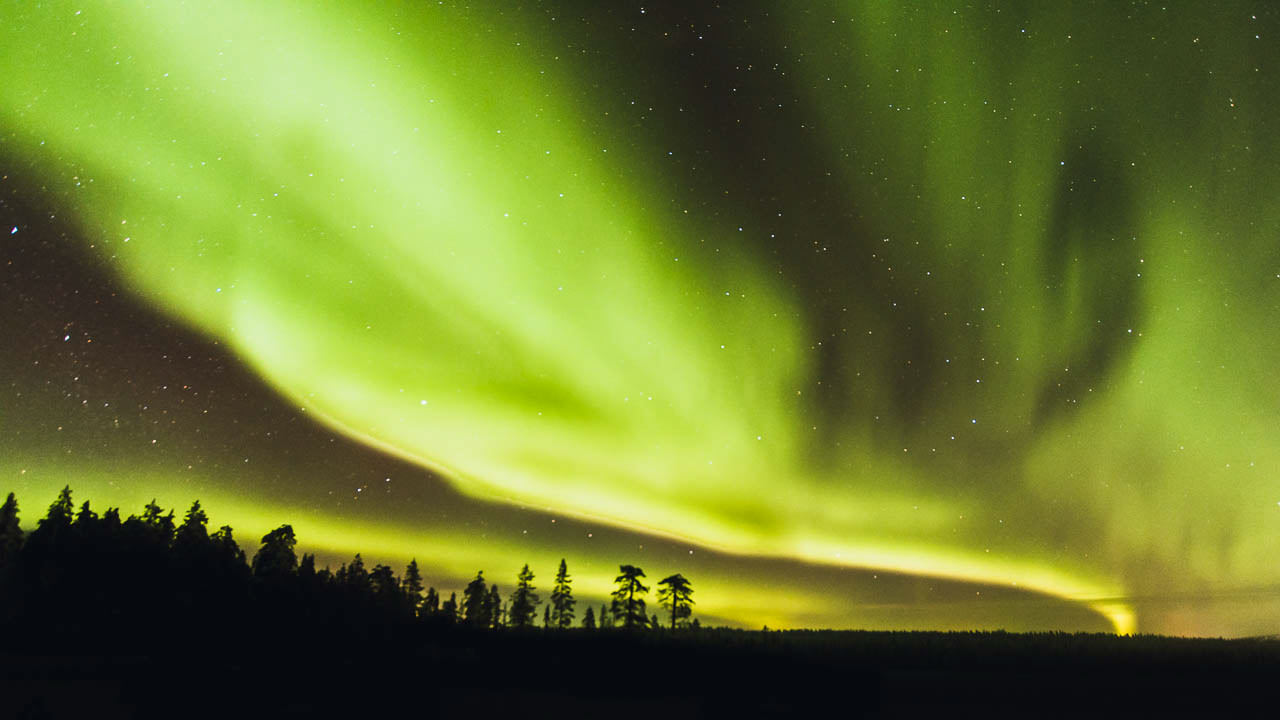
Capturing a stunning shot of the northern lights (or southern lights) dancing across the sky surely must be on the bucket list of many photographers out there. On a recent trip into the Arctic Circle, I was lucky enough to see the aurora borealis on several nights. What follows are some tips and recommendations on how to photograph the northern lights and come back with some stunning pictures.
My trip took me to Yllas in Lapland, a large national park in the north west of Finland near the border with Sweden. We stayed in a small log cabin in the village of Akaslompolo, which has a permanent population of about 350. The small size of the village means that light pollution levels are quite low, and this is helped by the lights on the cross country ski trails being turned off at 10:30pm each night. As a side note, I can thoroughly recommend visiting Lapland, as even during the day it presents amazing photo opportunities, such as these reindeer crossing the road.

But simply being in the right location is only half the battle. Finding the aurora can in itself be very challenging. The first thing you should do is download an aurora forecast app, I would recommend “My Aurora Formats and Alerts” (available on iOS and Android). It provides weekly, daily, and hourly forecasts, including cloud cover, and is free to download. The best function is the aurora probability section, which tells you the likelihood of seeing the northern lights at any given time. You can also opt in for alerts so that you can go to bed and be awoken if the lights begin at, say, 4 AM.
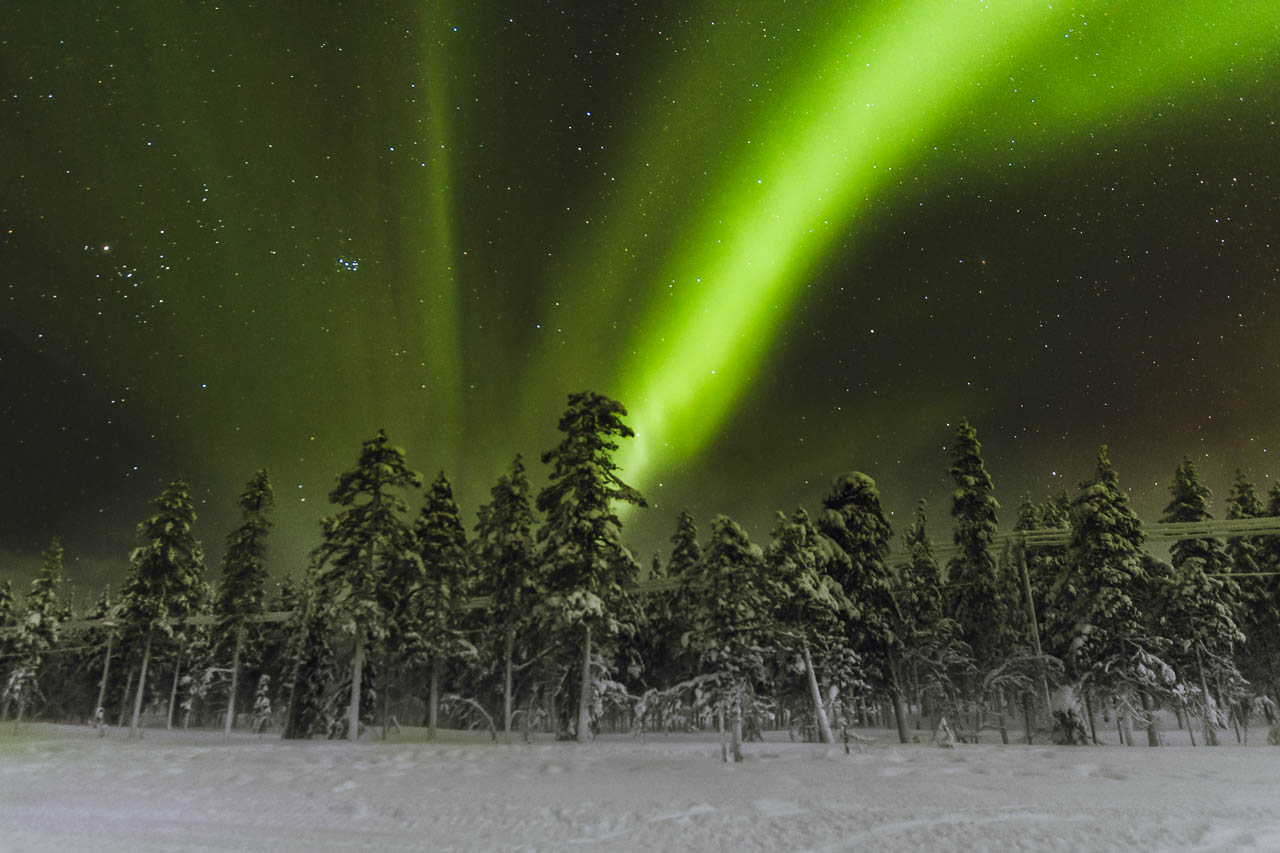
Next, I would suggest trying to book a tour or activity which takes you into the wilderness. This means that light pollution will be very low, plus your guide will likely know the best spots for seeing the lights. We opted for snowmobiling and drove about 15km from the village into the dark sky region of the national park. Although we saw the aurora from the driveway of our cabin on other nights, the lack of light pollution here meant that the snowmobiling was definitely worth it.

A side note on clothing: while I was in Lapland, the daytime temperatures hovered around -25 Celsius with night temperatures dropping to below -30. As such, it is vital to have the correct clothing; no photograph is worth frostbite. There are many websites which will advise on general clothing, but seeing as this is a photography guide I will suggest some hand wear. Changing camera settings in the field can be very tricky with thick gloves, so I would recommend wearing a thin pair of silk liner gloves under heavy mittens. The mittens will keep your hands warm, but when you need to use your camera you can quickly take them off and still have the protection of your liner gloves.
Now, the important part: camera settings. The first piece of advice is to set up your camera as much as possible before heading out. This will limit the amount of time you spend fumbling in the cold and dark trying to get your settings correct. As far as cameras/lenses go, you can take aurora photos with any camera or even phone capable of taking long exposures. Just make sure you have a tripod or some other method of keeping your camera steady. As for DSLRs, I would recommend:
- Attach your widest angle lens so that you can capture as much sky as possible. Wide angle lenses will also reduce the effects of star trailing at longer shutter speeds. Ideally, something in the region of 24mm or wider (full frame) would be perfect.
- You also want this lens to have a nice, wide aperture. Something like f/4 is a minimum, and f/2.8 or wider is better.
- Put your camera in manual mode and start with settings of f/4, 15 seconds, and ISO 800. If you have an f/2.8 lens, you should be able to lower your ISO. These settings will be a good starting point from which you can adjust depending on local conditions.
- Turn on mirror lock-up and any other features for reducing camera shake. Use a remote shutter release, shutter delay, or self-timer, and you are ready to go.
The aurora borealis moves fast and varies speed quite significantly depending on the conditions. So, the settings above are only meant to be a starting point. Once you arrive at the location, take a test shot and adjust your settings as appropriate. For example, if the northern lights are moving quickly, you may want a shutter speed faster than 15 seconds to capture as much detail as possible, which might require a higher ISO. If possible, do not use a shutter speed over 15 seconds, as this will cause the auroras to become a blurry mess.
As a side note, remember not to touch metal camera or tripod parts with your bare hands. I say thus after accidentally picking up my tripod on a -30 Celsius night, with results that were rather unpleasant.
After you have snapped some pictures and returned to your accommodations, you should resist the urge to take your camera out of your bag and look at the photos. The change in temperature from outdoors to indoors can cause condensation on the electronics inside your camera – not good! It is best to wait until your bag has warmed up gradually before taking your camera out and loading your photos.
I will end this article with my most important piece of advice: Put the camera down! For most people, seeing the northern lights is a once-in-a-lifetime experience. As amazing as it is to come back with stunning photos, it is not worth spending the entire time staring at an LCD screen. So, try taking a couple of shots first – then stop, relax, and watch the magic happen.
Thank you to our reader Candid Llama (Richard McInnes) for contributing this guest post! You can see more of his photographs at his Instagram page as well.
Hi,
Don’t know if this is the right question on this topic, but it is topical for me at the moment so here goes.
After many years of taking pictures with a “point and shoot” type camera, I am looking at “raising the bar” so to speak. I am going to Finland and Norway at the end of the year and have been reading up on photographing both in low light situations and the northern lights topics. I have also read your articles on ISO, Aperture etc. and how that affects the photograph.
I have been to camera stores (as opposed to electronics stores that just happen to sell cameras as well) to ask advice on what to get. While I’m happy with advice I’ve received, it’s interesting to note that different stores advised different things or requirements, so now I have to make sense of the info. Sometimes too much info is worse than not enough info.
I’m not a professional photographer and am looking at the range of mirrorless cameras and interchangable lenses.
In Australia, and I presume it’s the same in America etc, you can buy a camera body and then chose your lense(s) OR buy a kit that has a camera and generally, 1 or 2 included lenses. As an example, one of the cameras I saw is the Olympus OMD EM10 MKIII and the included lenses in the kit are the 14-42 Zoom f3.5-5.6 and a 40-150 f4-5.6
As I will be travelling, it was suggested maybe look at just a 14-150 f4-5.6 MK II instead, as then I wouldn’t have to be changing lenses and it would cut down on the weight in my suitcase etc.
One thing I did note in my low light photography readings, a wide aperture is preferable, around the f2.8, so it seems that just the 14-150 f4-5.6 MK II may not be the best choice as it seems to be a multipurpose lens and not a lens for specific situations. I do understand that I could change other settings to realise a similar result as using a wide aperture, and yes, I would be using a tripod.
Any advice would be appreciated as this is a new area for me from my “point and shoot” We were in Canada a few years ago and taking pictures of the grizzly bears from a distance just didn’t cut it with my point and shoot. Admittedly, my point and shoot is waterproof for taking on my kayak and some underwater snorkelling so not a lot of zoom. My wife does have a point and shoot with better zoom so all was not lost.
Thanks
Nice photos Richard. My experience from photographing the Aurora is that you loose a lot of details if you use shutter speeds longer than 5 secs.
It is possible to take pictures of the aurora when the moon is out. I’d take shots of the lights, both with the full moon behind me and in the frame. In fact, aurora that require total darkness to be seen are going to be weak anyway.
My most recent trip was timed with a new moon. I’d suggest a happy medium is to have a half moon, so that the foreground is lighted up.
I’d taken pictures of the lights numerous times. But I never tire of it.
Excellent article, tips and advice: specially for me, who will land in Reykavik in the very beginning of November for a Photography Expedition up there. Every advice and comment are mostly welcome. And once I am a Nikonian, this article was just made for me. Tks a lot! Best regards, Ney
Hey Ney
If you are in Reykjavik and the Northern Lights are turning on, I can recommend to go to the beach near Grotta Lighthouse. Its only 5 km from the city centre and it is very dark!
These photos are from one magic night in 2014. Nikon D800; Samyang 14 mm F 2.8; 6 sek; ISO 800
nis.nikonimagespace.com/html/…A&r=0
Guess time to write longer and more ellaborative article on my own for this site. Not that its bad info here, its just that i feel here is not enough info in this article in my opinion, especially about moon, what can happen during stronger solar storm, weather conditions etc. Good info for novice aurora shooter but not good enough for advanced aurora photographer. Ylläs is good place but i would recomment Kilpisjärvi much more. Statistically there are more aurora during season than in any other europiean lapland parts (dont know about Russian lapland). And its just 10km north or west you can get to Norway and Sweden respectively. Enjoy your trip and anyone must visit colder polar regions during cold season at least once in a life time, its much much more wonderful and amazing than lying on a beach in some warmer areas.
Wish I had been there! Good skies.
Though I’ve been viewing northern lights since childhood (retired geezer now) I did not appreciate how high is the dynamic range until photographing in Iceland February, recently. Caution not to burn out the green highlights producing yellow and white featureless zones. Processing in Lr I actually moved the green luminosity slider down to recover highlights in sky.
Another point, appropo filters (as mentioned in a comment above) is that the reason to remove filters in long low light exposures is the potential for amplifying reflections between front lens element and filter causing artifacts. These ruined a few of my ice cave photos until I discovered the artifacts, seen later on computer screen though not on camera LCD when shooting.
(Nex-7 w/ Samyang 12mm f2 at f/2.0, 30″ ISO 800, Jokulsarlon, Iceland)
Corrected Link:
photos.google.com/share…AyMm1zc0Nn
Wow great photo, thanks for sharing. Love the reflection. Agree with the UV comment, it is easy to forget, or miss when your out.
Thanks for your article Richard. Having just spent a few days in Norway to photograph the Northern Lights I agree with all the comments made. We had 3 days of exceptional NL displays however I have only 1.5 days of usable images. Unfortunately I set up my Canon DSLR to focus on infinity (pre-determined during daytime) but this did not give me sharp enough images until I used Live View to focus on some distant village lights. Luckily the second half of photos are much better. I would deem focussing correctly to be No.1 on your settings.
I used a Sigma 10-20mm lens @f3.5 and varied the shutter speed an ISO as the NLs increased and decreased in intensity getting various images, albeit I would have liked a faster and wider lens. I also used a 2 second timer to trigger the shots rather than fiddling in the dark and cold with a remote. I was fortunate to be in a dark wooded area with 360 degree NL displays so knowing where to photograph was a major problem so I just stopped and enjoyed the spectacle…..a memory to last a lifetime, although I would go back in a shot.
Thanks again Richard……do you also have any tips for post processing NL images using Photoshop ?
Hi John,
Thanks for the comment. Great to hear you had so many excellent nights.
In terms of editing, I mainly use Lightroom but the principles should be roughly the same. The main thing I would recommend is using selection masks to target specific parts of the image. The high contrast between the night sky and the NL means that you often want to brighten and saturate the lights while keeping the night sky dark. The dehaze slider in LR is certainly helpful. White balance is another area which is tricky. This is a bit down to personal preference how yellow or green you want the image but it is easy to go too far in one direction. In the snowmobile shot I had to desaturated the bottom of the image quite a lot to keep the snow white and the NL green.
Agree that I can’t wait for the opportunity to go back. Thanks again for the feedback.
Good article, I have also shot the northern lights in the Arctic at -20F, was on the bucket list and a lot of fun. I would add a few tips, after your night of shooting and before you go into your toasty room take out your battery and cards, (so you can charge battery and look at your pics while your camera is warming up) then put the camera/lens in a large zip lock bag. keep that closed until it reaches room tempt (same/better than camera bag storage trick) I also found the aurora Moves quickly and can also “rain” down, I would Play with your ISO to obtain a shorter shutter time, reducing the time the shutter is open will reduce blurring in the pic. due to the aurora moving. 15 sec is about right to start with. Look at your histogram after each shot to see how your settings are doing. Rent/get some insulated/thermal Boots, my feet were freezing the first night and I used loaner Army BUNNY Boots the second night and they were toasty all night. We had a warming hut at our shooting location with a stove going full blast some people were bring their cameras into the hut to look at settings… Don’t Do It. Their camera steamed up in seconds and they did not get to shoot any more that night.
If possible try and schedule your shooting at a “new moon” (dark is your friend)
And use a night vision Red led light to view/set your camera settings, a bright white light will just tick off everyone with a shutter open :)
PS you need to use the same zip lock bag trick when your in the tropics and leave your AC room and go out side into 90F 90% humidity (I bag it all and set it outside and go to breakfast)
Enjoy your trip, we really had some fun doing this.
Thanks for sharing, some great tips.
I spent a week in Inari recently, not far from where you were, amazing place. The aurora was something else. Got plenty of great photos too and as you say look up and watch, forget the camera and let the minds eye record the beauty.
Brilliant photos. Really interesting article.. Lots of great tips.