When photographing a solar eclipse, there are a few very important considerations you have to keep in mind to avoid damage to your camera equipment or to your eyes. In this article, we will take a closer look at where you should physically be at the time of totality, what equipment you should have on hand, what safety precautions to take before, during and after the solar eclipse, and what framing and composition aspects to consider. Keep in mind that totality might only last a couple of minutes, so if you are not fully prepared, you might miss the opportunity to photograph this rare phenomenon.
Our team at Photography Life has been fortunate to witness and photograph three solar eclipses before – one partial (in 2012) one total (in 2017) and one annular (2023), all in the USA. The partial eclipse was blocked for the most part by thick clouds, but I still managed to take a few shots when the clouds cleared up a little. The total and annular solar eclipses, on the other hand, took place on very clear days. In this article, I will write about my experience photographing these solar eclipses and provide some guidance and tips on how you can take advantage of your camera gear and photograph an eclipse yourself.
Table of Contents
What is a Solar Eclipse?
A solar eclipse is a rare cosmic event that takes place when the Moon gets in between the Sun and the Earth, blocking Sun rays partially or fully, essentially casting a shadow over Earth. Solar eclipses can only take place when the Moon is new and it is directly aligned with the Sun and the Earth, and depending on the Moon’s proximity to Earth and the relative alignment of the three, a solar eclipse could be partial, total or annular. Hence, a solar eclipse is a cosmic coincidence.
A total solar eclipse occurs when the Moon fully covers the Sun. It is the rarest of the three to witness, because several things need to happen at the same time. First, the three celestial objects need to be properly aligned, so that the Moon can fully block the Sun and cast its shadow. Second, the Moon needs to be at the right distance from the Earth – if it is too far, it will not fully cover the Sun. Third, in order to see a total solar eclipse, one has to be in the direct path of alignment of the Moon and the Sun, or in the center of the Moon’s shadow.
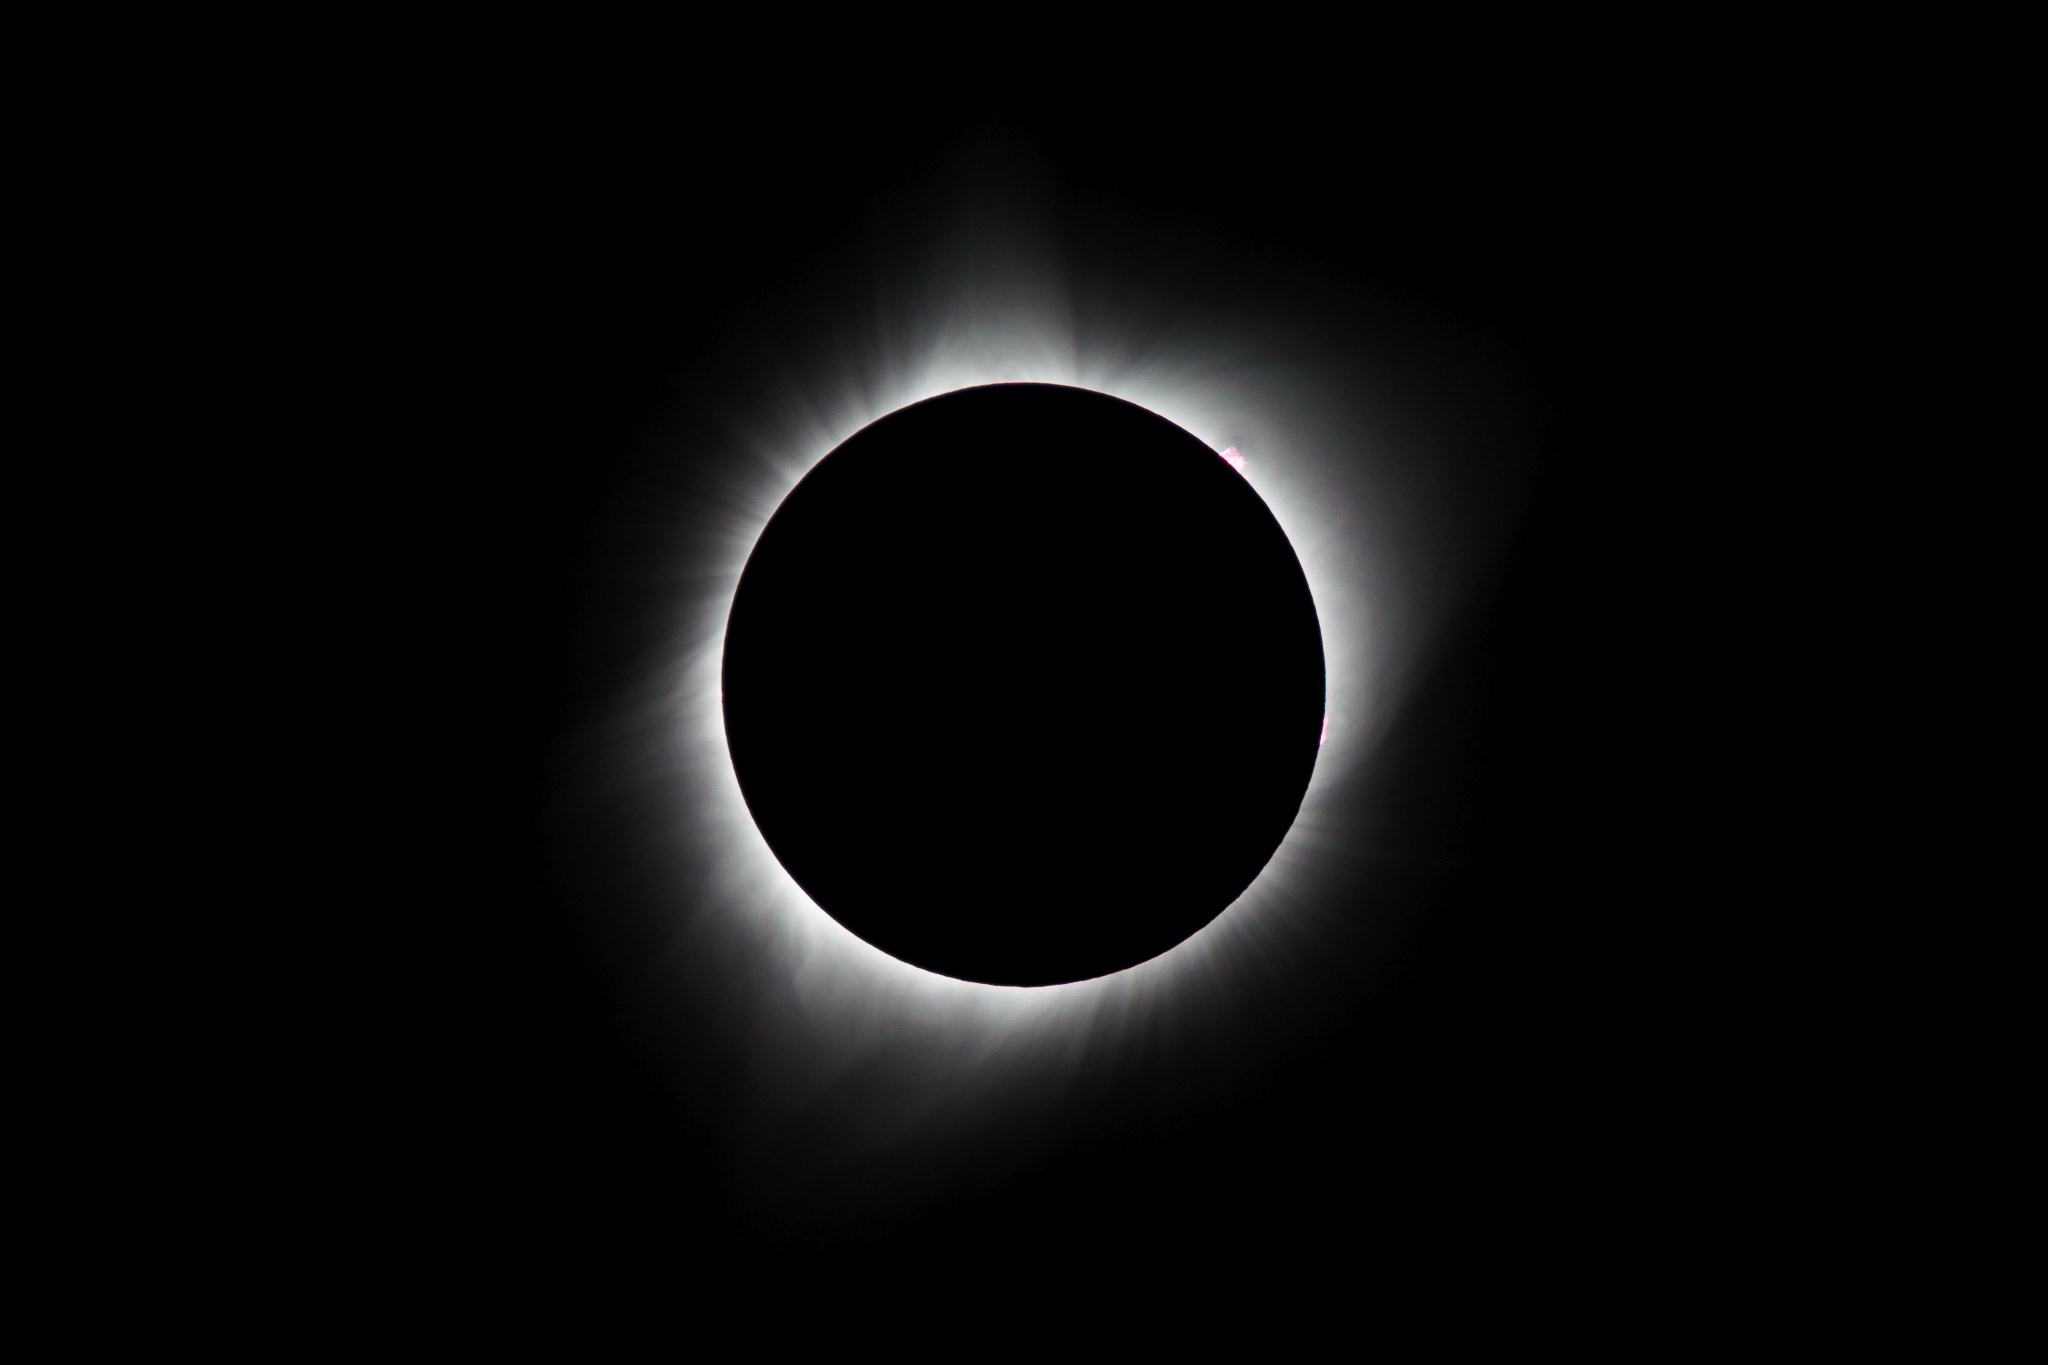
During totality, light levels can drop to very low levels, creating an eerie feeling and sometimes even allowing one to see stars in the middle of the day. You will be seeing a “ring of fire” around the Moon, or the Sun’s corona, which is pretty incredible (and this is exactly what happened during the last total solar eclipse on August 21, 2017).
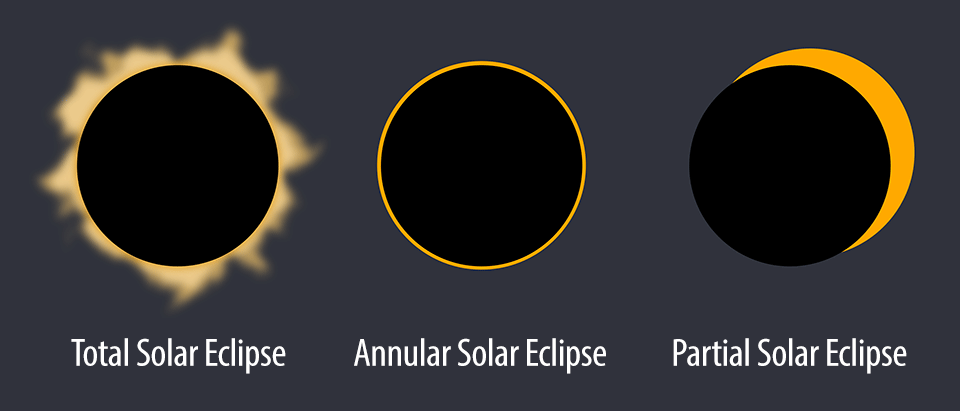
A partial solar eclipse occurs when the Sun, the Moon and the Earth are not exactly aligned, or the observer is located outside of the center area of the Moon’s shadow. As a result, the Moon does not appear to fully cover the Sun.
Lastly, an annular solar eclipse takes place when the Moon is too far from the Earth in order to fully block the Sun. As a result, one can observe a bright ring around the Moon during the eclipse.
Safety Concerns when Viewing a Solar Eclipse
Before I talk about how to photograph a solar eclipse, let me first talk about the dangers of doing it. First of all, you should never look directly at the Sun with your eyes, especially through an optical viewfinder, since everything will appear much more magnified when a telephoto lens is attached to your camera. Remember Galileo or those crazy people who stared at the Sun and went blind? You surely do not want to end up with the same fate. Looking at the Sun through a viewfinder, telescope or binoculars without blocking any light can result in immediate loss of vision – it will literally burn a hole in your retina! Keep in mind that looking through a lens is similar to using a magnifying glass or loupe…very dangerous. It is a pretty serious matter, so it is absolutely critical that you take necessary precautions.

NIKON D700 + 300mm f/4 @ 420mm, ISO 200, 1/4000, f/8.0
Gear Considerations
When it comes to gear, you will need to consider two types of gear: one for viewing and one for photographing a solar eclipse. If you prefer to enjoy seeing the eclipse with your eyes, then get a pair of eclipse glasses. At just 15 bucks for a pack of 5 eclipse glasses, you can equip yourself and those around you with the right type of protection. And no, regular sunglasses will not work – you need much darker filters that barely pass any light through them. If you want to step up the viewing game, you will either need a solar telescope or solar binoculars. If you already own a telescope and it allows you to add filters, you will need to get a separate solar filter. Since there are too many solar telescopes, solar binoculars and add-in solar filters to list and this article is aimed at providing detailed information on how to photograph a solar eclipse, I will not provide any specific recommendations on such gear.
For photographing a solar eclipse, you will need to carefully choose what camera gear you will be taking with you. Ideally, you might want to capture two separate types of images using two different setups: a close-up of the eclipse using a super telephoto lens and a wide-angle view of the scene you will be at. Both can yield very interesting and unique images! Keep in mind that it is going to get fairly dark during totality, so a wide-angle view of the scene around you might result in great-looking photographs, especially if you have something beautiful to include as part of your composition. Based on this, I will be providing two different gear and technique recommendations – one for getting a close-up of the solar eclipse, and one for those wide-angle shots.
Let’s start with the basics. Here is a quick list of camera gear you will need to photograph a close-up of a solar eclipse:
- Digital Camera: Pretty much any digital camera will do, whether you are planning to shoot with a DSLR, a mirrorless camera or a point-and-shoot with an optical superzoom lens.
- Super Telephoto Lens: If you want to get a good close-up of the solar eclipse, you will need a super telephoto lens – the longer, the better. See additional notes below on ideal focal length.
- ND / Solar Filter: A dense solar ND filter is a requirement to prevent potential damage to your eyes or your camera gear.
- Tripod: You certainly do not want to be hand-holding a camera with a super telephoto lens attached to it, so a tripod is a must.
- Remote Shutter Release: Not necessary, but might be useful during totality when it gets darker and your shutter speed drops to camera-shake prone levels.
While your camera might not be very important, your choice of a lens and its focal length definitely is. Keep in mind that if you want to get a good close-up of a total solar eclipse, you will need to get as much focal length as possible, but within limits. Take a look at the below comparison of the relative size of the eclipse to full image width:
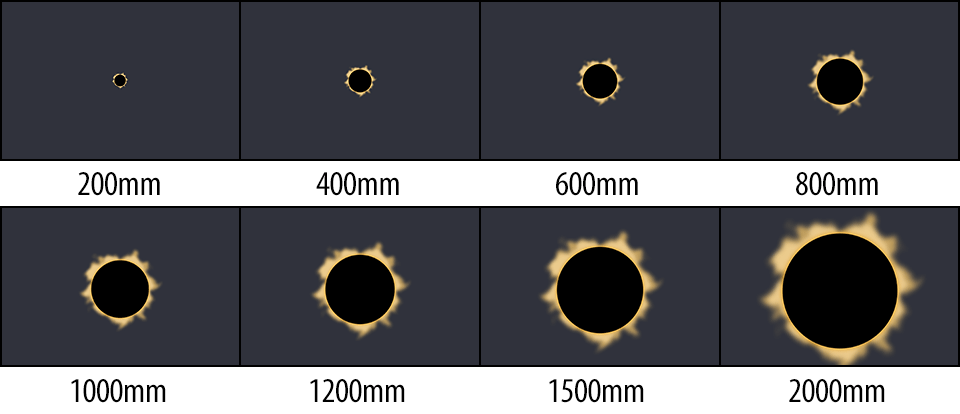
As you can see, a 200mm lens on a full-frame camera is going to yield a tiny view of the eclipse – you will need to crop quite a bit to get a usable image. And if you go too extreme and shoot with a 2000mm setup, you will be faced with all kinds of challenges: from constant needs to re-adjust framing, to cutting off the sun’s corona. Ideally, you would want something in between, perhaps around 800mm to 1200mm at most.
Now you might be wondering how it would be possible to achieve such crazy focal lengths – after-all, most people don’t have an 800mm f/5.6 lens to shoot with. The good news is, there are a number of great solutions and this is where crop factor comes into play. That’s right, if you use a camera with a cropped sensor, you can get to those crazy focal lengths much easier at a much lower cost. For example, Nikon 1 cameras have a 2.7x crop factor, so if you use something like the Nikon 1 NIKKOR VR 70-300mm f/4.5-5.6, you could easily get to 810mm equivalent field of view by zooming in to 300mm. And if you don’t have that particular lens for Nikon 1, you could slap on a cheap 70-300mm VR lens with the Nikon FT1 adapter and get to the same focal length. If you own a Nikon 300mm f/4 lens, you could pair it with a 1.4x teleconverter and easily get to 1134mm with a Nikon 1 camera, which is pretty incredible!
In fact, the setup that ended up working extremely well for photographing the sequence of the eclipse was the Nikon 1 J5 paired with the Nikon 300mm f/4E + 1.4x TC using the FT1 adapter. Take a look at the below image:

That’s not bad for a small and fairly inexpensive camera! If you don’t have a Nikon 1 setup, why not get something like the Nikon Coolpix P900? At $600, it is a cool little setup to get to 2000mm. Don’t believe me? Check out our in-depth review of the Nikon Coolpix P900.
Things get a bit tougher with APS-C cameras, since you will still need something like a Tamron 150-600mm to get to 900mm equivalent FoV. And if you are planning to use a full-frame camera, you’d better shoot with a high-resolution DSLR like the Nikon D810, since you will most likely be cropping quite a bit.
For these reasons, I think an ideal super telephoto setup would be a Nikon 1 camera with native or adapted lenses, or a superzoom point-and-shoot like the Nikon Coolpix P900. These will easily get you the reach you will need to magnify the solar eclipse as much as possible.
For the above shot, the Nikon 1 J5 was mounted on the Sky-Watcher Star Adventurer (setup by my friend Tunc Yildirim), which did a phenomenal job with tracking the eclipse, so that we did not have to worry about constantly adjusting a tripod head. Speaking of which, you certainly do not want to be dealing with a ballhead when photographing the solar eclipse! I quickly found this out the hard way – trying to constantly re-adjust a ballhead when shooting with a super telephoto lens was a nightmare…and I had a very solid head with me. Ideally, you should have an astro tracker as the one I pointed out earlier, but if you do not have one, then you should use a geared head or a balanced gimbal instead!
For the second camera to capture those wide-angle shots, you don’t need anything special – any camera + wide-angle lens combination will do. Just make sure you have another tripod or surface where you can rest this camera. To make sure that you don’t go back and forth between cameras during totality, I would set up this secondary camera to capture a timelapse, as recommended further down below. You do not want to be messing with your cameras at the time of totality, since it will only last a couple of minutes.
Safely Viewing a Solar Eclipse
If for some reason you do not have eclipse glasses or it is too late to get them, you could try out the below solutions for viewing the solar eclipse:
- Build a small pinhole camera / projector: Building a small pinhole camera/projector is very simple. Just grab two pieces of cards, make a small hole in one card, then hold the card with the hole above the other one and align them with the sun. The sun’s image will be projected through the hole into the second card. If you want something more advanced, check this tutorial out, where it is shown how to build a simple projector using a pair of binoculars and two pieces of paper to safely observe a solar eclipse.
- Use the camera’s liveview / LCD: If you are planning to take pictures, you can also safely look at the LCD when your camera is in liveview mode. However, in order to protect your camera from potential damage, you will first need to make sure to mount a very dense / strong neutral density filter (15+ stop solar eclipse ND filter like the Hitech ND 5.4 is ideal) in front of your lens. After that, make sure to turn off Auto ISO, set your camera ISO to the lowest number (something like ISO 100) and stop down your lens to something like f/8. This will ensure that very little light actually passes through your lens to potentially cause any damage to your camera sensor.
If you have a point-and-shoot camera with a relatively small front lens element, the same eclipse glasses you wear to protect your vision could be used to view the solar eclipse. Just hold it directly in front of the lens and it should do the trick.
How to Photograph a Solar Eclipse Sequence
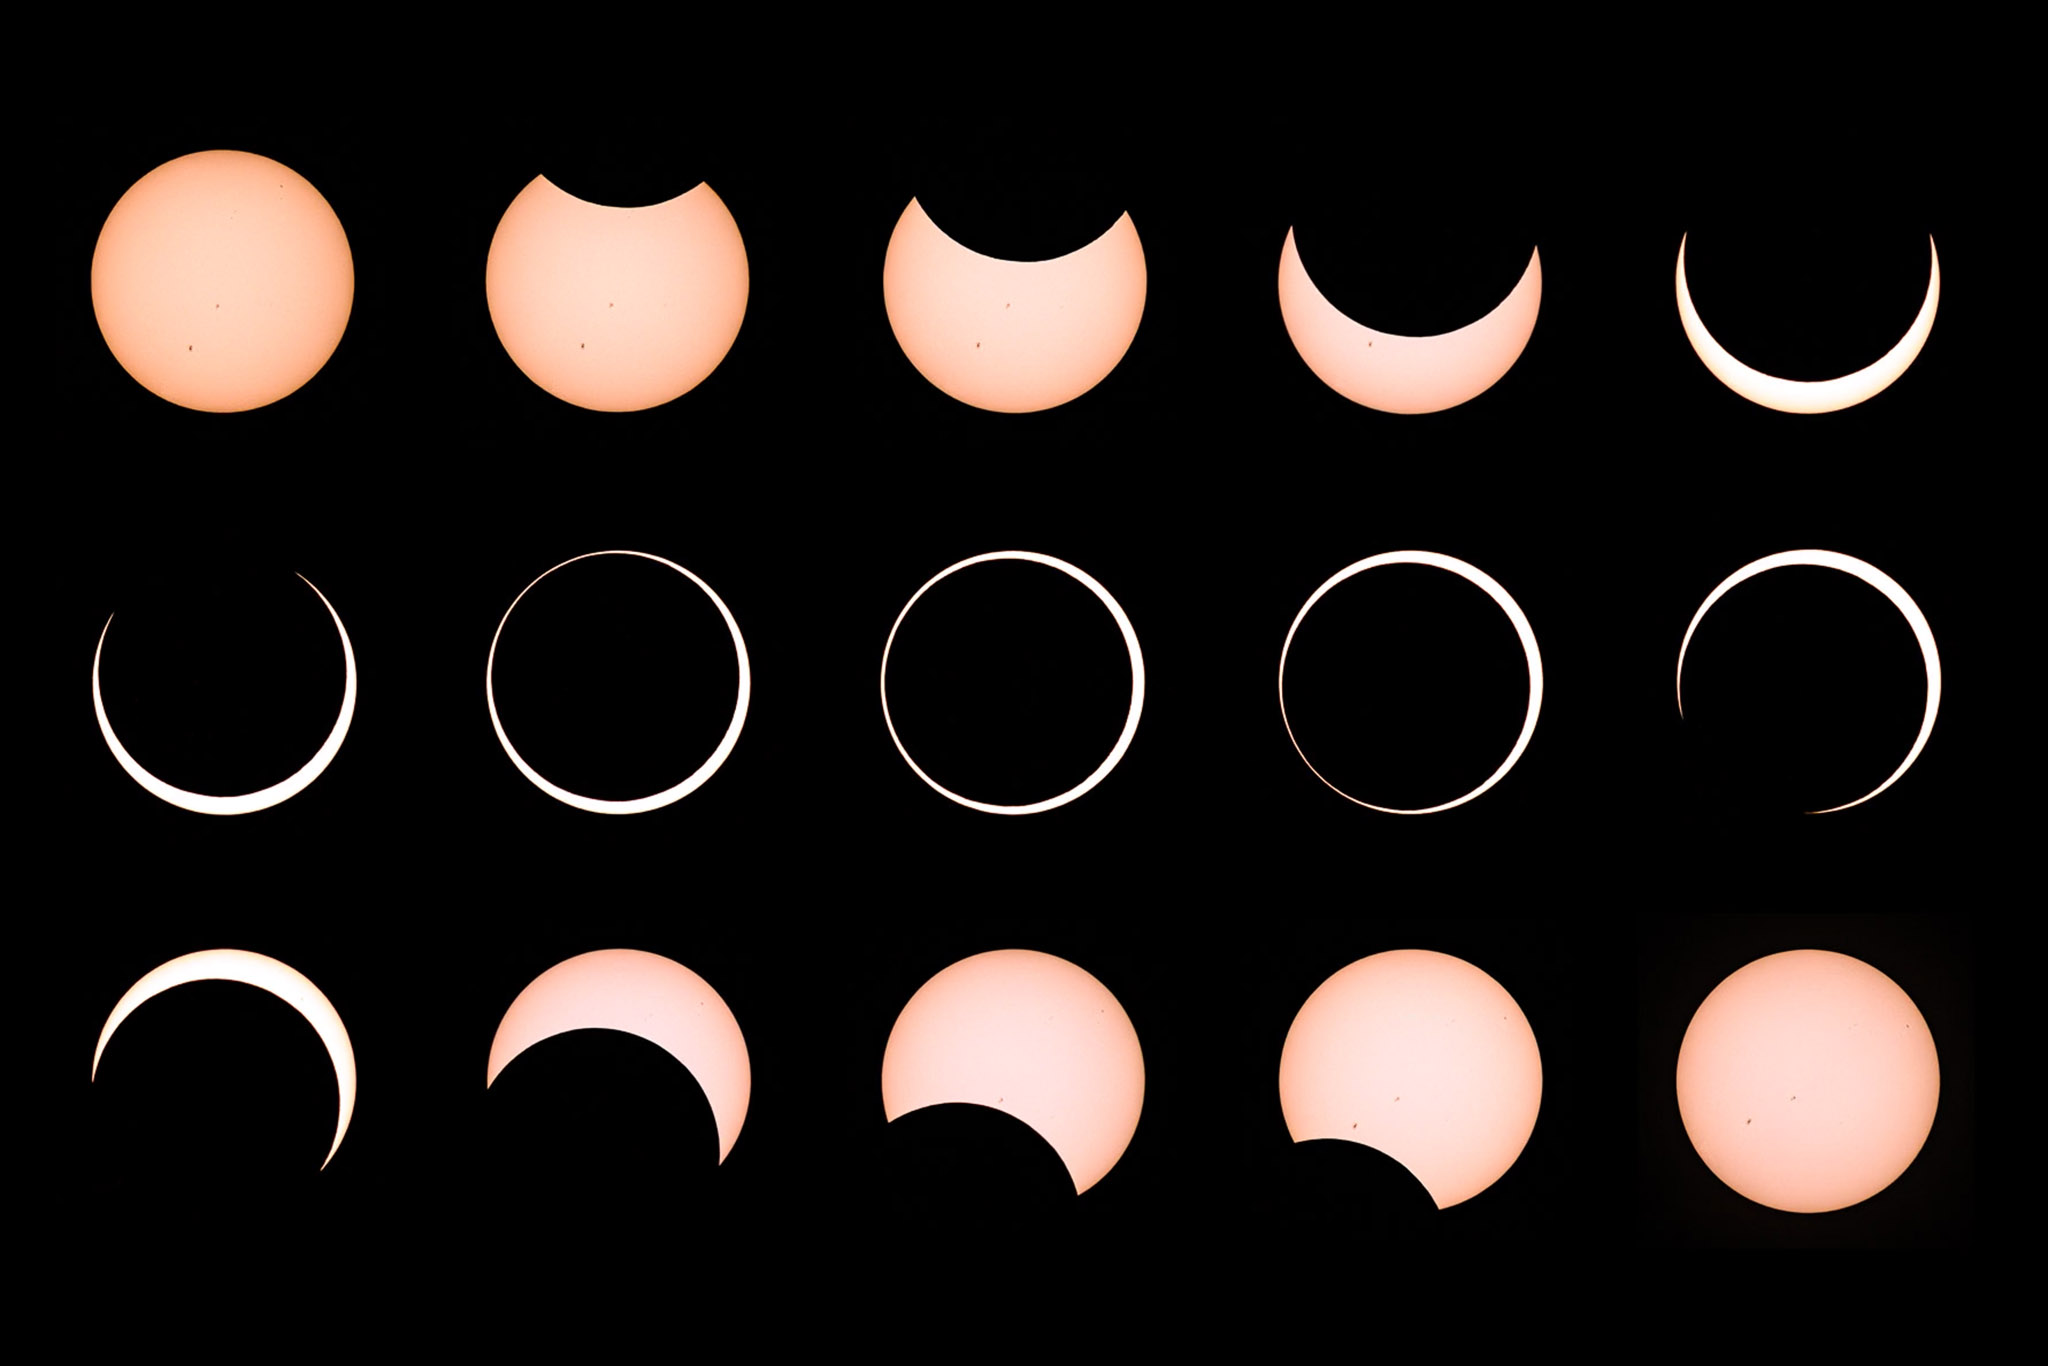
One thing you will need to decide early on, is whether you are going to be photographing the entire sequence of the solar eclipse, or just the period of totality when the moon blocks the sun. I would personally recommend to document the whole sequence from the beginning to the end, so that you have pictures of all the phases – from partial eclipse to “diamond ring” to totality and back. The great thing about having the entire sequence in pictures, is that you can later combine images together, creating a nice-looking composite image.
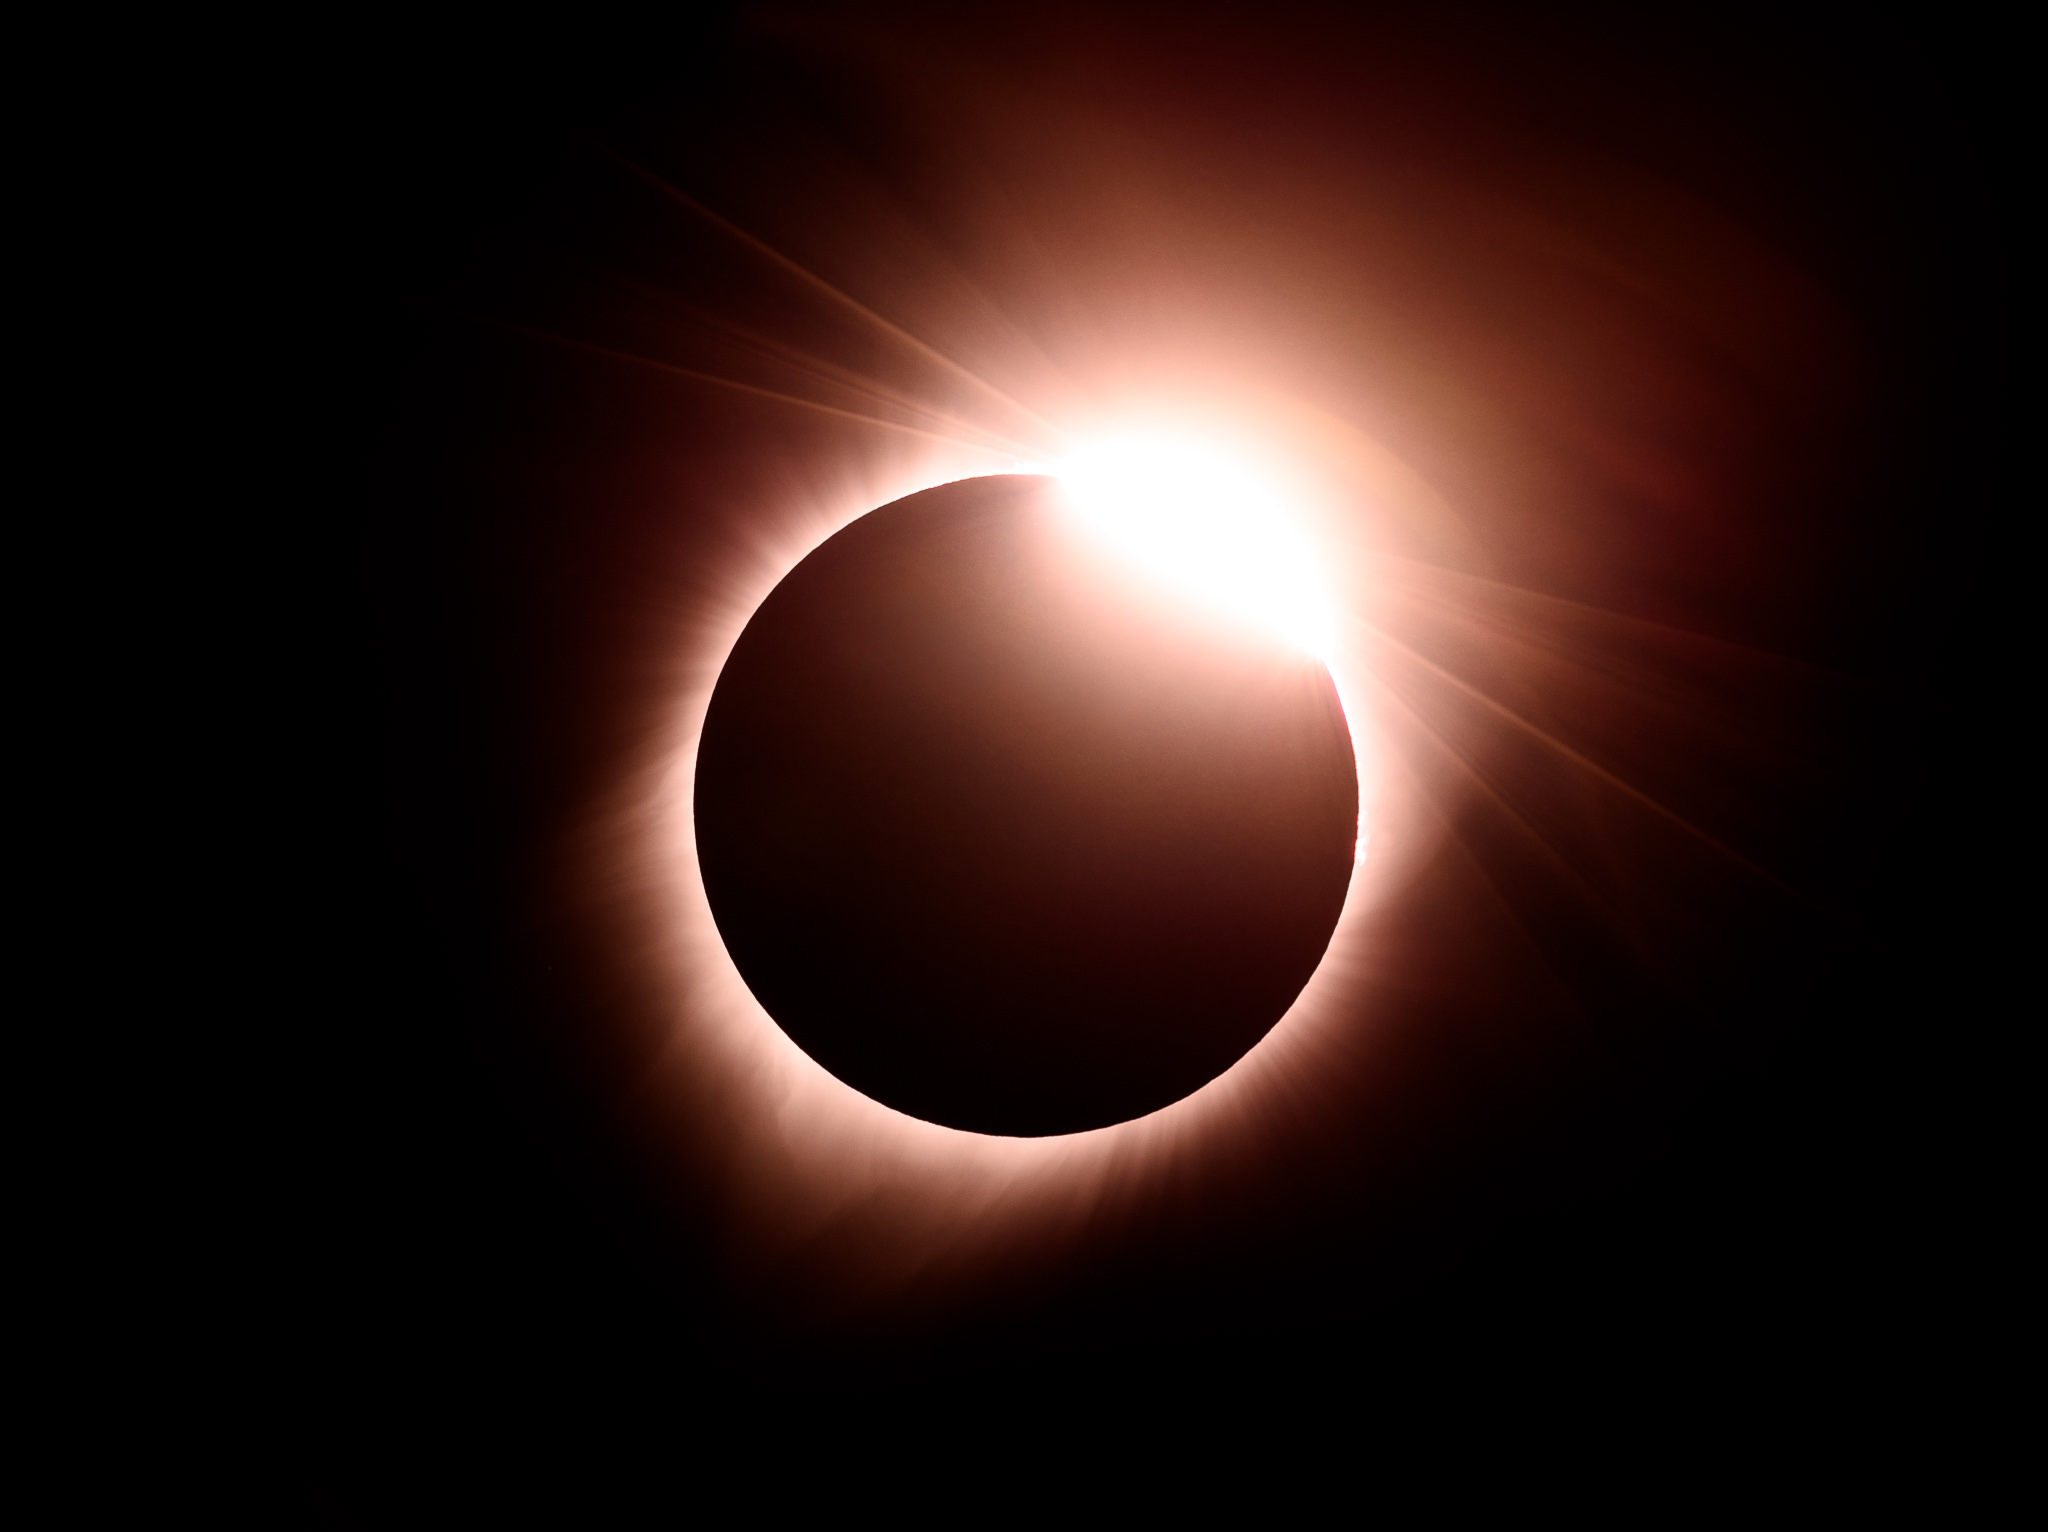
NIKON D810 + 150-600mm f/5-6.3 @ 850mm, ISO 100, 1/50, f/11.0
Bear in mind, you will have to be very patient though, as the process could take a while. If for whatever reason you cannot stay for the entire duration of the eclipse, then I would just focus on times near, during and right after totality.
Camera Settings
Here is what I would recommend to use in terms of camera settings at the start of the eclipse:
- Set your ISO to the lowest value like ISO 100.
- Set your camera mode to Manual.
- Set your shutter speed to its fastest value like 1/4000 or 1/8000. You will need to adjust it from there, depending on how dense your ND filter is and how dark it gets.
- Stop your lens aperture down to its “sweet spot”, which is generally between f/5.6 and f/8.
Depending on what solar ND filter you are using, your shutter speed should be fast enough to not cause any vibration issues during partial eclipse. However, once totality starts, you will experience drastic drops in shutter speed, to the point where it will be necessary to remove the solar ND filter. To reduce chances of camera shake, make sure to enable Electronic Front-Curtain Shutter, if you have it on your camera. Once it gets dark, you will need to be much more careful when handling your camera gear. Make sure to either use a remote shutter release cable or exposure delay mode in combination with a timer to reduce potential for camera shake.
Keep in mind that if you do decide to remove the solar ND filter during totality, you should still not use the optical viewfinder to look at the sun, since UV rays will be very harmful to your eyes. As soon as the totality ends, make sure to put the ND filter back right away!
To give you a basic idea of the exposure times you might be dealing with during the solar eclipse, take a look at the below table, which is compiled from this source:
| Camera ISO | ISO 100 | |||||
| Aperture | f/2.8 | f/4 | f/5.6 | f/8 | f/11 | f/16 |
| Partial Eclipse (5.0 ND) | 1/4000 | 1/2000 | 1/1000 | 1/500 | 1/250 | 1/125 |
| Baily’s Beads (No ND) | 1/32000 | 1/16000 | 1/8000 | 1/4000 | 1/2000 | 1/1000 |
| Chromosphere (No ND) | 1/16000 | 1/8000 | 1/4000 | 1/2000 | 1/1000 | 1/500 |
| Prominences (No ND) | 1/8000 | 1/4000 | 1/2000 | 1/1000 | 1/500 | 1/250 |
| Corona (No ND, Inner to Outer) | 1/2000-1/2 sec | 1/1000-1 sec | 1/500-2 sec | 1/250-4 sec | 1/125-8 sec | 1/60-15 sec |
As you can see, your shutter speed will vary greatly depending on what phase of the solar eclipse you are capturing. When starting out with photographing a partial eclipse, even with a 5.0 Solar ND (16.5 Stops) filter attached, you might still be shooting at fairly fast shutter speeds. However, once total eclipse starts, you will need to remove the solar ND filter, or your shutter speed will be way too low. The last thing you want is deal with a long exposure – that will not only blur the moon and the sun, but also cut precious time.
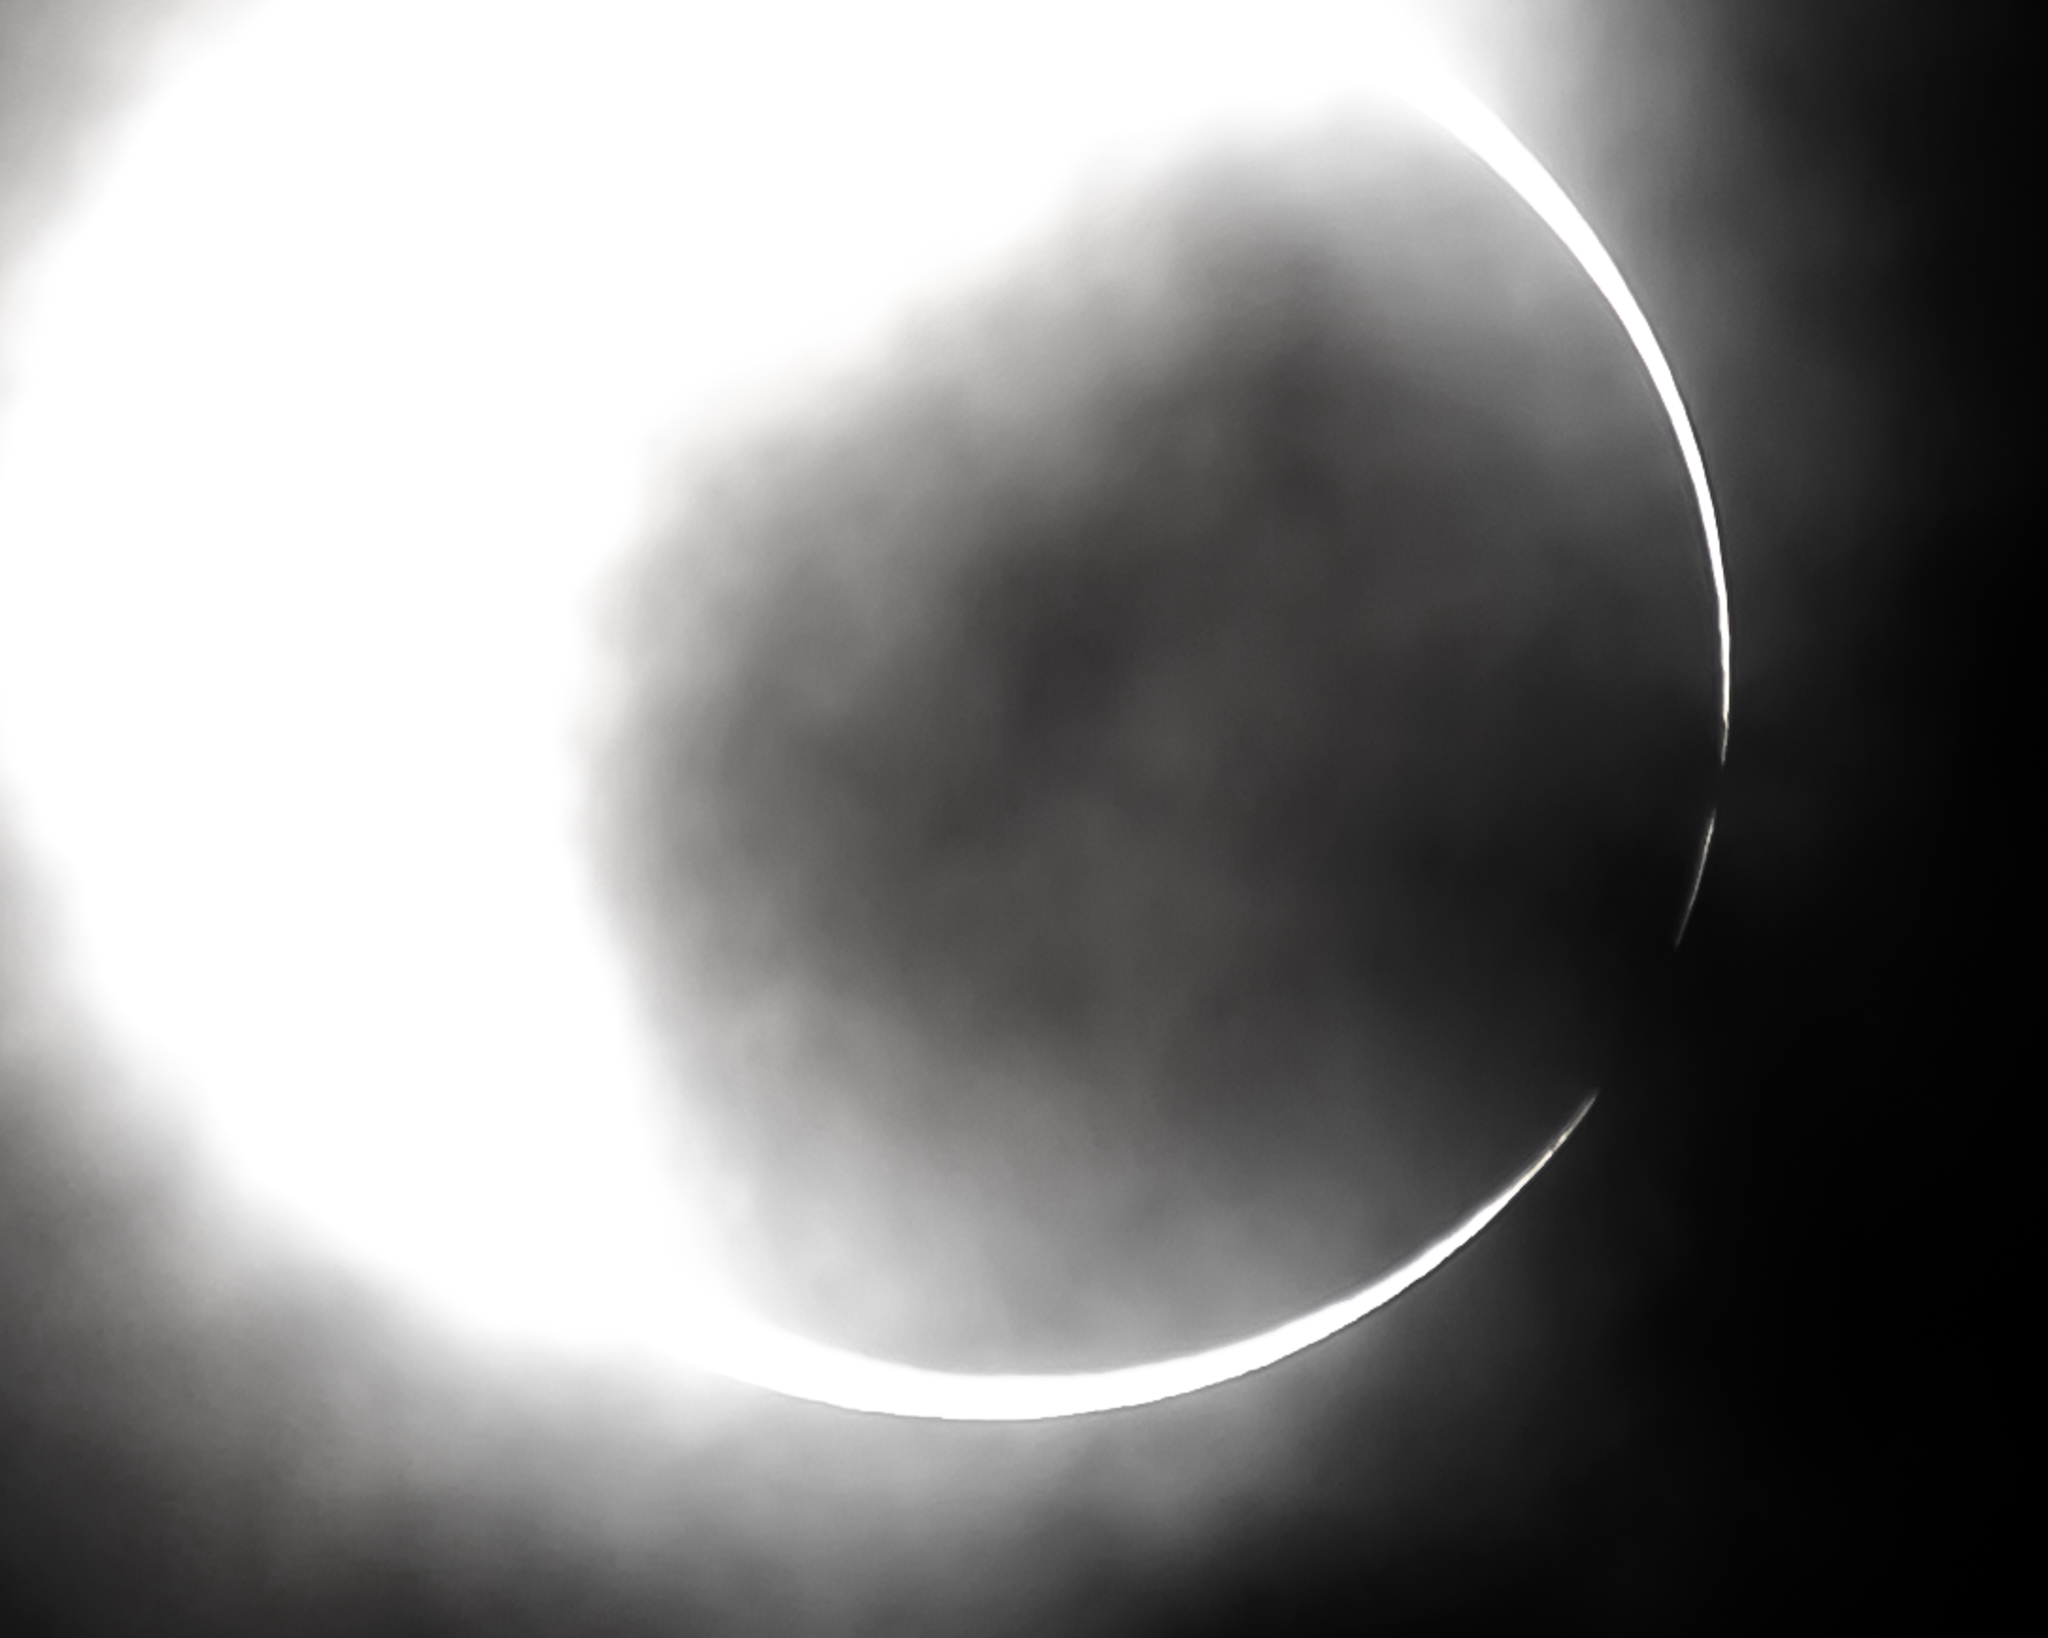
Do pay attention to your exposure – you do not want heavily underexposed or overexposed images. If things get tricky, you might want to bracket your shots as well. In fact, if you want to capture as much of the corona as possible, you should be bracketing during the total solar eclipse. We found out that extreme bracketing was required to capture all the details – we were shooting 3-5 brackets, 2-3 stops apart to make sure that enough information was captured. Take a look at the below image:

As you can see, we had to use a very slow shutter speed of 1/3 of a second at ISO 100 in order to bring out all that detail!
Focus Accuracy and Sharpness
No matter what lens you are using, getting accurate focus on the sun and the moon is extremely important. I know that some photographers suggest to shoot at infinity using lens marks, but since many lenses allow focusing “beyond infinity”, getting a true infinity focus is not that easy – a slight inaccuracy in focus will make the sun and moon appear blurry. Forget about trying to acquire focus on the sun without a solar ND filter – it is too bright and could be too small in the frame for that. What I would recommend instead, is to use the moon for focusing via liveview way before the solar eclipse starts. This way, you get your focus right with your setup once and you don’t have to touch it again until the end. Make sure to switch off autofocus once you get accurate focus, so that your camera does not attempt to refocus each time you take a picture. Once done, take a picture and make sure that it looks sharp by zooming in on it via the camera’s LCD.
Composition and Framing
When shooting with a super telephoto setup for close-up shots, don’t worry about composition – simply place the moon and the sun anywhere near the center of your frame. The exact location does not matter as much, since you can easily crop the image later on in post-processing. If you have some thick clouds in your frame, then play with the exposure a little and see if you can use clouds as part of your composition. Here is an image that I captured with the clouds, when clouds opened up a little bit during the start of the eclipse:

However, if you are planning to shoot with a wide-angle lens, then you will obviously need to carefully plan your shots and pay attention to both composition and framing. Having an interesting foreground subject is obviously important, so do take the time to scout a few locations early on. Ideally, estimate beforehand where the moon and the sun will be in your frame at the time of totality, so that you can place the two in an interesting location relative to your subject. Keep in mind that things will get pretty dark at the time of totality, so if you are planning to shoot a timelapse, you should ensure that your camera will adjust its exposure accordingly.
Below is an image that I captured after spending some time scouting for a solid location where I could use a very wide lens (18mm equivalent). I had to stand close to the foreground in order to make it appear relatively large in the frame and still leave plenty of room in the sky, since the eclipse was taking place so high up in the sky:
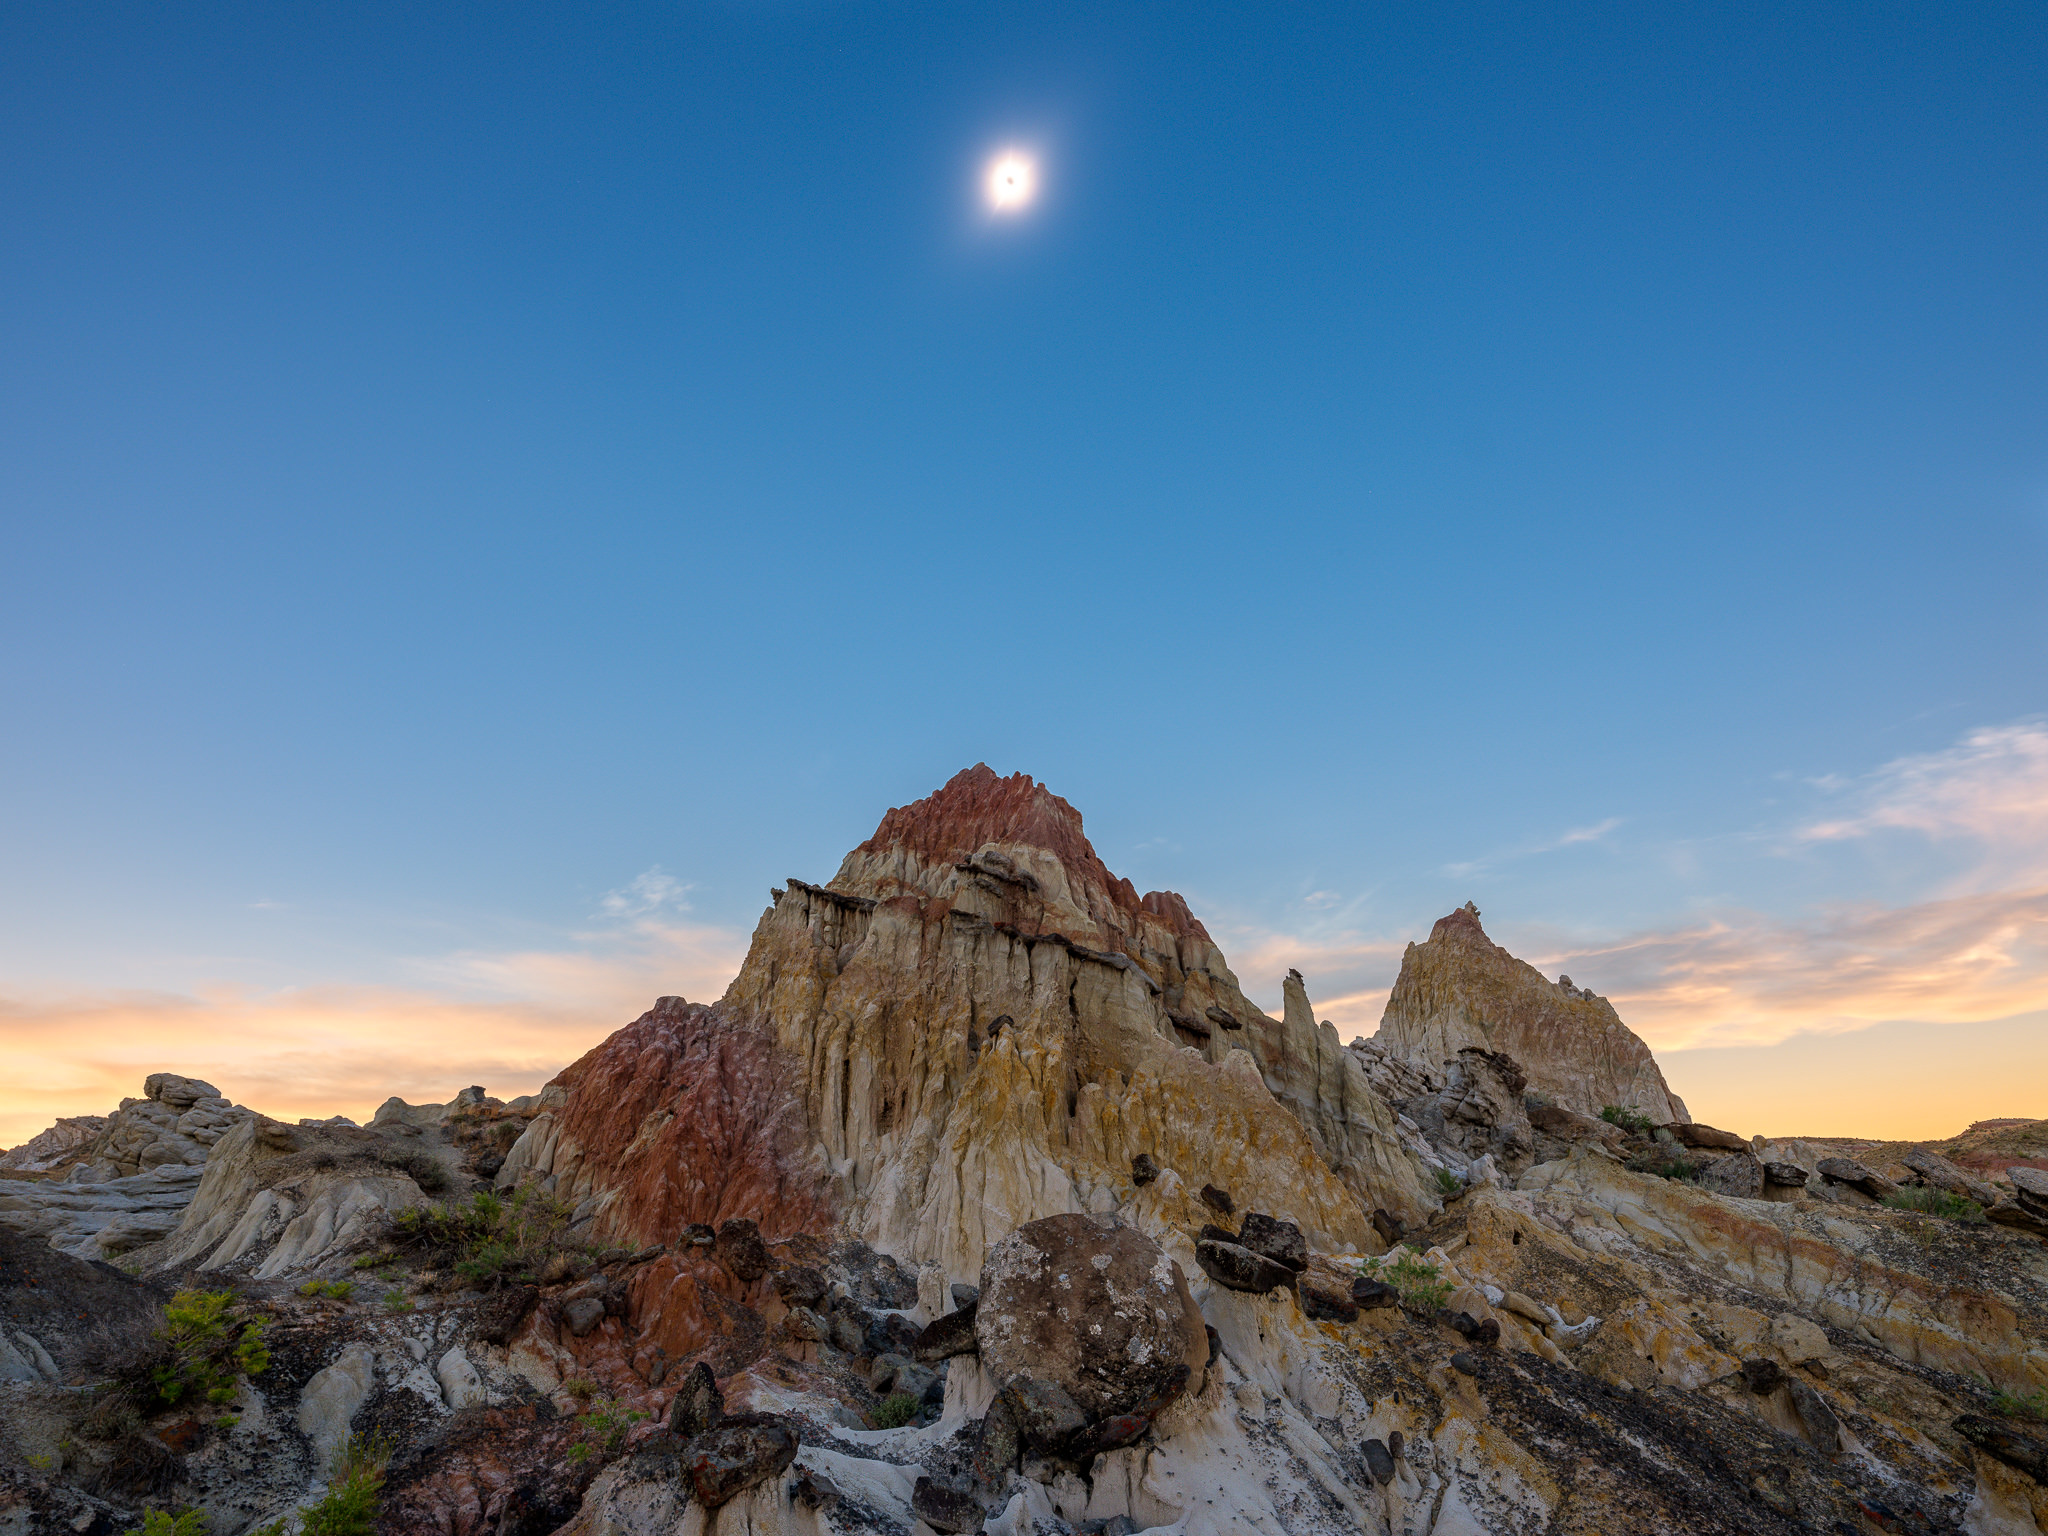
I used an app called “Photopills” in order to properly plan the exact position of the eclipse – it had to take place right above the peak of the foreground structure. Within Photopills, I fired up “Augmented Reality”, aligned the position of the sun for accuracy, moved my tripod to the exact spot, then started a timelapse before the eclipse. As you can see, it worked out perfectly!
Enjoy the Moment
Don’t forget to enjoy the moment. While as a photographer you will most likely want to capture a solar eclipse, if all you do during the eclipse is mess with your camera and never even see the magic in the sky and all around you, then perhaps it is a good time to stop! Remember, this might be your only chance to see a total solar eclipse in your lifetime, so make it an unforgettable experience, not a picture-taking-only experience.
Are you planning to see or photograph the total solar eclipse next month? If yes, then please let us know where you are planning to be, with whom and what you are planning to take with you gear-wise in the comments section below!
2017 US Total Solar Eclipse
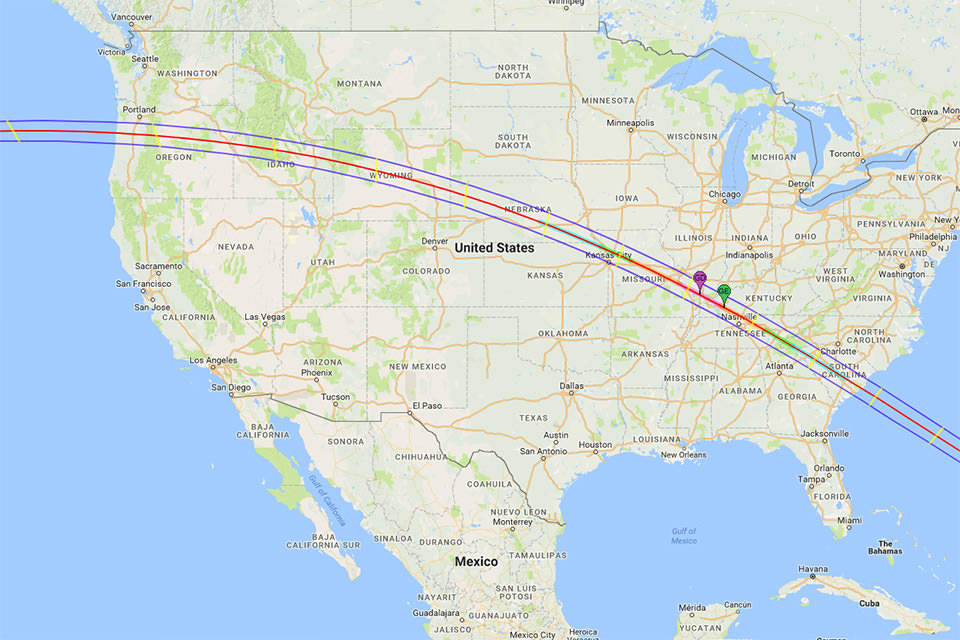
The 2017 US total solar eclipse started on August 21 at 10:16 AM PT on the Oregon coast of the USA and ended at 2:40 PM in South Carolina. The longest total solar eclipse was experienced in Carbondale, Illinois, with totality lasting 2 minutes and 40 seconds. I was near Casper, Wyoming where totality lasted roughly 2 minutes and 26 seconds. Here is the map of the entire region of the USA that saw the 2017 total solar eclipse, provided by NASA:
Because of the importance of this event, NASA also provided a few excellent videos associated with the 2017 total solar eclipse and the below video shows how the shadow passed through the continent:
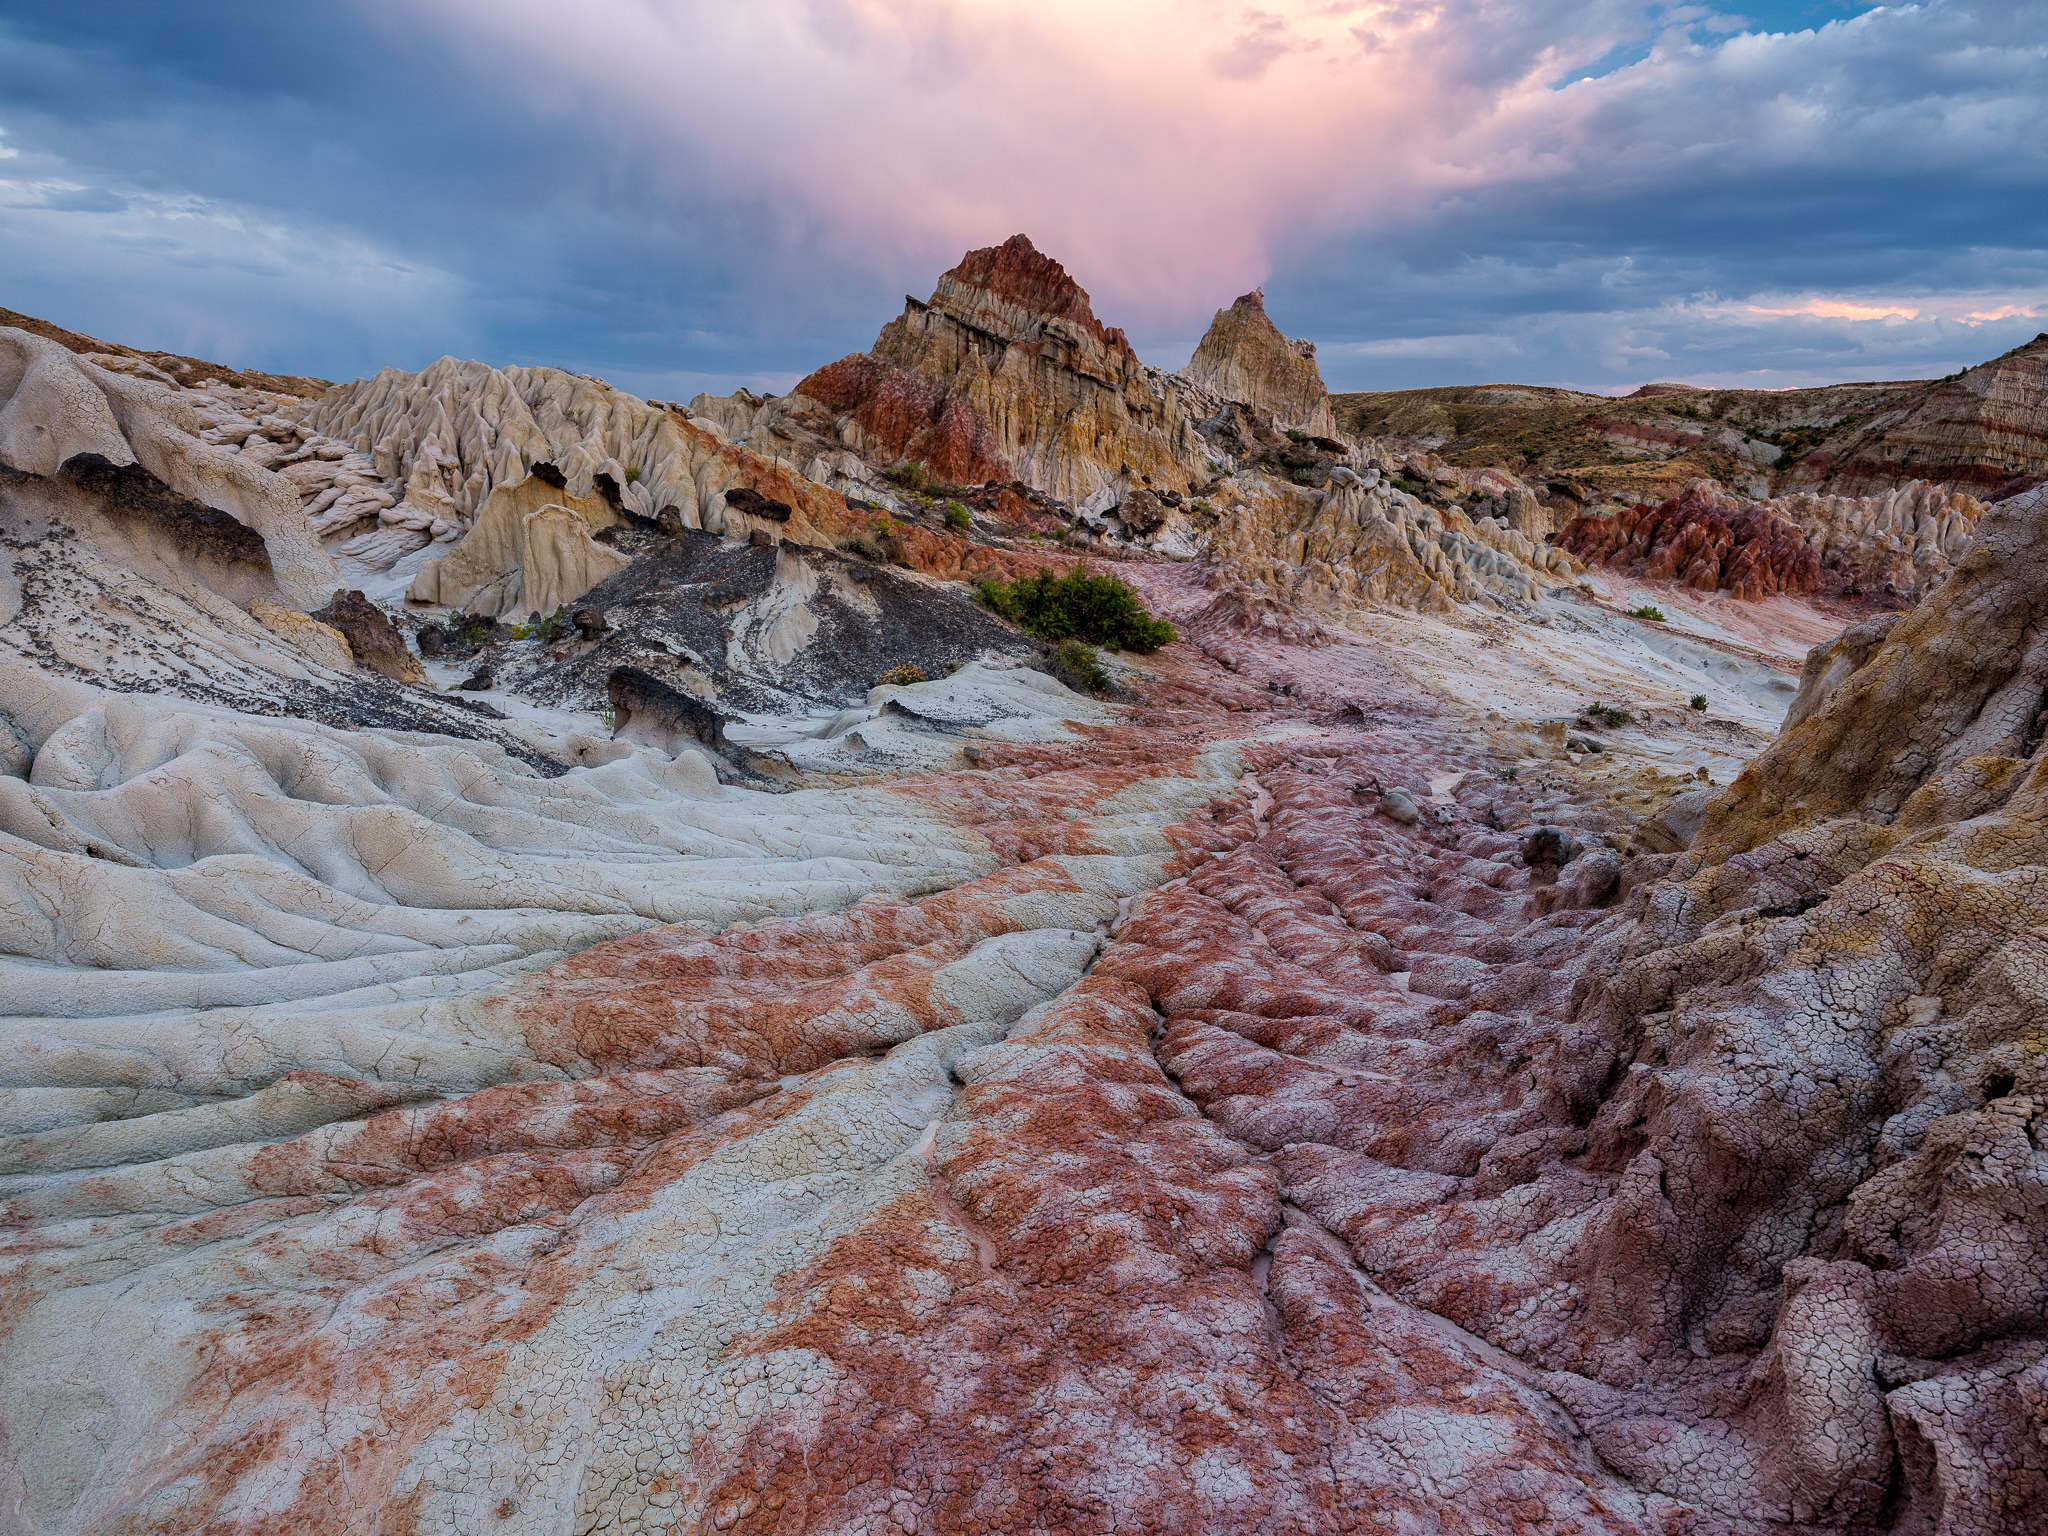
To photograph the total solar eclipse, I wanted to pick an attractive spot that I could use as a foreground for a wide-angle shot. As I drove away from the busy streets of Casper, Wyoming, I came across a spot that I was already familiar with – Hell’s Half Acre (I photographed there a number of times before). As soon as I saw the sign and realized that it would be in the area of totality, I decided to make a stop there, scout the area and come back on the day of the eclipse. Hell’s Half Acre has a very unique and dramatic landscape that is worth exploring and it reminds of Bisti Badlands of New Mexico in terms of its landscape. I scouted the area a day before the eclipse and found some spots that I wanted to come back to. Here is an image that I captured at sunset, showcasing the many vivid colors of the badlands:
You will notice that I used the same formation in the distance as my foreground for the total eclipse shot, as shown further down in this article. This highlights the importance of proper planning and scouting – I would highly recommend to arrive on location a few days in advance and do your best to find the exact spot where you will be photographing from. The only big variable is weather…make sure to check out weather forecast and have other options if your spot does not work out (provided that you can travel there fast enough).
The total solar eclipse was an absolutely amazing experience that is impossible to describe in words…when the landscape darkened and it got as cold as at night, with total silence around us, it was both cool and eerie – unforgettable for sure! Here is a video that I captured in 4K resolution that shows the last few seconds of the totality:
If you have never had a chance to witness a total solar eclipse, I would highly recommend to see it. The next total solar eclipse will land on the US soil in 2024, but there will be other eclipses taking place starting from as early as 2019. To see a list of upcoming solar eclipses, check out this website that shows solar eclipses for the next 10 years. There are also other resources such as NASA available, which provide accurate information on when one can expect to see solar, as well as lunar eclipses.
Great article. I usually come here first to learn. I’m however having trouble. I practiced yesterday and today and with my new ND 5 solar filter, using camera settings above, I’m getting shutter speeds in the “seconds”, even up to 15-30 seconds. I need to adjust my iso to 400 or so, and even “increase” my aperature to f4, just to a barely reasonable shutter speed of like 1/8 second. It’s almost as if the filter is too strong. I suspect we’ll have some clouds tomorrow. It’s almost like I should be using a 10 stop filter instead of a 16.6 stop. What am I doing wrong? Using a z6 with 24-70 f4 at about 70 mm.
That’s puzzling, on a clear day you should be able to keep a shutter speed of at least 1/100 second and a lower ISO like 100. Were there any clouds when you were testing it out?
Another possibility is that you were overexposing the sun somewhat. It should be a very medium brightness.
A 70mm lens is rather short for the eclipse, and it’s very possible that the matrix metering mode would look at the large area of dark sky and attempt to overexpose to compensate. Using manual mode and not worrying about the suggested auto exposure would be better.
During totality, all this advice does not apply, since you will be removing the solar filter, of course. I hope this helps and good luck with the clouds!
Thanks Spencer for the response. I’m glad I practiced. There were clouds on practice day. And I was overexposing the sun. I was on manual mode. Today, eclipse day 4/8/2024, worked out really well. I increased the shutter speed until there wasn’t a “halo” around the sun, and that worked out better. I still kept iso at 400 though.
Off to postprocessing once this very wierd feeling of extreme amazement and awe followed by a very sharp withdrawal feeling after seeing, feeling, and hearing a total solar eclipse for the 1st time. I oddly feel dissapointed somewhat that I was not as to capture an accurate video of the experience. Photos might be better, we’ll see. I may never see one again. Is it possible to capture a 35 mm view of an eclipse on video with massive dynamic range with a decent size view of the eclipse and the corona lighting up nature, minus of course the change in darkness, the cool breeze, and the animal and insect sounds changing? Has anyone done this?
Thanks, Nasim & Spencer!
I’m planning on using my D500 with my 500mm f/4E VR FL and my lens does not take front filters. Just 40.5mm drop-in filters, and I already have the CPL-405 drop in CP/polarization filter. The only thing I can find is an 40.5mm ND2000 filter with 13 stops. Will this work? I don’t really care about photographing the entire event and I’m in California, so not the best spot ever. At least I’ll be able to get a few shots. Will my drop-in CP filter work during the short totality period or do I need a solar filter? Which I can’t even find? Is an 13 step ND filter enough?
No, definitely don’t use a rear ND filter for the eclipse. It is very likely to break due to the extreme heat concentrated on it, then ruin your camera sensor. You’re better off with a homemade Mylar filter on the front of the lens, which you should still have time to make before the eclipse on Monday. Or a dedicated solar film instead of Mylar if you have time to get some shipped.
I don’t think you need a filter at all *during totality*. You do need one at any other time.
Before reading this article, I didn’t know the moon-earth distance varies more than the earth-sun distance (as a percentage of the average, not the absolute value, of course). Learned something new today. ;)
Does a wide-angle lens also need a solar filter? I am *only* interested in taking a wide-angle landscape photo of the eclipse, nothing telephoto at all. Between 14 and 28mm focal length full frame-equivalent.
For example, the eclipse photo in this article taken by the GFX 50s at 18mm full frame-equivalent. Did you have a solar filter for this lens? I assume there is no filter used in the photo, because it is totality, but did you use a solar filter in the minutes before totality to frame the photo? I worry it would make it too dark to see anything but the sun and hard to frame.
I don’t want to do anything dangerous, but most articles about eclipse photography talk about solar filters in the context of telephoto images, and then are not explicit about whether the filter requirements differ for wide angle photography.
You don’t necessarily need a solar filter for wide-angle eclipse photos, even in the time leading up to totality. However, you do need to cover the lens with your lens cap between photos. Only take the cap off for a brief moment for each photo. It’s like any other wide-angle picture where the sun is in your frame – you could damage the sensor if it stays there too long, but a very brief exposure is acceptable.
This composite was taken by my friend Steve Gottlieb on a workshop of ours, using that method:
And a brief guide to how it was captured: photographylife.com/photo…ar-eclipse
Hello Sir. This a fine article. I am traveling to Albuquerque for the coincidence of the balloon fest and the annular eclipse. I am hoping to capture a photo of both together.
I have all the safety gear you have mentioned. My a77 Sony can be fitted with a 300mm, a 16-50mm, or in combination with 2X teleconverter. I have several ND filters. I imagine a composition with some balloons in the foreground. What advice might you offer? What a rare treat!
Newbie here…for the diamond ring shot, how were you imaging at 850mm focal length if your length is only 150-650mm?
lens*
I used a teleconverter with the lens…
Could you clarify which one?
Yes, it was the Nikon 1.4x Teleconverter
Very timely, I was about to shop for the filter. Appreciate all the helpful safety information. Cheers.
Where did you take your eclipse picture at in Hell’s Half Acre, the rocks are beautiful. My brother lives in WY and I’d like to go to this location someday.
Thank you
Rodney
Hi Nassim,
congratulations on this excellent article. May I ask if you did use the Nikon 300 f/4E PF VR during totality (no filter)? Did you notice any issue due the phase fresnel lens element?
Many thanks.