What’s the right aperture for landscape photography? Is it the sharpest aperture measured in the lab (usually f/4 or f/5.6), or is it “f/8 and be there”? Maybe something narrower? Of course, it depends on the photo. But, on balance, most landscape photographers don’t stop down enough!
Table of Contents
Introduction
Let’s assume that you want your photo to be as sharp as possible from front to back – in other words, the nearest foreground and most distant background are both as sharp as possible. (This isn’t always going to be what you want – see Five Common Landscape Photography Mistakes – but it’s true more often than not for most landscape photographers.) Let’s also assume that you’re using a tripod in reasonable lighting conditions, giving you full flexibility over which apertures you use.
What’s next? How far should you stop down? One thing that scares people away from the narrowest apertures is diffraction. In particular, at narrow aperture values, you lose sharpness because the light interferes with itself substantially when it bends through the small opening in your lens. Diffraction is why almost all of our lens test charts show a drop in sharpness at narrow apertures like f/11 and f/16:
However, you can’t just stick to f/5.6 all the time for landscape photography, since you’ll often need more depth of field than that. Instead, most of the time, your choice of aperture becomes a balance. Stop down too much, and you lose sharpness because of diffraction. Don’t stop down enough, and you don’t get sufficient depth of field.
Pop Quiz
Let me give you a few hypothetical examples to test how well you can find the optimal aperture. For all three situations below, assume an optically excellent lens, with the same goal stated earlier: maximum front-to-back sharpness. Focus stacking is banned because it’s a windy day! (Interestingly, the correct answers don’t change with the sensor size that you’re using – although the scenarios and focal lengths discussed below are based on common situations as a full-frame photographer.)
- Scenario one: You’re using a 20mm lens, and the nearest object in the photo is fairly close, specifically 3.0 feet away from the plane of your camera’s sensor (a bit under one meter). You’ve focused at 6.0 feet to maximize depth of field, taking advantage of the double-the-distance technique of hyperfocal distance.
- Scenario two: Your focal length is 35mm. The closest part of the foreground in your photo is 6.0 feet away (a bit under 2 meters). You’ve focused at the optimal hyperfocal distance of 12 feet.
- Scenario three: You’re at a longer focal length of 140mm, and the closest object is much further away – 100 feet exactly (about 30 meters, or roughly the length of a basketball court). As before, your focus distance is ideal: 200 feet this time.
Do you have your predictions? Given the title of this article, did you bias them a bit on the narrow side to be safe? Here’s a hint – not all three scenarios demand the same aperture. I’ll reveal the answers after the following photo.
Ready for the grand reveal? The mathematically optimal aperture values for the three scenarios above are f/13, f/16, and f/16 respectively (derivations here). Even knowing the topic of today’s article, those apertures might be narrower than you expected! After all, these are hardly extreme scenarios as a landscape photographer, but f/16 feels like a pretty extreme aperture. Nevertheless, those are the optimal values.
Actually, in practice, it’s even a bit more dramatic than that. These three answers are correct only when you focus exactly at the double-the-distance point (also known as hyperfocal distance) with an optically perfect lens. If your focusing distance is imprecise, or if your lens has any field curvature, you’d maximize sharpness by stopping down slightly further, such as an extra 1/3 to 2/3 stop.
For context, what would have happened if you had used f/8 in these three scenarios instead? In scenario one, you would have lost about 17% of the photo’s maximum possible resolution (measured in line pairs per millimeter) at both the near focus point and infinity. In scenarios two and three, it would be a 31% loss of maximum resolution. These numbers are according to calculations by George Duovos.
Real-World Examples
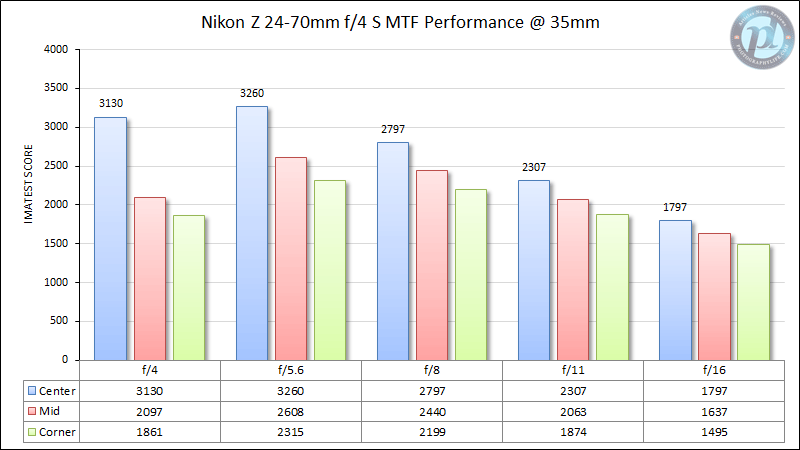
Even if you’re convinced that the answers above are correct, it might be hard to wrap your head around the impact on real-world photos. So, I’ll share some examples using the Nikon Z 24-70mm f/4 S at 35mm. This lens’s maximum sharpness occurs at f/5.6 in a lab environment, but what aperture should you use in practice? It depends on how close your foreground is.
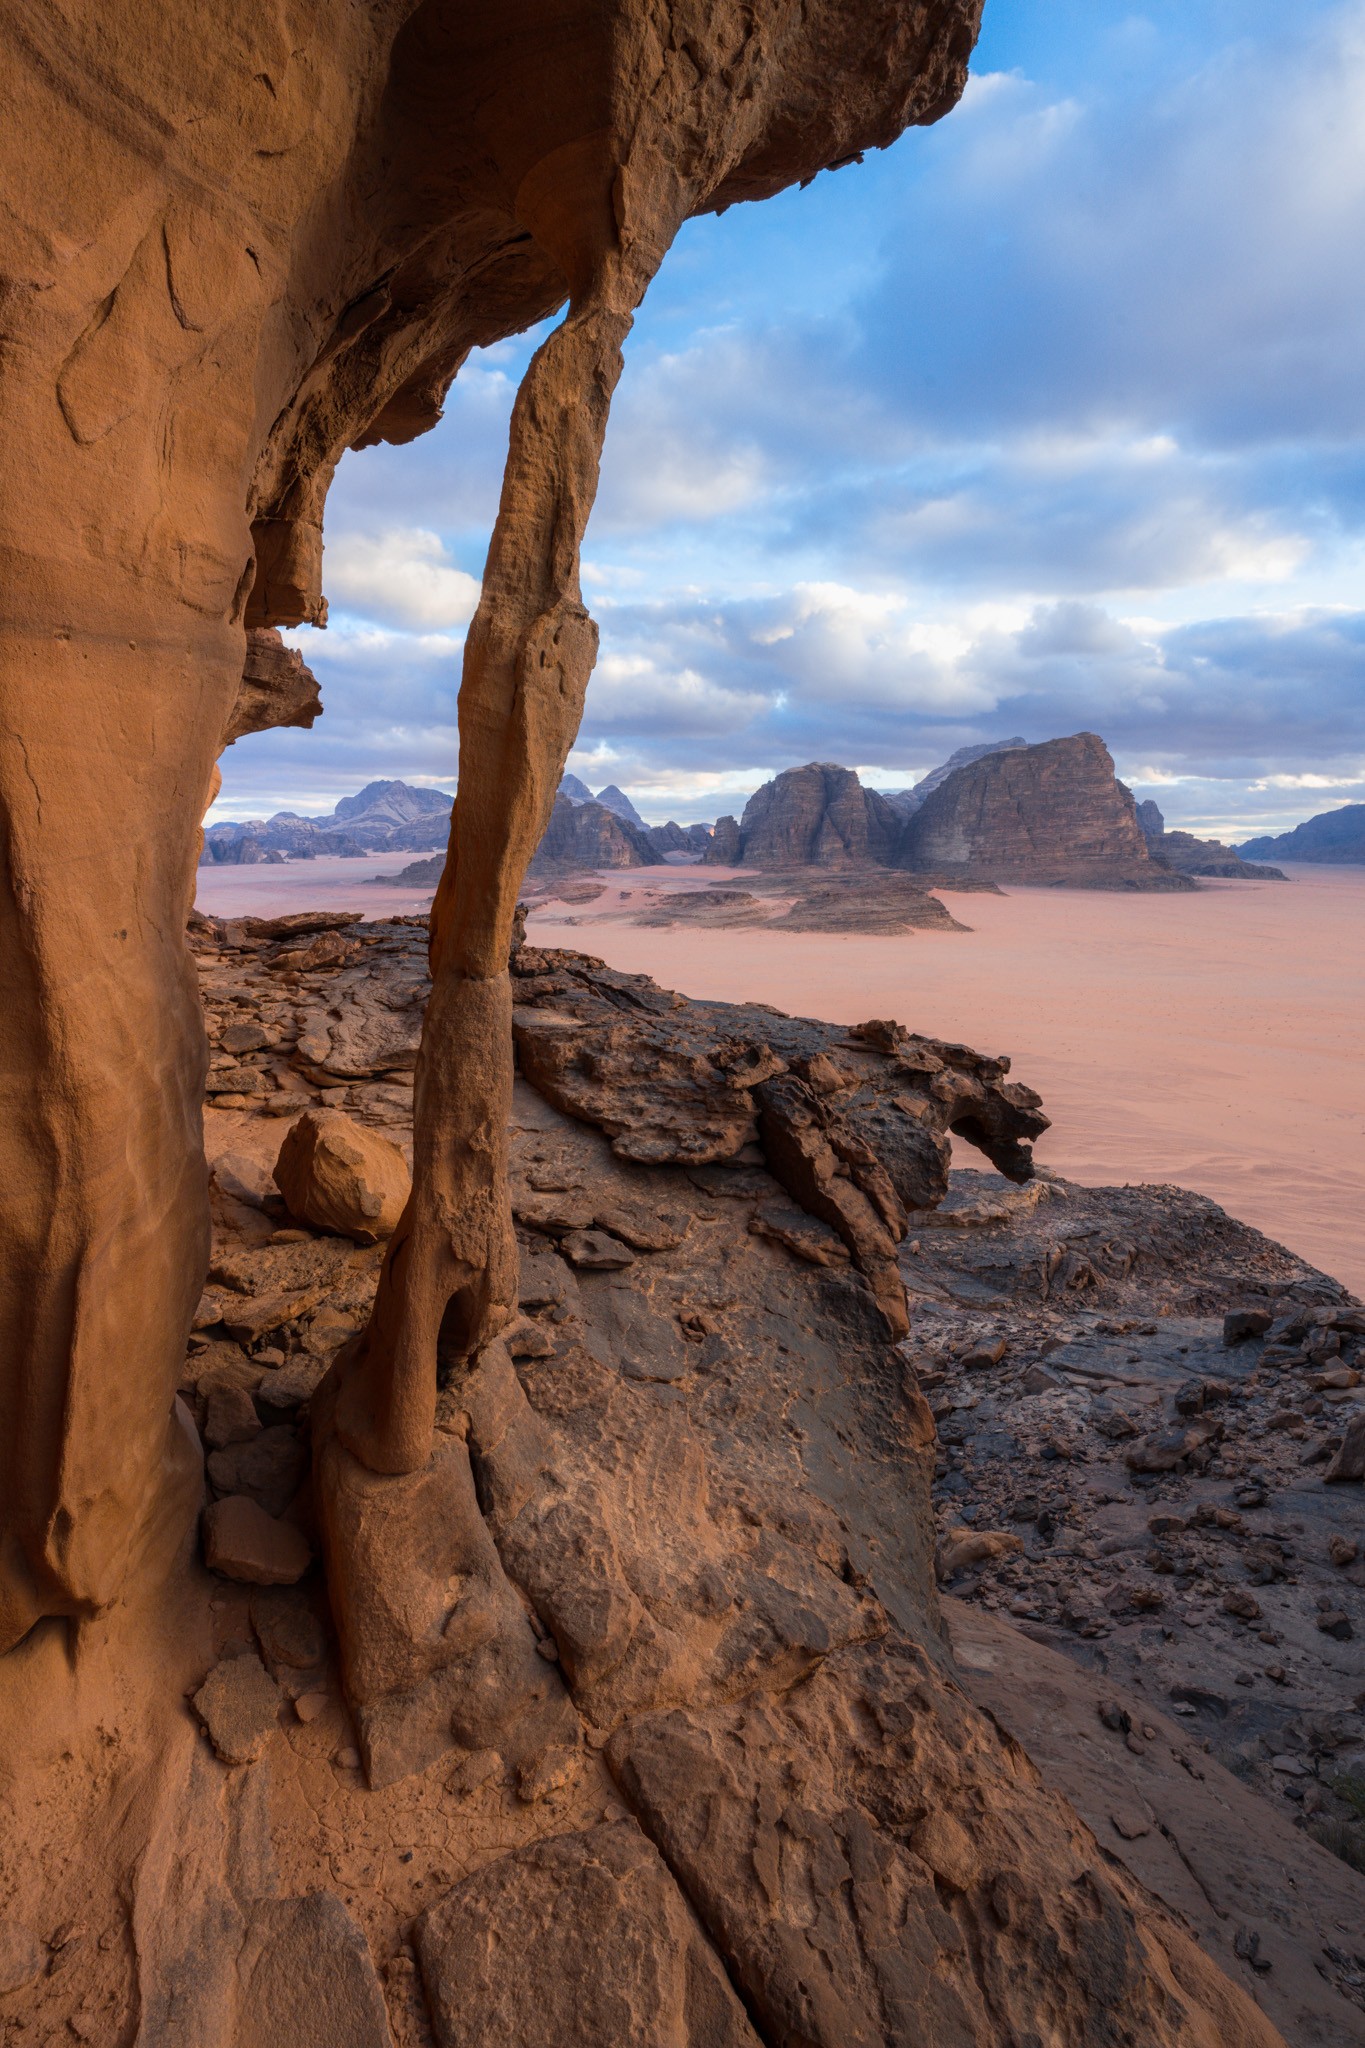
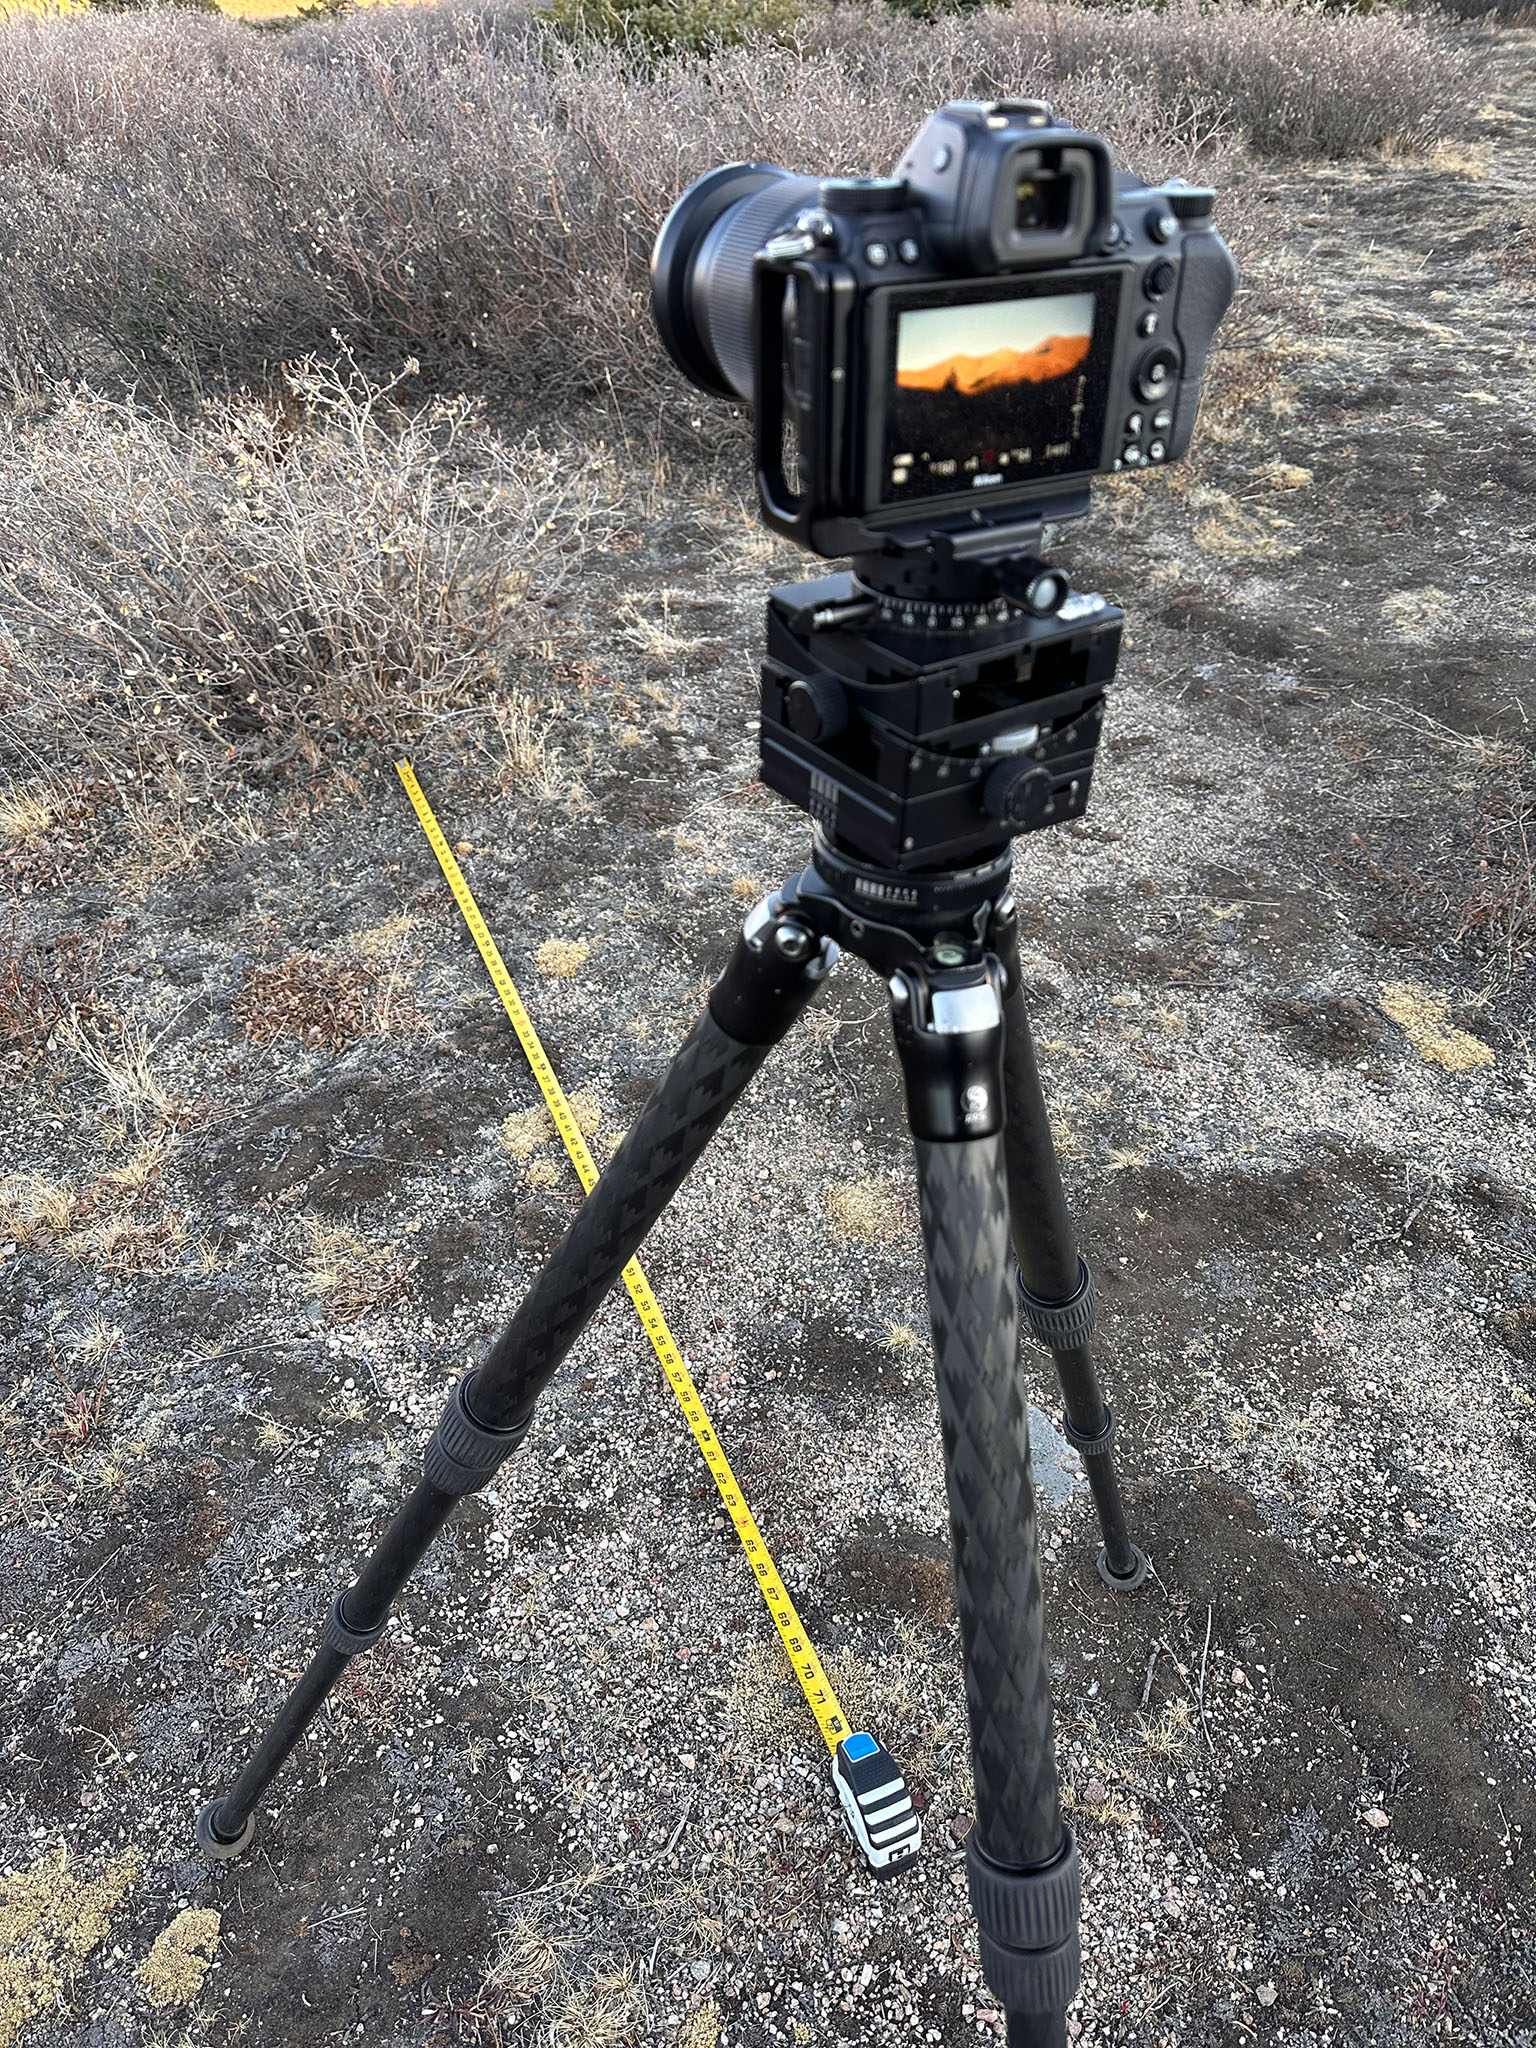
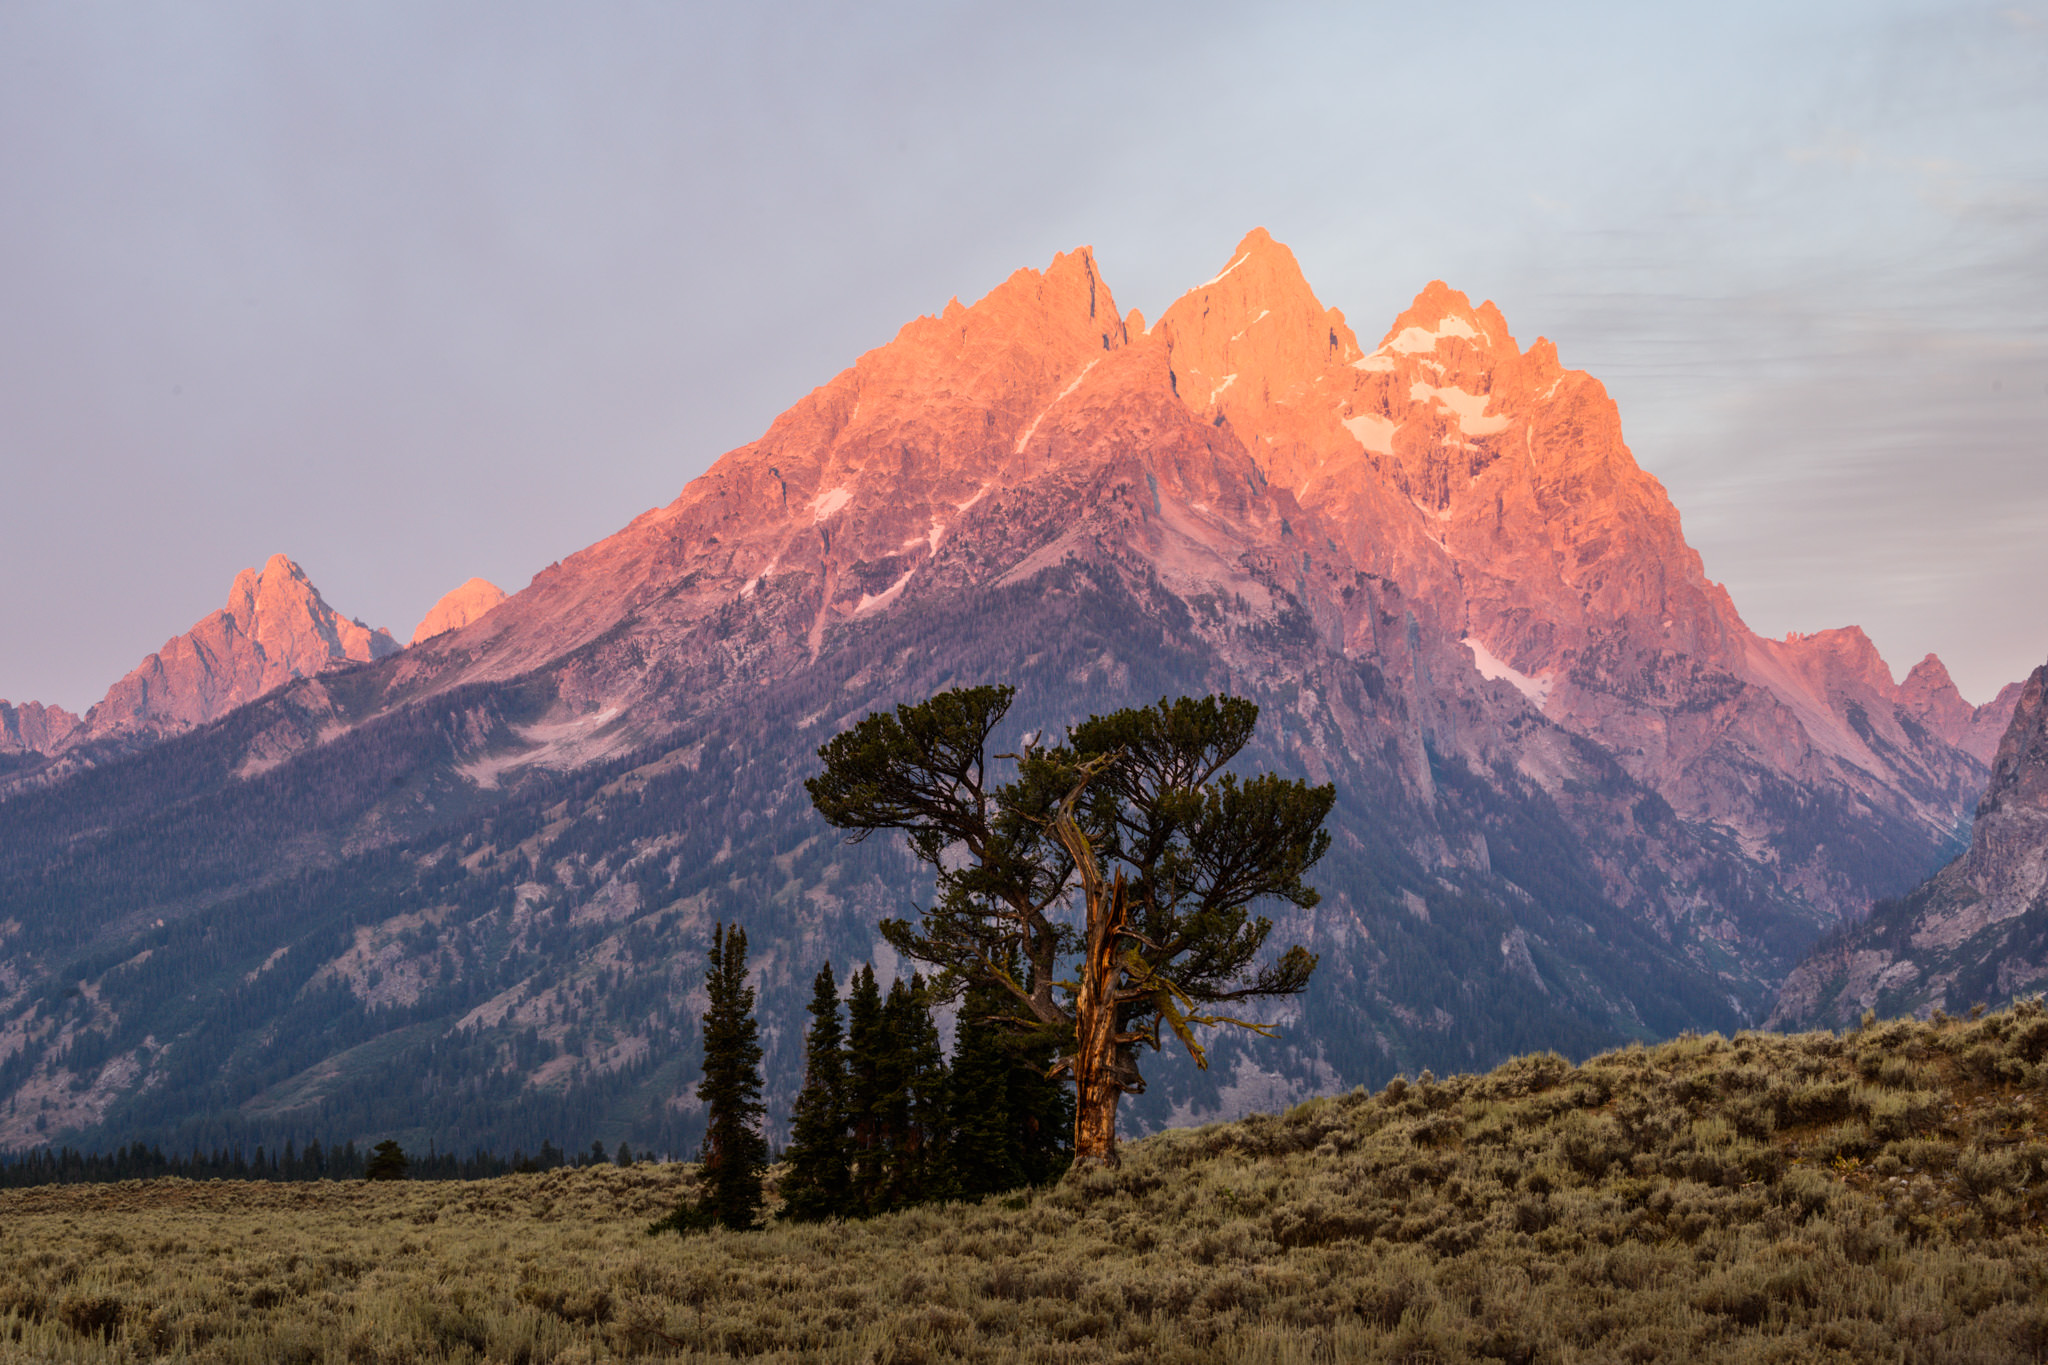
To match scenario two as described a moment ago, I photographed the following scene:
The composition is a little unusual because my camera was pointed directly forward (according to a bubble level) rather than angling the camera slightly downwards. This way, the plane of my camera sensor would intersect with the ground directly below the camera. This allowed me to put a measuring tape on the ground and ensure that I matched scenario two exactly rather than simply eyeballing the distances.
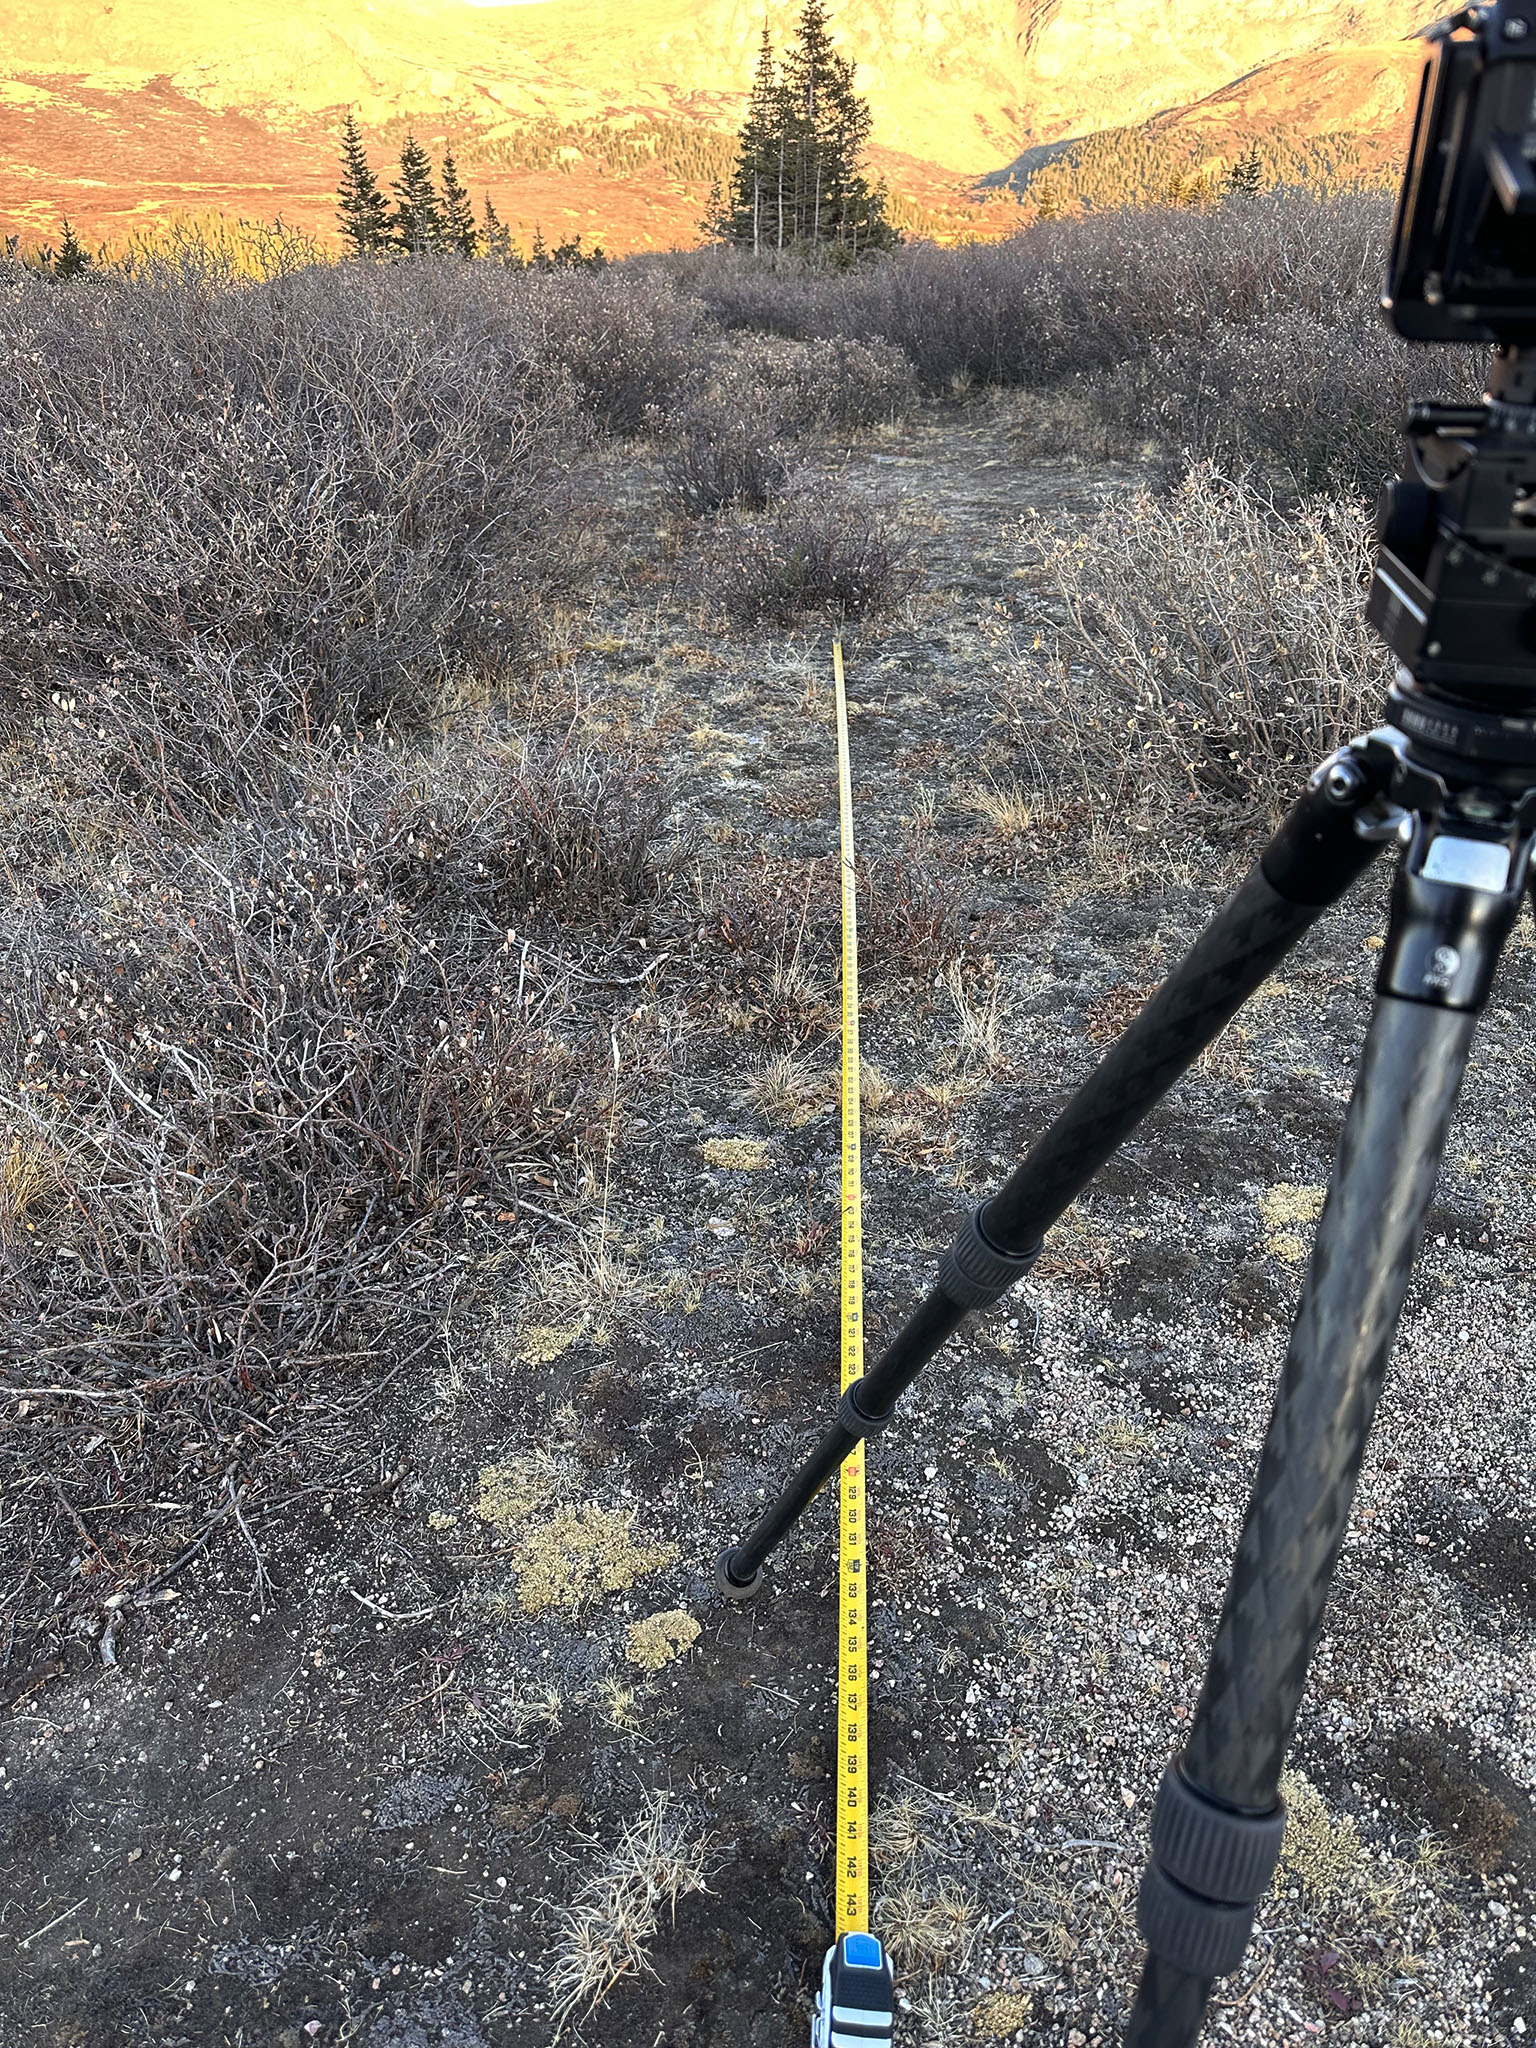
The nearest object in this photo is part of a bush at the bottom of the frame. As you can see, it was exactly 6 feet (72 inches) away from the plane of my camera sensor:
So, I focused at a distance of 12 feet (144 inches), which lined up with a more distant bush in the middleground:
As you’ll see below, I’ve included 100% crops of this scene at every full aperture from f/4 to f/22, with only Lightroom’s default sharpening applied. On this lens, the sharpest aperture in the lab – AKA, at the focus point – is f/5.6. However, according to my calculations, an aperture of f/16 will maximize foreground and background sharpness in this particular scenario. (As a side note, traditional hyperfocal distance charts – which are not very precise or optimal – claim that using f/11 at 35mm will provide depth of field from 6 feet to infinity.)
With that in mind, here are the 100% crops of the nearest foreground and the furthest background. Click on them to see full size:


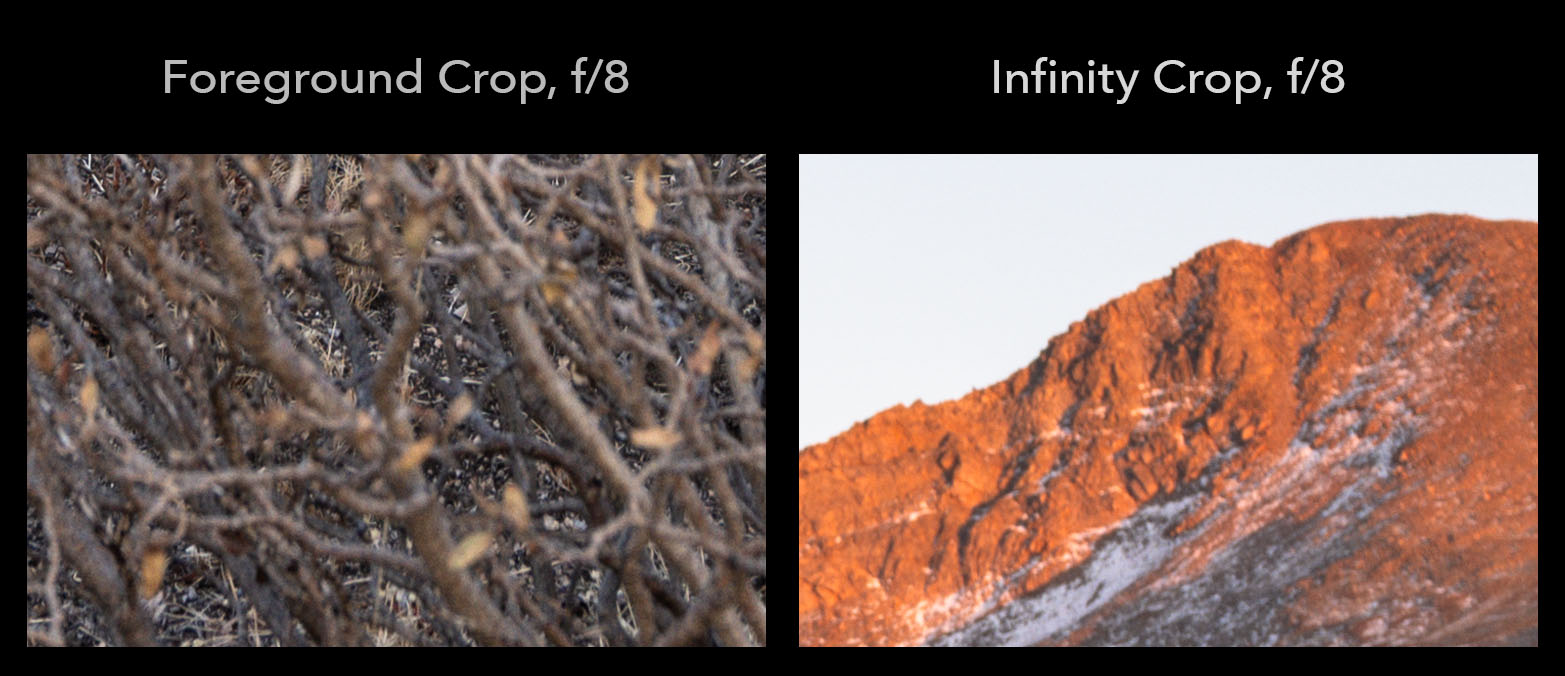
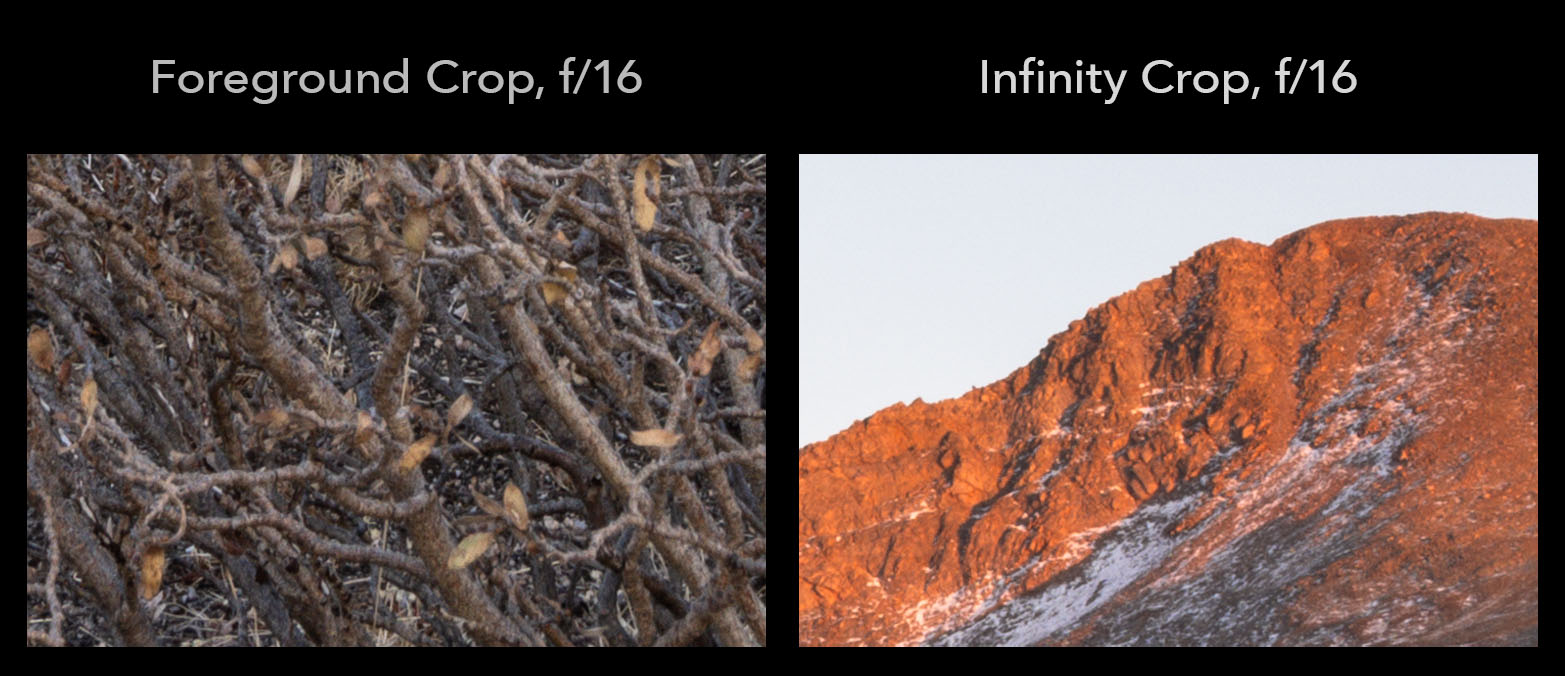
As you can see, the foreground and background here are sharpest at f/16. The images at f/11 and f/22 are almost as good – which they should be, since according to the same Duovos calculations that I linked earlier, those apertures have just a 10% loss in resolution. However, the crops at f/8 and especially f/5.6 are quite blurry by comparison, not to mention f/4. In other words, the math holds up in real-world images.
Takeaways
I see a lot of landscape photographers avoid f/16 or even f/11 because they’re worried about diffraction, yet they don’t realize that the wider apertures they love are costing them far more sharpness! Only the plane of focus will be nice and sharp at f/5.6, whereas the nearest foreground and furthest background will look pretty mushy up close.
By the way, I think this phenomenon is responsible for many of the complaints that “my lens is blurry in the corners” that I hear from landscape photographers. Your corners might be blurry because they’re out of focus, not because it’s a bad lens. In fact, I’d much rather have a kit lens at f/16 instead of a $2000 prime lens at f/5.6 if I wanted my nearby foreground to look sharp.
That said, in landscapes where depth of field is not a concern, feel free to use whatever aperture measures the best in the lab. At distant overlooks, for example, I prefer apertures like f/4 or f/5.6, where my lenses tend to be the sharpest from corner to corner. I don’t want you to always avoid f/5.6 as a landscape photographer – only avoid it when there’s a nearby foreground. (Just keep in mind that the definition of “nearby” is broad, especially as your focal length increases).
If you’re a stickler for maximum detail, and you refuse to shoot at apertures like f/16 no matter what, you have three options. First, you could reduce how much depth of field you’ll need, either by zooming out or by stepping back from your subject. Second, you could use a tilt-shift lens to align the plane of focus more closely with the landscape. Or, third, you could use focus stacking if everything in the scene is completely stationary.
Otherwise, be prepared to use f/11, f/16, or even f/22 if you want to maximize foreground and background sharpness in a lot of landscapes. It may give you more anxiety than using apertures like f/5.6 or f/8, but the math (and the images) don’t lie. The extra depth of field is absolutely worth the loss in sharpness from diffraction.
Finally, if you want more specifics, you can see a full list of optimal aperture values at various focusing distances and focal lengths in this article. I also recommend reading that article if you use a non-full-frame camera sensor size, or just ask me any questions you have in the comments section below.
Conclusion
I hope I’ve convinced you to shoot at narrower apertures more often as a landscape photographer. A lot of photographers will pay for expensive lenses that might be just 10% sharper in the lab, yet they could gain more than that just by using the right aperture and focusing distance in the first place.
Sharpness is hardly the most important thing in landscape photography, but if it’s something you care about, make sure that you’re not setting wildly incorrect apertures. Often, this means stopping down more than expected. Just because an aperture measures well on a flat test chart doesn’t make it the best choice for the three-dimensional world.
Seems to me that this shows that double the distance is misleading at best, and really rather bogus since it relies on precise measurements which are hard to get in many cases, and even when measured with a tape measure lead to bad results. Disappointing.
I mean, I’m not going out into the field with a measuring tape strapped to my hip. Normally you’d estimate these distances, which works perfectly well. Specifically for this article, I photographed precise measurements to serve as proof of my point.
By the way, double the distance is not any more or less misleading than any other tool. It does specifically one thing: it makes the circle of confusion at the nearest foreground equal to the circle of confusion at infinity. This is desirable in some cases and not desirable in others. It’s easy to prove this effect just by taking some photos. I urge you to do so. You won’t find a focusing distance that makes both the nearest foreground and infinity sharper simultaneously.
I generally use f/11, magnify with Manual focus to determine what’s in or out.
The exception would be if stacking 3 shots, likely F/8.
Makes sense to me! I would suggest that you open your repertoire to f/16 in situations where focus stacking isn’t viable due to wind or other subject movement, if you haven’t already.
Interesting article! I like F/11 for many situations as some others have said.
Thanks! Next step is to embrace f/16, and from there, f/22! (I still have a hard time bringing myself to shoot f/22 even when the math proves it’s ideal, but that’s something to work on…)
We are way too hung up with sharpness. Sharpness is just one aspect of a photograph. More importantly for me are the 5 trigger of engagement, as explained by Alister Ben. Luminosity, Contrast, Geometry, Atmosphere and Colour. When it comes to Dof, I trust an app called OptimumCSP. Which, btw, is spot on with what you wrote in the article. I have no problem to use f16 or even f22 when the situation calls for it. Thanks for another great article, Spencer.
Yeah, I don’t know if you started using OptimumCS Pro because of our recommendations years ago, or if it was just coincidence, but that’s the only app I know of that takes this discussion into account! Every other hyperfocal distance app is based on traditional, incorrect hyperfocal distance charts, and they don’t even include diffraction in their recommendations.
Another really interesting article Spencer. Your photo examples really make your point. I’ve been pleased with f/16 results since my pre-digital film days. Even when I focus stack a landscape, I use f/11-f/16 as a way to help make sure that the image will be sharp from front to back. One other advantage of using smaller apertures is to eliminate or greatly reduce vignetting, especially with wide-range zooms.
Thanks, William! Focus stacking at f/11 or so is an underrated technique. Since focus stacks are so susceptible to small subject movements, it’s best to keep the number of photos (and the time between them) as small as possible. Only in a totally stationary landscape like a slot canyon would I consider focus stacking at my lens’s sharpest aperture of f/4 or f/5.6.
For quite some time my favorite lens was the 70-200 f4. I noticed after a while that for the subjects I shot then, I pretty much always had to be at f16. In recent years though, I very rarely shoot subjects with a distant background, but more on the ground or a tree trunk and the like. Could you write an article about dof for that case as well? I often find myself wondering which f stop to use. For example, if the subject is .5m deep, like a tree trunk, and 5m away. How do I calculate the f stop and focus point? Since double the distance isn’t useful in that case. It gets even more complicated with subjects on the ground, since the subject is flat, but not parallel to the sensor etc.
There actually is a formula to calculate the sharpest aperture front-to-back when the background is nearer than infinity, but it’s much more complicated. I know that the app OptimumCS calculates it correctly. Personally, I just go by educated guesses in those situations. Or, if it’s an intimate landscape, I often don’t worry about depth of field and deliberately allow the background to blur.
Thanks for this interesting article. Need to try myself next time.
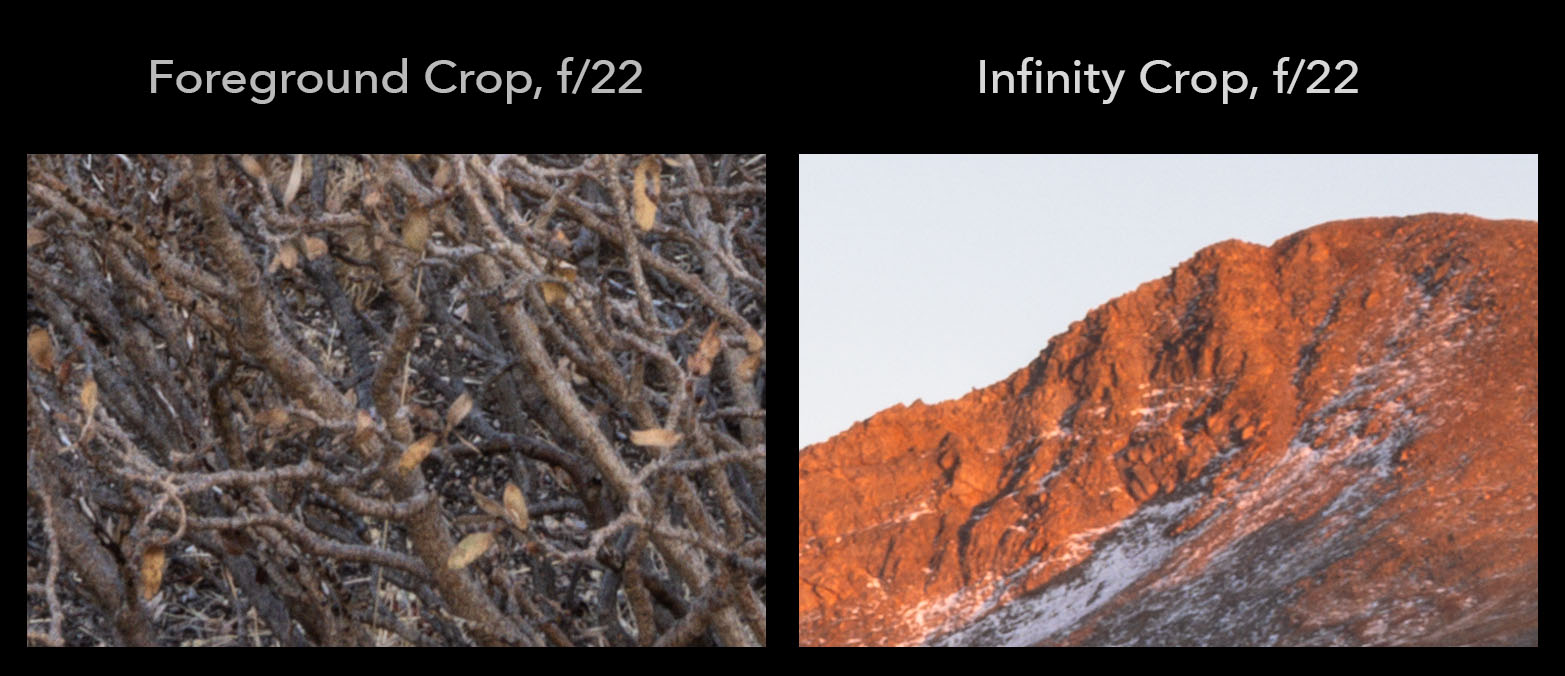
Would have been interesting having your picture also done at f/13 as the calculation tool I use tell me that this is the limit aperture to have everything sharp from 1.757m to infinity.
By the way: how far away was the mountain in the cropped images?
Sure thing, Patrick. The mountain is about 1-2 miles away – far enough to be effectively at infinity focus, but close enough to walk to!
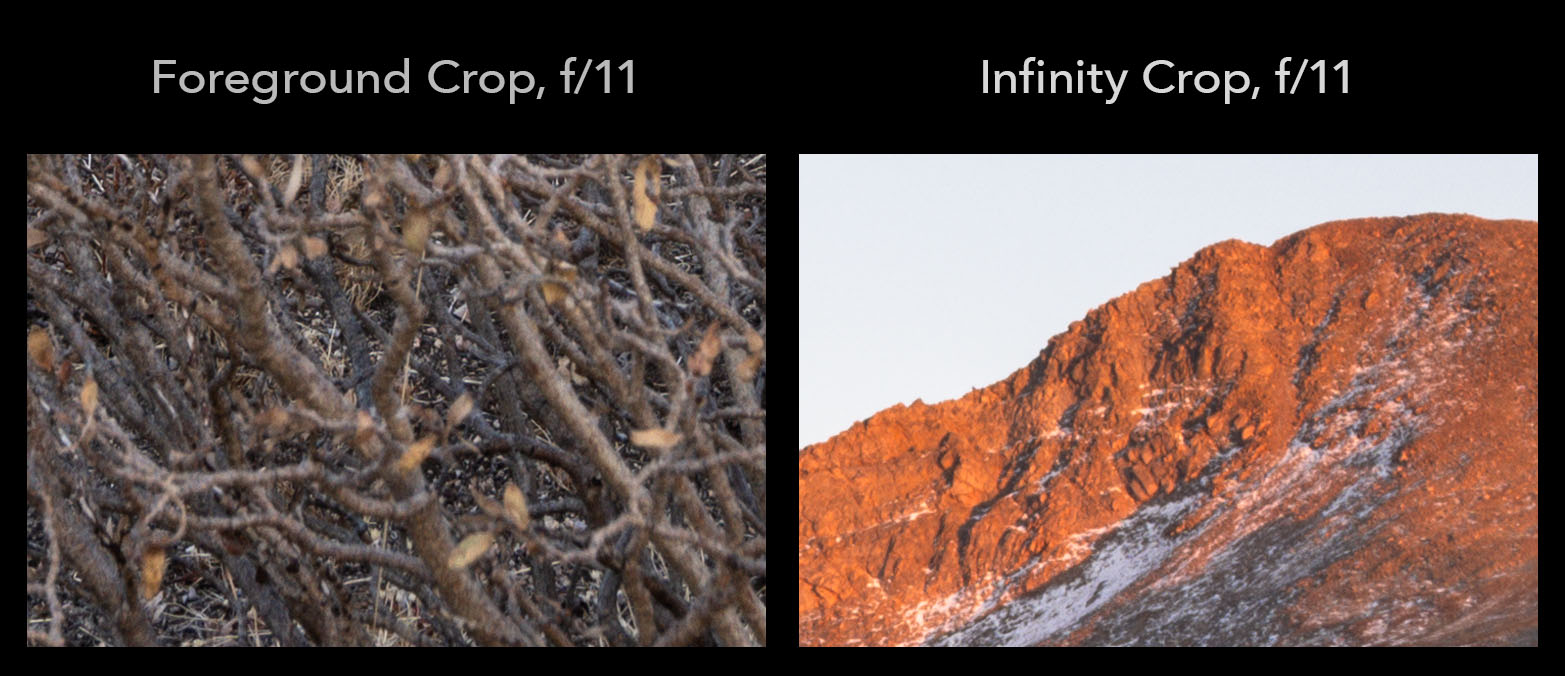
As to your other question, I actually took a separate set of images at every aperture in 1/3 stop values in case someone asked. The difference between f/13 and f/16 is quite small, but sharpness still favors f/16. Here’s the background at f/13 and f/16 – exceedingly small, negligible differences to my eye:
And here’s the foreground at f/13 and f/16 – in this case, I can more clearly see that the f/16 image is sharper:
This of course assumes that you want distant objects to be really sharp. I think that is usually not the case unless that it the landscape’s image main subject. Even an image where every distance is of interest, I will not be afraid of shooting at f/8.0 and letting the background be a little out of focus, which seems natural anyway.
But this is also why I will buy every tilt shift lens that Nikon makes when they get around to making them for Z. Focus stacking does not work if there is any motion, like a wind. I have experimented with my Nikon 24mm PC and I like the affect of enhanced sharpness.
I’ve taken plenty of photos before where the background ended up a bit fuzzy because of my imprecise use of aperture. At least in classic landscapes (as opposed to intimate landscapes, where I often like this look), it tends to feel pretty awkward to me – especially if it’s as extensive as the f/5.6 or f/8 example crops shown in this article.
That said, you’re not the only person who I’ve heard say that they usually don’t want distant subjects to be really sharp. If any of our readers has a set of photos where they employed this technique deliberately in grand landscapes, I’d be interested to see them. I don’t like it in my own work, but that might be a product of the subjects that I choose or of my subjective personal style.
I am assuming your are testing with a Z8/9. It would be interesting (to me) to see how the resolution of the same lens compares on the Z6 II. That would show the interplay between diffraction and pixel size vs. number of pixels. That would be fantastic, if you could.
Good question! These principles apply regardless of the sensor’s resolution. In other words, the sharpest image is the sharpest image, no matter how many pixels are there to record it.
However, lower resolution sensors would show less of a difference between the various shots. Even though f/16 would still be optimal, for example, it would be a smaller advantage than what is shown here. Next time that I’m out with my Z6, I’ll try to take a similar set to demonstrate.
“In other words, the sharpest image is the sharpest image, no matter how many pixels are there to record it.”
I hope you don’t mind my attempt to further clarify:
In other words, the sharpest image at the image plane is the sharpest image, no matter how many pixels are there to record it.
That’s absolutely right, I should have been more precise!
Great. Thanks in advance.
I can’t help thinking that you are way overthinking this whole thing. I noticed that you didn’t say how far away the far end of your photo would be (one mile, five miles, half a mile?). But I can say that I think that one should take into account the way the eye sees a scene. We don’t see maximum possible sharpness when we’re looking at a far landscape. Therefore a scene that is sharp all the way to the far mountains will look fake if we keep it that sharp. I really would not like to see a person’s eyeballs if I am standing in Colorado and shooting into Utah. :) That has been my main criticism of z lenses – they are too sharp. Having said that, I would have shot at f/11 and bracketed up to f/16 and down maybe one stop and then chosen the picture that I liked best of the possible three or four. This is not scientific, but it has always worked for me.
True, this technique and my recommendations in this article only apply if someone wants maximum sharpness from foreground to background. It doesn’t sound like that’s your goal as a photographer, so I wouldn’t recommend changing your current method!