Determining the ideal JPEG quality setting in both Photoshop and Lightroom can be challenging, because we often see two different values to choose from. Photoshop gives us compression levels from 0 to 12 when saving JPEG images through the “Save” or “Save As” dialog, while Lightroom only allows us to input a percentage. While percentages are easier to understand than numbers from 0 to 12, as we relate to 100% being the “best image quality” easier, Adobe also created a confusion as to what number represents what percentage, since the ranges of numbers are not provided in any of the help documents. The truth is, the percentages we see in Lightroom do not really scale from real 0 to 100 in single digits. Adobe simply mapped the 0 to 12 scale to the percentage scale. This ultimately means that changing from one number to another, like from 85% to 90% might make no difference whatsoever in compression or image size, while changing from 84% to 85% would make a big difference.
Below are the different screens we are used to seeing. First, here is the screen that shows up when you click “Save” or “Save As” and choose JPEG in Photoshop:
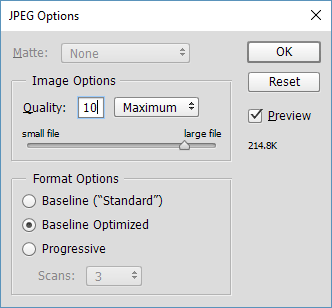
As you can see, the values you can choose from a represented in a number scale from 0 to 12. And here is the Lightroom export screen:
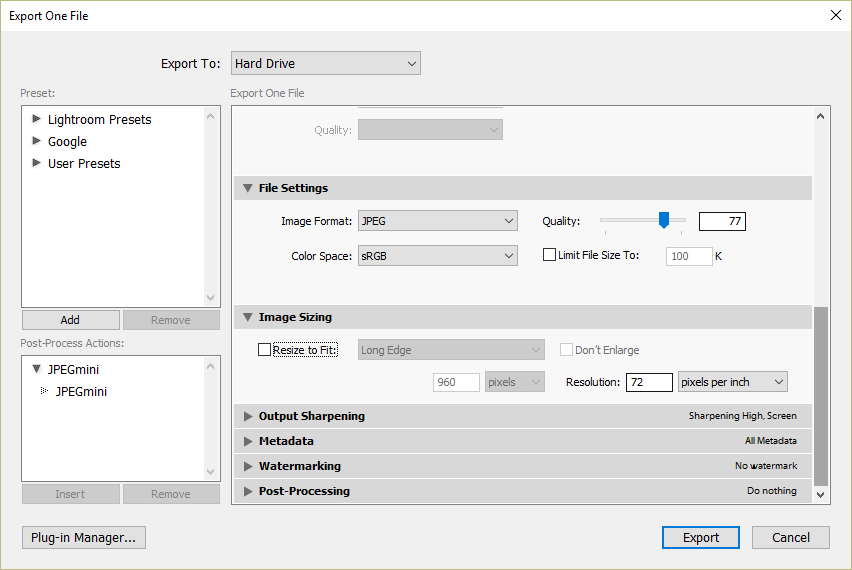
Here we see the representation of the JPEG compression scale from 0% to 100%.
Now let’s take a quick look at the table below, where the 0-12 values from Photoshop are mapped to percentages:
| PS JPEG Compression # | PS Scale Name | Equivalent in % | Sample File Size | Space Saving in % * |
|---|---|---|---|---|
| * Space Savings represented relative to the largest file size at 100% Quality (27.3 MB) and full resolution (captured with a 20 MP camera) | ||||
| 0 | Low | 0-7% | 2.2 MB | 1240% |
| 1 | Low | 8-15% | 2.4 MB | 1138% |
| 2 | Low | 16-23% | 3.0 MB | 910% |
| 3 | Low | 24-30% | 3.4 MB | 803% |
| 4 | Low | 31-38% | 3.9 MB | 700% |
| 5 | Med | 39-46% | 4.6 MB | 594% |
| 6 | Med | 47-53% | 5.2 MB | 525% |
| 7 | Med | 54-61% | 5.8 MB | 470% |
| 8 | High | 62-69% | 7.8 MB | 350% |
| 9 | High | 70-76% | 9.8 MB | 278% |
| 10 | Max | 77-84% | 12.9 MB | 212% |
| 11 | Max | 85-92% | 17.6 MB | 155% |
| 12 | Max | 93-100% | 27.3 MB | 0% |
So what does this mean? It basically means that some numbers don’t matter at all, while others do quite a bit when we use the percentage scale. Choosing say 80% quality, is the same thing as choosing 77% or 84%. Until you get to 85%, nothing really changes. The same goes for 90% – it is no different than picking 85% quality!
Photoshop’s Save for Web
In my original article I wrongly stated that the “Save for Web” feature of Photoshop worked similarly as the percentage field in Lightroom, which is wrong (thanks to Aaron Shepard for catching that!). In fact, the “Save for Web” feature of Photoshop works differently, as it uses a different compression algorithm compared to the 0-12 numbers or the percentage in Lightroom. Here, every number from 0 to 100 matters and the file size can vary in size considerably.
Here is the “Save for Web” screen in Photoshop:
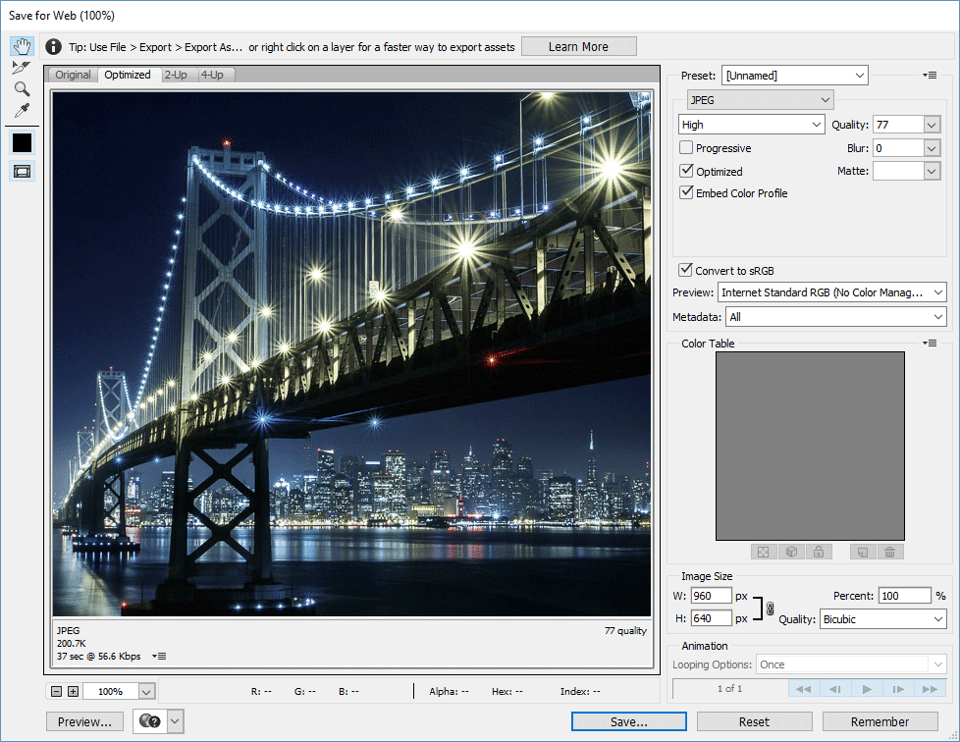
What’s important to note about this screen, is that it is optimized for smaller resolution files that are meant to be published online. As you can see, there are more ways to customize the final JPEG and you can decide whether you want to preserve the EXIF data (Metadata field) or strip it out completely, along with the Color Profile.
Best JPEG Compression Level
If you have been using 12 or 100% quality when exporting JPEG images all the time, you probably ended up with a lot of bloated images that are huge in size for no good reason. The thing is, you are defeating the purpose of the JPEG format when going with 100% all the time, because you are applying very little compression, which results in huge files. Not only does this increase your storage needs, but it also does not make websites that allow uploading images happy, as you are potentially increasing their storage and bandwidth costs as well. While many websites have gotten smart about letting people upload huge images by applying compression on them, very few sites do it smartly. So why waste all that bandwidth and storage by exporting to 100% all the time?
My baseline recommendation is to use 77% in Lightroom, or value 10 for JPEG compression in Photoshop. It often results in roughly 200% or more in space savings and usually preserves enough detail in the scene without adding visible artifacts. There are rare situations where 77% can create banding in the sky, so if you see such problems, bumping up by one level to 85% will usually take care of that. I practically never use anything higher.
For a lot of photos though, even 77% can be overkill. If you look at the above table, going below 10 results in pretty significant space savings. If you want to reduce the image size even further, try pushing quality down to 62% or even 54% to see if the result is acceptable. Please note that the results will vary from image to image. Some photographs will do fine at low compression levels, while others won’t look their best.
Pablo
For what it’s worth, this is what I do, bearing in mind I am a quality freak.
I save web images at quite a large size – 1920px on the long side – as I want my images to display large on large displays without being upsampled by the web host’s algorithm. With the increasing popularity of 4K and 5K screens I am considering going larger still (2560px). There are arguments about image theft but with advent of very clever AI upsizing software, this in my eyes falls by the wayside. It is what it is.
I initially save at 100% quality whatever that translates to in the software and then use JPEGMiniPro to compress the file for upload. It does a fine job of reducing file size without visible loss of quality. Nasim wrote an article about it a couple of years ago.
My files end up at around 500Mb which I feel is a fair compromise. Not the fastest, but good enough. I don’t upload thousands of images, just the one’s I feel are worth looking at. If you shoot stock or have a big website you might need to rethink both size and compression.
Question: what photoshop size would you suggest uploading to a website/portfolio where you have to take into consideration quality and loading time. I feel like 10 would be too much. between 5-9 is there an ideal size?
Question: What is the relationship between (1) reducing a JPEG quality index (any of them, be it 0-13 or %) VERSUS (b) changing the number of “pixels on the long side”? Would it be better to lower the “pixels on the long side” but maintain a high quality level, i.e., a low level of lossy compression. Or is it better to just specify a lower level of quality and let the software decide on the best means to achieve that quality?
I am similarly curious as to the effect of reducing DPI versus lowering a quality index.
I will not be surprised if this is too esoteric for anyone to have tested, but given this particular crowd I also won’t be surprised if some of you HAVE tested it!
Thanks!
Art
Art Altman
I think you are in a muddle? Your question highlights a widely misunderstood area of digital imaging.
The JPEG quality setting is not really comparable to the pixel resolution. It’s an apples and pears question. Pixel count (resolution) and compression level are two different animals.
If you need a certain display size, then that is the size you have to set.
If you need say, 1920px on the long side because that is required for say, a competition or because your image needs to be a certain size for satisfactory screen display, then 1920px is what you need to use. Once you have set your size, you can set the quality (compression level) according to the maximum file size allowed, how good you need/want your image to look when displayed or how fast you want it to open.
You can have any combination of size and quality – large (quality high, medium or low), medium (quality high, medium or low) and small (quality high, medium or low). How you mix and match is up to you according to circumstance.
It doesn’t require testing because (a) it’s been tested to death by those better qualified than you and me and (b) because it’s a matter of choice and circumstance.
“I am similarly curious as to the effect of reducing DPI versus lowering a quality index.”
First, DPI (dots per inch) is the wrong term to use when discussing digital images. The correct term is PPI (pixels per inch). Unfortunately, the two terms are often used interchangeably as if they were the same thing. They are not.
PPI defines how large your image can be printed.
DPI describes the number of ink dots laid down per inch by a print device. It bears no relation to PPI.
Second, if by DPI you mean the resolution figure (e.g. 72, 96, etc,) entered in the Image Size box of the Export dialogue, the answer is that it’s completely irrelevant. That number has absolutely no bearing on screen or projected image display. PPI resolution does not exist (even as a concept) in the binary, digital domain (the world of video/computer/projector screens, hard drives, graphics cards or processor chips).
The only resolution that matters or has any effect on web or screen is the pixel dimensions e.g. 1024x 720. You can put any figure you like in the resolution box – 7.2ppi, 72ppi, 720ppi, 7200ppi, 72000ppi – the images will all look (and be) identical because PPI has nothing to do with screen display, is irrelevant in this context and is ignored by the software.
PPI resolution only applies if you are sending your image to a printer for printing out on paper or some other physical medium.
Hope that helps.
Thanks for this article,… The space saving percent greater than 100% Its unreal. For example for PS compression quality=11, the space saving % related to the full quality file must be: (27.3 – 17.6) / 27.3 * 100 = 36%, not 155%.
When trying to export pics from Lightroom, I get the “not enough space error”. So if I “edit in” from Lightroom to Photoshop, then export through Photoshop it works. With that being said my problem is after I get the pic onto Photoshop it doesnt have the same quality so ultimately losing picture quality just to get the edited picture saved. Pretty new to Photoshop, is there something I’m not doing right?
At the risk of reiterating what Nasim and Aaron have said, it’s important to bear in mind that you can’t compare Lightroom’s JPEG quality settings wIth any other application because it’s unique unto itself.
Interestingly, 0 quality does not mean zero quality as this setting can produce quite decent results – better than many other programmes at say, quality 50.
In Lightroom, 0-100 is in effect 0-12 as Lightroom maps its 0-100 quality scale to only 13 different quality settings so that quality changes occur in discrete steps, not in a linear fashion.
This explains why quality 7 looks identical to quality 0 and quality 54 looks identical to quality 61 – but quite different when you increase it just one point – to 62.
Even more interestingly, Photoshop’s “Save as JPEG” dialogue comprising 13 (!) quality settings seems to mirror Lightroom’s behaviour in adjusting JPEG quality.
Whether this is real or merely coincidence is not clear.
In contrast, the ‘Save for Web” option in Photoshop clearly deviates from Lightroom’s behaviour as shown by the fact that a quality setting of 54 looks different to a setting of 61 whereas in Lightroom these two values produce an identical result.
Thus, while there is some (partial) correlation between Lightroom and Photoshop, this entirely falls down when comparing with quality settings in other applications. Although other applications may use 0-100 quality scales, these are entirely unrelated to those in Photoshop and Lightroom. Different applications implement these apparently similar settings in entirely different ways using different mathematical algorithms.
So, those who use the maximum quality setting for their JPEGs are in all likelihood wasting a lot of disk space, upload bandwidth and opening speed on the web unnecessarily. On the other hand, those blindly using a lower setting involve themselves in a lot of trial and error and risk showing posterization and other artefacts in their uploaded images.
JPEGminiPro, if it truly does what it says on the tin, looks like manna from heaven.
I just took the plunge and bought it.
Thanks very much for this article, it’s very very useful. Until reading this I had no idea of what, objectively, the numbers meant.
Of course the thing that can’t be measured is what difference the different compression levels make to the eye. (i.e at what point image degradation can actually be seen – particularly in print)
…or can it?
Is there an optimum file size vs. image size scale, so that a particular print size below its optimum file size will have noticeable compression artifacts?
I’m referring to printed media here..& I don’t know if the same would apply to commercial lab & home printing.
I hope I’m explaining myself clearly!
Nasim, something puzzling that I’ve seen at times is that, for example, the estimated file size for Photoshop quality 5 is actually a little smaller than for Photoshop quality 4. Have you ever noticed anything like that?
Thank you Nasim!
Nasim,
This is a useful analysis! I am now using this guidance (77%) for my Lightroom export.