ISO adaptive presets are one of my favorite ways to customize Lightroom. They can help you get better image quality out of your files at both low and high ISOs, and they are so easy to use. Despite their benefits, they can be a bit unintuitive to set up. I’ve worked out a quick and consistent way to get an ISO adaptive preset built for any camera you own. In this guide I’ll show you exactly how to create and install your own custom ISO adaptive preset in Lightroom.
Table of Contents
Why Use an ISO Adaptive Preset?
Consider the default adjustment that is applied to your image on import: It’s typically an Adobe Color profile with a one-size-fits-all set of sharpening and noise reduction values. For base ISO shots, this applies an unnecessary amount of color noise reduction, and it may not be aggressive enough in sharpening. Meanwhile, on high ISO shots, you’ll often want to apply more noise reduction than the default, especially luminance noise.
While you can correct these shortcomings manually, you’ll have to do so for every shot you want to edit. Instead, if you have an ISO adaptive preset configured as your default for that camera, Lightroom will look at the ISO of your file via the EXIF data and select the appropriate amount of sharpening and noise reduction. On my Nikon Z7, for instance, the default noise reduction is too aggressive, reducing all the great detail available in the files.

An ISO adaptive preset can adjust any value in the Develop module, just like a “regular” preset, but I find that it’s best used for sharpening and NR, as the values for other sliders typically aren’t related to ISO.
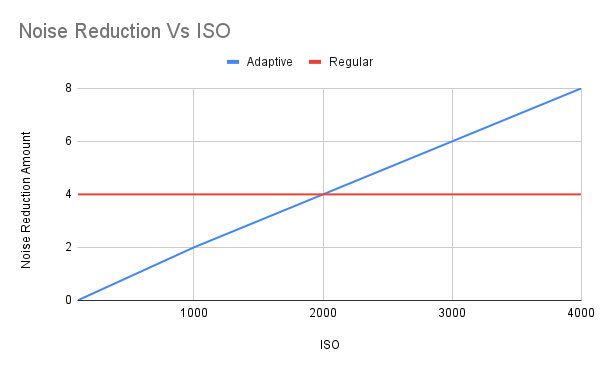
Our goal is for Lightroom to apply increasingly more noise reduction automatically at higher ISOs (the blue line below) rather than using the same noise reduction at every ISO (Lightroom’s usual default; the red line below).
At a broad level, to create ISO adaptive presets, you give a set of reference images for Lightroom to work from, and then it guesses at the in-between values. For example, you may tell Lightroom to turn off color noise reduction at base ISO and put it to +25 at ISO 3200. Lightroom will then guess at the in-between noise reduction values, like an image at ISO 800.
Below, I’ll dig deeper into the rationale behind selecting the best images to use as references, as well as the optimal noise reduction values in Lightroom. But to save time, you’ll be happy to know that you don’t have to create a reference image for every ISO step in your camera. You could choose as few as 2 images to create the adaptive preset, covering a low and a high value, but I feel it’s better to work from at least 3 or 4, depending on the ISO values you typically shoot at.
Selecting Your Images
To get started, you’ll need to identify some suitable images to work from. Good images to work from will have a few characteristics:
- They are your “typical” shots. For example, if you shoot primarily landscapes, try to select landscape images, as appropriate sharpening levels can be impacted by the content of the image.
- Image content is easy to see without other adjustments. In other words, the image is properly exposed and the subject has a typical level of contrast.
- They are all from one camera model. Different cameras will behave differently at various ISOs.
- They cover a range of ISOs. I typically use 4 shots, covering base ISO through 6400, equally spaced (ISO 100, 400, 1600, and 6400). While there’s a lot of technical background to ISO (check out our article on ISO invariance for more info), I don’t really think you need to worry about things like dual-gain sensors for this activity. Instead, just space out your selected ISO values to get a good feel for how your sensor behaves at low, middle, and high ISO values.
- They are raw files.
- They are free of shake, blur, subject movement, etc. These one-off factors make it difficult to judge sharpening.
- They are shot on a typical lens for your work. This is a personal consideration – if you primarily shoot on a 24-70, use those files. If you’re mainly using a 300 f/2.8, use those. For use with multiple lenses, consider using the one that requires the lowest sharpening amount most of the time, since you don’t want to over-sharpen images by default.
- They are unedited files or can be “reset” without issue. As you’re creating a preset from these files, you don’t want to have any edits on the files. If you select a shot with edits, you can create and reset a virtual copy in Lightroom to allow for a “blank slate”, that can be deleted after creation.
- They are all in one catalog. To create the preset, you need to be able to select all the files at once.
Creating the Adjustments
Once you’ve got your set of images picked out, I’d suggest creating a little collection for them. From here, you can arrange them in order of ISO, just to help keep things straight.
Open the lowest ISO image in the develop module. Then, configure your settings as desired, with a focus on noise reduction and sharpening.
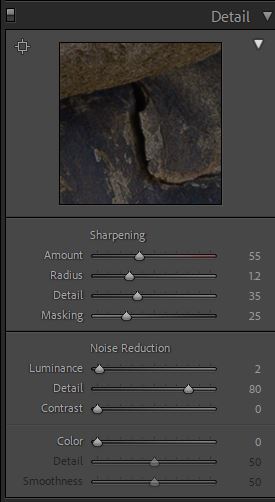
Remember that changes you make to White Balance or other settings will impact the final preset, so avoid changing those values. This is also a great place to change the default profile if you prefer a different base look for your image. I prefer the Neutral profile for my camera over Adobe’s more aggressive Adobe Color profile, so take the time to check out a few of the options available.
When setting Sharpening and NR values, don’t forget the power of the alternate viewing modes. Accessible by holding Alt or Option and dragging the slider, these viewing modes help you better visualize the impact of the respective slider. For instance, holding the Alt/Option key while dragging the Masking slider reveals where the sharpening is to be applied.
Setting these values is all a matter of personal taste, as well as a decision based on what you shoot.
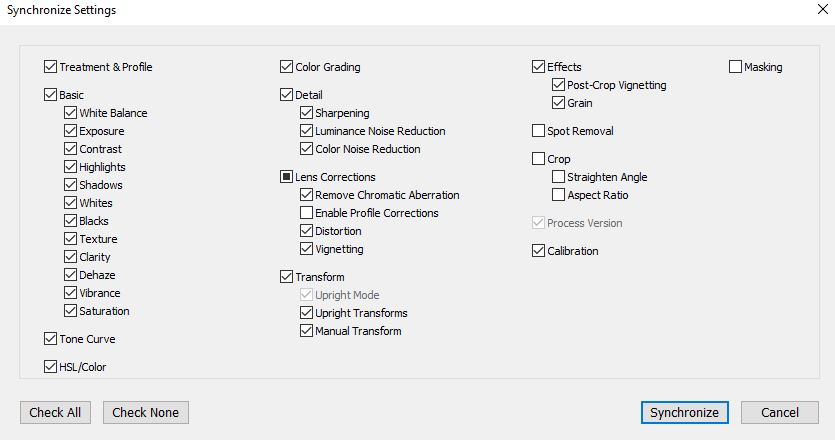
As I move through the files, I just sync the previous file’s settings over (via Sync Settings, Control+Shift+S), adjust for the higher ISO, and move on to the next file. With this, you can adjust all 4 files in a minute or two.
At the end, you’ll want to have each file look “right,” with the appropriate level of sharpening and NR for that ISO.
Creating the ISO Adaptive Preset
Once you’ve set up your files, it’s time to create the preset.
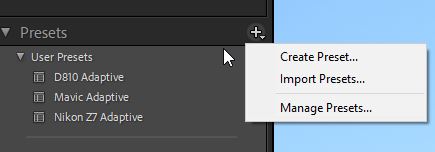
To do so, select all of the files, return to the Develop module, and find the Presets panel on the left hand side of the screen. Hit the plus button, then select Create Preset.
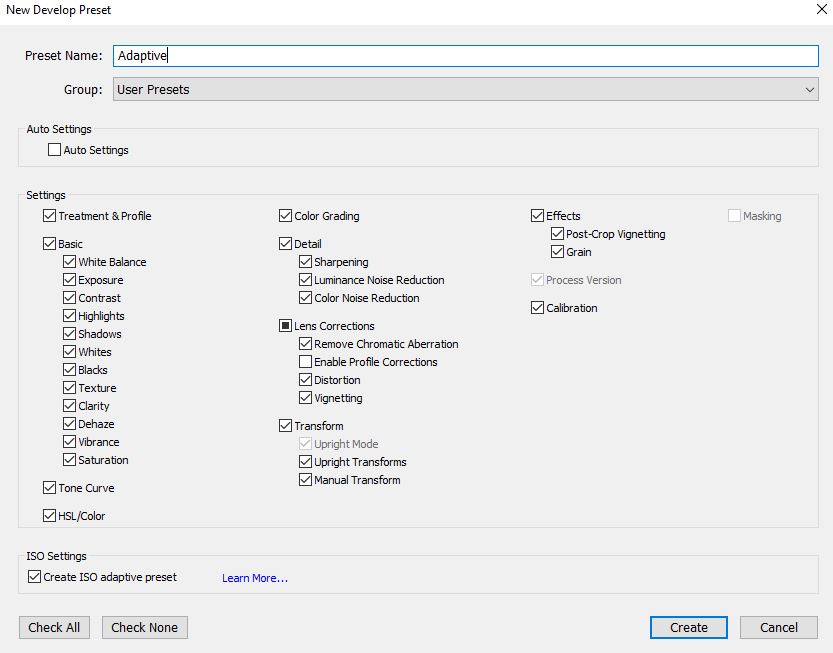
Make sure the NR and sharpening boxes are checked, and ensure the Adaptive ISO box at the bottom is checked. I recommend unchecking all the other boxes unless you want something like the camera profile or custom Basic Panel edits to be part of the preset as well. Then name and save your preset with a descriptive name (e.g. Z7 ISO Adaptive)
Once that’s done, it should appear on the presets panel, under User Presets. While you can now manually apply this preset to your files in the develop module or upon import, I like to go one step further.
Setting Your Preset as a Default
After checking my work on my photos at various ISO values, I’ve been really happy with how my adaptive presets turned out – so much so that I want them to be the default for Lightroom to always use with my files from that camera. Fortunately, that’s easy to configure.
Open Lightroom’s preferences in the top menu bar. Select the Presets tab and check Override Global Settings.

In this panel, you can select your specific camera and the specific preset you want to use, then update the default. Hit OK to save those changes, and now Lightroom is going to default to that preset when using files from that camera.
To check this has applied, just reset a file from that camera, and you’ll see that Lightroom resets to your adaptive ISO preset while showing the file as not having adjustments. Congratulations! You’ve now built and selected your very own custom-tailored default preset in Lightroom.
You can now go back and repeat the process for any other cameras you use. Lightroom even supports setting defaults on a per-serial number basis. This might be helpful if you’re shooting events with multiple camera bodies, or in some other special scenarios – let me know if you’ve made use of this feature, as it’s pretty unique.
Conclusion
I think the biggest part of setting up an ISO adaptive preset is actually just choosing the right files. With good choices, it’s easy to see what values will work well for your files. When in doubt, go with a slightly less aggressive default so that you don’t over-correct your images automatically.
Regardless of the settings you choose, I think setting up an ISO adaptive preset is a great way to tailor Lightroom to your personal preferences. Let me know in the comments if you have any questions about setting up the presets!
Interesting, valuable article; thanks. That said, given what one can now be done with Topaz Photo AI (or DeNoise AI and Sharpen AI), should one really be using LR and thus what this article is about as a standard procedure? Is it a good idea (or not) to do this and then use those other apps on top of the LR NR/Sharpen??
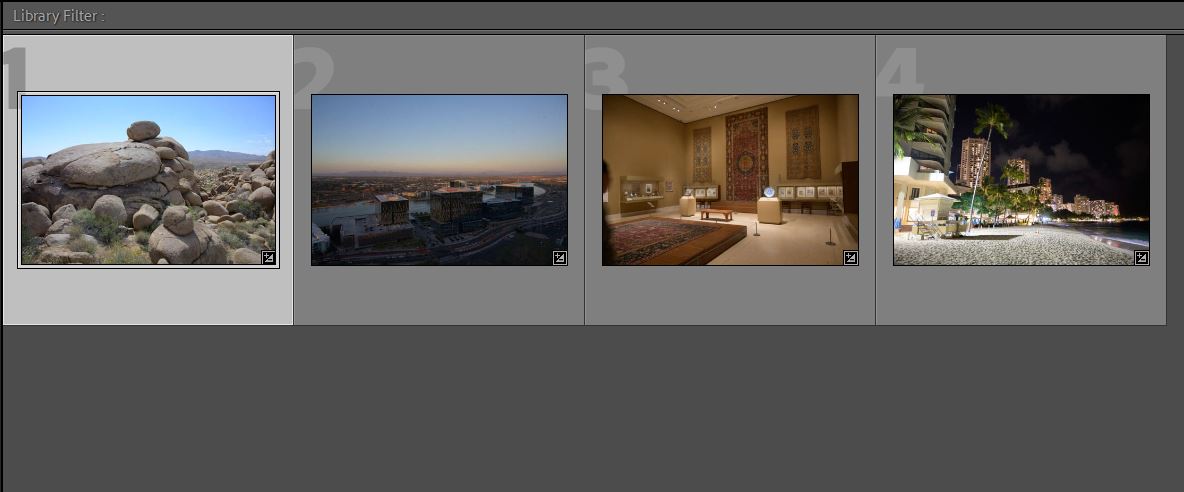
Interesting, informative article. You say “Remember that changes you make to White Balance or other settings will impact the final preset, so avoid changing those values. “. Then in your example the four photos you show don’t have the same WB or other values. Is this just that they were picked as fillers to show you selected 4 images?
If you leave the WB set to “As Shot” (or even deselect White Balance in the preset creation screen), it’s not going to impact the preset to have images with different white balances.
A very useful and informative article – thank you!
Thanks, Alex. I’m looking forward to trying this. This is just in time for my trip to Sedona in May and my first attempt at Astrophotography (no fancy gear, just a Fuji X-H1 with a 10-24mm f4 and a 35mm 1.4. Tripod, of course).
Hope it helps! Sedona is a personal favorite location, and I’m sure you’ll come away with some great images.
I would only slightly disagree to the point when suggesting to neglect dual gain sensors but then being as precise as to use 4 ISO settings for noise tuning. If you don’t care about dual gain then I think 2 settings like lowest ISO and highest ISO should be sufficient and interpolating in between. If you want to be so precise as to provide 4 settings then why not consider the dual gain? I find the noise pattern quite considerably different on the Z7/Z7II between ISO 320 and ISO 400. Here ISO 320 is noisier than ISO 400 because ISO 400 is the base ISO of the 2nd amplifier while ISO 320 is an amplified output of the ISO 64-based amplifier. So on a Z7(II) I would recommend to use ISO 64, ISO 320, ISO 400 and ISO 6400 for noise tuning.
Tip: For judging the noise profile I add +1 EV in exposure in Lightroom for the test picture, because often I increase shadows in landscape shots and want to have those changes covered in my base noise profile.
If you’re at the level where you understand the impact of dual gain, taking it into consideration isn’t bad. Same goes for adjusting based on a +1 exposure bump – if that works for your workflow, it’s a valid approach.
Thank you for explaining it. I was not aware of the checkbox in LR settings.
Valdemar
A very useful and informative article. I just wonder: You write “I recommend unchecking all the other boxes” but in the picture every available box is ticked; just to show us how NOT to do?
Kind of a case of “do as I say, not as I do”. If you’re sure you’ve not adjusted any of those other settings, you’re fine to leave those boxes checked, and it won’t impact the preset negatively. It’s just easier to suggest disabling those boxes if it’s someone’s first time creating a preset.