
In the past, I’ve written about camera settings in terms of optimization – pushing your gear to the limits in order to maximize image quality. Today, I’ll revisit those advanced techniques and explain how to combine them to capture the highest quality images you possibly can.
First, a simple premise: There is an optimal way to set your camera for a given photo. Not only that, but there is also an optimal way to set your post-processing software and export settings based on your output medium.
Sometimes, of course, you’ll need to sacrifice a bit of image quality in order to use the right camera settings. If you need to take a photo at f/1.4 for the shallow depth of field, go for it. Don’t stop down to f/5.6 just because it’s the lens’s sweet spot.
But often, there’s some significant leeway in the settings you choose, and it can be tricky to know exactly which ones will give you maximum image quality.
That’s what this article is for. I like to think that it’s one of the more important endeavors I’ve attempted recently on Photography Life; it’s my way of distilling many previous concepts we’ve written about into an overarching explanation of maximizing image quality. And it’s pretty long, and it’s occasionally complicated, but it works. This is the process I aim to follow for every photo, though I certainly don’t always succeed.
The only big thing I omitted was flash photography. Flash is complex enough to merit its own article, and this one is already bursting at the seams.
Other than that, the information below should apply regardless of the subject or genre you are photographing. Let’s start with camera equipment:
Table of Contents
1. Camera Gear and Image Quality
I can’t avoid pointing out that your choice of camera system has an impact on image quality. Some cameras simply have more resolution or better high ISO performance than others. Certain lenses are sharper, too.
But my goal today is not to recommend that you buy new camera gear if you want better image quality. It’s to explain how to maximize your image quality from any equipment.
If your current gear cannot produce the images you need, even with perfect technique, I’d be pretty surprised. I’d also recommend a different camera system. But if you’re reading this, I’m assuming that you already have workable equipment for the job at hand.
So, the only point I’ll make here is simple: Use a tripod!
Certainly, there are cases where tripods don’t work – most street photography, aerial photography, underwater photography, and a few others – but right now, we’re talking about maximizing image quality. Unless a tripod simply won’t work for your shot, use one. It’ll do more good than anything else discussed below.
For 90% of the subjects I shoot, give me a Nikon D3500 with a tripod over the Nikon D850 without one.
With that said, let’s move on to exposure.
2. Best-Case Scenario Exposure Settings
I’m going to start with the optimal settings for best-case scenario photos.
By “best-case scenario,” I mean that you don’t have any restrictions on what shutter speed you can use. You’re shooting from a tripod, and nothing in the scene is moving (or anything moving is meant to be a blur, like a waterfall).
I’ll cover the exceptions afterward, but they’re all just variations on the process below.
2.1. Aperture and Focusing
Before setting anything, note your lens’s “target” aperture – where it has the sharpest performance on a flat, test-chart-like scene.
For most modern lenses, this occurs somewhere from f/4 to f/8. But you should test your own lenses to be sure, or at least compare reviews online that analyze things like sharpness.
Here’s the key: This aperture (call it f/5.6) might be the target in terms of sharpness, but that doesn’t make it optimal for your photo. Quite often, you’ll need less or more depth of field than f/5.6 offers.
The first case is if you want a shallow depth of field – then, your job is super easy, and you can skip to the next section of this article. Just set whatever aperture gives you the depth of field you need. Don’t worry that you’re not at the lens’s “target” aperture. First and foremost, you need your photo to look right.

But shallow depth of field isn’t always going to be your goal. If you want the whole photo to be sharp from front to back, you’ll need to put in a bit more effort. Specifically, you’re going to balance depth of field and diffraction. That’s a big task, though not as hard as you might think.
I’ve covered the optimal method a few times in the past; it’s optimal because it leads to equally and maximally sharp foreground and background regions in your photo. That won’t always be your goal – sometimes, you’ll be prioritizing foreground or background sharpness over the other – but it’s a pretty excellent default.
Essentially, you focus using the double the distance method, followed by consulting charts to determine which aperture is mathematically ideal for maximum image quality. It goes like this:
- Frame the shot.
- Identify the closest object in your photo that you want to be sharp.
- Focus on something that is double the distance away from that object. So – if the closest object in your photo is a patch of grass a meter away, focus on something that’s two meters away.
- Use a chart derived from our sharpest aperture article to figure out which aperture best balances depth of field and diffraction.
- Set that aperture.
Creating the chart is where most people have hangups, but it’s not especially difficult. It takes perhaps 10 minutes of effort to whittle down the charts I already made into something useful for your gear. The whole process is explained in our earlier article.
For example, the chart (in feet) for the Nikon 20mm f/1.8 AF-S is below. Note that this lens has a “target” aperture of f/8, and it can’t stop down more than f/16:
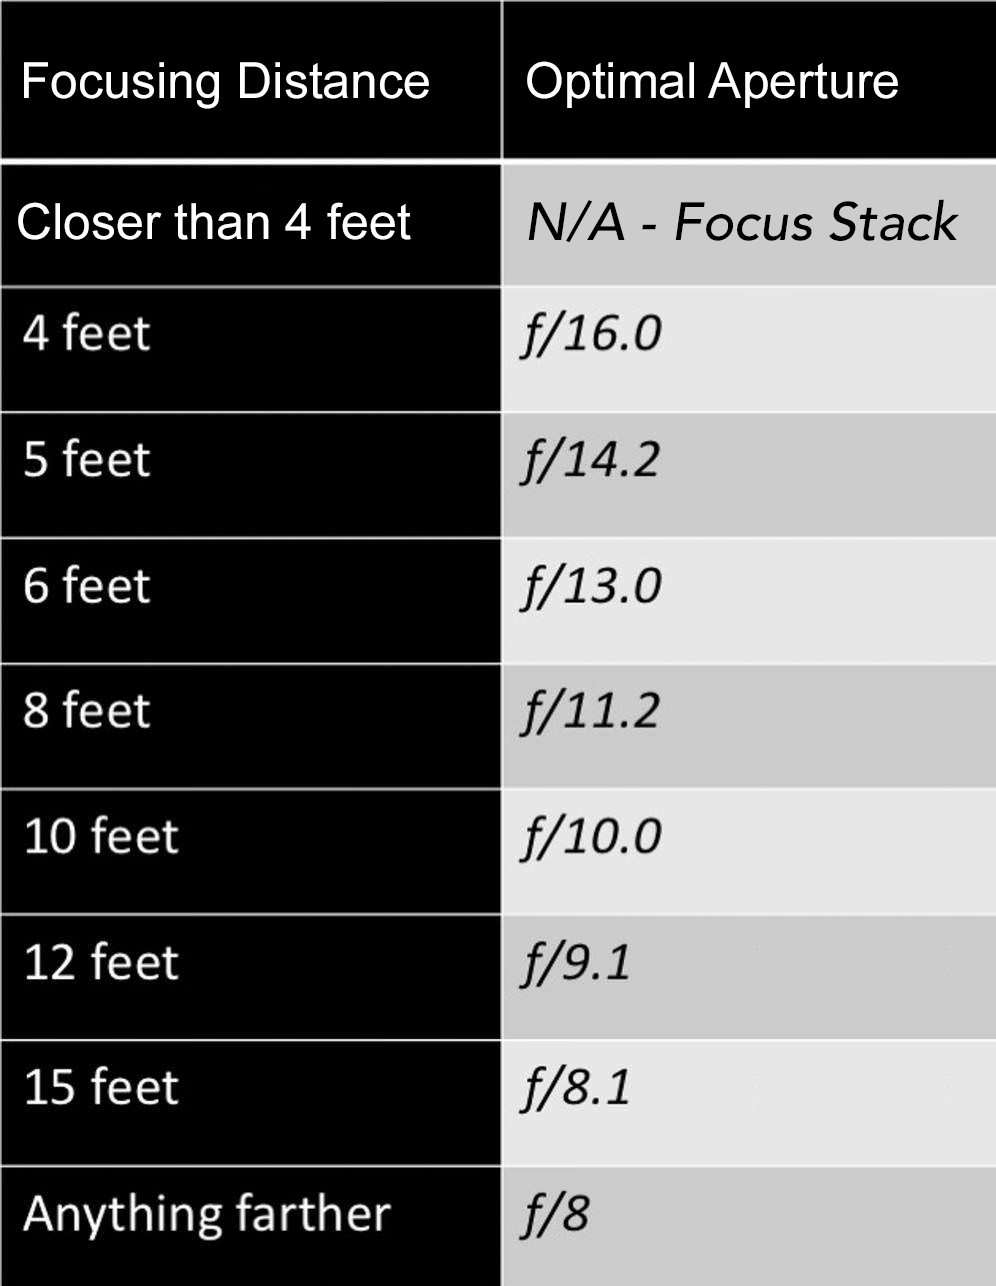
If you don’t want to consult charts in the field, I don’t blame you. One alternative – which I hope doesn’t sound too crazy – is just to memorize the chart for your typical gear. It’s easier with a prime lens than a zoom, but doable regardless.
And, again, this article is about maximizing image quality in every possible way. If that’s not your goal, just don’t follow these steps. An experienced photographer can guess a good focusing distance and aperture in most cases, no need to follow the technique above. Do whatever works best for you.

2.2. ISO
Set base ISO, and you’re done.
Many aspects of image quality are about gathering as much light as possible. With the lowest possible ISO value, you can use a longer shutter speed to gather more light while avoiding overexposure.
You’ve probably heard that some cameras have special “LO” ISO values that are lower than base ISO. Don’t use those; they’ll harm your dynamic range. Stick to your camera’s base ISO value instead.
2.3. Shutter Speed and ETTR
Next – set a shutter speed that exposes to the right (ETTR). I’ll explain the two different methods to do so in a moment.
ETTR is all about gathering as much light as possible, without gathering too much and overexposing important parts of your photo.
Somewhere along the way, photographers invented a myth that ETTR means capturing bright, overexposed photos. Frankly, in many cases (high-contrast scenes especially), the proper ETTR image is significantly darker than what the camera’s matrix meter recommends by default.
ETTR has nothing to do with capturing a photo that looks bright. It’s all about retaining 100% of your important highlight detail. Here’s how you do it:
Method One: Histogram
The easiest way to check if you’ve exposed to the right is to consult your camera’s histogram and see if any color channels are overexposed.
It’s not a flawless method, in part because the histogram on your camera is based on the JPEG preview. This means that you’ll get a very different histogram in “Vivid” versus “Portrait” picture control.
If you rely heavily on this technique, you’ll want to use the most neutral picture control, since it most approximates a RAW file.
Ah, forgot my usual disclaimer – shoot in RAW, not JPEG. Especially if you’re the type of photographer who reads articles like this, with the goal of maximizing image quality.
Method Two: Spot Metering
A more advanced way to figure out the optimal exposure is by spot metering on the brightest part of your photo. Then, dial in positive exposure compensation to place that part of your photo as a bright highlight – to be specific, as bright as possible so that you can still recover it 100% in post-processing.
It might take a moment in the field to figure out what the brightest part of your photo is, and the consequences for picking the wrong spot are almost certain to be overexposure. But at the end of the day, this isn’t too terribly difficult to do in the field, especially for something slower-moving like landscape photography.
However, the exact “100% recoverable point” is something you need to test ahead of time for your specific camera. With my Z7, it’s +2.7 EC (though I’ll often set +2.3 EC instead, to build in a bit of a safety net). Picture Control doesn’t matter here, since it is independent of your camera’s metering.
As an aside, this method – spot metering to expose the brightest tone of your scene optimally – reminds me a lot of Ansel Adams’s zone system, just a bit more digital. Kind of exciting if you ask me.
UniWB
If you use the histogram method, the optimal way to set your white balance and tint to optimize histogram accuracy is to set “unitary white balance” or UniWB.
In short – use the flattest possible picture control settings. Then, turn “tint” as green as possible, and set the white balance on your camera so that the red and green color channel multipliers are as close to each other (and to 1) as possible.
You can figure out the white balance at which this occurs by examining your photos in EXIF viewing software. (For MacOS, I use ApolloOne because it’s free, although there are plenty of similar programs.) It’s labeled as “Blue Balance” and “Red Balance” in most EXIF viewers. With the Nikon Z7, for example, the UniWB is 4945 K, although you can’t set that exact value and need to use 4940 or 4950 instead.
Color Filters
To take this to the extreme, you can use a color filter on your camera to balance out the fact that the green channel generally clips before the others in sunlight. I recommend a 30% magenta filter (specified as cc30m or cc30p by most filter companies) or a 40% magenta filter (cc40m or cc40p).
As a side note, if you use a magenta filter in combination with UniWB, the in-camera preview image will actually look relatively normal.
And yes, this is a really esoteric method for eking out maximum image quality, but it works. You’ll get (at best) about 2/3 additional stops of exposure with a cc30m or cc40m filter before you start blowing out one of your color channels. That’s not bad – akin to using a camera with base ISO 64 rather than 100.
3. Optimal Exposure When You Have a Shutter Speed Limit
All the information above assumes that you can set any shutter speed you want without issue. However, that’s obviously not always the case.
If you’re trying to freeze a moving subject or shoot handheld, there’s probably a limit to the longest shutter speed you can set. In turn, that requires compromises in the ISO and/or aperture that you set.
And this is where things get a little messy.
3.1. Shutter Speed
First, keep in mind that every photo has an optimal range of shutter speeds. When you find that range, you really don’t want to go outside of it. Too much motion blur can ruin a photo in an instant.
So, what exact shutter speed should you set? Ideally, you’d use the longest possible shutter speed that still completely freezes the photo’s motion. As an example, if you eliminate motion blur with a 1/125 second shutter speed or faster, 1/125 second is the perfect shutter speed to use. It’s the longest exposure with zero motion blur, meaning it captures as much light as you can under the circumstances.

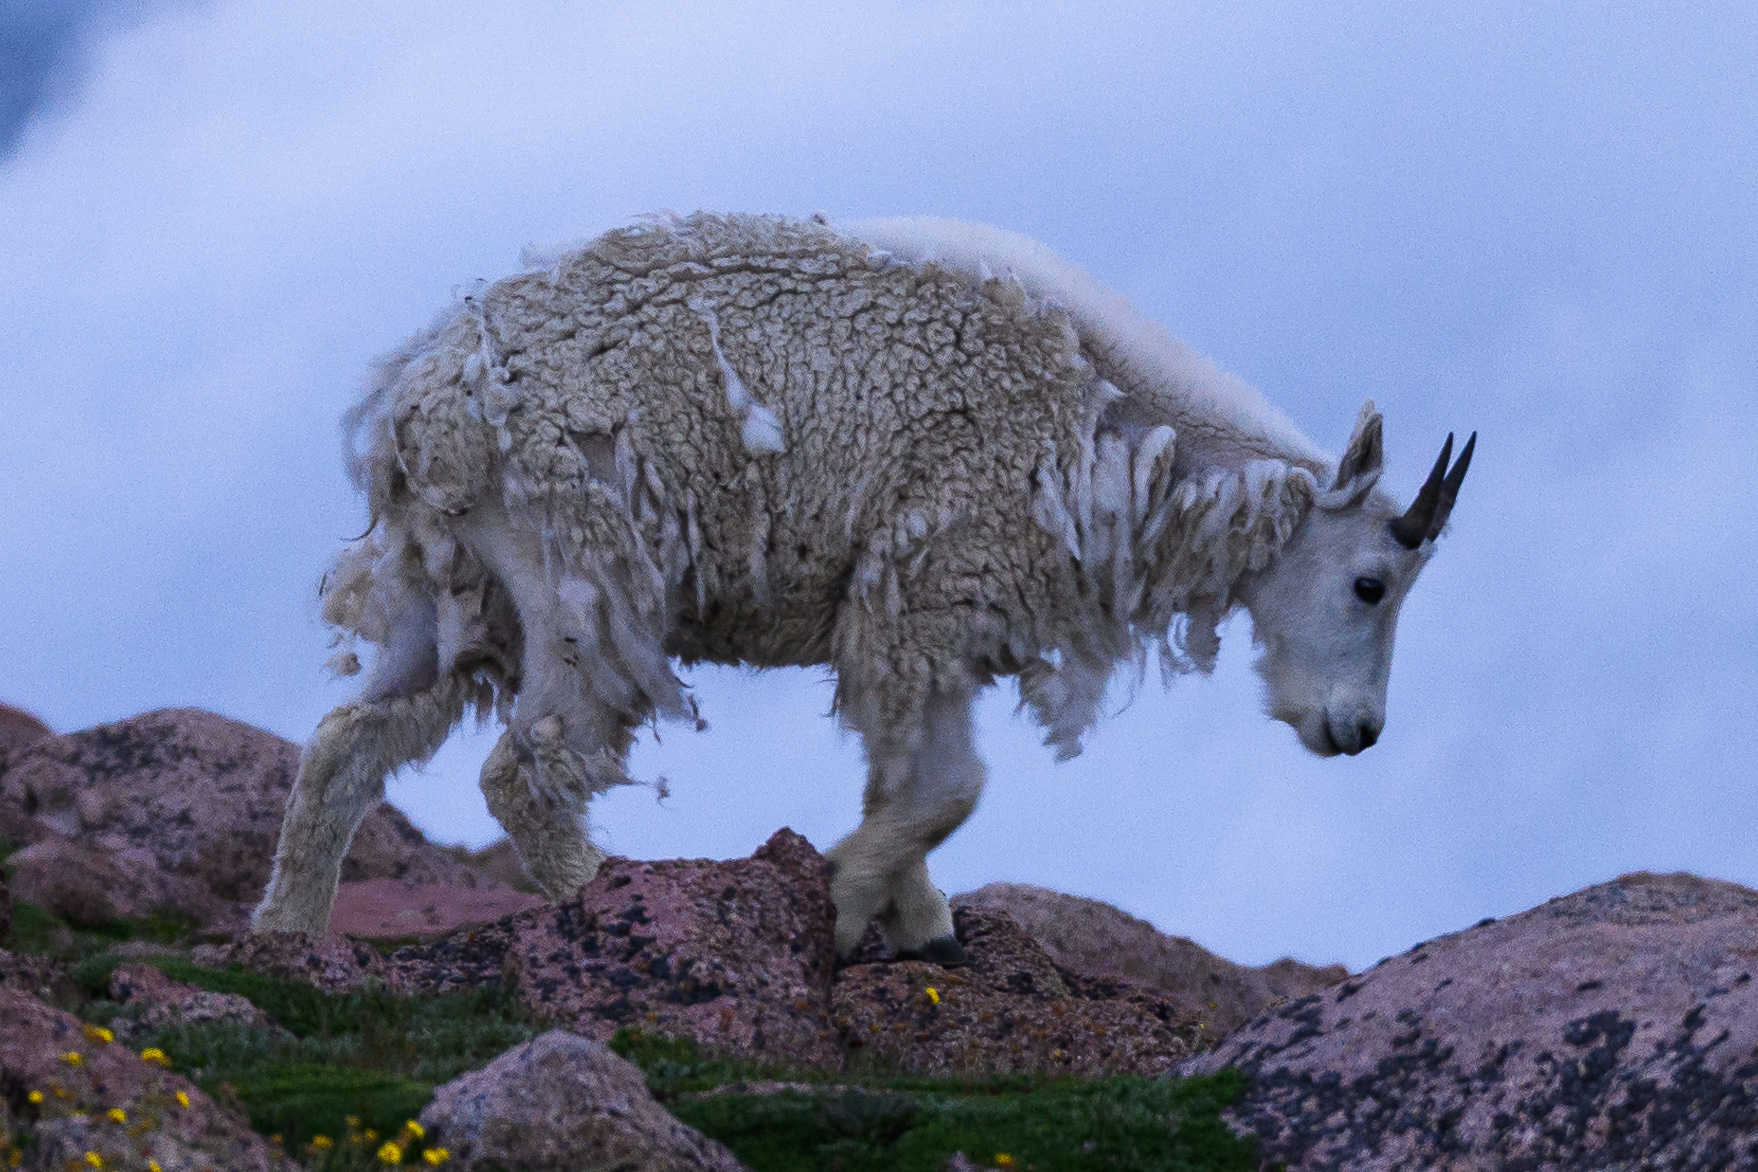
In order for this photo to be totally sharp, I needed a shutter speed of 1/125 second (or faster)
Here’s the 100% crop (click to see full size):
However, you’ll rarely know the exact shutter speed cutoff for a given scene. It requires some trial and error in the field, although practice and experience are good substitutes. Once you do find the range of acceptable shutter speeds, it’s best to stay within that range no matter what – or, at most, go about 1/3 or 2/3 stops longer than ideal.
That’s because shutter speed blur is one of the most annoying image quality issues you can have. If it’s too obvious – and it gets too obvious in a hurry – it can totally ruin an otherwise good photo.
In tricky situations like fast-moving sports photography, it’s possible that some photos will have different shutter speed cutoffs than others. In those cases, it’s best to play it safe. Just go with the shutter speed that makes every photo sharp, and don’t worry if you could have snuck in a slightly longer exposure on a few of them.
3.2. Aperture and ISO
Next, it’s time to figure out what aperture and ISO values you need to use in order to accommodate your shutter speed limitations.
If you’re already shooting at your lens’s widest aperture, just raise your ISO until the photo is bright enough. But if you’re at a narrower aperture, you’ll often need to widen it in order to capture more light.
And that’s when you get into the tug-of-war with ISO. Specifically, is it better to have too high an ISO, or too shallow a depth of field?
There’s no perfect answer, although I do have a preferred process for my own work. Up to ISO 400, I just raise the ISO. Beyond that, I’ll trade off: a third stop wider aperture, then a third stop higher ISO, then a third stop wider aperture, and so on until the photo is bright enough. Find a similar method that works well for your gear, and you’re set.

3.3. ISO Invariance
One exception to the technique above involves the weirdness of ISO as a photographic concept in the first place.
To distill the issue down to a single question: Why raise ISO when you can simply brighten an image in post-processing?
Usually, the answer is that you get better image quality by raising ISO in-camera rather than brightening in post. But that’s becoming less and less true over time, as camera sensors become “ISO-less” or more accurately ISO invariant at some point in their range (or across the entire range).
With my previous camera, the Nikon D800e, this occurred at ISO 1600, although it wasn’t far from ISO invariant at the lower ISOs. In other words, up to ISO 1600, it was worth brightening the photo using the in-camera ISO. Anything more – 3200, 6400, etc. – provided no image quality benefits. Plus, the higher ISOs increased my risk of overexposure in highlight details, especially pinpoint highlights like stars.
Not all cameras are as simple. For example, the Sony A7R III is ISO invariant across two ranges: ISO 100 to 720, then ISO 800 and up. So, if you only ever used ISO 100 or 800 on the A7R III, you wouldn’t be losing image quality. If your photo is underexposed because you would have used one of the other ISOs, just brighten the image in post.
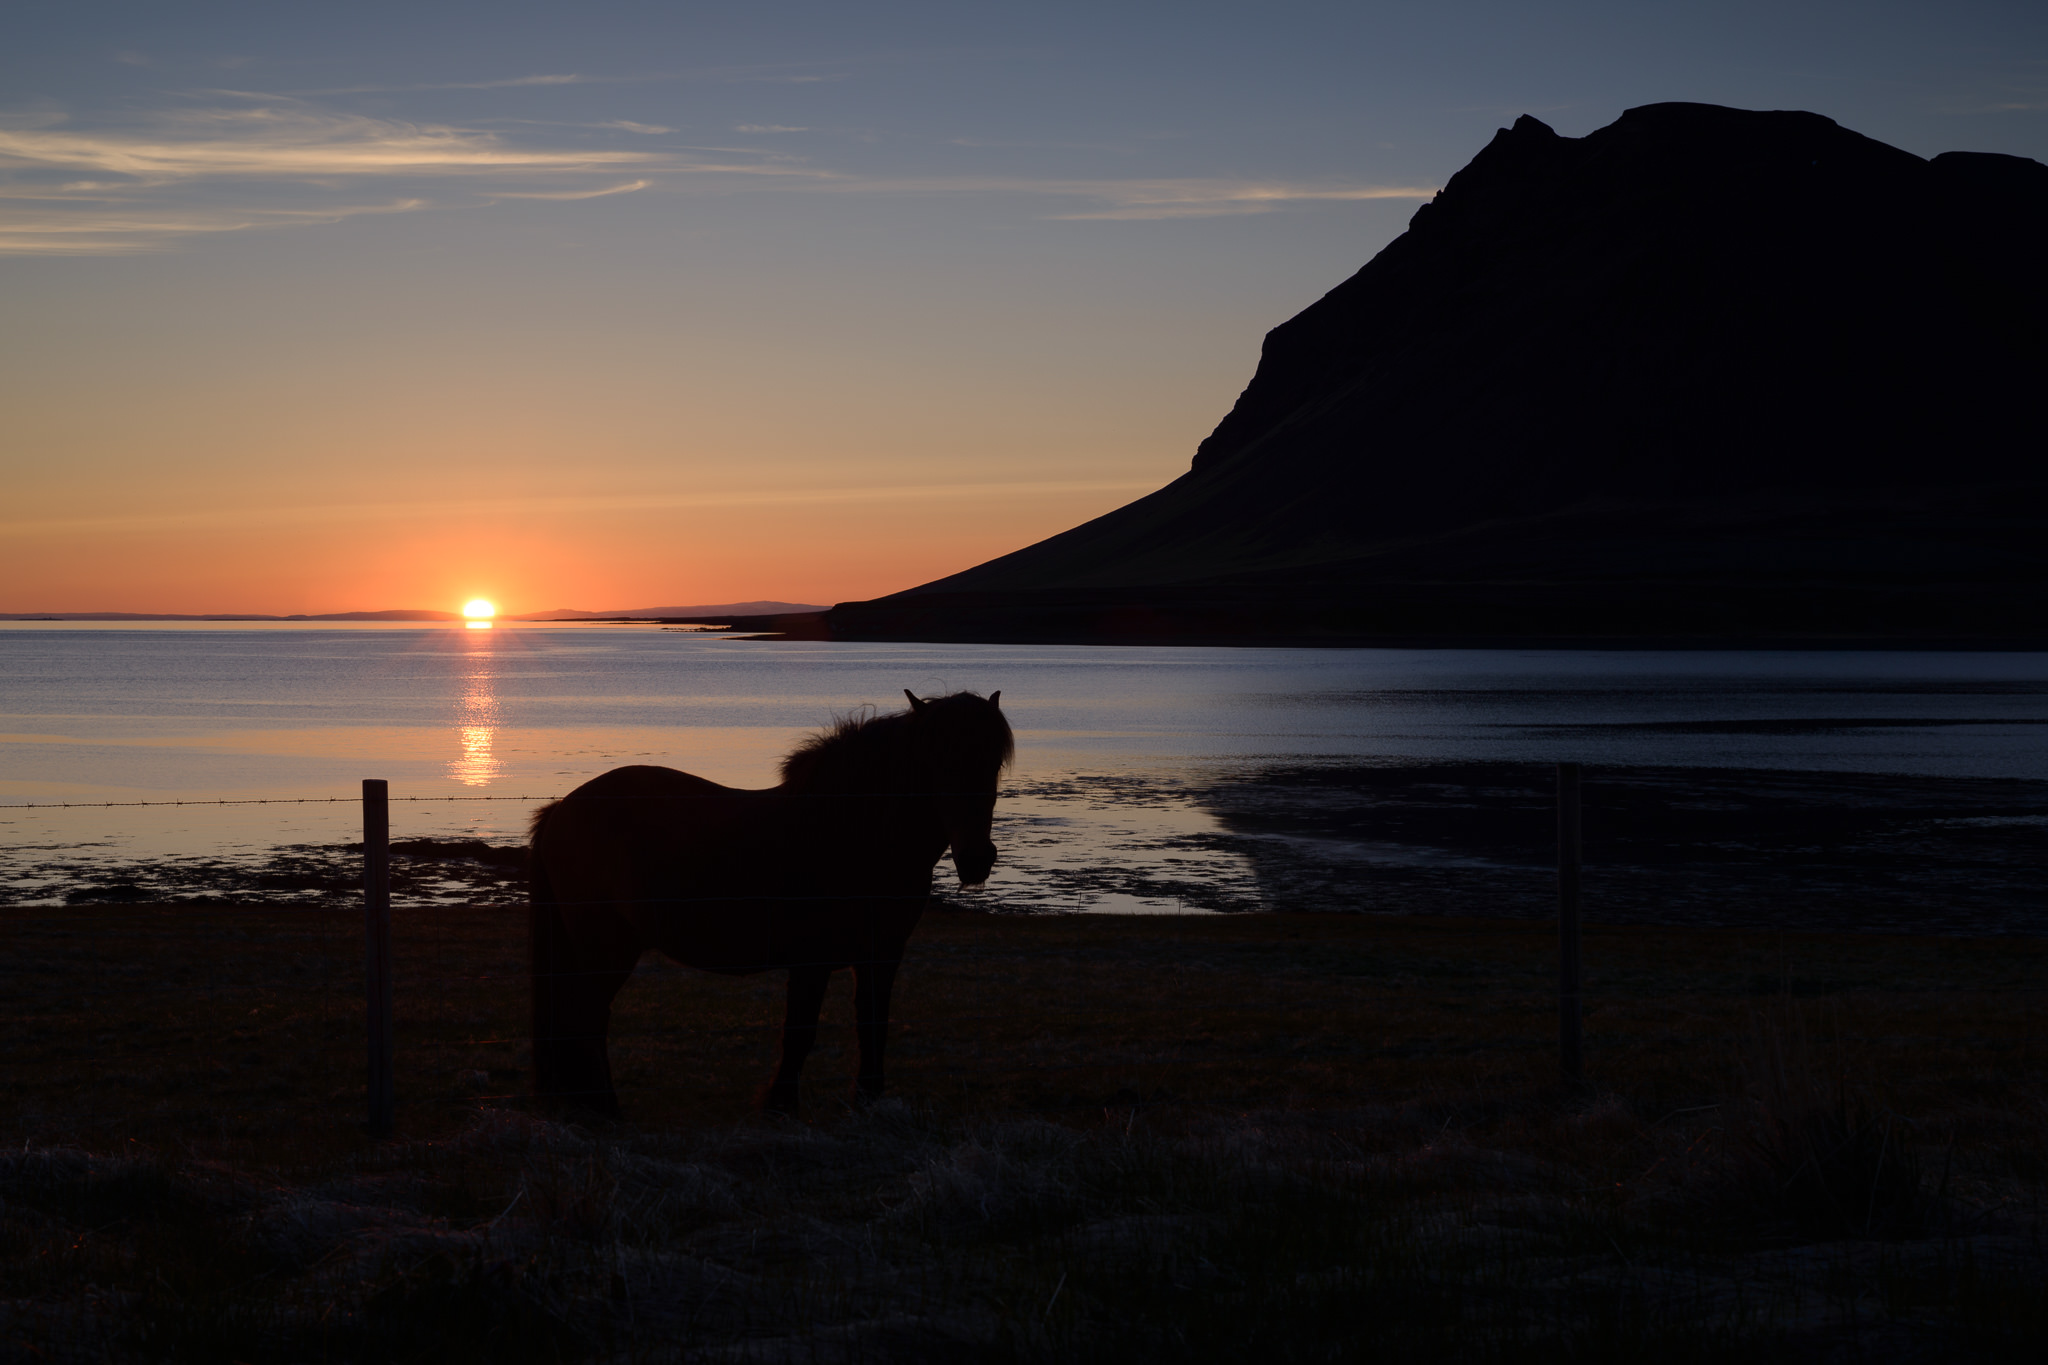
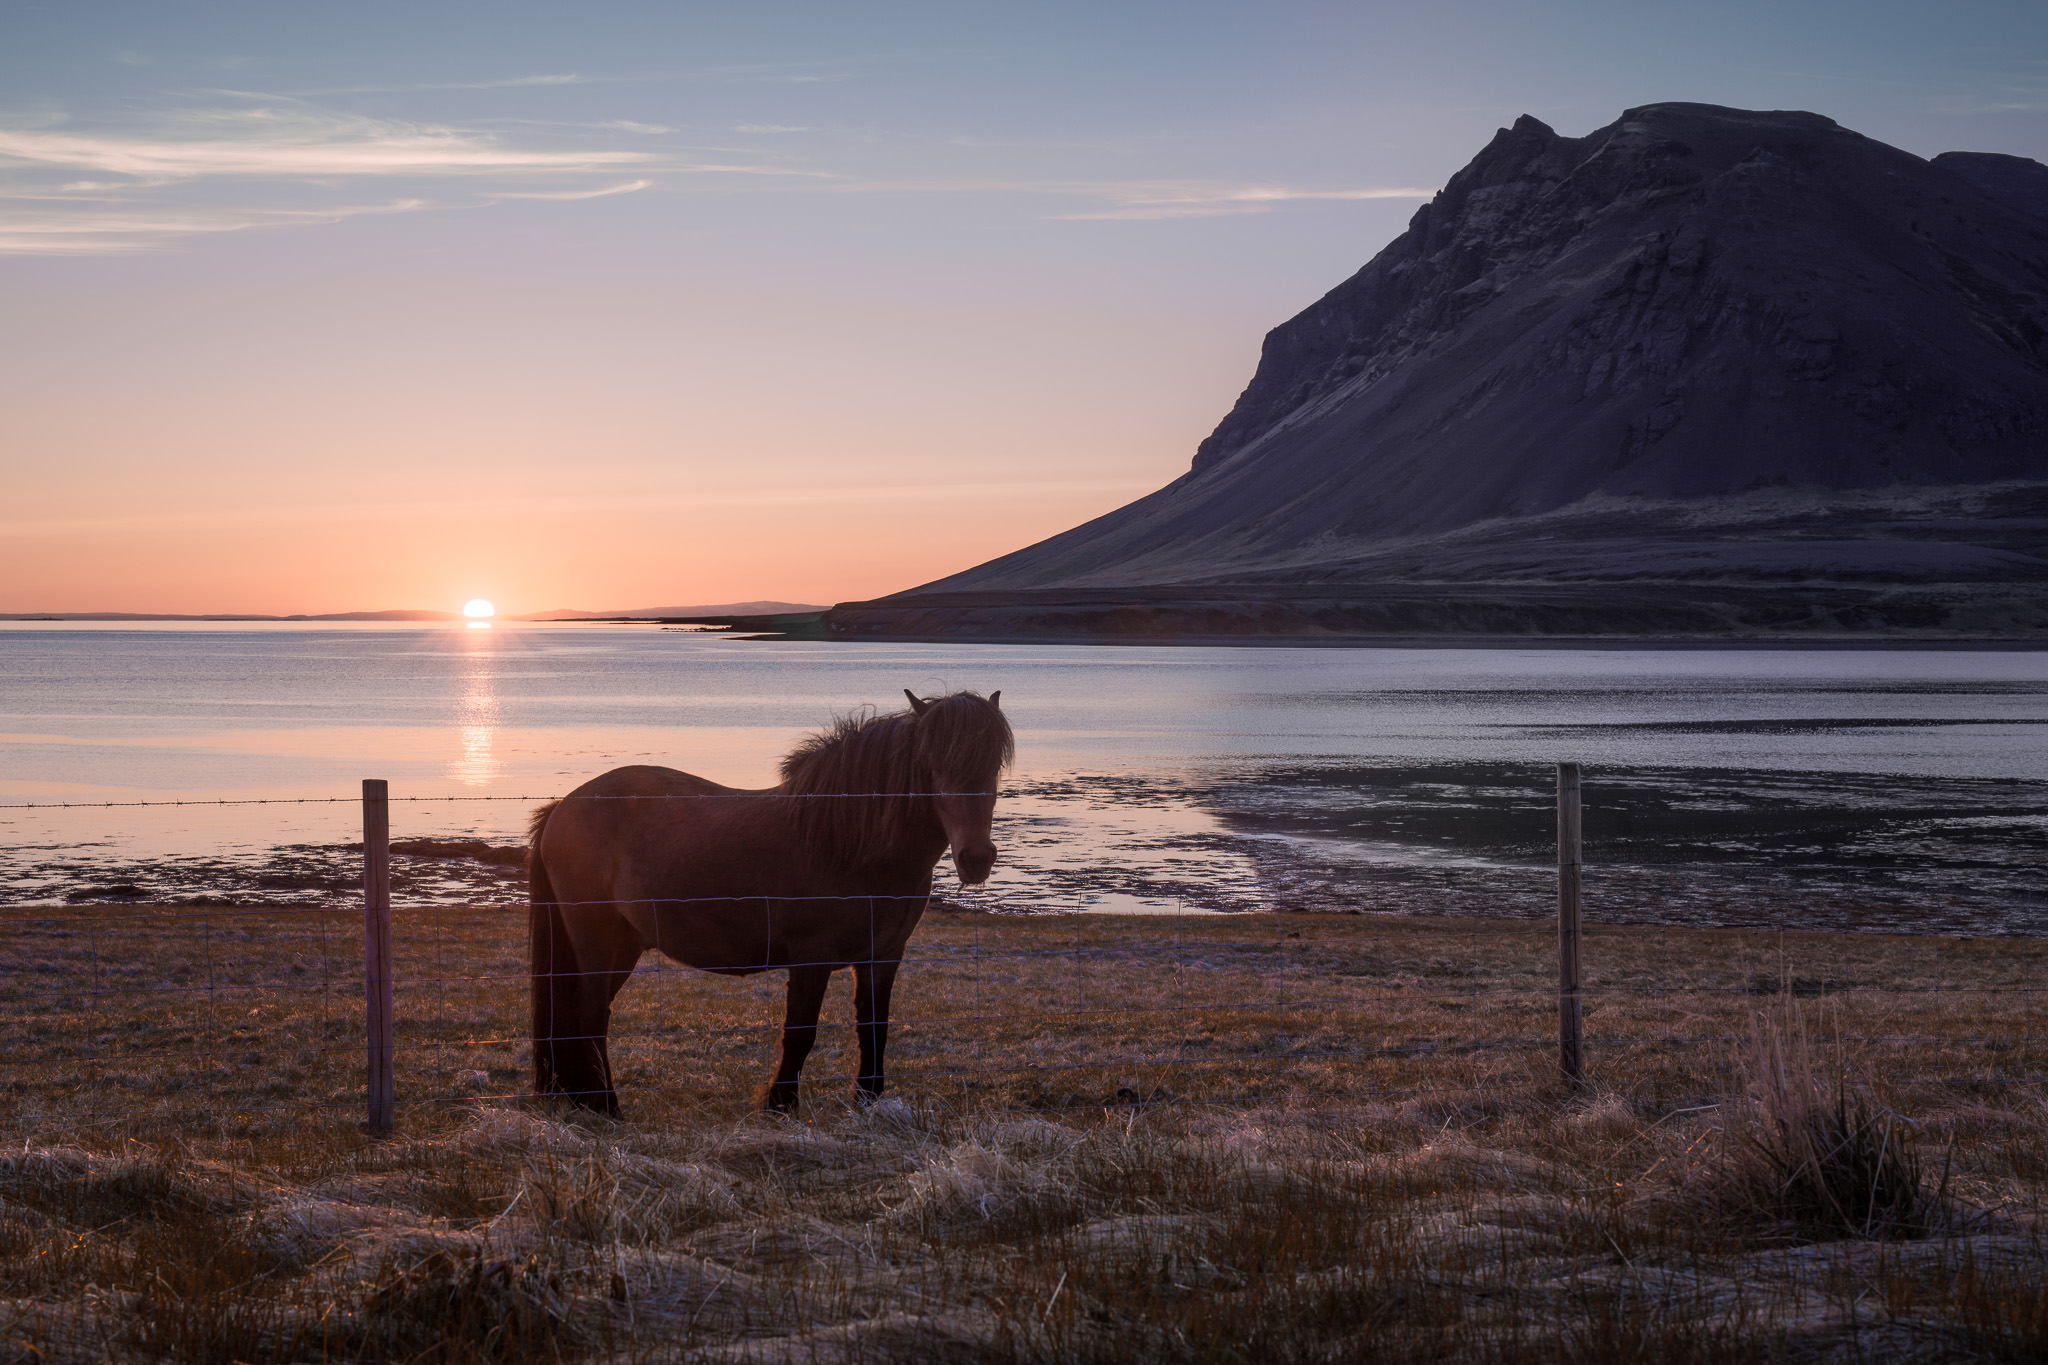
Out-of-camera original
Of course, ISO invariance is controversial for a few reasons. The big one is that it makes it harder to preview images – and it also adds more time in post-production. Plus, most post-processing software is not made for giant boosts to image brightness, so you might get some color shifts or other artifacts when doing extreme shadow recovery.
I’d say it’s only worth worrying about ISO invariance for one specific case: astrophotography. There, shooting at too high of an ISO can blow out color details in the stars, while shooting a lower ISO and brightening in post-production can retain those details. Personally, I avoid ISOs beyond 6400 for astrophotography for this reason, even if it requires a bit of brightening in post-production.
Otherwise, make your life simpler and don’t worry about ISO invariance. After all, brightening a photo in post-processing doesn’t give you better image quality than increasing ISO in-camera; it just protects highlight details more, without harming image quality.
If you’re not shooting a scene like stars where the highlights need special care, it doesn’t bring any other big benefits.
4. Other Camera Settings
The exposure settings above are very important, but there are a few other camera settings which are worth noting if you want optimal image quality.
4.1. Shutter Mechanism
I recently wrote about the three common shutter mechanisms today: mechanical, electronic, and electronic first curtain shutter (EFCS).
You should read the comparison to see all the differences in detail, but the takeaway is simple: Use mechanical when there is artificial light in your photo, and electronic otherwise – or EFCS if your camera doesn’t have an electronic shutter.
4.2. Mirror Lockup
Along the same lines as setting your shutter mechanism properly, you also need to get rid of camera shake from mirror slap (only on a DSLR, of course) and simply from pressing down on your camera, even if it’s on a tripod.
For this, I recommend using mirror lockup mode in combination with a brief self-timer, such as two seconds. Or, if you’re a Nikon shooter, “Exposure Delay Mode” makes this simpler by raising the mirror when you press the shutter release button, pausing for a second or two so vibrations dissipate, then capturing the photo. We’ve covered this extensively in our article on exposure delay mode.
4.3. 12-Bit vs 14-Bit RAW
Many cameras today have a RAW image quality setting that lets you choose between shooting 12-bit or 14-bit color.
John Sherman already showed quite elegantly that anyone who shoots 14-bit RAW rather than 12-bit is a paranoid pixel-peeper. And today, that’s exactly what we are!
If you’re using the (very slightly) lower quality 12-bit RAW setting, rather than turning it up to 14, how can you possibly claim to be capturing maximum image quality? Also, something about storage being cheap, and so on.
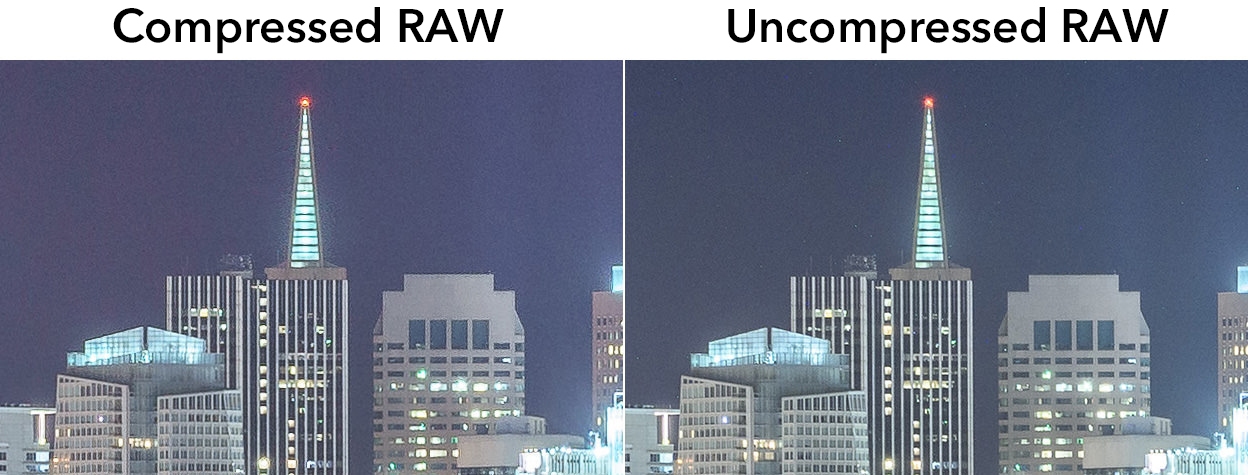
4.4. RAW Compression
This one does actually make a difference – RAW compression. Most cameras let you choose between uncompressed, compressed, and losslessly compressed RAW. Some omit the “lossless” option.
Of the three, lossless compression truly is lossless; there is zero image quality detriment to using that setting. It’s my strong recommendation.
If your camera only has “compressed” and “uncompressed,” go for better image quality. Uncompressed RAW photos take up more hard drive space, but they’ll show some definite image quality benefits in certain cases.
4.5. Long Exposure Noise Reduction
When you’re shooting with long shutter speeds, there’s an important camera setting to keep in mind: long exposure noise reduction.
With this mode enabled, the camera takes two photos in a row. The first is your actual, main exposure. The second is a dark frame with the shutter curtain closed, captured with an equally long exposure as the first. Your camera then uses the dark frame to subtract out noise and hot pixels from your main shot.
This does affect RAW photos, and it can make a real difference when you’re shooting especially long exposures. I hate the wait as much as anyone else – it takes twice as long to capture these photos, since you’re taking two photos – but in the race for maximum image quality, what’s an extra 30 seconds in the field?
5. Image Blending
If all of the above isn’t enough for you, the most in-depth way to improve image quality is to blend multiple photos together.
This can take a few different forms. The most obvious is creating a panorama, since you’re able to increase the resolution of a photo drastically – no real upper limit, aside from how long you’re willing to spend stitching the photo together.
HDR photography is another big one. In high-contrast situations, getting enough highlight and shadow detail simultaneously may be impossible without blending photos together. HDR increases your dynamic range, and, when done right, decreases shadow noise as well.
There’s also focus stacking – taking multiple photos focused at different distances, then combining them into an exceptionally sharp photo from front to back. This lets you use your lens’s “sweet spot” or target aperture and still get enough depth of field, making for extremely sharp photos.
Lastly, you can use the technique of image averaging to reduce noise and improve dynamic range. This is especially useful for something like Milky Way photography, but also applies to a few other situations, like drone photography or as a replacement to HDR.
A few other types of image blending exist, but these are the big ones in terms of image quality.
The real question, however, is whether or not you should actually put any of this into practice. My answer is – by default – you shouldn’t. Photo blending has some serious potential to go wrong, especially if the light changes or your subject moves from shot to shot.
I tend to blend images only to salvage photos that wouldn’t work any other way, not to boost image quality for its own sake. But that’s just me. Again, this article is about the things you can do to push image quality to the next level – and image blending clearly qualifies.
Extreme resolution: 231 megapixels (from a multi-row panorama)
6. Post-Processing Workflow
In terms of editing your photos, one of the key components of image quality is to work with image files that are lossless. In photography, this largely means the original RAW file, DNGs, or TIFFs.
If you’re ever doing a lot of edits to a JPEG file – whether directly (like Photoshop) or indirectly (like Lightroom) – you’re setting yourself up for trouble. A JPEG on its own looks good, but starts to produce some serious blocky artifacts when pushed around in post.
Along the same lines, make sure that you’re always editing in a large color space that won’t clip any highly saturated colors – something like ProPhoto RGB or similar. (I highly recommend our sRGB vs Adobe RGB vs ProPhoto RGB article if you aren’t familiar with color spaces.) On top of that, be sure to edit 16 bit-per-channel images rather than clipping them down to 8 bit.
Essentially, this means that if you export a photo from Lightroom/other software into Photoshop/other software, you should be working with 16-bit ProPhoto TIFF files the whole way. With a lower 8-bit image, you’ll risk banding in gradient regions. With a smaller color space, like sRGB, you’ll permanently clip certain colors in your image. And with a lossy format like JPEG, you’ll risk serious compression artifacts.
Of course, you should never let a ProPhoto image of any kind out into the wild unless the sole recipient is another photographer. Same with 16-bit TIFFs just because they’re such large files. This is solely about optimizing your workflow to avoid throwing away data in your photos without realizing it. There’s a separate process in a moment for the export side of things.
Other than that? Feel free to process images however you want. Editing images is a really subjective, artistic part of photography, perhaps just as much as the field side of things.
Oh, and calibrate your monitor. I’m sure you’ve already done it, but if not, that’s essential to editing the colors you mean to edit.
7. Optimizing for the Output Medium
Now that you’ve set up your post-processing workflow to maximize image quality, let’s take a look at the proper steps for printing your photo or otherwise outputting it as well as possible.
The two major steps here are sharpening (including noise reduction) and converting to the right color profile. I’ll start with sharpening.
7.1. Optimal Sharpening and Noise Reduction
There are many different philosophies on the optimal sharpness settings in post-production. I (mostly) won’t go into the exact slider values that work best, because there really isn’t just one set. Instead, proper sharpening is about following the three-stage method:
- Deconvolution sharpening: Light to moderate sharpening across the image, with a very small radius and a low masking/threshold value. Also, light to moderate noise reduction – both color and luminance – evenly across the image in proportion to the amount of noise in the photo.
- Local sharpening: More aggressive sharpening to important, high-detail parts of the photo, like feathers or eyes on a wildlife subject. Also, more aggressive noise reduction to large, empty areas.
- Output sharpening: Anywhere from zero to aggressive sharpening evenly across the image to counteract texture in the output medium, like a matte print.
The deconvolution stage is the most important. In Lightroom, for a 45-megapixel sensor without an AA filter, my default is 33 sharpening, 0.5 radius, 100 detail, 13 masking. Combined with 10 luminance and 10 color noise reduction.
That said, it’s best to figure out your preferred settings through trial and error. This is especially true for output sharpening, which varies wildly based on the medium – including digital or print – as well as the physical dimensions of your output.
7.2. Color Profile Conversion
Last, but not least, is converting your working image to the proper color profile (and file type).
For web, this is easy: sRGB JPEG, pretty much 100% of the time. Anything other than sRGB is likely to create really strange colors for at least some users out there (those with outdated browsers, mainly) – and anything other than JPEG is likely to take up too much space.
For print, it’s a bit trickier. The most ideal method is to find the exact color space of your ink/paper combo – either through measuring for yourself or downloading ICC profiles online – and then soft proof your image in post-processing using that color space.
(Soft proofing means “previewing” how the print will look, to the best of your monitor and software’s capabilities. Lightroom, Photoshop, and most other post-processing options today allow this.)
Then, export a 16-bit TIFF with the ink/paper combo’s ICC profile. Lightroom doesn’t let you directly do this, however, so you will need to do the intermediate step of exporting a 16-bit TIFF in ProPhoto, then opening in Photoshop or other software and converting that to your ICC profile. Again, there’s more info in our color space article.
That’s a few steps, no doubt. But if you send the print lab an sRGB file, or even an Adobe RGB file, you’re potentially throwing out some important color details (especially in darker, more saturated areas).
If you want a simpler method – though one which likely clips some colors – just send a lab of your choice a photo exported to their specifications (usually sRGB, though some allow AdobeRGB and an elite few allow ProPhoto). Then, select the lab’s “color correction” option if they have one, where they’ll basically do the steps above for you.
It’s the easiest way to get colors that match your monitor, with the least that can go wrong. It’s why I recommend it to most photographers, especially at first. However, there certainly are subtle color benefits of the hands-on method I covered above. And when you’ve already gone through this entire article… well, you’re probably after all the quality you can get.
8. Conclusion
The information above dives pretty deep into image quality, and I think it’s useful for photographers to have a goal to strive for. At the end of the day, though, these are not the most important parts of photography. A high-quality image is a whole lot better than high technical image quality.
So, before you go out and follow all these tips to the letter, make sure you’ve really mastered the basics. Light, composition, basic exposure settings, and everyday post-processing – all that is more important.
Once you’ve gotten a hang of it, then it’s a good time to dive deeper. Try out some of these techniques for yourself, and figure out which ones are easy to incorporate into your day-to-day work. It’s worth doing.
Why? Simple: To me, photographers should aim for the best possible result for every photo. No, you won’t always have time to get everything perfect. And sure, some scenes are tricky to photograph, and it’s smart to build in leeway even at the expense of image quality. But if you can aim for the best – you should.
I hope you found the explanations in this article useful for achieving that goal.
Thanks for this great arcticle. Pls provide a link to your above mentioned article about camera settings. Thanks in advance
I was taught that RAW files store more highlight detail than shadow detail, hence ETTR maximizes quality due to storing more information. I was also taught that RAW files store all of the (essentially unprocessed) sensor data. These two things seem contradictory. If someone can clarify, I’d appreciate it. For example, imagine I photograph a scene where the entire histogram is less than half the width of the available dynamic range, and is up against the left (with no clipping). I take the shot again, ETTR, and the second image’s histogram is up against the right (with no clipping). I boost the first one in post processing, I tone down the second one in post processing. Do I now have two identical shots, or is the ETTR shot a bit sharper or more color accurate?
In the example you suggest, the ETTR shot will have better shadow detail, less noise, and potentially more accurate color. It will have higher image quality in every way.
I’m not sure that “RAW files store more highlight detail than shadow detail” is an accurate way to phrase it – more like, highlights have proportionally less noise than shadows.
That’s the whole reason for ETTR. There’s a “noise floor” in every image (i.e. noise you’ll see when the lens cap is on). By percentage, this noise floor takes up a decent bit of very dark shadow regions, and proportionally less of the highlights. The other big source of noise, photon noise (randomness of photons), is the same way – it impacts shadows proportionally more than highlights.
So, if you expose your photo to place as much of the image in the highlight region as possible (of course, without blowing out your highlights – very critical), noise will have comparatively less impact on the image. That holds true when darkening the image in post-production, giving you better image quality.
Hope this helps!
Yes, that does help! So it is a matter of signal-to-noise ratio (SNR). Since light is our signal, the more light we have (e.g., via ETTR) the larger our SNR becomes, which results in better image quality. It also sounds like we are dealing with two types of noise, one that is relatively constant across the dynamic range and one that is worse in the shadows. Hence for both types of noise, ETTR moves our image data to a better SNR place within our dynamic range.
Thanks!
Nice article! When it has to do with photography, perfection is something I enjoy & isn’t a bad thing, maybe unless it takes up too much time. I think this article can help me in the future with my nature photos. One of my predictions is that artificial intelligence will remove much need for these steps in the future. One example is Luminar and its AI structure, although even other programs have what is essentially the same thing. This isn’t to say that it can currently replace going about your editing work manually, but AI will almost certainly become better. As a side note, the manual way of doing things does seem to be rewarding.
Looks like there is a mistype in the phrase:
“Focus on something that is double the distance away from that object. So – if the closest object in your photo is a patch of grass a meter away, focus on something that’s two meters away.”
Shouldn’t it be 3 meters away should it?
Hi Boris, the article is correct in this case. You’re not adding double the nearest distance onto your nearest point. You’re simply focusing twice as far away as your nearest point.
So – nearest point is 3 feet away, focus 6 feet away (not 9)
Nearest point is 10 paces away, focus 20 paces away (not 30)
And so on. Hope this helps!
Hi Spencer, thank you for clarification.
It’s “double the distance away from that object” that mislead me. I even tried to google translate it but it is still kind of double distance after object, like 1 meter to the object and 2 meters after.
Great work – you really captured everything. I’m going to print this and bring it with me every where I go.
Question about E-T-T-R – you said “It’s all about retaining 100% of your important highlight detail.”
I may be confused by I always thought E-T-T-R was about preserving detail in the darks. Since the human eye’s response to light is non-linear, such that it is far more sensitive to details in the darks than it is to detail in brights (including highlights), when we E-T-T-R, we brighten the image as much as we can – losslessly – so that we capture as much detail in those dark areas. Then when we darken the image in post to correct exposure, we have more details and less noise in the darks. Of course, this can only typically be done in images where the dynamic range is low enough that there’s enough headroom to push the histogram to the right. In images with high DR, we are actually doing E-T-T-L where know that the bulk of the image will be noisier and less detailed – particularly in the darks – but that’s a compromise we must make to preserve the detail in the highlights.
Thoughts?
Talha, it is always good to hear from you!
In regards to ETTR, Spencer and I define it as “pushing exposure as much to the right as possible, without blowing out the highlights”. I think we should also add something like “in standard lighting conditions” :)
When ETTR is done right, you are always going to have more detail in the shadows (compared to a darker image) and you are also preserving all the highlight detail. If the image is only pushed to the right for the sake of the histogram and you are losing highlight detail, then it is pointless to take that image in my opinion.
At times a single exposure is simply insufficient to capture the entire dynamic range (as you have already stated). In those cases you utilize bracketing techniques for HDR or luminosity masking in post. If the ETTR image looks so dark that it requires massive exposure or shadow adjustments, then the image is arguably properly exposed, but it is not necessarily ETTR by definition, since you are no longer pushing the exposure to the right of the histogram. So it essentially becomes ETTL with correct exposure, LOL!
All jokes aside, the idea behind ETTR is to push the image sensor’s potential and have the highest image quality possible. However, it has to be done right without blowing out highlights. Otherwise, what is the point of doing it in the first place? :)
Always good to hear from you as well, Nasim!
I think we are on the same page. The goal is to maximize image quality in the darks (more details, less noise) by capturing a brighter exposure than is needed with and then later correct the exposure in post. Of course, brightening the image can blow out highlights and so must be careful to preserve them. This is what I would call Expose-TO-the-Right. Important to note that E-T-T-R is optional and we would have a decent image with normal exposure.
On the other hand, in bright scenes with a high HDR, we actually Expose-FOR-the-Right. In this case we are underexposing the image to capture highlight detail that would be missed in a normal exposure. This is not optional. If the result is too under-exposed for post, we may have to blend multiple exposures. Alternatively, we would have to compromise and lose some hi-lite details just to have a use-able image.
E-T-T-R applies to scenes with medium DR.
E-F-T-R applies to scenes with high DR.
Hi Talha, you’re certainly correct, although, at least to me, that explanation is overcomplicating things.
In any photo – low, medium, or high dynamic range – your goal for optimal image quality is the same: find the brightest highlight for which you want to retain all the detail, and place it as far to the right as possible without overexposure.
In high-contrast scenes, this usually involves negative exposure compensation, while in low-contrast scenes, this usually involves positive exposure compensation. But your end goal is the same in either case. Traditionally, this is called ETTR even if it requires negative exposure compensation.
Hi Spencer – you put that very well. By comparison, my description is definitely over-complicated.
I realize I’m dragging this on but this is a photography website and I find this discussion fascinating so I’ll add a little something: the reason why the ‘preserve brightest highlight’ definition of E-T-T-R troubles me is because I’m sometimes in situations (mostly street photography) where there is a high-contrast scene, multiple exposures are not an option but the highlights are not that interesting and I can actually afford to blow them out just so I can capture more details / less noise in the darks. I consider this E-T-T-R even though I’m not preserving highlight details. In these situations, With exposure compensation, I would have had a decent exposure and preserved the highlights but I E-T-T-R just to maximize in the image in the part that mattered most.
Now I know this situation is an exception and your definition covers 90% of E-T-T-R scenarios but I do think it is important to understand the underlying intent of E-T-T-R so as to make effective use of it in the other 10%.
Make sense?
That does make sense, and I agree – the scenario you describe counts as ETTR in my book as well.
In the discussion on exposing to the right, I try to make a distinction between “brightest highlight” and “brightest important highlight.” It’s still ETTR if the brightest highlight in your photo is blown out, but it’s just overexposed if the brightest important highlight is.
Your street photography case is the perfect example. Same with the photo of the horse in this article (ISO invariance section)… it’s exposed to the right, even though the center of the sun is quite clearly blown out. And that’s because I don’t care if the center of the sun blows out; it’s not a highlight where I care about retaining any detail.
Thanks for this addition, because I think it’s something a lot of photographers don’t fully grasp when reading about ETTR.
I see now – you did say “find the brightest highlight for which you want to retain all the detail”. That covers everything.
You’d make a great lawyer ;)
Nice summing up article.
I appreciate concrete numbers for LR workflow sharpening and smoothing. I will try them to see how they compare to those I have used in previous work. (Usually I do not go to 100 in details and use higher numbers for sharpening value up to the point where significant artifacts are visible at 2:1 zoom.)
Thanks Tibor. It’s just a different algorithm – at 100% detail, Lightroom is emulating a deconvolution sharpening algorithm as much as possible, which I find gives me better results than the 0% detail algorithm, or a mix between them.
Spencer, thanks. You’ve convinced me to switch my a7iii to uncompressed RAW when shooting auroras.
But: are you sure about using in-camera long exposure noise reduction? I’ve read it can be of no benefit or actually play funny tricks, even in the best cameras. In Iceland a professional guide advised it be turned off. Until I did turn it off, I missed shots and observed rapidly drained batteries (the old Sony small battery, and out in the cold).
Cold brings up another question: are there fewer hot pixels in long exposures when the camera is at winter night time temperatures?
Thanks!
Thanks, Richard! I’ve never found long exposure noise reduction to harm image quality or play unexpected tricks, although that doesn’t mean it’s impossible. That said, I actually leave mine turned off more often than on, simply because I don’t like waiting from shot to shot (and in the 30 second range, hot pixels and thermal noise aren’t especially visible anyway).
To answer your other question – you’ll generally notice less thermal noise and hot pixels in cold environments, and the image quality benefits are actually fairly significant at longer exposures.
Spencer – great article, and applicable to many photography genres.
I have invested nearly two decades capturing wildlife. Much of your advice applies, though most wildlife photogs have their list of excuses and rationales for not tapping into these kinds of suggestions – and have images that reflect that.
At the end of the day – if taking great images was easy, more would be doing it. Articles like this provide great practical info that is key to the technical side of image capture. It’s great to have a great subject and a great composition – but if we shy away from the work of understanding how to maximize the quality ALSO, then that image can be an average shot.
More articles like this one – and especially pointing out the key points for great images in different genres of photography. Clearly there is a bias toward landscapes, but there are a lot more genres of photography that people enjoy – so getting this same kind of practical direction in those would help all to take things to the next level.
Thank you, WileEC! I’ve always been of the opinion that image quality is another component of the creative side of photography. It limits your output size and other variables if you don’t maximize the quality of the photos you can capture.
And I’m certainly lucky as a landscape photographer that these suggestions are often easy to put into practice. Any fast-moving genre like wildlife photography requires a lot more intuition and sudden decisions that need to be right on the first try.
I’ll try to think of more articles in the same vein. That “last 1%” is something a lot of photographers care about, but it doesn’t get as much attention these days as it probably should.
Thank you for this post. It has come at the exact right time for me. I recently purchased a 200-500 zoom and am struggling to get consistant sharp images out of it. I know it is capable of it, as I have managed a few extremely sharp images. I have to take all of the “hand-held at 1/30 sec.” comments with a grain of salt. I was told there was a learning curve with long lenses. Now I believe them.
I don’t know if you’ll see this, but another hugely important part of sharpness with very long lenses (300 mm + in my experience) is atmospheric interference.
Let’s say you have a bison nicely filling the frame at 500 mm. The problem is you’re so far away that haze in the atmosphere is going to rob you blind and cause all sorts of sharpness problems most of the time. This problem is completely dependent on distance-to-subject and weather, and only one of those can you kind of control, but that’s also at the whim of the critter in question.
If you’re birding then you’re almost certainly close enough it’s not a problem, but if you’re photographing large critters, or even people, at long ranges you’re not going to get what you want without some cooperation from the weather.
Morning is best because the ground is cooler, low humidity helps, as does just cooler weather overall.
p.s. to my previous – I grew up in photography shooting sports. When I tell beginners what the pros do to ensure sharpness, I get loud indignant protests: “I can handhold at 1/30 and get sharp images all the time!” Well, ha-ha – I’ll stack my rate of acceptably sharp pix against yours all day long. Old sports hack’s secret: shoot at the fastest shutter speed possible, very preferably above 1/500 and optimally above 1/800. Of course, there are lots and lots of “buts,” e.g., when shooting stage events that require 1/160 with a stabilized tele lens (or 1/500 with an f/2 lens, again ha-ha).
Thank you, George, and I’m happy you enjoyed the article! Fully agree – the actual cutoff for zero blur in a handheld shot (or a photo of a moving object) is much stricter than photographers tend to think.
When in doubt, set up a tripod side-by-side a handheld shot, and compare the images full size. It’s the quickest way to prove that the “1/focal length” rule is meant for fairly small enlargements, unless you’ve got a top-notch image stabilization system to help out along the way.