Almost all photographers know about panoramas and HDRs. Most also know about focus stacking. But how often do you hear photographers talk about a fourth method of blending photos together – image averaging?
Although image averaging has picked up a bit more popularity in recent years, it’s still not especially well-known. That’s a shame; depending on what subjects you photograph, image averaging can extend your shooting capabilities significantly.
Let me demonstrate.
Table of Contents
What Is Image Averaging?
As the name implies, image averaging involves stacking multiple photos on top of each other and averaging them together. Generally, all the images in question are taken from the same camera position using identical camera settings.
The main purpose of image averaging is to reduce noise. However, it can also be used to simulate motion blur, akin to using a longer shutter speed.
How It Improves Image Quality
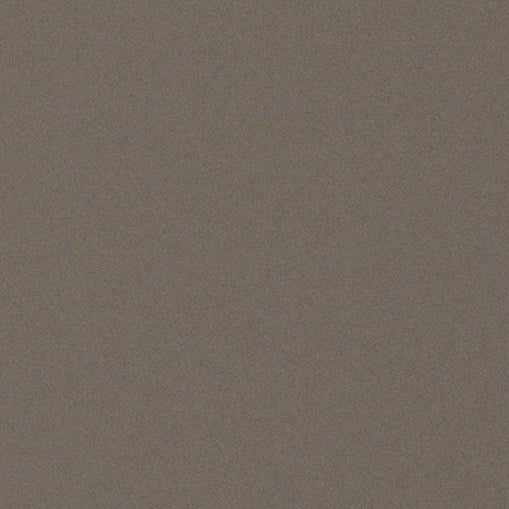
Much of the noise that appears in your photos is random. It looks completely chaotic, like in this crop of a blank wall:
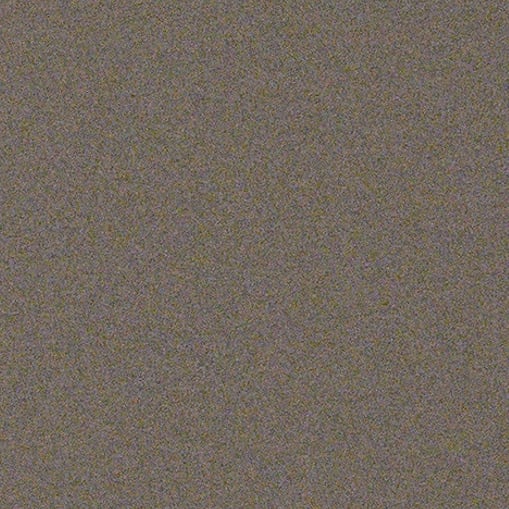
If you take a series of photos with the same settings, the pattern of noise generally isn’t correlated from photo to photo. So, a pixel that’s bright in one image may be dark in another, and vice versa. This means, when you average multiple photos together, the overly bright or dark pixels will start to balance out, reducing the total level of noise in the image:
The more photos you average, the less noise will be in your final result. Each time that you double the number of photos you average, you will improve the noise levels by one stop. By averaging together four, eight, sixteen, etc. photos, you can get vast improvements in the level of noise in your photos.
Note, however, that image averaging is susceptible to movement in your photo. If you want everything in your photo to be sharp in the final image average, you must make sure that neither your camera nor your subject moves between photos. So, as nice as it would be if this method worked for sports or wildlife photography, most of the time it simply won’t.
Image Averaging Method in Photoshop
Image averaging is quite easy to do in Photoshop. There are two methods you can follow.
- Method one: Load all the individual photos as layers. Keep the bottom layer at 100% opacity. Reduce the layer above it to 1/2 opacity (50%). Go to 1/3 (33%) opacity for the next layer up. Then 1/4 (25%), 1/5 (20%), 1/6 (17%), and so on
- Method two: Load all the images as layers. Select them all, then go to Layer > Smart Objects > Convert to Smart Object. Then go to Layer > Smart Objects > Stack Mode > Mean
Both methods will produce the same result. Method two is much easier when you have a large number of images to average. However, method one leaves the individual layers intact so that you can edit them separately from one another, should you so choose.
When to Use Image Averaging
There are three main situations where image averaging is especially helpful:
- Using a smaller camera sensor (including a drone)
- Photographing the Milky Way
- Simulating a long exposure
Let’s go through each of these situations in more detail.
Smaller Camera Sensor
One problem with a smaller camera sensor is that, even at base ISO, you may still have high levels of noise in your photo. Image averaging can be a way to simulate a lower base ISO on such cameras.
For example, if a photo from a point-and-shoot camera has objectionable noise in the shadows at base ISO 100 – but your subject is stationary, and you’re on a tripod – why not just shoot multiple photos to reduce noise? You can take a series of images to average later, which can improve your noise levels significantly.
I use this technique all the time on my drone, the DJI Mavic 2 Pro. Among drones, the Mavic 2 Pro has a relatively large 1-inch type camera sensor. But it’s still not at the level of even an entry-level DSLR, and there is reasonably high noise even at base ISO 100.
However, the Mavic 2 Pro also has a built-in “burst mode” that fires five images rapidly in sequence. Since all five photos are captured in about one second – and assuming the drone is hovering rather than moving – there’s essentially no shift in composition from shot to shot. This means that image averaging is an excellent method to reduce noise. (Incidentally, averaging five photos together results in about 2.3 stops of image quality improvement, which leads to roughly the same image quality as ISO 100 on a full-frame DSLR!)
Here’s how one of my drone photos looks, uncropped:
When zooming in, you can see some pixel-level noise. This will be further exaggerated the more post-processing that I do on the image:

However, after averaging together the five photos from the burst, the noise levels are much lower:
That’s a really exciting improvement! I’m always after maximum image quality in my photos, and this lets me get wall-sized aerial prints without purchasing a $5000+ drone.
In fact, you may be interested to hear that image averaging is also how many smartphones boost image quality in low light nowadays. You hold the phone steady for a few seconds while the phone takes many photos in a row, which it then aligns and averages behind the scenes. The result is that it’s possible to take photos like this with a phone that look perfectly usable (especially on a small screen):
Milky Way and Astrophotography
One of the biggest uses of image averaging is to capture large amounts of detail in the night sky. It’s a popular technique among both the telescope crowd and those who use a wide-angle lens on an ordinary DSLR.
The telescope method should be reasonably obvious. So long as you have a tracking head to follow the stars, you can average together as many photos as you like to improve detail in the night sky. This way, you can take 100+ photos with several minutes of exposure each, then average them for a combined several hours of exposure time. You can even average together photos taken on different nights!
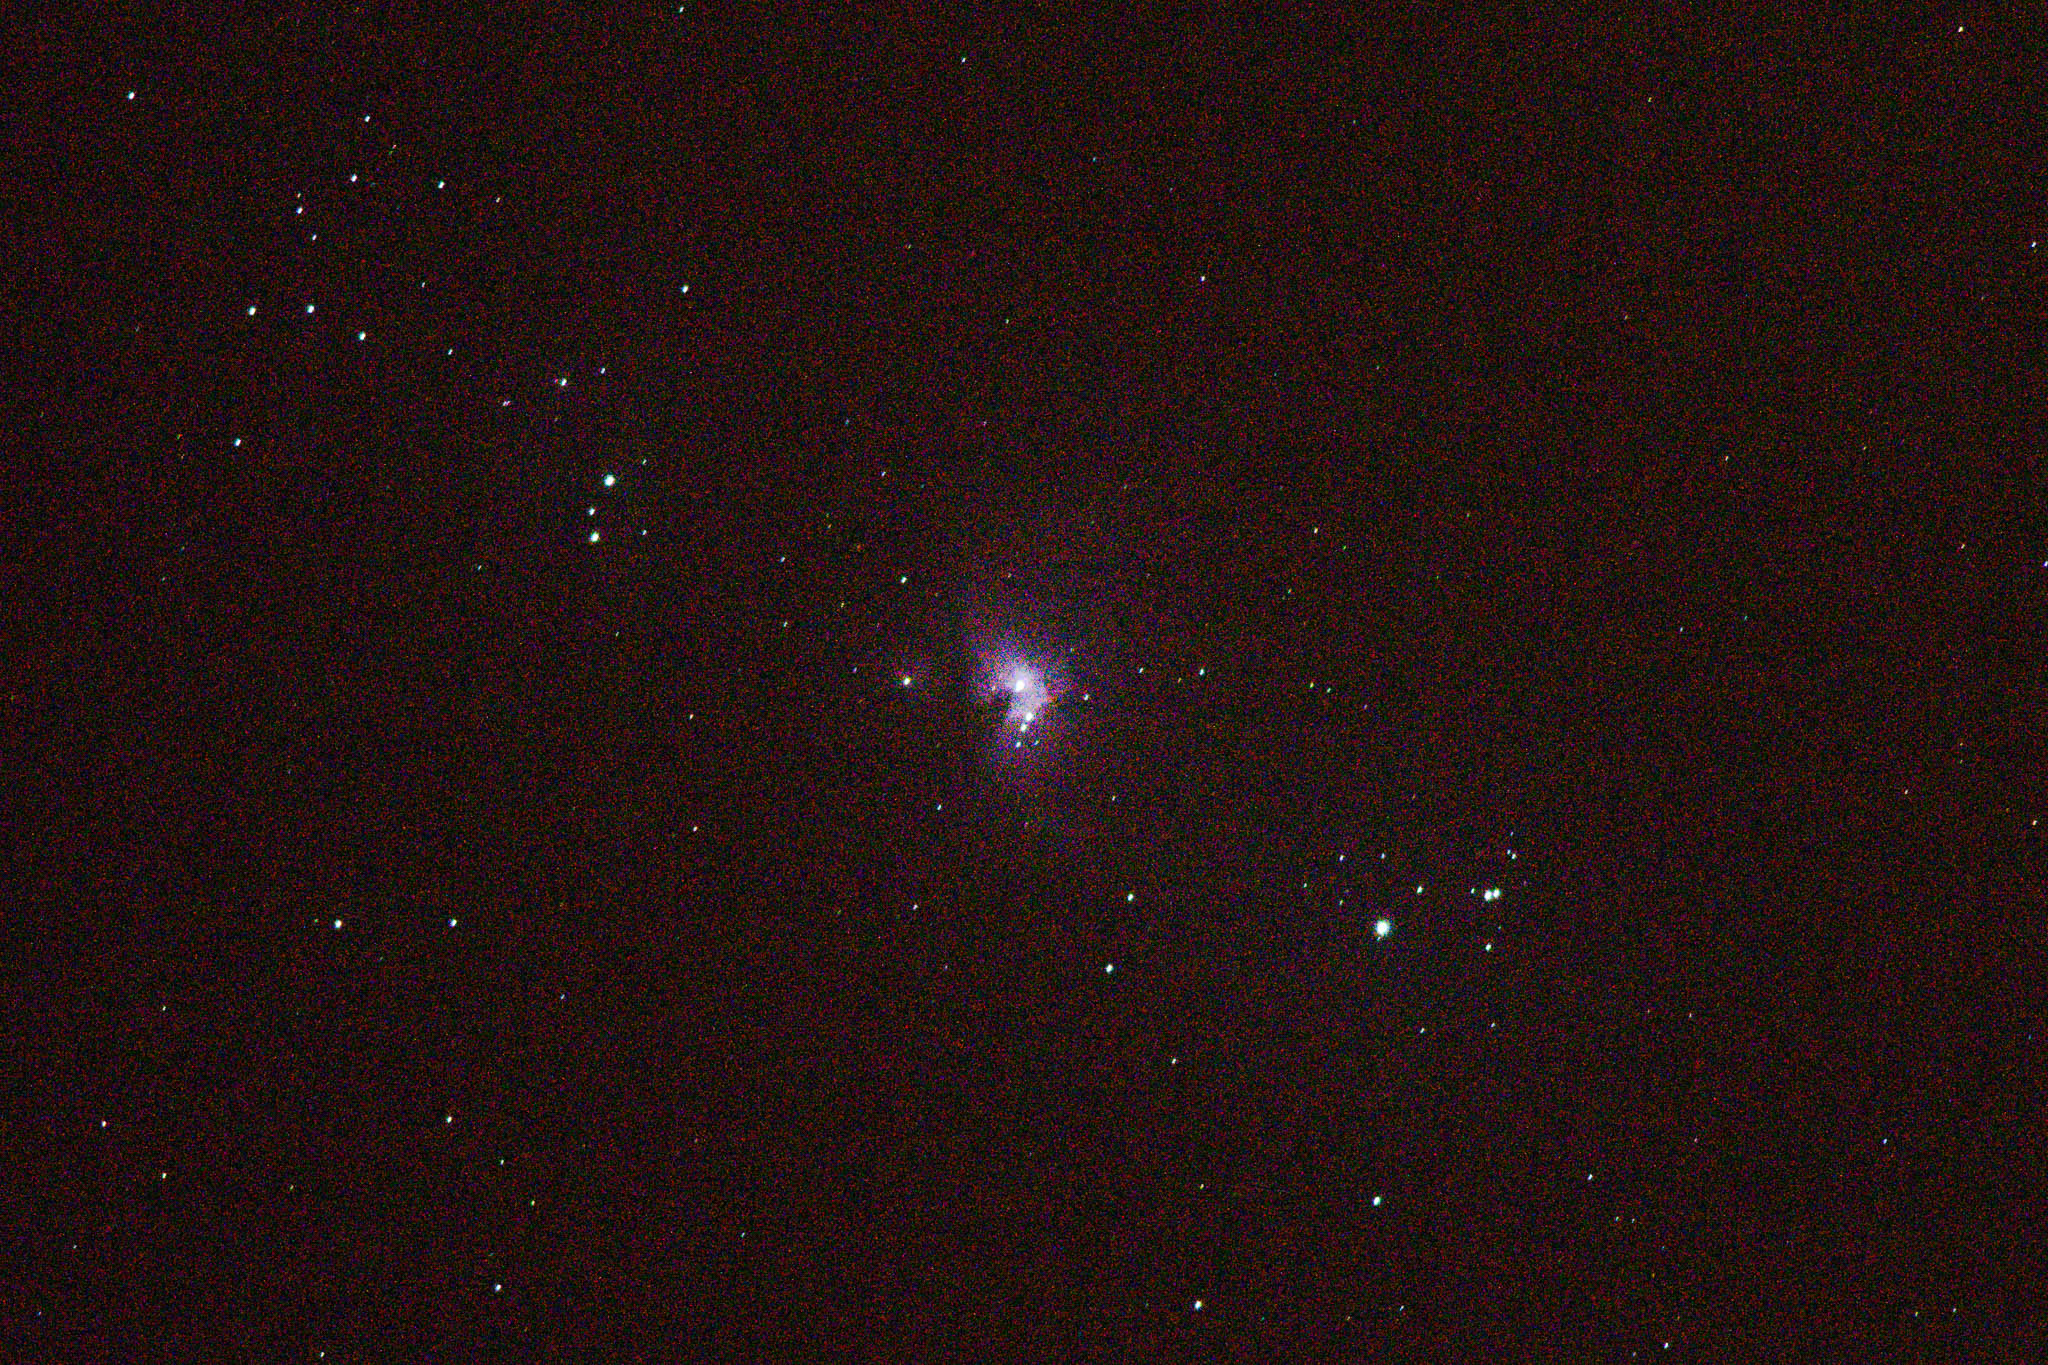
I personally don’t do anything at that level, but I still like using image averaging for some basic deep-sky astrophotography. For instance, here’s a single image of the Orion Nebula taken at ISO 12,800:
Here’s the final stack I made of 250 individual photos of Orion, which I tracked manually from shot to shot:
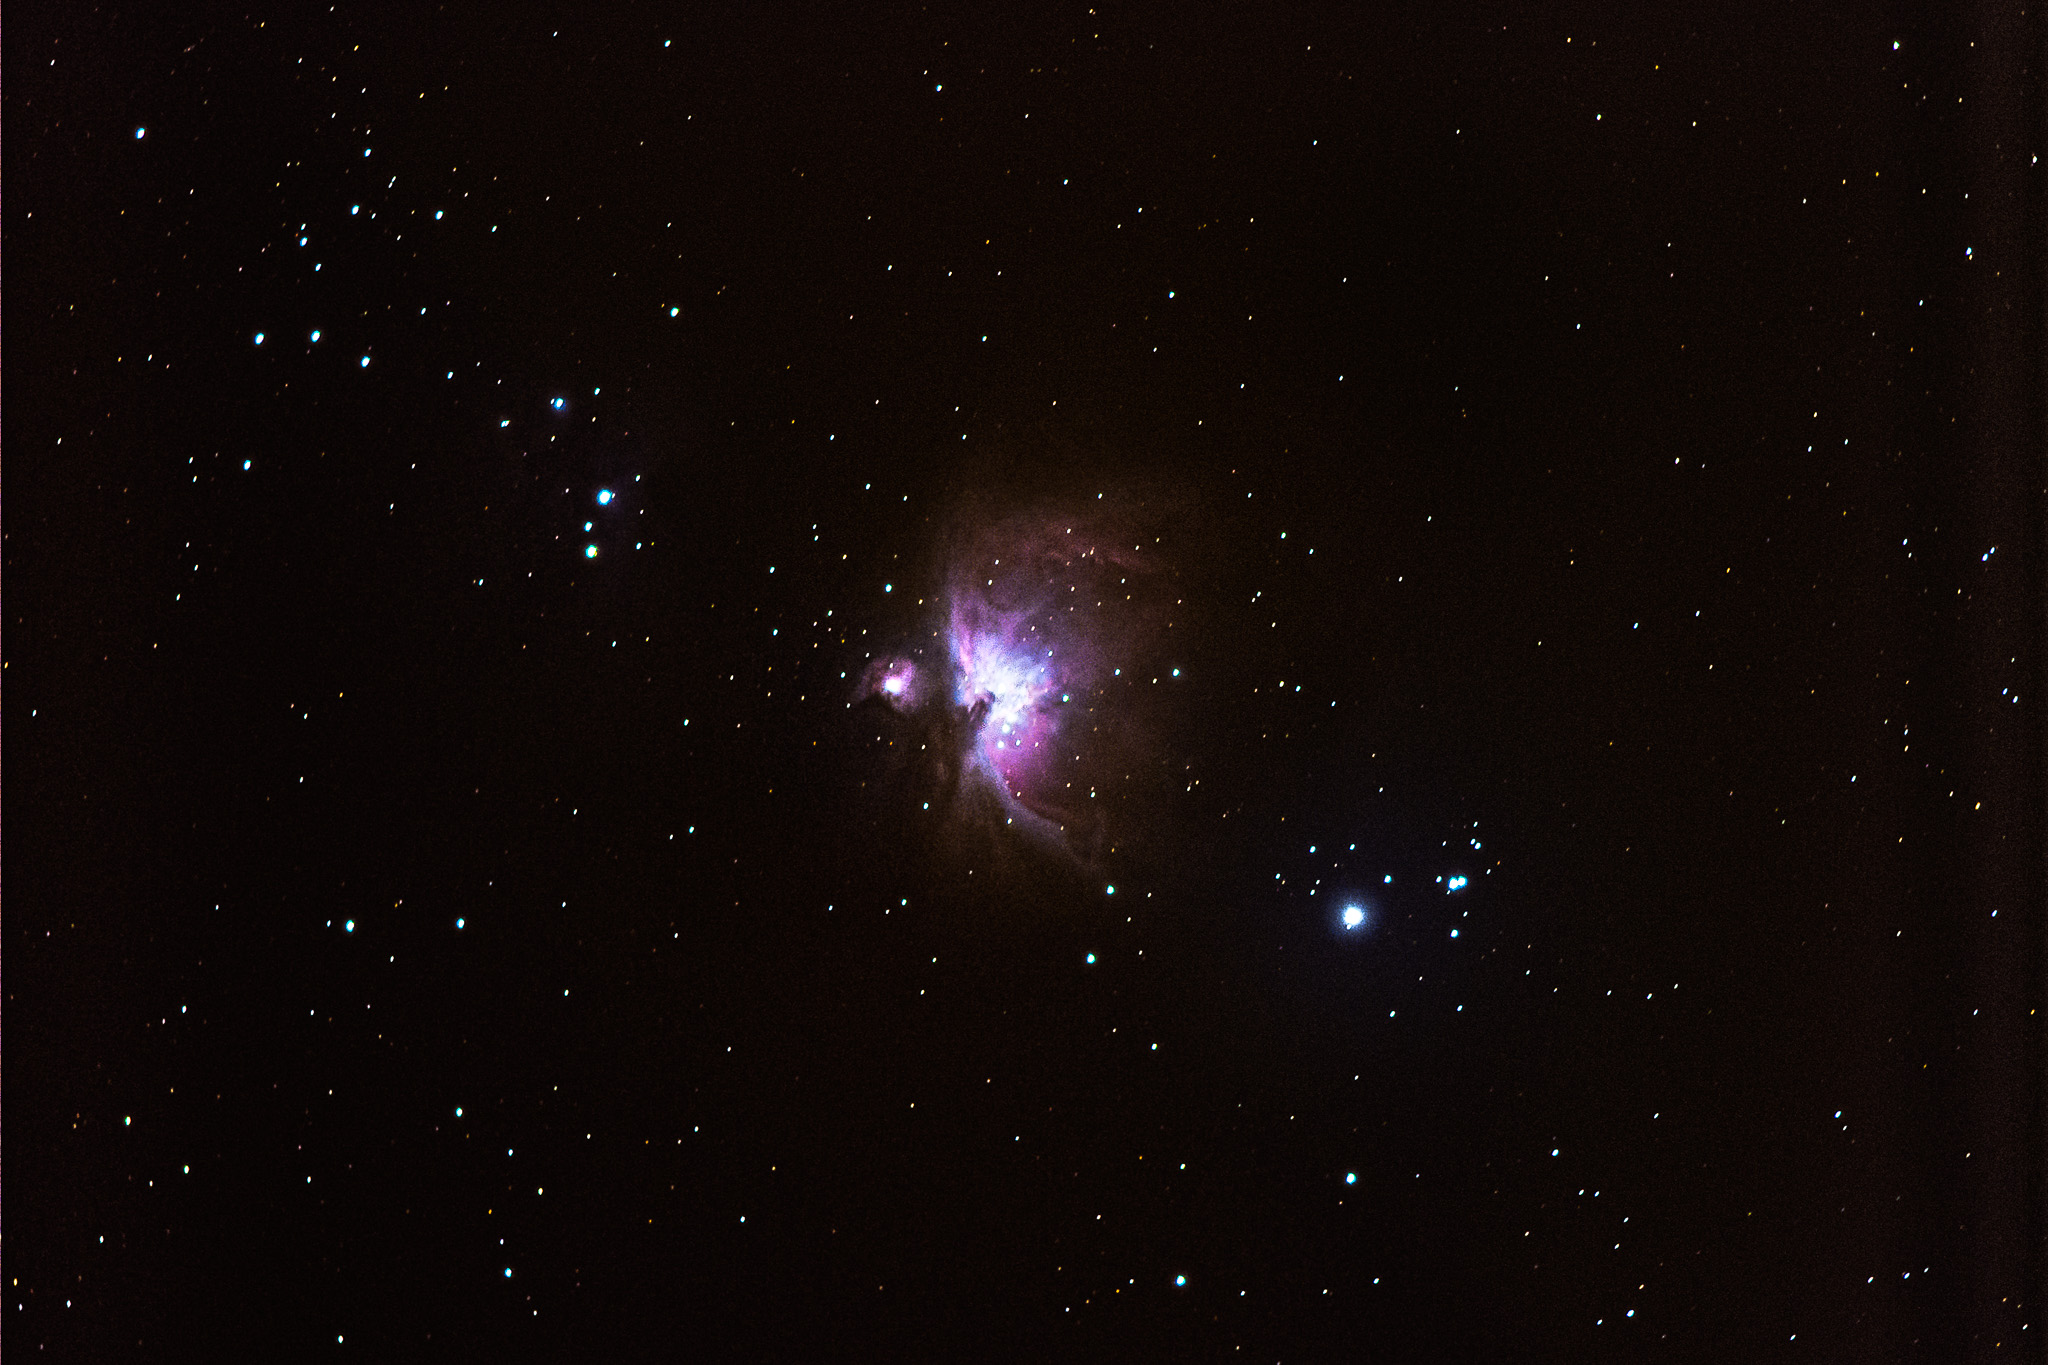
Huge difference!
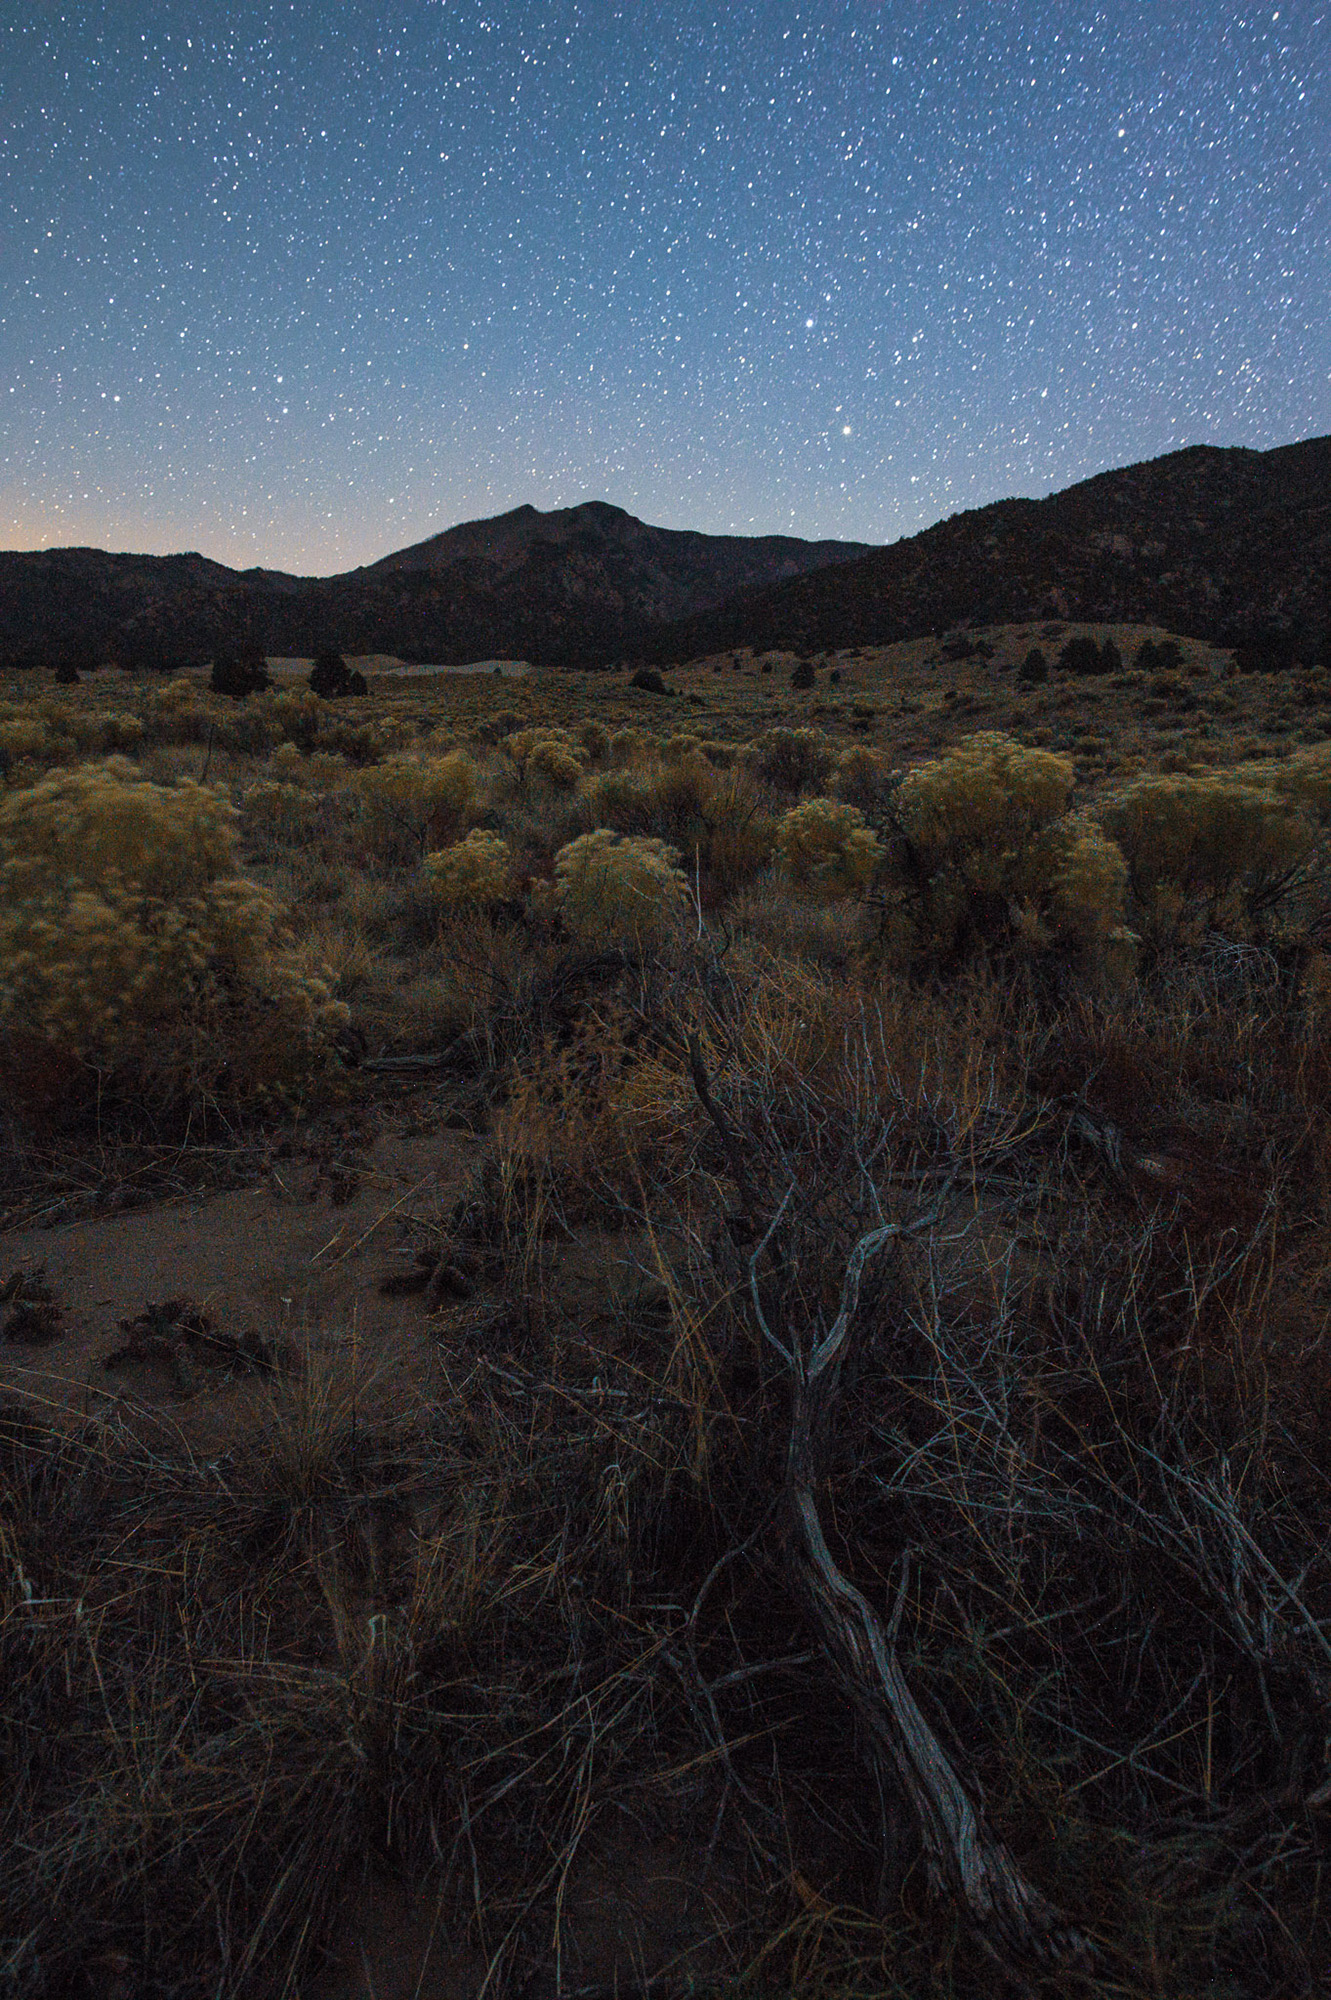
You can also use a similar technique for ground-based Milky Way photos. You might think this wouldn’t work, because the stars are moving across the sky and thus will look blurred when averaged. However, it actually does work, so long as you use software that’s designed to align the stars independently of the foreground prior to averaging the images together. This feature allows you to capture much, much higher image quality than usual at night.
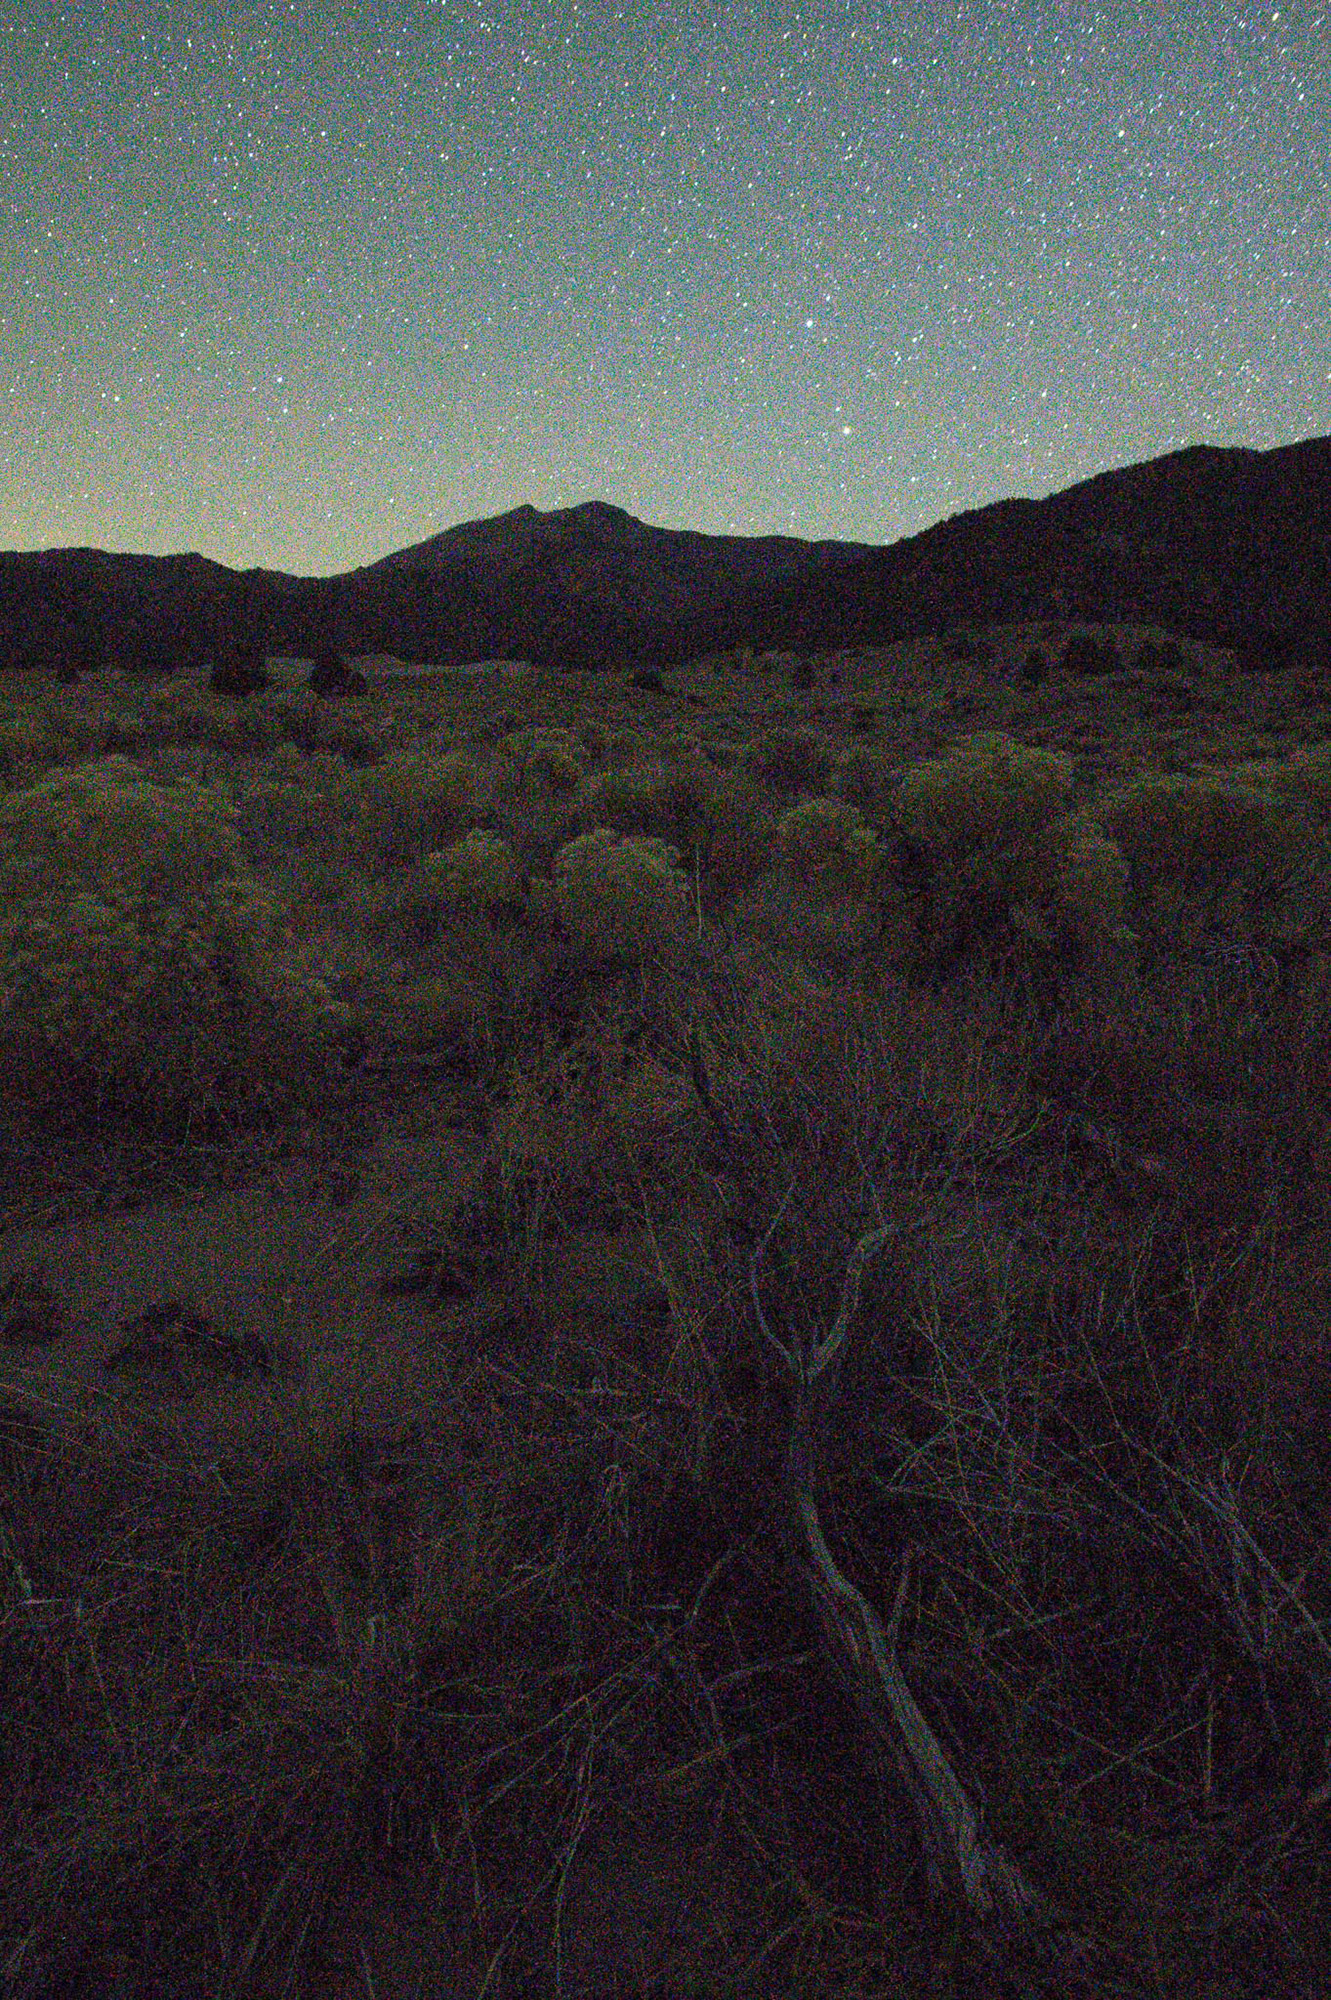
I used image stacking here to capture an extremely sharp Milky Way photo at f/4. The photo below is a blend of 14 individual frames, each shot at ISO 6400:

You can see how the image quality compares between one of the individual photos in the stack (first image) and the final stack (second image):


(As you can see, my image blending software did a good job aligning the stars prior to averaging, despite the complex foreground. I have a further article on that topic here.)
You can also use this technique to extend your depth of field at night to capture detailed foregrounds. That’s one of the “holy grails” of Milky Way photography which is normally very difficult to achieve – a large depth of field. But with image blending, it’s hardly a challenge at all.
I did it below by taking 33 photos at ISO 51,200 and f/8, then used image averaging to blend them together:
An individual photo in this stack has so much noise that it’s completely unusable:
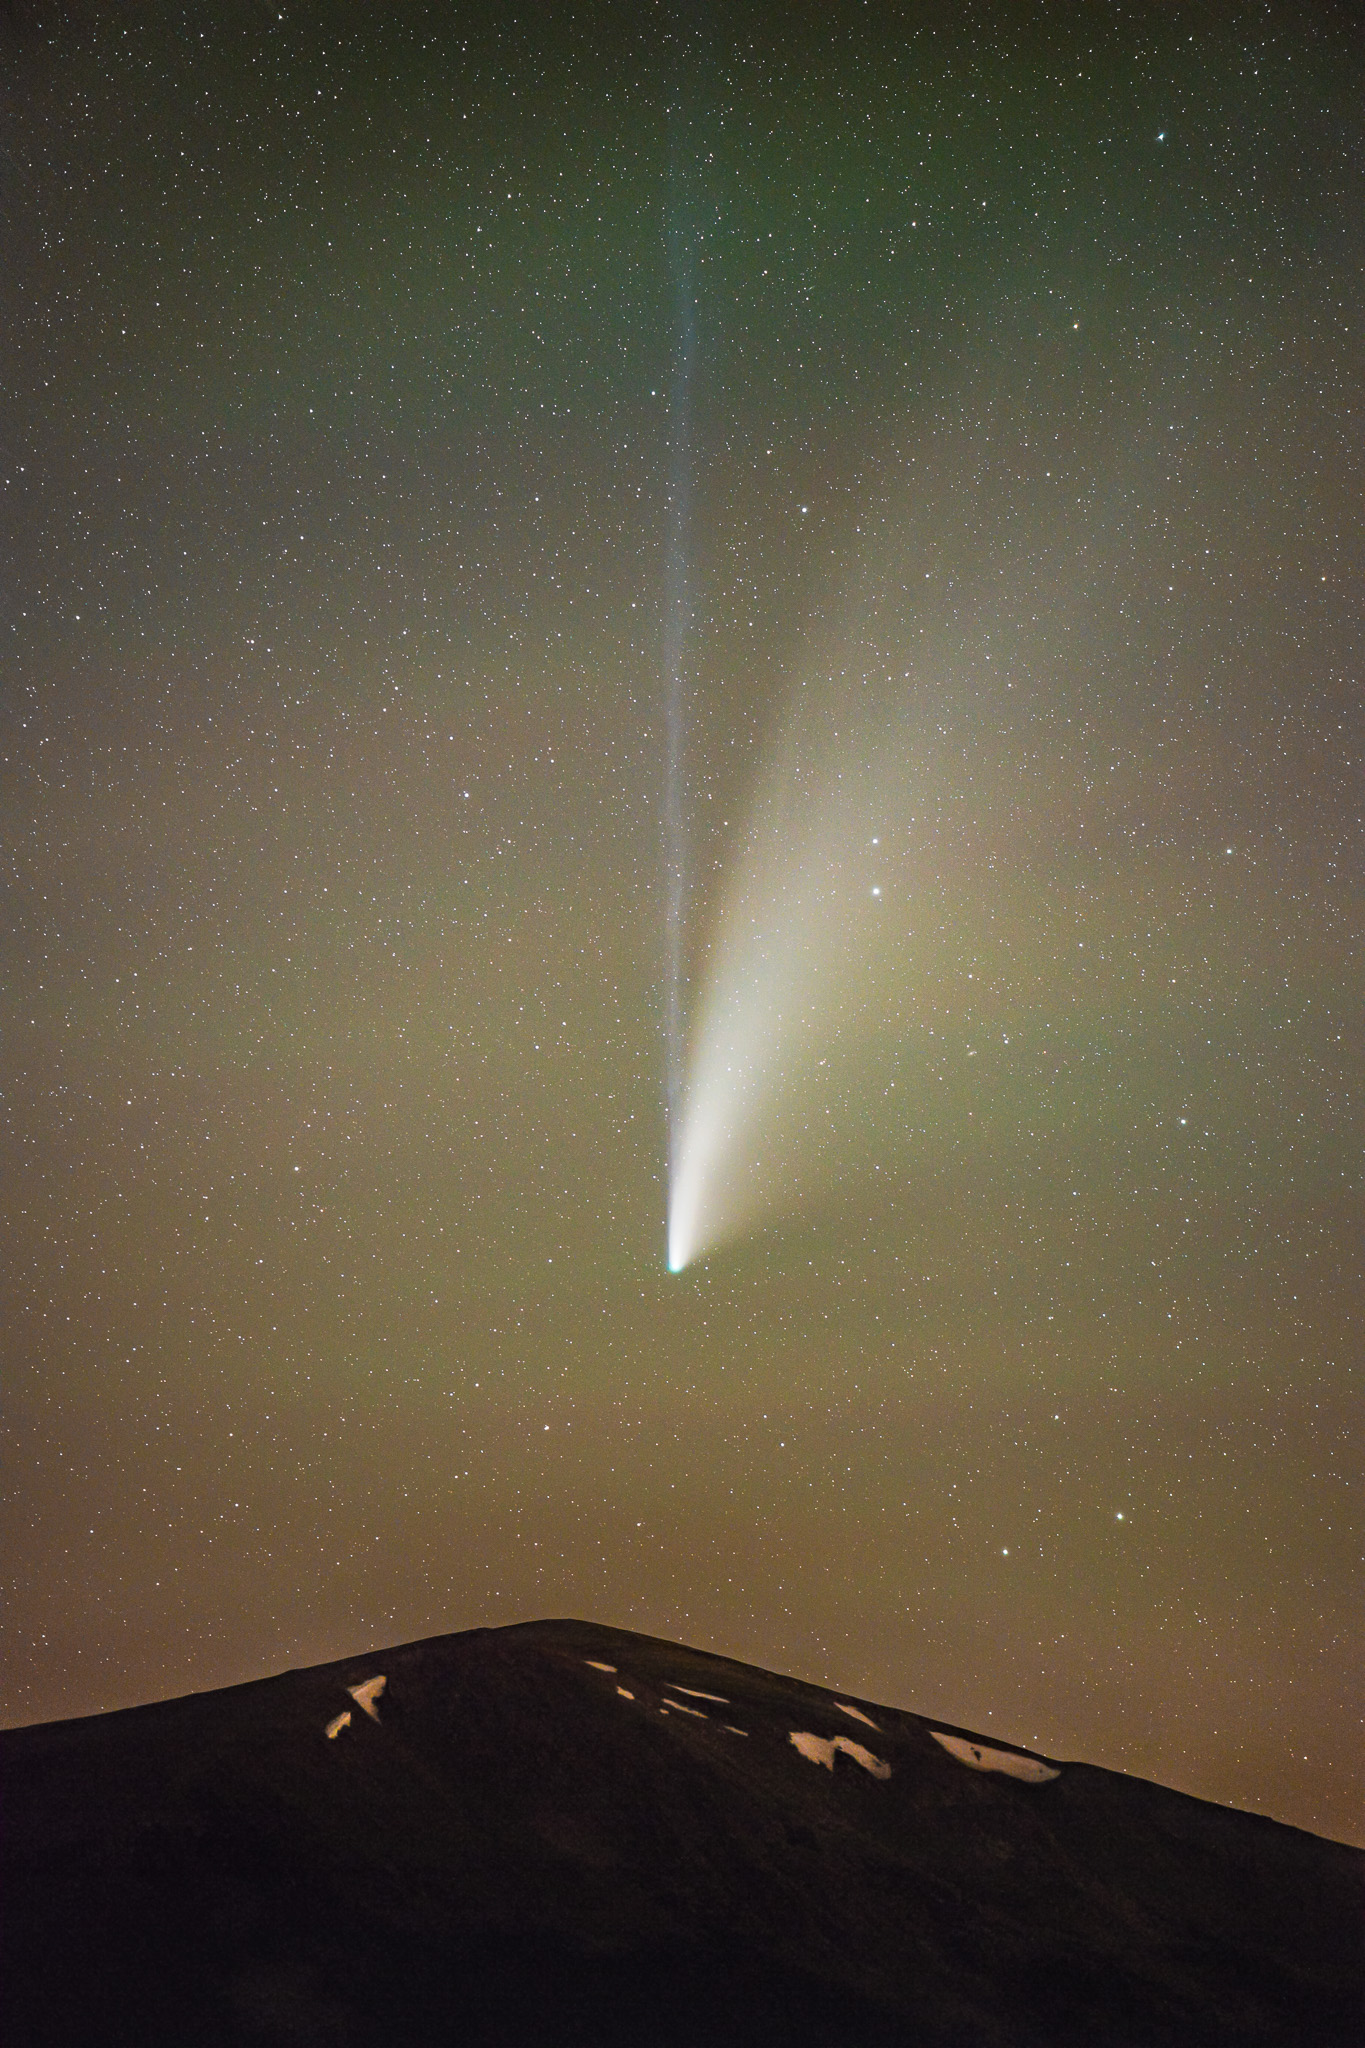
And finally, I was able to use this technique to vastly extend my image quality while photographing the comet NEOWISE earlier this year. With a 105mm lens, I took 53 photos at f/2.8, 3 seconds apiece, and ISO 16,000. The final blend would have been impossible to capture sharply in a single photo. The 53 images simulate approximately ISO 320 in terms of noise level, even though I shot each individual photo at ISO 16,000:
Finally, image averaging would also allow you to capture high-quality Milky Way photos with more basic camera equipment, such as an asp-c sensor DSLR with an 18-55mm kit lens, or even a point-and-shoot. There are many good possibilities here!
Again, though, you do need specialized software that aligns the stars prior to image averaging, or your stars will be blurry. The two most popular such options are Starry Landscape Stacker ($40, Mac only) and Sequator (free, Windows only).
Simulating Long Exposures
So far, I’ve only covered situations where you want to avoid the motion blur image averaging picks up. That won’t always be the case.
Sometimes, motion blur can look really interesting in a photo, such as photographing a waterfall or moving clouds. In situation like that, the typical solution is simply to use a long exposure like a 30 second shutter speed to capture motion blur. However, image averaging can simulate the same effect, which can be useful if you don’t have a neutral density filter with you.
I did that here to get a smoother appearance in the water. This a single image, taken without any special camera settings:
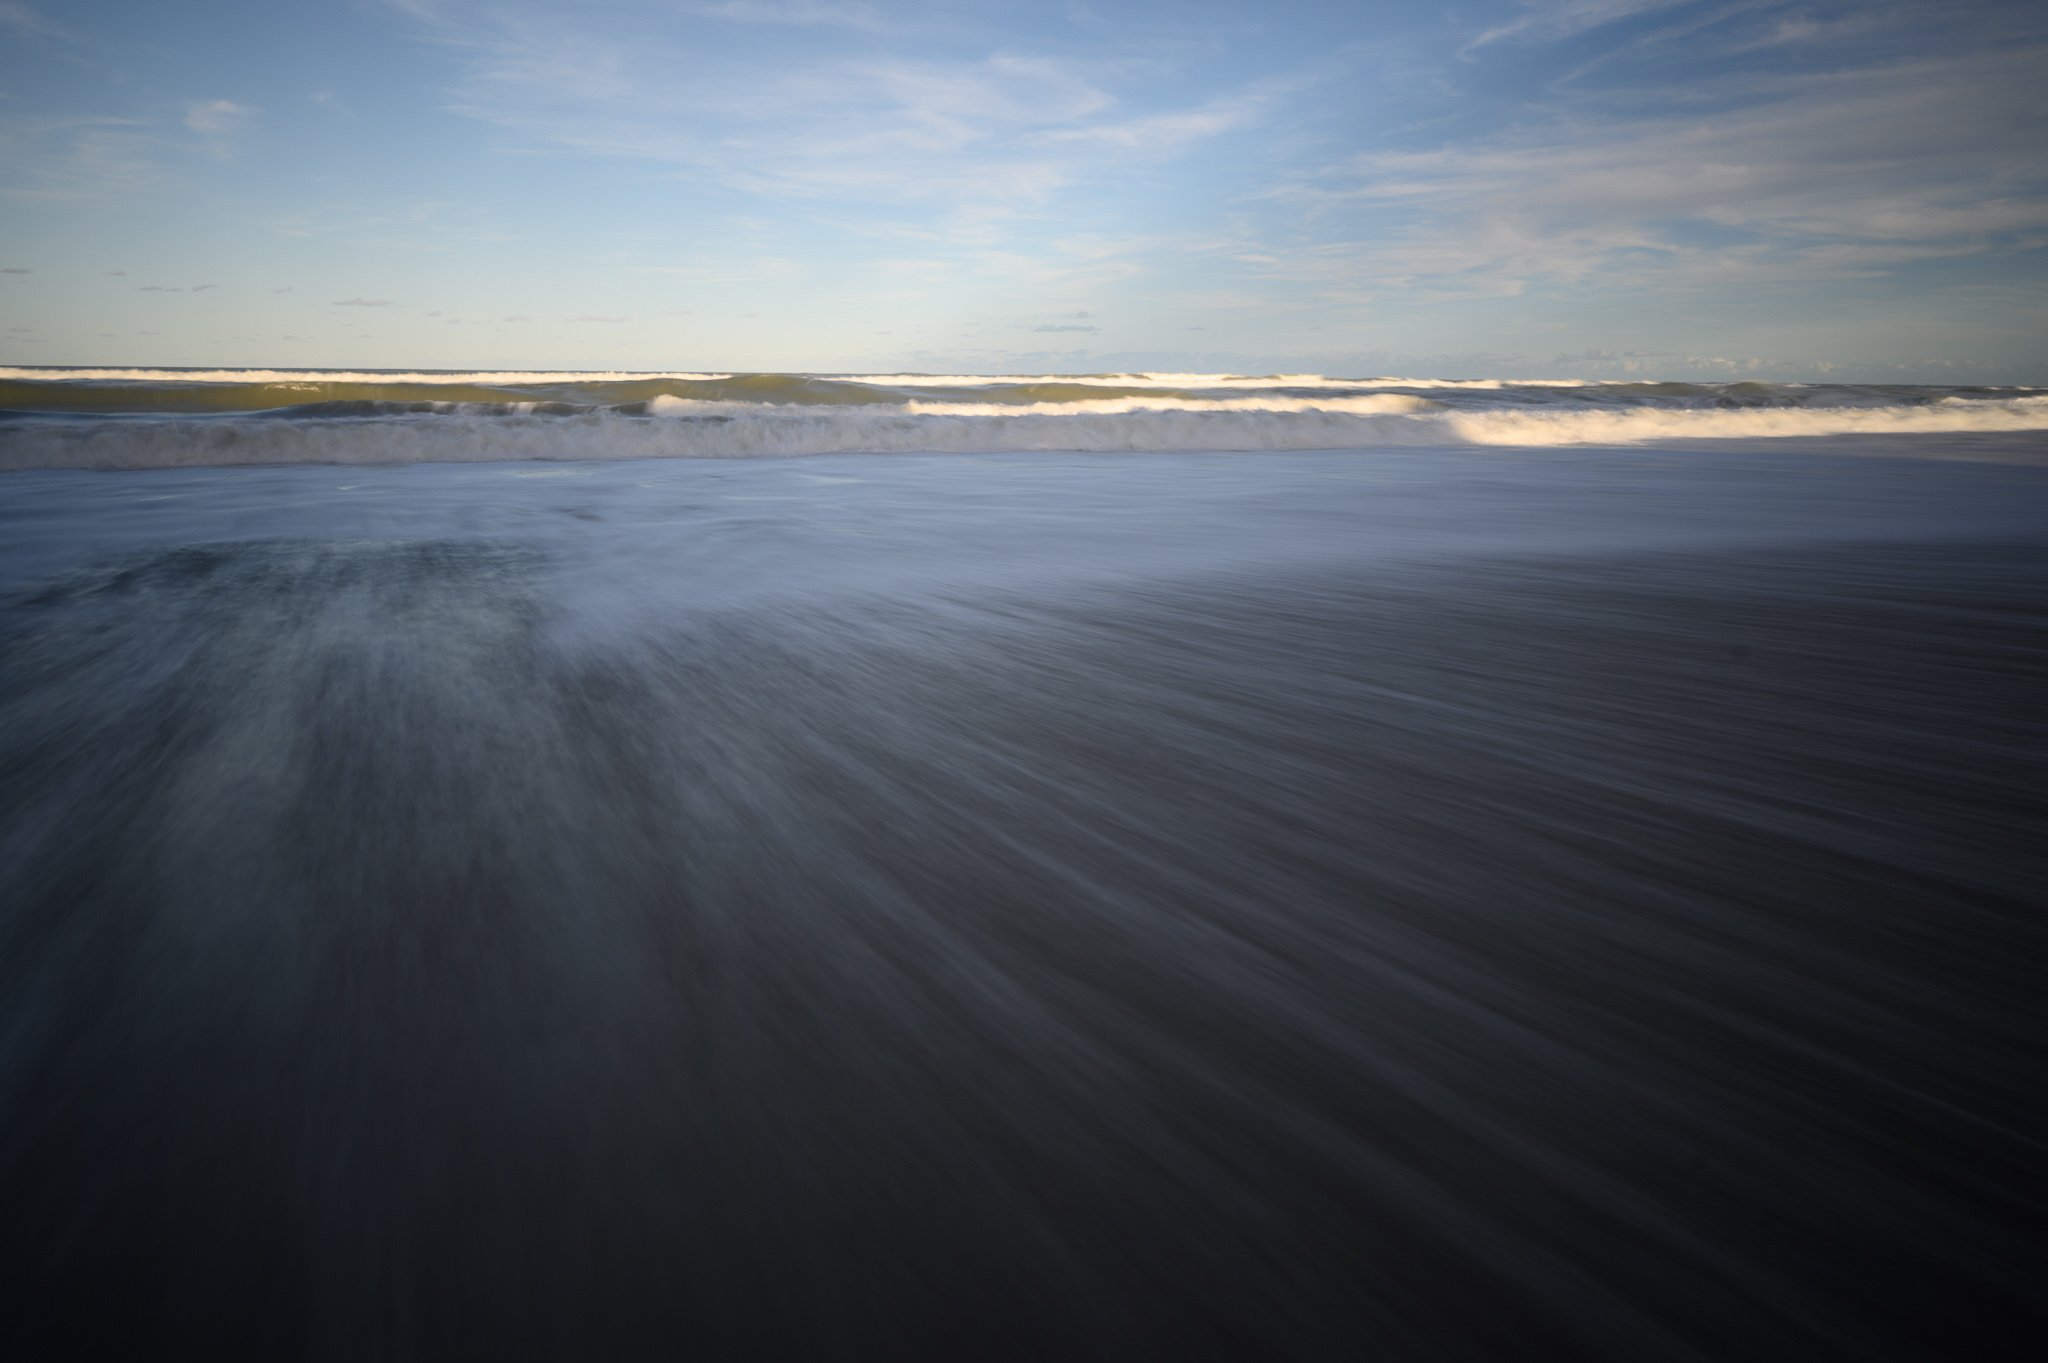
And then a blend of four such images to simulate a longer exposure:
Here’s how it looks as a single image with an ND filter instead – pretty similar to my eye, although a bit smoother:

The more photos you take, the smoother the long exposure effect will be. You’ll certainly want an ND filter if you take a lot of long exposure photos like this, but image averaging is a solid backup option.
Conclusion
Hopefully this article demonstrated just how powerful image averaging can be in photography! I use it for every single drone photo that I take these days, as well as many of my Milky Way photos in order to improve image quality or extend my depth of field. You may also find other uses for it, such as improving your camera’s dynamic range at base ISO, that I didn’t go into in this article. But the three main uses that I covered are the biggest that you’re likely to encounter.
As always, if you have any questions or comments, let me know below.
I am a bit late tot this discussion… Spencer thank you for the interesting article. I have used your smart object method and it works flawlessly.
I cannot believe however the method delivers an equal outcome compared to a three-image HDR photostack (like -2, 0 +2 exposure)
With frame averaging there is not benefit for the overexposed pixels… it only benefits the underexposed parts, so i would suggest also to under expose a bit when using frame averaging- or at least to be very sure you do not clip highly exposed parts.
( it is the same with pixelshift)
my nikon 1 J5 gets renewed interest thanks to this and ai noise reduction.
This technique has not been worth the effort in my experience. I’ve tested this under numerous scenarios, and the stacked image performs no better than a single raw file (Canon R5, FWIW, I know he said small sensor, but I’d expect to see some improvement, none the less). If it is better, it’s so slight it’s not worth the time it takes to (set up a tripod), capture extra photos, eat up your storage, and then wait for PS to average the images.
I believe Spencer provides good, sound advice and is clearly a talented photographer. I respect him and his advice. I did not try astrophotography, so I have no reason to doubt he’s correct there. However, this recommendation just does not deliver the additional image qualities suggested in my testing. Furthermore, HDR images performed better hands down in my testing. The blur effect cannot compete with an ND filter, either.
I challenge you all to try this for yourselves and see if you can tell the difference.
None the less, I thank you Spencer for motivating me to challenge myself with this technique. In a pinch, when I’m not going to use an ND filter, it’s still nice to have options!
Thanks!
Thank you for the kind words, Neb! It might just be that the technique isn’t right for you, although I’m very surprised to hear that you find it no better than a single RAW image – to the degree that I wonder if Photoshop averaged your images properly in the first place when you were testing. Or perhaps you accidentally averaged multiple copies of the same image, which wouldn’t give you any improvement, instead of averaging together different images with the same composition.
The examples in this article aren’t simulated or anything; they’re real examples of image averaging that I’ve done before, and I’m sure you can see the improvements in noise in the examples in the article. The benefits aren’t just theoretical, which is why it surprises me that you’re not seeing them in your own workflow.
If you’re wondering about the number of photos it takes, you don’t need to capture dozens of photos to reap the benefits of image averaging; four is enough to reduce noise by two full stops. A four-image average is also identical to a three-image HDR in terms of dynamic range (given an HDR where each image is one stop apart).
Keep in mind that to simulate an HDR with image averaging, you need to take four “under” exposures – not four metered exposures – and then brighten them one stop in post. Like you, I challenge people to try this themselves and see if it works for them. It does for me.
I should have linked to this article as well, where I’ve included some real-world crops demonstrating the identical dynamic range of a three-image HDR and a four-image average: photographylife.com/ahdr-…amic-range
Hi, this is really helpful. How did you take that Orion Nebula photo? Is it possible to do with a tripod, nikon d3400 DSLR and a 55-200mm zoom? If so, can you tell me the exact method? Thanks
Hi Ethan, this video I made goes through the steps better than I could in a limited comment: youtu.be/Vm1Th1IWjFM
In short, it’s possible, but just barely. Image quality won’t be perfect, and it might require some time-consuming manual post-processing. But where there’s a will, there’s a way.
Thanks! Probably wont be able to do it. But the method really is handy. I got one milky way photo (file:///Users/ethanhudson/Desktop/Photos/DSC_0139.jpg) Not sure if the link will work. It has a lot of noise, but i only got the one so i cant average it. How do you get the whole milky way in the photo? This was taken with an 18mm lens, yet it only has a bit of the colours and that (i think its called a nebula). How can i get photos like your one with the whole arm with purple stuff in the middle?
Okay thanks. Probably too difficult for me. How do you capture the whole arm of the milky way? I tried before, but I just got a tiny bit of colour even with an 18mm lens.
Shoot it during summer and you’ll see more of the Milky Way core. 18mm is a bit longer than ideal but should still give you enough of the Milky Way to look interesting. Shooting vertically can also show you more.
Okay thanks. Whoops didnt realise i commented twice xD. What is ideal? What length did you use for the one above shot through the trees. I’m in australia so is that different?
I should have been more specific than just saying summer — the core is the highest in the sky during June and July, no matter where on Earth you live.
That said, the Southern Hemisphere better Milky Way viewing year round than the Northern Hemisphere. Maybe you need to find a darker sky location if you’re not seeing the core well in Australia.
My lens was at about 18mm for that shot, but on a full-frame camera. The equivalent focal length on the D3400 (an aps-c camera with about a 1.55x crop factor) is roughly 11mm.
Okay is early may okay too? I want to capture it rising over the ocean) Okay but it was a really dark area – maybe i needed higher settings in the photo. So is 18mm on mine not enough? I can’t really afford another lens anyway.
When i follow the steps above – “Stack Mode” is grayed out??
use the manual method instead i guess
Hi All, Nice article Spencer! Was wondering if any of you may be able to help me. I’m working on a project with a few surgeons. We are using EMG to stimulate facial muscles. we want to see the blur or deflection in the muscle after we stimulate it. I’ve been taking videos, then splitting them into frames. i want to now average the frames together to blur only the parts that are moving. What would be a good image averaging software to use?
Thanks in advance!
That’s interesting. It’s very easy to average them in Photoshop, just by opening the frames as layers and following the “averaging method in Photoshop” process in this article. If you don’t have Photoshop, there’s Affinity Photo (usually $50, looks like $25 right now) which has a similar function – see here: affinity.help/photo…e%20stacks
None of these methods exaggerate motion, though – they’ll just be more blurred in those areas, maybe in a way that is difficult to tell without comparing side-by-side with a single image. Maybe that’s all you’re after anyway. There are probably some more scientific programs meant for directly mapping and highlighting pixel movement, but I’m afraid I don’t know what they are.
An easy technique, and superb results!
Thanks for sharing it with us, Spencer, and I wish you a prosperous 2021!
And damned be the Covid!
Tord
Great article Spencer!
I guess there is also the trick to make moving objects, like tourists, or cars disappear, using the median stack filter that can be usefull
Nice article Spencer. I particularly like the results of the astro shots.
If I understand the technique correctly, the reduction in noise is an automatic result of multiple exposures, there is no ‘smart’ algorithm being applied that identifies noise (?). Hence, I suppose it would also work if you use the multi-exposure in camera, using the ‘Average’ setting? Indeed, it would be interesting to see results of that with and without in camera noise-reduction as well, as that is a ‘smart’ technology. Could be too ‘smooth’ though I guess.
That’s right, no algorithm making tricky decisions. You could conceivably use the same technique in a darkroom if you could align the negatives in the enlarger precisely enough!
Good point about the in-camera methods. I admit, because those settings are JPEG-only, I’m not especially familiar with them as a raw shooter. But I see no reason why it wouldn’t work in theory.
Thanks Spencer. Not much noise in film photography of course, just grain which is uniform throughout the image due to the requirement for larger silver halide chrystals in fast film emulsions, so no chance to cancel it out.
Yes, I’m referring to film grain. Unless I’m misunderstanding what you’re saying, wouldn’t each photo on film have a different pattern of grain? It’s certainly not like regularly-aligned pixels. (I’m not referring to double exposures on one piece of film, which wouldn’t work, but to multiple separate photos.)
Granted, it would be near impossible to align the negatives properly on top of one another in a darkroom, but the principle of reducing grain through image averaging still stands. An easier way to show that would be to scan the film, align the images in Photoshop, and use the same averaging technique.
Not that I recommend any of this, it’s just in theory. I may be misunderstanding you as well, if so, my apologies.
Unfortunately, you have misunderstood film grain Spencer. In high ISO emulsions, the silver halide chrystals are larger in both exposed and unexposed areas, be they either B&W tone or colour hue. There are no areas that are not grainy. Averaging lots of grain, would just be lots more grain.
I believe you’re mistaken. I’m certainly open to tests that show the opposite. But I just imported some crops into Photoshop from side-by-side images taken on film, aligned them, and averaged them. I see just the same benefits as with digital. I’m happy to email you the test results if you like.
This result makes intuitive sense as well. Given that film grain has no fixed pattern from shot to shot, it will inevitably average out as more and more shots are averaged (such as a particularly bright speck of grain in one shot having less and less of an impact, when averaged with shots that don’t have such a speck).
Spencer, is there an analogous postprocessing software technique to produce shallow depth of field by merging multiple images? That is the one limitation that frustrates me after switching from full frame to micro 4/3. Your current article makes me think there might be a back-door way to produce the shallow depth of filed that’s so easy with a full frame camera and a 24-70/ f2.8 lens. My iphone can do it in portrait mode and I understand Apple accomplishes that trick via software.
Thanks for another great, very useful article.
Sure thing!
The only way I know of is to create what’s known as a Brenizer method panorama.
Zoom in beyond the composition you actually want. Use the widest aperture you have available, then capture a panorama (usually multi-row). The more you zoom and the more images in your panorama, the shallower your depth of field will be.
Hope this helps!
Here are the Brenizer method articles by Romanas Naryškin:
photographylife.com/tag/b…zer-method
Happy New Year, Spencer.
Kindest regards,
Pete
Thank you, Pete! Happy New Year to you as well.
Happy New Year Spencer! Great article! Question: For Astrophotography, do you need to do image averaging if you are using a star tracker? Would it make the image come out better? Thanks! Happy New Year!
Happy New Year, Zigman! Yes, it’s a good idea to stack photos when you’re using a star tracker. If your tracking alignment isn’t perfect, if your tripod shifts partway through, or if an airplane flies through your photo, an ultra-long exposure (say, 30 minutes) could be ruined. Taking 15 exposures of 2 minutes apiece, deleting any bad frames, aligning them (if they’re out of alignment), and averaging them will eliminate these problems. It also tends to result in less thermal noise, particularly if you wait 10-15 seconds between exposures.
Thanks!