The second “How was this picture taken?” series article turned out to be a bit controversial, because some people either did not like the photo, or did not like some things about it. Some complained about the moon appearing unrealistic, with its darker side being darker than the sky (and they were right, as pointed out below), others did not like how the moon arced in the way I made it appear in the image. One of the readers even said “this shot is to astrophotography what a stuffed owl on a branch would be to wildlife photography”. I totally understand and sympathize with such views, because we want to see a realistic world in images. However, when it comes to moon photography, things can get quite difficult when trying to be realistic. First of all, unless you photograph just the moon by itself without any foreground elements, it is quite difficult to yield a good-looking and realistic image. The moon by itself is a small object when viewed from our planet, which means that if one wants to photograph the moon up close and include foreground elements so that they both appear realistic in terms of sizes and proportions, the only option is to use a telephoto lens above 200mm. And in such cases, one would have to time the shot and take pictures at moonrise, while the moon is still very close to the horizon.
Sounds relatively easy, except it is really not. Unless the moon happens to rise at the horizon during the day, while sun rays are still illuminating the foreground, you run into a rather big problem – differences in exposure between the moon and the foreground. The darker the foreground, the more the moon will overexpose. If you expose for the moon, the foreground will be dark. That could be a good option for a silhouette shot, but what if you want to show the foreground? While one can certainly attempt to capture a well-lit foreground (cityscape or a brightly lit object) with the rising moon, planning for such events requires quite a bit of preparation and even then, it might be difficult to get both the moon and the foreground looking good in a single image. The easier solution usually involves taking two shots, with one exposing for the foreground and one exposing for the moon. Then the two can be blended together, provided that the conditions are right and the sky is completely clear. If haze or a light layer of clouds are present, the moon will create a pretty nasty “glow” around it and it will be quite difficult to blend the two images together.
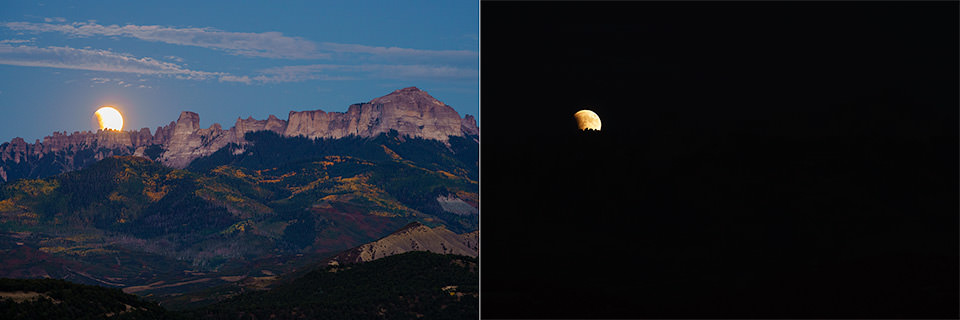
Take a look at the below images, which were capturing using this particular technique:

As you can see, there is a pretty drastic difference between the foreground and the moon in terms of exposure. Looking at EXIF data, I can see that the foreground was exposed at 0.6 seconds, while the moon was exposed at 1/60th of a second! That’s a five stop difference between the two shots. And what’s worse, at a mere 200mm of focal length, the moon moves so fast that before I adjusted my exposure and fired the second shot, it had already moved quite a bit. The longer the focal length, the faster the moon will move relative to the foreground elements. So blending such shots in Photoshop can be tricky.
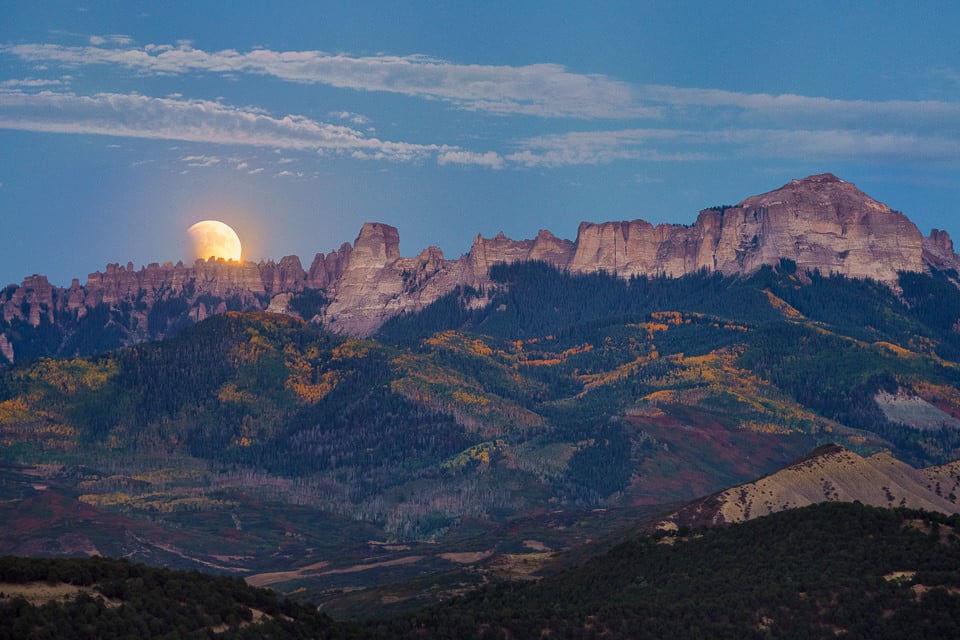
Here is my attempt to quickly blend the two to demonstrate this:

I brightened up the image a little, but you can clearly see what I am talking about – the glow from the moon is there and it would take quite a bit of time to clean up in post. For cleaner and quicker result, it would have been easier to capture the foreground way before the moon shows up, then capture the moon separately and copy-paste it into the scene… wait, did I say “copy-paste”?
That’s right! That’s what most of us photographers end up doing anyway. The moon is so hard to capture in a single shot with the foreground, that it is always easier to expose for the moon separately, and then copy-paste it into a separate scene. But the big question remains – how do we make the foreground objects appear realistic relative to the size of the moon? If you capture the moon at say 400mm, the foreground would have to be shot at a similar focal length as well, or at least have the “feel” that it was photographed from far away. That means any wide-angle shot would be pretty much out of question, as the size of the moon would appear unrealistically huge!
But that’s what you see in most images of the moon anyway…that’s right – most images you see of the moon with all the crater details and a beautiful foreground scene are actually fake, with the moon pasted into the scene. The fact is, it is not like we have a lot of interesting foregrounds that we can photograph at 200mm and longer focal lengths, which will remain relevant while the moon moves up from the horizon. It all happens too fast and planning for such shots is extremely difficult, since you have to know exactly where the moon will show up. Once the moon moves a bit above the horizon, it gets even more difficult to photograph, because you will be losing most of the foreground. At long telephoto focal lengths, the angle of view is too narrow and too limiting to incorporate grand vistas. Unless you are willing to shoot a sequence of shots to later stitch them to a panorama…
Table of Contents
Total Lunar Eclipse Composite Image
You can see that I have been leading you to the image in question, the below composite of the moon phases that I captured during the total lunar eclipse of 2015:
Anyone who has done moon photography before, would know that the shot is a composite, with the moon copy-pasted into the scene. As I have pointed out above, capturing such a scene at night with both the moon and the foreground captured at the same focal length would be quite difficult. So the only way to make such an image is by photographing the moon separately, then photographing the foreground and blending the two together. And that’s exactly what I did here. I photographed the moon phases at 200mm with the Sony FE 70-200mm f/4 lens on the Sony A7R II. Determining when to switch from the bright side to the dark side and vice-versa was surely a challenge. Initially, just to be safe, I hopped back and forth. As stated in my article on how to photograph a lunar eclipse, the difference in exposure between the bright and the dark side can be up to 8 full stops, which is insane! You will surely be pushing the limits of your camera system at such exposures. During the period of totality, I was pushing ISO 3200 just to be able to keep my shutter speed fast enough not to introduce motion blur. And if I shot with a longer lens, it would have been even more challenging.
After the show was over, I went to a completely different spot to photograph the foreground. Since the moon was full, photographing the moonlit foreground was quite easy. Remember, the moon is just a reflection of the sun, so you get the same reflected sunrays hitting the scene – even the white balance is the same! Once I got my focusing figured out (which wasn’t easy, since it was pretty dark), I set the focal length to 70mm on the same lens, switched to vertical orientation and then took 10 shots from left to right with some overlap between each shot, as described in my panoramic photography guide. The resulting exposure was 30 seconds at f/5.6, ISO 800. It took a while to take all the images. During the capture there was a little bit of wind – if you look at the tips of the trees on the bottom, they appear blurry for that reason.
From there, it was all post-processing. I stitched the images using Lightroom’s built-in Photo Merge to Panorama feature. The resulting image had over 25,000 pixels horizontally and the amount of details was pretty impressive. The background was a bit too hazy though, so once the stitching was done, I had to add contrast to some areas of the scene. From there, I took the image to Photoshop and started the process of copy-pasting the moon phases into the shot (each moon phase was cropped earlier). To be able to properly align and arc the moon, I created a custom oval shape, as shown below:

Once my visual guide was there, it was just a matter of moving the moon phases and spacing them out. For this sequence, I ended up using a total of 23 moon images.
The Arc of the Moon
To those who were concerned about the arcing of the moon – yes, I am well aware of the fact that the arc is fake and unrealistic. It was never done to look realistic anyway, so it is just an artistic choice. If this angers or annoys you, I am sorry, but you and I both know that it would be impossible to create a realistic arc in this particular scene. If you look closely, you can clearly see the shadows of the trees, indicating that the moon was at a pretty high position. If I wanted to show a natural arc of the moon, the foreground would have looked minuscule in comparison, which is exactly what I did not want to do. And come on, aligning a total lunar eclipse (the next one is happening in 2033!) with a scene to create a natural arc from the beginning all the way to the end of the lunar phase, with a nice-looking foreground would be near impossible, wouldn’t you agree? Where I was, the moon went up quite a bit, so I don’t know what type of a foreground would even work for such a shot…
Blending Issues
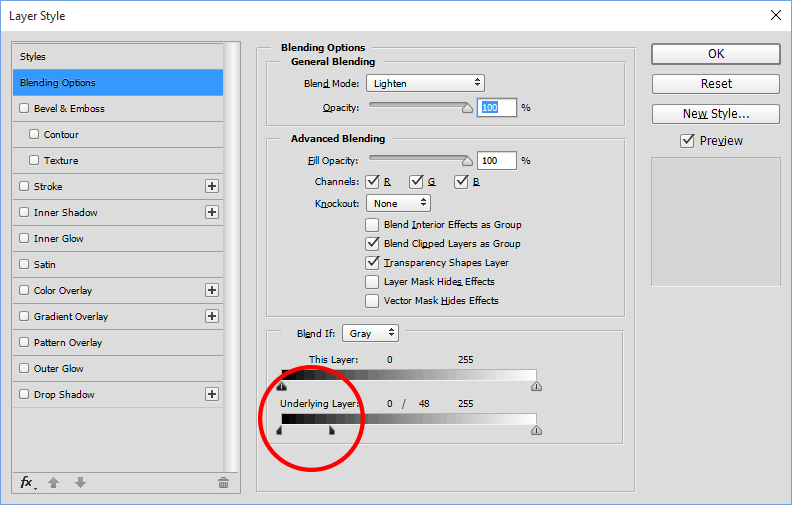
My earlier image that I used in this article was a quick job that I did at the campsite, while I was in the mountains. I ended up with quite a poor blending of the moon with the sky, but since I was short on time, I ended up publishing the image anyway. A few of our readers noticed the problems and let me know that the dark side of the moon was darker than the sky, which never happens. They were right, so I had to fix the sky after I got home. I initially blended the moon and the foreground together with a simple “Screen” layer blending mode and for the blood moon images in the middle, I only reduced the opacity a little, which ended up making the moon look quite unrealistic. After I got home, I changed the blending mode to “Lighten” and used the “Blend If” feature in Photoshop to blend the moon a little better with the sky. By pressing the “Alt” button on the keyboard and clicking on the right side of the black pointer, I was able to drag that portion a bit to the right for finer and more pleasing blending of the moon against the dark blue sky:

I then de-saturated the moon a little, as it was a bit too red/magenta in the middle.
That’s pretty much it. From there, I resized the image to 4K resolution and added slightly more sharpening.
4K Image – Public Domain
As promised, I am releasing a 4K high-resolution image to Public Domain. This means you can use this image for any purpose – personal or commercial without any need for licensing or attribution. Here is the image you can view or download to your computer at 3840 x 1233 resolution:

Why public domain? No reason really – just want to give this one away for the world to use and enjoy.

Great image !
Thank you. :)
This is a WONDERFUL image, Nasim. I’ve set it as my desktop.
Thank you for your feedback Greg! Glad you enjoy it.
Wonderful image.
Thank you sir, appreciate the feedback!
Nice article, Nasim.
As for photoshopping images, I consider that artistic license is valid in photography, even more in a cool and instructive shot.
Thank you!
Rafael, appreciate the feedback. Of course there are REAL photographers out there who never use Photoshop :) Sadly, I am not one of them.
I think the thing one needs to recognize is that some of us are actually capable of getting real and compelling landscape with moon shots and go to extraordinary lengths to do that. So for us “oh its hard” doesn’t quite cut it as a reason to play into yet even more media misinformation and adopt a facade of having done it. It’s quite frankly no more legitimate than cut and pasting out of Internet stock.
I think the thing one needs to recognize is that some of us are actually capable of understanding that while some people work differently, it doesn’t mean there’s a need to comment on the articles in question with an incredibly “holier than thou” -attitude.
So for us “works great and is one technique REAL photographers use” doesn’t quite cut it as a reason as people work with different methods and the fact that you can’t learn them or think they are wrong, doesn’t necessarily make it so.
It’s quite frankly no more legitimate than saying “it’s wrong because I say so”.
David, would love to look at what you have done – looks like you have some amazing images to share with other readers!
Let me ask a silly question (which I know I will get slammed for). First, this is not the type of photography I do, so please don’t make too much fun of me.
Now the question:
You mentioned early in the article that the difference between the two exposures was five stops. Now, what if you had the camera on a tripod, exposed for the moon, and then fired off a series of multiple exposures (all on the same frame)? My thinking is that the moon would be properly exposed for each part of the sequence, which hopefully you would get more of the other parts of the scene exposed with each added shot. With the camera on a tripod, locked down, etc, there should be no camera movement.
I understand that clouds, or other moving parts of the shot could be a problem, however I am curious as to how the results would be. Has anybody tried such?
Again, please be kind in response. The question is one from TOTAL lack of experience in trying such.
works great and is one technique REAL photographers use.
William, I apologize for a late response!
Are you asking if one could take multiple exposures in brackets? If yes, I did quite a bit of bracketing that day too. The problem is – once you start exposing for the dark side of the moon, your exposure slows down drastically, so you have to push ISO to compensate, or your shutter speed will be too slow for the moon. That’s why you cannot just bracket the moon with multiple images – you have to adjust the exposure to keep the moon from blurring.
Now if you are asking if the moon and the foreground can be shot on the same image at different exposures, of course it can be done, but only if you are shooting a very distant landscape with a telephoto and the moon is very low, close to the horizon.
Great image! Thanks for taking the trouble to compose it – a symphony is unnatural too, yes? – and share the story with us.
Lunar eclipses are quite frequent in any given location, unlike total solar eclipses. Google “lunar eclipse calendar north america” for good links.
I can quite easily imagine it might be some years before somebody composes another such artistic lunar eclipse montage
Sometimes you can get great moon images if you are able to photograph the moon the day before (or after) the full moon. This, of course, cannot be done for lunar eclipses which require the exact full moon. By shooting the day before, the moon will have risen above the horizon while there is still some light on the horizon. This is a technique I’ve been using for several years with good results.
Here are a few examples:
www.dblanchard.net/blog/…-eclipses/
www.dblanchard.net/blog/…sco-peaks/
www.dblanchard.net/blog/…a-part-ii/
Well guys who actually do this, and don’t pretend to have done it like this guy, are aware of that and make choices and and preparations just like you would for other images. We don’t always shoot fulls, we don’t only shoot rises, the particular light dynamic we are looking for or can get is what we use to compose, not photo shop. NO not true. Real Pro photogs don’t cut and paste it in.
No need to apologize for art. The fact that you stirred emotions, positive, or negative, means that it was a success. If, a painter had painted the same scene, it would have better accepted. This is YOUR ‘painting’! Great job.
There will be several total lunar eclipses long before 2033! The next total lunar eclipse visibile in N. America is Jan. 2018.
For a more complete list, check this NASA site:
eclipse.gsfc.nasa.gov/LEdec…e2011.html