Last week, I had posted a landscape photograph for installment #8 of our How Was This Picture Taken? series. Judging from the comments, many of our readers took this exercise very seriously and posted deliberate and insightful remarks on how this photograph was visualized and constructed. I enjoyed both the aesthetic and technical analyses offered by our readers, some of whom were correct on many aspects of why and how I chose to make this photograph. Well done!
Let’s review the photograph again, which I made last month during a road trip into the Southern California desert. I will have much more to express on the reasons for embarking on this particular photo shoot in my upcoming photo essay, but for this particular photograph I sought to study and capture structure, tonality, and textures in a way that would impart an abstract and provocative mood. I visualized high contrast – bright and alluring highlights balanced with equally alluring deep shadows.

As I further studied the scene under the burgeoning light, many emotions were permeating my mind. I was feeling an uncanny sense of minimalism and romanticism. I visualized not just the intersection of light and land, but the intersection of man and nature. I felt an emotion of scarred beauty, as in a scar on a human face. I saw and felt the juxtaposition of smooth skin tones, a scar, with deep shadows conveying an untold story. At that moment, I felt compelled to create a rendition of this beauty with the hope of conveying some degree of emotional impact.
Now, for the technical rationale. I made this photograph with one shot – one exposure. As a few readers astutely surmised, I used black and white film in a 35mm format coupled with a long lens. I was impressed with our readers surmising that I made the photograph at night – under moonlight – to craft the mood for this scene. Although my rendition for this scene does indeed have the appearance of a nighttime exposure under moonlight, that was not my specific intent. I made this photograph at early sunrise to capture the unidirectionality of high contrast light bathing the triad of dunes in the center of the frame. Although a moonlit scene would not be expected to create this degree of directionality of light, the quality of the light captured nonetheless imparts the emotion and appearance of moonlight.
So, how were these effects – high contrast, deep shadows, with preservation of detail and texture (and even a night time appearance) – made possible?
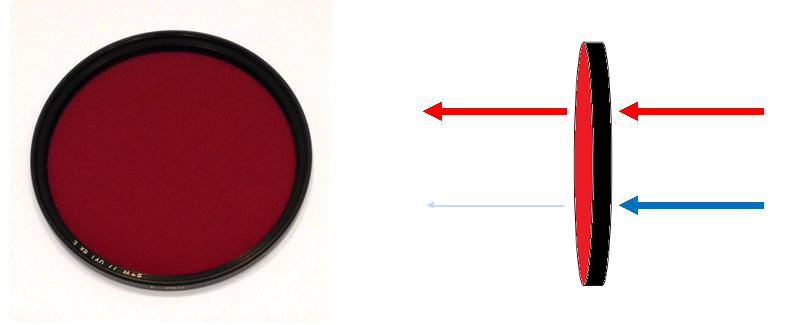
Well, the answer is both interesting and straightforward. As I had described previously in my one of my articles on Film Photography and Visualization, to create stark contrast, deep shadows, and extreme tonal separation, I used a classic tool in black and white photography – the red filter.
Why the red filter?
Here’s a brief and simplified rationale. The red filter is one of many contrast filters in black and white photography that can be manipulated to create a multitude of effects. As I have previously written, red filters exert their strong and unique effects by heavily blocking blue light from exposing the film. Since blue light (via sky light) is responsible for illuminating shadows in outdoor scenes, any filter in front of the lens that curbs blue light transmission has the potential to strongly reduce shadow detail, and thus, strongly increase contrast.


Within the visible portion of the electromagnetic spectrum, red light extends from approximately 650-750 nm, whereas blue light occupies the far left of the visible spectrum from approximately 450-495 nm. Since red filters only *begin* their light transmission in the 570-610 nm range (depending on the specific filter grade and manufacturer), any wavelength of radiation below this transmission threshold is essentially cut off. It’s simple physics.
In order of strength of the blockade of blue light transmission through the lens, green filter < yellow filter < orange filter << red filters. Among red filters, there are varying strengths, such as the Wratten # 23, Wratten # 25A, and Wratten # 29, with the #29 exerting the strongest effect. These filters block so much blue light that their creative potential in both still and landscape photography is boundless. They even block UV light.
For this photograph, I used the # 29 filter grade, also known as the deep red filter.
Next, how was the exposure manipulated? In order to create the high contrast that I visualized, I needed to manipulate the light in a way that would *obliterate* as much shadow detail as possible in my subject. A photographer could easily accomplish this feat by attaching a red filter, then underexpose the strong high values on the left face of the dunes by 1-2 stops by placing them on Zone VII or VI (which would ensure that the opposing shadows close), then extend development of the film by N+1 to N+2 to recover the highlights. If I had used sheet film, I would have certainly used that strategy. However, with 35mm roll film, I typically avoid overdeveloping in order to minimize grain structure in the negative. So, I chose to spot meter the high values on the left face of the dunes on Zone VIII (white, pale details in the highlights), develop the film normally, and hope that the deep red filter would deliver the goods in blocking enough blue light to obliterate shadow detail (i.e., Zone 0, or Zone I at most) on the opposing face of the dunes. Based on the lighting at the moment, I knew there would be areas of highlights on the upper and lower borders of the left face of the dunes that would fall onto Zone IX (bright white, minimal detail), but I was not concerned about that.
For black and white film, I chose Adox CMS 20 II, which is a new film for me and one with which I had been planning on experimenting for some time. What is interesting about this panchromatic film stock is that it is a very low ISO film. When used with its proprietary developer, Adox rates this film at ISO 20. However, when developed with conventional black and white chemistry, Adox rates this film at an astounding ISO 6. Since I planned to develop this film using regular black and white chemistry, I exposed it at ISO 6.
For the camera settings, I zoomed in at the maximum focal length for my lens (200 mm) and stopped down the aperture to “f/8 and be there”. Of course, with a film speed of 6 coupled with a deep red filter (filter factor +3 stops), a tripod was mandatory. ;)
In terms of the post-processing, well, this image is “straight out of the camera”. The raw scan of the negative was so good that I made no adjustments. I cropped the image to a 2:1 aspect ratio. Once again, superb job by Scott and Bonnie at Northcoast Photographic Services!
The final image was exactly as I had visualized it in my mind and in my heart: a scene filled with emotion and beauty, captured in a way that evokes deep thought, maybe a sense of mystery and romanticism, with strong contrast to impart an element of abstraction, yet still abound with fine texture and detail to visually explore. Overall, I was quite pleased with the result and the experience. :)
Incidentally, Adox CMS 20 II is a *wickedly* sharp film with stunning resolution, high dynamic range, and minimal grain. I have never before seen any 35mm film with a performance anywhere near this level. This film stock has now become one of my “go-to” films for landscape and fine art photography. This month, I am thrilled to have acquired a supply of Adox CMS 20 II in both 120 roll and 4×5 sheet films to use with my medium and large format cameras, respectively, and I look forward to reviewing this film for Photography Life by this summer.
Please, stay tuned for an upcoming essay on my landscape photo shoot of these sand dunes in which I will share additional images and thoughts on exploring artistic vision, exploring the emotion of beauty, and the quintessence of the intersection of light and land.
A very helpful article.
However, I have a question. Is the big difference in contrast between exposure at 12 and 20 iso? What do you think about applying Skylight filter (1B) and exposing film at 20 iso. I think I’m gonna test this way
Wait a minute. This photo was shot with the Nikon F6. Of course it was an excellent photo! Just kidding. Good job on this. How do you like the F6? I own a purchased-new F100 but I’m always tempted by the F6.
Hi Robert,
Thank you very much for your comment!
I’m thrilled that you asked that question. The F6 is an awesome camera. It is one of my personal favorite cameras and (in my humble opinion) one of the best SLRs engineered by Nikon, or by any company, for that matter. Tomohisa Ikeno and his Development Division (at the time) at Nikon did a superb job developing this camera. The F6 has everything a photographer needs and is built to perfection – it feels solid in your hands.
The F100 is an excellent camera. I nearly obtained one as a back-up to my F6, but one design flaw in the F100 was a deal breaker for me: the lack of mirror lock-up. For stills at shutter speeds from 1/25 sec to 1 sec with a long lens, the prospects for getting a sharp exposure with the F100 (even on a tripod) are slim. Otherwise, it is a superb camera. :)
Nicely done.
Thank you, Motti!
Excellent article Rick, thank you for sharing!
Thank you, Nasim! I’m happy you enjoyed it. :)
Once more very interesting. How did you scan the negative?
Hello Philippe,
Thank you for your comment!
The negative was scanned with a dedicated 35mm scanner at Northcoast Photographic Services. For 120 and sheet film negatives, I personally scan them with my Epson V850.
– Rick