This article is the answer to my “How was this picture made?” post from a couple weeks ago. First, an apology – I intended to have this article published several days ago, but my winter classes already have taken their toll on my spare time (and sleep). That said, I hope the answer is worth the wait!
In all, people did quite a good job of guessing how this image was taken. No one got every part of my question correct, but many of you were close. I especially would like to congratulate our reader Rob, who somehow managed to find the Google Maps location that I took the image. Well done! Others of you got four out of the five questions correct, so I must extend another congratulations.
Without further ado, then, here are the answers to my five questions:
Table of Contents
Is this a single photograph?
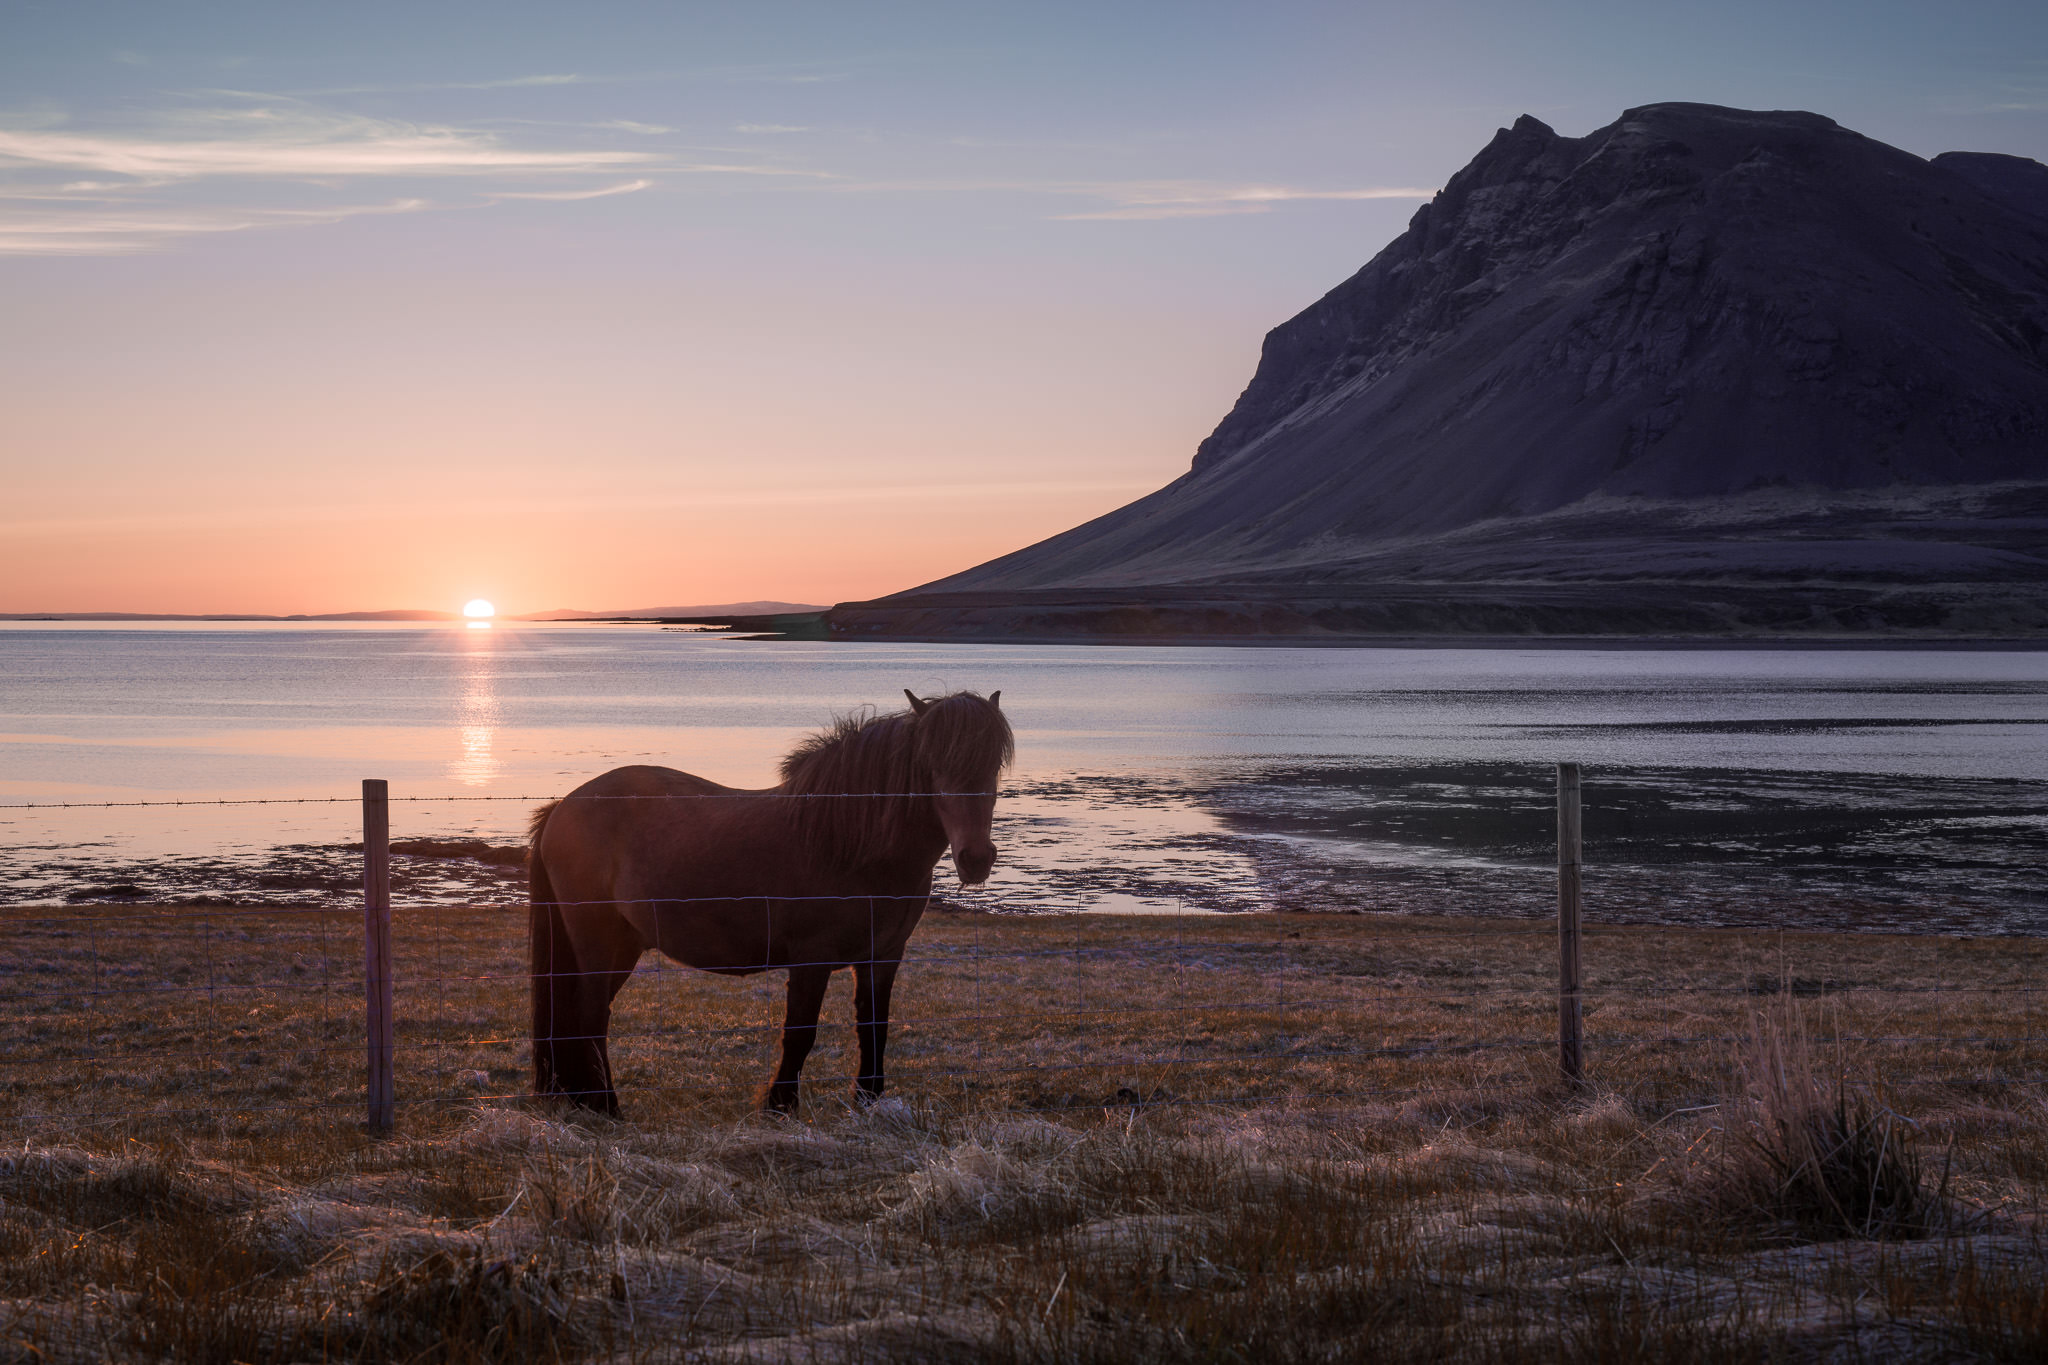
Yes, it is a single image. Many people took the shadows as evidence that it was a composite – which is very clever thinking – but the image is just a single frame. Other readers suggested that I used an off-camera flash to illuminate the subject, which also is not the case. What happened instead (as I will mention in the next answer) is that I lifted the shadows fairly dramatically on the horse; if you do this, something is going to light your subject. In this particular case, due to the off-camera pattern of clouds, the light from the left-hand side of the sky was brightest; that’s why the horse appears lit from the left, even though it should be a silhouette. As much as it looks like a trick, it wasn’t!
A couple of readers wisely pointed out that the fringes of the horse’s legs still look backlit, which shows that the main source of light is indeed from behind. An astute Photoshopper certainly could have added these highlights for a more realistic effect, but I am far from an expert at compositing! Indeed, no parts of this image were cloned or removed, aside from a couple of dust specks and distracting bits of snow.
Also, the horse does indeed cast a shadow; the light is just so low that it is difficult to see. Look, though, at the grass closest to my camera. You can see a few backlit sparkles on either side of the horse, but none directly in the center of the image. Again, a professional photo manipulator easily could simulate this effect, but it was entirely natural in this case.
What “unusual” post-processing did I do for this image?
This is the fun part. To process this image as best as possible, I needed to brighten it significantly. For comparison, here is the original RAW file (with Lightroom’s “camera standard” rendering):

Quite a big difference! If the photograph hadn’t been so dark, though, the sun would have lost all of its detail – underexposing was my only option. The tricky part was to make the image look natural in post-processing. (I was helped by the high dynamic range of my Nikon D800e, although I am convinced that most any modern camera would be able to make something of this shot.)
Although I experimented for quite a while on this RAW photograph, I wasn’t getting anywhere. My edits for the land were ruining the sky, and vice versa. Even the local adjustments in Lightroom weren’t doing the job, since they are fairly limited in functionality (for instance, the Hue/Saturation/Lightness sliders are conspicuously absent from the local adjustment options). Since this image needed opposite post-processing adjustments for almost every slider, my best option was to combine two separate edits in Photoshop.
Here is my initial Lightroom edit for the ground:
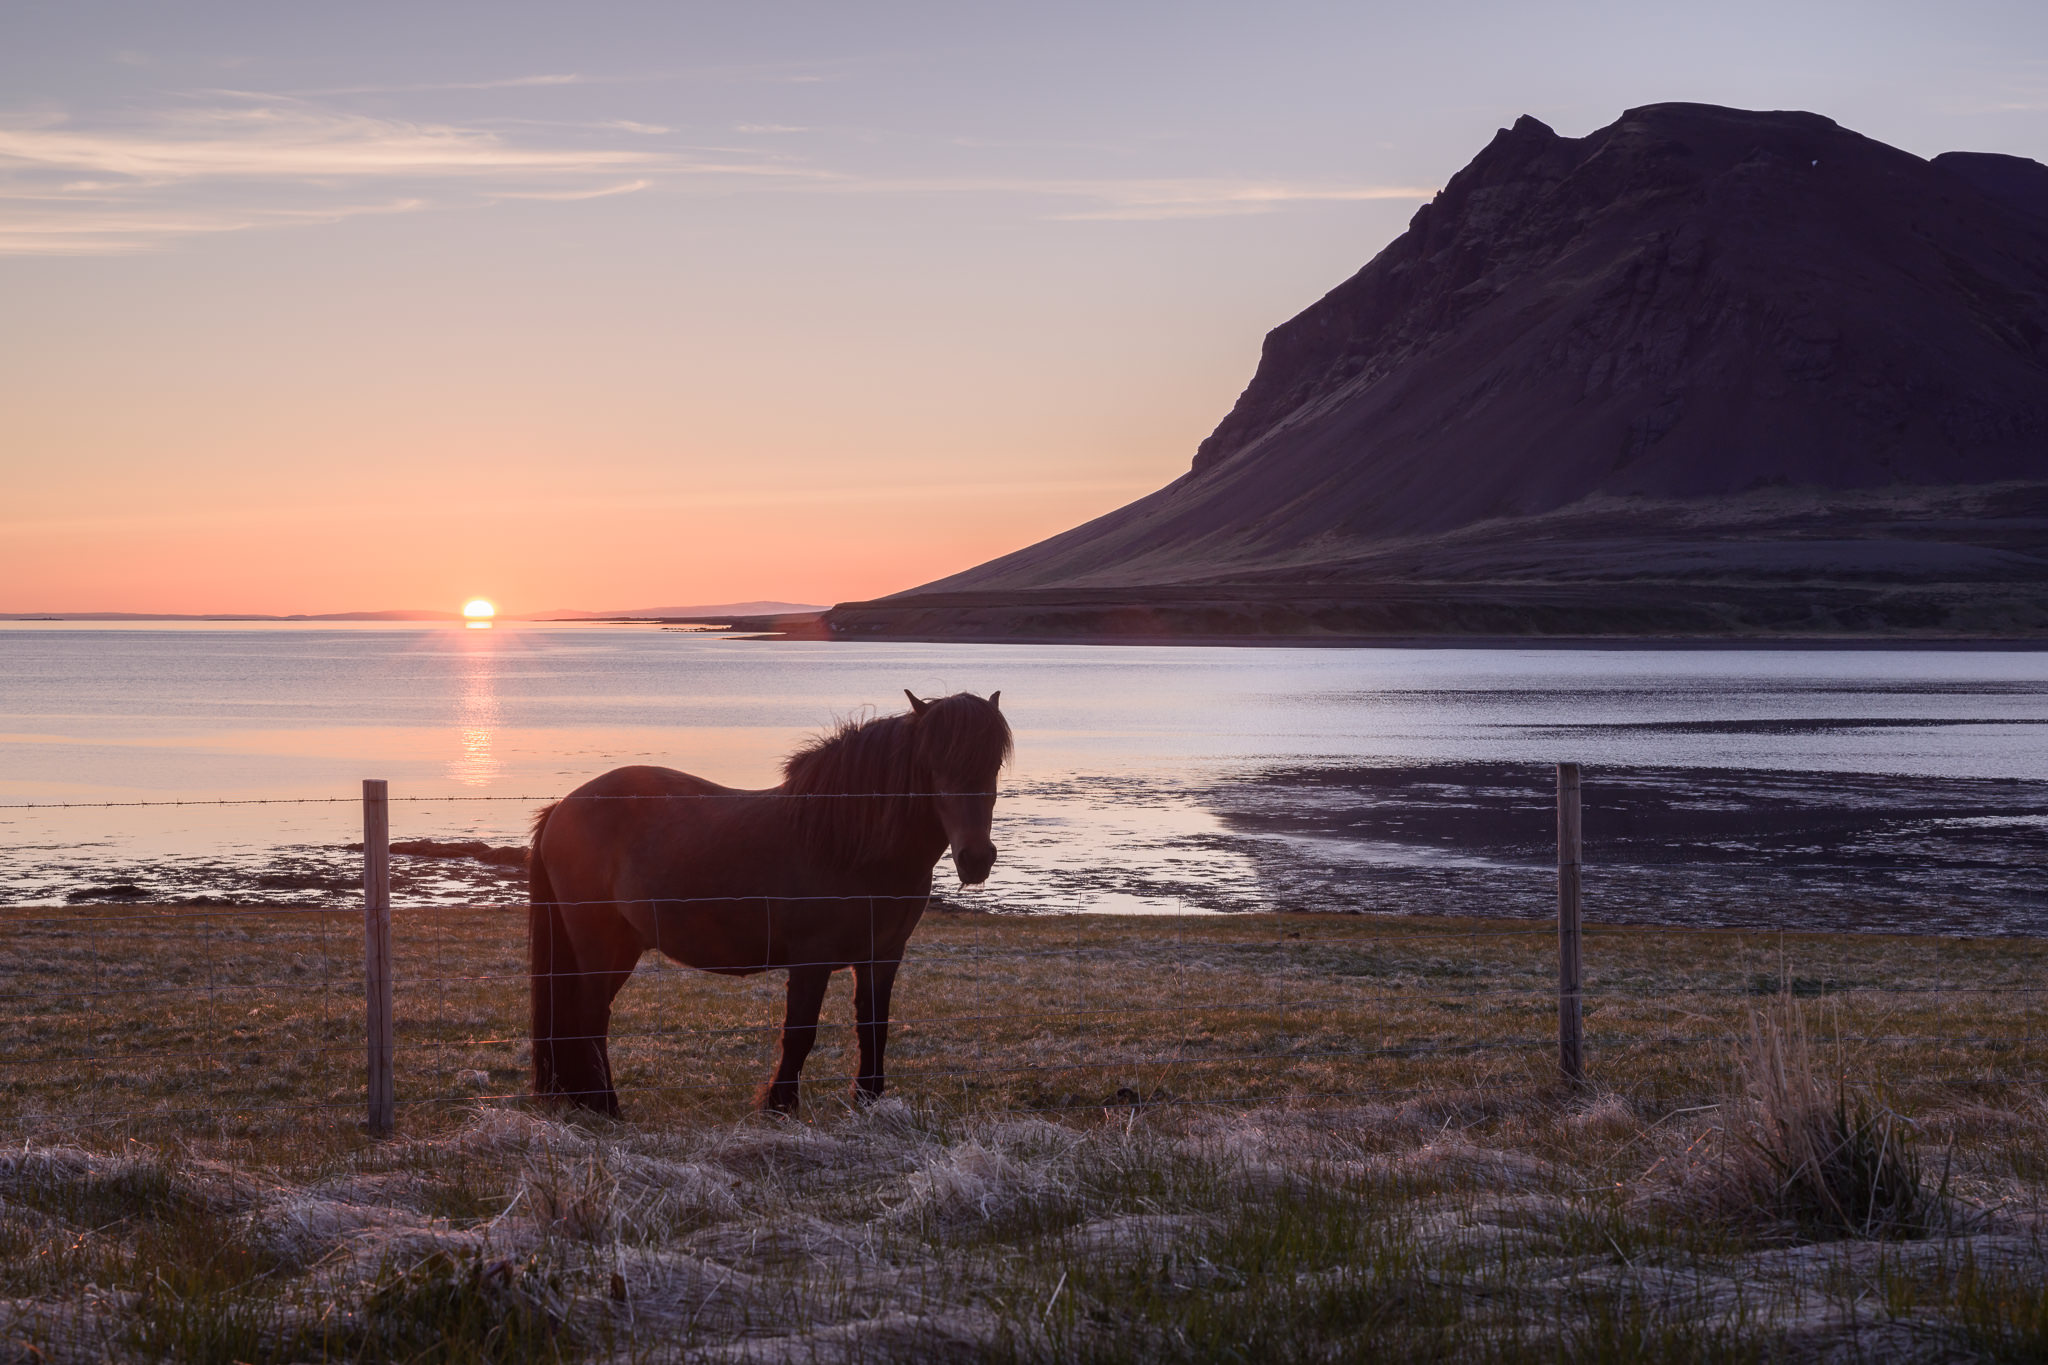
More than anything, I increased the overall brightness of the image, then vastly decreased its highlights. The result is far better than the RAW file, but I don’t like the washed-out purple color of the sky. As much time as I spent with local adjustments, I couldn’t get the sky to be the nice blue color that I wanted. This was accomplished in a few seconds with a virtual copy:
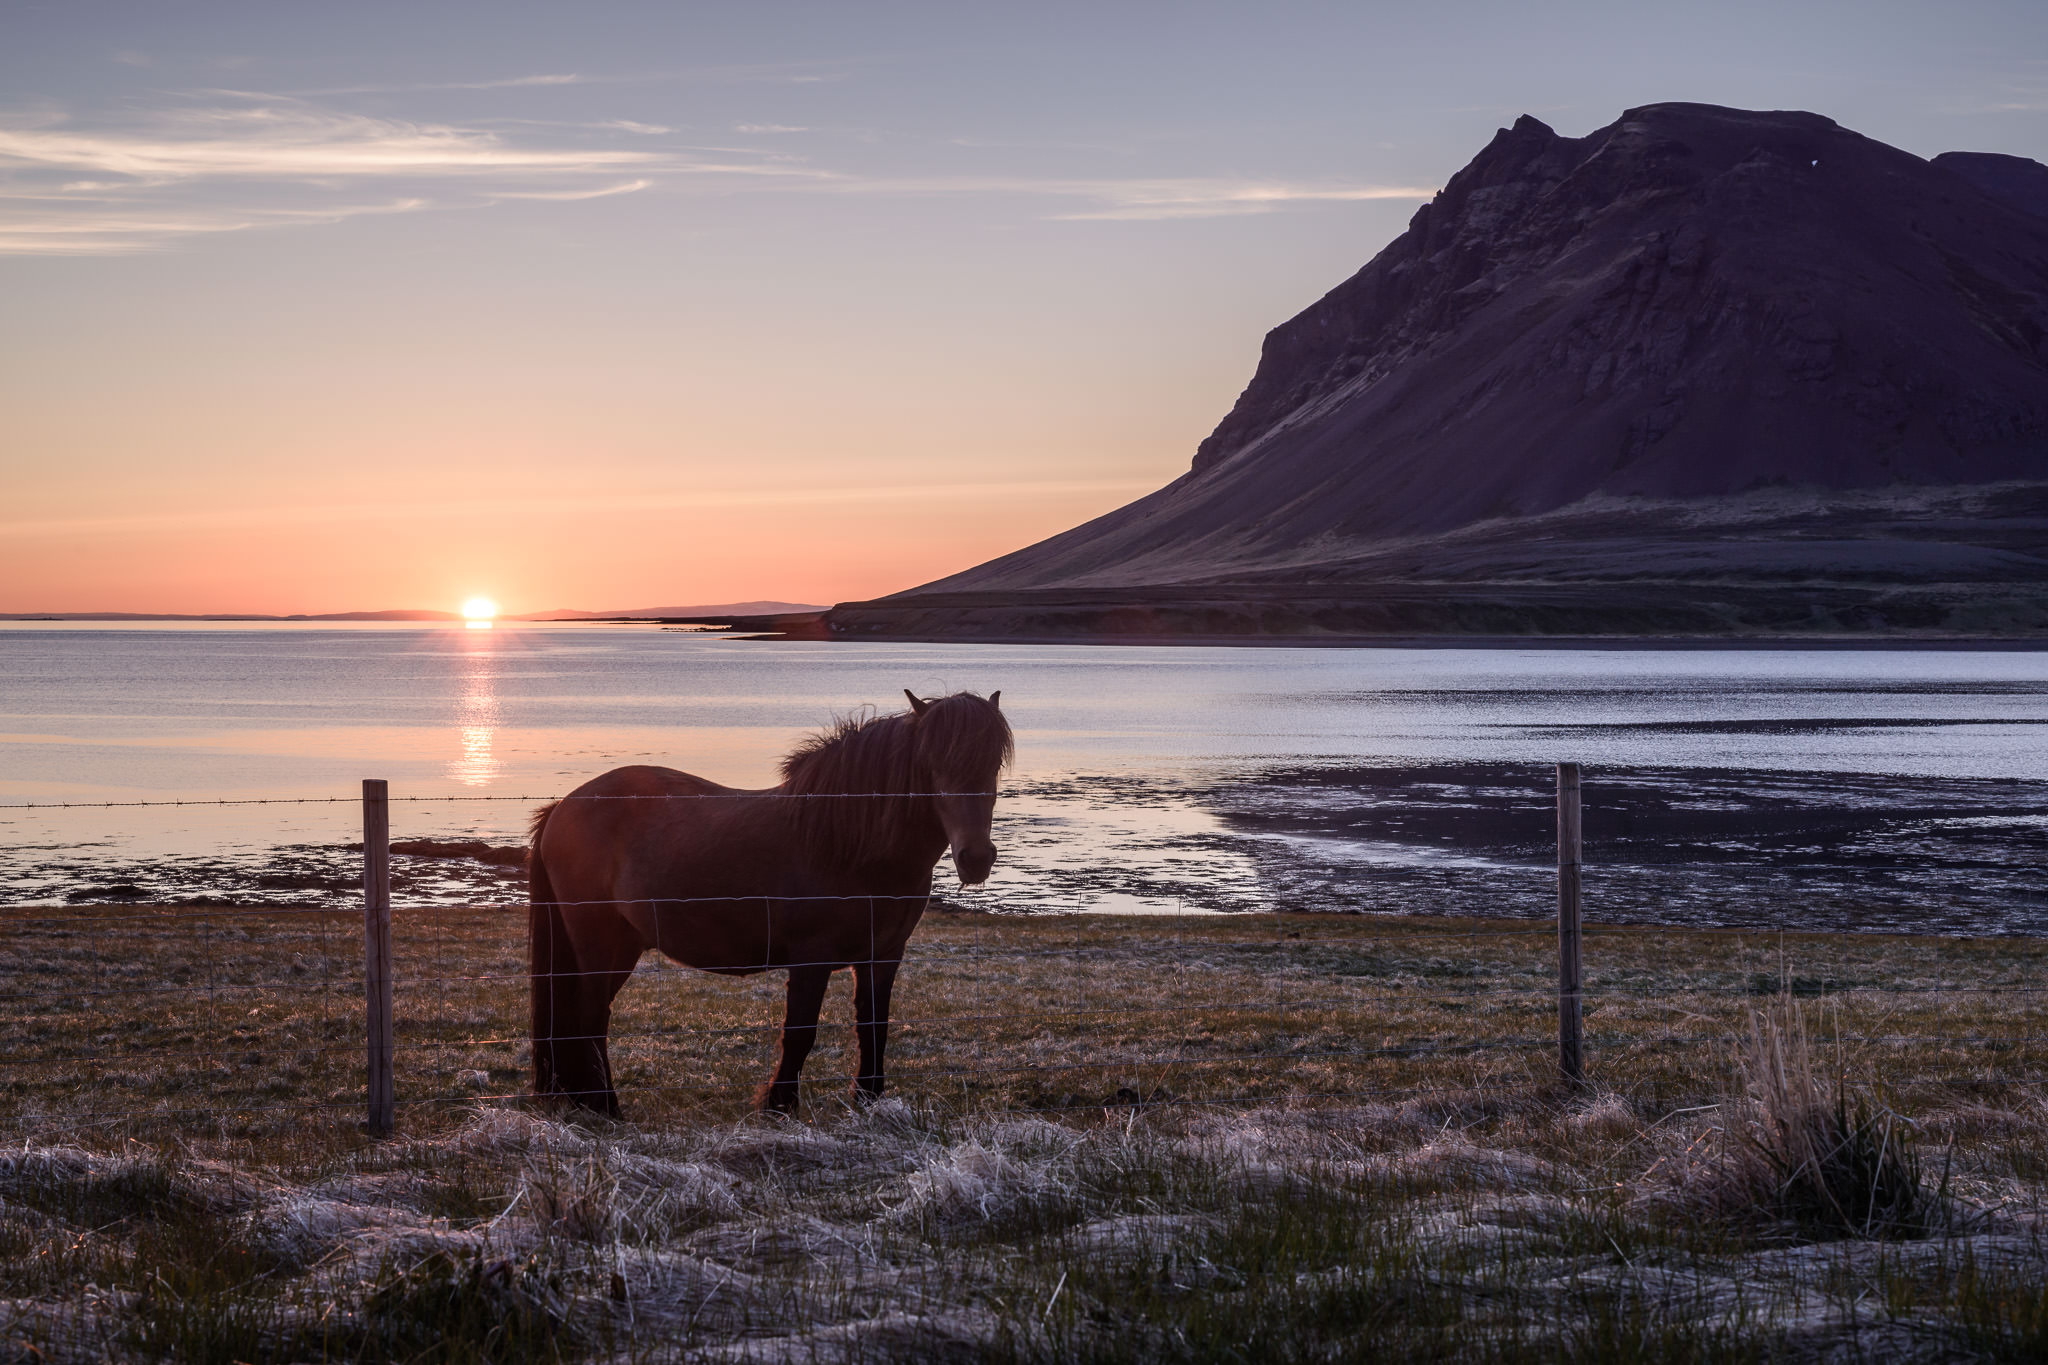
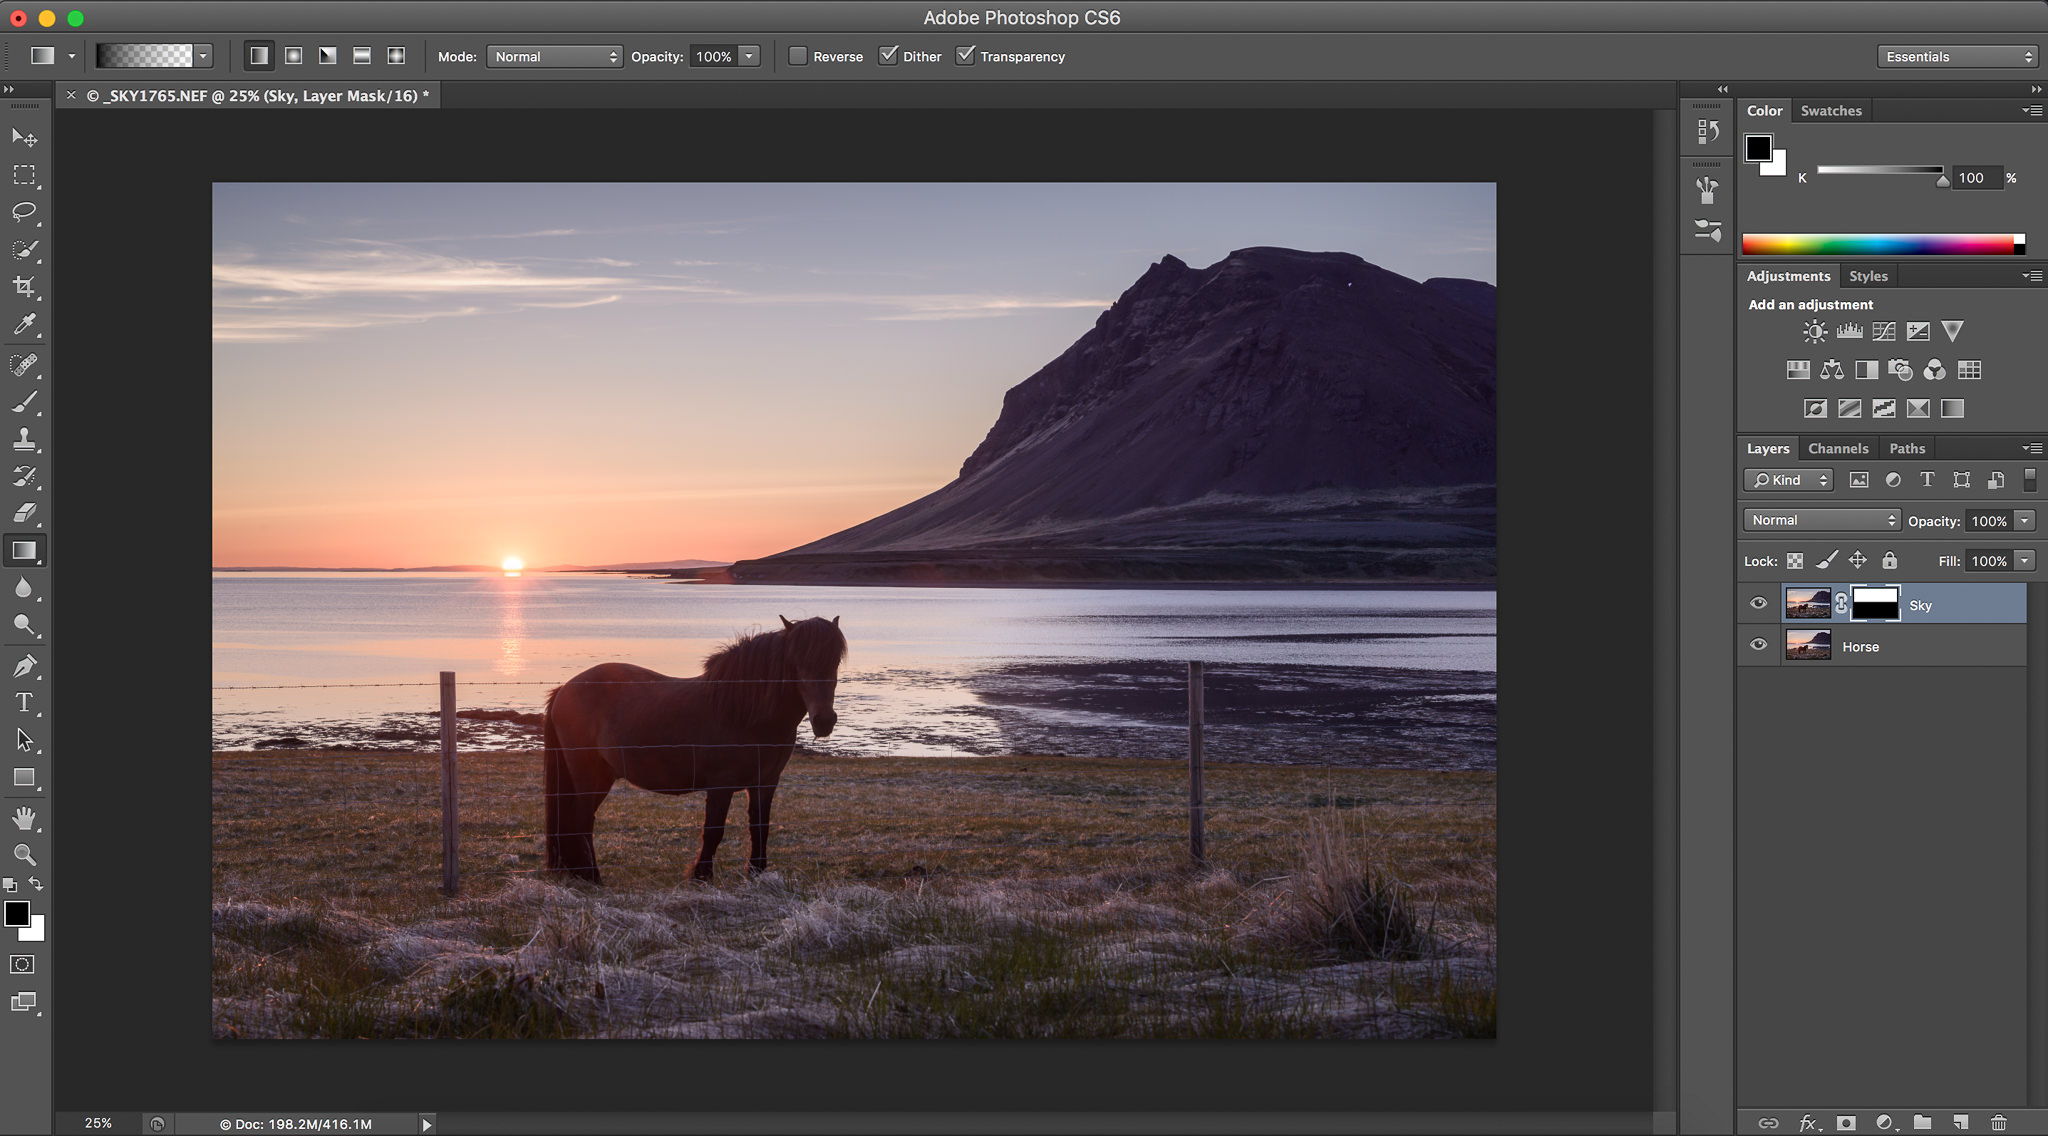
With this separate copy, though, the colors in the ground are far too cool (and the clarity is too high, although that can be fixed by a local adjustment). To reach the final image, I brought both copies into Photoshop as layers, and I used a simple gradient mask to blend the two shots together. I centered the gradient along the horizon, making for the most natural transition. If I had wanted, I could have been more elaborate with my blending; in this case, there simply was no need for it.
Here is the result of that blend:
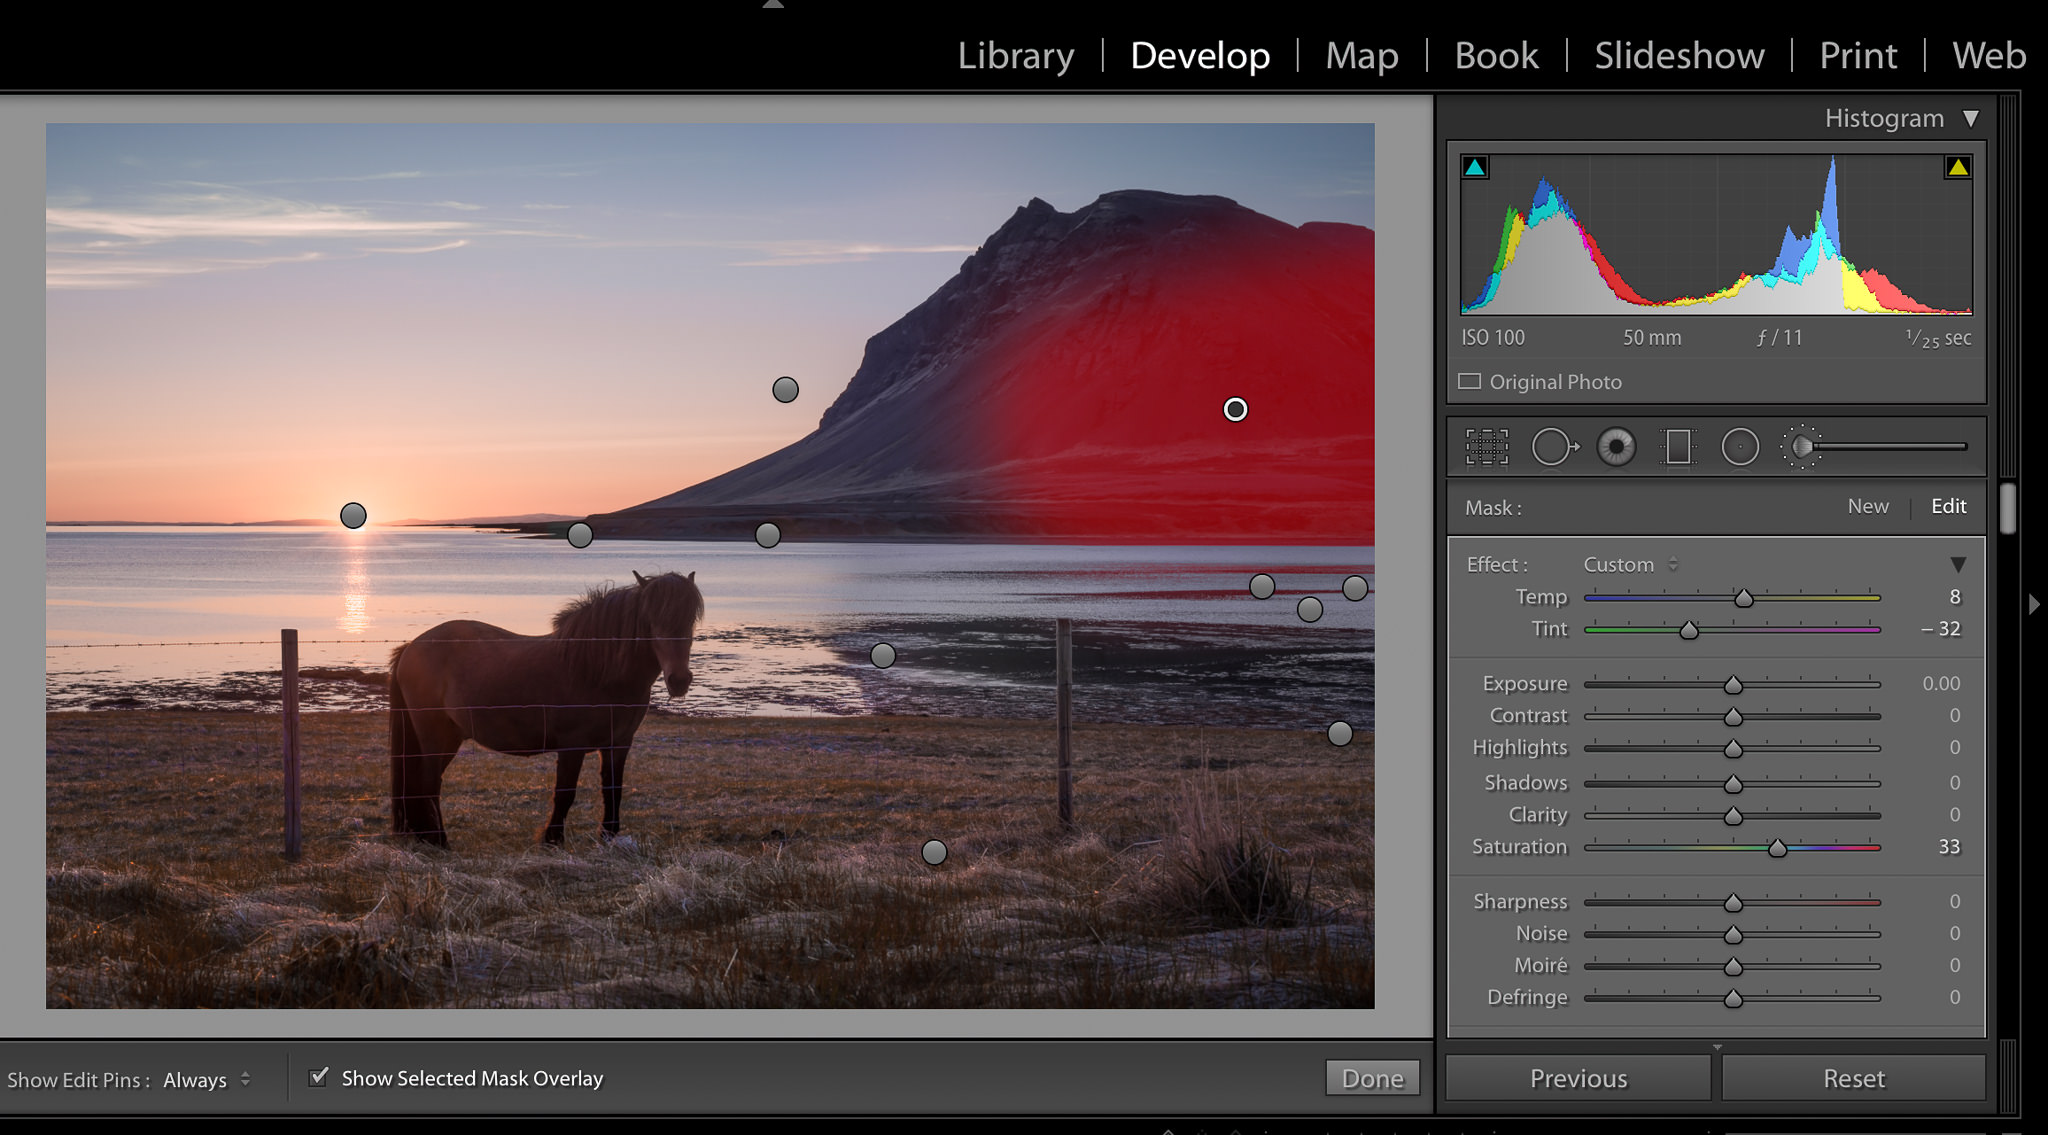
It’s starting to look much better! I then exported the resulting image back to Lightroom, where I made a few final edits. I cloned out a few spots of snow, and I minimized the small amount of lens flare that had appeared. More than anything, I just changed around some local contrast and saturation, primarily trying to draw attention to my subject. This part was no different than for most of my images; the hard work is already done. Perhaps the most dramatic adjustment I made was to remove the purple cast of the right-hand mountain; I simply moved the “tint” slider to the left with a local brush. A screenshot shows some of my edits:
Perhaps a more skilled photographer could do the same edits without Photoshop; I hold no delusions that my method is the only way to process such an image. Personally, though, this was the quickest way to reach my end goal. I rarely blend multiple copies of an image in post-processing, but it can be an invaluable technique when it is needed.
Did I use any filters while I was in the field?
This question tripped up most readers, although that certainly was not my intent. I did use a filter for this photograph – specifically, a soft-edged graduated filter with a -2.5 stop rating. This helped me keep the sky and water manageable, as you can see in the original photograph, although it may not have been essential.
Which settings did I use for the photo? In particular, what was my exposure compensation (using matrix metering)?
I asked this question because I wanted to point out a particular feature of the matrix meter in most cameras, and one which may not be obvious at first. This photograph was vastly underexposed – an exposure compensation of -2 and 2/3. (I was in aperture-priority mode.) Most commenters in the original article were correct, but others said just the opposite: they believed I had a significant positive exposure compensation. Why is this?
If you have ever shot into the sun, or another bright light source, you may realize that your meter underexposes the image heavily – it tries too hard to preserve highlight detail, and you may need a high exposure compensation as a result (assuming that you don’t blow out any important highlights). In this photograph, though, the sun was not yet bright enough for my camera’s meter to care; as far as I could tell, it didn’t even take the sun into consideration.
This is an interesting scenario if you are shooting into a bright light, particularly one which changes in intensity. At first, the meter may not yet recognize the bright object at all; once it does, your reading may change suddenly and significantly. If you want definition in your highlights – as I did for this photograph – you will need a vastly shorter exposure than the camera recommends.
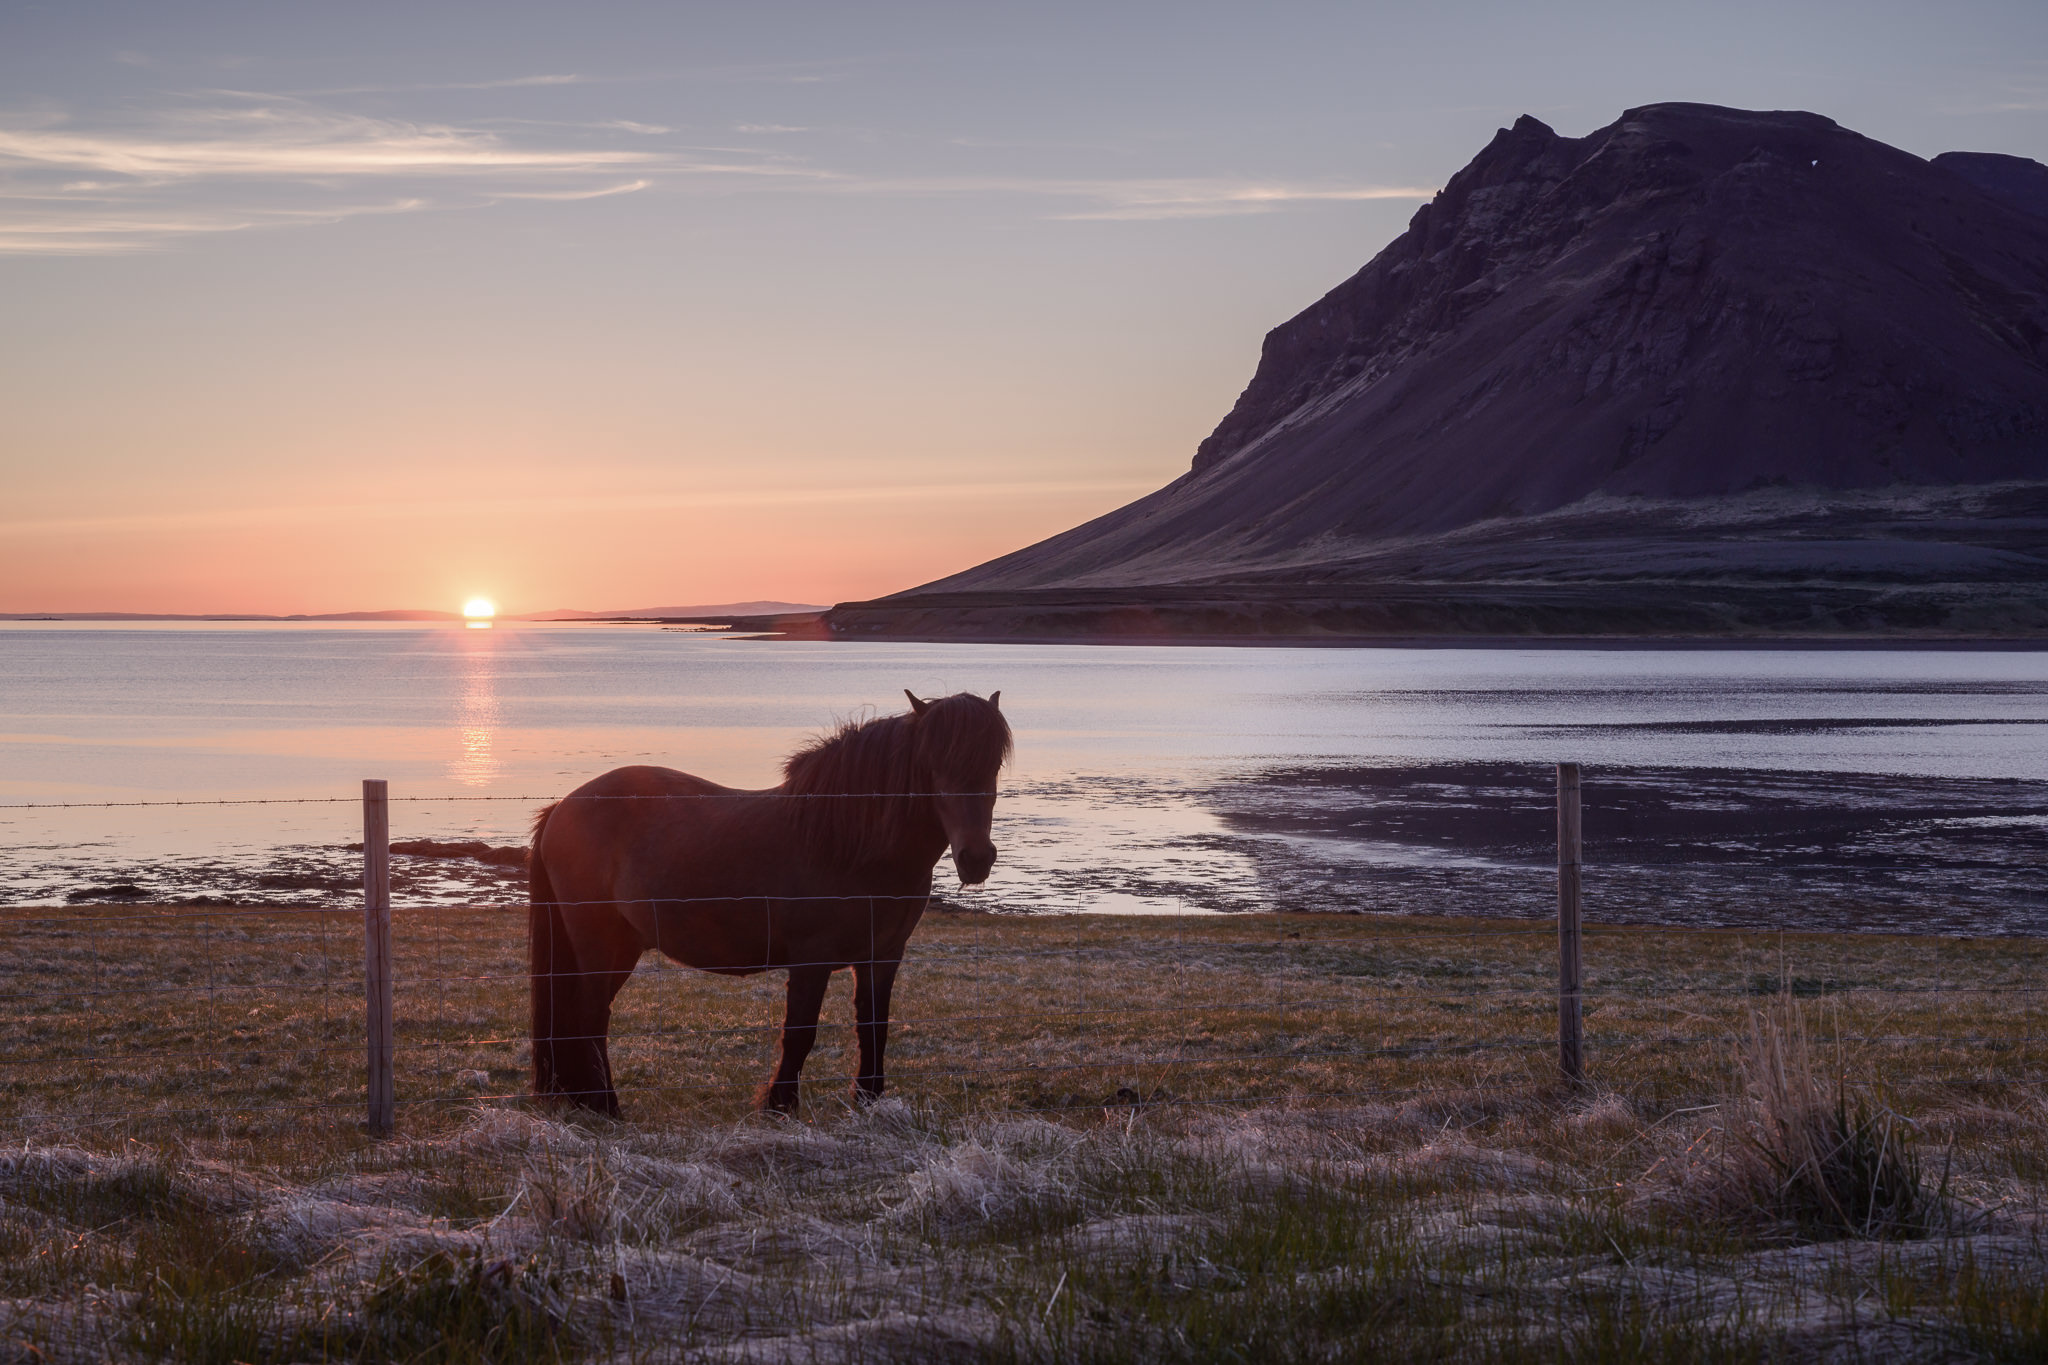
Aside from exposure compensation, my other settings depended entirely upon the brightness of the scene (and the wide depth of field that I needed): f/11, 1/25 second, and ISO 100. My D800e was on a tripod with the Sigma 50mm f/1.4 A lens; as one commenter mentioned, the lens quality is the reason that this image has minimal flare (although I corrected it slightly in Lightroom). I took several photographs to ensure that the horse would be sharp at 1/25 second, but I didn’t need to worry – that horse was a perfect subject!
And just for fun – was this photograph taken at sunrise or sunset?
I was very impressed that most people guessed that the photo was taken at sunrise – I didn’t think that this question would be so easy! Also, I will give credit to the readers who said that this was the midnight sun, and thus neither sunset nor sunrise. Indeed, I took the photo right around Iceland’s summer solstice, when the sun barely dips below the horizon. However, Iceland is mostly below the Arctic circle, and at my elevation the sun actually did set – though only for an hour or so. Technically, yes, this image is from sunrise; at the same time, it was taken at two in the morning!
I hope that this exercise was fun and informative – I certainly enjoyed writing it. If you have any questions about my technique, please do not hesitate to ask in the comments.
this technique is commonly called double raw processing. If you had used luminosity masking instead of a straight gradient I think you could have preserved the more natural colors in the sky and sun as you have in your original exposure. I’m also surprised you don’t have a custom camera profile for your D800 in LR… it would help even more with preserving natural colors.
Hi Spencer,
I really enjoy these “How was this picture taken” series. I enjoyed your explanation. I did not submit a guess and if I had, it would not have been real close! I was still trying to figure out whether it was 1 image. Regardless, I like the post-processing.
Thanks Spencer. It didn’t take long to find the location and I had a good Google tour along the way. Once I’d sussed the time of year (and the latitude, which was presumed to be Iceland) all I needed was a matching coastline. The barbed wire fence helped and showed it was on a road, though there’s the same fence on the Southern side. A similar vista from the South would be midday in winter, with far more snow. The Geology in Eastern Iceland is quite different. Then I found your portfolio (Google image search helped with that!) which confirmed I had the right region. It felt like a revelation when the vista opened up!
Sunrise… sunset… what’s the difference! ;-)
Yes, thanks again, Rob! I am still quite impressed.
Just one question: while you matrix metering, where in the scene was your selected AF point(s) located?
Oops!
Just one question: while you were matrix metering, where in the scene was/were you focus point(s) located?
I know that I was in live view for this photo (always a good idea when the sun is in your frame). As far as I can remember, my focus point was on the horse — I suppose that the meter would have suggested a darker exposure if my point were on the sky. I’m not entirely sure if this answers your question, but I don’t remember anything more specific…
Thanks, Spencer. That, I think, explains why I was surprised that you needed an exposure compensation of -2.67 EV. Nikon matrix metering places emphasis on the area around the selected focus point(s).
According to the manual, it is for Spot, rather than Matrix, metering where emphasis is placed on the off-centre AF point of the D800E. With Matrix metering, the camera sets exposure according to tone distribution, colour, composition, and (with some lenses) distance info.
Martin, You are quite right about spot metering, but matrix also has a bias for the selected focus point(s), focus distance info, and of course, it also uses its onboard image database. Nasim has written about this:
“One of the key factors (in addition to color, distance, subjects, highlights, etc) that affects matrix metering, is where the camera focus point is set to.”
photographylife.com/under…x-metering
Thanks Pete, although I’m not convinced about matrix metering being affected by the AF-point. Regrettably, I no longer have a Nikon to check its behaviour (my current A7RII doesn’t even spot meter at the AF point – only in the centre!). However, in the D800E manual it also explains (p128) about locking exposure with the AE-L button for spot and centre-weighted metering but NOT for matrix metering, which kind of confirms what’s written earlier (p115) about the AF-point only affecting the metering bias with spot metering.
Having said that, I’m fully prepared to accept that the Nikon’s metering could be much more sophisticated than is actually described in the manual – it’s certainly more controllable than that of the Sony.
Martin, unfortunately I can’t find the in-depth technical description (which included diagrams) of the Nikon D3 and D700 Matrix Metering that I read some years ago. Although Matrix Metering has been updated since then, I see no reason why Nikon would remove this very useful part of the metering algorithm because it is beneficial 90-95% of the time for the majority of users.
Nikon manuals do not explain *why* they recommend avoiding the use of the AE-L button with Matrix Metering: it would require an essay-length highly-technical explanation. Actually, to fully explain all of the features of their high-end cameras would require a multi-volume set of manuals. Nikon’s recommendation applies to the factory default (out-of-the-box) settings, and I fully endorse it. However, I use custom settings on all my cameras to enable their AE-L buttons to work the way I want them to, with Matrix Metering, for my various styles of photography. Nikon’s Matrix Metering is indeed “much more sophisticated than is actually described in the manual”! I started with its first iteration (decades ago) for shooting images on transparency film.
Many thanks for the interesting discussion,
Pete
Pete,
From my experience, I also have found a significant difference between the live view matrix meter and that from the viewfinder — in live view, the camera seems to assign much more weight to the focusing box. This isn’t something that I have seen mentioned in Nikon’s manuals, but it is apparent in practice (particularly as I use live view at least as much as the viewfinder). At this point, I have internalized this particular “quirk” of live view — and it also is why I use spot metering (along with ETTR +2.3 compensation, with the focus point on the brightest area of the frame) whenever conditions are stable.
As you said, this is quite interesting to discuss.
Spencer
Spencer, It is a very interesting topic to both discuss and to experiment with. The reason that I very rarely discuss the technical aspects of metering (both in-camera and external metering), and several other technical aspects of photography, is because these topics have a strong tendency to attract trolls who delight in starting, then fuelling, flame wars.
The problem with all sophisticated algorithms is that, while they work very well 90-95% of the time, it is the 5-10% of the time that they seriously interfere with users who actually know what they are doing that is so annoying, because we are given no option/button to temporarily or permanently override the algorithms. Notwithstanding, these algorithms, and the quirkiness of the machines that use them, makes photography more enjoyable rather than less enjoyable.
Martin, Pete, Spencer,
looking at Thom Hogan’s “Complete Guide to the Nikon D800/D800E” tells me that the D800E indeed takes the position of the AF-point into account even in Matrix Metering Mode.
Thom also writes the following about Matrix meetering (p. 269): “… the Nikon matrix metering system sucks at silhouettes. A near subject with a bright background will almost always be interpreted as “expose for the near subject. … I see this especially when I shoot with my Olympus PEN models side-byside with the Nikon D800 at sunset. The Olympus matrix meter always puts the sky tones (brightness) at mid-tone and the near subject in silhouette. The Nikon always tries to bring up the exposure for the near subject, doubly so if it’s a person. That washes out (or worse: overexposes) the sunset colors.”
I wouldn’t call this sucking because this might be exaclty what you want in some situations, but anyway, this explains what happend with Spencer’s exposure.
And finally, he gives the following tip (p. 269): “If you want saturated sky colors at sunset (with or without a silhouette), use spot metering and measure the sky value 10° or so away from the sun near the horizon. That should put sky values into the mid-tones. For silhouettes that’s perfect.”
(BTW: If Thom’s camera guides were printed books, they acutally would be multi volume sets of manuals. With almost 1.000 pages they fully explain every little detail.)
Carsten, Many of Tom’s guides are available in printed versions. No disrespect intended to you or anyone else, I obtain my information from multiple sources who back their writings using independently verifiable empirical evidence.
You quoted Tom stating that matrix metering sucks at silhouettes… Well, Nikon and many other vendors of multi-pattern metering cameras rightfully assume that the users of advanced cameras are able to comprehend the descriptions and illustrations, provided in both their user manuals and online tutorials, adequately enough to learn why, how, and when to change the metering mode. What was Tom expecting, Nikon to provide a Psychic Metering Mode? It’s as stupid as stating examples of when spot metering sucks. This sounds very much like an instance of: Don’t RTFM; purchase my much better manuals instead.
I totally agree with you that the situation being described is not a case of Matrix Metering sucking, it was doing exactly what it was designed for. And Nikon is commendable for documenting and illustrating the caveats to Matrix Metering at its inception, and all the way through to its latest iteration.
By far the best and quickest way to learn how to use a camera is to attend a vendor-approved training course that includes some one-to-one time with the experts. The cost of these courses seems to be high, but much less expensive than a high-end camera, zoom lens, or even a decent set of filters for the lenses!
This was fun! :) Thanks for explanation.
Thank you Judit, glad that you enjoyed it!