The Filter Bar within Adobe Photoshop Lightroom is one of the most useful features in the software. It is a quick and easy way to find photographs, filter them out by specific criteria, and properly sort them for easy file management and organization. In this article, we will take a closer look at the filter bar in Lightroom and see how you can take advantage of it for different purposes.
Before we get into the details, let’s do a quick overview of the filter bar and how you can access it.
Table of Contents
What is the Filter Bar?
One of the most powerful features of Lightroom, is its ability to quickly find photos. Since Lightroom automatically extracts and saves image metadata during the image import process, including image EXIF data (such as capture time / date, lens focal length, exposure information, etc) into a database known as “Lightroom catalog“, all the imported information becomes searchable. Thanks to a very efficient database, Lightroom is able to search through this data very quickly, allowing one to find exactly what they are looking for through several clicks.
As the name suggests, the Filter Bar controls Lightroom’s built-in ability to filter through imported image metadata, specific text, as well as other parameters and attributes. There are four tabs available to click as filters:
- Text – allows searching for specific text in image filename, keywords, title, etc.
- Attribute – allows filtering images by flags, edits, rating, color and media type.
- Metadata – allows applying one or more levels of customizable filters using image metadata
- None – disables all filters
We will go through these one at a time further down below.
By default, Lightroom will look for images in the folder location that you are currently browsing, and not the whole catalog. If you don’t use the “Folders” tab / sub-module in Lightroom, or you click on the root folder that contains all your images, Lightroom will then use its entire database to search / filter through data.
How to Access the Filter Bar
The Filter Bar can only be accessed through the Library Module. It can be toggled by hitting the “\” key on your keyboard. Alternatively, you can use the “View” menu to show or hide it, by clicking the second option from the top “Show Filter Bar”. The Filter Bar itself appears at the top of the Image Grid and is only available in Grid View. Hitting on the “\” key in Loupe View will automatically switch you to Grid View and then show the Filter Bar.
Filter Tabs Explained
Once you toggle the Filter Bar on, you will notice there are three ways to filter your images – by simple text, an attribute or image metadata. For more in-depth search, it is possible to combine two separate filters together, such as Attribute and Metadata (keep in mind that only two filters can be turned on at a time). Let’s go through the three tabs one-by-one.
Filter Based on Text
If you do not know where to start searching and filtering your images, the Text-based search is probably going to be the first filter you will explore. It is a very simple tool that allows you to search through specific text in your images.

The problem with this filter, is that there must be some kind of text already present in your catalog for it to find anything useful. If you import your images without renaming them and the files are something like “DSC_0001.NEF”, you didn’t tag your images with specific keywords, titles or captions, or if your images do not contain any metadata / EXIF (film scans, etc), then this tool is as good as useless, because the data is simply not there. However, if you properly rename your images on import and you have your images properly tagged, and image metadata is present, the text filter can actually be quite powerful for quickly locating images.
If you select “Any Searchable Field” from the “Search Target” drop-down (default setting), type anything you like in the search field and Lightroom will search through all kinds of fields, including image file name, title, caption, searchable metadata / EXIF.
For example, if you enter “50”, Lightroom will try to locate any image that is related to that number. It will display all images that contain number “50” in their file names, any images that have any keyword that contains that number, as well as any related metadata and EXIF data. For example, if an image was captured with a 50mm or a 500mm lens, it will display those images too, just like images captured at shutter speeds like 1/50, 1/500, or ISO 50, 450, 500, etc. Even if your camera’s serial number contains that figure, it will show all those images. Basically, any match of that number in any of the fields will trigger the filter. Therefore, doing a broad term search like that is not going to be particularly helpful. However, if you tackle a very specific search term, this tool can be very useful.
Keep in mind that you can be very specific about the field you are trying to search, and you can also apply different sub-filters, such as “Contains” or “Starts with”. Another way to make this filter more useful, is to combine it with the “Attribute” or “Metadata” tabs.
Personally, I rarely ever rely on this tool – I find the other two filters to be much more useful.
Filter Based on Attribute
The Attribute tab allows you to find images that have specific filters assigned to them. These include Flags, Edits, Star Rating and Color Labels. On top of that, you can also filter the content of your catalog based on file type (Master Photos, Virtual Copies and Video Files).

Any number and type of filter can be used together, so you can filter down to images that, for example, have a four-star rating, are Virtual Copies and have a red Color Label by selecting the attributes accordingly.
What is more useful, is that you can use Attribute filters along with Text search or Metadata search. For example, if you select the blue Color Label from the Attributes section, you will be presented with all the images in that location that have blue color assigned to them. If you then enter Canon in the text search field, all the images previously filtered will be narrowed down to those that do not only have the blue Color Label, but were also taken with a Canon camera or have the word “Canon” in any other searchable field.
I quite often rely on the Attribute tab, since I star my images and apply differnt color labels, which makes it easy to quickly find specific images I edited, or previously tagged.
Filter based on Metadata
The third filter tab is called “Metadata”, and it is perhaps the most useful of the three filters when it comes to its filtering capabilities. I use this tool quite a bit when organizing photos, or when I need to find an image captured with a specific camera or lens, or a combination of the two.

What makes this tool extremely useful, is the ability to choose between many different fields, such as Date, File Type, Flag, Rating, Exposure, GPS Location and much more, with the ability to apply different levels of filtering.
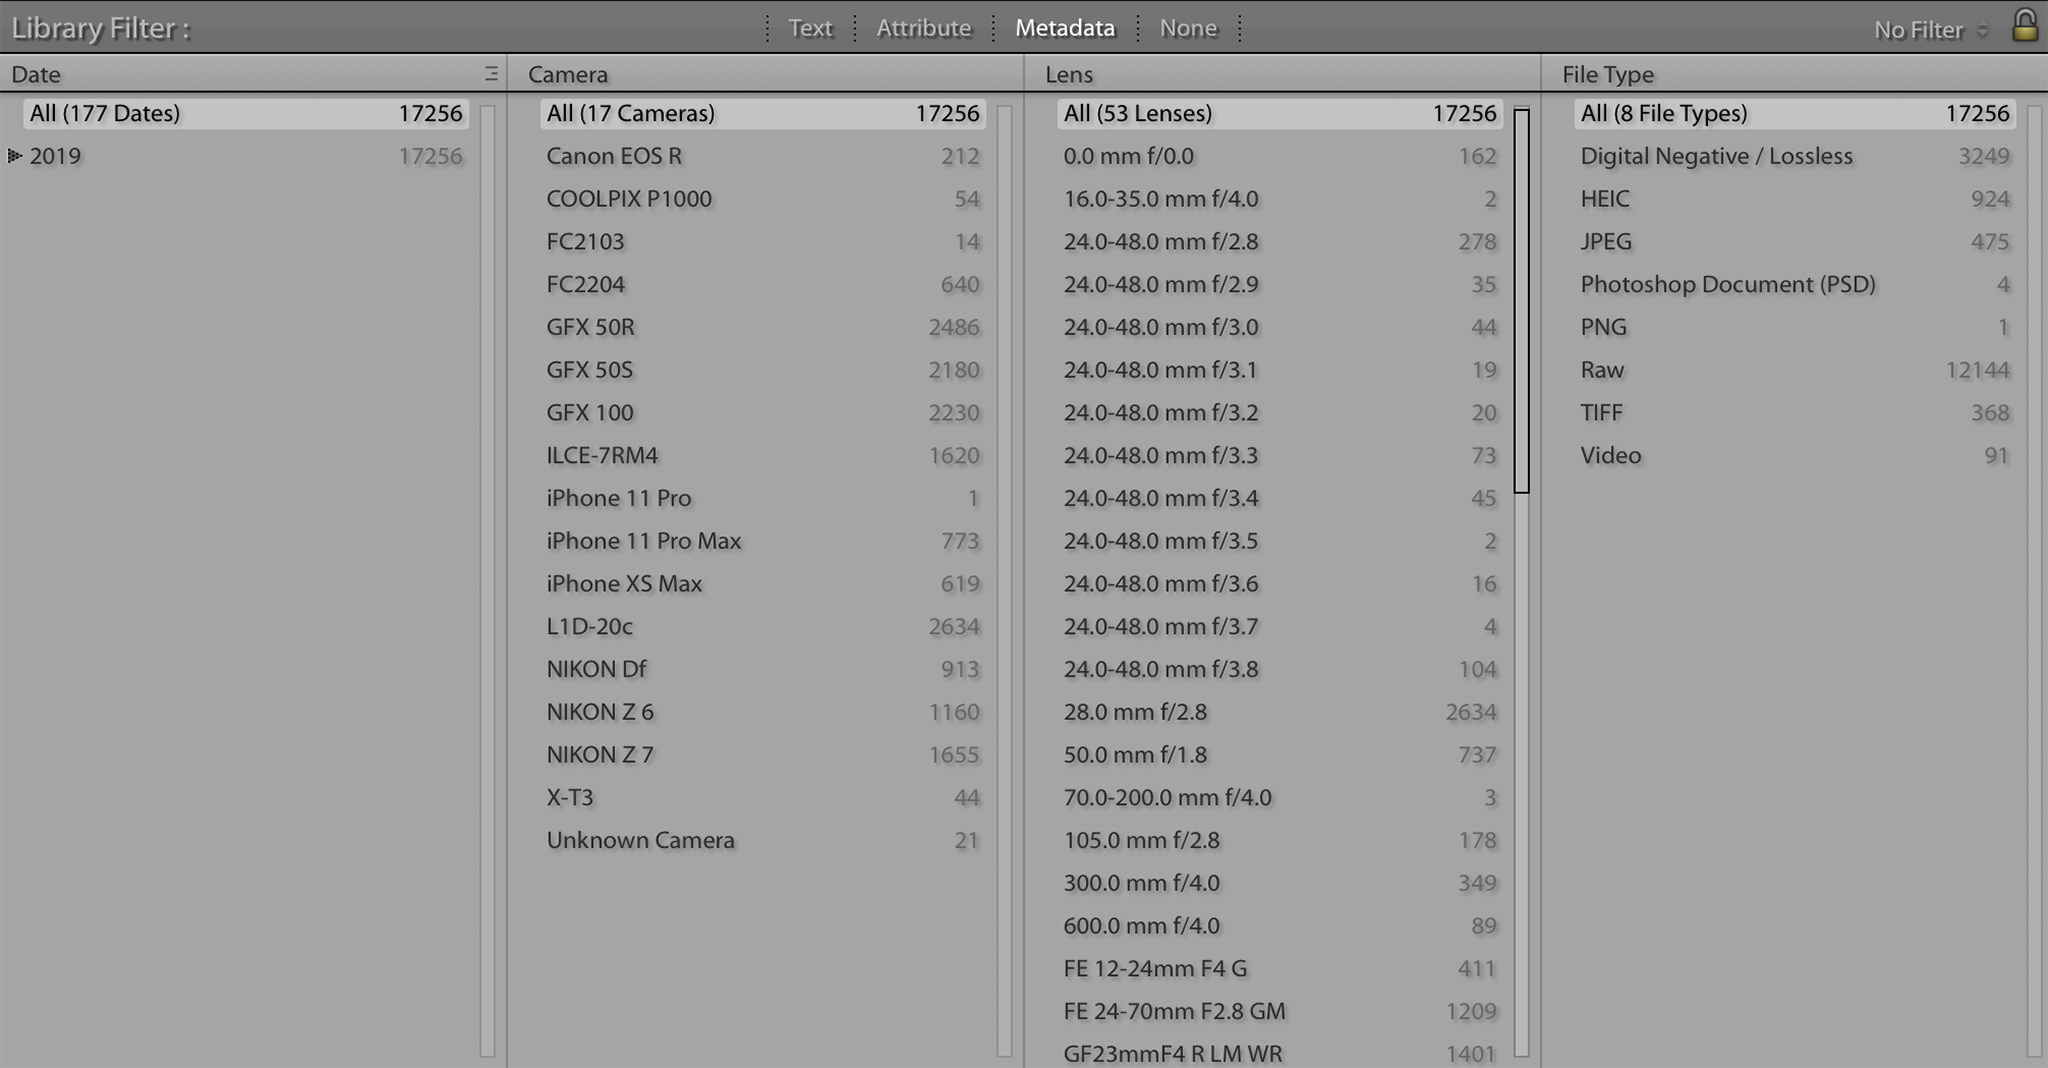
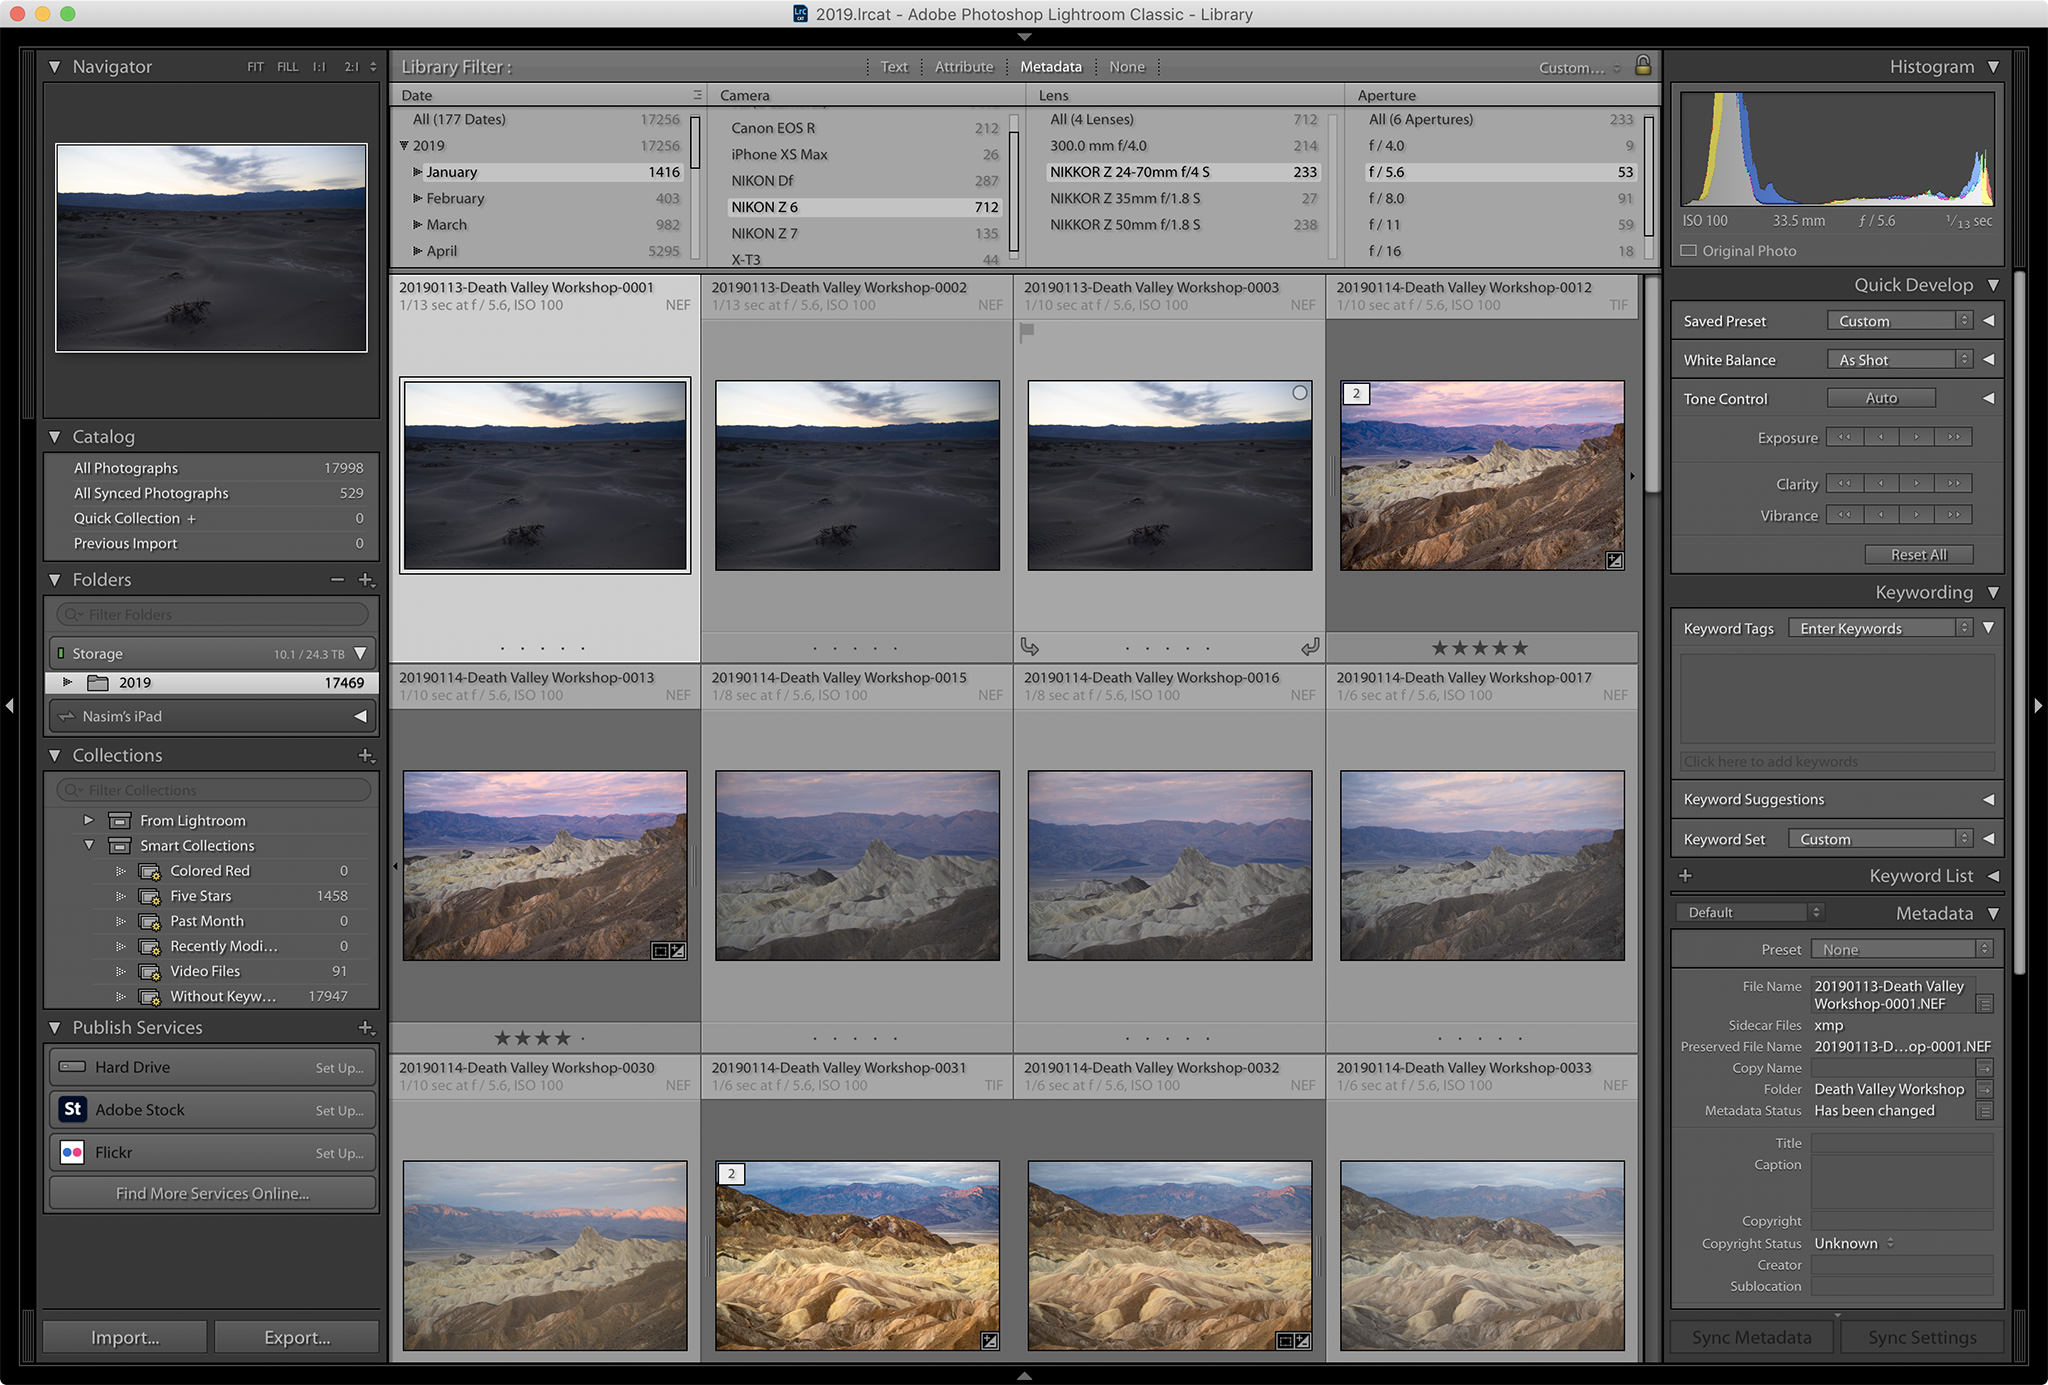
For example, if I am looking for all images captured in the month of January, using the Nikon Z6 and 24-70mm f/4 S lens at f/5.6 aperture, I can easily do that with this tool. I simply select “Date” from the drop-down for the first row, then click on “January”. For the second row, I select “Camera” and choose “Nikon Z6”. For the third row I enable the “Lens” filter and select “NIKKOR Z 24-70mm f/4 S”. Finally, I select “Aperture” for the last field and click on “f / 5.6”. At this point, I have a match of 53 images in total, as shown in the screenshot below:
When it comes to different filters, you can slice and dice them in any way you want, and in any order. As long as there are appropriate matches for the criteria you select (which is represented by the total number to the right of the value), you should be able to go deeper than 1 level. If you don’t want to go beyond one or two levels, you can simply pick the “All” value from the top, or you can completely remove those columns from view.
Speaking of which, I love the ability to add or remove columns in the Metadata filter. By default, I keep four different levels / rows for my Metadata tab, but sometimes I add or remove columns, depending on if want to be more or less specific. You can do this very easily by clicking the little icon to the right of the column, then selecting “Add Column”, or “Remove this Column”.
If you have specific search criteria that you use all the time, you can even save it as a template from the top right part of the filter bar.
How to Use the Filter Bar to Organize Photos
As you can see, the filter bar is a very powerful tool, as it allows you to filter through your images and only display those that are relevant to your search. One of the best ways to use this tool is when organizing images. If your Lightroom catalog is a mess, start by organizing image folders by things like event type. You can do that by filtering images by specific dates to identify groups of images, then select the appropriate images and move them to a newly created folder.
Once your files sorted in a single folder, then use the Filter Bar to apply additional criteria, such as image rating, or edited / not edited status – perhaps you want to organize your rated or edited images separately from the rest. There are many ways to do this…take a look at my detailed article on organizing images in Lightroom for information on how I personally keep my Lightroom catalog clean. Meg Faehl also wrote an excellent article on the usefulness of the Metadata tab / panel, which is definitely worth checking out.
Using the Filter Bar to Identify Most Popular Lenses
The Filter Bar can also be very useful for identifying your most popular lenses in your camera bag. A while ago I wrote a detailed article “What Lens Do You Use the Most?“, where I talked abou the benefits of the metadata library filter to identify lenses I use the most. This tool was very handy in cleaning up my closet and selling lenses I no longer use, and it was a great way to even check what particular focal lengths I apparently use more when shooting with my zoom lenses.
Have you been using the Filter Bar to check what equipment you use the most? Have you based your purchase or selling decisions based on it? Please share in the comments section below!
Filter bar is an interesting feature that I’d found to be very inconvenient at first (I worked with Photoworks and it doesn’t have a filter bar) but now I can’t imagine LR without it. Wish I’ve seen this article earlier!
I suggest you might want to take another look at the text tool. I use it all the time. Did you know you can use it with logical operators? I found the feature to be especially useful when I learned that the directory name that a photo is stored in is also a searchable text field.
Larry, as I pointed out in the article, it all depends on how much information you are already storing in EXIF and image attributes. For those photographers who don’t have a folder structure, or file naming convention, the text tool isn’t particularly helpful…
Filters are great tools. If you use filters for a specific lens, ISO, focal lengths, date, etc, you can then save the photos as smart collections for easy access later. As always, good read from you and Photographylife. Thanks.
Tom.
Tom, glad you’ve enjoyed the article!