A couple of weeks ago I wrote the article “Four Simple Tips for Better Composition”. In that article, I discussed in-camera techniques for keeping your horizons level and verticals vertical. However, even if you are careful, this is not always possible. This is especially true when trying to take pictures of tall buildings. I received several great comments mentioning that Photoshop’s powerful “Transform” tool can be used to correct the keystoning issues that arise in such a situation. I thought it would be a good idea to follow that last article up with one on post-processing methods for perspective corrections. I will go over a couple of ways to quickly fix horizons in Lightroom and how to easily improve/correct keystoning in Lightroom. I will also go over some more advanced techniques for perspective correction using Photoshop, for when the Lightroom methods don’t quite make the grade. The combination of good in-camera image creation and post-processing perspective corrections should allow you to create images that reflect how are eyes see and our brains perceive the world around us.
Table of Contents
1) Correcting Horizontals in Lightroom
Even when you are trying hard to create images with level horizons in-camera, it is easy to find yourself a bit off-kilter! Luckily it is very easy to correct images with tilted horizons in Lightroom.
1.1) Adding an Overlay Grid
Firstly, let’s make it a bit easier to see how crooked your horizon really is. Open your image inside the Develop Module. Now lets overlay a grid on the image.
- Go to View>Loupe Overly> and select both Show and Grid.
- In the toolbar at the bottom of the screen, just above the filmstrip, select Show Grid: Always (You can turn this setting back to Auto or Never once your horizon is corrected).
- You can change the spacing of the grid by moving the slider under Show Grid.

If you are finding it hard to see the grid, try changing its opacity.
- Hold down Command (Mac)/Ctrl (PC) and a small box will appear at the top of the screen.
- While continuing to hold down the Command (Mac)/Ctrl (PC) key, position the curser over the word “Opacity”.
- Click and drag to change the opacity to values between 10 and 100.

1.2) Fixing Well Defined Horizons
If you are working with an image that has a clearly defined horizon, like an ocean, usually the Level Mode in the Upright Perspective Correction tool will remedy the problem with one click.
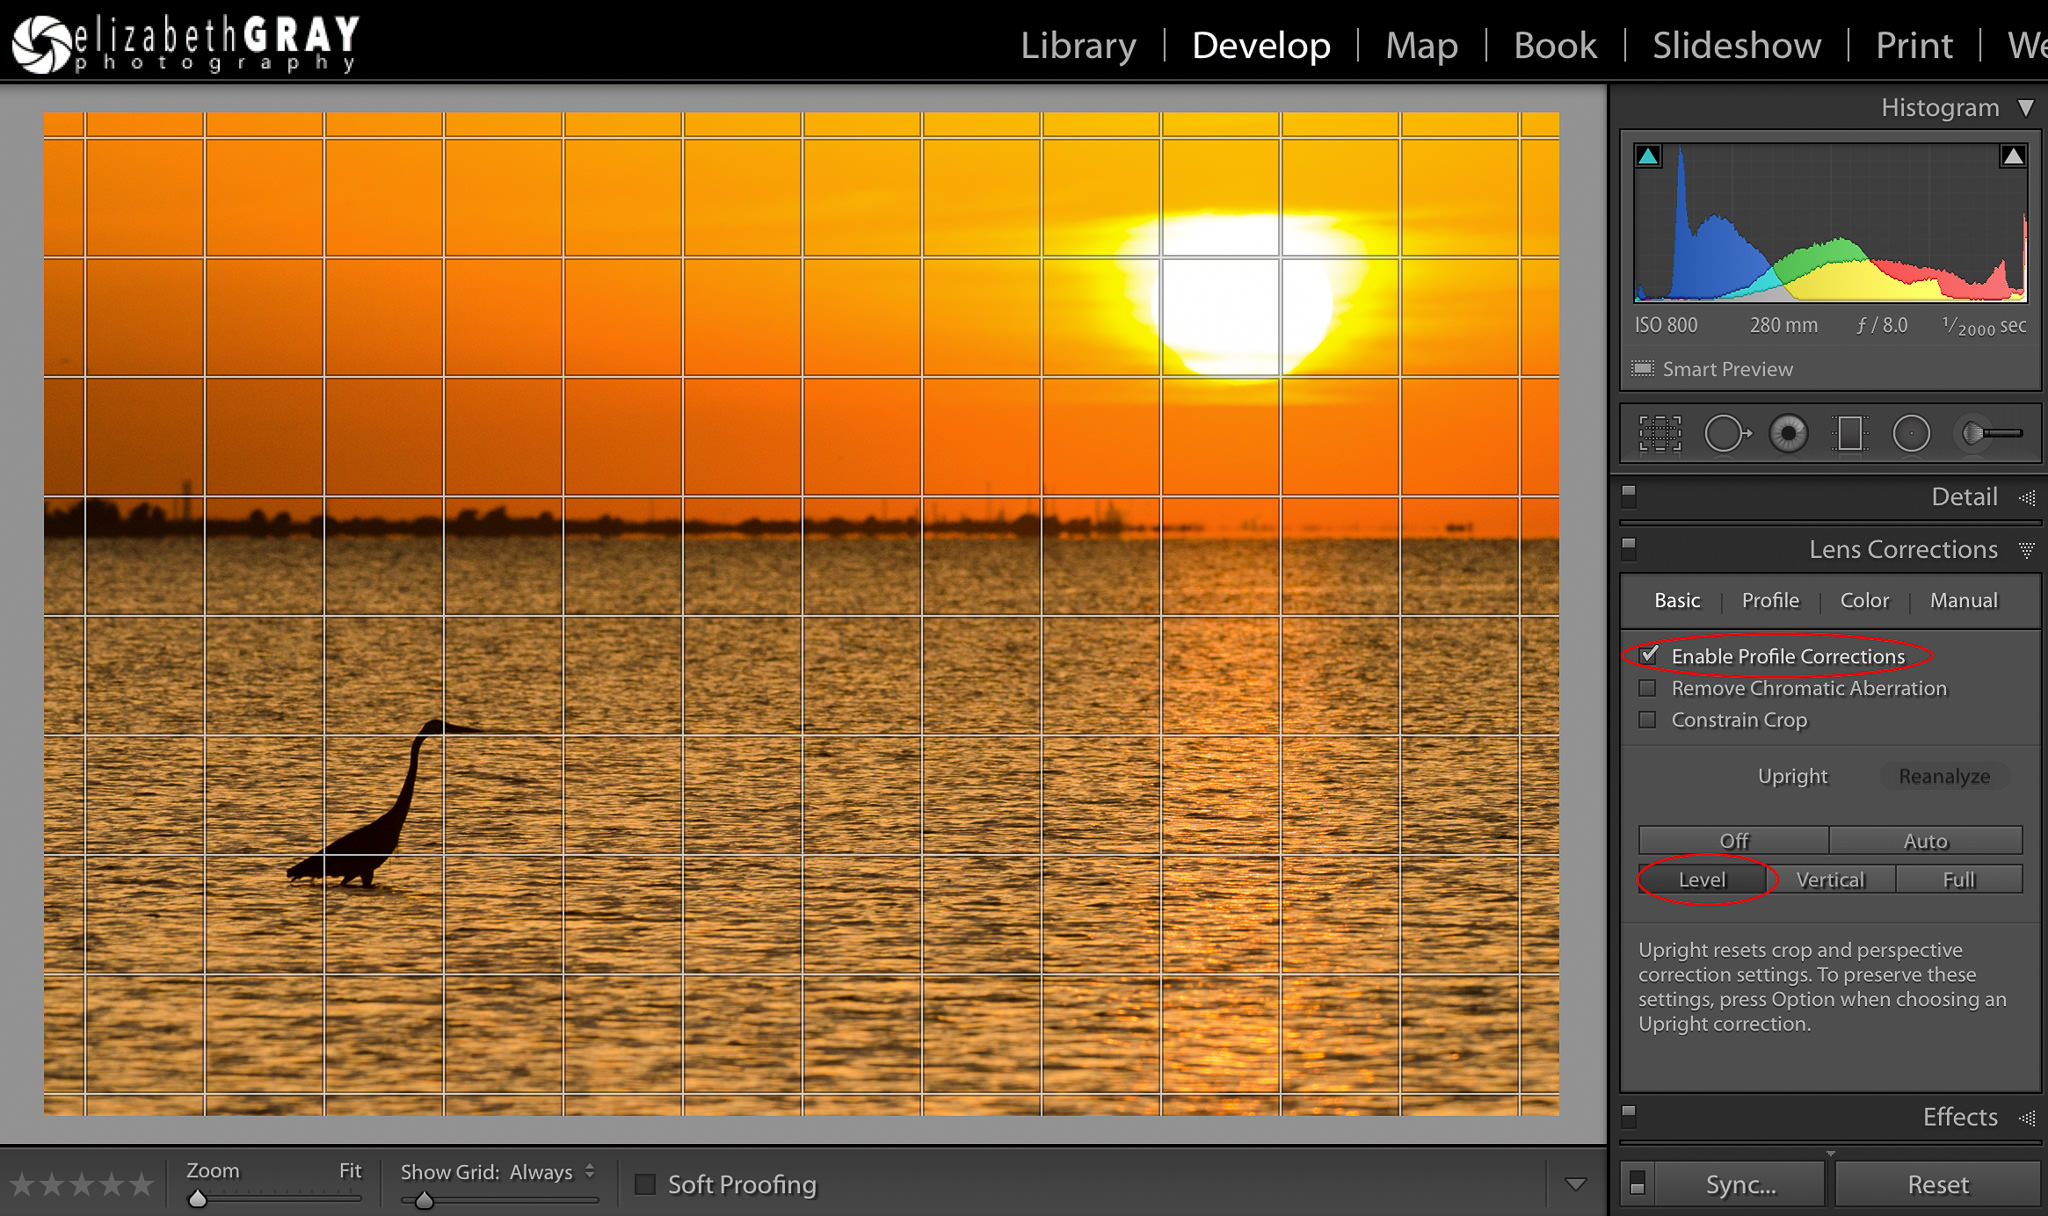
- Open the Lens Corrections panel in the Develop module and click on the Basic tab.
- Make sure that the Enable Profile Corrections box has been selected before you correct the perspective. This gives Lightroom a better starting point and results in better image analysis.
- Click the Level box.
Magically your image will rotate the exact amount needed to fix the wonky horizon.
With this sunset image, the horizon is clearly defined so the Level tool works very well. Notice how the horizon is now parallel to the overlaid grid lines.
One annoying feature of this tool is that it will reset any cropping you have already done. Luckily, there is a work around. If you have cropped your image, hold down the Option (Mac)/Alt (PC) key when you click the Level box. This will maintain your crop. However, Lightroom will be able to make more accurate calculations if it has more data to work with. It is a good habit to make your horizon correction first, and then crop your image.
1.3) Fixing Horizons that are Not Well Defined
When you use the Level mode in the Upright Perspective Corrections described above, Lightroom uses the data in your image to analyze how much of a correction to apply. When there is no clear horizon, Lightroom can have problems with this calculation. If this is the case, I like to use the Straighten tool under the Crop options.
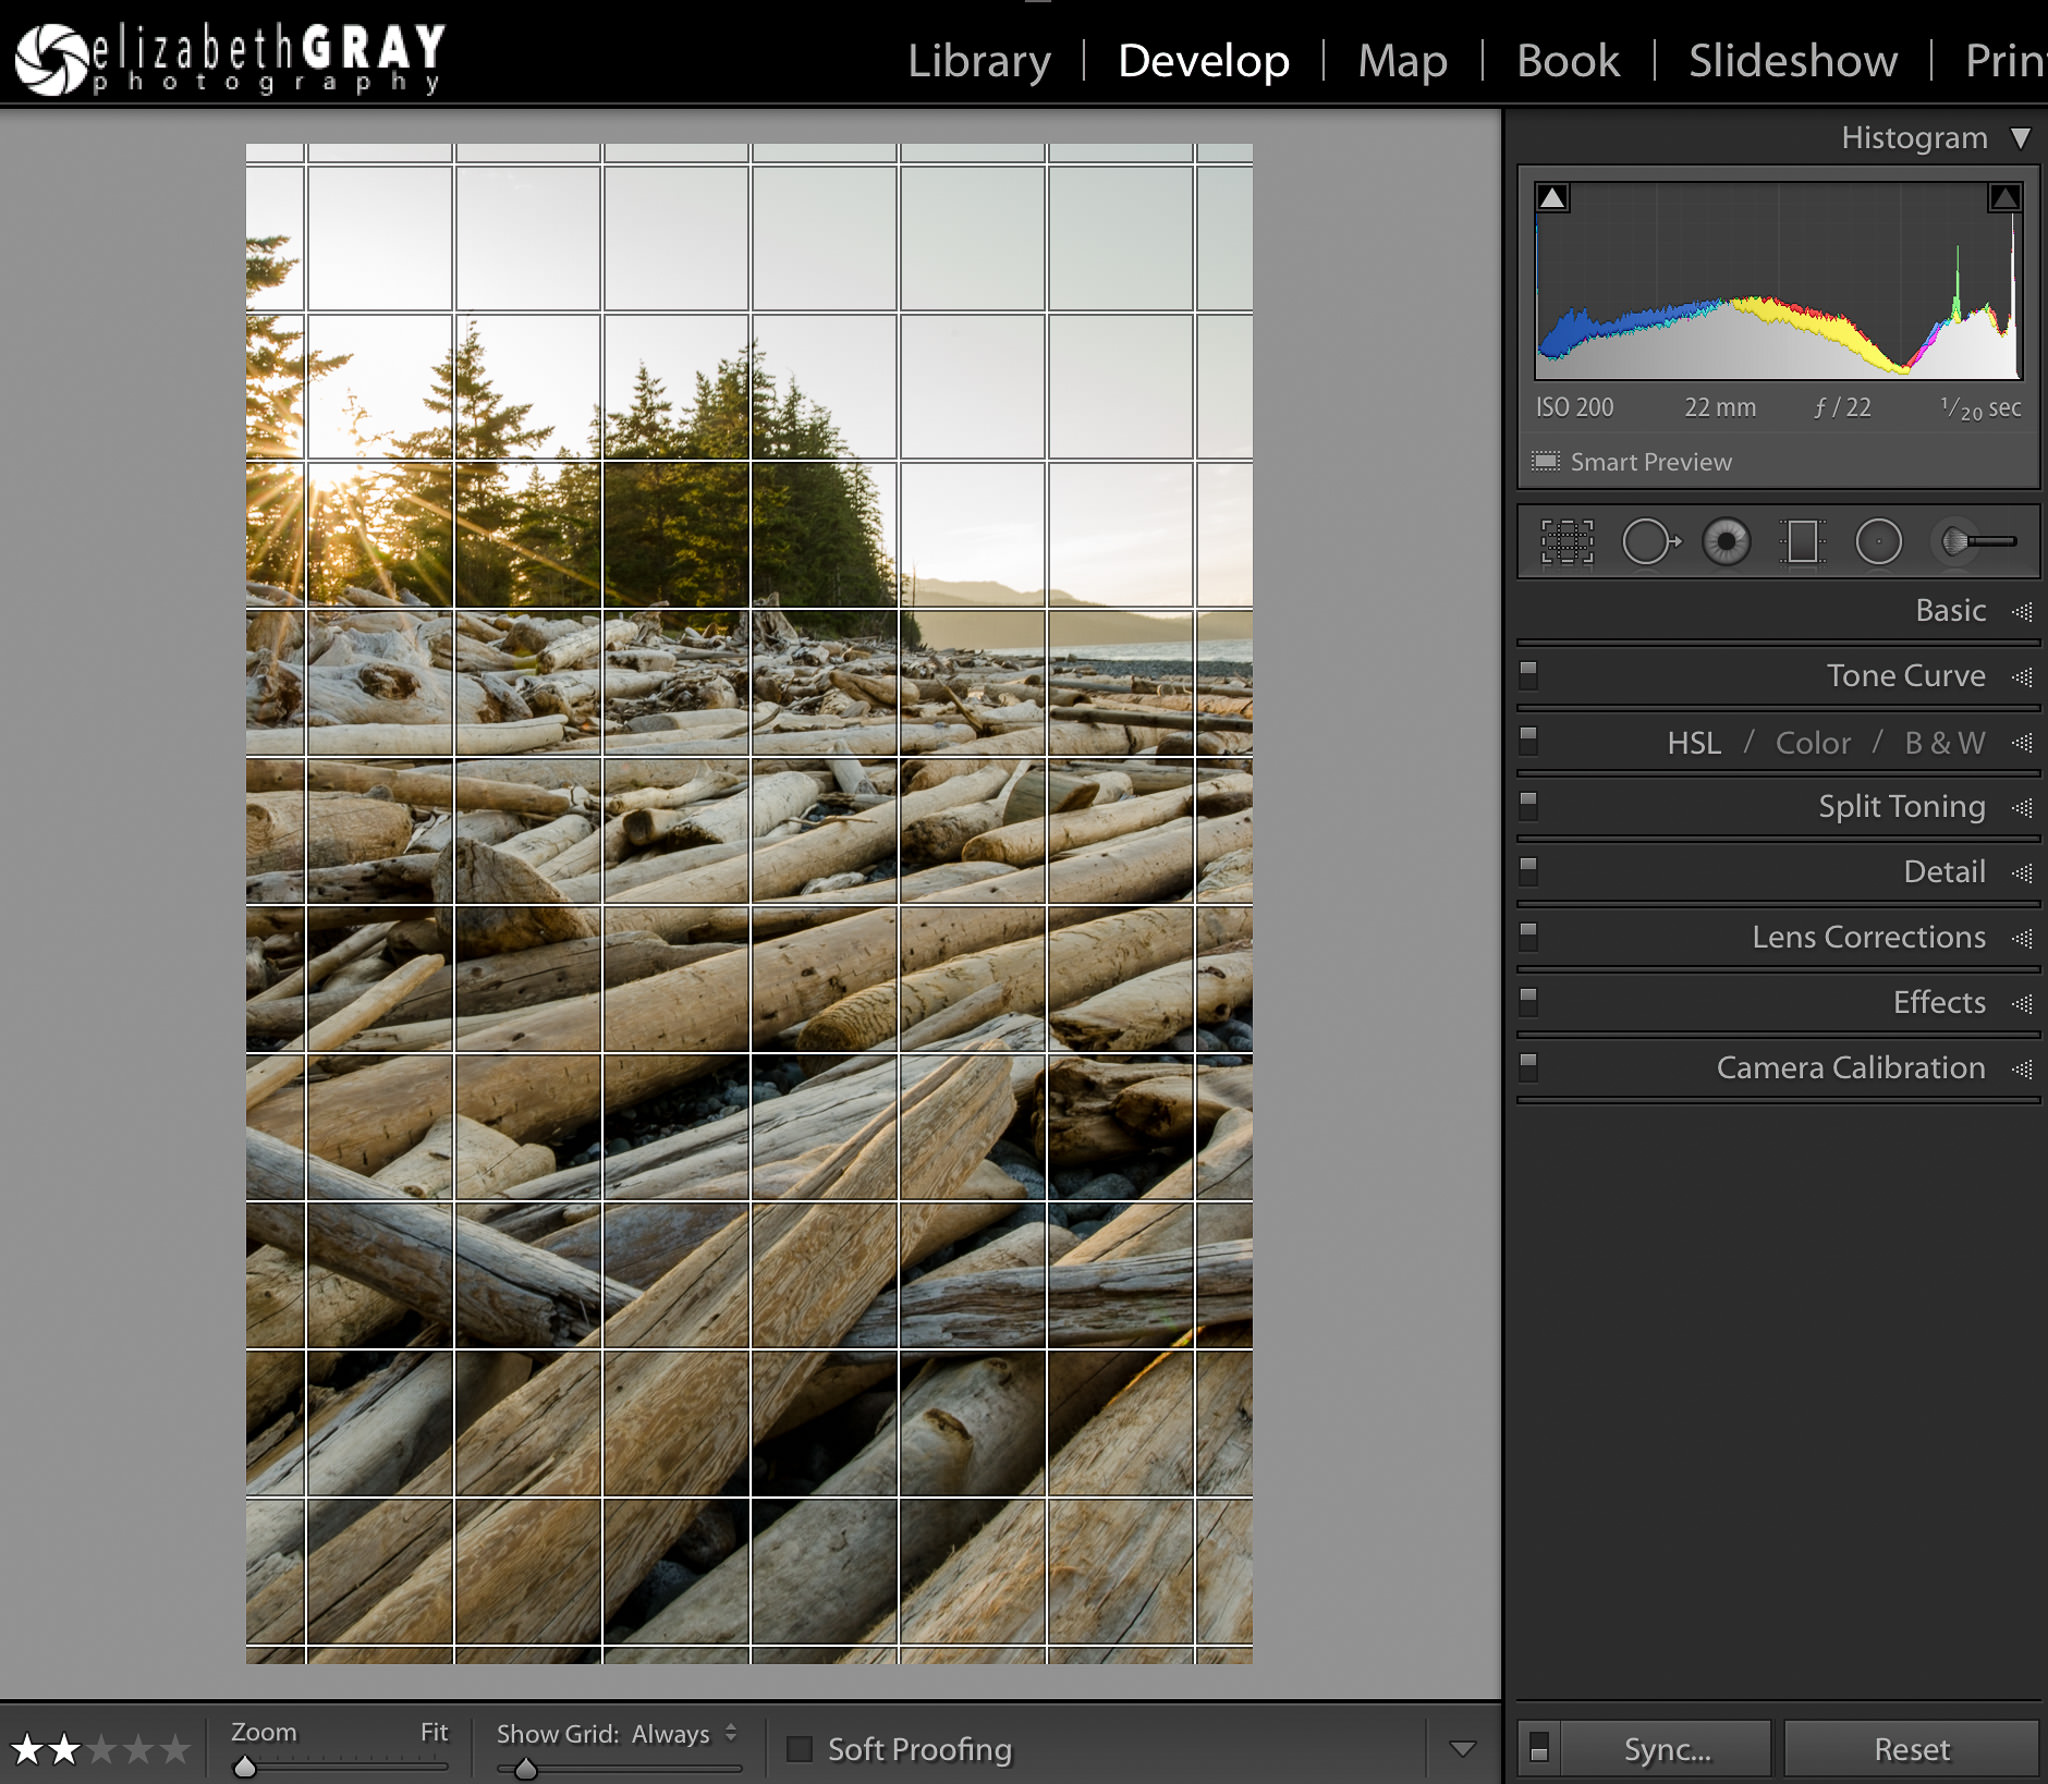
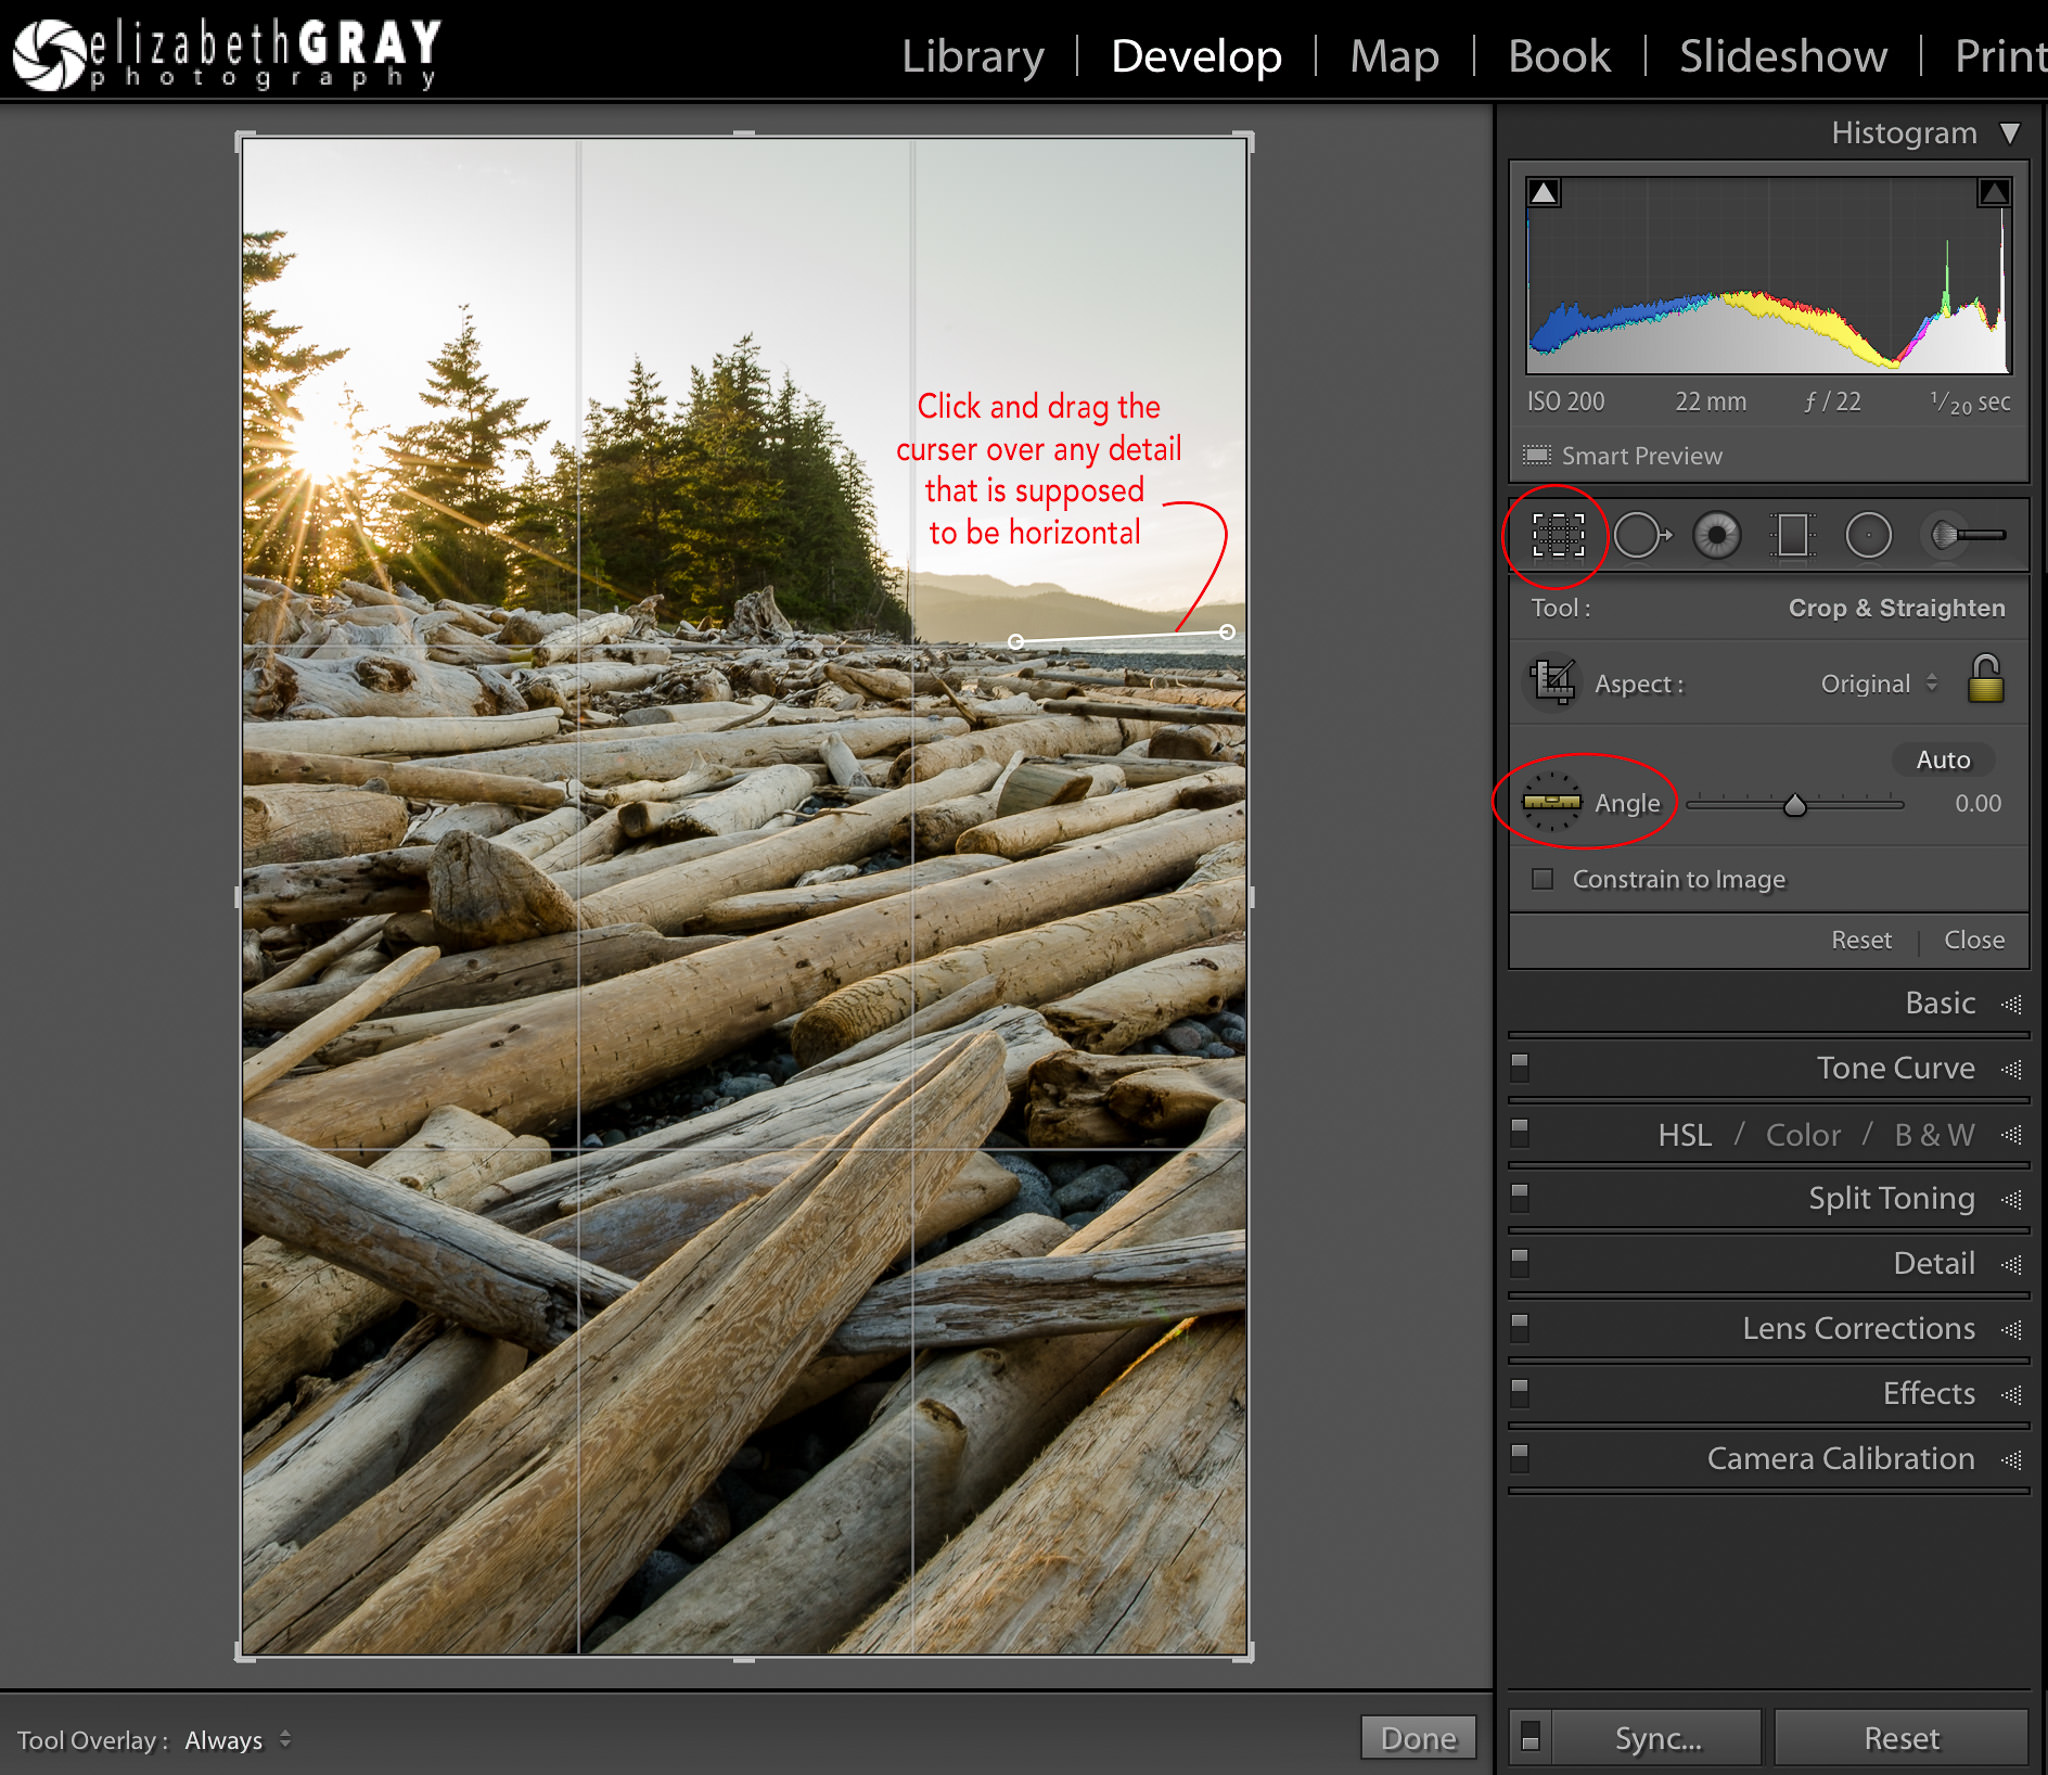
In this photo, there is a very small section of horizon showing. To make matters worse, the logs contain many lines, some of which are close to horizontal, and they are far more dominant than the horizon. All this conflicting data “confuses” Lightroom when it tries to calculate how much of an adjustment to make.
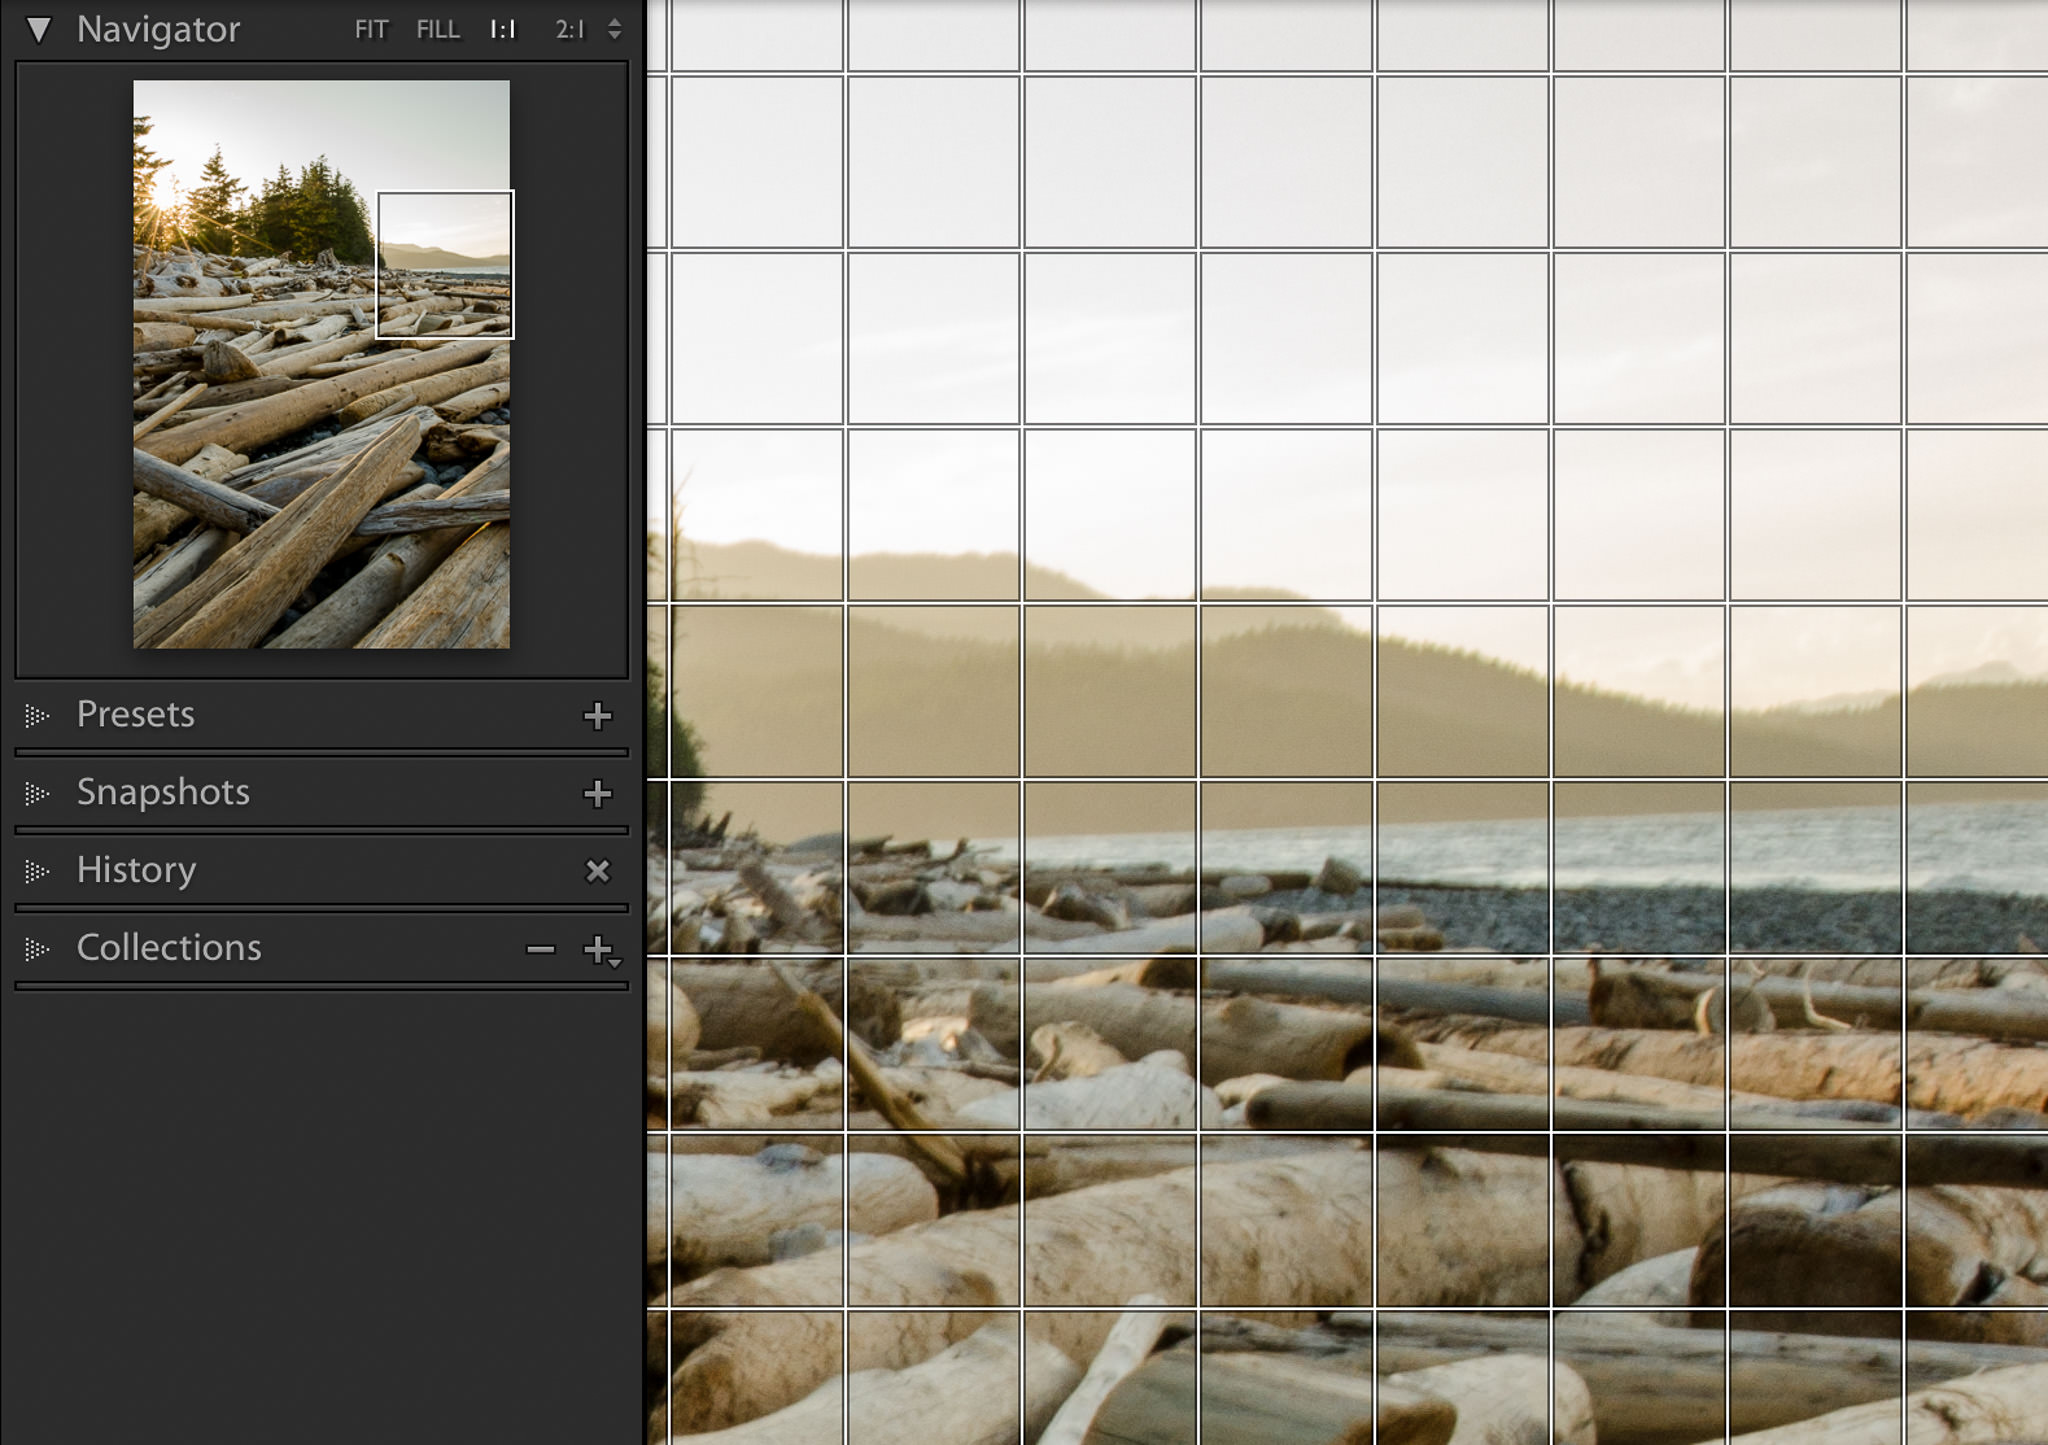
You can see from the enlarged portion of the image that the horizon is indeed sloping down towards the left.
If I try to do the automated Level correction, like I did with the sunset image, Lightroom makes a horrible choice! It has probably confused the log near the front of the frame as the horizon.
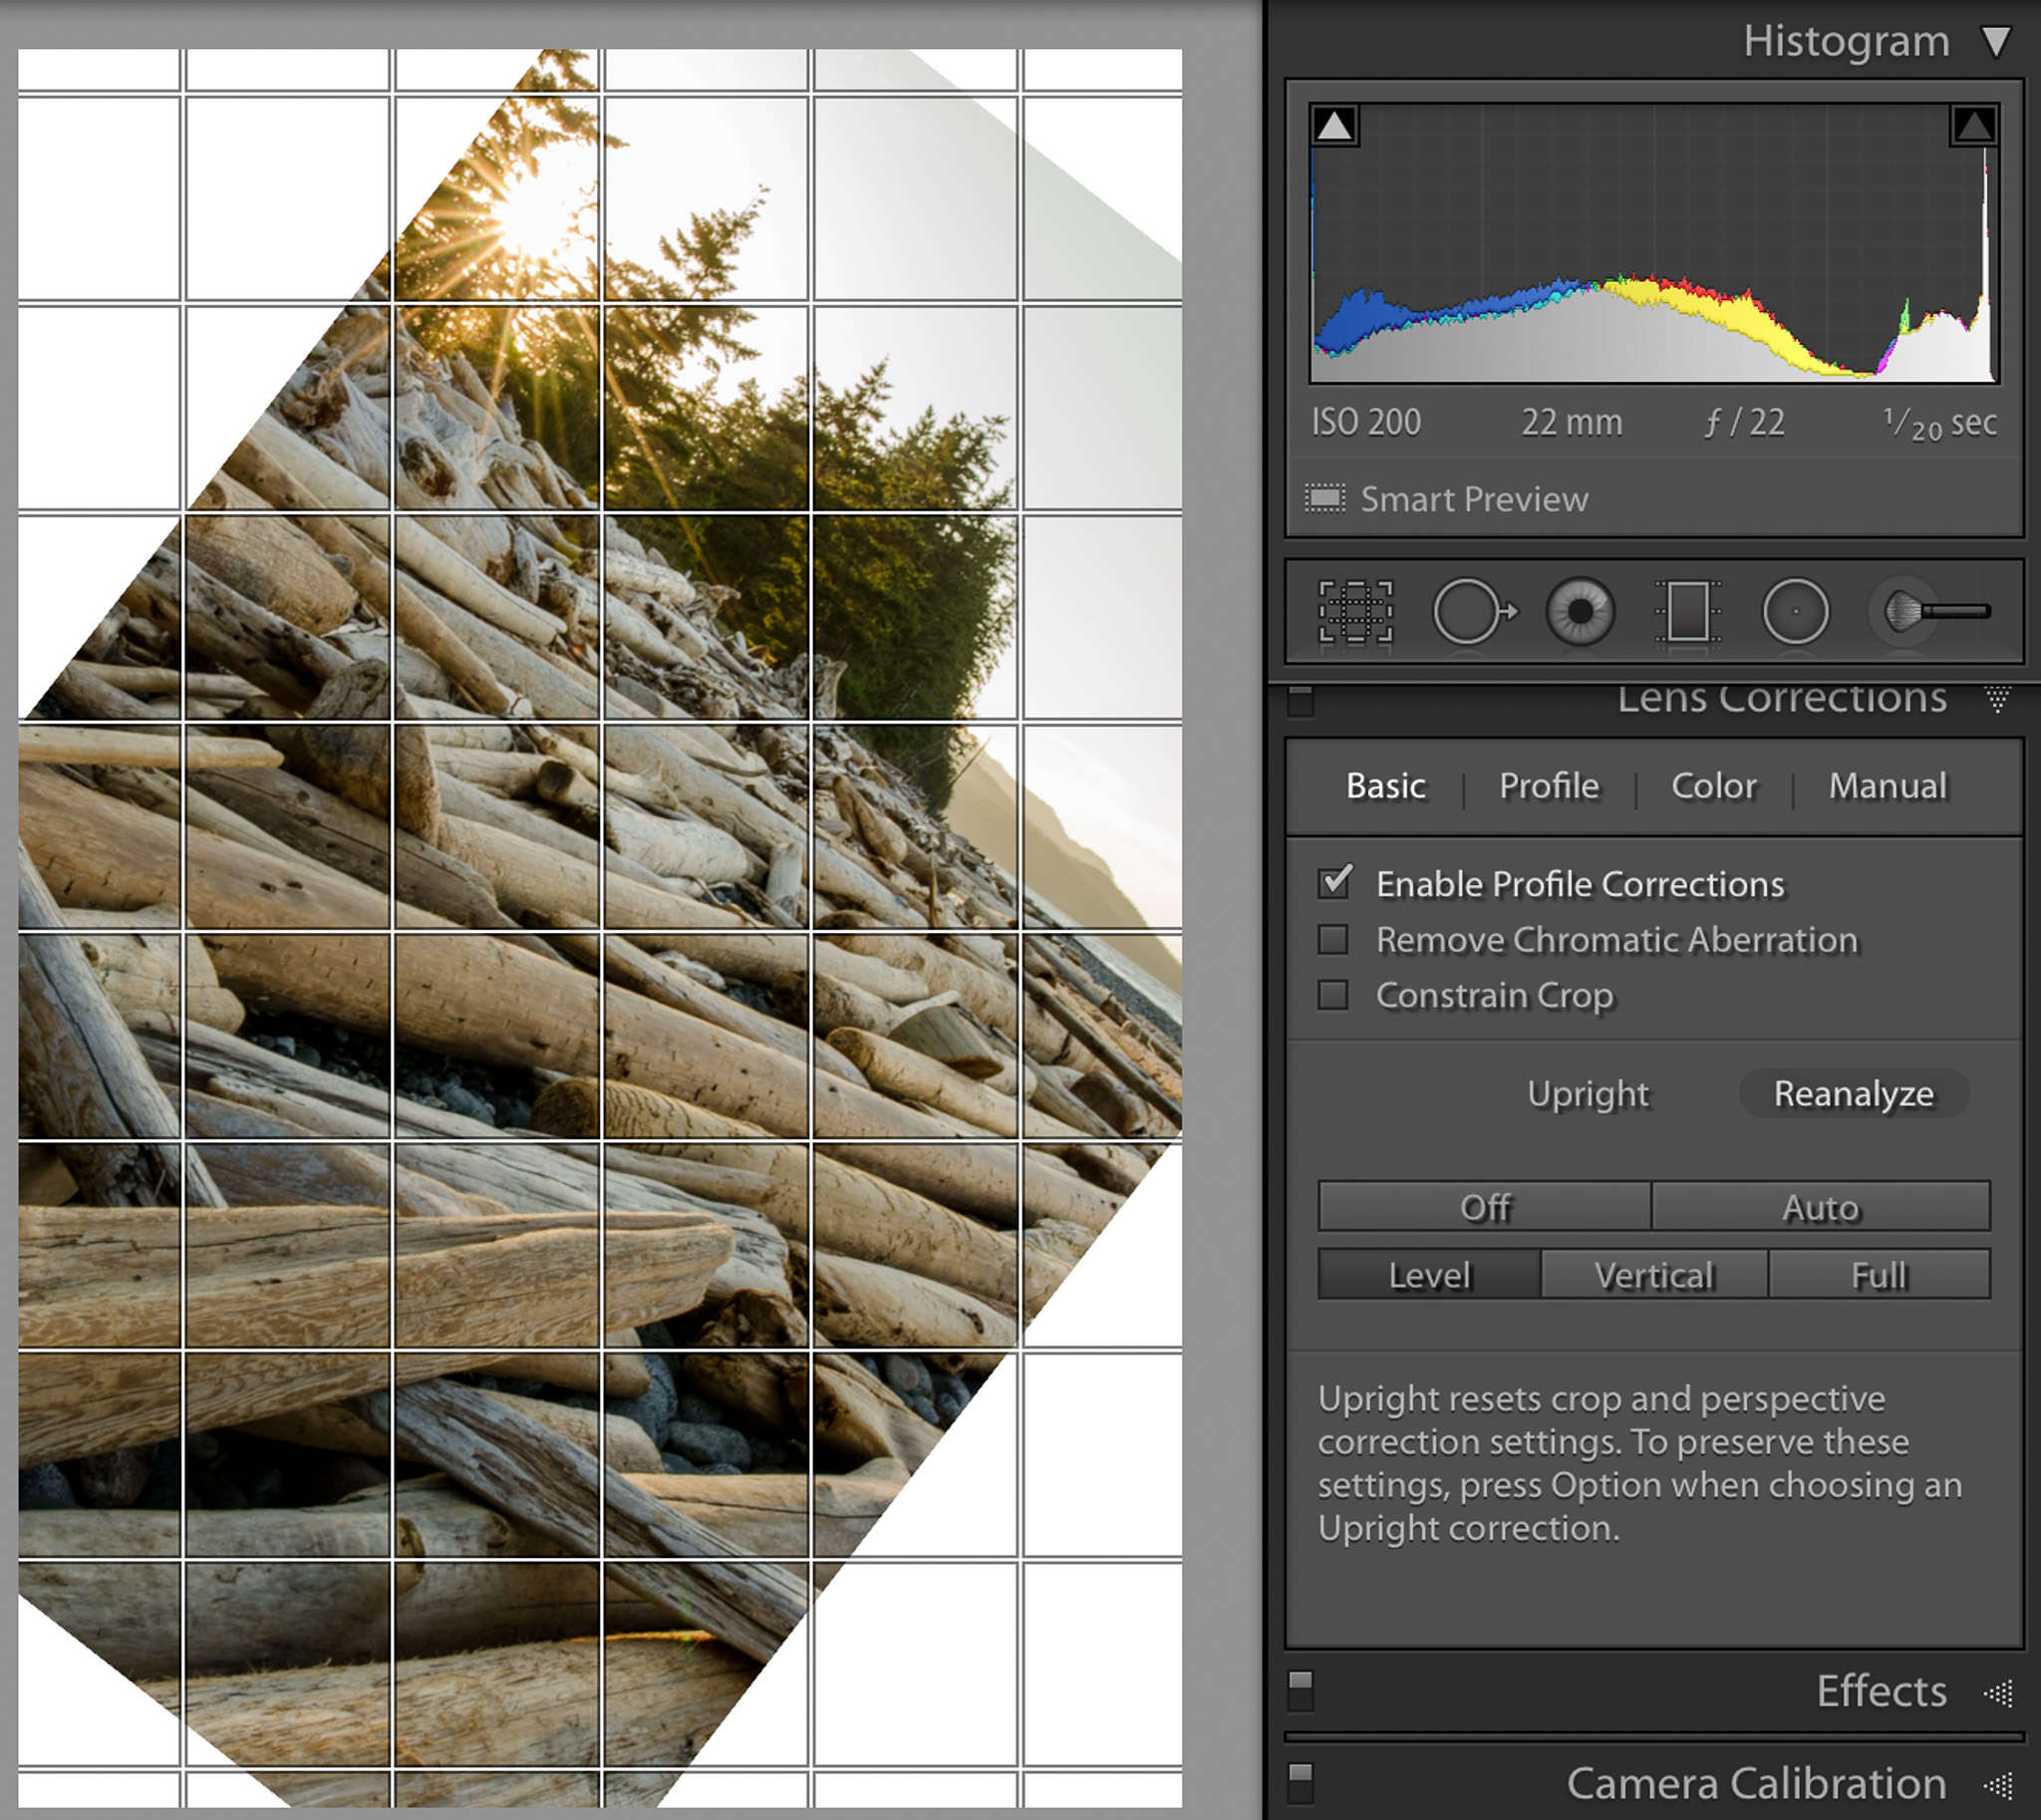
In situations like this you have to give Lightroom a hint in order for it to determine how much of a correction to make.
- From the Develop Module tool drawer (underneath the histogram), click on the Crop Overlay tool. This will open the crop options.
- To select the Straighten tool, click on the ruler.
- Now click and drag the cursor over any detail that is supposed to be horizontal. You do not have to drag across the entire width of the photo. This will give Lightroom the information it needs to calculate how far off from level the horizon is, and rotate the image the proper amount to fix it.
- To confirm the correction, hit the enter key.
You can also try to manually rotate the image. To do this select the crop tool and position your cursor outside the edge of the photo. The cursor will change to a double-sided curved arrow. Now you can rotate the image until the horizon is level. I find the rotation tool very sensitive. I tend to get much better results dragging the ruler along something that is supposed to be horizontal instead.
It is important to note that all of these methods result in some loss of image. The more off-kilter your horizon, the more the image will be cropped once it is leveled.
2) Correcting Keystoning in Lightroom – Vertical, Full and Auto Modes
You probably noticed the other three modes in the Upright Perspective Correction tool: Vertical, Full and Auto. As we saw above, Level corrects horizontal details in a photo but does not make corrections to elements that should be vertical. Vertical, Full and Auto modes make automatic corrections to the vertical details in a photo with a single click, but each affect the photo in a different way.
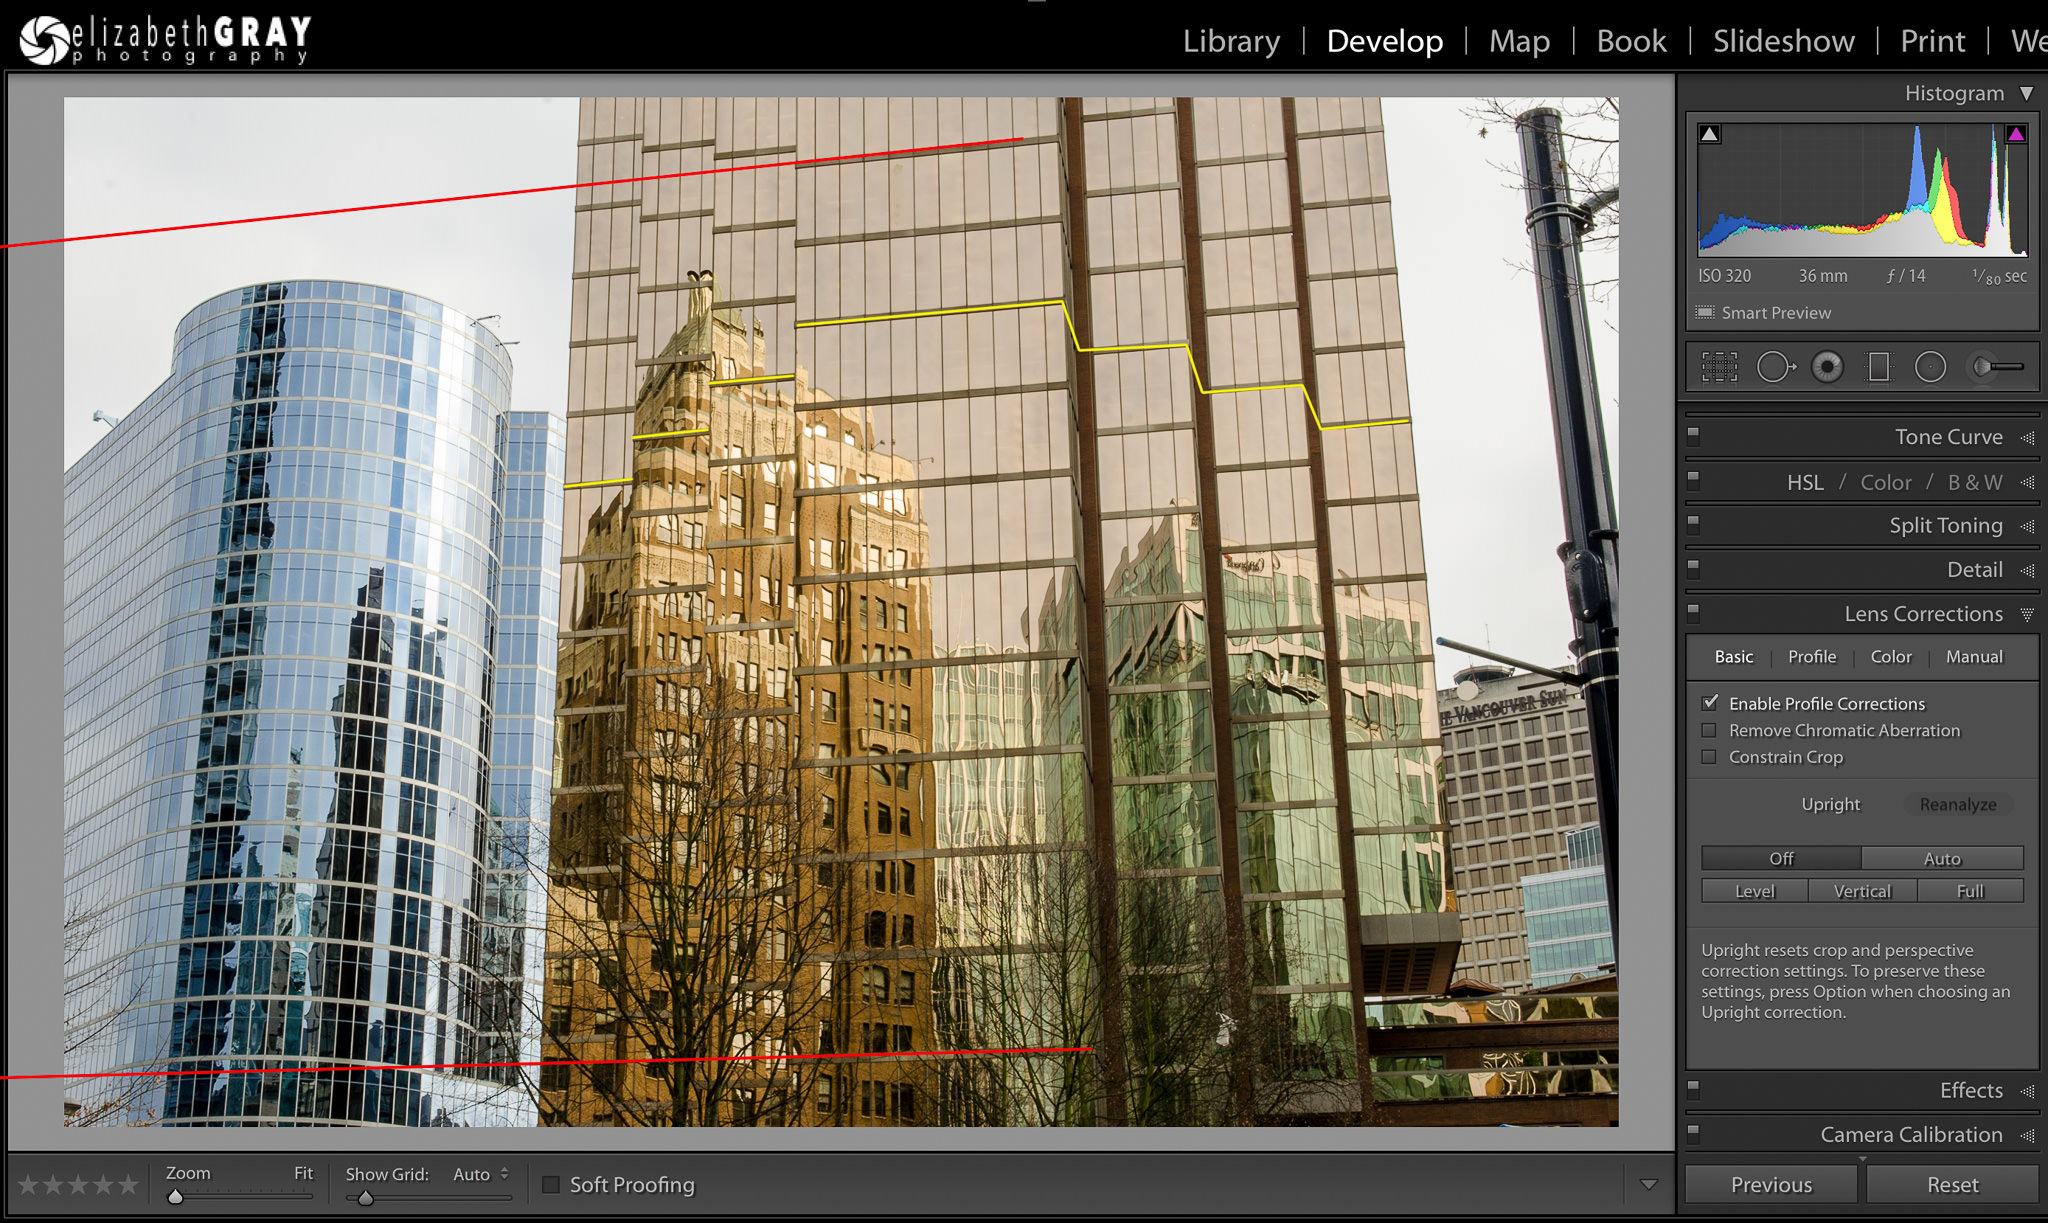
Lets take a look at an example to see how the remaining three Upright Perspective tools impact a photo. There are several issues happening in this image below. Firstly, the buildings exhibit some keystoning. They appear to be tipping backwards. This is because my camera was tilted up to take the picture. Secondly, it appears my camera was not completely level with the ground. Notice the red lines, they are dropping significantly from right to left. To me, it looks like the main building is tilting to the left. One last note, I intentionally did not take this photo with my camera square to the main building. Notice how the horizontals are not parallel (red lines show some horizontal keystoning). They appear to converge to a point somewhere beyond the left edge of the picture. The reason I did this was to get some perspective. The footprint of the building has three setbacks on each side (yellow lines). If I photographed the building straight on, I wouldn’t have seen any of the sides of the building where it steps back on the right. In hindsight, I wish I had taken the image at even more of an angle to add additional interest!
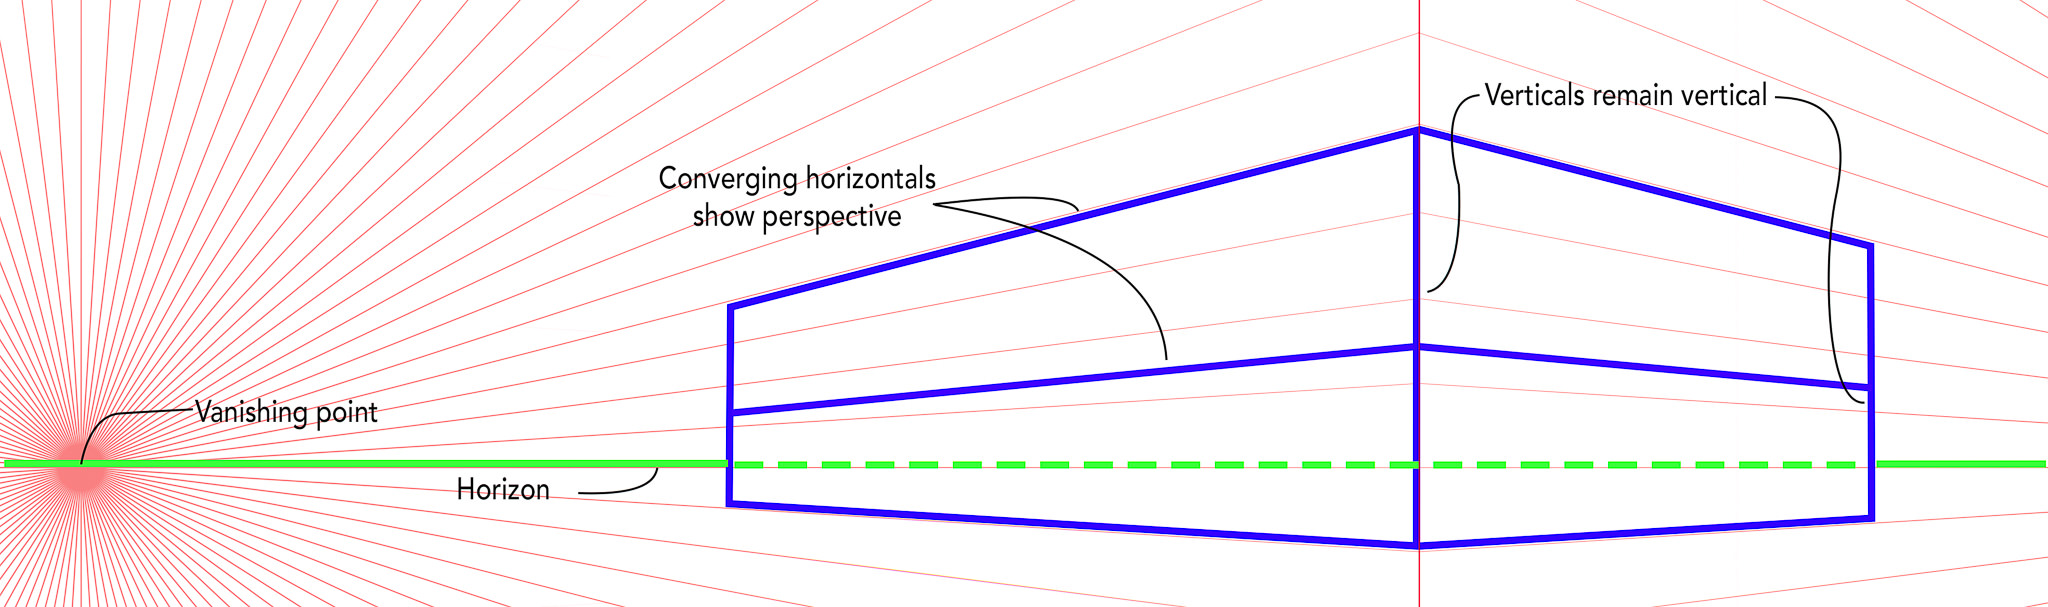
To try and better illustrate what the corrected image should look like, consider this simplified sketch of a rectangular building. All the vertical corners are upright. In addition, the horizon is level (green line). However, the other horizontals are not level. They are showing perspective, and converge to a vanishing point. This shows the viewer that the image is three-dimensional, and not just a head on shot of a two-dimensional façade. The converging horizontals give the impression of depth. When we see things with our eyes, objects that are further away appear smaller. That is why the closest vertical corner of the building is taller than the other two. With this sketch in mind, lets look at how the remaining Upright Correction modes affect the cityscape.
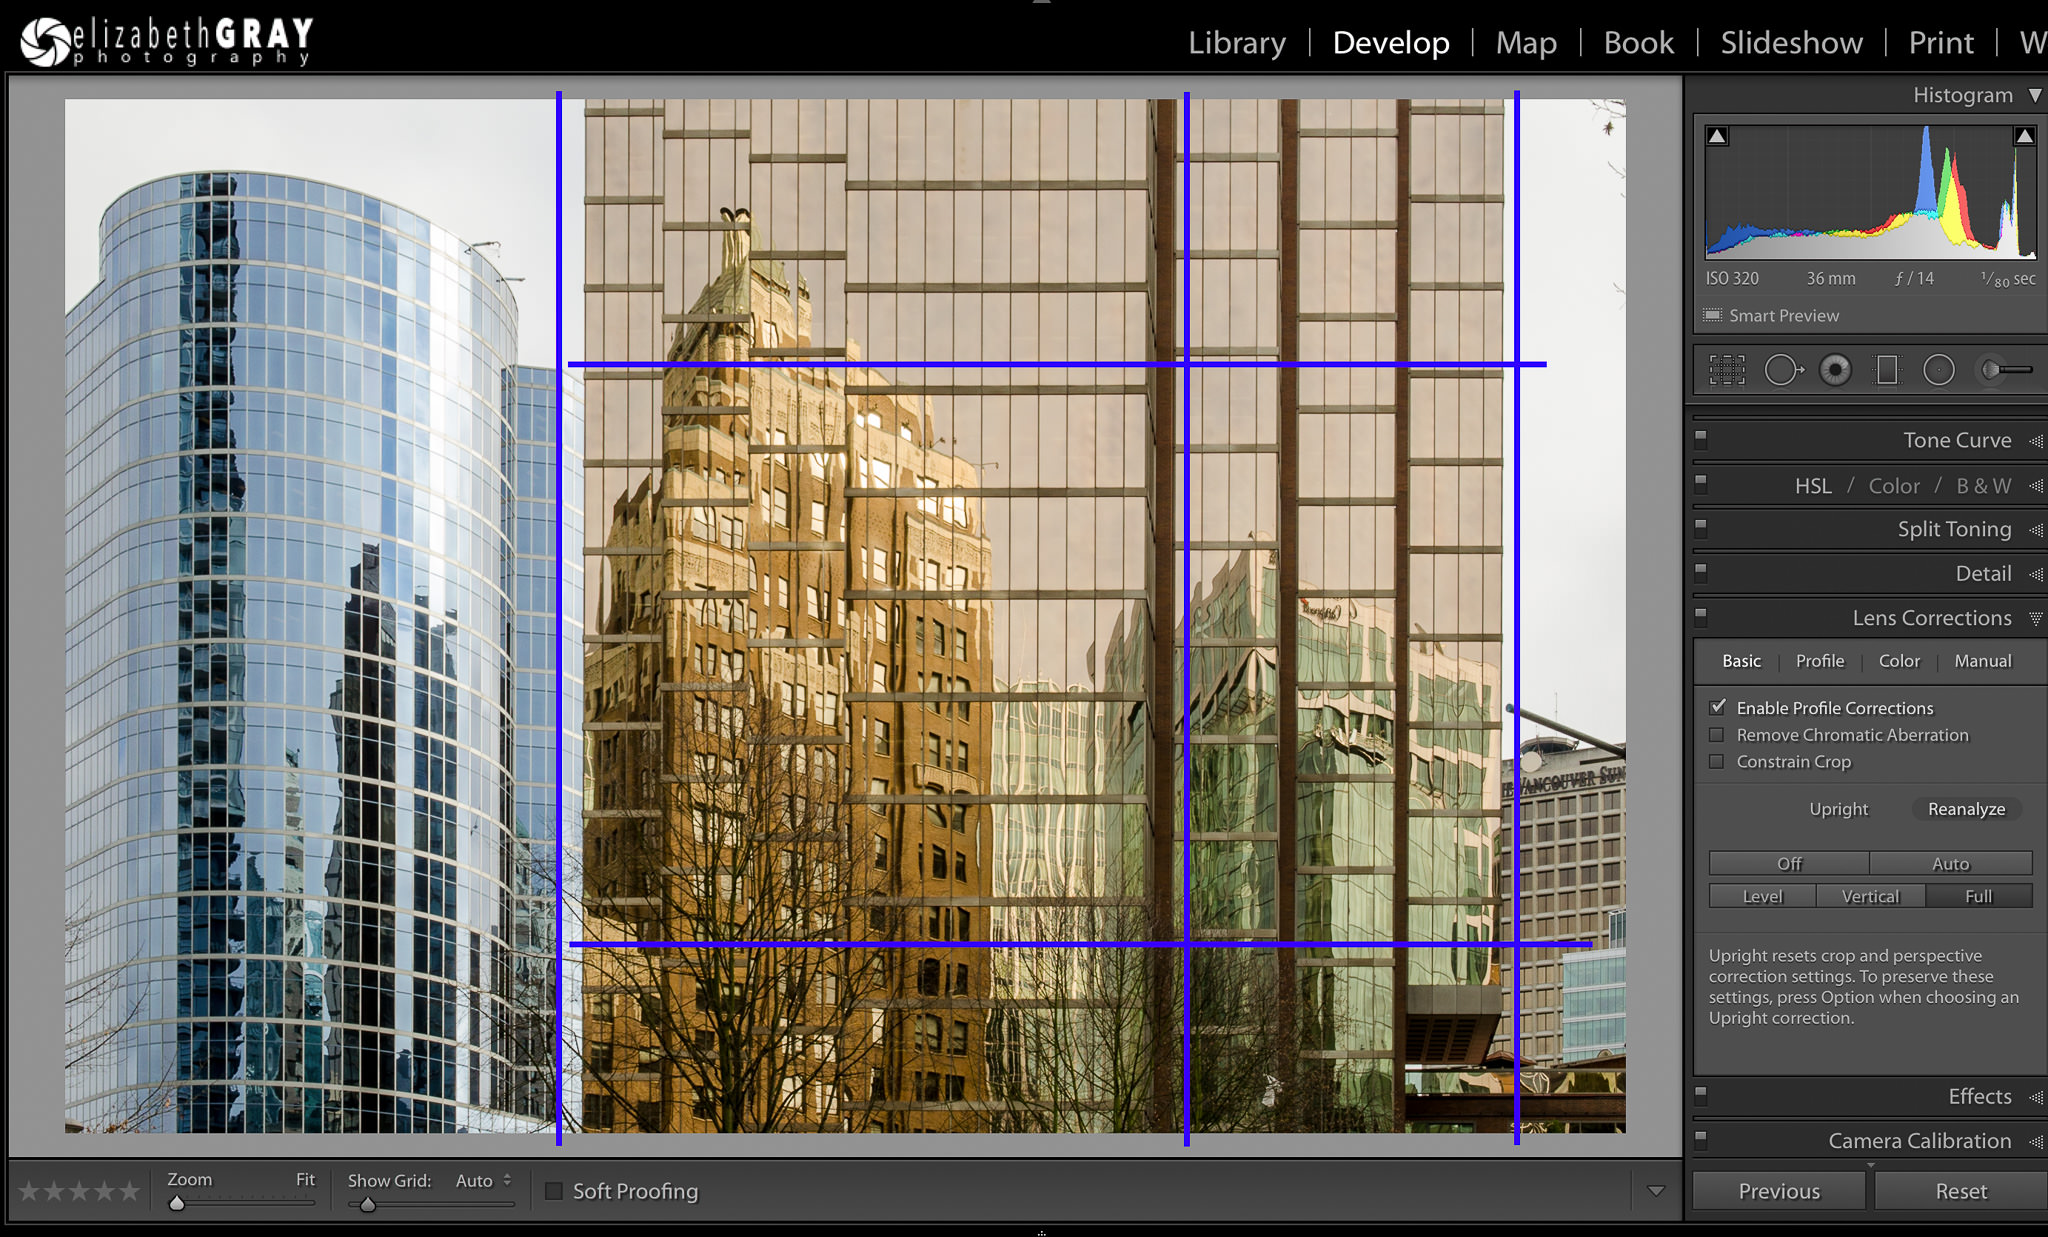
2.1) Vertical Mode
Vertical mode considers the vertical elements in the image when it calculates how to correct the image. This mode tries to make those elements upright.
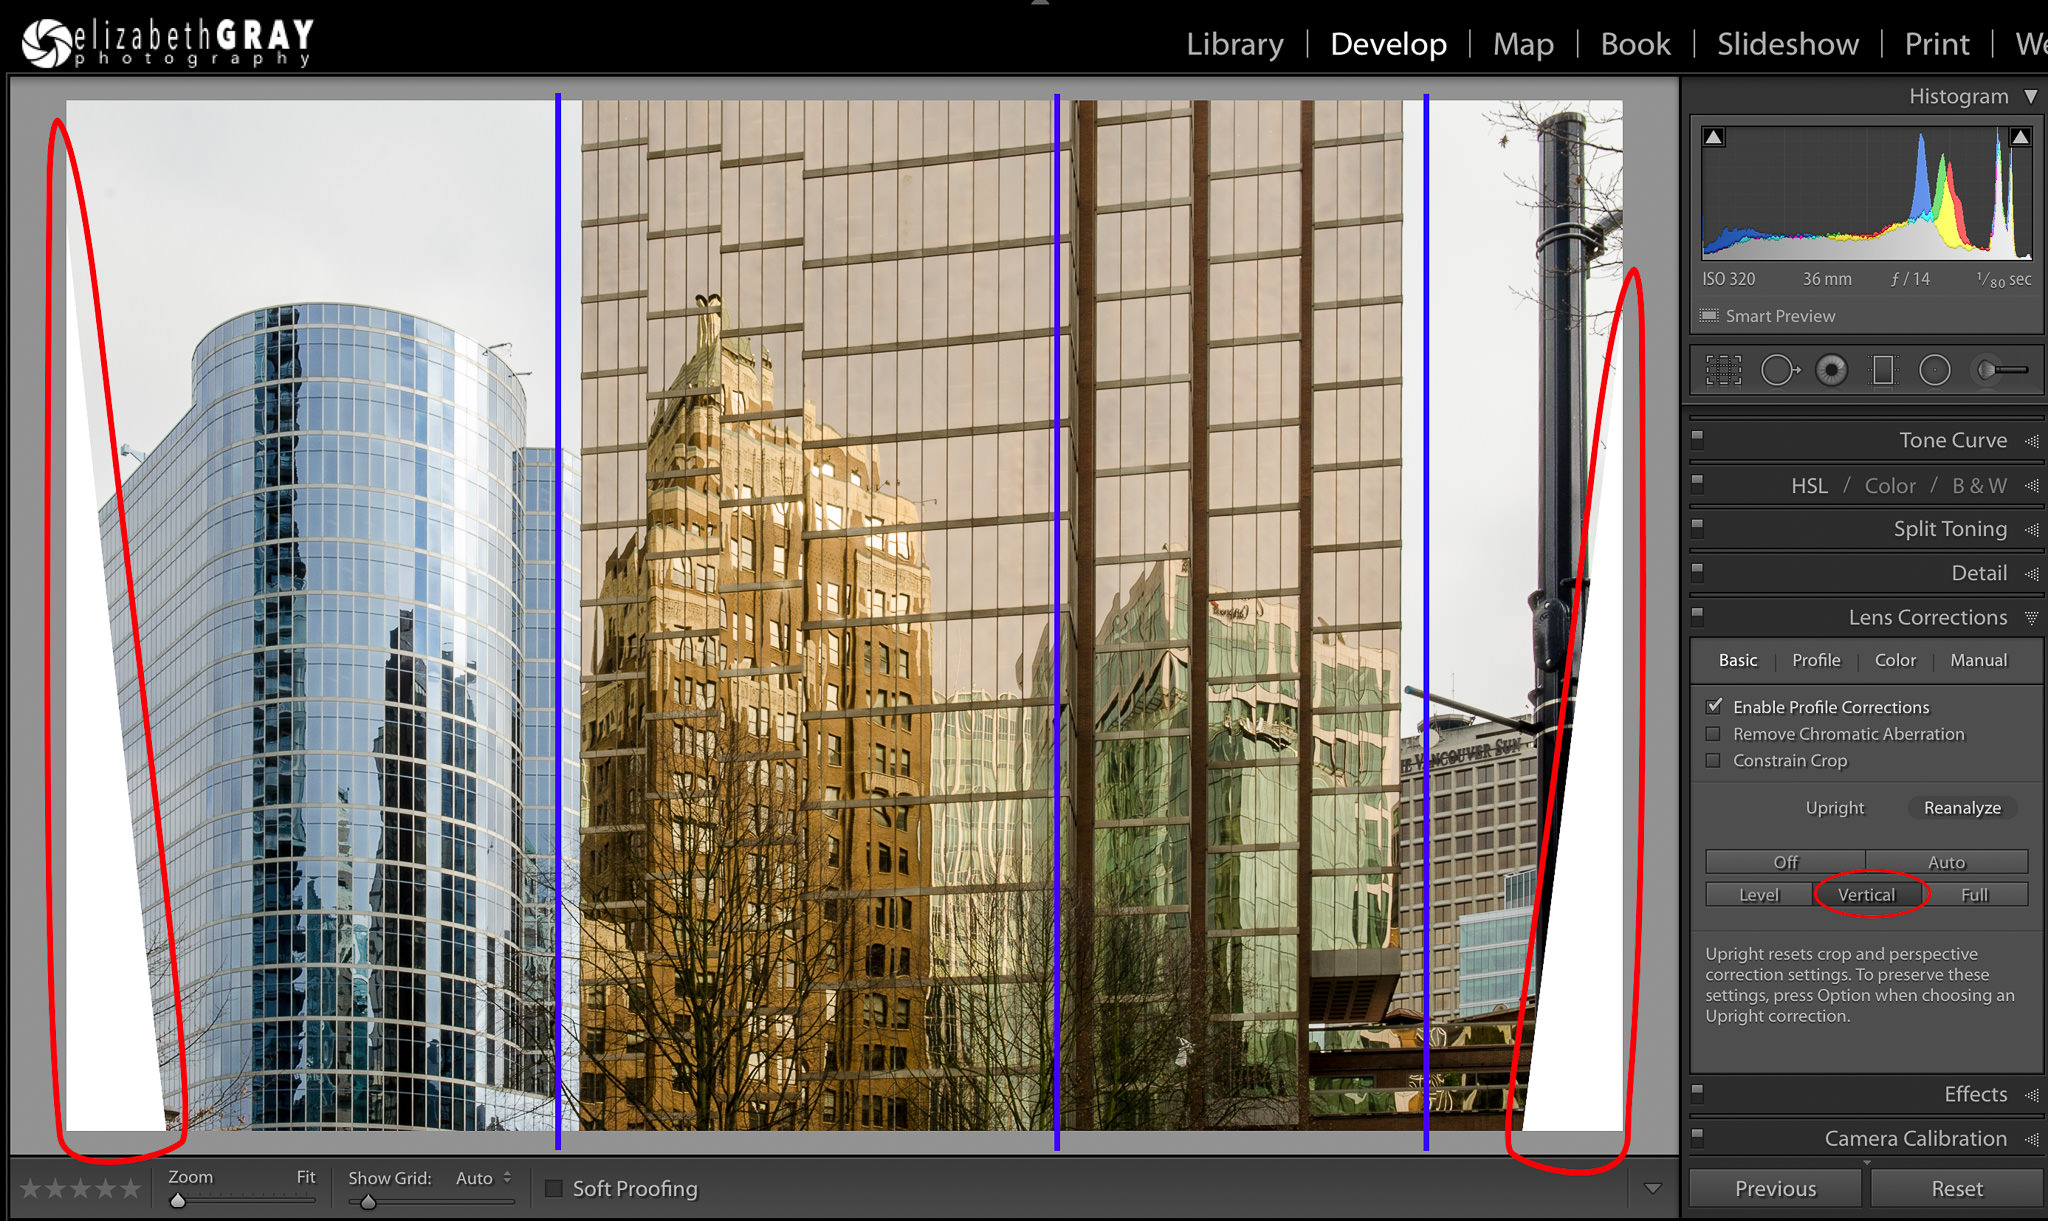
Look at the vertical blue guides I added to the photo. Notice how the vertical elements have indeed been corrected. The horizontal elements remain more-or-less unchanged. Two other problems have occurred though. Firstly, notice how the bottom corners of the picture have no information (white triangles). Unfortunately, the only way around this is to crop your image. This is why I like to compose the original shot with extra space around my subject. The extra space will give me the room I need to crop into the photo after I make my perspective corrections.
Secondly, the Vertical Mode tends to vertically stretch images. Sometimes it is not too noticeable, while other times it seems very pronounced. Luckily there is a manual correction that can help.
- While in the Lens Corrections Panel, select the Manual tab.
- Adjust the Aspect slider to the left until you are happy with the transformation. As a side note, moving the slider to the right will make your image even taller.
- Crop your image (blue box) to remove any white areas where there is not enough picture information. Depending on how much you moved the slider to the left, you will loose data at the top and bottom. This is in addition to loosing those triangles we saw in the Vertical Mode correction.

2.2) Full Mode
Full is a combination of vertical and horizontal corrections. I find this mode often makes very severe, often unrealistic, adjustments.
I have added some blue guidelines again. Observe how both the verticals and horizontals have been corrected. However, to me it looks like the perspective of the photo has changed. The main building no longer feels three-dimensional.
With all that being said, depending on the photo, Full mode can work miracles. Don’t be afraid to give it a try. If you don’t like this auto correction, just choose another mode.
2.3) Auto Mode
Auto, which corrects both vertical and horizontal elements, does so in a more conservative way. This correction tends to look more natural. The vertical elements of the image will be closer to upright, but may still exhibit a bit of keystoning. Horizontals will not be forced artificially to be level. In general, buildings will maintain some perspective.
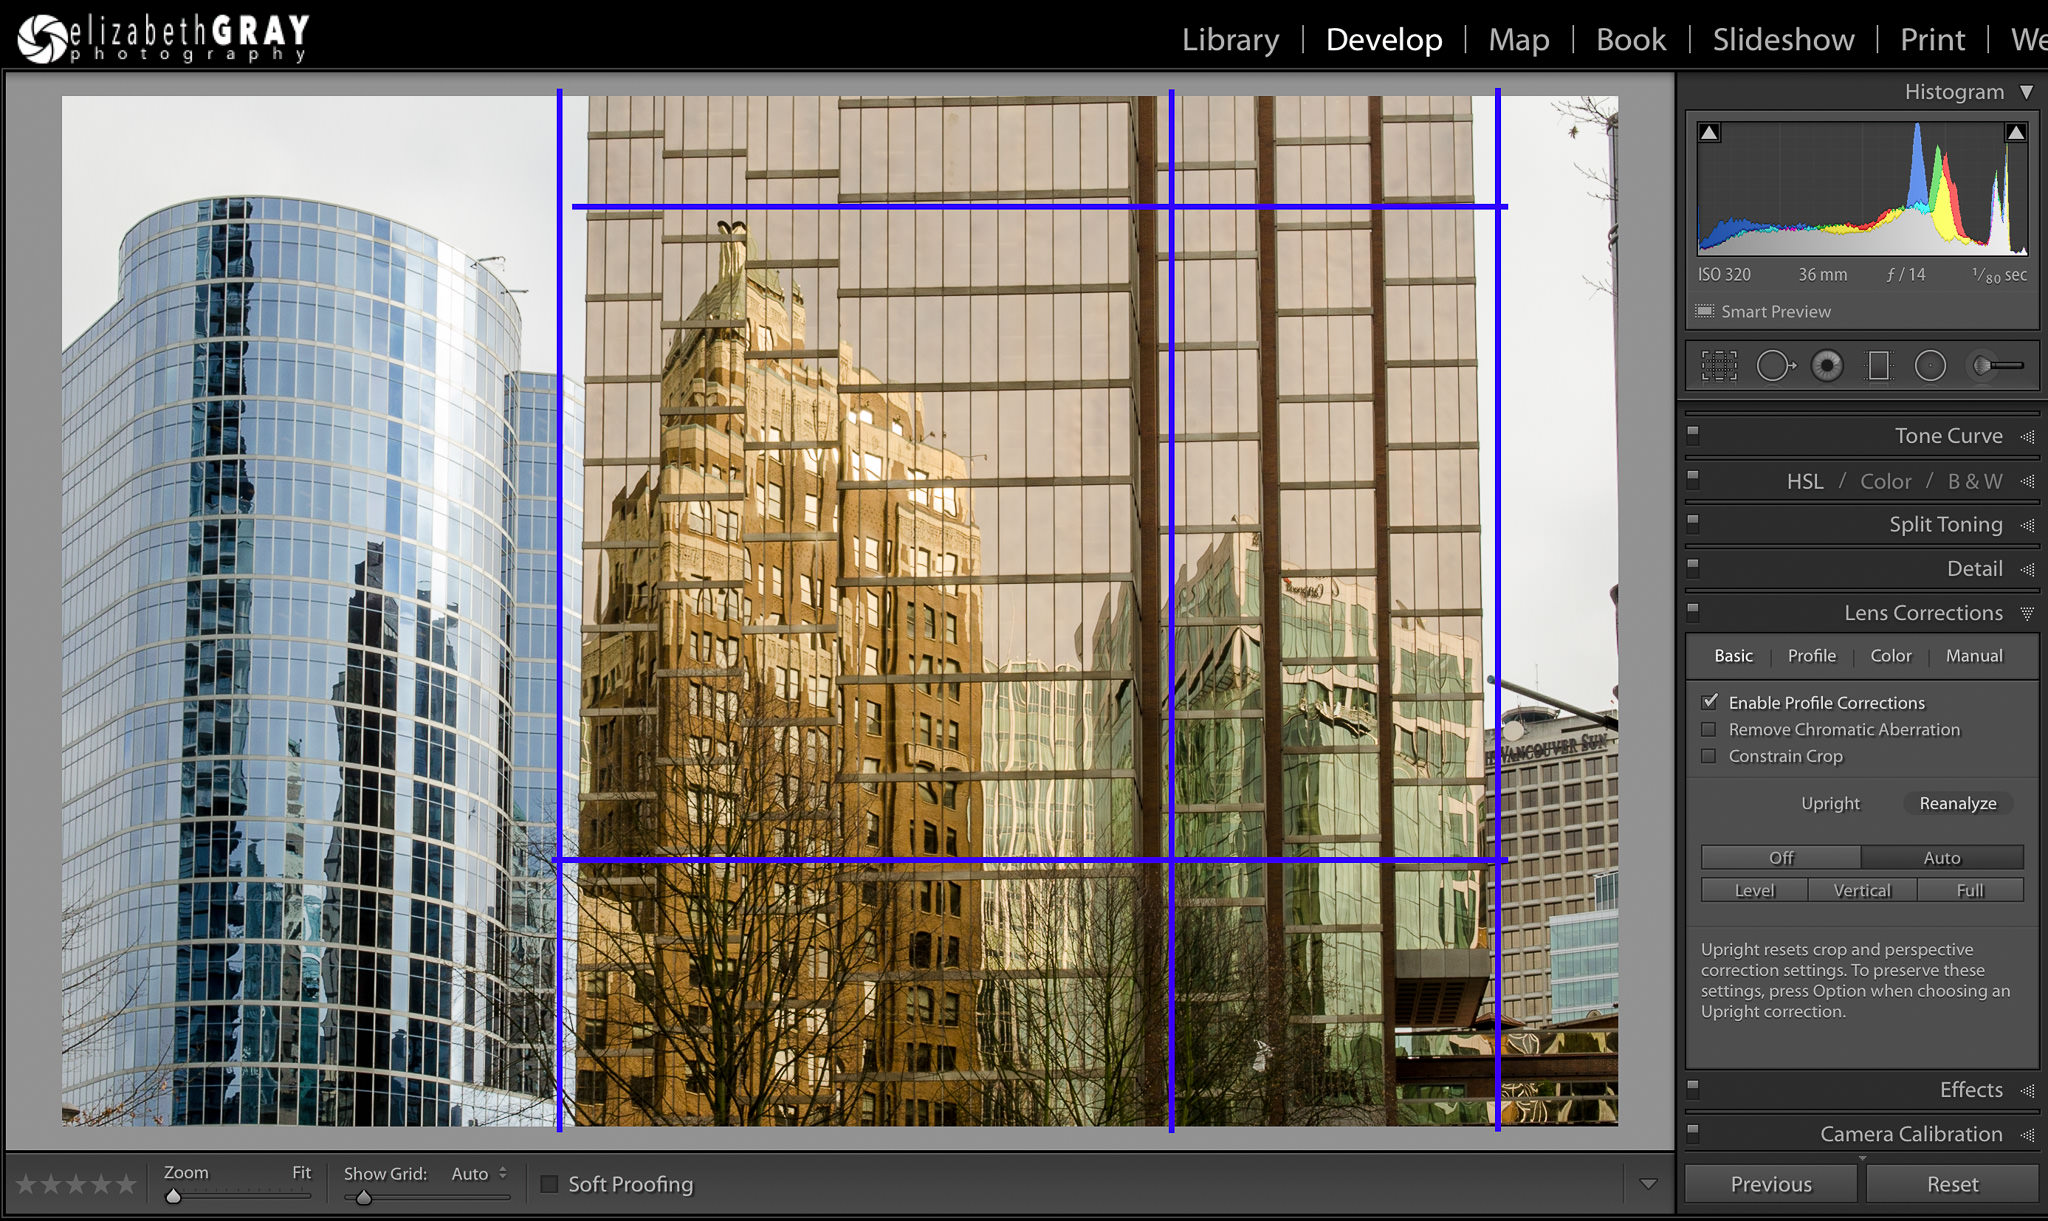
For me, this is the most realistic and visually appealing of all the possible perspective corrections for this particular photo. Again, I have added some guidelines to help you see the corrections. The building is still displaying a bit of keystoning, but much less than it did prior to the correction. The obvious tilt to the building has been corrected. Lastly, the horizontals have been corrected, but not in the harsh way that they were using the Full mode.
2.4) Additional Upright Perspective Correction Comparisons
Because these auto perspective corrections are so photo dependent, here are two more example images.
In this first image, Auto and Vertical look almost identical and I feel give the best correction. Level doesn’t seem to do much, while Full makes some pretty drastic changes!

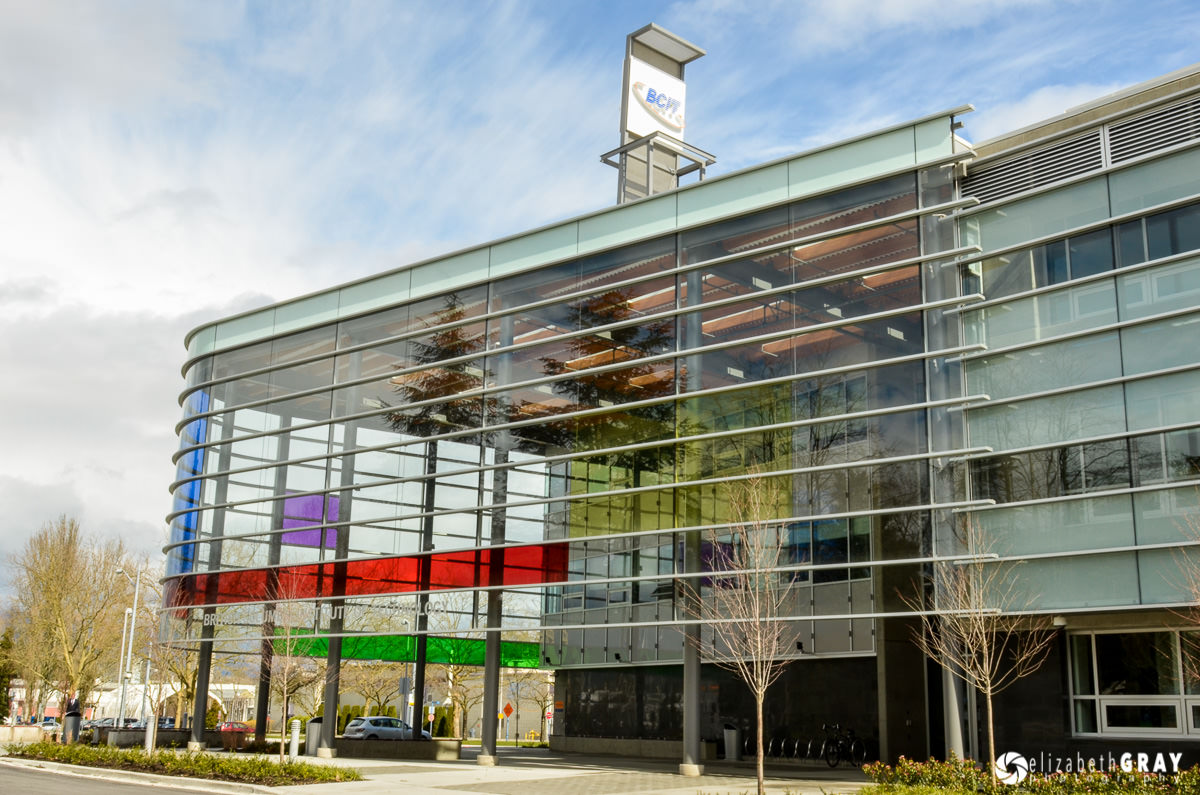
Here is another shot of the same building from a different angle.

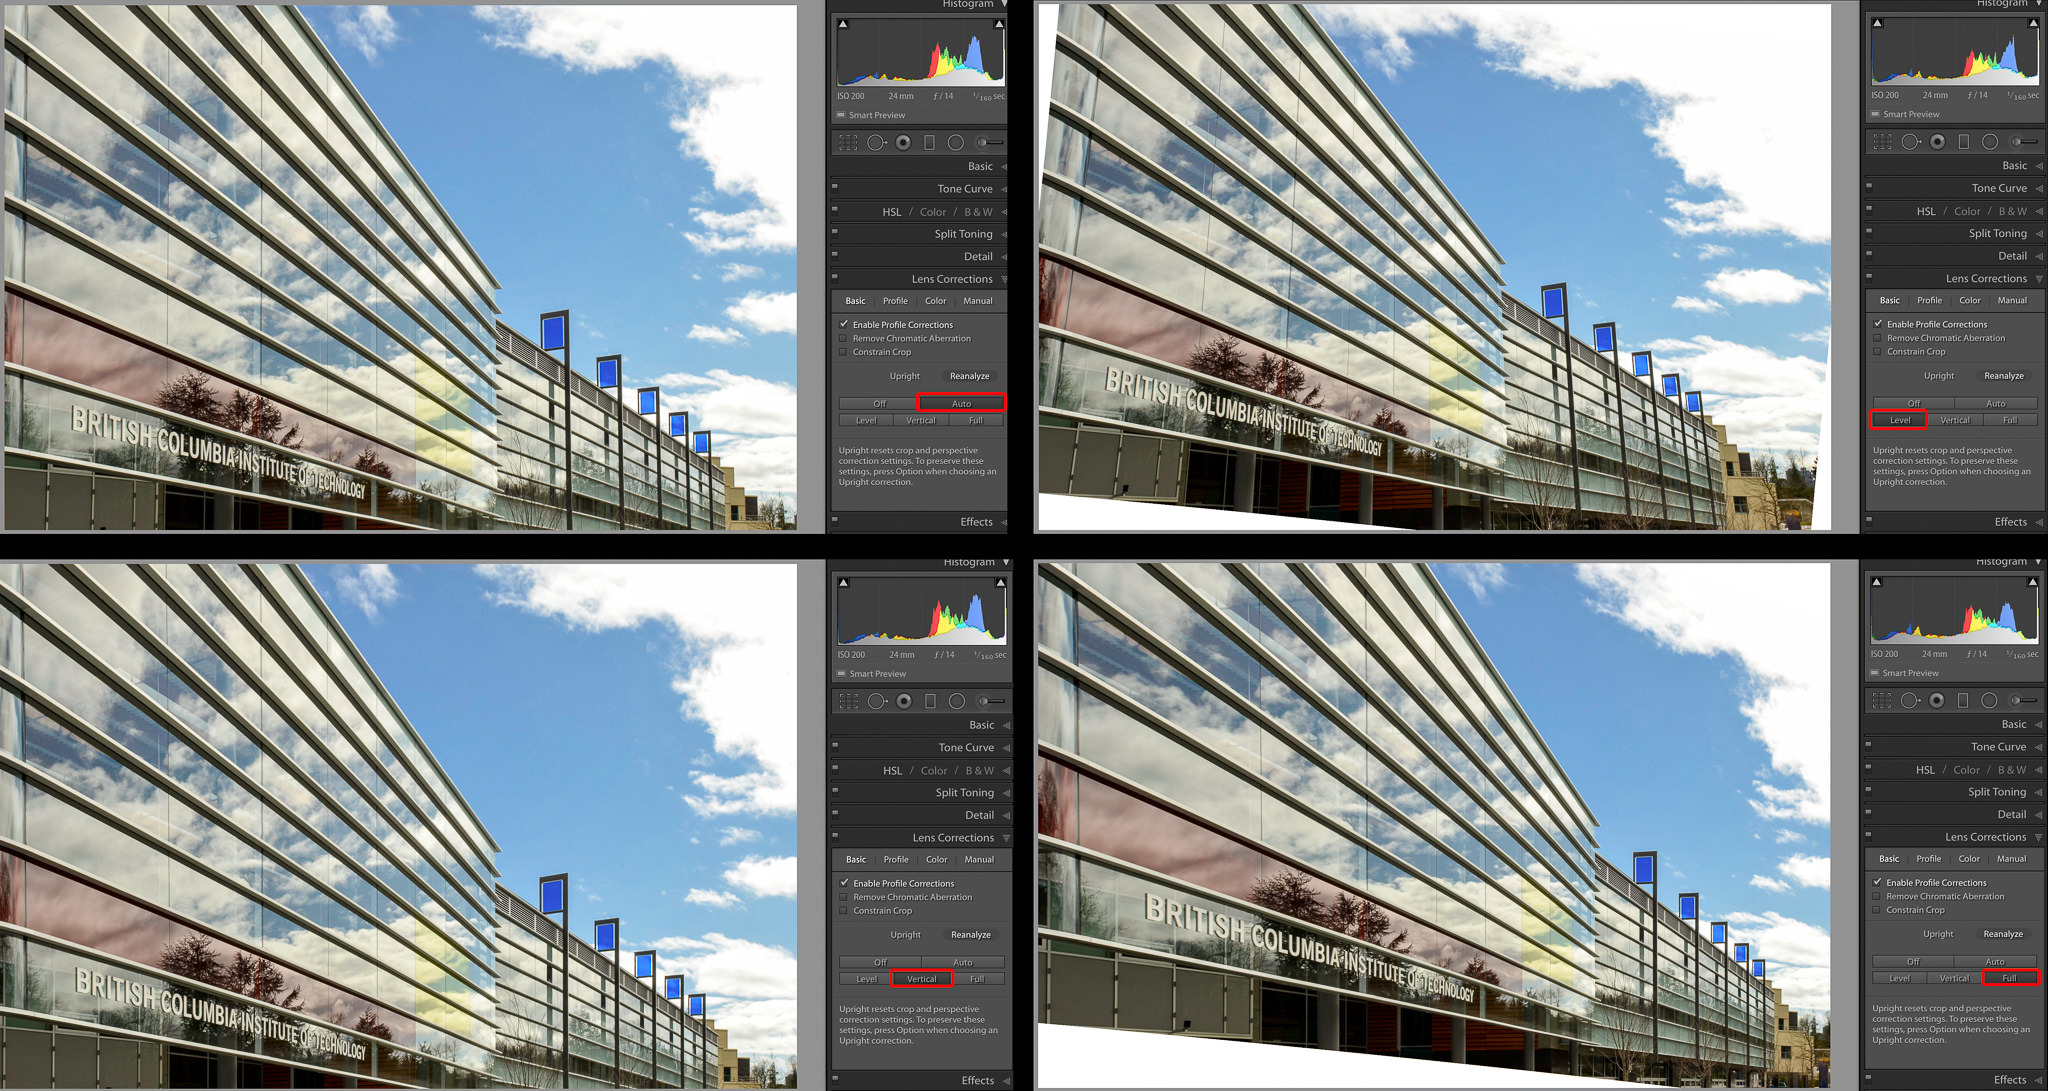
In this second shot Auto and Vertical both do a decent job, but I give the edge to Vertical mode. Full does a good job with the corrections, but requires such a huge crop, that it is not practical. The Level correction doesn’t straighten the flags and looses quite a bit of information in three of the corners.
Luckily for us, Lightroom is non-destructive. Experiment with each of the Upright modes until you find the one that works best. What works for one photo, may not be effective for another.
3) Manual Corrections in Lightroom
Sometimes, for reasons known only to Adobe, none of the Upright modes seem to accomplish anything! Even when you think the fix should be easy. In this case, try using the manual corrections. Actually, experimenting with these corrections, will give you a better understanding of what the auto corrections do. In this image, it didn’t matter which of the automatic corrections I tried, none of them made a significant difference to the obvious keystoning.

Lets try a manual perspective correction.
- In the Lens Corrections panel, select the Manual tab.
- You will find six sliders here, all of which can be adjusted independently.
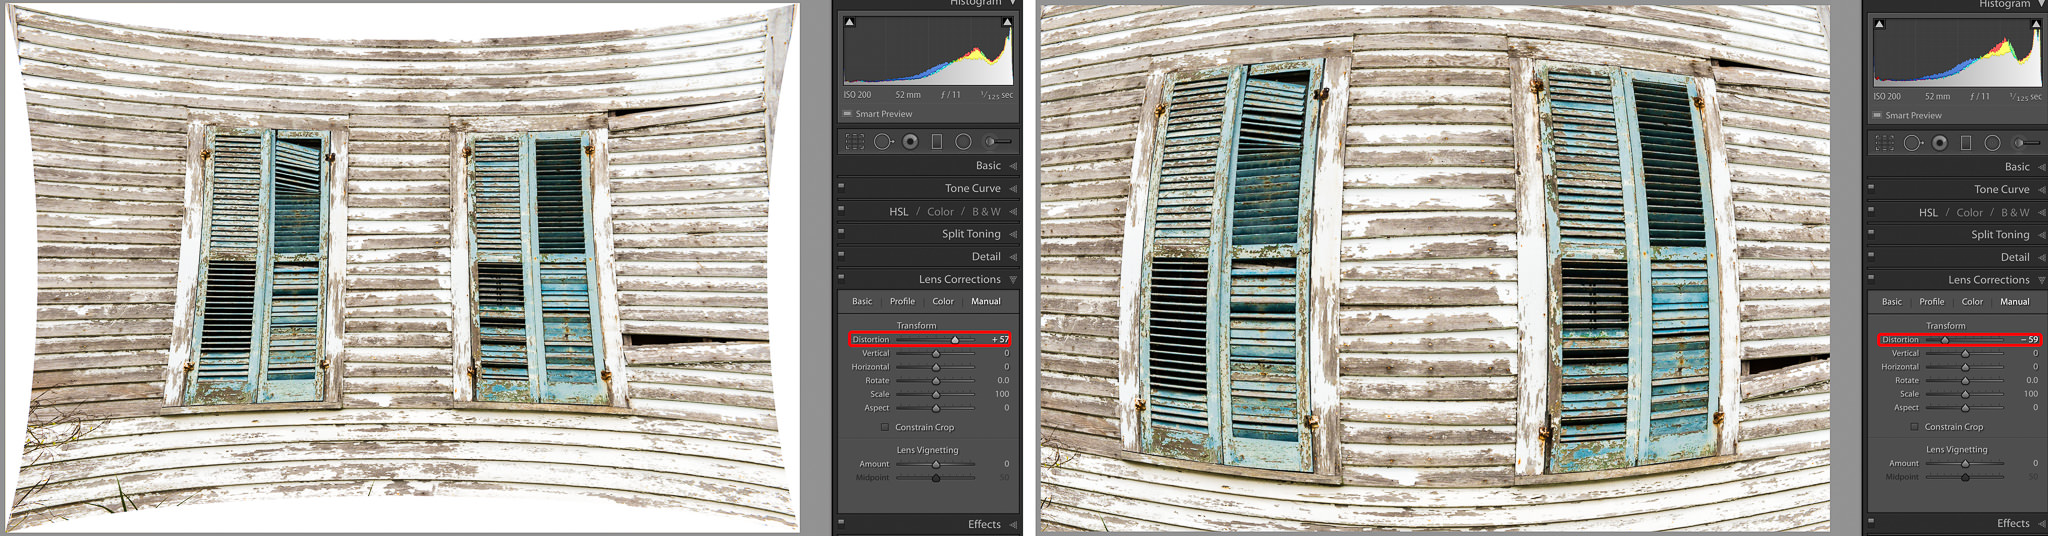
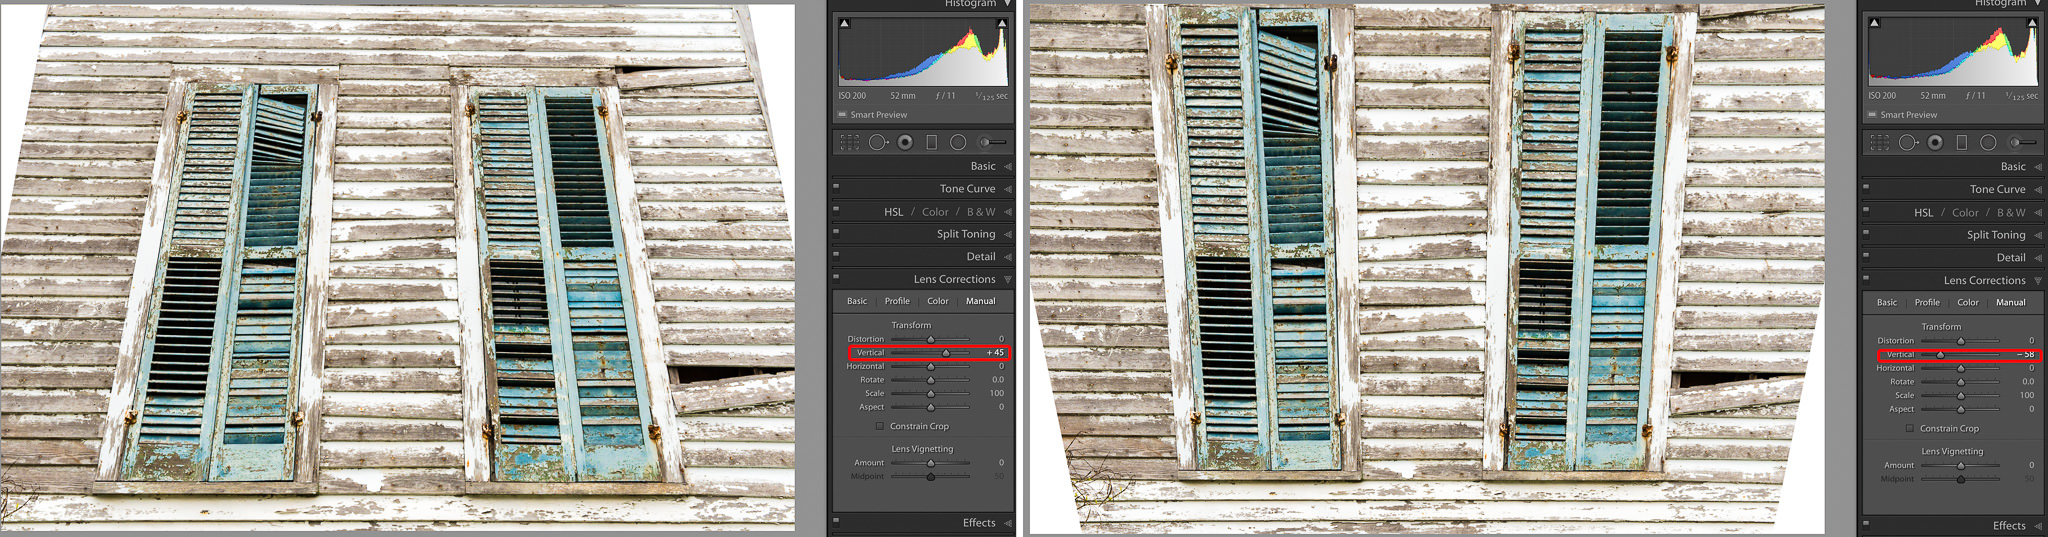
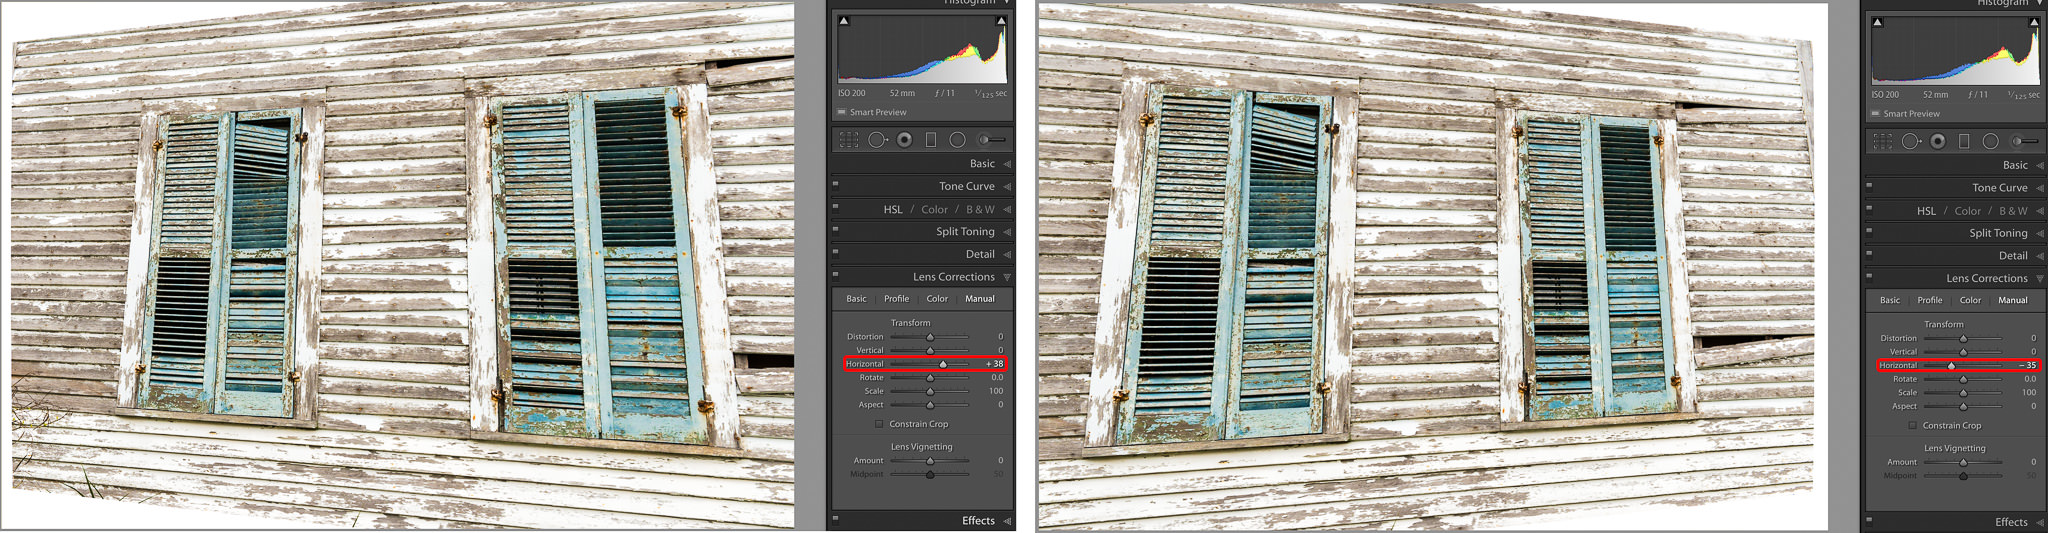
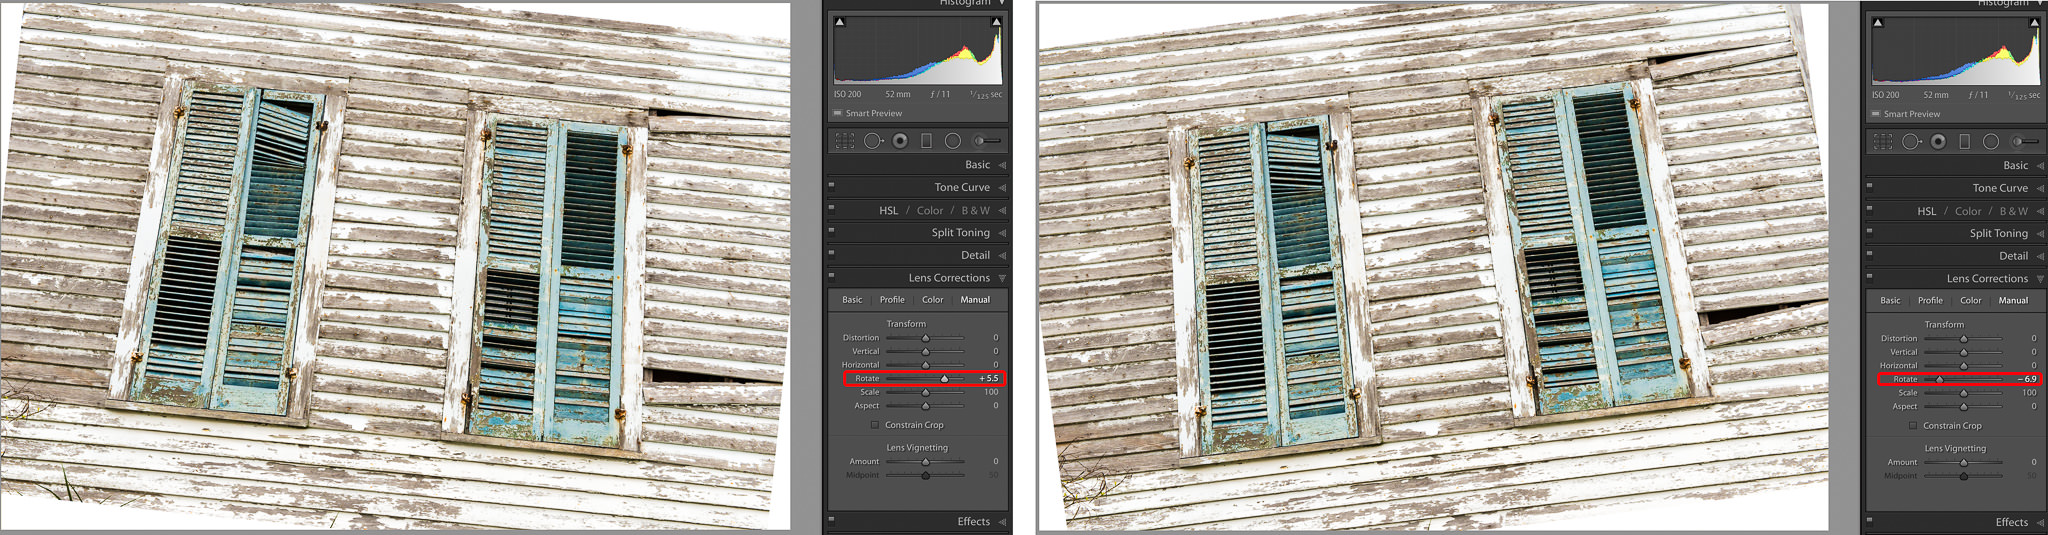
In the images below I have exaggerated the effects of the Manual transformations so you can see how their adjustments affect the photo.
Distortion: Corrects barrel and pincushion distortion. Think of it as inflating or deflating the image. Notice that moving the slider to the right results in areas with no information.
Vertical: Works to correct keystoning. Imagine a horizontal line drawn through the center of your picture. When you move the slider, the picture swings in and out around this imaginary line. As you drag this slider, notice what happens to the corners of the photo. Depending on which way it is moved; you will end up with white corners at the top, and bottom corners that have been pulled out (or the reverse).
Horizontal: This slider is very similar to the Vertical slider, except it swings the image around an imaginary vertical line. It is used to correct horizontal keystoning.
Rotate: This one is pretty self-explanatory. The image is rotated either clockwise or counter-clockwise when the slider is adjusted.
Scale: Enlarges or shrinks the image.

Aspect: We looked at this slider when we were looking at the Vertical Upright mode. When you use it, it will either squish or stretch, for lack of a technical term, the image.

With this window image, I ended up using a vertical correction, minor rotation and gave the picture a final crop.

If you don’t get the perspective correction you want using the automatic modes, try the manual corrections. They can be used on their own, or in addition to one of the automatic Upright modes. Remember, each photo will produce different results, so play with them all before you decide on your final correction
4) Free Transform Tool in Photoshop
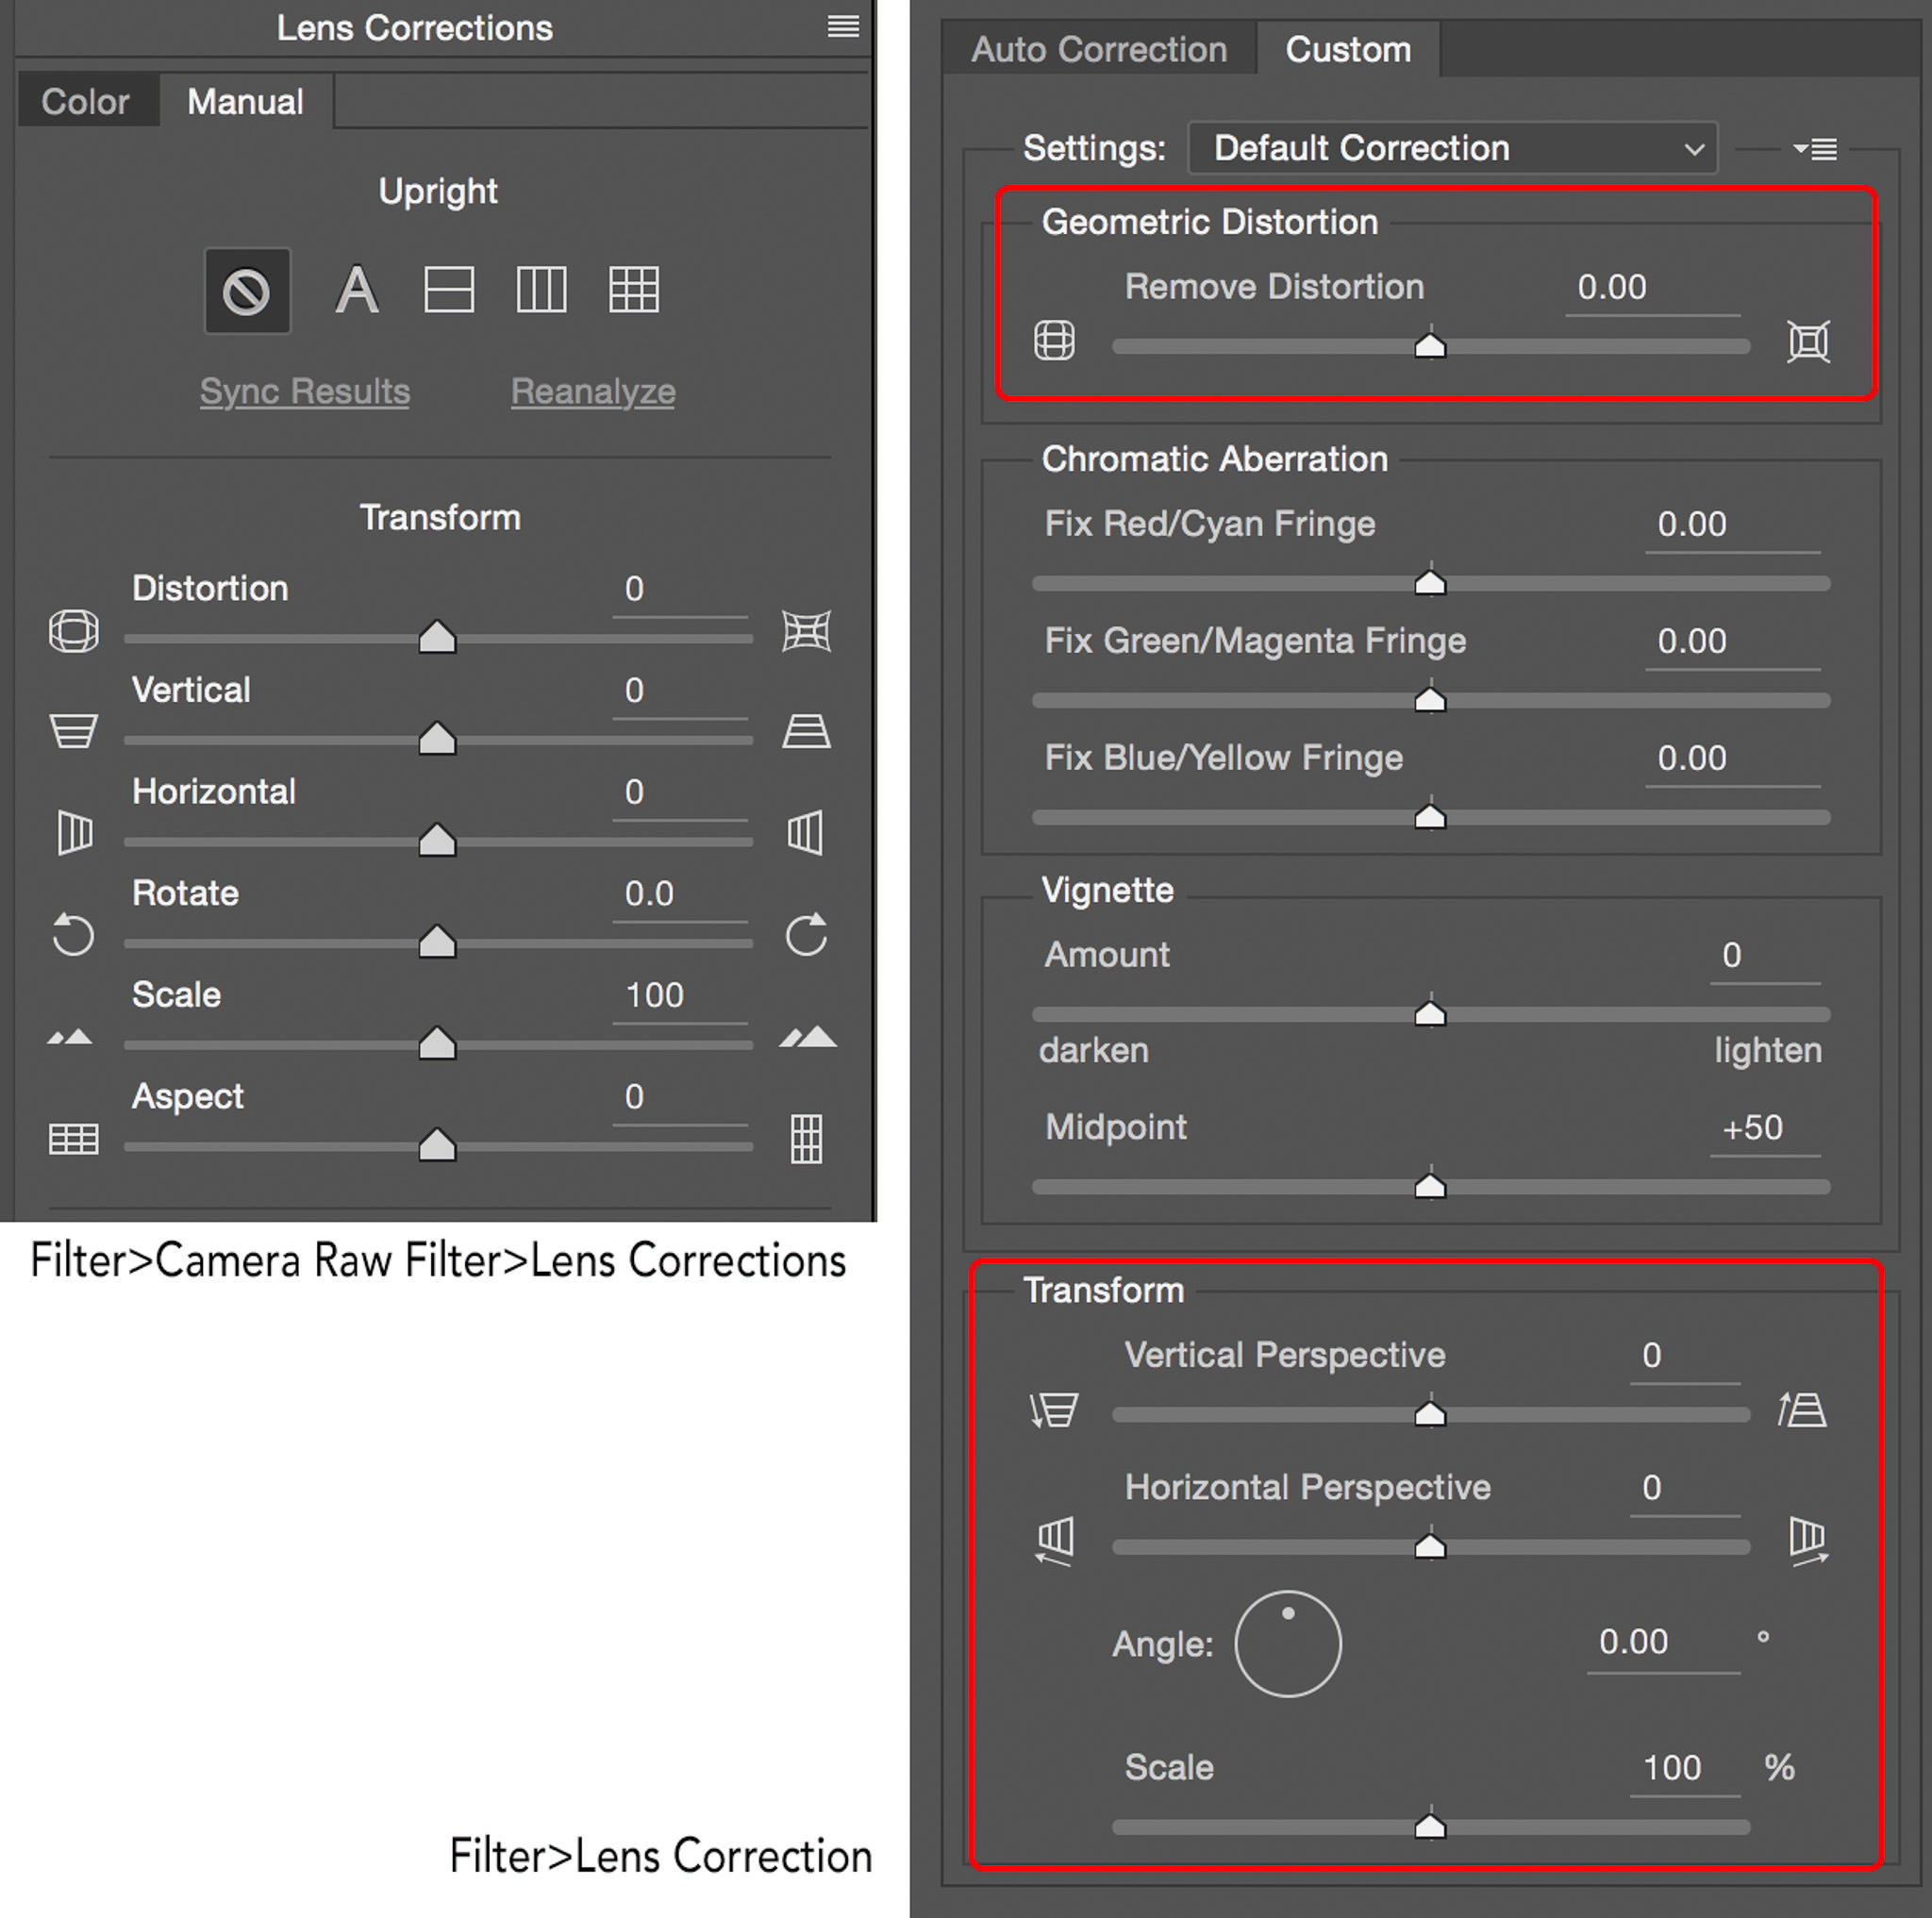
I do not want to spend much time talking about all the ways in Photoshop to fix perspective. However, I will mention two and briefly discuss a third. The easiest, and probably the best way is to use the Camera Raw filter. This will allow you to do the same types of edits as I discussed in Lightroom. The only difference is the interface.
Some photographers prefer the Lens Correction filter, which uses similar controls to Lightroom’s Manual Lens Correction Tab.
In my article “Four Simple Tips for Better Composition” several readers commented that if the Free Transform tool was used instead, I could minimize the areas with no picture information (those white triangles that the Automatic Upright Perspective Correction tools often create). This is true, however, there is always a price to pay!
The Free Transform tool can be found under Edit>Free Transform. I like to increase the size of my canvas before I use Free Transform, so I can see where all my pixels are moving. I’ll do a final crop at the end.
- While your image layer is active, Go to Edit>Free Transform. You will now see four handles at the corners of your image and four side handles.
- To push or pull the corners evenly, press Command+Option+Shift (Mac)/Ctrl+Alt+Shift (PC) and drag a corner handle.
- To move a handle individually, press Command (Mac)/Ctrl (PC) and drag any handle. A handle can be moved in any direction.
- For a complete description of all the corrections you can make, check out the Adobe Helpdesk.
Take a look at this image shot in Houston. There is some keystoning and a bit of a tilt to the building.
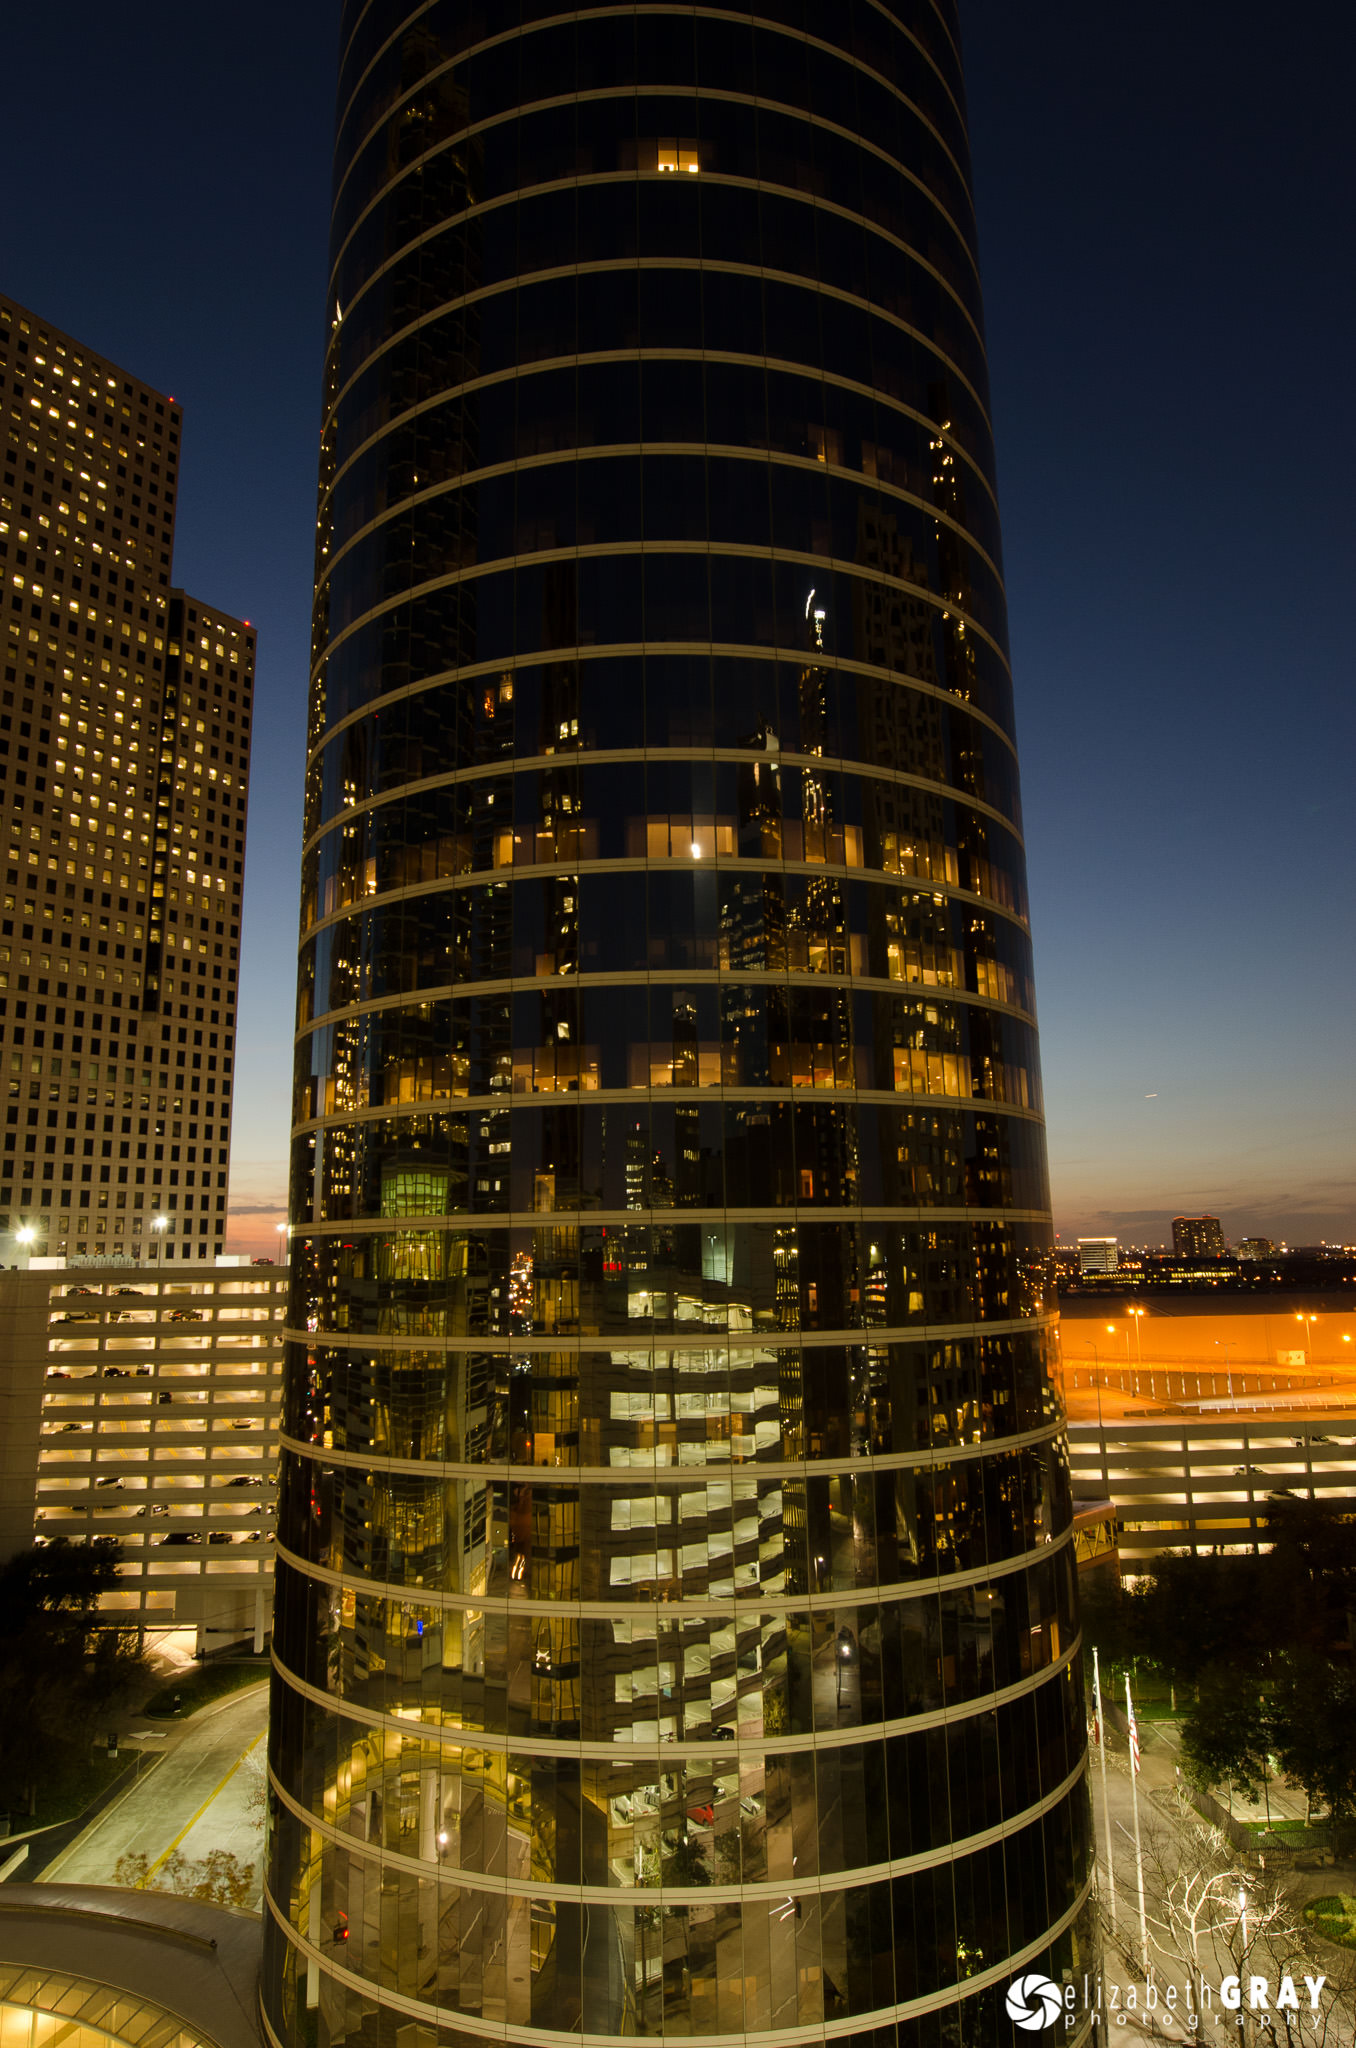
Below are several different correction options. I have outlined the location of the unaltered photo position in red. In the first shot, I pushed the bottom corners in evenly. Notice the white triangles with no image data. In the second option, I pulled the top corners out. No white triangles, but I have lost a lot of the sky. In the bottom left example I did a bit of both, top corners out and bottom corners in. Smaller white triangles and less sky lost. This is the recommended way to correct keystoning. It results in a more natural correction with less distortion. In the last example, the bottom corners are pushed in evenly. The top two corners are moved out and down different amounts. Again, some areas with no information and some sky lost.
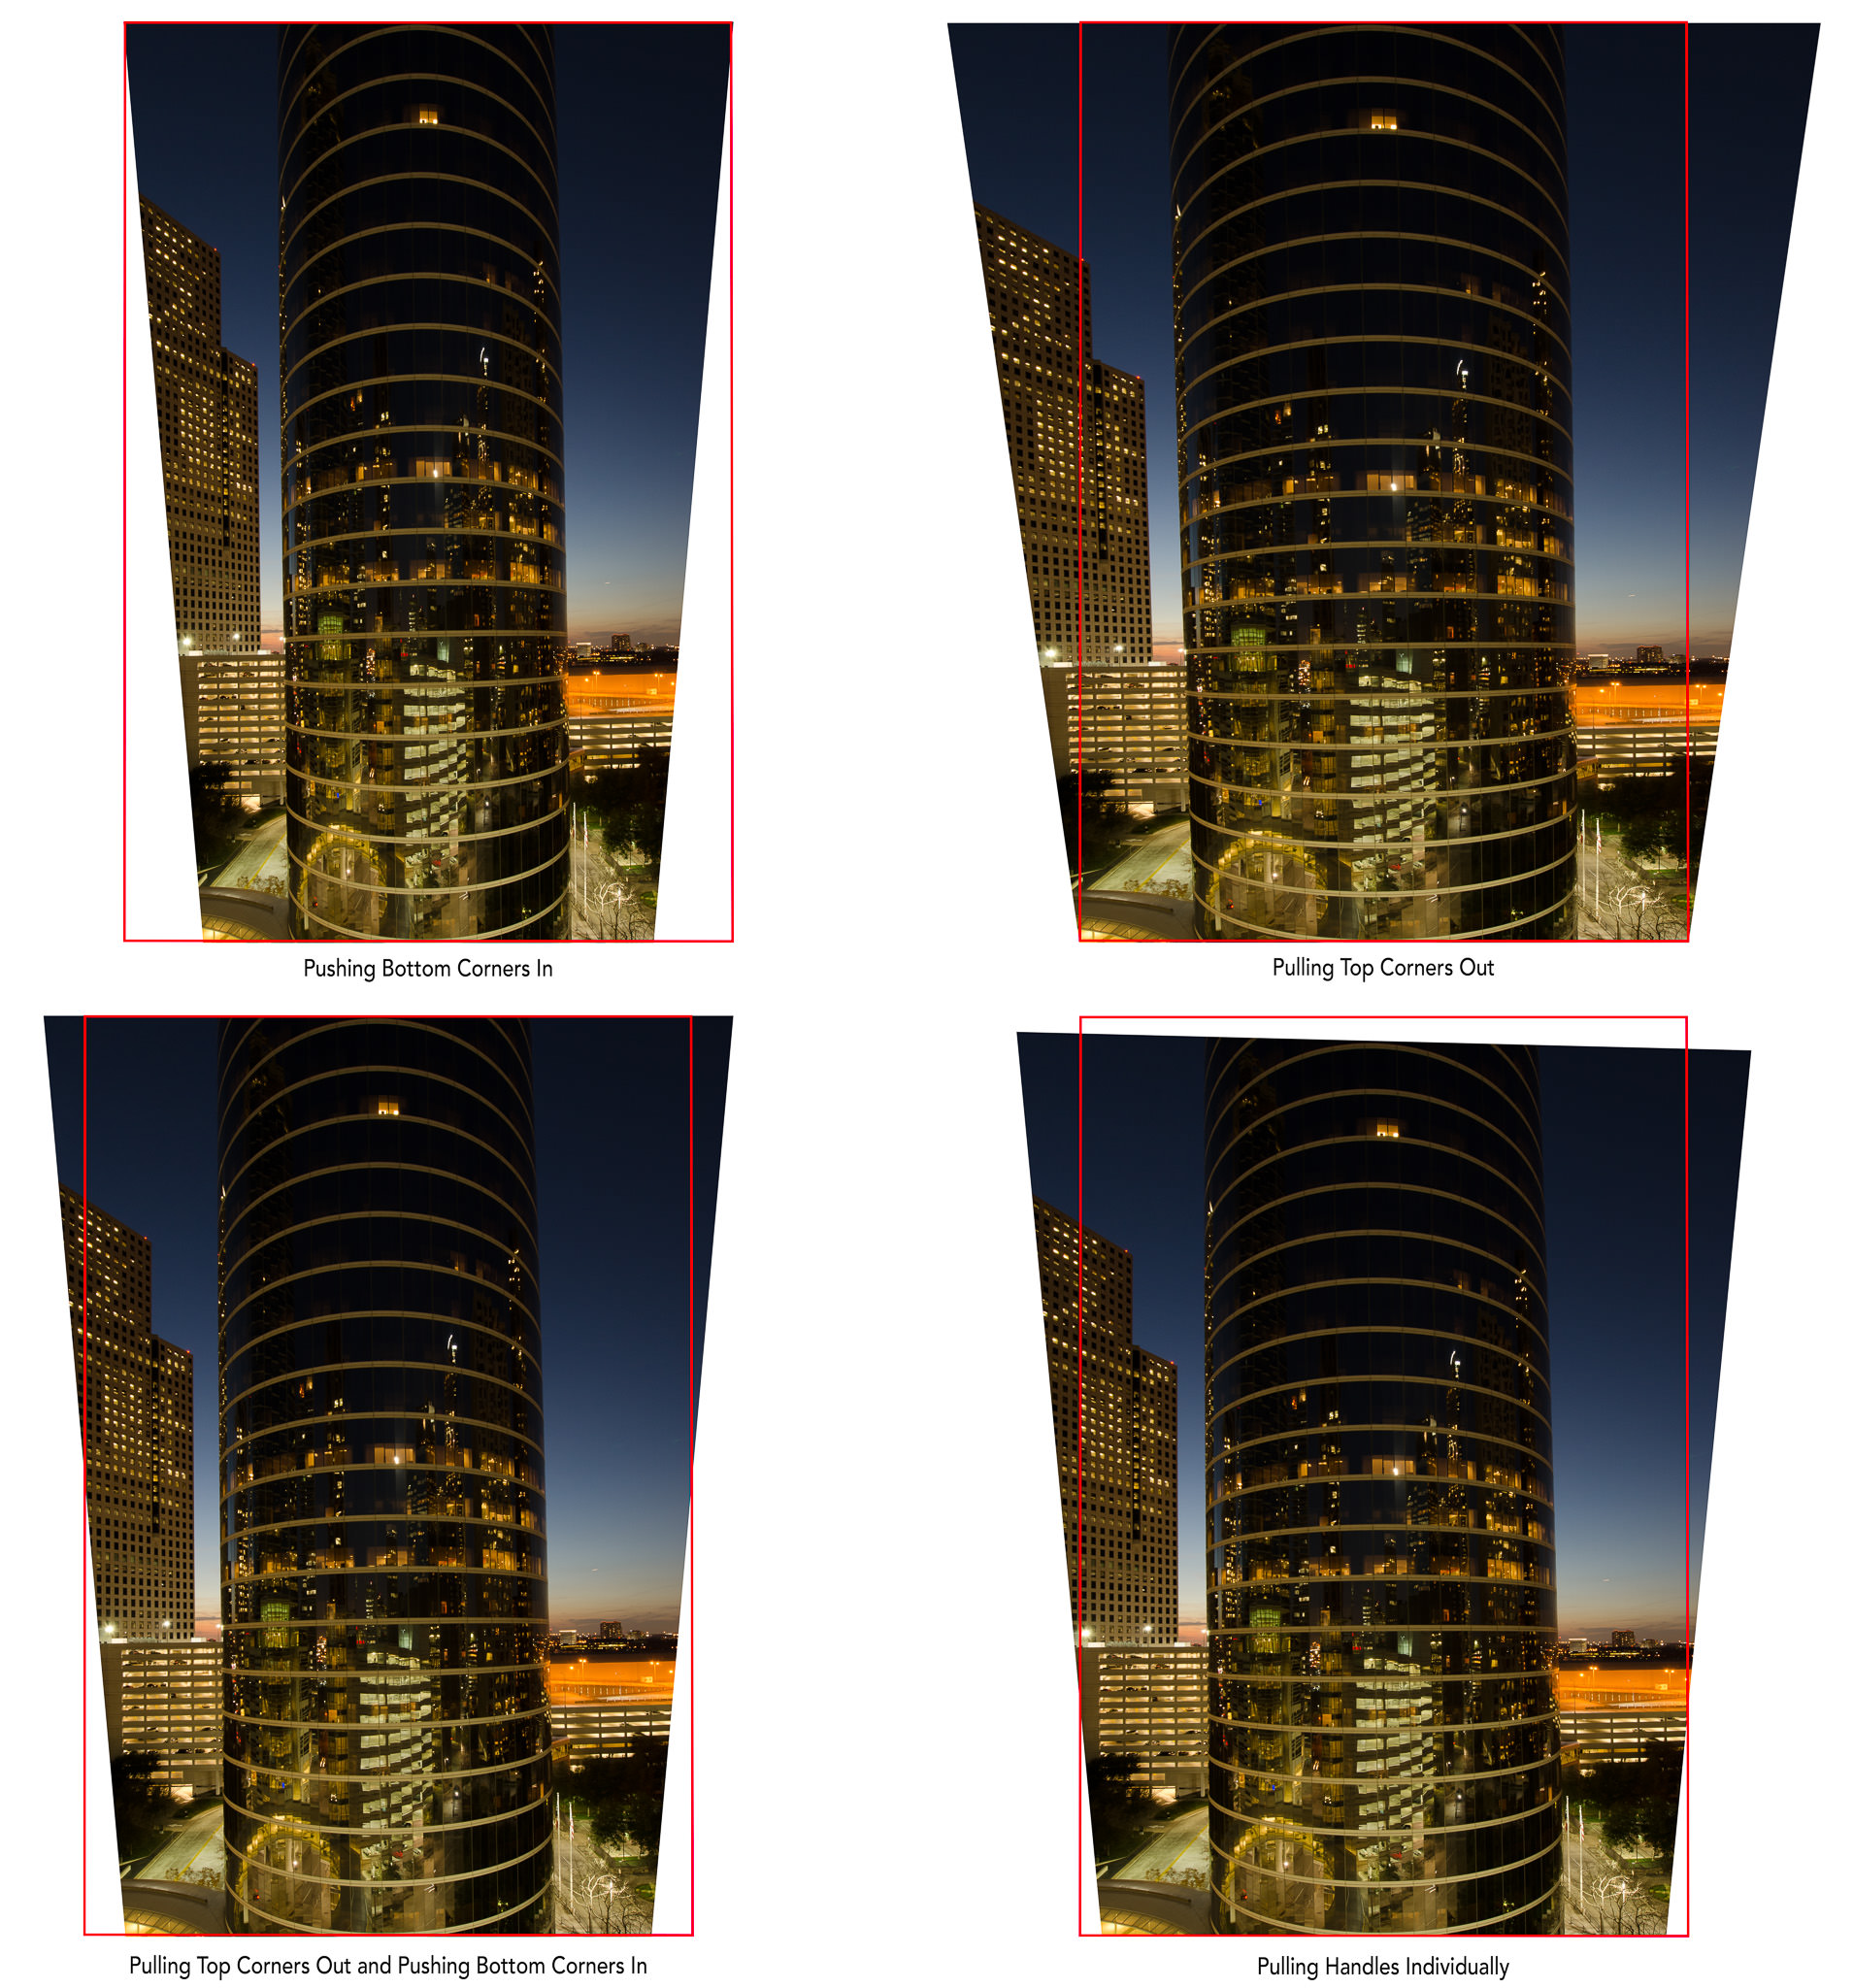
As you can see it is a trade off. All of these options will need a final crop, resulting in slightly different final versions. The key here is not to go too hog wild! When you transform a photo, you are moving the pixels around. The more manipulations you do, and the more drastic they are, the less sharp the final image will be. Before you commit the transformation, make all the adjustments you need. This is preferred to doing several transformations separately.
5) Conclusion
Both Lightroom and Photoshop have some very powerful perspective correction tools. In my photography, I find that I make use of Lightroom’s corrections most often. With those, I usually find the automatic corrections do the trick. If I have a photo where I want to be selective about which information I have to crop out (sky or foreground), and I don’t want Adobe to make that decision for me, I use the Free Transformation tool in Photoshop.
The best way to learn these tools is to experiment. If something doesn’t work in Lightroom, simply reset the tool. In Photoshop, make a copy of your background layer to work on. If you don’t like the results, delete the copied layer and start again. Before long you will learn what techniques work best for you and your style of photography. With these editing skills, careful image capture (remember to leave some crop room), and a bit of creativity, you will see great results.
“I am a bit confused by the ‘8 corners’ you mentioned, but I am sure it is simple once tried.”
I was writing hastily. For one, I should have written ’12 corners’. And it’s “transform warp”. From the menu it’s Edit->Transform->Warp. It divides the image into 3 squares by 3 squares, bounded by lines. These lines will form 16 intersections, and each intersection is now a drag point. And you can go beyond merely dragging them around. You can also use them to curve the adjacent lines. Easy to do, easy to mess up.
This is very useful when you shoot a panorama of a long horizontal object, like a road. Because of the angle you are shooting it will appear to bulge towards you. You can use the transform warp to remove the bulge.
Hi Yandoodan, I got tangled up in a project at home this morning, so haven’t had a chance to try the photoshop method. Thanks for elaboration, it will make it easier this evening when I should be able to get a good look at it. I would rather wait until I know I have an hour to learn it, than to try it quickly and forget how to use it by next week!
Regards,
Ross
A shortcoming of optical correction is that you lose image detail, sometimes a lot. I t depends on what type of correction you’re doing, and how much. If your final image will be downsized, than this isn’t an issue, as you’ll be sacrificing more detail in your image reduction. If you plan to print large however, carefully review you image and decide if you really want to apply X correction.
Hi Spy Black, you make a very good point. For those who read your post and worry about image quality, I have a few thoughts which may reassure those people, if I may…
I don’t use lightroom, I use DXO Optics Pro, and that has a rectangle tool which overlays your image, so when I need to fix vertical (and horizontal) perspective in a shot, the method is to fix the four corners appropriately. Most buildings have both vertical and horizontal lines in there, so it is not difficult to locate and use the four corner method.
I typically do this after using the ‘horizon’ tool in the same software, in order to get any issues on horizontal-and-parallel-to-the-ground sorted out. Thinking about that, I don’t have to use both tools that often, because it is easier to get the lower part of the building straight with the ground, in camera, at time of shooting.
As you rightly say, there will be a loss of image detail, but for those who are using 16mp or higher cameras, this is balanced against the end print size. Losing 20% off the edges of an image from a 24mp image equates to 4.8mp lost, leaving you with ‘only’ 20mp.
Unless you are going beyond 20×16″ in your print size, this is a non issue, since 20mp will easily cover that print size with no perceptual image quality loss. Beyond 20×16″ you might need to resort to careful image resizing within Photoshop, which does a good job, if used in moderation, to get your image up to 24mp again. The image resizing often works well, and there have been times I have pixel peeped results ‘before and after’ and found it well nigh impossible to distinguish the resized image from the original, after perspective correction has been applied.
Of course, stating the obvious, if you ‘know’ your intended end game is a poster sized print, at the time of shooting, then the shooting process itself needs to be done more meticulously in order to side-step some of the perspective correction issues that will present. With architecture, more than anything else, it will never be possible to eliminate all the PC issues, unless you have a superwide lens and can hover at one half of the height of the building you are shooting, keeping the camera focal plane parallel to the subject as you shoot – which is not something that you are likely to be able to do!
I think, to summarise then, I would warn people intending to make large print, to be very careful when shooting, do it off a tripod for more control. For everyone else, don’t be afraid of PC adjustments losing you image quality, because even with a 20% loss of pixels in the process, you’ll have 19mp left, which will produce a perfect print up to 20×16.
If you shoot a lot of street or architecture in particular, this is a good reason to run a high resolution camera, so you have the ‘elbow room’ to take the hit of lost pixels in post processing.
What AutofocusRoss says, plus:
To be clear, you are applying this kind of image editing because is image is screwed up. You are losing pixel data (“image detail”) when you do these transformations. But you are not spoiling the image. Instead, you are converting an image that’s so spoiled that you can’t use it into an image you can use at lower resolutions.
Shooting panoramas instead of using a single shot with a wider lens will give you the abundant pixels you need to perform these transformations and still have the resolution you need.
BTW, for those who want to used the four corner transformation AutofocusRoss describes without buying something new, it’s in Photoshop. Hit ctl-A, then ctl-T, then hold the control key while dragging a corner. You can add eight corners in the middle (a 3×3 grid) by hitting the Puppet Warp icon in the toolbar on the right.
Yandoodan, yes, I hadn’t thought of panorama shots, but I do find that the wider angle lens gives slightly less detail in an image due to the inclusion of more of the subject at a given distance, so I shoot as wide as I absolutely have to, without including extraneous detail around the subject, which is sometimes possible, other times the detail is actually needed.
For anyone pondering exactly why you lose data (pixels) in the perspective correction process, what is happening to the original image includes one or more of the following actions.
Rotation of the image to help straighten verticals and horizontals – this causes the corners to spin off the true image corner, leaving a slim black triangle along all four sides of the image, usually, which then has to be cropped out automatically, or sometimes manually, dependent upon what software and settings you are using.
stretching of the image – to balance a wide ground floor of a building against a narrow top floor, despite both floors in reality being the same width. This pushes pixels off the side edges of the original due to the pulling of one or both sides to outside the original image boundary, in order to get the perspective straightened.
Twisting of the image – This happens when a building is shot from one side, to the left of right hand edge of it’s base rather than central and frontally. In this case the stretching of the image is not uniform but biased towards the edge furthest from the camera, throwing the foreground of the building to a point below the original shot, and this also throws the side of the image out of the original image area, in order to ‘turn’ the building back to a parallel perspective.
In all three cases, this means the original image has to be cropped out as the pixels you wish to keep are moved closer to the edge of the frame. This is why we think of it as lost data, or lost pixels, the impact of this can be lessened, as I said before, by using a high resolution camera and giving the building a little breathing space around the frame. Until you have done this, it is hard to put into words, but a bit of experience and you’ll quickly see why images are cropped in perspective correction techniques like this.
Yandoodan, I thank you for the info on using Photoshop to do this. I must admit I have been using Optics Pro (as well as Photoshop 6) for two years and have become accustomed to how easy it is to do this PC adjustment work. I have suspected for a long time that it must be possible in Photoshop, but had not pursued it since I already possessed the other software anyway.
I am a bit confused by the ‘8 corners’ you mentioned, but I am sure it is simple once tried.
It’s a little late here in the UK as I type, so I’ll dig out a suitable image in the morning and try the photoshop technique, it may be more flexible, I’ll be interested to try that out.
Regards
Ross
Thank you for this!! Great article!
Thank you Joepet! Glad you enjoyed it.
Hi Elizabeth
Just as an aside, when reading your article, your first photo example struck me as being familiar.
I looked up where you come from – Vancouver, Canada – and then the penny dropped.
I have the same photo, but taken from higher up!
5 years ago I did a photo trip to Alaska and got a return flight deal which entailed a 2 day stop over in Vancouver.
I stayed in the hotel across the road from your subject and looking out of the window in the morning, was struck by the wonderful light and reflections.
It is perhaps a bit extreme to book a hotel room to get an image, but it does illustrate the point that physically raising the camera eliminates the need for perspective corrections in LR or PS!
Incidentally, we were greatly impressed with the beauty of the city and spent a very happy day exploring and visiting the Museum of Anthropology and the Bill Reid Gallery to see the wonderful carvings and artefacts of the native West Coast indigenous peoples.
Nice clear, well balanced article.
Thank you for you comments Betty! And I’m so glad you enjoyed your stop in Vancouver. The hotel you stayed in is also a really neat building to photograph. Several of the floors have sayings that wrap around the entire building. Check out my website’s banner photographybyelizabethgray.com/) to see a photo of it. I am envious that you were able to get a photo from a higher elevation, it makes all the difference in the world!
Elizabeth, thank you so much for such a wonderfully detailed but totally clear explanation of how to deal with distortion in Lightroom. Are there any other LR or PS subjects on which you have written articles? Count me as a fan!!.
I’m so glad you liked the article Steve! Thanks so much for your comment. I started writing for Photography Life around Christmas this past year. This is my first Lightroom/Photoshop article, but I have some more planned, so stay tuned. This is my fifth article so far. The others include a couple on planning for a photo tour, one on how to take really long exposures, and the last one “Four Tips for Better Composition”. Again, thanks for the kind words.
This is an excellent article. I thought I knew LR pretty well, but I didn’t realize the Lens Distortion panel did all this. I’ve been fixing my horizontal horizon issues with the Angle tool in Crop. Now I’m aware of many more options in LR…thank you!
Thanks very much Eric! It is a huge program and there is always some new feature to discover. I have been using LR since version 2, and still feel I have lots more to learn! Glad you liked the article.
An excellent article. Here are a few additional points:
1. With these techniques Lightroom and Photoshop don’t just adjust the way the pixels are displayed; they eliminate pixels that the camera created and replace them with different — often radically different — values. This is unavoidable, a feature not a bug.
2. That said, Lightroom does not actually destroy any pixels. It stores an algorithm for replacing the pixels, and you can alter or remove the algorithm. Photoshop, on the other hand, destroys the original, as-captured, pixels. The various ways of reversing this in Photoshop either disappear when the image is closed or bloat the file size. You point this out, but it’s worth repeating.
3. You can eliminate cropping by using Photoshop’s Free Transform. Hold the control key down while dragging the corner. This will stretch that corner over the blank spot, independent of the other corners. Just like cropping this destroys pixels, but unlike cropping it replaces them with values calculated to be correct. You’d think this would mess up the straight lines, but more often than not it improves them. Usually it works great, but it can be unpredictable.
4. Some of the most difficult problems can be fixed with Free Transform/Puppet Warp. Puppet warp places a two by three grid over the image and allows you to drag any of the nine corners independently. For example, let’s say you create a panorama of a horizontal object that’s near your camera and runs edge to edge. The knitted image will bulge towards the camera, exactly as if you had taken it with a fisheye lens. You can remove this apparent distortion using puppet warp, dragging the corners to move the bulging lines into horizontal.
Thanks for you comments Yandoodan!
Hi Elizabeth,
If I’m cropping and straightening, I generally use the Auto button in the cropping tool before I do the crop if I have a well defined horizon. I believe it is basically the same operation as the Lens Correction Tool and you do both in the same tool without having to go from one tool to the other.
Good point John! Yes, if you have a well defined horizon this will work well, and will save you from using two tools. Thanks for bringing that up. Sometimes when you are trying to cover everything, you forget to mention the most basic and obvious!
Elizabeth, a very detailed article, but I have to say, what a lot of work it seems to use Lightroom to achieve perspective corrections.
Have you tried the DXO Optics Pro latest version, which incorporates two perspective adjusting tools in the basic interface which work amazingly well?
One of them is a pair of vertical lines which you attach to two vertical lines, one on each side of the image. This forces these lines, and the rest of the content in the image, to readjust to a vertical alignment, which also lines up with the edge of the image. Great, works well.
For images that have both vertical and horizontal lines, both of which need to be corrected to the ‘edge of the image’ there is a rhombus or four sided version of the preceding tool – and it has one X point on each corner. Again, all you need to do is place each of the ‘X’ points onto a relevant corner, top left, top right, lower left, and lower right, and apply the tool. This forces both vertical AND horizontal lines to conform to the image edges. Naturally this will incur a level of cropping as a part of the correction process, just as you had happen in Lightroom.
For me, these tools alone are almost worth the cost of the software, and it isn’t very expensive to be fair. I use the Prime Noise Reduction to get rid of unwanted noise in the image when the gradation is too great for the camera sensor, and also the gradation tools to bring up the shadows and drop down the highlights a tad, as a part of the same process. To be honest, these are the tools I use much of the time, and rarely anything else in the software before I export a high quality tiff for further work in Photoshop, or if the image is ok as it is, I export it directly to a Jpeg.
Seems a heck of a lot easier than all the hard work you do in Lightroom, especially if you have multiple shots needing such adjustment.
Take a look / and a trial download, I think it works unrestricted for 30 days, including exporting processed images, I love it and would never be without it as long as I shoot RAW.
Thanks for commenting Ross! I did go into a lot of detail! However, it really isn’t all that cumbersome using Lightroom, and you can synchronize your corrections over multiple images. The bulk of my workflow is Lightroom to Photoshop, so I can’t comment on any other programs. I think most post processing programs offer some sort of perspective correction tools.
I will have to take a look at DXO’s perspective correction tools, it sounds like it has a pretty slick interface. Thanks for letting our readers know about it and for taking the time to comment.
Hi Elizabeth,
The DXO software is called Viewpoint 2 and it also installs as a plug-in for Lightroom and Photoshop:
www.dxo.com/us/ph…-viewpoint
It’s very good, fast and effective, but you will still need to leave some space around the edges to achieve the final cropped result.
Hi Peter, I am aware of the separate ‘Viewpoint’ software from DXO, but I was NOT talking about that in my earlier message.
I was actually talking about DXO’s Optics Pro 10 Elite software. This, like ACR, has a range of tools for Raw processing. Among them are two tools situated along the top right edge of the workspace, above the image. One of them has two vertical lines with a small circle on each end of both lines, while the other tool is a rhombus, or four sided mis-shaped square, with a small circle at each corner.
That on the left is called ‘Force Parallel’ while that on the right is called ‘Rectangle’.
The main reason for me buying the software is in fact the ‘Prime Noise Removal’ which does a truly amazing job. There are a lot of other very useful tools in there too.
I know the separate software ‘viewpoint’ is designed for perspective corrections too, but I never saw any reason to get it when the Optics Pro 10 (and the previous version 9) had the ‘Force Parallel’ and ‘Rectangle’ tools right there on the toolbar. Can you tell me anything more specific about Viewpoint, and what it offers beyond these common perspective issues already covered in Optics Pro? I would be interested, as I have several times encountered it but never tried it.
To give you a real world example of what Optics Pro does, I had a shot of a room we refurbished recently. The room was narrow and long, approx. 6 feet by 24 feet, and the shot was taken from the middle of one of the short walls, from a doorway, looking into the room. There were piers, fitted wall cuboards, and a ceiling beam, plus a chessboard design floor tile in black and white squares, so the lines were very distinct, and the only way to get the room fully into the shot was using an ultra wide lens.
Having captured the shot, despite my best efforts, it was off level and the vertical lines tapering slightly. I used the Optics Pro Rectangle tool on this, and used a cupboard corner edge, on the left side of the frame, and the floor, to the lower left corner to fix the lower left tool mark. I used the same cupboard edge but with the ceiling beam above it, to locate the top left tool mark. The right hand side was fixed by placing the tool mark on a wall pier, coming out of a reveal, the top right edge and the ceiling beam intersect, and the lower right was fixed using the floor tile line, and keeping the vertical line again, fixed onto that brick pier. Once all four marks were located properly, I clicked apply, and the image zoomed out slightly due to the required cropping, but all sides of the room were now perfectly square with the image edges on screen, in seconds! lovely!
It is not often I shoot in situations that even need this kind of correction but outdoors, with buildings in the scene, or trees, or lighting posts etc, I do find I use the ‘Force Parallel’ tool quite a lot, to rid myself of that common effect of a building seeming to fall away as you look at the highest part of it in a shot.
The other tool on that toolbar with mentioning is the Horizon tool. This is simple. Where you have an horizon, or a perceived horizon, in your image, you draw a single line with this tool, one to the left, one to the right, and hit apply. There is a mini-crop to correct slight loss at the edge as the image is rotated slightly to true up the horizon, and that is it, job done.
Because Optics Pro is set up to know your camera and your lens combination, and provides a module for each combination you may have, barrel and pincushion distortion is already dealt with when you load the image, automatically, so when you then go on to use the horizon (or force parallel, or rectangle) tool, you know that because the distortion is already dealt with, any further tool used for perspective is not going to reveal strange curves in the finished image.
I think I have done enough for Optics Pro to offer me a job here :-) but seriously, I was struggling to get things done in ACR and photoshop which are a total breeze in Optics Pro, I even had to buy a new computer, and upgrade Optics Pro to version 10 so I could keep using it with my D5500 (not supported in version 9, sadly).
Anyone struggling to deal with lens distortion, and truing up images with architecture in them, or trees or posts outdoors etc, should really get the free trial an make a special effort to try these particular tools, and while you are at it, make sure to try the PRIME noise removal tool which works magic on images I took with D5100 – D5200 and D5500 over past few years!
Thanks for the link and comment Peter!
Hi Elizabeth,
“Squish or stretch” work fine for me, but this word “keystone”, hell no!
The term Keystone is used for projected images.
The words we should be using are “converging” or “diverging” verticals or horizontals. Yes?
Thanks.
Thanks for the comment Andrew, and you are correct! Keystoning is a term used when you are projecting images. However, it is also used in photography. In photography it refers to the distortion that occurs when you tip your camera upwards to take a photo of a tall building. The building will look like it is leaning back. It is very similar to what happens when you project an image on the wall and the projector is not square to the wall. And it does result in converging verticals. The best way to avoid keystoning is to keep the back of the camera parallel to the building surface if at all possible.
Thanks for reading and taking the time to comment.
A minor point. The way the building seems to lean back and converge towards the sky is not really distortion. If you stand at the same place and tilt your head up it will look exactly the same. Instead, this is apparent distortion. It’s the way it actually looks in real life; the “distortion” comes from you expecting it to look different.
When setting up your image and altering it in post-processing, it is sometimes useful to remember that you are trying to alter reality into something artificial.
Thanks for your comment Yandoodan! Good point, and that’s why I don’t like to go too hog wild with the corrections. The Full mode, to me, makes corrections that are too harsh. I still want to see some of that perspective that you speak about.