In 2016, Nikon first introduced SnapBridge, an app designed to create a “seamless connection between a camera and a smart device.” I first used this app a year later on a trip to Australia, where I intended to use it primarily as a remote shutter release for my Nikon D500. In that respect, the app didn’t work very well for me at the time, so I quickly returned to the old-fashioned hardware solution.
A lot of water has passed under the bridge since then, however, and SnapBridge has undergone a number of improvements. Recently I gave it a second chance, and I’m glad I did. The app has found a place on my smartphone, and I’ve already used it to take some photos and videos that would have been difficult to capture otherwise. This prompted me to write an article for you today on how to use Nikon SnapBridge effectively.

Table of Contents
What Does SnapBridge Do?
First, let me summarize what SnapBridge could be useful for. There are several reasons why a photographer may use it.
For most users, the app will serve as an easy way to get photos from their camera to their smart device. From there, you can share those photos in a million different ways.
SnapBridge can also be used as image storage – nothing fancy, but up to 20 GB of photos can be backed up there (via Nikon’s Image Space) as 2 megapixel JPEGs.
You can use the app for updating the firmware of your camera, too, which can be useful if you are away from your computer when a useful firmware update is released.
Finally, SnapBridge can be used as a smart remote shutter release for your camera.

SnapBridge Installation and Compatibility
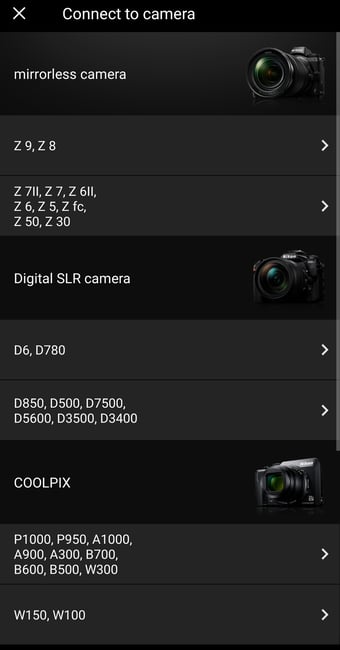
Before you make use of any of these features, first you need to install SnapBridge on your device. It’s compatible with pretty much any smartphone or tablet running on Android and Apple operating systems (iOS and iPadOS). Most, but not all, Nikon cameras are compatible with SnapBridge. You can see the full list here of camera models supported by the app.
As the cameras vary, so does the range of features available via SnapBridge. An important factor is whether the camera allows WiFi connectivity. If it doesn’t, you won’t be able to control the camera with a live view on the smartphone screen, for example.
The app can be downloaded to your mobile device from either the AppStore or Google Play. During the installation process, you will need to confirm a few things for the app to work properly. In particular, you will need to confirm access to all photos on your device, as well as Bluetooth. During installation, you will then confirm the licensing terms, and you can finally start pairing your camera.

How to Pair Your Camera
Interestingly, the process of pairing your camera with SnapBridge varies slightly depending on the camera you are using. Below, I’ll describe the pairing process for the Nikon Z9 (as a mirrorless representative) and the Nikon D500 (as a DSLR representative).
Nikon Z9
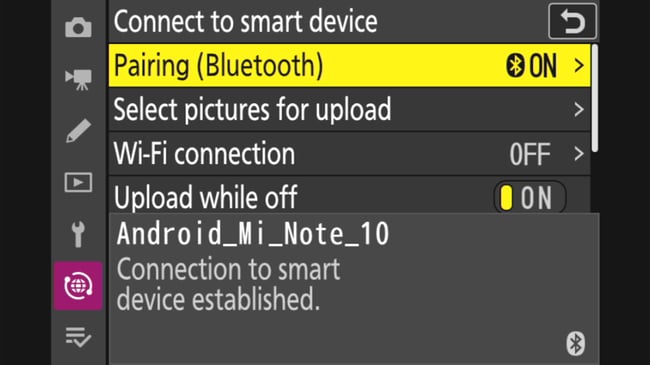
- Before pairing, you must turn off Airplane mode on your camera in the Network menu to establish a Bluetooth connection with your smartphone.
- Stay in the Network menu and scroll down to Connect to smart device. On your camera, click Pairing (Bluetooth), and then click Start pairing. Once pairing has started, a new device will appear on both the camera and phone screens, and you will be able to see your camera’s model and serial number (in my case, Z_9_6007790).

- Confirm the paired camera on your smartphone. A unique code will appear on both devices at the same time. On your phone, press Pair. On your camera, press OK to confirm that the code on your phone and camera match. This completes the pairing process.

Nikon D500
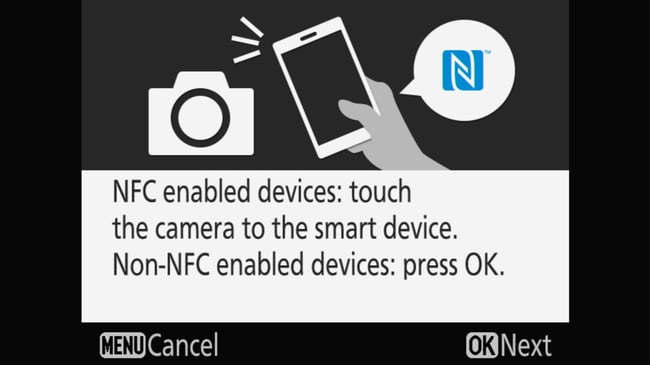
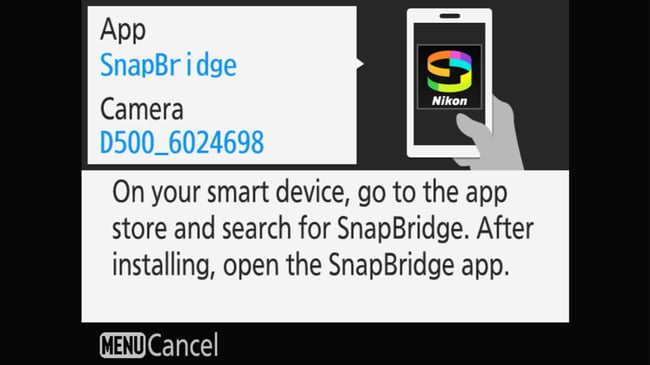
- To pair a DSLR with your smartphone, first go to the Setup menu on your camera. From there, click OK to confirm Connect to smart device, followed by Start. You’ll see a welcome screen and press OK again. If you have an NFC-enabled device, touch the camera with it. Otherwise, press OK.
- Now it’s time to get to the SnapBridge app itself. Tap the gear icon and select Add camera. As with the Nikon Z9, your camera will be automatically detected (if you’ve enabled Bluetooth), so just tap its name on your phone’s screen to confirm.
- The next step is pretty much the same as on the Z9. The only difference is that once pairing is complete, the camera will ask you to confirm two more things. The first is to agree to download location data from your phone, and the second is to perform a date and time sync. Done.
How to use SnapBridge
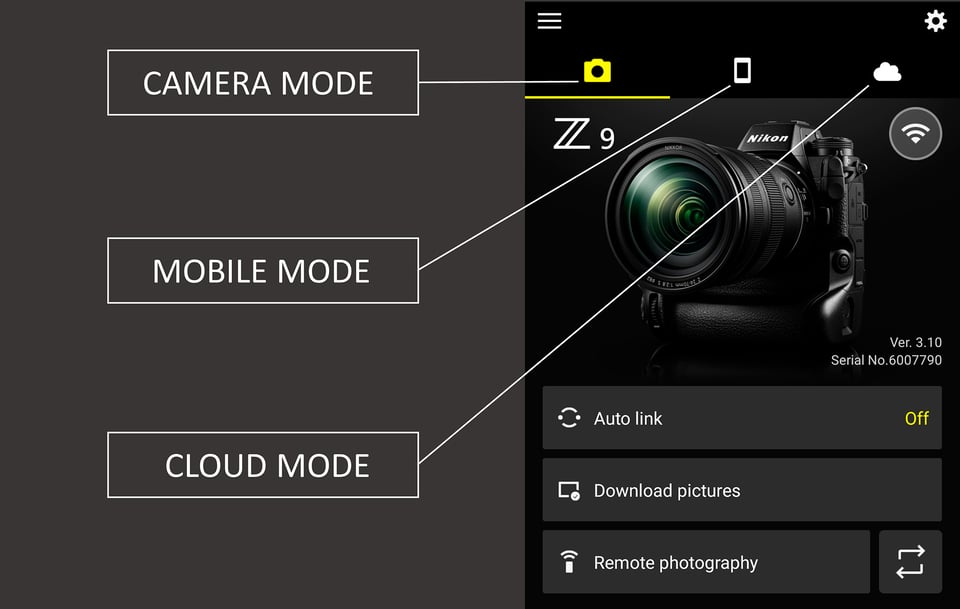
The SnapBridge interface can be divided into three sections. Although they are not named, but only labeled with icons (a camera, a mobile device, and a cloud), I will give them names for clarity: Camera mode, Mobile mode, Cloud mode.

Options in Camera Mode
1. Auto link
If you leave Auto link turned off, all of the app’s activities are under your control. If you turn Auto link on, SnapBridge will do many things automatically. How much free rein you give the application is up to you.
The following four settings are found within the Auto Link section, and they allow you to control what SnapBridge can do automatically. They only appear if Auto Link is turned on.
1.1. Link mode
SnapBridge can run in either Foreground or Background. This choice mainly determines how GPS data will be applied to your photos.
If you select Foreground, your phone will only connect to the app when SnapBridge is running. Although location data will still be applied to your photos, it will only be applied after the photos are downloaded and will not have up-to-date GPS coordinates. Meanwhile, if Background is selected, your camera will connect to SnapBridge even if it is in sleep mode. Location data will flow to the images in your camera the entire time you’re shooting. The GPS coordinates become part of the photo’s EXIF data.
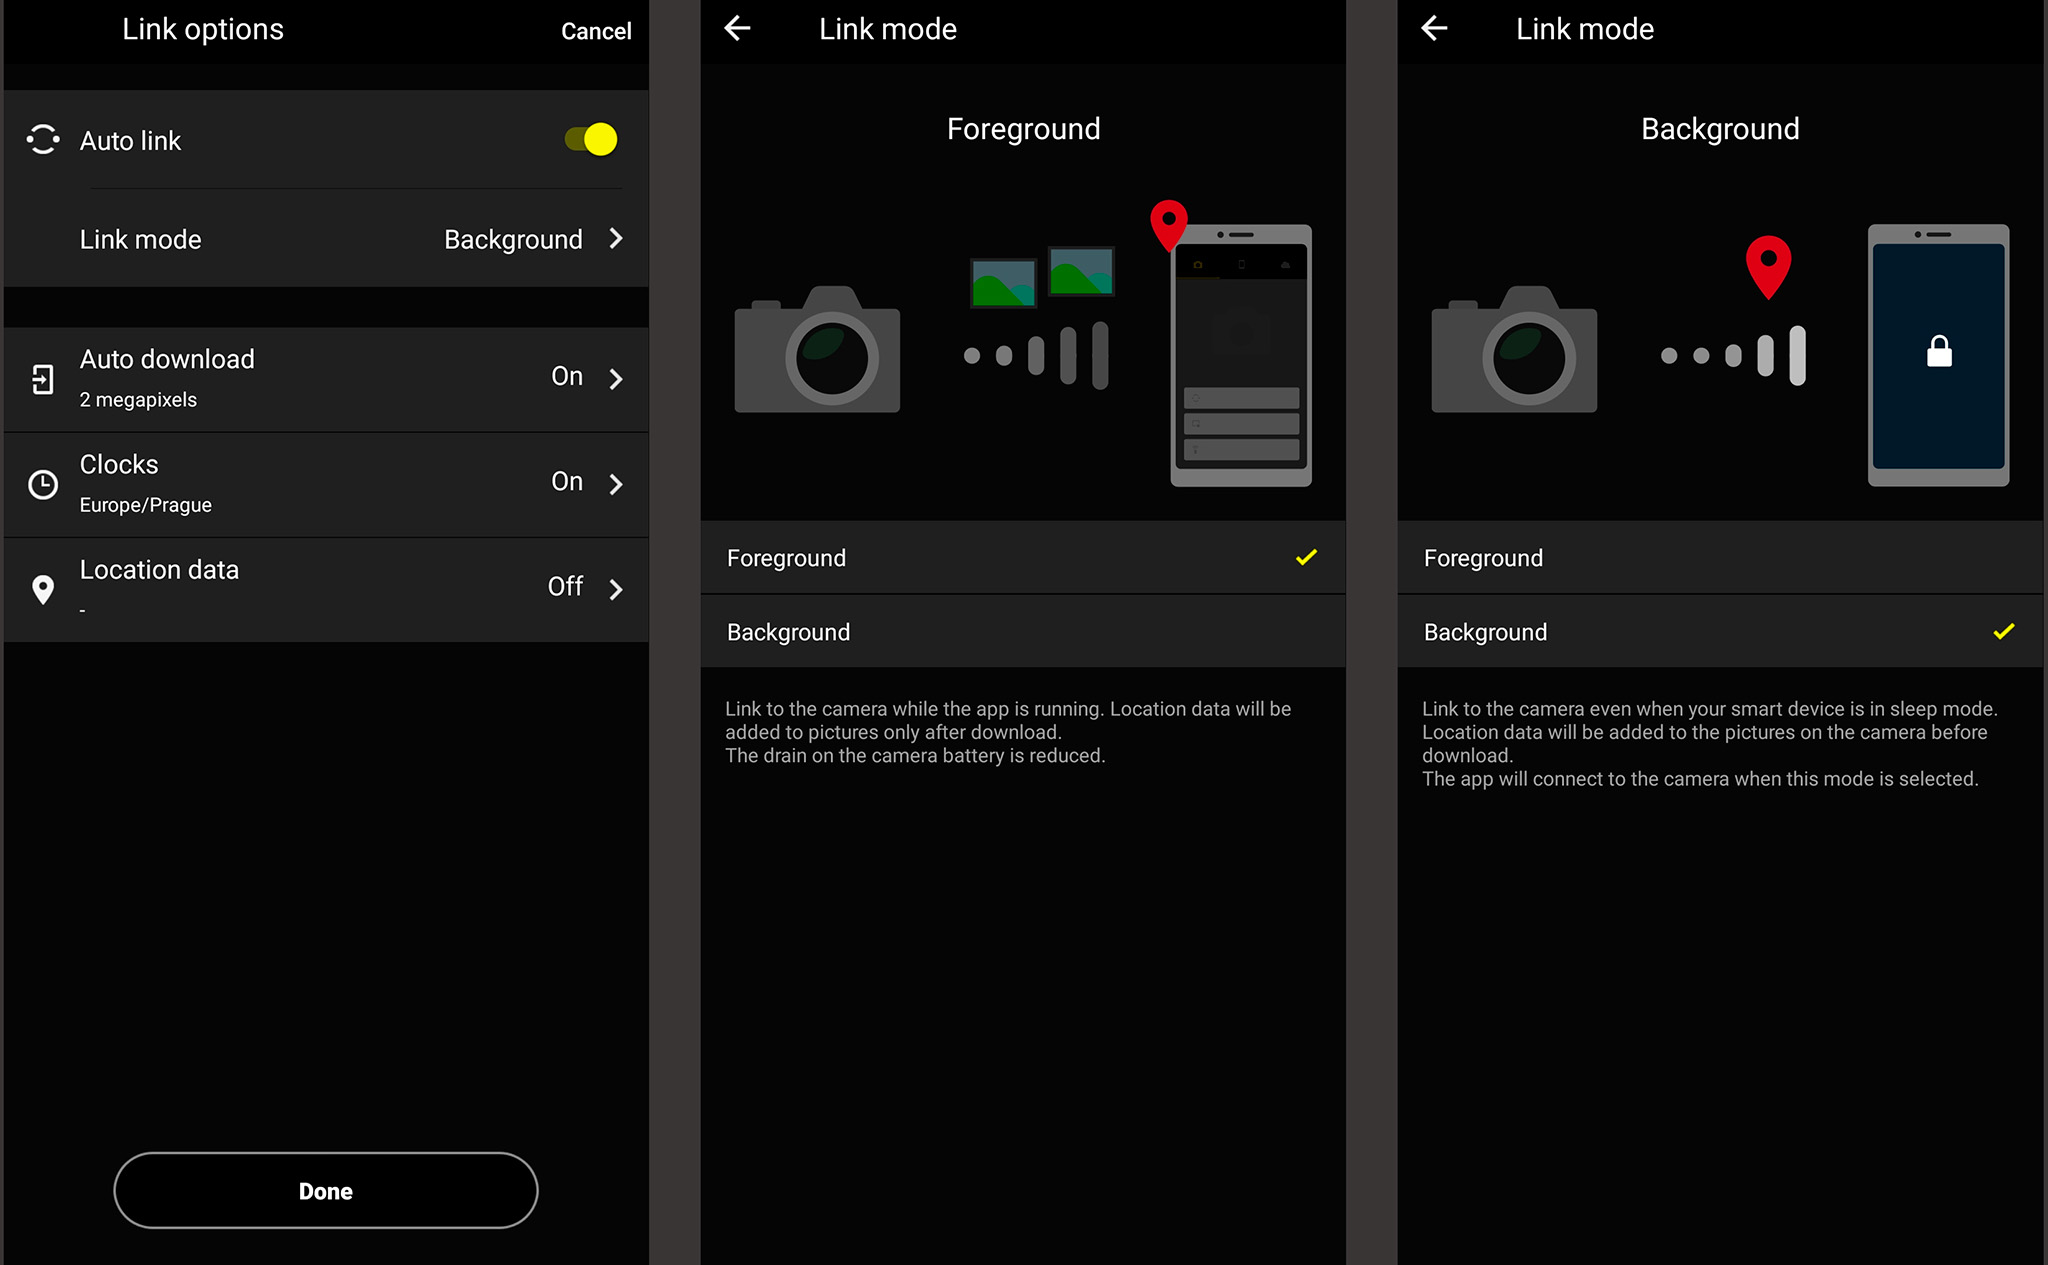
Selecting Background is the way to get location data for every photo you take. The downside is that it requires more power consumption both from your phone and your camera.
1.2. Auto download
If you enable this feature, every photo you take with your camera will soon appear on your phone. Depending on your camera, you can choose between 2 or 8 megapixels, or you may be restricted to just 2 megapixel photos.
Personally, I leave it OFF. With my style of wildlife photography, where I routinely use fast continuous shooting, I would soon have my phone flooded with tons of photos.
1.3. Clocks
Leave this option turned ON to keep the time on your camera in sync with the time on your phone. This can come in handy when you travel across time zones and, like me, forget to tell your camera that you’ve moved a few meridians away. (If you also enable the following option – Location data – clocks will automatically be ON.)
1.4. Location data
When enabled, your phone will add location data to downloaded photos or even photos in your camera. You can choose how accurate and up-to-date the location will be. The more precise the location, the more your camera and phone will use battery power.
If you shoot in one place all day (quite typical for wildlife photography), it is pointless for your phone to inform the camera every second about it. I also recommend that you leave Power saving enabled. Location data will only be added to your photo’s EXIF if you have the app turned on and set to run in the background.
2. Download Pictures
The next option in the “Camera Mode” is called Download Pictures. This is a way to get selected photos from your camera to appear on your phone.
How do you do this? It’s pretty straightforward.
- Take the camera out of Airplane mode (airplane icon OFF). This will give you access to the Download pictures option in the SnapBridge app. In the Network menu (some new Nikon cameras) or Setup menu (most Nikon cameras), under Upload while off, select OFF. This gives you control over when the camera uploads photos to your device.
- In SnapBridge, click Download pictures and press OK to enable the camera to switch to Wi-Fi mode (some cameras, such as the Nikon D3400, do not support this feature). Confirm this option again during the connection process.
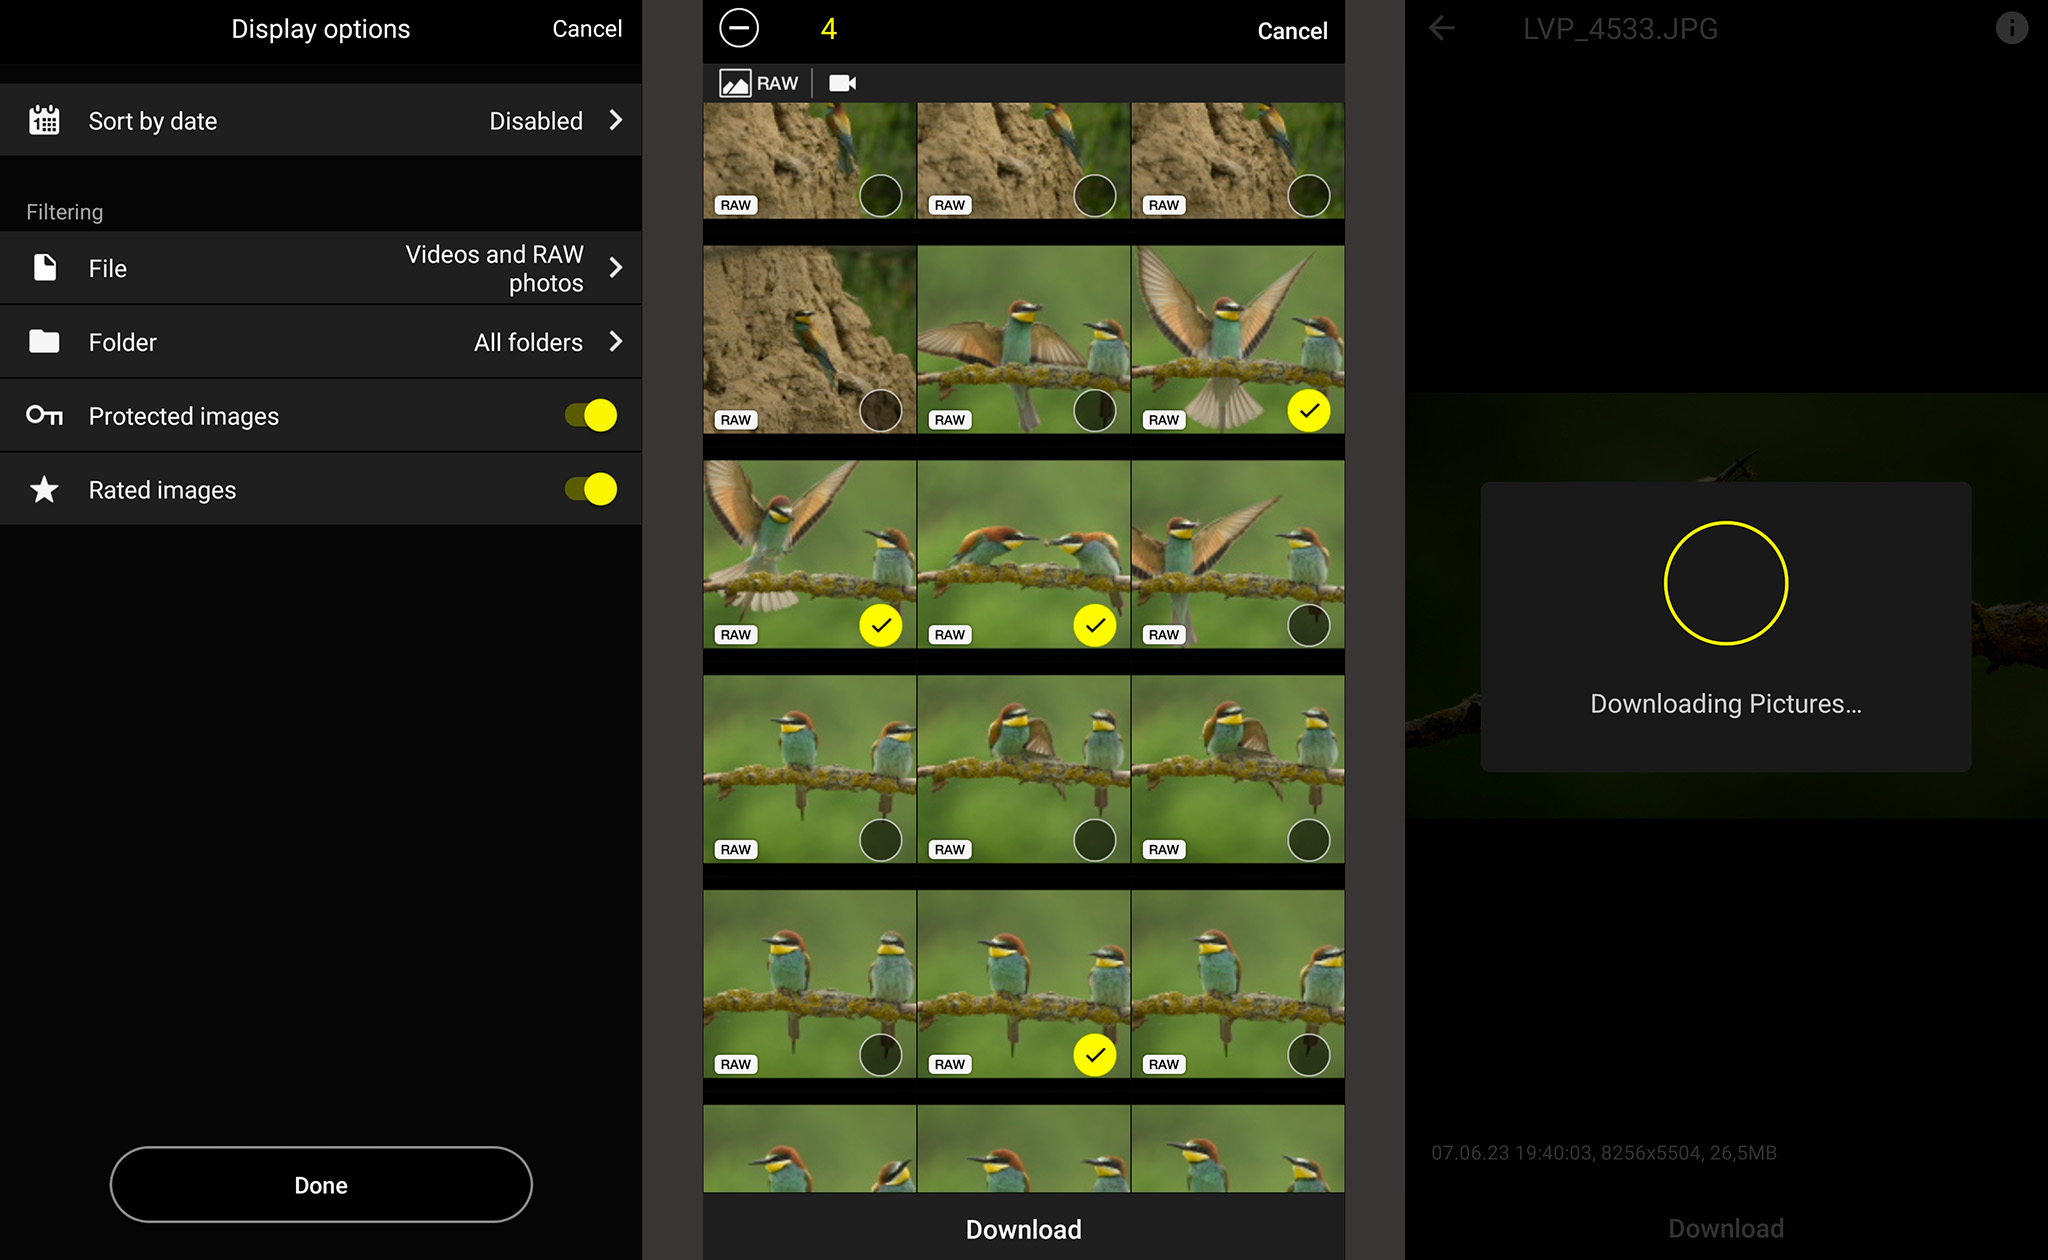
- All photos and videos in your camera will appear on your mobile device screen. Click Select to choose which files to transfer to your mobile device. Once you have made your selections, click Download. In the pop-up window, confirm whether you want to download the images in 2MP, 8MP (see compatible cameras), or in their original format (can be useful when editing the photo in the mobile version of Adobe Lightroom, for example).
That’s all you need to do to get your chosen photos onto your phone or tablet!
A useful function I want to mention is Display options. It will help you navigate through the files on your card. It acts like a simple filter. You can sort the files by creation date, or decide what type of files you want to display (photos, videos, JPEGs or RAWs). You can also select from individual folders on the memory card. If you’re used to tagging good photos with a key or star, you can also filter photos tagged that way.
That’s it, the photos are now in the gallery of your mobile device. You can view them by clicking the Mobile mode icon in the main menu.
3. Remote photography
I first downloaded SnapBridge years ago because of this feature. It wasn’t very stable at first, and I decided to wait a few years until it was a more effective product. I think that time has come.
Just to avoid any unfulfilled expectations, though, you’ll need to check what options your camera offers. Not all of the functions I’m about to describe are applicable to every Nikon camera.
First, use the two broken arrows to switch between Remote photography and Bluetooth remote control. These two modes are different – let me explain why, and how to work with each.
3.1. Remote photography
In this mode, the camera and mobile devices communicate with each other via Wi-Fi. This brings with it a number of advantages, but also one major disadvantage. But more on that later.
To switch to this mode, you need to set up a Wi-Fi connection between the two devices. You’ll need to accept this by clicking on Remote photography in the start. After a moment, you’ll be asked to click the Connect button to make the connection to your camera. The whole process takes around 40 seconds. The working distance depends heavily on the power of the Wi-Fi antenna in your device, but expect a minimum of around 10 meters / 33 feet.
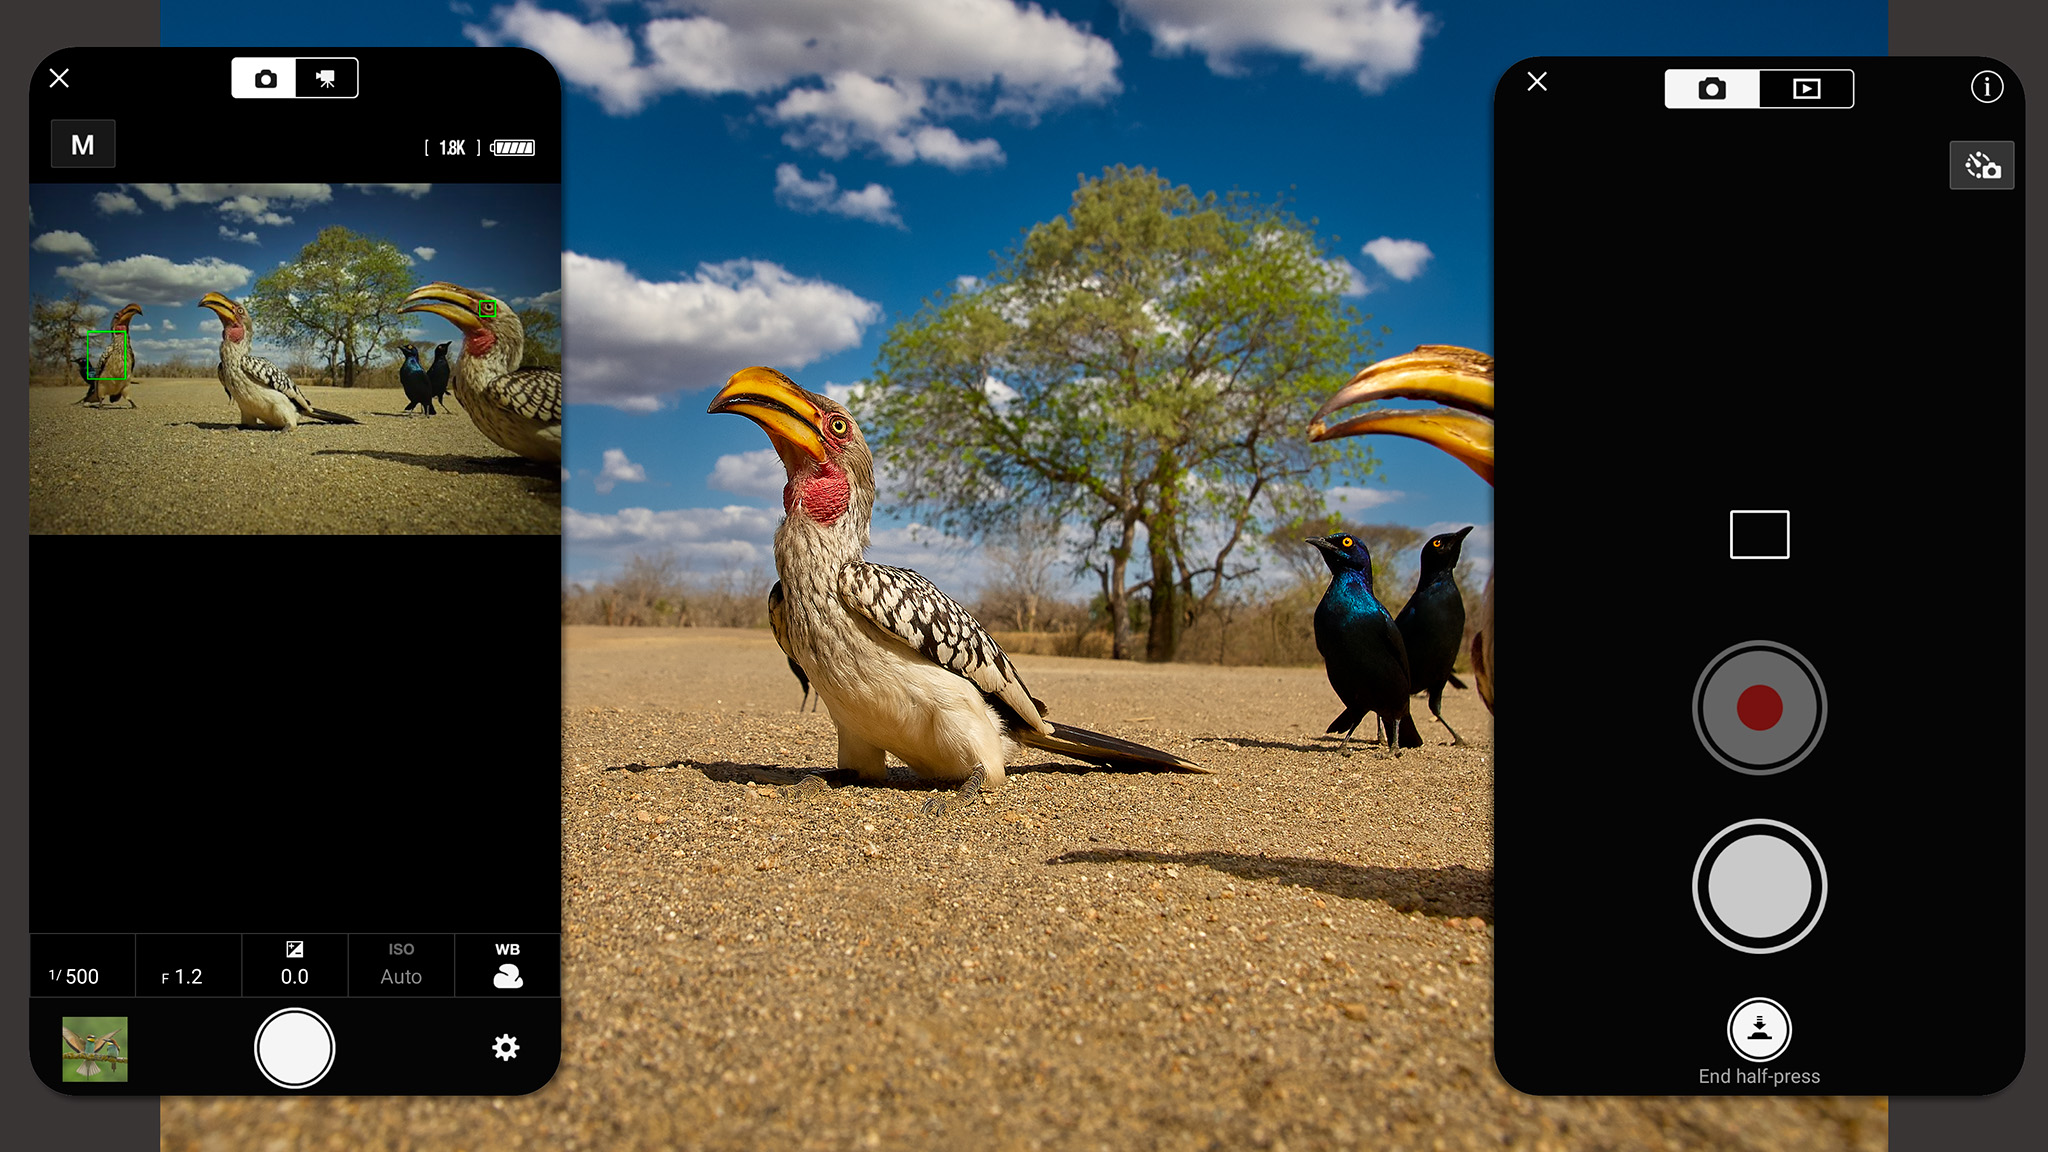
With Remote photography, your camera turns into a kind of remote viewfinder. You see the image in live view and can control things like your focus point, shutter speed, aperture, ISO, and exposure compensation. At the top of the screen, you can switch between photos and video. (Note that some things cannot be changed remotely, like Auto ISO and the size of the focus area. So, you still need to think carefully about how you set up your camera beforehand.)
If you’ve activated the option to have your photos transferred straight to your device, you’ll see a preview with the last photo you took in the bottom left. Tapping it will take you to the gallery, where you’ll see the exposure data in addition to the photo itself. However, enabling this option adds a bit of a delay to taking each photo.
What is the drawback of shooting over Wi-Fi? It’s the shooting speed. If you don’t need to shoot fast sequences, you’ll be happy with the Remote photography feature. Otherwise, you’ll have to accept that you’ll be pecking the shutter with your index finger at the speed of a depressed woodpecker in order to reach a maximum rate of about 1 FPS.
3.2. Bluetooth remote control
The Bluetooth remote control mode can be thought of as a classic wired remote trigger. The signal range is still about 10m / 33 feet. In this mode, the camera and mobile device communicate with each other via Bluetooth. This method of control has its positives, but also its negatives.
The main positive is the camera’s very fast response to pressing the shutter button on your phone. You can also shoot in bursts, unlike with the Wi-Fe connection. On a remote Nikon Z9, I can shoot at the same 20 FPS rate as if I were holding the camera in my hand.
However, the big negative is that you cannot set your camera settings via Bluetooth, and you can’t see a live preview of your composition. Only shooting options such as interval timer, time-lapse and focus shift can be set via Bluetooth. In that sense, it is more limited than the Wi-Fi based Remote photography.
At least you can still see the photos that you’ve taken. When you press the familiar icon for viewing pictures at the top of the display, your mobile device turns into something like a remote control on your TV. Only instead of the TV, you’ll be controlling the display on your camera. You can scroll through individual photos and videos (right and left arrows) and switch between different display options (up and down arrows). Pressing the center button simulates an OK button so you can view 100% photo magnification. The magnifying glass symbols allow you to zoom in and out in increments.
Note that not every Nikon camera has both methods of remote control. My Nikon D500, for example, only allows you to shoot over Wi-Fi, in Remote photography mode.
Options in Mobile Mode
That sums up “Camera Mode,” which is where most of SnapBridge’s options are located. The next section of the app, “Mobile Mode,” is where you can manage the photos you’ve downloaded to your mobile device and, if you wish, send them to the Nikon Image Space cloud app.
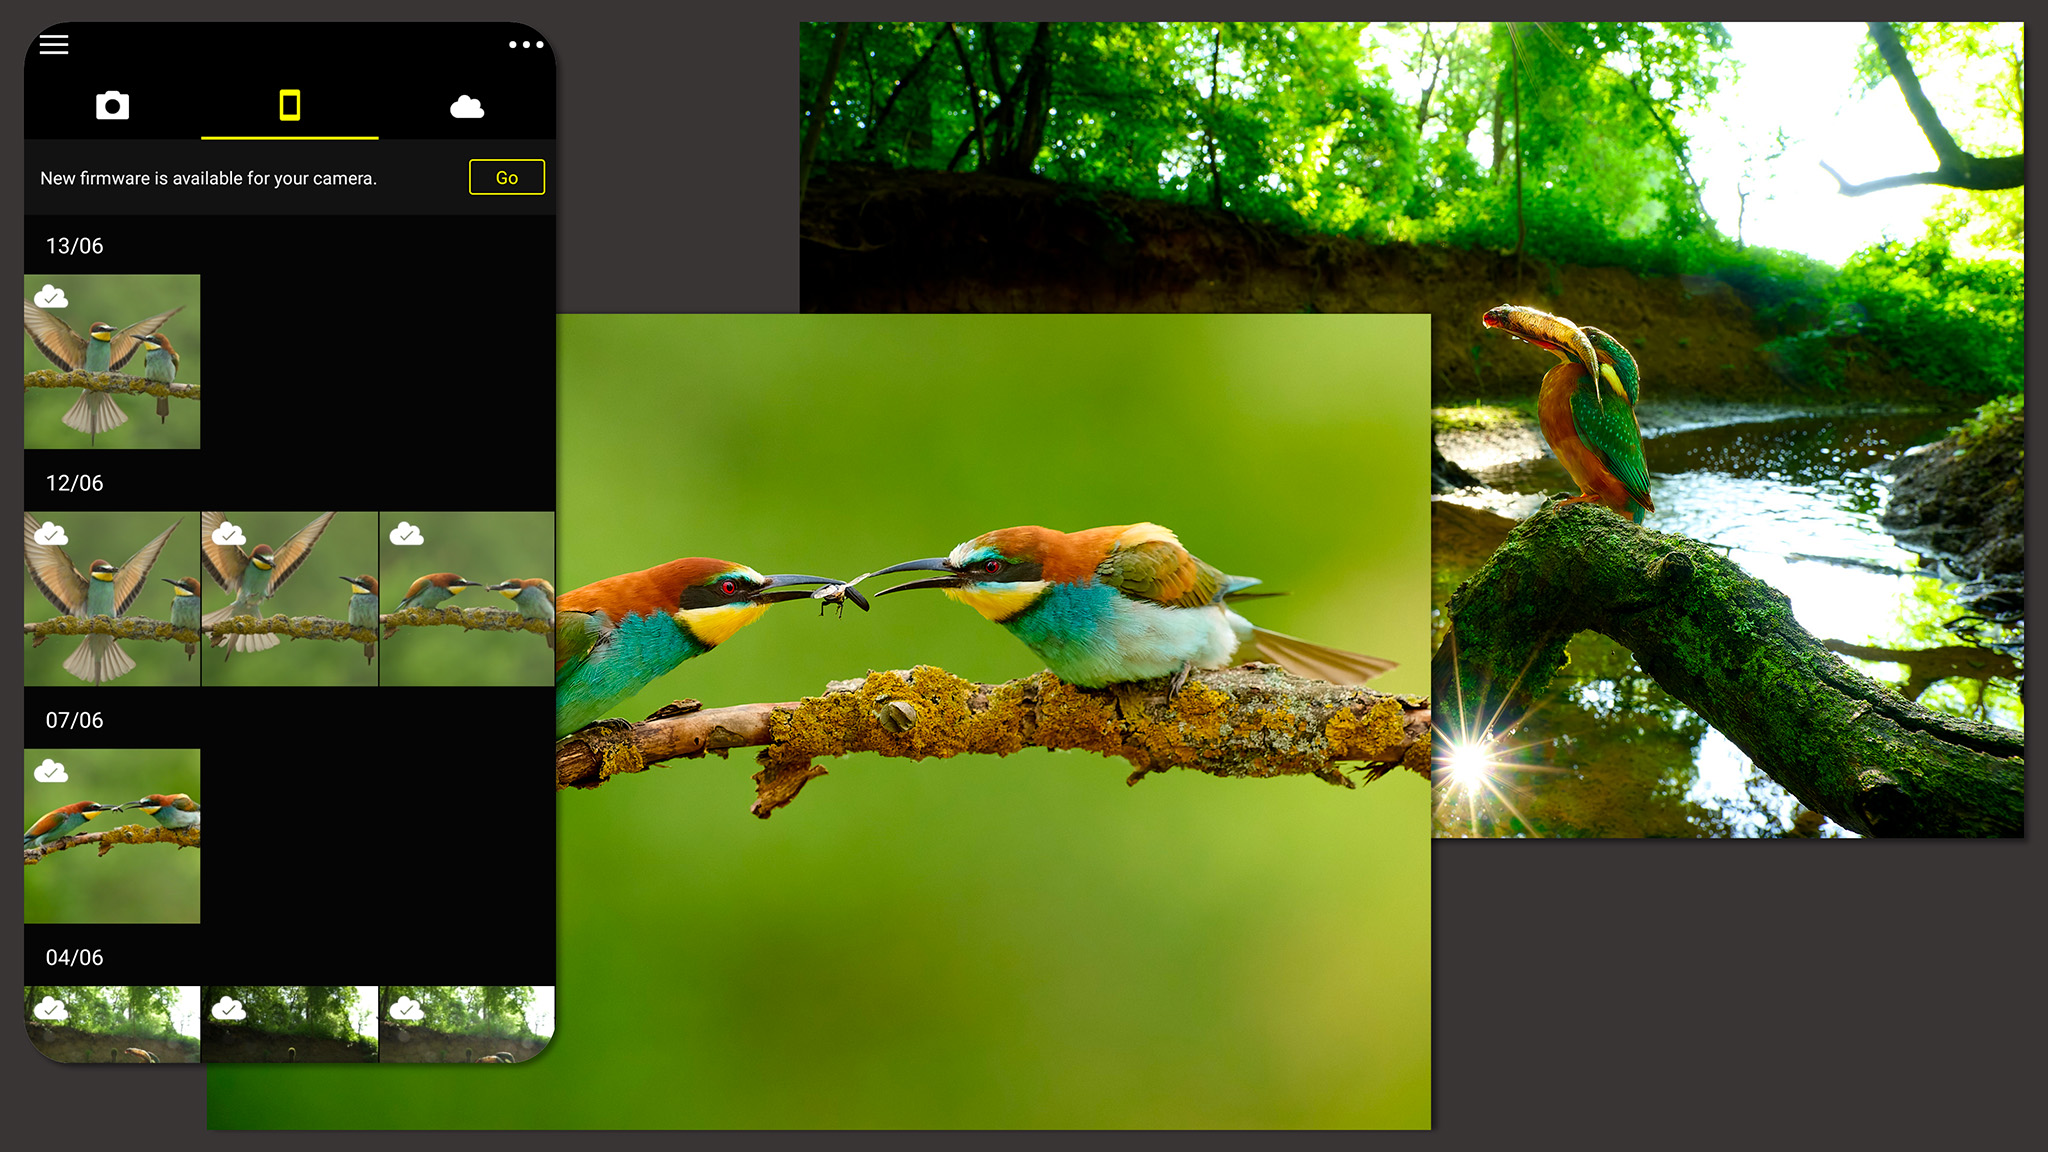
By clicking on the photo and the familiar share icon, you can send the image both to Nikon Image Space and basically anywhere in virtual space. Use the three dots in the top right corner to select multiple photos. The cloud icon in the photo preview means it has already been uploaded to the cloud.
This is a lot simpler than Camera Mode, but that sums it up! Next is what I call “Cloud Mode,” which is equally simple.
Options in Cloud Mode
Cloud Mode only works if you’re registered with the Nikon Image Space app. There, Nikon provides 20GB of storage space for your files (or an unlimited number of 2 megapixel images). This section of SnapBridge lets you set up your phone to automatically upload any transferred images to Image Space.
If you don’t use Image Space, you will not have any reason to use the Cloud section of SnapBridge.

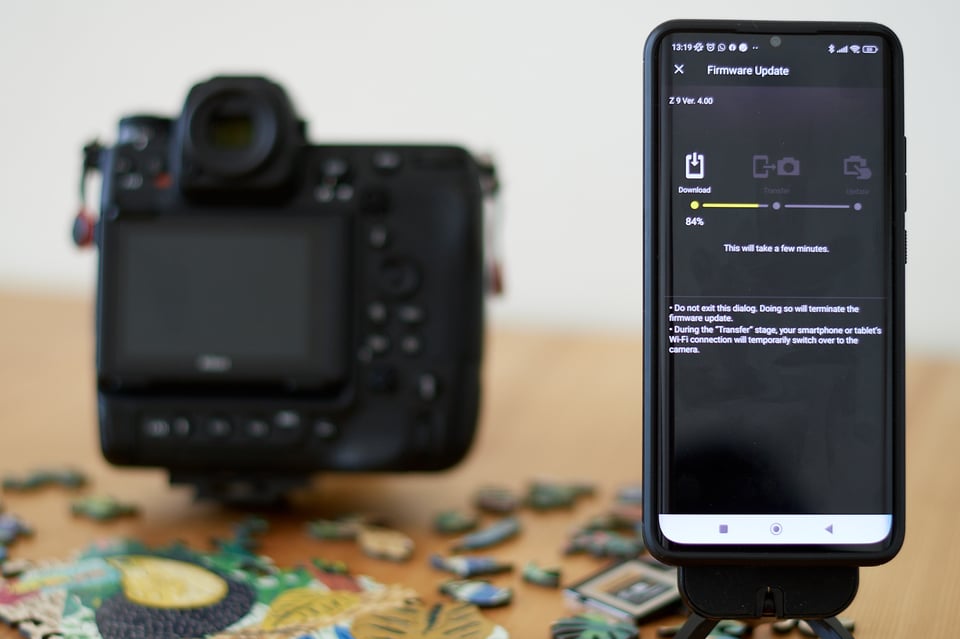
Firmware Updates
One last thing that SnapBridge can do is update the firmware of your camera. It’s a relatively simple process:
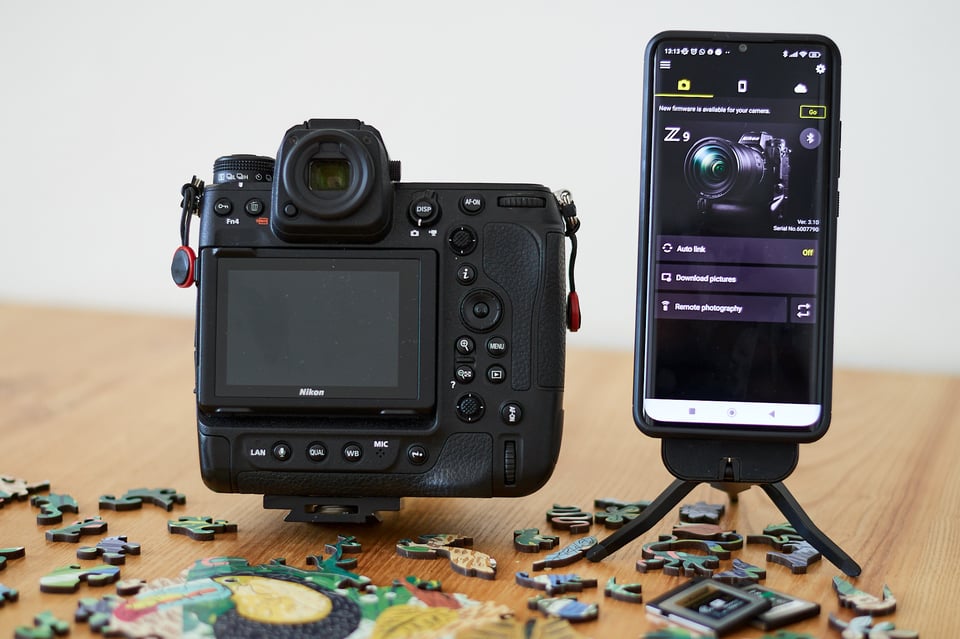
- When new firmware is available for your camera, you’ll see a notification pop up near the top of SnapBridge. It will say “New firmware is available for your camera.”
- Make sure your camera is turned on, has a fully charged battery, and a memory card (ideally empty) in the slot. Click Go.
- On your mobile device, confirm that you’ve done all of the above and make sure you’re connected to Wi-Fi. Click Download to begin downloading the data to the memory card in the camera. During this process, the app will ask you to connect to the camera’s Wi-Fi.
- Once the data has been downloaded to the camera’s memory card, the camera will display a message showing the old and new firmware versions. You have the choice to postpone the update until later or to perform it immediately. Confirm your choice in the camera, and the rest will happen automatically.
I like this way of updating because you don’t have to check if an update has been released. Nor do you have to search, download, copy, etc. – you can update your camera via SnapBridge very easily.
Summary
In this article, I introduced you to all the features that Nikon SnapBridge application offers and what it can do. While the app used to be relatively limited and buggy, it is a lot more capable now. It can act as a GPS, a high-quality remote shutter release, a firmware updater, and a way to transfer photos from your camera to your phone. They say good things don’t come for free, but in this case I see one of the exceptions.
I’d like to know if you use SnapBridge as a Nikon user, and what you use it for. Feel free to share your experiences and insights in the comments below!