When dealing with slow shutter speeds, a solid tripod is a must-have tool for eliminating camera shake and capturing sharp photographs. Although setting up a tripod and effectively utilizing it for photography needs at first sounds simple and self-explanatory, I often come across photographers that do not know how to properly use a tripod. Even though you could own the most expensive tripod on the market and know exactly what to do to yield razor sharp images, your images could still be suffering from poor framing choices. In this article, I want to explore the proper techniques for setting up, handling and using tripods.
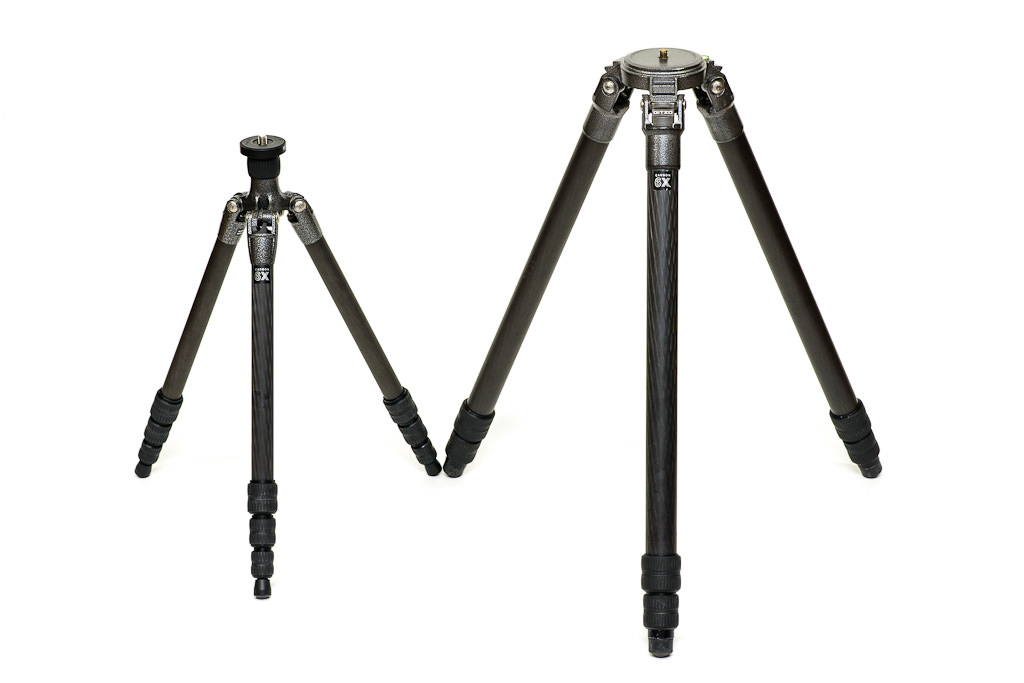
Table of Contents
Invest in a Good Tripod System
Before I get into the topic of using tripods, I first want to highlight the importance of investing in a good tripod system. Unfortunately, many of us end up making poor choices when it comes to purchasing tripods. I remember how I started out with a few cheap tripods, then bought a moderately-priced tripod, only to realize that I needed something better. Overtime, I spent too much on “experimenting” with different tripods. Don’t go through the same process like I did and invest in a good tripod system sooner than later. If you are overwhelmed with choices and do not know where to start, see my detailed article on choosing a tripod. Keep in mind that good tripods often do not come with a head, so make sure to carefully pick a solid head for your tripod as well. The type of head you pick will depend on what you shoot, but the most common type on the market today is a ballhead, which does well for various photography needs.
When to Use a Tripod
It is important to know when you need to use a tripod. Shooting hand-held is effortless compared to setting up a tripod and mounting the camera on it, which is why many of us (myself included), prefer shooting hand-held when possible. Although most modern cameras are capable of producing excellent results with very low noise levels at high ISOs and thus have certainly reduced the need to use tripods, tripods are still preferred in low-light situations, especially when one desires highest quality images with little or no noise on high-resolution cameras. Since there are so many variables involved, such as camera hand-holding technique, shutter speed, ISO performance, sensor size, focal length, image stabilization, lens sharpness and camera to subject distance, there is no magic formula for figuring out exactly when a tripod must be used.
There are some considerations though, so here is the list based on my personal experience:
- Weight: if gear is very heavy, it is best to avoid hand-holding it, especially when photographing for extended periods of time. Trying to hand-hold a 600mm f/4 lens with a professional DSLR will quickly tire your hands, even if you work out every day.
- Photography Genres: Landscape, Macro, Architecture and some other photography genres might require tripod use for precision, framing and consistency, even if light conditions are good. One might want to introduce intentional motion blur, such as when photographing waterfalls, moving clouds and other movements. Also, some specific techniques such as Panorama, HDR, Timelapse and Exposure Blending might also require tripod use.
- Hand-Holding Technique, Reciprocal Rule and Image Stabilization: knowing how to properly hand-hold your camera is important, but if shutter speed is too low, you might still be introducing camera shake. As a general guideline, the reciprocal rule works quite well, which basically says that your shutter speed should be at least what the focal length is. For example, if you are photographing with a 300mm lens, your shutter speed should be at least 1/300 of a second. If you have a crop sensor camera, make sure to multiply the focal length with the crop factor. Lastly, if you have image stabilization in your camera or on your lens, turn it on and know that you can lower your shutter speed below the reciprocal rule by two stops or more (depends on image stabilization effectiveness and your hand-holding technique).
- ISO Performance and Acceptable Level of Noise: some of the modern full-frame cameras are capable of producing superb images at high ISOs without introducing too much noise, losing lots of dynamic range and colors. However, there is always a fine line between what the camera can do and what your preference is in terms of what you consider acceptable. Some photographers do not mind seeing lots of noise, while others are bothered by even a hint of it. Decide what you consider acceptable for your camera and if the conditions call for higher ISOs, you will know when tripod use will be mandatory.
- Print / Output Size: how large you are planning to print or display your images is also important. If you need amazing pixel-level quality for those large billboard-size prints or ultra high-resolution monitors, you might need to shoot at low ISO levels, which result in slower shutter speeds. However, if you are not interested in printing and only want to showcase your images on the web, then you could take advantage of resizing / down-sampling of images, which will drastically reduce blur, noise and other problems in images.
- Focal Length and Subject Distance: the longer the lens, the faster your shutter speed will need to be to yield sharp images when shooting hand-held. Subject distance is also important – if the subject is far away and represents a small part of your frame, poor sharpness will be much more obvious.
- Camera and Lens Resolution: The more resolution your camera has, the more demanding it will be on your lenses and your hand-holding technique, so keep this in mind.

Do Not Let Your Tripod Dictate Framing and Composition
One of the major pitfalls with tripods, is developing tunnel vision for framing and composition. Many of us fully extend tripod legs, set up the camera and then start framing and composing our shots. How many times have you seen photographers stacked up like this:
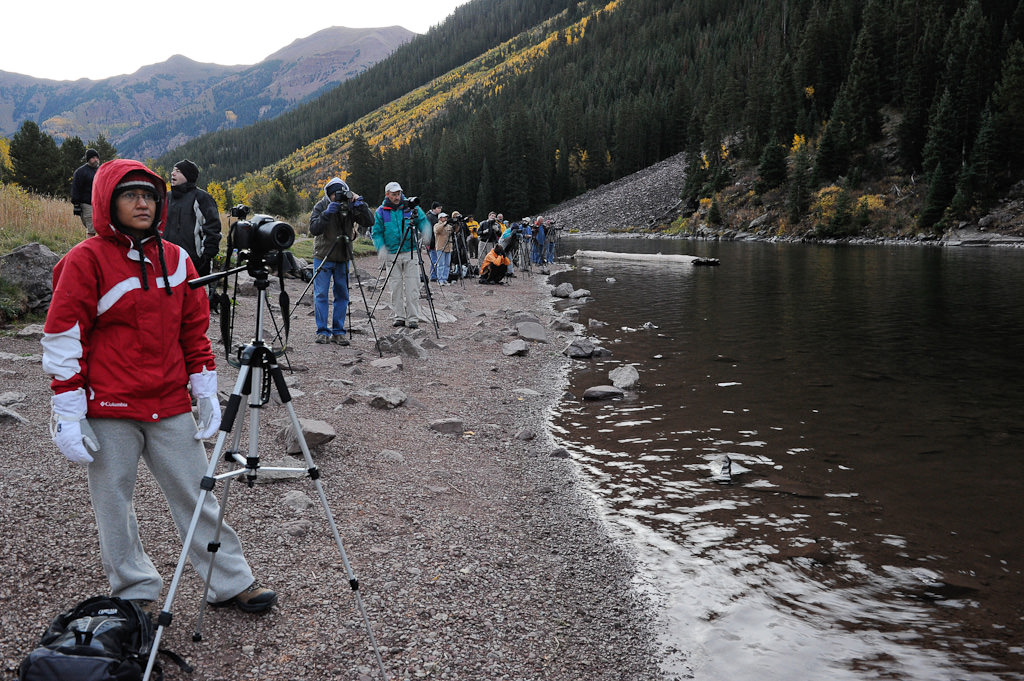
All capturing the same scene at the same angle. Before you set up your tripod, walk around the area, look for good angles and work on the composition with your camera hand-held. Drop down, look at lower angles or move higher up and look for a different perspective. Once you figure out what your shoot will look like, only then open up your tripod and mount your camera on it. Develop this habit of working with your tripod and avoid doing it the other way around. Do not let your tripod hinder your creativity and dictate your framing and composition!
Setting Up Tripod
Now that you have your shot framed and composed, let’s now talk about proper usage techniques:
- Tripod Placement and Leveling: Before you start setting up the tripod, first identify where it will be placed. While most locations have firm and flat grounds making it easy to set up a tripod, some places can be very tricky, requiring some of the tripod feet to be extended shorter or longer to be fully secure. Always make sure that the tripod base is properly leveled – use those bubble levels on the tripod legs. You want the load in the center of the tripod to be distributed evenly to all three legs. The last thing you want is accidents with your gear crashing down! Also, be extremely careful about placing tripod feet on anything that moves or can potentially break (thin ice, sand, etc).
- Extend Thick Leg Sections First: My Gitzo Traveler tripod is lightweight, but its legs are quite thin on the bottom. If I only need to use one or two sections, I will be extending the thicker ones and leaving out the thin ones, because it will make the tripod more stable. The same goes for all other tripods – the top sections are always going to be the thickest and the strongest.
- Fully Open Up the Legs: All tripods will have stopping points where the legs will not open up any further. Always make sure to spread those legs all the way – you do not want heavy equipment to suddenly spread legs when shooting, potentially ruining not only your shot, but also your equipment.
- Leg Placement: When placing your tripod, it is a good idea to point of the tripod legs towards the subject / scene middle, so that you could stand between the other two legs.
- Use Center Column as a Last Resort: I avoid center columns / posts like plague, but sometimes I have no other choice when my equipment needs to be physically higher. I always make sure to extend all the legs first and if that’s not enough, only then use it. Why? Because center columns always destabilize your setup – it is a single point of connection versus three. If you do use the center column, always make sure that the tripod base is leveled, so that the center post is in vertical orientation – you do not want to angle it, as the weight of the camera might make your tripod fall on the heavy side.
- Secure Your Camera / Lens Tightly: To avoid potential accidents, always make sure to secure your camera or lens tightly. Once you mount your gear, hold it with your hands and try to move it. There should be no wiggling or shaking of any sort.
- Camera L Bracket: When mounting your camera on the tripod head, it is always a good idea to use an L Bracket instead of a single plate on the bottom of the camera. With a regular plate, your camera will be heavier on one side in portrait orientation, which might not be secure. L Brackets can be expensive, as they are made specifically for each camera, but they are worth the investment in the long run.
- Long / Heavy Lens Mounting: If you are using a heavy lens, always make sure to mount the lens on your tripod using its tripod collar, instead of mounting your camera and letting your lens hang off the mount. Not only will you keep your camera safe from potentially breaking or bending the lens mount, but you will also end up with a much more stable setup.
- Head Flip Lock Release Considerations: Flip locks are nice and convenient, but you always have to make sure that the plates are of the right size for your head. This is especially important for Arca-Swiss plates, which can vary in size depending on the country and manufacturer.
- Tripod Hook: If your tripod is equipped with a hook on the bottom, or perhaps in the center column, hanging your camera bag or a sandbag can provide extra stability. However, if it is very windy and your bag is not heavy enough, it could have a detrimental effect, potentially destabilizing your setup.
Using Tripod
After your tripod and camera are fully set up, it is time to employ additional techniques to avoid camera shake:
- Camera Strap: Camera straps are convenient to have on your camera, but once mounted on a tripod, can cause camera shake in windy situations.
- Shoot at Base ISO and Turn Off Auto ISO: Most cameras have the least amount of noise and the highest dynamic range at their base ISO (usually between ISO 64 and 200), so use the lowest native setting. Make sure to turn off Auto ISO.
- Use Cable Release: Squeezing the shutter release with your fingers will surely cause camera shake, so it is a good idea to use a remote / cable release.
- Self-Timer: Adding a two+ second delay with self-timer is usually a good idea, especially if you do not have a remote / cable release.
- Mirror Up: If you have a DSLR, its mirror causes a lot of vibration when it moves up before each exposure. Using Mirror Up will raise the mirror first, then you can wait a little before taking the shot. Mirror Up requires a remote / cable release.
- Exposure Delay: If your camera has exposure delay feature and you do not have a remote / cable release, exposure delay mode can help effectively eliminate camera shake. With exposure delay, the camera mirror will go up, then the camera will wait for a specified time before taking a picture. On some cameras you can specify the amount of time to wait. Some cameras allow you to use a self timer in combination with exposure delay.
- Electronic Front Curtain Shutter: A number of new DSLRs (like Nikon D810) and mirrorless cameras have the Electronic Front Curtain Shutter feature. With this feature turned on, the camera will not operate its shutter mechanism at the beginning of the exposure, which can completely eliminate any kind of camera shake. If you are shooting with a DSLR, you will have to be in Mirror Up mode though and there might be other limitations. Although this feature is usually off by default, I would recommend to turn it on and use it actively.
- Turn Off Image Stabilization: Unless your lens has a specific image stabilization mode to be used on tripods, you should always keep it turned off. When your gear is on a stable setup, you do not want image stabilization to try to compensate for movement that is not there.

I am an upcoming photographer and am still learning a lot of the basics when it comes to taking photos. Something I am learning a lot about right now as well is using tripods. I do not have a cable release, so it looks like I will need to add a two second delay on my self timer. I am excited to get my first tripod and get some more quality pictures. I appreciate all of these tips you have on here, they are so helpful! www.acratech.net/categ…ducts.html
Hi,
As a person who is extremely new to cameras and that whole world, I would greatly appreciate if someone could answer the following for me – When putting a tripod back in the bag after using it, is it correct that the head should be completely upright and not bent at all. Also, should the handles be left loose and the pan and tilt locks left unlocked?
Stephen
Great Article. How about a post on What head. I have big problems here on choosing…… Tripod mot much use without a Head :) sorry if I missed the article on this one recently. Arca, Really Right, etc. True Arca Compatible etc
What do you think of the idea of using a really lightweight tripod that you’ll actually carry, but keeping IS on to compensate for the shake inherent in such a lightweight tripod?
Dear Nassim
Thanks for this in depth article on tripod. I’m in the process of buying a tripod and very likely will get the Gitzo. I would like to see tech data on tripod review and comparison. I could not find any site that show real data on tripod performance. such as vibration damping, strength/weight comparison etc. Do you know anyone doing lab test on tripod?
General question for the board:
I shoot with a Nikon D810 and 24-70 2.8 Nikkor. Fairly heavy set up. Does anyone have any tips on shooting in portrait view while on the tripod? Seems like the weight of the camera/lens + gravity causes the camera body to start to move unscrew from the tripod plate thread. I recently updated my ball head to the Siuri 40x, which holds up to 77 lbs, but yet it still seems to start unscrewing at the mounting thread when I apply pressure . Maybe I’m missing something obvious??
If you use an L-bracket, you shouldn’t have this issue.
Quick question –
When you want to use multiple cameras on same tripod, what are some tools you would recommend?
I have seen some photogs attach a clamp like product to tripod.
I know that this will reduce stability if you are messing with two cameras but it will be nice to have the option.
Good article. Just a few things to consider that I didn’t see mentioned. When wind or stability is a problem, it might help to have your sandbag or gear bag firmly on the ground and secure the bag to the hook on the tripod with a bungee cord, rope, etc. The weight of the bag will then provide some steadiness and won’t be swaying. On another matter, when using a tripod in sand. I cut slits in tennis balls and place the ends of the tripod legs into the tennis balls. This can help keep the tripod legs from sinking into the sand.
Those are great tips Robert, thank you for sharing!
Excellent article. Most important thing to me is get the best quality tripod you can. It makes no sense to put thousands of dollars of equipment on an unstable platform. People shutter at spending $300+ for a rock solid stable carbon tripod then put their D810 with a 24-70 f2.8 zoom on a $90 piece of aluminum that shakes withe the slightest breeze. Then they want to blame the camera or glass
Charles, I fully agree! It is like buying a BMW M5 engine and putting it on a Toyota Corolla suspension, it just does not make any sense…
I agree with the analogy but $90 can buy a carbon fiber tripod which is sufficient if you can weight it down.
Excellent topic. So much to be gained by reviewing these skills, which make for better photos; likely more of a difference in final output than the latest greatest technical advance.
Thank you for your feedback Tom!