While a good, sturdy tripod is often best for stabilizing your gear, there are times when a monopod is more convenient and/or can be a big help in supporting larger camera/lens combinations. In keeping with Nasim’s mention in the Focus and Recompose Technique article that we would be doing some posts on basics and Tips for Beginners and since we have had a couple of monopod reviews, it occurred to us that some people may not know how to properly use a monopod, so we decided to share some pointers. The main differences between the three methods that we will discuss here is where you place the foot of the monopod.
Table of Contents
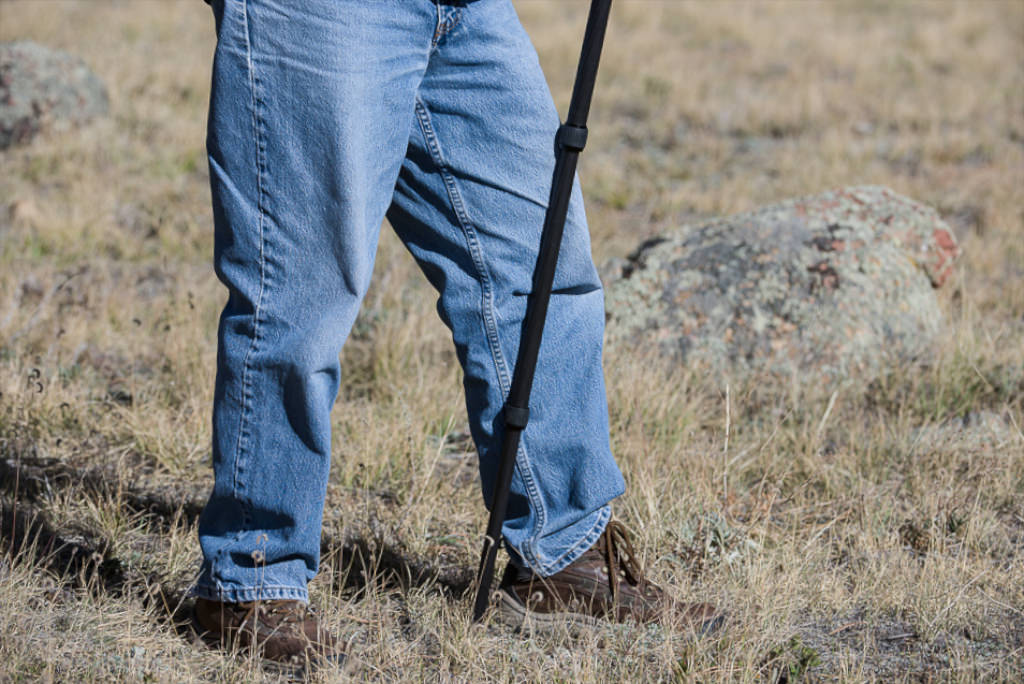
Method 1: Straight Out in Front
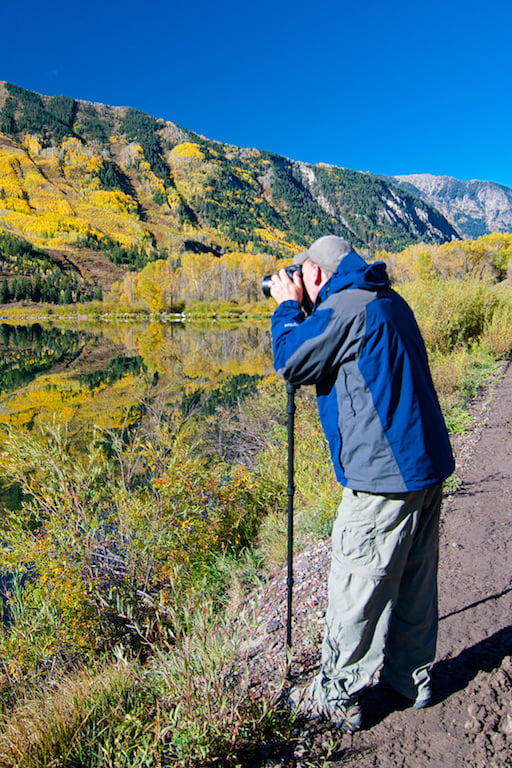
Most people will first use this method as it is the logical way to use a monopod. With their own legs standing square and spread to approximate shoulder width, they will put the foot of the monopod roughly centered between their legs and straight out in front of them so that the foot of the monopod forms a triangle with the photographers two feet. This more or less mimics a tripod with two legs supplied by the photographer and the third from the tripod. To increase the stability, the wrist strap should be utilized by using it to firmly seat or push the monopod foot into the ground.
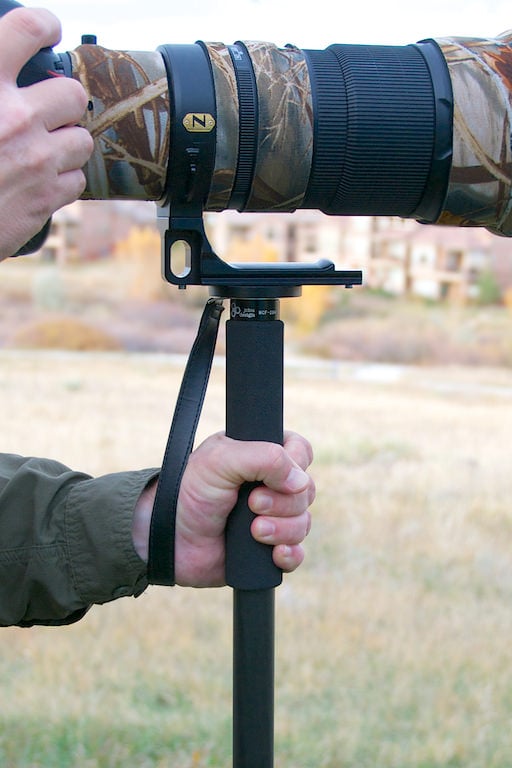
Try it and you will see that the strap isn’t for carrying the monopod only, it functions to minimize the monopod head from rotating on the foot as a pivot point. As pointed out in our review of the Oben CTM-2500 Monopod – some wrist straps can be too long resulting in your hand hand being off of the padded section of the leg. Therefore, I would suggest checking the length of the wrist strap and seeing where it places your hand before selecting a monopod.
When using a large telephoto lens, this is the method that I use most because when using the next two methods the monopod leg is tipped at an angle, resulting in the need for a monopod head to adjust the camera angle to maintain a level plane.
Method 2: Braced Against the Instep of Your Rear Foot
In this method, you stand with your hips at a slight angle to your shoulder, similar to a boxer, with one foot slightly back and the foot of the monopod is placed or braced up against the instep of the rear foot and the pole angled to the photographer’s other leg for additional bracing. The hand is pushing the monopod into the ground with the hand on the shaft and the wrist strap pushing down as well, just like in the first method.
Method 3: Between the Legs
In this method, you stand similar to method 2 but the leg of the monopod goes between your legs with the foot of the monopod closer to, but behind the leading foot. In this stance the leg of the monopod braces against the leading leg of the photographer to give more stability. As always the monopod is pushed down into the ground.
Using a Head on the Monopod
While using the monopod without a head is preferred by many sports and wildlife photographers, if one desires, a head can be used but just be certain that the head and the screws can support the weight of the camera and lens. Heads range from a simple tilt to a ball to a gimbal head. Many feel a simple tilt head is all that is needed since the monopod pivots and rotates easily. If you feel you would like to utilize a head on the monopod, a ball head works for landscape shots with a wide angle lens, but a gimbal head works better for larger telephoto lenses.
Conclusion
The bottom line is that when possible, using another part of your body to brace the monopod against it will increase stability. Try each method and see which is best suited for your shooting needs and style. As for what type of head to use if any, that is up to you. Finally, since we all learn from each other, we would love for you to share with us how you use your monopod in the comments section below.

Tom, I was wondering what is the best practice method when shooting with a manual focus telephoto glass, since you constantly need to adjust focus and f/ ratio.
Cheers,
How essential is a ballhead on a pod?
My personal opinion reflects the use of a monopod with larger/longer length telephoto lenses and not wider landscape lenses. That said, I don’t use a ballhead or tilt head on my monopod.
Personally, I prefer to use a head with a quick release – much quicker to use with a variety of lenses or different cameras at lenses when speed of changeovers can be important.
Question about Monopod use.
I have a nice carbon tripod/monopod but I struggle to use it for this reason:
I generally prefer to handhold my camera for my birding photography. It’s quick, it is usually shake free (enough) and requires no extra gear (light and easy).
That said, if I have time to prep for a shot a monopod could be great. More stable and when you have to wait for a shot it’s less tiring.
All good… BUT… I can’t figure out a good way to combine these to types of shooting.
If I use the monopod as a walking stick planning to (usually) shot handheld – then, when the shot comes the biggest problem is where does the monopod go? Drop it (too expensive and heavy for that with even small ball head. Lead it against myself – yes, but if I need to turn my body or crouch down she drops and off fly my “shot”.
If I keep it connected to the monopod and around my neck – well, that’s just unwieldy. So, that would never work.
There are monopod tripod little feet but those only work on perfectly flat surfaces (indoors etc).
The closest idea I’ve seen is to use a belt hook for a hammer (that carpenters use) and the slip the monopod through that carried on the belt when not in use. I’ve not tried it – maybe good – maybe ungainly but what someone was doing.
The other option (I thought of) was to attach a small piece of velcro to somethign like a luggage label … like a leather one (the velcro being small enough to limit sound but strong enough to hold up the monopod) and hook this up to the monopod. Also, to have a the corresponding piece of velcro sewn onto a strap of some kind. In this way, I might use the monopod as a walking stick and when I want to shoot handheld I could quickly connect the velcro pads and they would keep the monopod vertical and mostly out of my way. When I’d caught my shot, it wouldn’t matter if I make some sound separating the two side and be on my way. At the same time, if I have time to setup a shot… well, the monopod is with me for use.
Sounds somewhat OK to my thinking – but I’ve not done it.
Any other thoughts on how to address this issue?
It could be that I’ve just not found the right way to carry/use my camera fixed on the monopod. I’ve seem some people carry their camera in the air like a napsack on a stick of a runaway boy. Seems like a reckless way to carry $5K in gear but maybe it’s fine? (is it?) On the other hand, I’ve found no comfortable way to carry my camera on the monopod to date… so, I’ve tended not to use it… which, is a shame.
Suggestions? TIA.
FWIW: Nikon D500, 399 PF and 1.4, MeFoto Carbon with call head.
I think you meant to type, 300mm PF and for that gear, I would handhold as well, I think that the gear that you list is fine handheld for most people and less troublesome than the monopod.
Jay – I don’t know if you have found a good way to carry your monopod, but perhaps using a caribiner through the handstrap (or the handstrap bracket if there is enough clearance) would allow you to just hook your monopod to a belt/backpack/etc. It would always be handy, and if you hooked it on behind you, it would stay out of the way when you are trying to shoot without the monopod.
My main reason for photography is small birds and i use a d7100 with a 300mm f4 and 1.4 teleconverter, all Nikon. 95% of my bird shots are with a monopod(Gitzo aluminium). It has the following benefits. Allows lower shutter speed and therefore less light required. It lets me remain looking through the viewfinder for long periods waiting for the birds who are usually in cover to come out and i am ready for them. Too tiring hand held although a tripod would be better but a monopod is faster to get set up and use. Being aluminium and fairly heavy it becomes a real weapon when collapsed to its shortest length, i have been ready to brain a dog or 2 usually unrestrained on the beach and taking absolutely no notice of its owner and bounding towards me and i not knowing its intentions until it gets close to me! I use a Manfrotto tilt head and that seems to do the job. It is easier to carry than a tripod, a lot quicker and collapses to a very easy to transport item.
Great article. I am about to get a long lens and have been wondering about how to best use it with my monopod. This was very helpful. Thank you for sharing.
If you don’t extend the monopod fully, you can tuck the end in your pocket and brace the monopod against your chest for a very good platform. Not as good as a tripod but better than handheld; this also allows some movement and recomposition. I use a trigger-grip head.
And what about shooting vertically?…
Place monopod foot against tree or rock with monopod parallel to ground .
Thanks for Tips, it helped me to use my new Monopod.
I hike with may DSLR and take bird and wildlife photos. I put a 3/4 inch ball on my camera and a socket on top of my monopod so when I see something I slip the ball into the socket and take the photo. Thus I can point my camera up, down, left, and right with ease.
Thanks for sharing John!
Since I am a stroke survivor I do carry the monopod with me when taking photos and I prefer the Straight Out in Front method as it serves both as a support for the camera … and for me. Then for low light photography and for long exposures I prefer using the tripod. Thanks for your useful tips.
Joseph, thanks for the feedback and I am glad you are out shooting after the stroke – good for you! Happy trails.