If you are like many professional photographers, you may be finding that more and more clients are asking if you can also do video for them when you’re on-site doing a photo shoot. Video can be a “strange new world” and you may be passing up some good opportunities. Most modern DSLRs are quite competent in shooting video, and you can use them to create industrial and commercial productions that are ideally suited for use at corporate functions, in sales presentations, as training aids, and as promotional spots on YouTube…so there is a great opportunity to expand your service offering by including video.
Without a doubt, shooting video with a DSLR can be more complicated than shooting stills, but you can achieve beautiful, creative results by following a few, simple guidelines. And, while you may add more video-related gear over time, you can make some initial, fairly modest investments and get into video production without having to break the bank. If you are a consumer reading this article and you are considering buying a DSLR thinking you can replace your camcorder to shoot family events, don’t bother – a camcorder is much better suited for “family memories” type videos. While I concentrate on shooting video with a Nikon DSLR (since I shoot Nikon), the below article applies to shooting video with any brand DSLR.
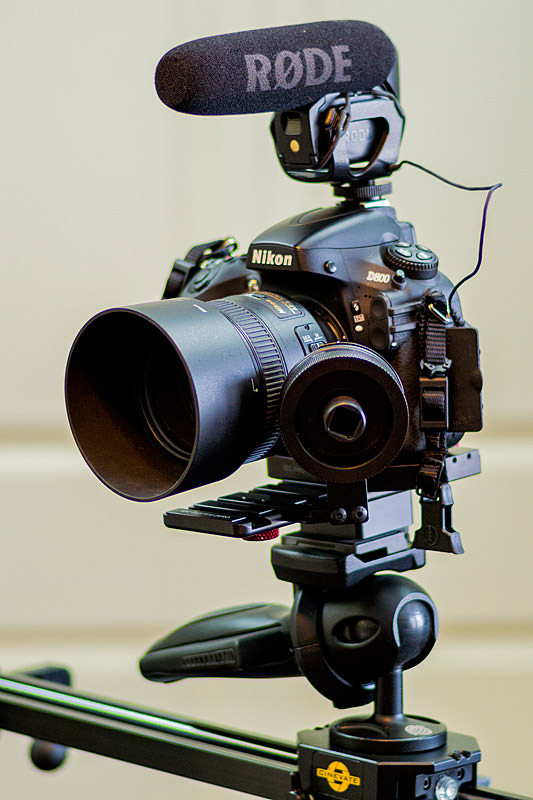
My D800 rigged up with Rode VideoMic Pro and iDC System Zero follow focus. The 327RC2 Manfrotto pistol grip is attached to a Cinevate FLT camera slider.
1) Is your DSLR the right tool for the proposed video assignment?
This is the very first question that you need to ask yourself before accepting any video assignment. Generally speaking any assignment where you would be shooting people moving around in a scene (like a wedding for example), especially if autofocus needs to be maintained on specific individuals as they move towards or away from the camera, it is not well suited for DSLR use, and would be best shot with a professional video camera. This is because the auto focus on most DSLRs is slow, somewhat jerky, often hunts a lot, and is noisy. The audible noise from the focusing motor in your camera body and/or lens will transmit readily onto your footage…and it can be a pain to try and filter out. Also, the lenses used on DSLRs do not have power zoom functions so they are cumbersome to use if a lot of in/out zooms are required in the footage. Any assignment that requires the recording of long (30+ minutes), uninterrupted video clips is not suited to DSLR use as your camera is often limited to less than 30 minutes of single clip recording time.
Video assignments that are well suited to your DSLR are ones when you will be filming subjects where clear separation from the background is desired, where you’re shooting static scenes or scenes where the focal plane of the subject is not changing significantly, and where wide, rapid panning movements with a camera are not required.
2) Choosing a frame size and frame rate
Your DSLR camera will have a range of frame sizes and frame rates from which to choose. The vast majority of clients I’ve worked with prefer 1920 x 1080 frame size, shot either at 24 fps or 30 fps. This allows the video to capture a high level of detail and look very professional when displayed on a large monitor, or projected at meetings and conferences. If you plan on integrating any kind of camera movement into your productions (more on that later in the article) I would recommend shooting at 30 fps as it will help the camera-produced motion look smoother than if shot at 24 fps. Obviously if your camera can shoot 1920 x 1080 at 60 fps that’s even better…although you will use up memory cards very quickly on site and your editing/production time will increase dramatically because of file size. 4K video is quickly emerging and this is something to watch for as a potential feature with future DSLR camera offerings.
3) Matching shutter speed and frame rate
To get good, smooth looking video footage where any motion captured looks “natural” you need to match up your shutter speed and frame rate appropriately. This means using a shutter speed of 1/50th if shooting at 24 fps, 1/60th when shooting at 30 fps, or 1/125th when shooting at 60 fps. You can also use your shutter setting to achieve different creative effects. For example, shooting at slower shutter speeds will add more blur to your footage and can make it look more subdued or “dreamy”, while using faster shutter speeds can give it a sharper, sometimes even “choppy” or hectic feel. Panning or moving your camera while using these slower/faster shutter speeds will tend to amplify the effects. For the vast majority of corporate client videos a standard shutter speed/frame rate match is used.
Table of Contents