This week Microsoft released the long anticipated Windows 10, the latest, the greatest and the last “operating system of the future”. Why the last? Microsoft claims that Windows 10 will be the last operating system with a version number, so we won’t be seeing a Windows 11 or 12. Apparently, the company has no plans for future iterations of the operating system, and instead plans to focus on providing continuous updates to the Windows 10 platform. That’s probably why the company skipped Windows 9 altogether, since 10 sounds more “complete”. Microsoft is tired of trying to convince its customer base to buy the next version of the operating system every time it is released, and the costs of ongoing maintenance and support for each OS iteration has been getting out of control. So it makes strategic and business sense to move everyone to the Windows 10 platform, and focus on selling a single operating system instead. But how do you move everyone to Windows 10? Microsoft found an easy solution – to allow every licensed user of Windows 7 and Windows 8 / 8.1 to upgrade for free. A great strategy in my opinion, which I believe will work in Microsoft’s favor in the long run. And we get the best of the breed at no cost, so we cannot complain, can we? So if you have been thinking whether to upgrade to Windows 10 or not, I don’t think it is the question of “if” anymore, but a question of “when”. Microsoft’s generous offer has a time limit – you must upgrade before July 28th 2016, if you want to take advantage of the free upgrade offer. In this article, I want to provide some information on upgrading to Windows 10 from a prior version of Windows based on my last two days running the operating system on my main desktop and two Microsoft Surface Pro 3 laptops.
I have been on Windows 8.1 for a while now and although I personally found it to be pretty solid and did not mind the Metro interface, some people absolutely hated it. And I don’t blame them – it took me some time to get used to the Metro interface from the classic Start menu that we have seen on every prior iteration of Windows. Didn’t quite like the bottom right corner mouse-over pop-up menu action though (which I was glad to see completely removed in Windows 10). Having spent most of my teenage and adult life in information technology, I have always had a rule of thumb – to wait at least a quarter after every major release (usually until the first service pack was released) and at least a month after every minor release, in order to make sure that all potential software roll-out issues and bugs were addressed. But this time I decided to make an exception and make the jump right on the day of announcement, because I was very excited about the Windows 10 release and I have been closely monitoring the beta program for a while now. So I decided to upgrade all the PCs at home to Windows 10 and see what the experience would be like. So let’s get down to it!
Table of Contents
1) Backup First
Before proceeding with any of the steps below, please fully backup your system. If things go wrong, you should be able to restore to where you were before starting the upgrade procedure. Although I did not have to revert any of my computers to their previous state, you might have potential upgrade issues, so it is best to take the time now to perform a full system backup. Don’t just copy your photos, assuming it is all you need. You might have images, documents and other important data in your computer that you do not want to lose.
Backing up is really easy and Windows even gives you a tool that you can use to perform a full backup. Fire up your control panel, click on the “File History” icon, then click “System Image Backup” (available in Windows 8.1). If you use Windows 7, the backup utility can be found in control panel in “Backup and Restore”.
2) That Windows 10 “Reserve” Icon
If you have previously reserved your copy of Windows 10 through the “Reserve” icon in Windows, you might be a bit frustrated by now to see this:
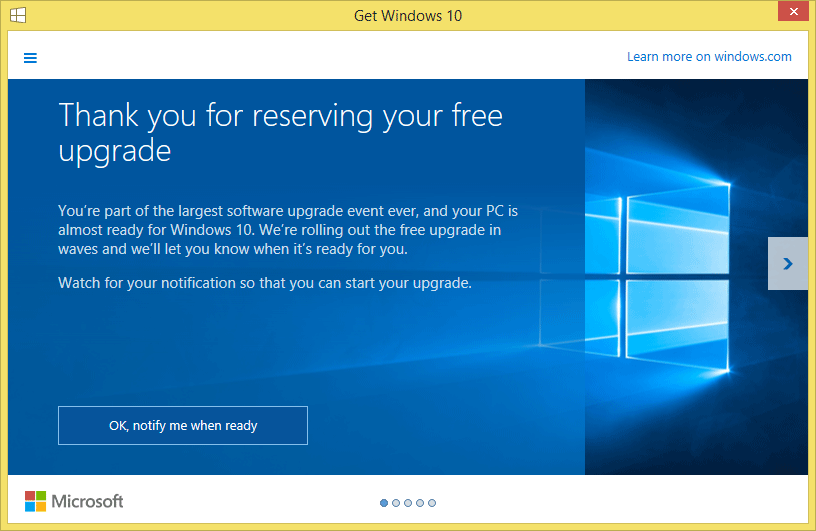
One of my older machines that I have not upgraded yet is still showing the above, so if you see a similar screen, you might want to update manually, as shown below:
3) Upgrade vs Clean Install Considerations
When upgrading your current OS to Windows 10, you will have to decide whether you want to upgrade by keeping your prior settings and files, or upgrade and then perform a clean install afterwards. While I always recommend performing a clean install, since I like starting fresh and not having all kinds of junk from previous OS occupying space in my computer and potentially making it slower, for some people it might not be the best option, since it does require a lot more work – you will have to reinstall all applications and potentially even restore wiped out files from backups. So it goes without saying that you should certainly double check your backups before even thinking about a clean install.
Now there is a “gotcha” with the Windows 10 upgrade and license generation process – Microsoft first needs to validate your current OS copy and generate a working license key during the upgrade process, before you can perform a clean install. If you wipe everything out before performing an upgrade, you will have to restore to your previous state and start over, since license information will be missing and you will have to purchase Windows 10 to activate! So unfortunately, this has to be a two step process – first you perform an upgrade from your current operating system to Windows 10, and only after it is completed, you can then wipe everything out and perform a clean install.
Another reason to perform a clean install vs just upgrade is space savings – if your OS drive has a “recovery” partition, it will no longer be needed, so you can free up that space. Windows 10 is now much better than the previous Microsoft operating systems when it comes to restoring the PC to its default state – there is no longer a need for a separate recovery partition. In addition, Windows 10 will be compressing select operating system files, so that they take a lot less space, which is great! So if you have a laptop that has little space in the boot drive, particularly on thinner machines like the Surface Pro 3 with a 128 GB system partition, you certainly do want to perform a clean install.
3) Download the Windows 10 Media Creation Tool
Click here to download the Windows 10 media creation tool. Get either the 32-bit or the 64-bit version, depending on what you are currently running. If you are not sure about what you have right now, just right click the “My Computer” icon on your desktop or your start menu, go to “Properties”, then look at the field “System type”. Hopefully you will see something like “64-bit Operating System, x64-based processor”, which indicates that you are running a 64-bit OS. If it says 32-bit, check how much RAM you have – if you only have 4 GB of RAM, I would either move up to a better machine or at least increase the amount of RAM you have. My recommendation is to have at least 8 GB, preferably 16 GB or more for best performance.
Next, fire up the utility. You will be presented with two options – “Upgrade this PC now” and “Create installation media for another PC”, as shown below:
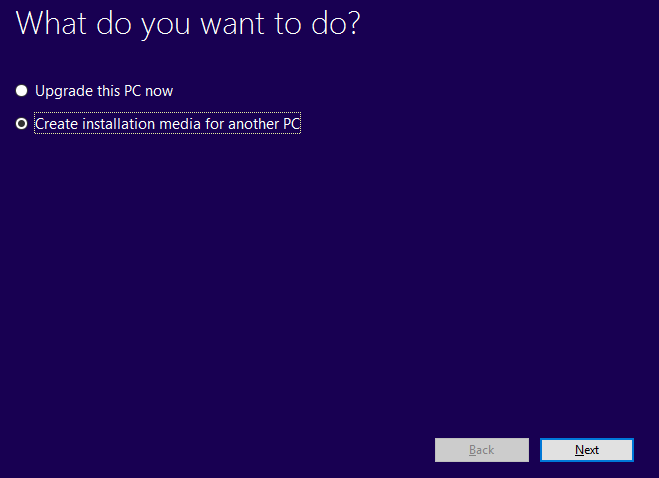
Select “Create installation media for another PC”. I recommend this option, because if you are planning to perform a clean install or perhaps perform an upgrade on more than one PC, you will need to have the software loaded on external media. If you select “Upgrade this PC now”, the utility will have to download the whole image once during the upgrade process and you will have to download the image again later to create bootable media.
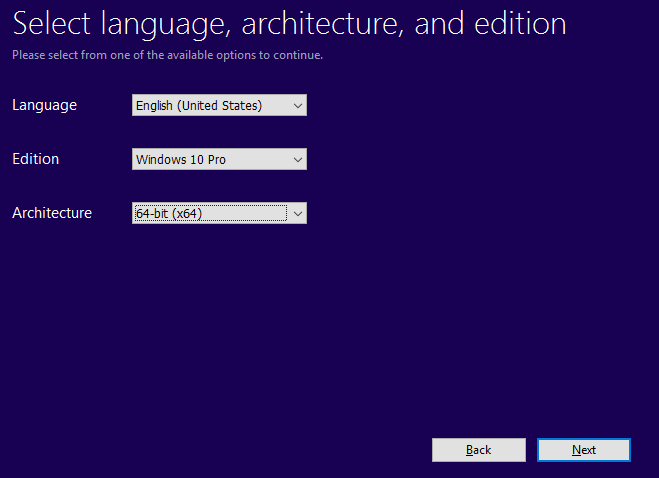
On the following screen, pick the desired language and pick the correct edition from the drop-down menu. Please note that the OS edition must match what you already have, so if you are running Windows 7 Home, you should pick “Windows 10 Home” as well. If you pick a wrong version, the upgrade license won’t be properly generated. Pick 64-bit under Architecture, since you do not want to be running 32-bit on a machine with more than 4 GB of RAM anyway:
On the next page, you will have the option to pick where to offload the image – to a USB flash drive, or to an ISO file that you can burn to a DVD. I personally went for the USB flash drive, since I don’t have DVD drives on my Surface Pro 3 and one of my PCs. Plus, USB flash drives are faster and more convenient anyway…
Once the files are downloaded and copied to your USB flash drive, or if you have already made a bootable DVD, you are ready for the next step.
5) Perform the Upgrade
Open up the USB flash drive or the DVD where the installation media was copied, find a file called “setup.exe”. You will see a Windows 10 setup that will first “Prepare” your machine for the upgrade:

Once the process reaches 100%, you will see the next screen, where the tool will ask you to download and install the latest updates. Go ahead and pick “Download and install updates” and click “Next”. Accept the terms and conditions and from there you will see a window that says “Ready to install”. Click “Install”, sit back and relax – Microsoft will take over from here:
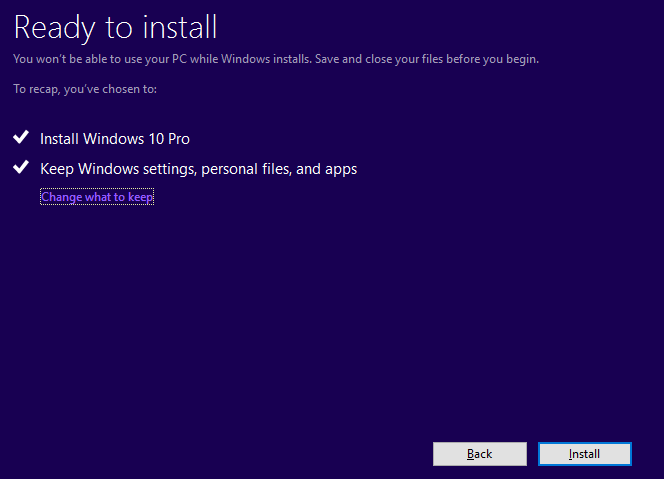
Quick note: technically, you can click the little “change what to keep” link, then select “Nothing” as the option, which will perform a clean install. However, it is not really a clean install per se, because the installer will still keep your old Windows files in a Windows.old folder and if you have other folders and partitions, those will not be touched. After the first upgrade, in which I selected to keep personal files and apps, I could not get rid of the Windows.old folder. I ran the Disk Cleanup utility and tried to wipe out this folder, but for some reason the system would not let me do it, saying that some files were in use. If you select “Nothing”, you should be able to remove the Windows.old folder, but then like I said, you still might end up with traces of old stuff left by your previous operating system.
I personally prefer doing a very clean install, so I usually wipe out all the boot drive partitions and start fresh.
6) Post Install Activities
Once Windows 10 is upgraded, check and make sure that it is fully activated. You will find the activation options in Settings -> Update & Security -> Activation. It should read “Windows is activated”:
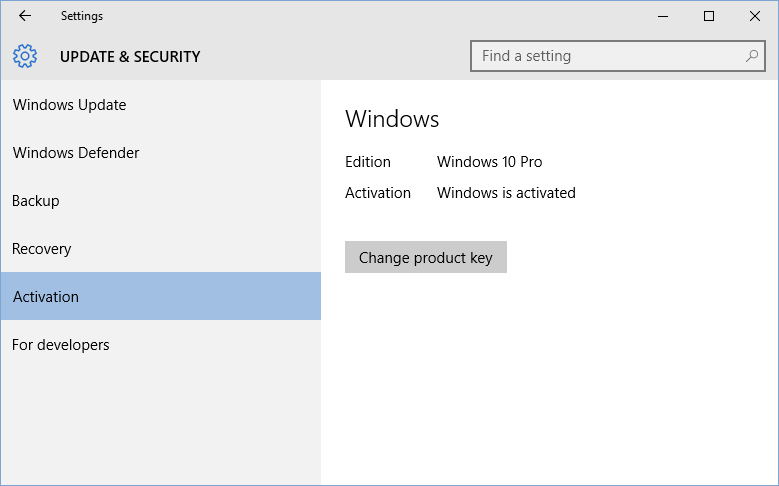
This means that everything is good to go and your license is now fully activated. Your PC is registered with Microsoft, so you can now perform a clean install.
7) Clean Install
Now that your upgrade license is activated, if you want to clean up the system partitions and start over with a completely fresh install, you can do it. But before you proceed, it might be a good idea to grab your new Windows 10 license key, just in case. Open up notepad, and copy-paste the following text into the file:
Set WshShell = CreateObject("WScript.Shell")
 MsgBox ConvertToKey(WshShell.RegRead("HKLM\SOFTWARE\Microsoft\Windows NT\CurrentVersion\DigitalProductId"))
Function ConvertToKey(Key)
Const KeyOffset = 52
i = 28
Chars = “BCDFGHJKMPQRTVWXY2346789”
Do
Cur = 0
x = 14
Do
Cur = Cur * 256
Cur = Key(x + KeyOffset) + Cur
Key(x + KeyOffset) = (Cur \ 24) And 255
Cur = Cur Mod 24
x = x -1
Loop While x >= 0
i = i -1
KeyOutput = Mid(Chars, Cur + 1, 1) & KeyOutput
If (((29 – i) Mod 6) = 0) And (i <> -1) Then
i = i -1
KeyOutput = “-” & KeyOutput
End If
Loop While i >= 0
ConvertToKey = KeyOutput
End Function
Save the contents into a script file by going to File -> Save As, click on the “Save as type” dropdown and change it to “All Files”. Give the file a name like “key.vbs” and Save the file on your desktop.
From there just double click the key.vbs file and you will see a small window that will display your license key. Write this key down on a piece of paper:

Although you should not need this license key, since Microsoft will automatically successfully verify it later (and yes, you can skip putting the license key during install and it will still activate), it is still a good idea to retrieve it and keep it safe in my opinion.
Now that you have the license key, it is time to perform a clean install.
Restart your PC and boot from the USB flash disk or from the DVD. If your computer does not want to boot through the newly created media, try restarting and tapping the F12 key. If nothing happens, tap the DEL key, enter the BIOS and change boot priority to force boot from the created media device.
Please absolutely make sure that you have a backup of ALL your data before you do this! Once you boot from the media, select “Custom” when it asks you, then delete all the partitions from the boot drive click on “Unallocated” and select “Next”. The installer will automatically create a partition and install the OS on it.
Your computer will restart several times during the install. Once everything is installed and ready to go, visit the activation page in Control Panel one more time to verify if your PC is activated. Visit the Windows Update link under the same “Update & Security” icon and make sure that you get the latest updates.
That’s all there is to it! Good luck with your install and please post your thoughts on Windows 10 upgrade process below!
Activation key troubles
Hi Nassim
I’ve followed your instructions and used the key.vbs on one desktop and three laptops – all with activated Danish Win 7 home running for years, three with 64 bit installations, one with 32 bit installation.
For some reason one laptop didn’t activate after clean install. And when I tried with the key shown by key.wbs it was not a valid key!
When looking up the keys from the other PC ti was the same code generated at all four!
Gert,
Did you follow the steps above by upgrading to Windows 10 before doing the clean install? That’s a required step – it generates a valid license key. If you skipped the upgrade and did a direct clean install, then you will have to reinstall your old copy of Windows, perform an upgrade, then do a clean install after the first two steps succeed. Unfortunately, there is no quick way around it – you have to upgrade first.
Nasim, you are a Star.
Thanks for a fantastic site, and for another right on time and quite unexpected “make my life easier” article.
Hi Nasim,
A little bit of issue when I perform the clean install.
After “Finishing up”, the computer restarted. However, it boosted again from the USB and went back to scratch i.e. starting the installation process again.
Is something wrong here? According to your instruction, it should know to progress instead of starting the installation process again, right?
Is there any other step I may need to take?
Thanks.
Quang, remove the USB disk and reboot the machine :)
Repeat of a prior question on the hardware discussion. Thanks for the great article Nasim! I was wondering, what drives do you install your OS and relevant programs (PS & LR)? Thanks! What do you put on the M.2 x4 ssd and M.2 ssd specifically
Dean, all programs, including the OS get installed in the main M.2 x4 SSD drive. The M.2 SSD drive can be used for caching / scratch and other purposes. You can also put your Lightroom catalog on the second drive if you do not want to put your catalog files in the fastest x4 drive.
Love your site man, glad it’s not closed. I can see how much you love photography, love your 500px stuff man! And I can’t wait MS to send their love this way!
Hi Nasim,
I followed your instructions which worked out perfectly. Unfortunately Windows 10 seems like a mixed bag somewhere between win 7 and win 8.1. I guess the simple and straight forward windows interface is now a thing of the past. Yikes, no colored title bars either, thus requiring a download and more tweaks to get them back. Windows 10 is typical of what some of the camera companies are doing today. Lots of engineers run around with their creative ideas and no one is able to put it all together in a way that’s uncomplicated and easy to use. I’m glad I imaged Win 7 beforehand. I had a sigh of relief once I had it back.
Mike
Hi Nasim,
This is a very valuable article on three fronts. First, there is a link to the Windows 10 media download page. Yes, it’s a big deal because a simple Google search does not immediately reveal it. Second, you bring up that you must activate Windows 10 before you can do a clean install. While this is easy to discover it’s all in one easy to follow article. Third, you provided a visual basic file that allows you to quickly / easily retrieve the Windows 10 product key. That beats rummaging around in the registry everyday of the week (and I don’t have to write the script myself, were I so inclined) Can’t thank you enough.
BTW – For those who want to be very careful, wait a few weeks or until SP1 in October to upgrade. If you do the clean install instead of the in-place upgrade, you should not get any weird errors. A relative did an in-place upgrade and got the Critical Error Start menu and Cortana aren’t working… error and after I did a clean install, that was gone.
Just finished upgrading my Bootcamp partition on a MBP from win 7 to win 10, slow process but no issues. I only use Win on Bootcamp to be able to run Samsung DVR Smart viewer software and WinTV recording software, sadly are not available for MAC OS X. After the upgrade I had to update both mentioned apps and they are working fine now.
One thing is for sure, this Win 10 OS is VERY VERY intrusive, in every configuration setting will try to gather personal information and it is complicated to circumvent, the BIG DATA era, I guess that Big Data collection gives more revenue than selling a New OS version.
Take no offense here and definitely don’t want to start a big argument, but doubt the reason is “big data” other than trying to gather as much information as possible to make sure Windows 10 works and is secure. They have a ton riding on its success and it goes beyond desktop computing. The amount they would make from “big data” would be puny if this OS upgrade works and allows them to sell a whole lot more mobile devices (especially phones) and services.
BTW – love Macs, typing this on 2013 MBP and have two Windows desktops for video / Proshow slideshow software / heavy Photoshop. No bias at all. Windows, Mac OS, and Linux are just platforms along with IOS and Android. I have accepted the limitations as well as the advantages of all of them :)
Why do people think Windows is the only intrusive OS out there. Do people have to be that naive or blind to what the other companies OS is doing?
Every time I do something on this macbook it is asking if I want to use Keychain? Where is keychain stored, the cloud, who has access to it? Apple, the government, police, a very good or lucky hacker and yourself.
Intrusive…
I have a phone and it is loaded with useless google bloatware.
Samsung NX1 has Android, how long will it be when reviews will be saying…This camera has android and it has this this and this…vs this camera has iPhone(mac iOS) and it can do this this and this? Wow you can take better pictures and share it with social media because Android bloatware or iOS bloatware says so.
What do you think Nasim, are cameras heading in the direction phones are? The Samsung NX1 has Android on it.
Thanks for this well written article.
Thanks for taking the time and writing the script.
Thanks for the information on update first then clean install.
I have a Mac but bootcamp Win 7. (those of us with mac’s have that option. Try that on a windows machine!) Just remember once 30 days have past your “free” upgrade will no longer let you revert back to whatever version of Windows you had and will no longer let you use the license key that it came with to register that version. So, your Win 7 install disk will be useless with your Windows 10 free upgrade.
Now your STUCK with Windows (who will) be able to force all upgrades whether wanted or not. Good luck with that one:)
My advise is to wait this out. You have a whole year to read and decide just how intrusive Microsoft will become before you pull the trigger on this OS.
“I have a Mac but bootcamp Win 7. (those of us with mac’s have that option.” Those of us with windows don’t need the option. If Mac’s really were that wonderful someone would have wrote the program for Windows but there is no demand/market for it.
The 30 day thing you refer to is not a problem. Ever hear of cloning?
Normally I don’t respond to posts like yours but your unjustified superior tone rankles.
Really Windows “best of breed” what a joke.
I can’t imagine any serious artist working with a Windows operating system.
I can’t imagine that in this day and age there are still oldtimers like who think that Mac is only thing appropriate for media. And you do know that Mac today is Unix with a shell on it ? So good was that old Mac that it’s creators abandoned it. Like 99.95 av Mac users you are “technologically challenged” and it is not windows fault that you people can’t handle the tech.
As an ‘old timer’, I don’t feel particularly technologically challenged, but switched to the Mac because the ugly, counterintuitive and downright convoluted interface of Windows drove me nuts.
Mind you, I was a learner at the time and I would often find myself sitting up at 1am trying to dig my out of the hole I had dug for myself in the Windows ‘system’.
Eventually I listened to some good advice from a friend, dumped Windows and bought a Mac.
It was like night and day and I have not looked back – other than in pity.
Thanks Nasim for the updating instructions. I look forward to updating when I get home in a few weeks from working . I have book marked this page on my macbook.
I am a long time user of windows. I learned to control the operating system. Sometimes difficult sometimes easy, always a good learning experience.
I heard all this stuff about mac os. I bought a macbook pro. I have learned that…YOU DO NOT CONTROL anything. The OS controls you. So true are the books that sell Mac for dummies.
For me it is a Love Hate for both operating systems.
Like photography. If you want the control of the pictures then get a DSLR-mirrorless and learn the camera(windows os). If you want a point and shoot-phone camera then the camera controls the pictures(Mac os).
As always… which is better
Windows or Mac
Nikon or Canon
Navy Seals or Canadian CSOR
Euro fighter or F22 Raptor
Men or Women (how many men does it take to change a burnt out light bulb…5, one to hold the light bulb and 4 to turn the ladder. How many women does it take to change a burnt out light bulb…no one knows, they order the men to change it).
Any serious ARTIST is not on this forum for their are too BUSY to make ART!
This was the joke of the day ,are u smart enough to say that Dan de man ?So serious artist are using Mac,and people with Windows can´t be :)))
So people who make design,3D artist,graphic for games and movie editors are using Mac ?Real artist don´t have time for forums because their are busy for their art :))) For what forums are build,for people like u?
C´mon man what planet are u living?
Don´t comment if you are so close in mind and stick with one thing Mac.