With each new release, Lightroom requires specific changes to the database, also known as a “catalog”, that must be carried out in an upgrade process before the newer version of the software can be used. While the process of upgrading the actual software is pretty straightforward, there are some important steps one needs to take to make sure that the Lightroom catalogs are upgraded successfully. If you are scared about upgrading and have not done it in the past, this guide might assist you in this process. The good news is, Adobe allows keeping both the newer and the older versions of Lightroom on the same machine, which means that you can continue to use your old Lightroom catalog if anything goes wrong. Once you are fully satisfied with the upgrade, you can then remove the old version of Lightroom, along with the old versions of catalogs. In this article, I will guide you through the process of upgrading Lightroom to the latest version.
Table of Contents
1) Download and Install The Latest Lightroom Release
Whether you are using the standalone / retail version of the software or the Creative Cloud (CC) version, once you purchase the latest version or become a CC subscriber, you should have access to download the latest software release. If Adobe releases a new major version, you should get notified either via the software itself (you can also check Help->Updates within Lightroom), or through the Creative Cloud app. Download and install the latest version of Lightroom – the process is typically very easy and straightforward. Once Lightroom is installed make sure that it did not wipe out your existing Lightroom version (which can sometimes happen with the CC version), in case you want to continue using it. If you find that your older version is removed in CC, fire up the Creative Cloud app, then navigate to the “Apps” tab and click the “All Apps” drop-down that sits next to “Find Additional Apps”, as shown below:
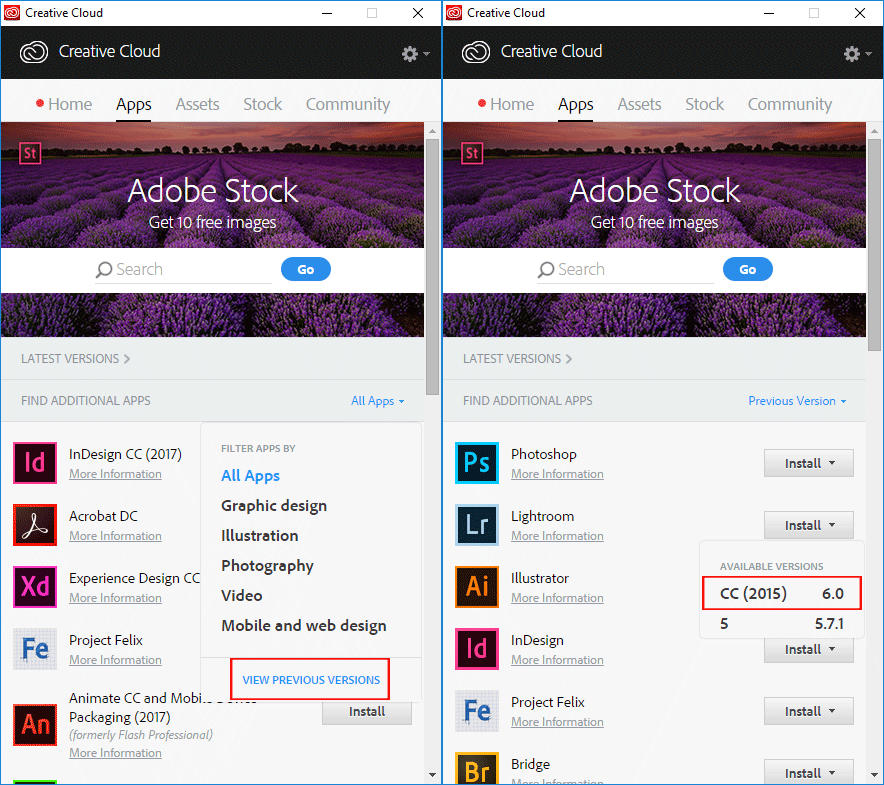
From there, click on the “View Previous Versions” link, which should reveal the options to install the older version of the software. You can then click the “Install” button that will reveal older available releases for you. Select the release you were on, which will install it on your computer.
2) Back Up Your Existing Lightroom Catalogs
Before you upgrade Lightroom, it is always a good idea to locate every catalog you have and back it up to a place other than your computer (ideally to an external back up drive). All you have to do is find the actual catalog files with the .lrcat extension and back them up. You don’t need to back up all other files and sub-folders like “Previews.lrdata”, because those folders just contain thumbnails of images that you can re-generate later. Plus, if you back up the whole folder, it will take significantly longer than backing up the single catalog file. If you do not want to go through the hassle of regenerating thumbnails later, you can back up everything – the choice is yours.
3) Upgrade Your Lightroom Catalogs
After everything is backed up and the latest and greatest Lightroom release is installed, you should see its icon on your desktop, start menu or within the CC app. Go ahead and launch Lightroom, which will bring up a dialog box warning you that you need to upgrade your existing catalog. Unfortunately, this is something you must do and not just for the latest catalog you are working on – you will have to upgrade every single catalog you are planning to work with in the future. Personally, I prefer upgrading every catalog rather than just the latest one, because if anything fails, I want to know about it upfront. Sometimes Lightroom updates are quite buggy and if something does not work out during the upgrade, it might be worth waiting until Adobe releases a fix before fully committing to the new version. When going through the catalog upgrade process, you should see something like this:
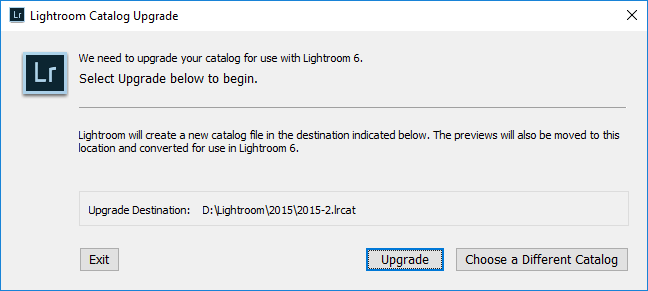
Lightroom will typically place the upgraded catalog in the same folder where you have the original catalog and will preserve the folder structure and the file name (by default, it will add a “-2” to the catalog name as shown above). You can either keep it in the same folder, or you can move it to a whole different folder structure. I typically just leave the folder structure the same and clean up the folder later (more on that below).
Next, simply hit the “Upgrade” button to start the upgrade process. The speed of the upgrade process will depend on the number of pictures in your catalog, your computer’s processing power and your storage speed, but typically should not take more than 5-10 minutes, unless it is a major overhaul with a lot of changes to the database and your catalog is large.
4) Make Sure All Images are Available and Visible
Write down the total number of photographs in your upgraded catalog, then close the new version of Lightroom and open the older one. Look at the total number of images in your older catalog and make sure that the numbers match. Close the older version of Lightroom, open the latest one back again and then go through some random images and see if they are opening up and you can see all your prior edits in them. If you upgraded the catalog in a different folder than your original, you might need to wait for thumbnails to regenerate. If you previously created a lot of 1:1 previews and you do not want to lose them, another option is to copy the Previews.lrdata folder to the same folder where your upgraded catalog resides. This way, Lightroom can continue using the older preview files and 1:1 renders.
5) Review Collections and Presets
Make sure that your Collections and previous Presets are all preserved. Lightroom typically shares the same preset folders, so those should work by default, but it does not hurt to check anyway. If the upgrade was successful, custom Collections and your Keywords should be visible as well:
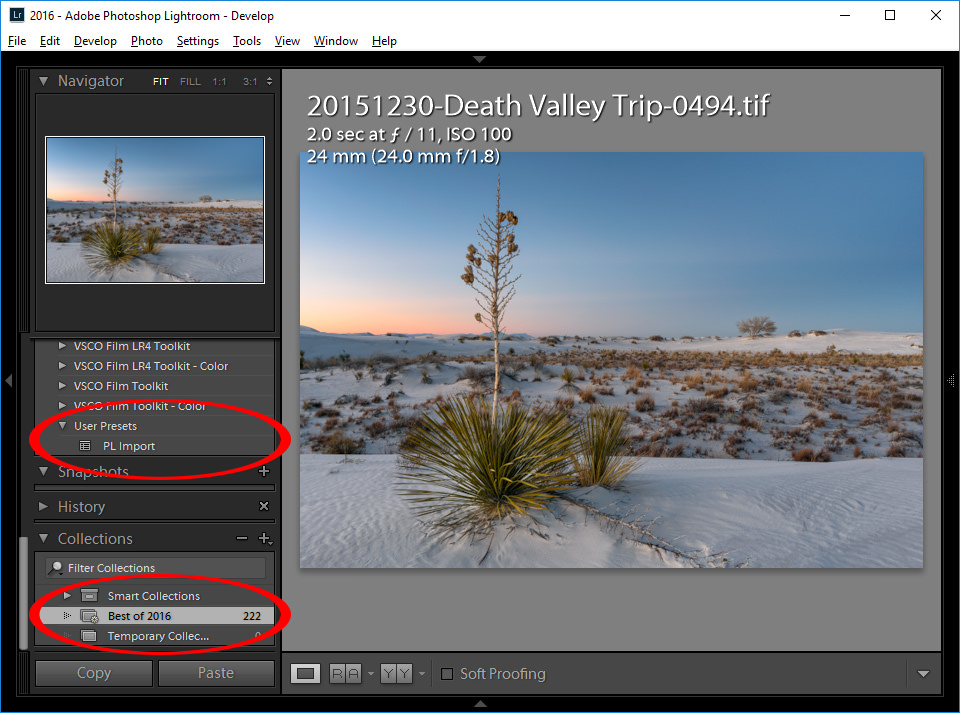
If anything is missing, something probably went wrong during the upgrade process. Personally, I have never had to manually migrate any of the presets and collections before and I have been upgrading Lightroom since the original version.
6) Process Version
Another thing to check is the Process Version – sometimes Adobe will deliver changes to the core functionality of the software and the only way you can reveal those changes is by upgrading to the latest and greatest process version. I wrote a detailed article on Lightroom Process Version, which I highly recommend that you give a read, as it is an important topic. Don’t just mass-upgrade all your photographs to the latest process version, because it might drastically change your existing edits and make your images look completely different.
If you have more than one catalog, repeat steps #3 to #5 for every Lightroom catalog that needs to be upgraded.
Good luck and please let me know if you have any questions!
I have light room Version foron an Apple Computer and since I upgraded the operating System I cannot download the new Photos. The system just crashes. Any suggestions?
Thank you
I am using LR 5.7 standalone version in pc. I like to upgrade to LR 6 in order to use HDR feature, but I can find the link to buy. Can you help?
i am using the older LR 3.6 version…can i jump to LR6 from 3.6. HDR and newer features of LR are attracting me quite a bit.
any experience with on1 2017 raw vs perfectly clear v3 as add on to photoshop elements ?
Thanks Nasim, for the new info! This raises a new question for me. I have been backing up my only catalog every time I exit Lightroom and now have a lot of backup files for the same catalog. I am wondering if any of the older files are of any use and if not can I delete them ?
I have the Lightroom 6.7 release – not the CC version. I’ve read there is a 6.9 release but my updater is not seeing it. Is there an update to the updater or some else I’m missing?
Strange– I always download from the Creative Cloud app and have never seen the “Upgrade Catalog” dialogue. Everything seems to be OK. Been doing this since the beginning of CC. What am I missing?
Same here. I have been updating Lightroom CC for over a year, and never had this dialogue box.
David, please see my response to Jay below.
Jay, that dialog only comes up with a major new version rolls out. It has been a while since Adobe released a new version, but if one comes out later this year, you will see that dialog.
I recently imported some pics into LR and my pics went under a 2015 file instead of going in consecutive order under 2017! The file dates are 2017 but it it’s under the 2015 file! And after that I imported more pics are they are all landing up there! What is wrong? Thanks.
Mickey, you probably have the wrong folder you are pointing to during the import process. Check my Lightroom Import Settings article for more detail on where you should be placing your images. Also, if you ended up with images in the wrong folder, it is very easy to move them back to where they should belong – simply select all the images and drag and drop them into the appropriate 2017 folder.
Thanks Nasim, great article as always. I am a LR desktop users, non CC, and, as much as I love the product, I really struggle with it’s start-up performance. Ay tips on how to accelerate the process?
Thanks,
Tom
Tom, I will be posting a separate article on how to improve Lightroom’s speed, so please stay tuned :)