Normally, if you’re using a tripod, camera shake isn’t something you’ll have to worry very much about. However, there are some obvious exceptions. If you’ve ever found yourself taking pictures in heavy winds, you’ll know the difficulties of capturing sharp photos — particularly if you’re using a telephoto lens. This seems like an impossible situation; what do you do when a tripod isn’t enough to stop your camera from shaking? Luckily, there are ways to improve sharpness even in windy conditions and come away with photos that are completely usable. I’ll cover some of the most important here.
Table of Contents
1) Don’t Use Your Center Column
This one should be a given, but one of the most preventable mistakes I see photographers make in windy conditions is to continue using the center column on their tripod.
Even in normal conditions, you need to exercise caution with a center column, particularly on cheaper tripods. As we mentioned in our article on using a tripod, they add a single point of weakness to your setup and are very susceptible to vibrations from the surrounding environment.
It’s not like they are never useful — particularly if you need your tripod to reach a certain height — but they’ll harm your sharpness significantly if you’re shooting in the wind. Whenever possible, lower your center column.
2) Lower Your Tripod
Assuming that your composition allows it, you’ll see incredible improvements simply by lowering your tripod a foot or two. Even in mild breezes, using a heavy-duty carbon fiber tripod, I’ll often find suboptimal sharpness when I’m using a focal length of 150mm or more at my tripod’s full height.
Just collapsing a single section of each leg can, from what I’ve seen, reduce the intensity of the blur almost in half. In the wind, this is one of the best ways to restore optimal sharpness to your setup.
Another important note: When you collapse one of your tripod sections, it should be the thinnest one. Thin tripod sections are much more prone to vibrations, and there’s no reason to leave them open last.
The only case where this doesn’t apply is if you’re taking pictures in sand or the ocean, and you don’t want grit or salt to mess up the joints of your tripod. In that case, it’s fine to leave the lowest, thinnest section of your tripod extended, since it can raise the upper joints above the water or sand damage — though, even that is at the expense of some possible sharpness.
3) Use Vibration Reduction
Although the common wisdom says to avoid using vibration reduction with a tripod, this is one situation where that advice absolutely doesn’t apply.
Vibration reduction (also known as optical stabilization or vibration compensation) does a surprisingly good job of reducing blurry photos in the wind. Take a look at the comparison below, which is a crop from a photo taken at 200mm in a strong breeze, both taken at 1/4 second:
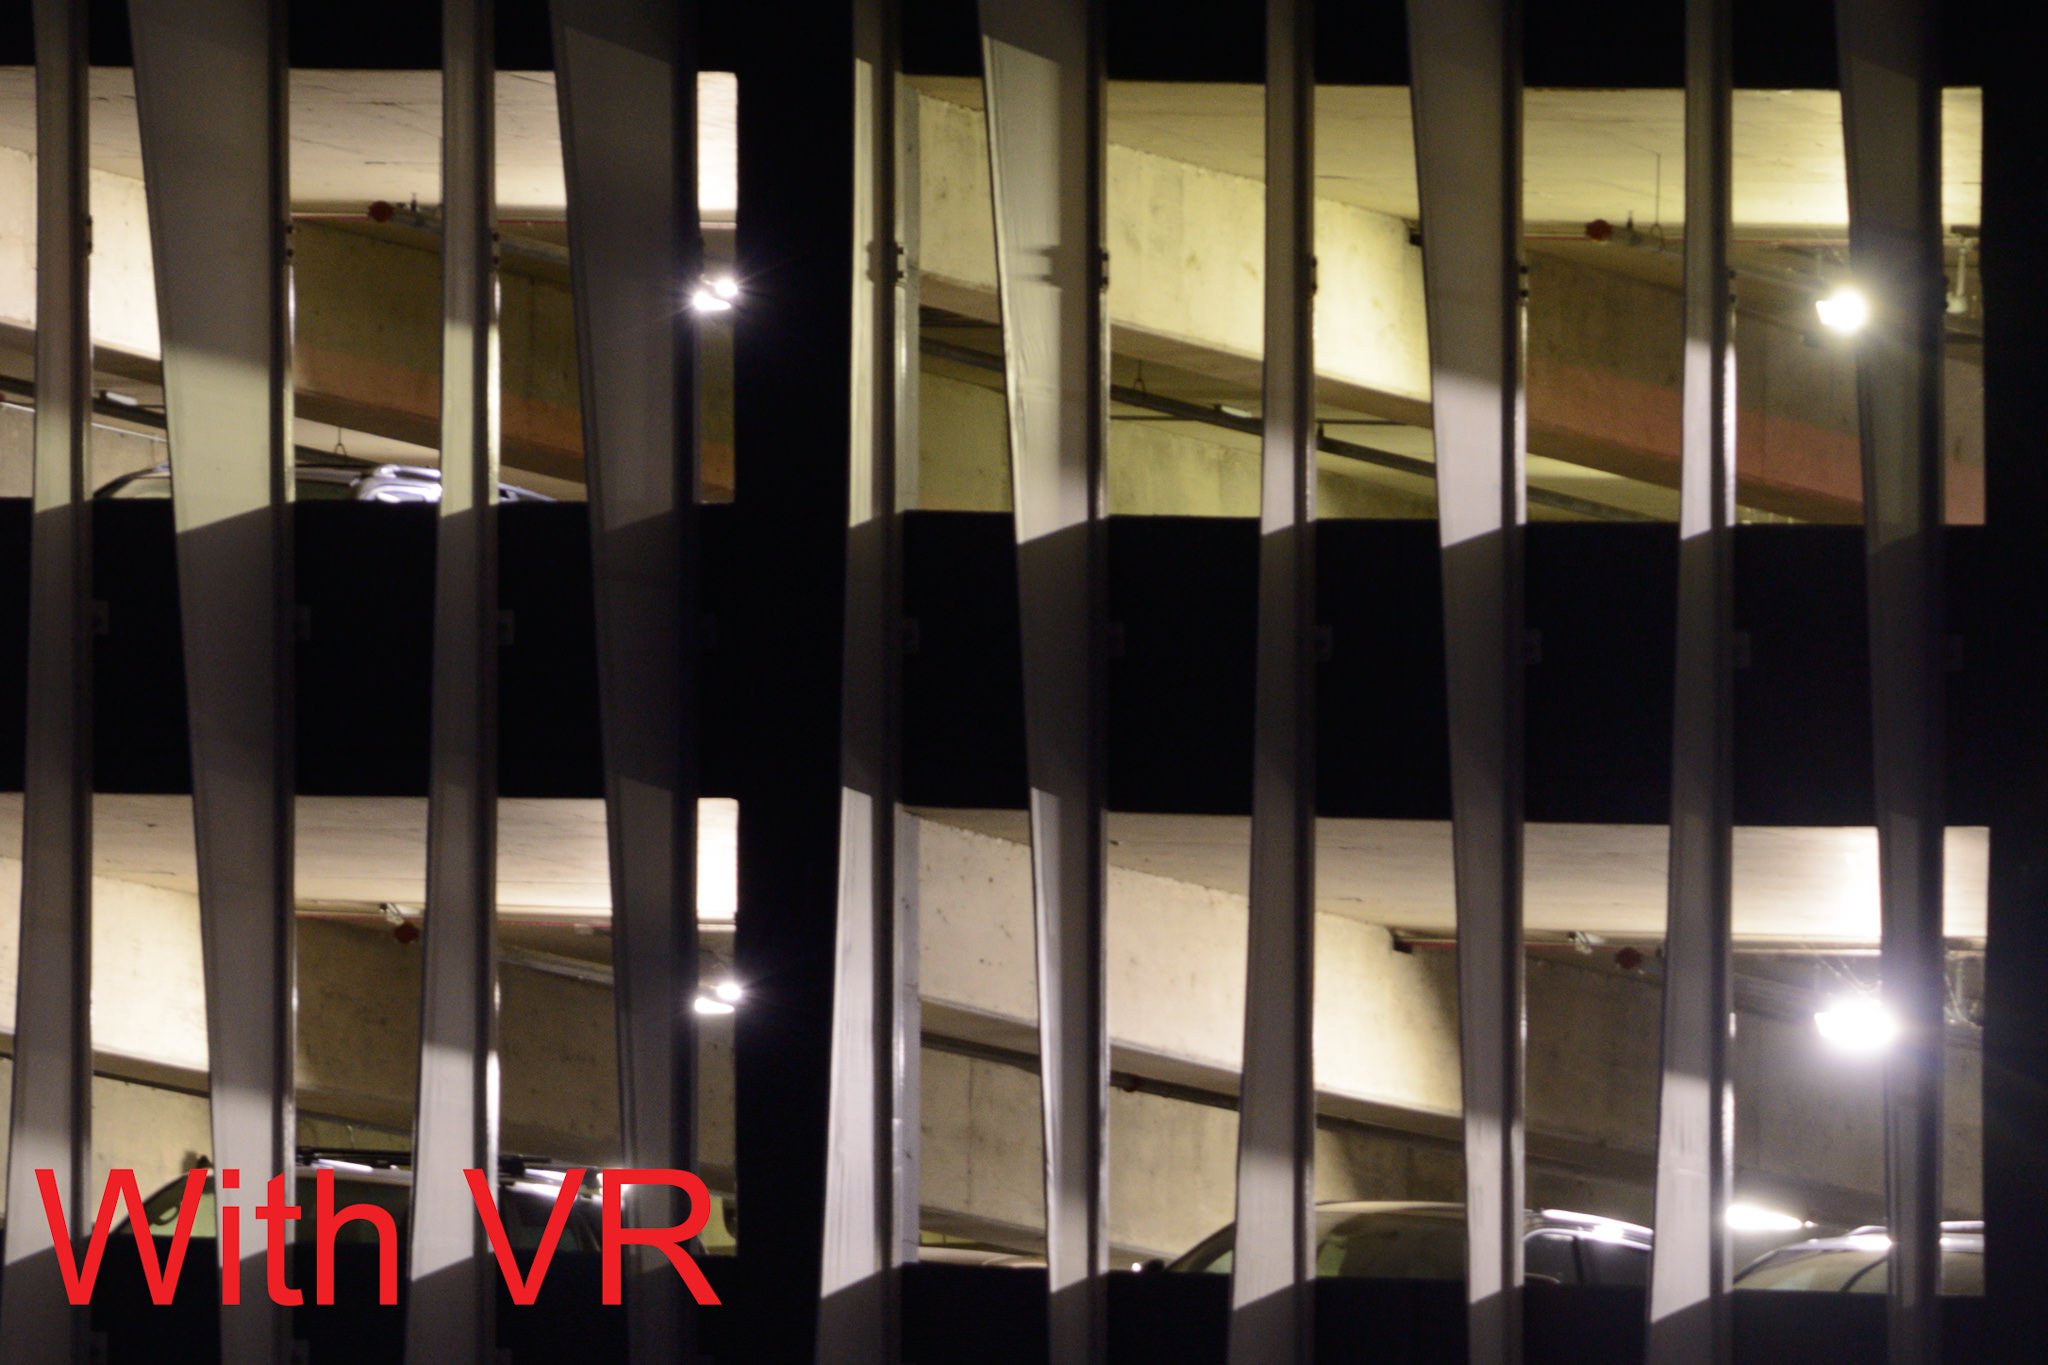
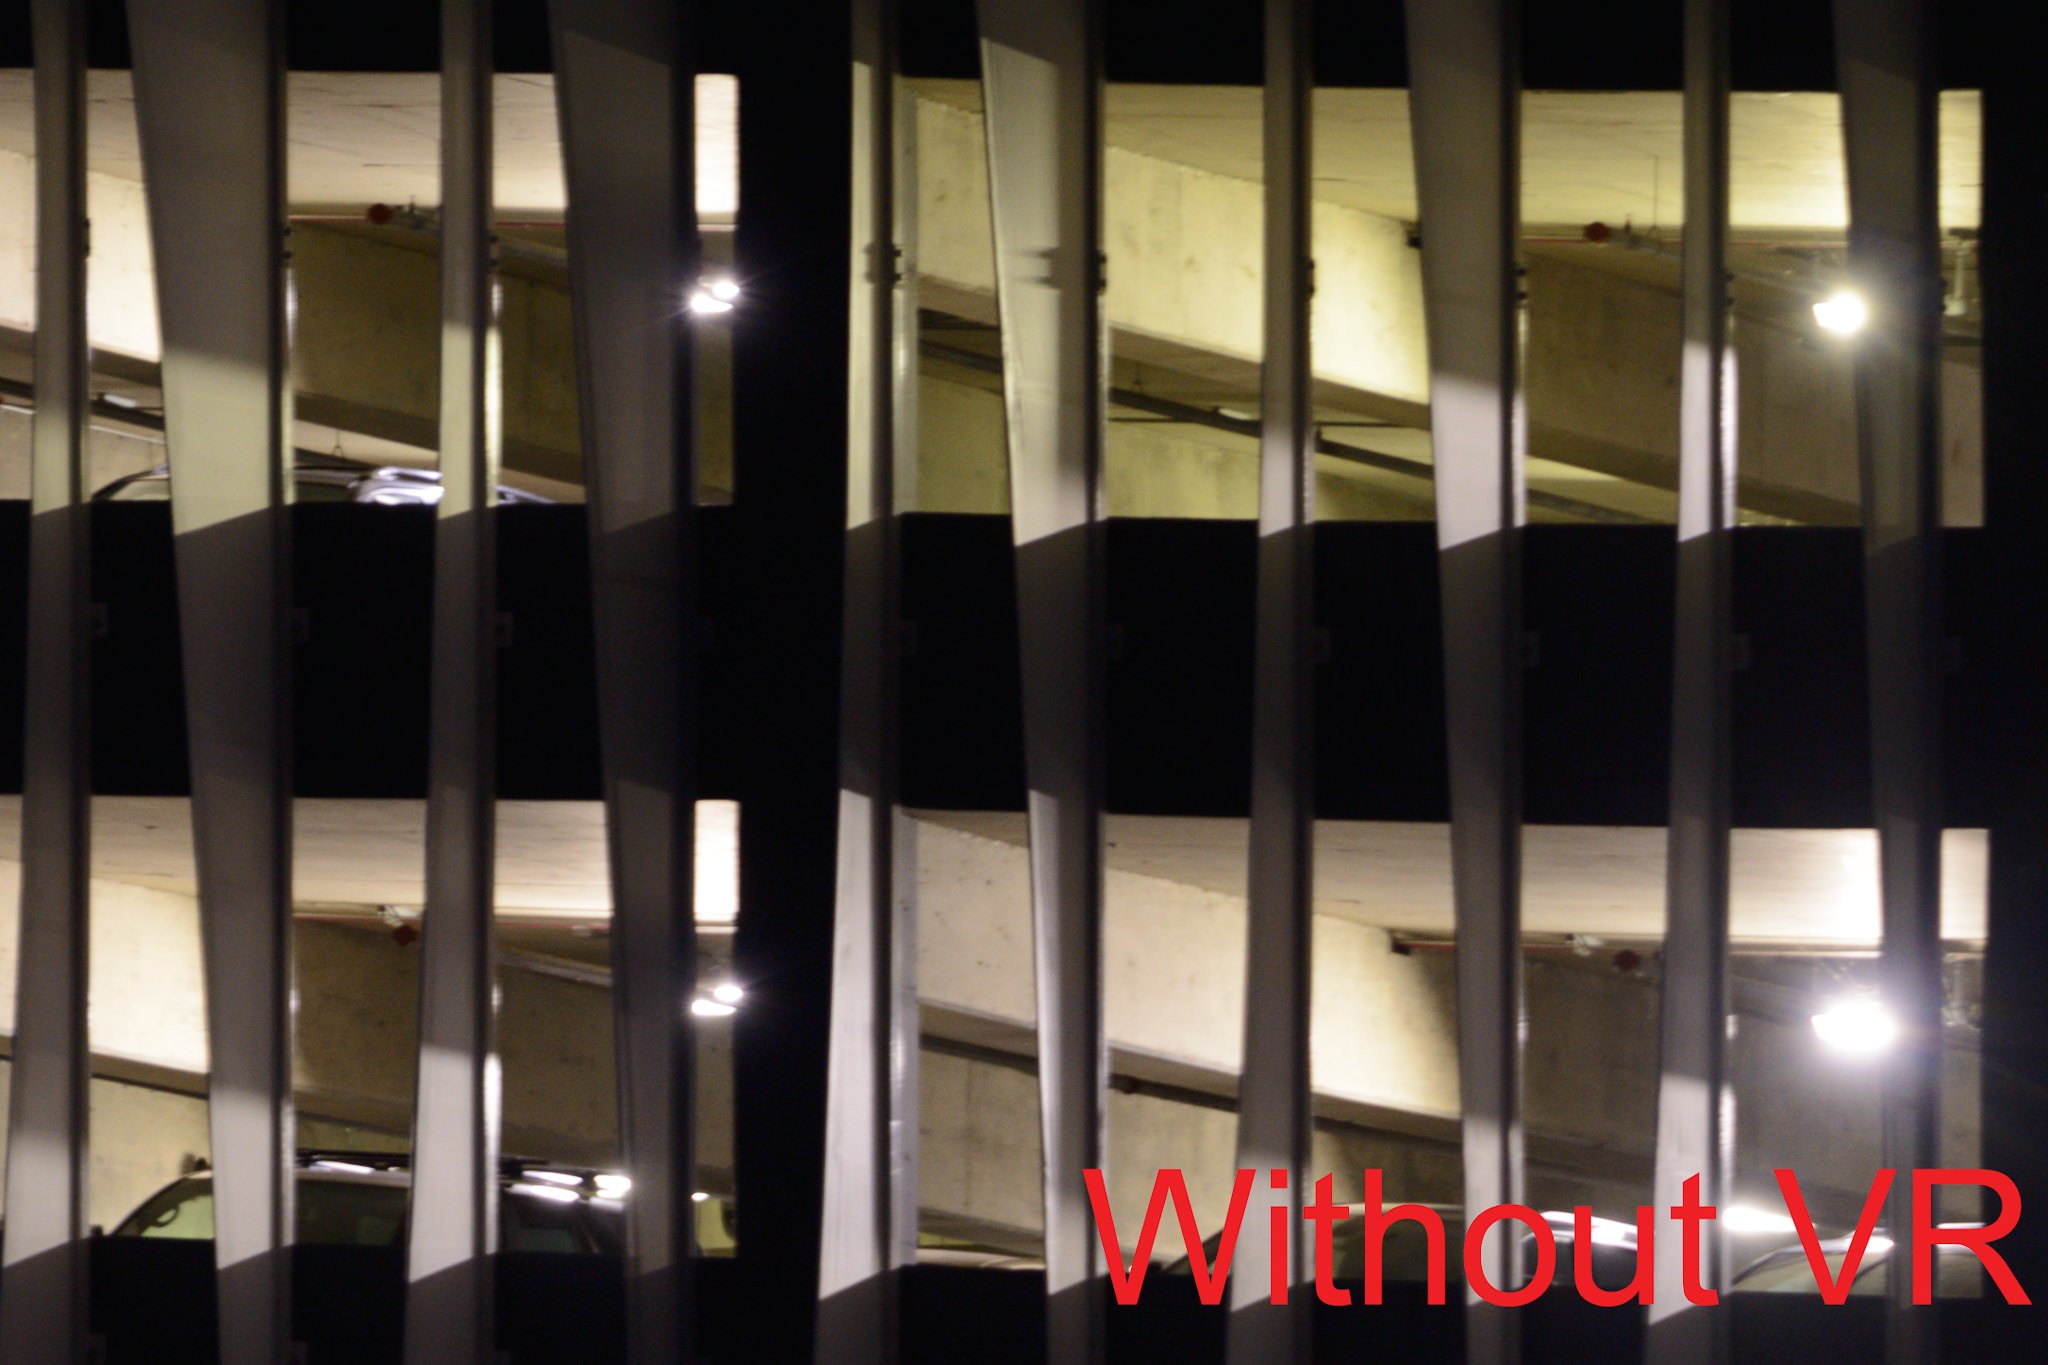
The differences in these unsharpened photos are pretty clearly in favor of the VR, and this isn’t a particularly extreme crop.
As for the accuracy of this comparison, when I took these photos, the wind was shifting enough that there were already some sharpness differences from photo to photo (leaving my settings unchanged). So, I did my best to capture both of these photos when the wind was similarly strong, and I also took a series of photos to confirm that these effects were present in more than just a single comparison — which, inarguably, they were.
When it’s windy, and you’re using a tripod, turn on vibration reduction. Even if you don’t think that the wind is robbing sharpness from your photos, it’s worth the effort.
4) Don’t Hang A Bag from Your Tripod
One of the stranger suggestions I’ve heard from photographers is to hang a bag from your tripod when it’s windy. Some tripod manufacturers even include a hook at the top to make this easier.
It’s also something that doesn’t help at all. In fact, if it’s windy enough to cause your tripod to vibrate significantly, it’s also windy enough to cause your bag to swing around and make your photos less sharp. Unless your tripod is actually in danger of blowing over, there is no benefit to hanging your bag from the hook.
While working on this article, I also tested the idea of “strapping” your backpack to the tripod, rather than hanging it, in an attempt to make your tripod weigh more without adding a component that could swing. This method is better, but I really didn’t see any differences between a photo taken that way and without any backpack at all. That’s because the shaking that causes blur tends to be low-level, high-frequency vibration, which is not something that is easy to steady with your bag.
Again, though, if it’s so windy that your tripod is at risk of blowing over, this may be a viable method — luckily, I’ve never shot in conditions that were quite that extreme, and I don’t think most people do, either.
As a whole, except in the most insane situations, just leave your tripod as it is. Adding a backpack may seem like it would help, but it almost always does more harm than good.
5) Don’t Grab the Tripod to Steady It
Along the same lines, don’t grab your tripod in the hopes of steadying its vibrations. You’ll just add larger, courser shakes that blur your photos even more.
Luckily, I don’t see many photographers attempt to do this, but it’s still something that happens occasionally. Unless you’re taking pictures in the ocean or in a river, and you’re worried that your tripod will roll over, there’s no reason to hold onto it while taking a picture (and even then, it’s generally better to hold your hand a couple inches away from the tripod in case it falls, but not actually touch it during the exposure).
Tripods, especially high-end versions, are well-machined tools with the sole goal of being as stable as possible. We photographers, in contrast, can’t hold our own hands perfectly still in front of us for even a second. Tripods win.
6) Take Lots of Photos
I don’t like watching people machine-gun a scene while taking pictures, since I see landscape photography as a much slower, more deliberate process. However, if you’re taking pictures under very windy conditions, it’s a good tool to have at your disposal.
For every single frame you’d normally take, capture five or six instead. If you’re creating a panorama or HDR, take several shots at once before changing your composition or camera settings. This is one of the few cases where “Continuous High” mode can be useful for landscape photography.
That’s because wind, as far as we’re concerned, is random. There is no way to predict when your photo will be sharp or blurry in a breeze, and your best shot at minimizing the damage is to capture as many samples as possible. No, this doesn’t guarantee that you’ll get a sharp result, but it’s a good way to maximize your odds.
7) Use a Faster Shutter Speed
Although it’s frustrating to raise your ISO for landscape photography, it can be necessary if you’re still getting blurry photos after doing all the steps above. Your last resort is to use a quicker shutter speed, which likely will require a higher ISO than you’d normally want.
Still, it can be worth it. It’s much better to have a sharp photo at ISO 400 and 1/20 second than a blurry photo at ISO 100 and 1/5 second. Blur from camera shake is much worse than the extra graininess of a high ISO; it’s definitely worth the tradeoff.
Ideally, you won’t have to make such a compromise, but it’s important to know that you still have this option for particularly intense winds.
NIKON D810 + 70-200mm f/4 @ 110mm, ISO 400, 1/60, f/16.0
8) Conclusion
It’s never possible to guarantee perfect photos in windy conditions, but there are certainly some things you can do to improve your chances.
First, lower your tripod’s center column and collapse it to be as low as possible. If your composition requires your camera to be a certain height, collapse the thinnest leg sections first to minimize vibrations.
Then, if your lens or camera allows it, turn on vibration reduction. Although VR isn’t usually necessary for tripod-based photography, this is one situation where it makes a clear difference.
Also, unless you’re worried about your tripod blowing away, don’t hang anything from the center hook or hold the tripod with your hands while taking a photo. Most of the time, you’ll add vibrations, or, at best, not affect the photo in any meaningful way.
Finally, to maximize your chances of getting a sharp photo, take several images per composition and pick the sharpest one later. This mindset is anathema to most landscape photography, but, under particularly windy conditions, it may be your best option. And, if all else fails, you can always raise your ISO and use a faster shutter speed.
These tips won’t save you in every case, but they’ll make your life easier if you run into particularly windy conditions. Plus, since bad weather often works well for photography, it’s likely that this information will be most useful when you’re capturing an especially beautiful landscape — so, it’s important to commit to memory. By optimizing your camera setup, you’ll be able to maximize your ability to take usable photos under even the most extreme of situations, including windy conditions.
Great article, thanks. Not so new anymore, but I just found it accidentally.
There is another technique that I sometimes use in extremely windy conditions. I do the long exposure to capture the mood I like, and before moving the camera I take off all filters and add a short exposure which should be sharp. Then, in post-processing I blend those elements that are supposed to be sharp from the short exposure into the long exposure.
Requires some experience in Photoshop, and it does not really work for all images. And it time-consuming, but if the shot turns out to be a great one (if sharp), it might be worth it. Just another option.
Other tripod researchers showed that tripod motion per se, from any reason, was minimized by solid metal to metal rigid connections ( e.g.: Arca Swiss quick release plate and clamp, fully clamped and locked ballhead, metal-to-metal bolted ballhead to metal tripod top. Carbon fiber tripods have an inherent resistance to transmitting vibration over metal tripods, but the research on wind effect was all done with metal ( Gitzo/Manfrotto/Sachtler) tripods, and I ask if anyone has seen any si;milar research ( measuring carbon fiber tripod motion with wind vs similar wind effect on identical height/section/quality carbon fibver tripods)??
I have a bottom-of-the-line Manfrotto tripod. The cameras mirror slap was enough to make the end of the telephoto lens bob up and down. I tried all kinds of things, in fact, most of those suggested here.
Then I noticed an O-ring on the vertical shaft between the head and the top of the tripod. I would imagine that it was designed to cushion the contact between the head and tripod. I took that O-ring out and now there is a metal-to-metal contact when the head is lowered to the tripod.
This worked very well. Best of all it was free and the mod is reversible. I put the O ring on the center shaft below the tripod. I can’t imagine ever putting it back, but if I chose to, the O ring is safely stored. I obtained the tripod second hand, so I do not know if Manfrotto shipped it this way or if the previous owner moved the O-ring. Either way, getting that O-ring out of there made a significant difference.
Spencer,
Superb tips that are very practical as always. Your section 5) “Don’t Grab the Tripod to Steady It” brought a question to mind.
Many folks suggest long-lens technique (LLT) when using a telephoto to help stabilize the camera/lens and improve sharpness especially when shooting in windy situations. By LLT I refer to lightly draping one’s hand over the lens above where the lens mount connects to the tripod head (assuming the lens has a lens collar.) I’ve long wondered about this since a person’s hand is not as stable as a good tripod, and I have not seen clear (sic) benefits to it, in particular when taking picture of the moon with a 600mm lens. Have you any suggestion regarding this?
Pete
I’ve heard about that. I don’t use long lenses, so take my comment for what it’s worth, but here’s my opinion. For something like the moon, don’t use LLT; instead, set your camera on shutter delay mode and potentially a self timer. It’s only when you’re photographing moving subjects that LLT comes into play — a situation where your right hand is already touching the camera to take the picture and causing shake. By draping your other hand on the end of the lens, you’re not trying to prevent vibration caused by the wind, but to dampen vibration from your other hand, which will be more intense. I’d imagine that this wouldn’t be a night and day difference, and you’d only see it at certain shutter speeds, but my prediction is that it’s a real effect.
Hopefully that makes sense. When I eventually buy or rent a supertelephoto, I’ll test it out and see if LLT actually helps.
Additionally the shutter will cause vibration that reverberates up and then back down a long lens. By placing your hand in the position described above dampens this returning vibration so it would also help with moon shots.
Or use your camera’s Mirror Up (Mup) setting. It locks your mirror in the up position. I use it routinely; it nearly never does any harm (except sports and wildlife).
After having shot exclusively tripod since 1986, I simply cannot believe that putting any part of your body within a foot of your tripod is anything but bad. Perhaps hanging your bag from the place where your lens attaches to your body, then placing the bag where the center column sits on the tripod, would work. I’ve never tried it; it just sounds good to me. My method is to use an ultra-heavy tripod (20 lb) topped with a light camera. And yes, I would carry it long distances into the field (until I reached my fifties).
How about using the spikes instead of the rubber feet? In which situations do you find the spikes helpful? Thanks.
I think the spikes are really versatile, often more so than the rubber feet. If I’m taking pictures in wet sand, they’re essential, particularly when ocean waves are threatening to blur the photo. In mud or soft grass, they’re also better than rubber, especially if you want to anchor your tripod to the ground in high winds. Lastly, I find them very useful in icy conditions, since they’ll prevent your camera from sliding around. There aren’t many situations where rubber feet are clearly better, but I tend to find them more useful to generate friction if you’re taking pictures on sloped rocks or the side of a hill.
I’m in Colorado and do a lot in the mountains, so I have to deal with winds…some very high winds…just about every time I go out. I have a RRS 4-section and Acratech pan head to get the height I want without a center column.
I was out a couple of months ago when the wind was howling. I was at a Wilkerson Pass pull off looking out at the Sawatch Range. The clouds were spectacular. The wind was blowing so hard, though, that it made just standing still difficult. I knew I’d likely not get those clouds and sun like that again, so I set up my A7rII/Sony70-200 f2.8 GM lens on my RRS tripod. I felt the legs; I could feel very high frequency vibration in the legs as the wind assaulted them. I hugged the tripod and the vibrations disappeared. I thought…what if. So I hugged the tripod and made my photos of the range (20-photos for a pan image). Then I wondered…and got a long bungee cord from my car, wrapped it tight below one of the leg adjustment “knobs” (tight enough to stop the vibrations, but not draw the legs in). I made the pan photos with weight on the tripod head. In both cases, I ended up with sharp images. I wonder if anyone else has tried this approach and if it worked for them as it did for me.
Also, once last spring, I was down by Blanca and the Crestones to photograph the Sangre De Cristo range. The wind was howling. I’d not thought of the “hugging technique” yet, but I wanted the photo (again, the sun and clouds were spectacular). I stopped at an Ace Hardware in Alamosa, bought two metal posts (kind of those sign post posts), some rope, tent spikes, a hammer, and 10 feet of some material that I thought would allow some of the wind to pass, but stop most of it. I also bought a package of those plastic ties that are like police use for hand cuffs to fasten the fabric to the posts. It took a long time to set it up…the wind was my enemy…but when it was ready, I had a good wind reducer. Honestly, I haven’t used it since.
Those are two techniques that have worked for me. But if using my wind break idea, it’s best to have someone there to help.
I hope these ideas might be able to work for someone.
Wow, that’s intense, Peter! I have to say that I never thought to create a windscreen like that — very impressive. As for the hugging and bunjee cord techniques, I’m surprised if you didn’t also get sharp photos without them, but I obviously wasn’t there, so I can’t comment specifically.
Excellent! I’ve never thought of collapsing the lower leg. But so simple!
Here’s another: keep a very, very heavy tripod in the back of your car. My backup tripod is a Manfrotto 3036 that weighs in at 16 pounds. Until recently I used a four pound 3047 tripod head, for a whopping 20 pounds! Even our Pacific gales have a hard time moving a 20 pound tripod around.
Interesting thought, thanks for adding this! Yes, if you have a 16- or 20-pound tripod, it’ll certainly dampen vibrations from the wind! This is definitely a situation where you should use the heaviest-duty tripod you have at your disposal.
I live in an area with lots of wind. From experience, I offer two tips:
– if possible, stand to block the wind from the camera & tripod
– the wind never blows steadily, there are always gusts and lulls …. wait for the lulls
Very good points, thank you!
Hi Spencer
Very nice article, particularly for item 4 & 5. Would you please recommend how to cleam or do preventive maintenance on a carbon fiber tripod when the legs are underwater or use on an ocean beach.?
regards
Luc.
Luc, it definitely depends upon the tripod model that you have. If yours can be taken apart easily (like RRS tripods and, to some degree, most Gitzo tripods), I would follow the manufacturer’s recommendation on assembly and disassembly. That’s usually the best way to clear out sand that’s stuck in the leg sections. If your tripod doesn’t include teardown instructions, and you don’t want to risk taking it apart yourself, I’m afraid there is not much you can do aside from waiting it out and occasionally wiping down the joints with a paper towel or microfiber cloth. You could try rinsing it with water, but I’ve done that in the past (back when I had an aluminum tripod that couldn’t be taken apart) without much success.
Good suggestions, Spencer.
Following on from Harvey’s comment, I’d just add that I carry a broad elastic webbing strap with a hook at one end (to engage with the tripod) and a loop at the other in which I place my foot. Provided there is sufficient tension in the strap, in strong wind it can be helpful in maintaining sharpness.
Interesting, thanks for adding this. I’m surprised that technique doesn’t add some low-level blur to a photo, but I haven’t tried it myself, so I can’t comment directly on its effectiveness. It would certainly keep the tripod from blowing over, though!
It likely depends on the material the ‘broad elastic strap’ is made of. To damp vibrations well it would be a viscoelastic material and so able convert some motion into heat. It might be time to try out a couple of different kinds of elastic straps. I’d start with the ones designed to take up motion in boats moored at docks.