One of the biggest issues many of us photographers face is the gigantic size of our photo libraries, which creates a lot of issues for backing up and restoring images. While we have written a number of articles on properly backing up images, with a recent article on a backup workflow, we have not spent much time on managing the backup size and reducing it. After all, if the backup size itself is significantly reduced, the time it takes to back up those images improves drastically as well! Let’s talk about some of the tips, techniques and potential changes to your workflow you can administer today in order to reduce your backup needs in the future.
There are two primary strategies for reducing the size of your photo library: one involves potential changes to your current workflow process before images are transferred to your computer (which will address the growth of your photo library in the future), and the other one consists of steps you can take to reduce what you have today.
Table of Contents
1) Changes to Current Workflow
It would be pointless to discuss strategies to reduce your backup needs, if your photo library is needlessly growing at an exponential rate. Thanks to all the nice options we have today in cameras and in software, it is extremely easy to waste space. Yes, storage is extremely cheap today and you can easily stock up on a lot of hard drives. However, why go through all the hassle with additional storage and add the unnecessary wait time to our backup processes, if there are some simple steps you can take to reduce your storage needs in the future? Let’s go through your workflow and see if what you have set up today is in line with our best practices. We will start with your camera.
1.1) Camera RAW Options
First, let’s go through your camera settings. Since you are a Photography Life reader, we are already making an assumption that you shoot RAW (if you don’t know what I am talking about, please see our RAW vs JPEG article that explains why you should be shooting RAW). But what kind of RAW do you shoot? sRAW/mRAW? 12-bit? 14-bit? Uncompressed? Compressed? Losslessly Compressed? With all kinds of options available, even shooting RAW can get confusing! So which RAW format is the best and why? Unfortunately, the answer is not so simple, because it all varies depending on what camera you shoot with. Some cameras give you the option to choose from different RAW formats, while others don’t. If you have the ability to choose from different RAW format options, our general recommendation is to pick Losslessly Compressed RAW in the highest bit depth available (typically 14-bit) for best results. Losslessly Compressed RAW images preserve all the data, making Uncompressed RAW a complete waste of space on your hard drive. As for bit depth, while most people won’t be able to tell the difference between 14-bit and 12-bit RAW images, when you need to recover maximum information from a file, you do have quite a bit more data to work with when shooting at higher bit depth. If you nail exposure every single time and you never have to recover much data in post, shooting 12-bit is the way to go. But for everyone else who wants to have the maximum data to work with in post-processing in order to reduce banding and other artifacts in both highlights and shadows, my recommendation would still be to stick with 14-bit or higher.
Now if you shoot Canon, you have a limited number of options to choose from, such as RAW, mRAW and sRAW, along with a number of options to shoot in JPEG, as shown below:
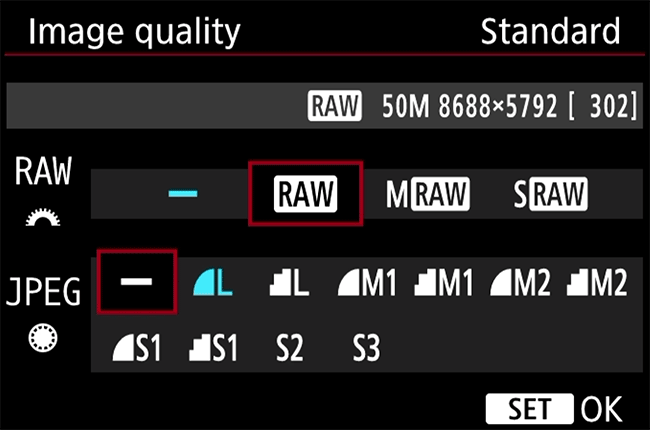
By default, Canon shoots in highest bit depth available, so you don’t have to worry about that. Just choose “RAW”, which will give you the best image quality. Don’t pick mRAW (medium RAW) or sRAW (small RAW), even though those two options might sound appealing for reducing image size – that’s because those two options will result in a file that is really not a true RAW file, as explained in my article on the sRAW format. You will also see another option to shoot JPEG – skip that, unless you know what you are doing (more on RAW + JPEG below).
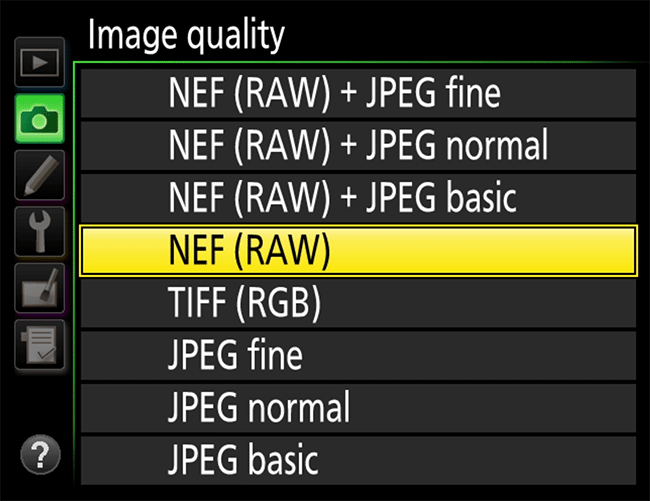
If you shoot Nikon, you have a lot more options to choose from. First, make sure that you have RAW selected from the Shooting Menu option, as shown below:
Next, you will find another setting in the same menu called “NEF (RAW) recording”. Choose the options as shown below:
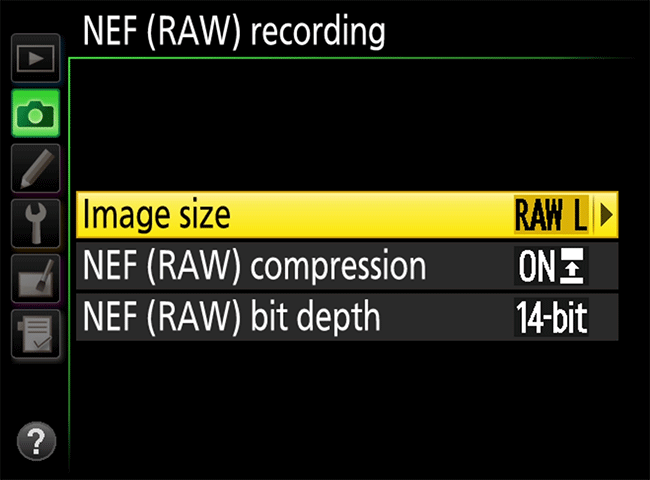
Don’t worry if you don’t have the first option (it is only available on some of the newer cameras) – that’s for choosing between sRAW and full size RAW, which as stated above, you should always keep at full size. The next two options are NEF (RAW) compression and bit depth. Make sure to select “Lossless compressed” for the compression algorithm, because it gives you the best quality, while keeping the file size relatively small. You don’t lose any data with this option. The “Compressed” option is basically “Lossy Compression”, which is not what you want (unless you really know what you are doing), as it results in loss of data. As for “Uncompressed”, don’t ever choose that option, as you will end up with enormous files every single time, even if you photograph a plain blue sky!
Most other brand cameras don’t give you so many different options. On the Sony A7R II and A7 II, you have a new option to shoot Compressed and Uncompressed RAW. Unless you need to keep the shooting speed fast, I would stick with Uncompressed RAW, as it preserves all the data from the sensor. Since Sony has not provided the option for Lossless Compressed RAW, you have the option to convert RAW images to DNG format, since DNG automatically applies Lossless Compression to Uncompressed RAW images. Personally, I avoid the DNG format as stated in this article, but in the case of Sony, I really don’t see another option until Sony adds the Losslessly Compressed RAW option. See this article for more details.
1.2) RAW + JPEG
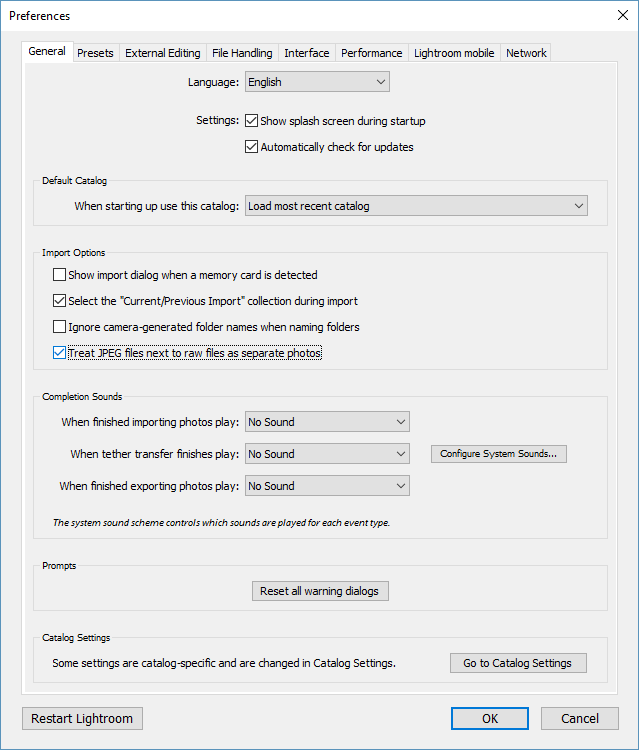
What about RAW + JPEG? I find a lot of folks out there who end up shooting both RAW and JPEG. Some do it because they really need the JPEG images (sports shooters, news shooters / reporters, etc) and others do it for little to no reason. If you belong to the latter group, it might be a good idea to re-evaluate your menu settings. If you end up importing both RAW and JPEG into Lightroom, I can already tell you that you are most likely doing it wrong. Why? Because Lightroom does not really care for the JPEG image in the first place when there is a RAW image already present. Unless you have a specific menu setting in Lightroom to treat RAW and JPEG images separately, the two images will be combined as a single image and you will only be able to work on the RAW image. Take a look at your Lightroom Preferences and see if the option “Treat JPEG files next to raw files as separate photos” is checked or not:

Most likely it is not, because that’s the default setting. Here is what happens when you load a RAW + JPEG into Lightroom:
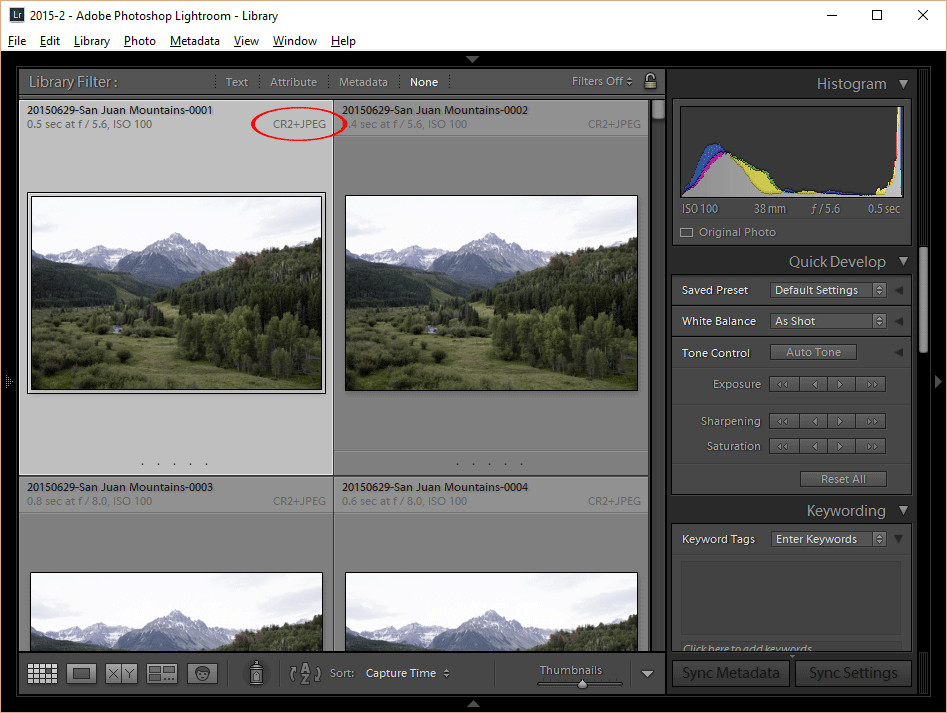
Look at that – you have a single image being displayed in Lightroom, when in reality, there are two images residing within your file system:
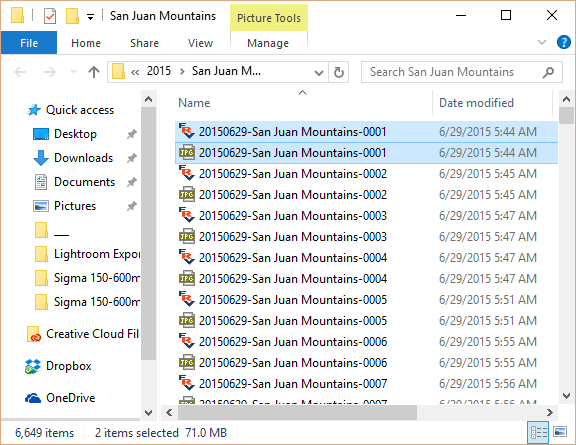
This means that you are essentially storing a total of two JPEG images in your file system. That’s right, not one, but two! How? Well, a full-size JPEG image that your camera created is already sitting within a RAW image. By preserving another JPEG image, you are storing a separate copy of that JPEG file on its own. So what’s the point of keeping that camera-rendered JPEG image? Those files are just wasting a lot of space for no good reason! And if you really ever want to be able to go back to your original JPEG image as it was spat out by your camera, you can always extract it out of your RAW file using free tools such as Phil Harvey’s excellent ExifTool. It is as simple as running the following command “exiftool -b -JpgFromRaw DSC0001.NEF > DSC0001.JPG”.
So if you have been storing all those JPEG images, what do you do? How do you get rid of them now? Unfortunately, Lightroom has no way of simply deleting those JPEG images, but there are a couple of tricks you can employ to get rid of them – keep on reading this article to find out how!
1.3) Bracketing is Evil!
Bracketing is evil if you don’t know what it is used for, because it results in 3+ images of the same thing. This one is fun to see in the field and in my workshops. If I hear “click-click-click” in good light, I usually come up to the person and ask why they shoot in brackets. Every once in a while, the answer is “HDR” or some other advanced answer, which I totally respect, as it is intentional. But most of the time, I hear something like “because another photographer told me”, or “because I want to get the best exposure”. Sadly, after spending a lot of time shooting with other photographers, I realized that most people have bracketing enabled without real purpose. Think of that – that’s 3+ images of the same thing, over and over again! That’s a lot of wasted frames and occupied storage. Even worse, if a camera does not automatically shoot brackets in a single burst, many photographers end up with underexposed and overexposed images without knowing why it is happening.
There is no reason to shoot bracketed exposures in good light. The best exposure is the one that contains the most amount of data without any losses, a technique known as “Exposing To The Right“, or “ETTR”. Most of the time you can achieve that with a single shot. Unless you are dealing with a very wide dynamic range that your camera is incapable of capturing, you should not shoot in brackets.
1.4) Eliminate Bad Images In Your Camera
I know some people won’t like this for different reasons. Some argue that they do not have the time to do it while shooting, while others argue that they dread of potentially deleting good images. I totally understand both. However, when an image is bad and you know it is bad at the time of capture, why keep in on your memory card in the first place? If you have a second and you are currently viewing that one bad image, all you have to do is press the trash button and it is gone! There is no need to review all the images and delete the bad ones – I personally don’t do it either, as I rarely have the time when working in the field. If you limit yourself to deleting one or two images at the time of capture, you will have practically no risk of accidentally deleting other important images in the memory card. By reducing the number of images stored in the card, you will be saving a lot more time during the culling process.
1.5) Bad Photos: RAW Image Culling to the Rescue
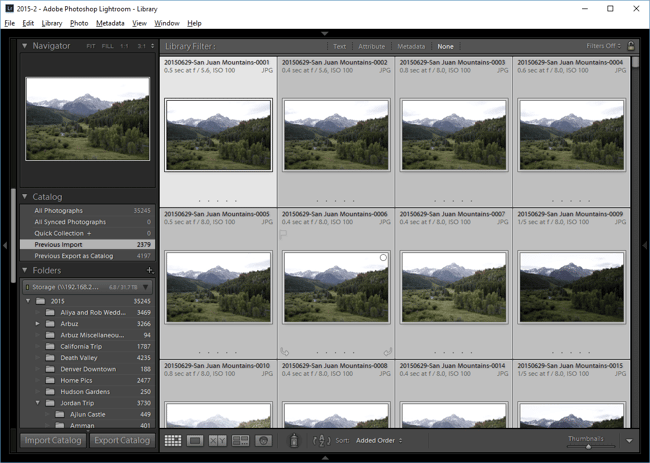
Even if you removed all the obviously bad images from the card at the time of capture and disabled unnecessary bracketing, you will still end up with images that you will never touch again. Everyone shoots bad photos, even the best of the best. Whether it is a soft photo, a heavily underexposed photo or just not a keeper, many of us run into the same problem – we import everything we have in a memory card into post-processing software like Lightroom, then leave the sorting and culling for later. Well, I wish we could all say that we are super diligent in cleaning up our photo catalogs after the fact, but the reality is, it rarely ever happens when we get busy, doesn’t it? In addition to ending up with a boatload of space wasters, we are also decreasing the speed of the photo catalog! That’s right, if you did not know – importing images adds a bunch of data into database-driven software like Lightroom. Even if you delete images afterwards, it does not mean that all the wasted space within the database/catalog gets freed up! Yes, you can take steps to minimize the wasted space by optimizing your catalog or you can re-import all the images into a brand new catalog, but that’s still so much unnecessary work that you could have prevented by properly culling images.
So what is the best way to cull images?
Don’t cull images after the import process – do it beforehand. There are two methods of image culling – do it from the memory card directly, or copy images to a folder on your computer first, then cull images before you start importing them into your post-processing software. I personally prefer doing it directly in the memory card. For this to work well, you will need fast memory cards. If you are still running USB 2.0 and those old 10 MB/sec cards, it is time to move up to faster storage my friend! Memory cards from reliable brands like SanDisk are dirt cheap nowadays and you can get very fast, large capacity 90+ MB/sec SD cards for $10-$30 per card. If your memory card and memory card reader are fast, you can cull through the images very quickly. And if you are scared about doing it directly from the card, you can obviously copy images to your computer first. But if you are using the right software, there should be no reason to be afraid of that, as it should not be deleting anything from the card in the first place.
Speaking of culling software, my personal favorite is FastRawViewer. Ever since I tried it out, I have been using FRV for image culling directly from cards and it works wonders. It is incredibly fast and best of all, I can zoom in to a particular area of an image at 100% view (CTRL+1), then press the “Space” and “Backspace” buttons on the keyboard (which you can completely customize to your liking) in order to navigate forward and back between images. This is extremely useful, because I do not have to navigate to an image, then zoom in to see if something is sharp – if my subject is in the same area, I leave it there to check for sharpness. If the subject moves, I scroll in the direction I want to see and leave it there for the next image:
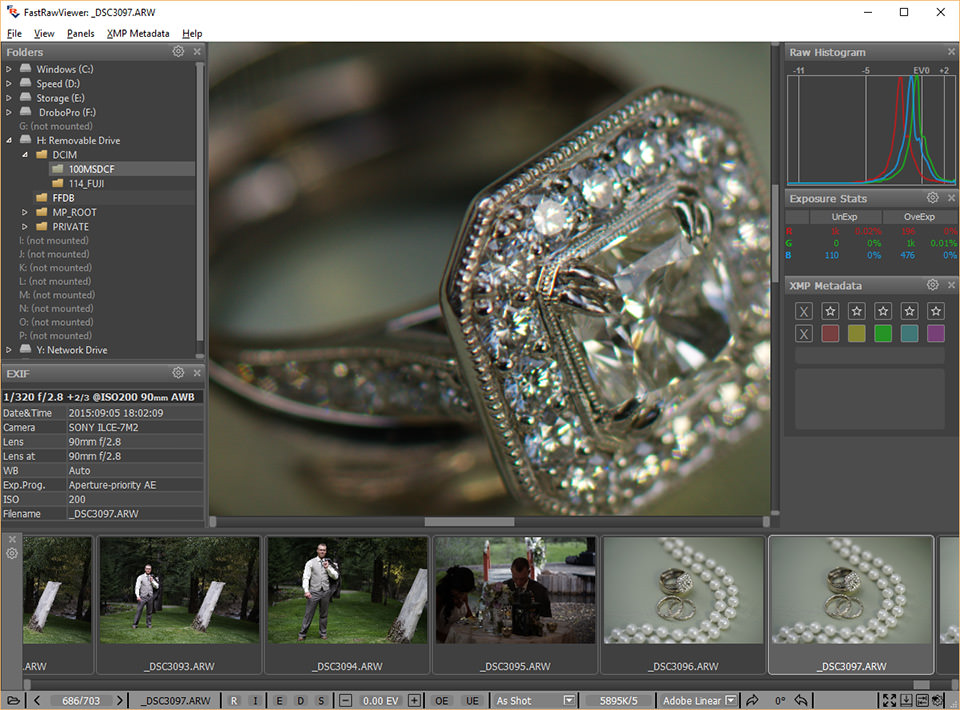
Saves me a ton of time! Once I find an image I do not like, I press the “Delete” button on my keyboard (I modified this shortcut under File->Keyboard Shortcuts), which moves it to a “_Rejected” folder. When you launch FRV for the first time, it will give you a warning that the file is about to be moved to the rejected folder. I personally disabled this behavior from the File Handling option in Preferences. From there, it is just finding images and pressing the same delete button action to get rid of the images I don’t like. And if I accidentally delete an image and want to restore it, I can press CTRL+SHIFT+] to bring it back, or I can do it directly from the File menu.
During the culling process, I also identify images that I want to edit in Lightroom. I changed the keyboard shortcuts to be the same in FRV as in Lightroom, so by pressing 0 to 5, I can assign star ratings to each file. This creates a sidecar (XMP) file right on the memory card, so when I import the file into Lightroom, all those stars will already be there in images.
Before the import process, I delete everything from the “_Rejected” folder on the memory card, so that those files are not accidentally imported into Lightroom. I get a nice warning from FRV that tells me about all the files getting wiped out and once I click “Yes, I’m sure”, the files are gone:
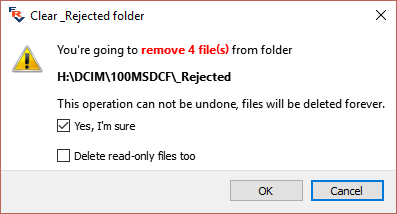
Obviously, you should be very careful with this feature, as the files will be gone. If you don’t write anything else on the card you can still restore images via recovery software, but it is rather painful. If you are not comfortable with this, you can move the _Rejected folder into a temporary folder on your computer and delete it later.
That’s pretty much it when it comes to RAW image culling! From here, the next step is to import images into your post-processing software of choice.
Trust me, if you do this process, you will save yourself hours of work and frustration, because you are eliminating bad images way before they make it to your post-processing software!
2) Cleaning Up the Mess: Reducing Backup Storage
What if you have not been doing a good job with keeping your photo library clean? Don’t worry, most of us are guilty of such sins, including myself! Yes, for years, I have been shooting images without properly culling through them or sorting them. While my file and folder organization is pretty tidy, putting 40-50 thousand images per year into catalogs has not been pretty! Earlier this year, I realized that I have close to 6 terabytes of images. That’s a lot, considering that the images I actually ended up using probably comprise less than 5% of the total storage. So what’s the point of keeping all those images you might ask? Well, who knows, maybe one day I will go back and edit those extra images. Most likely not, but back in my mind I do count on that potential :) And if that were to happen, I would still want those extra images. But wait – how many will I actually need? I only recently started doing the proper RAW image culling thanks to FRV and my catalogs earlier than 2014 look absolutely terrible, with all kinds of bad images I will never ever touch. Unfortunately, I cannot find myself sitting through tens of thousands of images again, even with FRV in my hands – I simply don’t have the time. However, there are some things I can do to minimize the number of images that I really need to backup.
First of all, after going through some of the folders on my computer, I realized that I have a boatload of JPEG images. A lot of them are older images from different cameras, some are scans, some are from our smartphone and others are those same JPEG images that were the result of me shooting RAW + JPEG. Since I test cameras quite a bit, I often shoot RAW + JPEG, because RAW support is typically not immediately available. Well, that in itself created many gigabytes of wasted storage, which needs to be cleaned up. But the question is “how?”. If you have been shooting RAW + JPEG and you want to clean up all that wasted storage, below are some steps you can take to clean up your image library in Lightroom. If you don’t have Lightroom, you can utilize command prompts to go through images and delete them (you can easily find such scripts on Google), but that would be a riskier proposition, especially if you are not very tech-savvy. If you don’t have Lightroom, you can install a trial version, get your library cleaned up and you can uninstall it afterwards.
2.1) RAW + JPEG: Deleting JPEG Files
Before you start this process, please do make a full backup of both your files and your Lightroom catalog! While the below procedure is not particularly risky if you properly follow it, you can still potentially mess things up! So please do make a full backup before you start the clean up process.
Here are the steps:
- Make sure that JPEGs and RAWs are not treated separately. As show earlier in this article, make sure that you uncheck “Treat JPEG files next to raw files as separate photos”, as shown below:
This is needed for the initial import and synchronization of files.
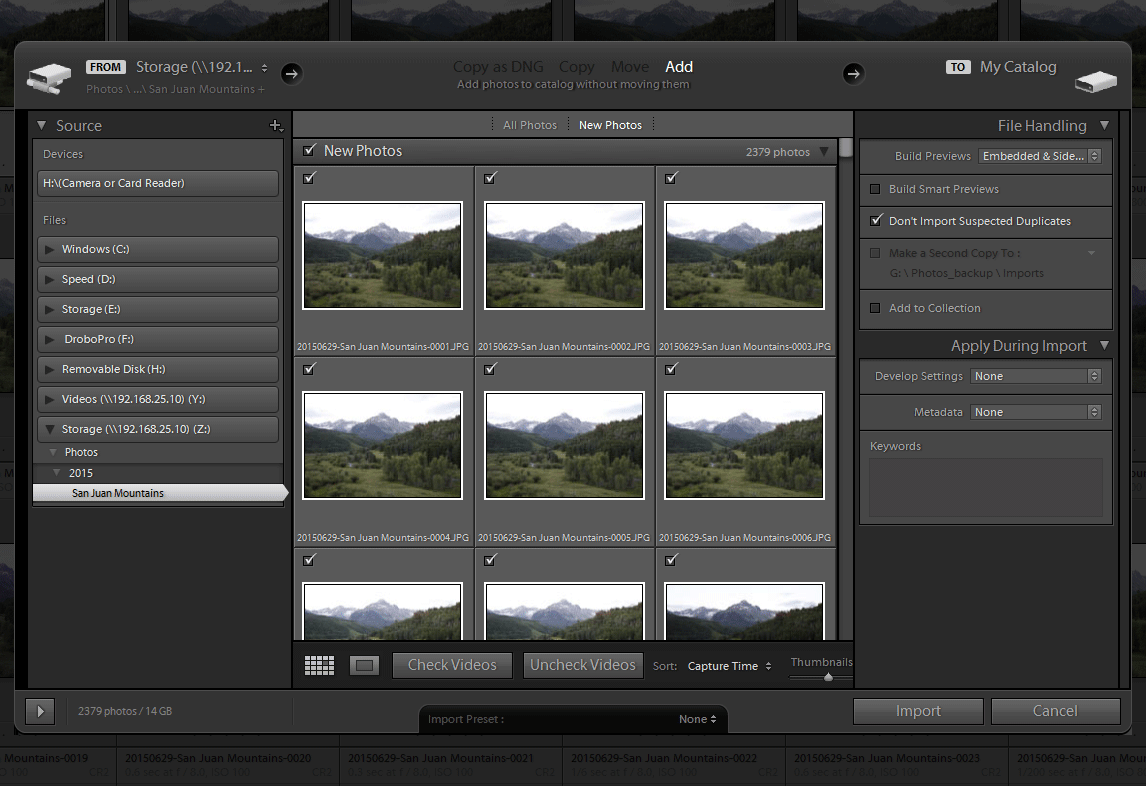
- Import images into Lightroom. Skip this step if you work with Lightroom already and you have one or more Lightroom catalogs. If you don’t have Lightroom installed and you want to clean up your RAW + JPEG images, you first need to import all the files into a new Lightroom catalog. I won’t go through the process of doing that in detail, but there is really not much to it – simply select the master folder that contains your files and make sure that on the top you have “Add” selected instead of the other options:
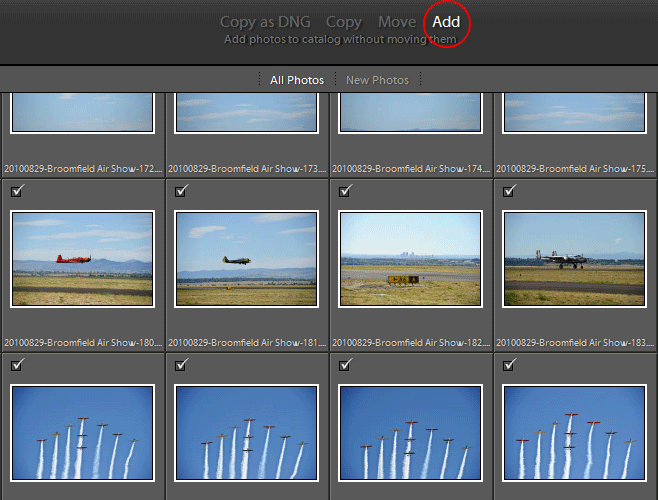
Once you do that, Lightroom will import all the photos and preserve your folder structure without copying or moving anything.
- Verify and Synchronize all photos. This is a very important step, because you need to make sure that everything is properly imported into your current catalog and nothing is potentially missing. Right click the master / root folder that contains all your images in Lightroom, then click “Synchronize Folder…”. I did it on my 2015 folder, which obviously contains all images from 2015:
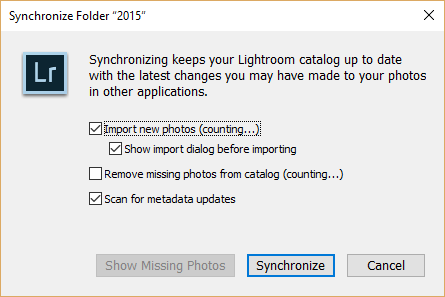
Depending on the size of your catalog and your storage speed, this might take a while. After the process is completed, Lightroom should report of any potential images that it finds in the file system, which are not found in your Lightroom catalog. Go ahead and import all the images that are missing, as we want all the images to be accounted for. If any images are missing, you might want to review those and remove, if necessary.
- Untreat JPEG Images. Now we are going to uncheck “Treat JPEG files next to raw files as separate photos” in Preferences:
This will allow us to import all the JPEG images separately through the same synchronization tool into the same catalog!
- Resynchronize the Images. Right click the master folder again and click “Synchronize Folder…” again. If your catalog is large, I would do it one folder at a time, as the recalculation will take forever. You will notice that this time you will get a bunch of images under “Import new photos”:
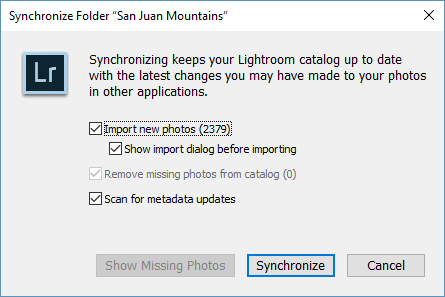
Yup, those are all the duplicate JPEG images that are wasting the precious storage space! Click “Synchronize” to start the import process. It will take a while, but you will soon be presented with the same import screen that you are familiar with:
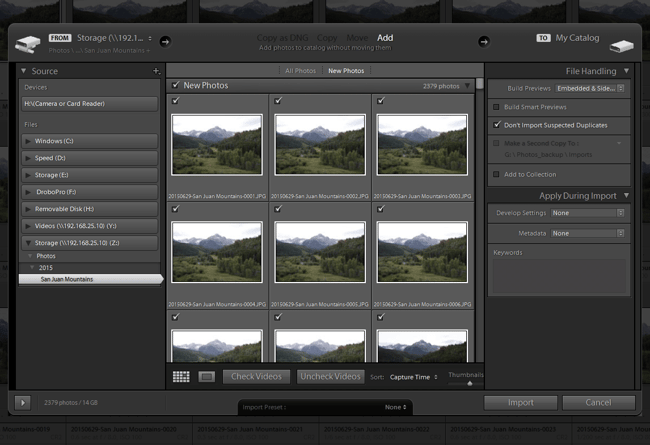
You need to make sure to wait until this screen is done completing all the tasks. Since the number of images is quite high, the count will take a long time! As you can see, the extension of files is all JPG!
Click the “Import” button to add all the missing files into the existing catalog. Keep in mind that we are physically not touching the files yet – we are simply adding them separately into the same catalog!
- Delete all the imported JPEG images. We have just imported all the JPEG images into the same catalog. Now it is time to physically delete them! Make sure to click “Current Import” under “Catalog”, because that’s where all the imported JPEG duplicates are sitting, then press CTRL+A, which will select all the files:
Now wipe them all out by pressing the “Delete” key on your keyboard. When Lightroom asks what you want to do with the selected images, make sure to select “Delete from Disk”:
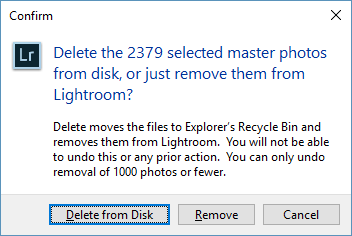
And just like that, all the space-taking evil JPEG duplicates are kaput, gone! Repeat the process for all the remaining folders.

2.2) Compress Remaining JPEG Images: JPEGMini to the Rescue
What about the rest of JPEG images that you shot with your iPhone? What about your scans and other older JPEG images that are also taking up a boatload of space? Fear not – your JPEG images can be significantly reduced in size without any loss of quality! You might be wondering how that’s possible, since JPEG is already a lossy format in the first place, containing a puny 8 bits of data. Well, that’s what JPEGMini is for! If you have never heard of JPEGMini, please take a look at my detailed review of JPEGMini, where I explain how the software functions and give specific examples demonstrating no visible loss of image quality. What’s remarkable about JPEGMini, is that it actually does an amazing job at batch-compressing JPEG images! This means that you can literally feed your entire master folder of images into JPEGMini and it will automatically find every single JPEG file and optimize it for you.
What kind of potential space savings are we talking about? In my particular case, the software was able to compress my JPEG images by 2.5x on average!
Take a look at my first folder from 2003, which contained only JPEG images and compare it to the optimized version on the right:
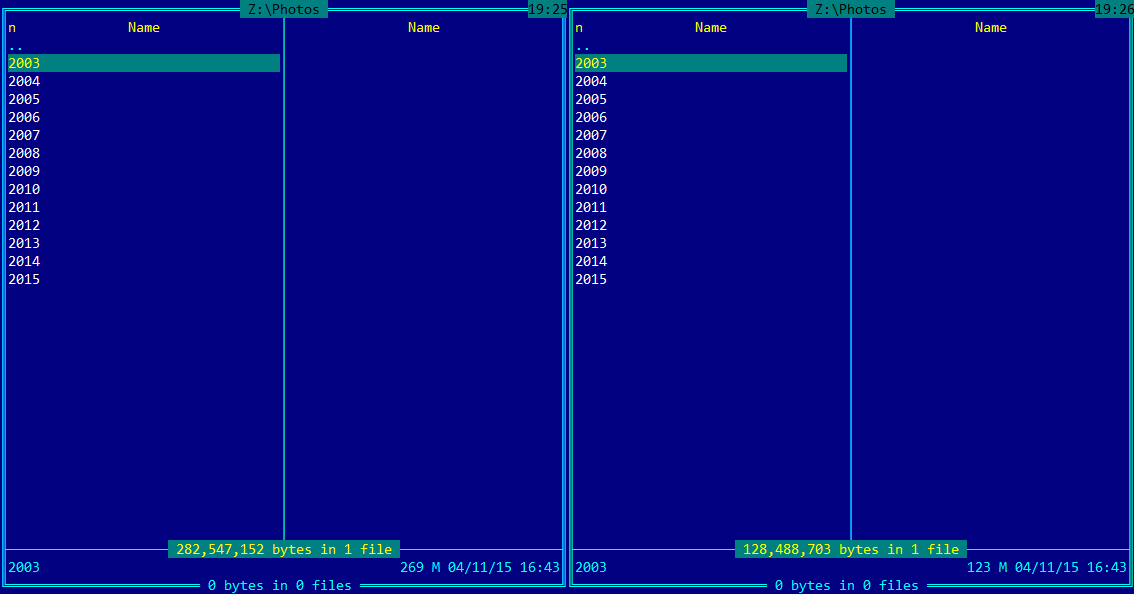
My folder went from 282 MB to 128 MB in a matter of minutes. After I saw such a change, I ran the tool on all of my photos to see how much space I could save altogether:

Whoa, that’s roughly 84 GB of space savings, which is just insane! The process took several hours to run, but I never thought my JPEG images were wasting that much space. And that’s me being a RAW shooter! Some of the images were skipped in my photo library and those are probably some of the huge JPEG panoramas. JPEGMini limits resolution to 60 megapixels, which should be enough for most needs.
3) Summary
As you can see, you can take some steps to significantly reduce your current and future photo library size. By keeping it to a minimum, you not only reduce the amount of storage space you require today, but you also significantly reduce both backup and potential restore time. This, in turn, simplifies your file structure, improves your workflow speed due to smaller image database / catalog files and helps streamline your post-processing tasks, which ultimately translates to improved overall efficiency.
Hi,
I read thst you say you can always extracted from the raw file a jpeg as spat out by the camera: ‘! And if you really ever want to be able to go back to your original JPEG image as it was spat out by your camera, you can always extract it out of your RAW file using free tools such as Phil Harvey’s excellent ExifTool. It is as simple as running the following command “exiftool -b -JpgFromRaw DSC0001.NEF > DSC0001.JPG”.’
I don’t think this is true, is it? Eother you extract the embedded jpeg, which is small and low quality, or you expoort a flat raw file, there’s no data in the dng file which can recreate the saved jpeg settings, is there? Would love to be able to do so if you can help!
Mr. Nasim,
I’m a little confused with the steps detailed in section 2.1, “RAW + JPEG: Deleting JPEG Files”, especially step #4.
1. Make sure that JPEGs and RAWs are not treated separately. As show earlier in this article, make sure that you uncheck “Treat JPEG files next to raw files as separate photos”
–This is needed for the initial import and synchronization of files.
2. Import images into Lightroom.
–Once you do that, Lightroom will import all the photos and preserve your folder structure without copying or moving anything.
3. Verify and Synchronize all photos.
–This is a very important step, because you need to make sure that everything is properly imported into your current catalog and nothing is potentially missing.
4. Untreat JPEG Images. Now we are going to uncheck “Treat JPEG files next to raw files as separate photos” in Preferences:
–This will allow us to import all the JPEG images separately through the same synchronization tool into the same catalog!
Step #4 — Didn’t we do this in step #1 already? What am I missing?
I’m sure I’m missing something, although I can’t figure out what it is… I do appreciate all your articles and I’m learning quite a bit from all of them. Thank you! I’m just starting out in Photography as a hobbyist.
Thank you again for your time.
I think he meant to check the box “Treat JPEG files next to raw files as separate photos” in step 4 above. This is how Lightroom will separately import the jpeg files.
Nasim–
This article was fantastic and I have referred back to it regularly. I have started using FastRawViewer and love how quickly I can get through my images for my initial review. I just reread your article because I hit a snag with my new workflow and I am hoping you can elaborate on your process a bit further.
I reviewed my (Nikon D750 Raw) images on my SD card in FastRawViewer and either rejected (moved to new folder) or rated my images. Then I went into Lightroom to import them to catalog, move them to my external storage drive and make a back-up copy. All seemed well except that none of my ratings data is making it into Lightroom!
I posted a note about this problem in FastRawViewer’s user forum and was informed that Lightroom apparently ignores any XMP files on any memory card since it doesn’t expect them to be there. The individual who responded to my post (and appears to work for FRV based on language in the reply) offered his/her workflow and voiced concern over writing to a memory card because of the potential of a malfunction that could ruin the card. His/her workflow is to browse card in FRV to copy all files considered to be candidates to a hard drive (no mention of how he copies them, so I presume drag and drop, but could be importing through LR…). Then he/she browses the hard drive folder with candidates with FRV and does adjustments, labels & ratings (which create XMP file) and rejects anything not worth keeping. He/she concludes with “If the files are already imported into LR, you may need to refresh the metadata records” and then explains how.
I had tried using the refresh metadata in LR when I discovered my problem with the ratings not making it into LR. I experimented with several things and did successfully see my ratings at least once, but when I tried to repeat what I thought I’d done, it didn’t work. I also experimented with importing as .NEF and as .dng files (although I’ve read your thoughts on dng lately, I’ve also been influenced by Peter Krough’s recommendation to use the, because of the validation opportunity, so I’m not entirely convinced to avoid dng yet, but that is really a separate topic!).
So, my apologies for this lengthy explanation, but if I read your article correctly, you do review and rate images on the SD card and then import your keepers into Lightroom and move them into your filing system. First, do I understand your workflow correctly? Second, have you experienced any challenges with seeing the ratings from FRV after your files are moved off the card and imported to Lightroom? If not, please share if there is a step I may be missing? If yes, how have you dealt with it? Thanks for any guidance you might have to spare!
Could you explain what I should look for when comparing an image shot in both 12 and 14 bit? I understand that 14 bit will have more data but will I see that in the histogram or in the image?
Thanks.
You won’t be likely to see it in the histogram – there are too many variables that affect the histogram and it does not have enough detail. You might see it in the image, but its much more likely that you’ll see it after some processing. Think about the difference between 8 bit and 16 bit color. There is a huge difference, but we usually can print a JPEG and it will be fine. Where you see the difference is when you manipulate the image – recover shadows or adjust color – and some of your new selection is outside the bit range or color space you selected. Gradations are less smooth. You’ll be more likely to see the difference with high magnification – a 100% view.
Since you don’t know in advance whether processing will create a problem, it’s better to have 14 bits of data to work with and avoid the issue. If you minimally process images or have high volume work, the smaller file is probably fine.
Thanks Eric, that really helps.
Hi Nasim,
Another great article. You did a great job earlier of turning me on to FRV. I am a ruthless culler and FRV is just perfect for that. Drop the memory card in and start rejecting. It is so much faster than doing it in LR and, as you say, it doesn’t bloat the LR catalog (although I backup / optimize on exit so I doubt that is much of an issue) Regardless, it really speeds up culling – time = $$$.
As for jpegMini, I really have very few jpegs. I am the only photographer I know that still uses an Android smartphone. I just couldn’t deal with the Iphone’s small screen. Because my smartphone’s camera is pretty poor, I rarely use it. Instead I frequently a carry a small mirror-less with a 25mm prime. Works great and, of course, I end up with raw images. Not quite as convenient as a smartphone and I do plan to finally get an Iphone 6s next summer when my contract is up. At that point, I will consider dealing with jpegs.
Thanks again.
Remember FRV is your friend :)
Did you shoot panorams? How you store layered-files like PSD? It is very huge size… I mean I shoot about six or nine 24Mp shots and create panorama from it – and vuala – I easy got about 500-900Mbytes per result file :(
I can flatten image- but then i lost a lot of work and I willl need to do it again, if i want to change something. But store these huge files…?
“Bracketing is Evil! … This one is fun to see in the field and in my workshops.” Yes indeed, but not nearly as much fun as seeing auto-flash being so frequently used when the subject is hundreds of metres away :-)
Pete, I love that one! I have seen people shoot with flash looking down the Grand Canyon :) Hundreds of meters away is nothing in comparison LOL!
Image stabilization isn’t really for low-light photography, I’m sure its primary purpose is to aid photographers who are trying really hard, without much success, to avoid laughing :-)
Shooting with flash down the Grand Canyon is very similar to having an ashtray on a motorcycle!
I’m missing a statement/warning regarding the lightroom catalog itself. It should be pointed out, that the catalog-file is so important that it should have a special treatment with higher frequency and more independent storage places than the rest of the files. Loosing the catalog means loosing all.
Axel, please see my previous article on file organization. With my “hybrid” method, you can lose the Lightroom catalog all you want and still keep all the structure intact, along with all the edits within Lightroom. Losing Lightroom catalog for me is only losing the editing history – everything else is easily recoverable.
Your way of removing Jpegs paired with a raw file using Lightroom does indeed work, I tried it (but it’s the adjective- WORK, way too much of it).
So I was writing some python scripts to do the compares and deletes, I got it running pretty good and then stumbled onto this software and it works exactly as I want. Heck I’m lazy ill use someone else’s stuff if its legal. Shoot, you can have what I wrote so far.
This script – Removes all jpeg’s that have a raw file in the same directory with the same front name.
www.pointsinfocus.com/blog/…peg-pairs/
The script wants to want to run on files in a Folder. So put this script in a Folder that has the Folder or Folder’s you want to clean. So at a min you will have 2 items in the clean folder, the script “clean raw+jpeg jpegs.ps” AND the FOLDER containing the files to clean.
I create a working FOLDER on the SAME HARD DRIVE your files are on and leave this file in it “clean raw+jpeg jpegs.ps”
I then cut and paste the folder into the working directory I want scanned and files deleted (this will only create a “Link” and really not move anything, if on the same Hard drive)
I guess you can run it on your entire directory structure at the top and do them all at once, I got way too many folders, it may take a while.
You need to have windows PowerShell installed, it’s part of Win10 and free at the provided link.
Right click on clean raw+jpeg jpegs.ps and run with PowerShell, and it will ask you if you want to delete the files, yes.
Cleaned up years of saving on 5.5GB in no time
Don’t feel bad, for years I saved Raw And Jpegs. Raw for home and Jpegs for the road to view on a laptop without any power, and until lately Raw viewers were not available on all platforms and OS’s
This worked for me and its Legal Free
Enjoy
Thank you Mark! I did initially want to put some scripts on how to do it via command prompts and scripts, but boy, I did not want to carry the risk – just don’t want anyone to end up with files they do not want get deleted.
I wish there was a way to use a script to read data via ExifTool from both RAW and JPEG images. If the files in comparison are identical in terms of date and time, then delete. Can you write a script like that? My scripting skills aren’t very good to manage output results and do comparisons and looks like you are far better versed than me in that. Let me know if it is possible – we would make this script public at PL under your name of course and I can write a separate article that covers that.
I agree, doing it through Lightroom is extremely inefficient and slow :(
Thanks Nasim
I’m not a Software geek, but have been hacking code for 40 years, I’m a Computer designer for space applications (Director level now) But I have to know all of it, Software and Hardware. I have got to keep up with my team. So I do write code also.
Your request for “ExifTool from both RAW and JPEG images. If the files in comparison are identical in terms of date and time, then delete” .
Nasim this is a Valid request. I also do believe this is an over kill. My thoughts are this, No one would name their file the same name in the same directory as raw AND jpg if they were different pictures. They would have to go way out of their way to rename a file named IMG_0024.jpg AND IMG_0024.CR2 IF they were indeed different pictures in the same directory.
OK, I’m an Electrical Engineer and yes it is possible to lose data running this scrip if the users went out of their way to rename their file, but I do not think anyone in our group would do such a thing.
I did a test case on my (backed up) entire data base (5.5TB) and it ran fine it produced the same results as “Inching along” directory by directory. I removed over 850GB of duplicate .jpgs
Like I said, and you all know this , In the past the raw format tools were not that available. So It’s time to clean up and get into today’s environment. Raw is Real and we no longer need to save Both file types.
PS If you need help with the scrip’s you can contact me at [email protected] Ill be happy to support ( a PC – I’m not a MAC person)
Love the topics here
Thanks
There are a lot of great tips in this, but I want to take issue with one of them… deleting photos in camera. Though not common, deleting photos in camera has the potential of leading to corruption on the memory card. And, the more one does it – especially those that don’t always format their cards after each download – the more possible it becomes.
Chris, corruption can potentially happen if one does not format memory cards. There is nothing wrong with deleting images from the camera – if there was a threat, none of the cameras would have the delete button :) I have been deleting images for 8+ years through my cameras and I have never seen any corruption. What’s not good is moving images from memory cards without formatting them. Do it many times over and you have a potential for corrupted images…