These days, it’s more important than ever for photographers to know how to capture high-quality videos. Cameras have gained a ton of video features in recent years, which I can hardly complain about, but it also means there’s more that you need to know about! In today’s guide, I’ll cover everything you need to know about filming video on your mirrorless camera – from the necessary accessories, to the best camera settings to use.
Table of Contents
1. Useful Video Accessories
Unlike still photography, where a tripod and perhaps a flash are all the accessories you “need,” capturing good video usually takes a lot of extra gear. I’ll go through the most important ones below. While you won’t need all of this gear for every shoot, having them in your bag will let you get the best video (and audio) across a range of situations.
1.1. Lavalier Mic
While mirrorless cameras can capture great quality video, their built-in mics are awful. They might be fine for scratch audio, or just to capture cues for syncing later, but an add-on mic is the most essential accessory.
A great match for small, portable mirrorless kits are wireless lavalier microphones. With these mics, you place a receiver on your camera, then clip the transmitter – which has a built-in mic – to the person speaking. (You also have the option to attach a higher-quality lav mic to the transmitter.)
Two popular options are the ubiquitous Rode Wireless GO and Smallrig’s budget-focused Forevala W60. If more than one person is speaking, such as when you conduct an interview, it’s best to pick up a system with two transmitters.
1.2. Shotgun Mic
Small, on-camera shotgun mics are a good option when you need to capture audio quickly, without clipping a microphone to your subject. This is ideal when you’re trying to capture ambient sounds, or film people on the go.
While there’s a massive range of shotgun mics available, not all of them are made for on-camera use. (Some are meant to be operated with a boom stand instead.) The portable shotgun mics that I recommend, like the Rode VideoMic GO II, are meant to attach directly to your mirrorless camera or a cage, and they’re quite small. However, this can result in lower audio quality and less audio isolation than a full-sized shotgun mic.
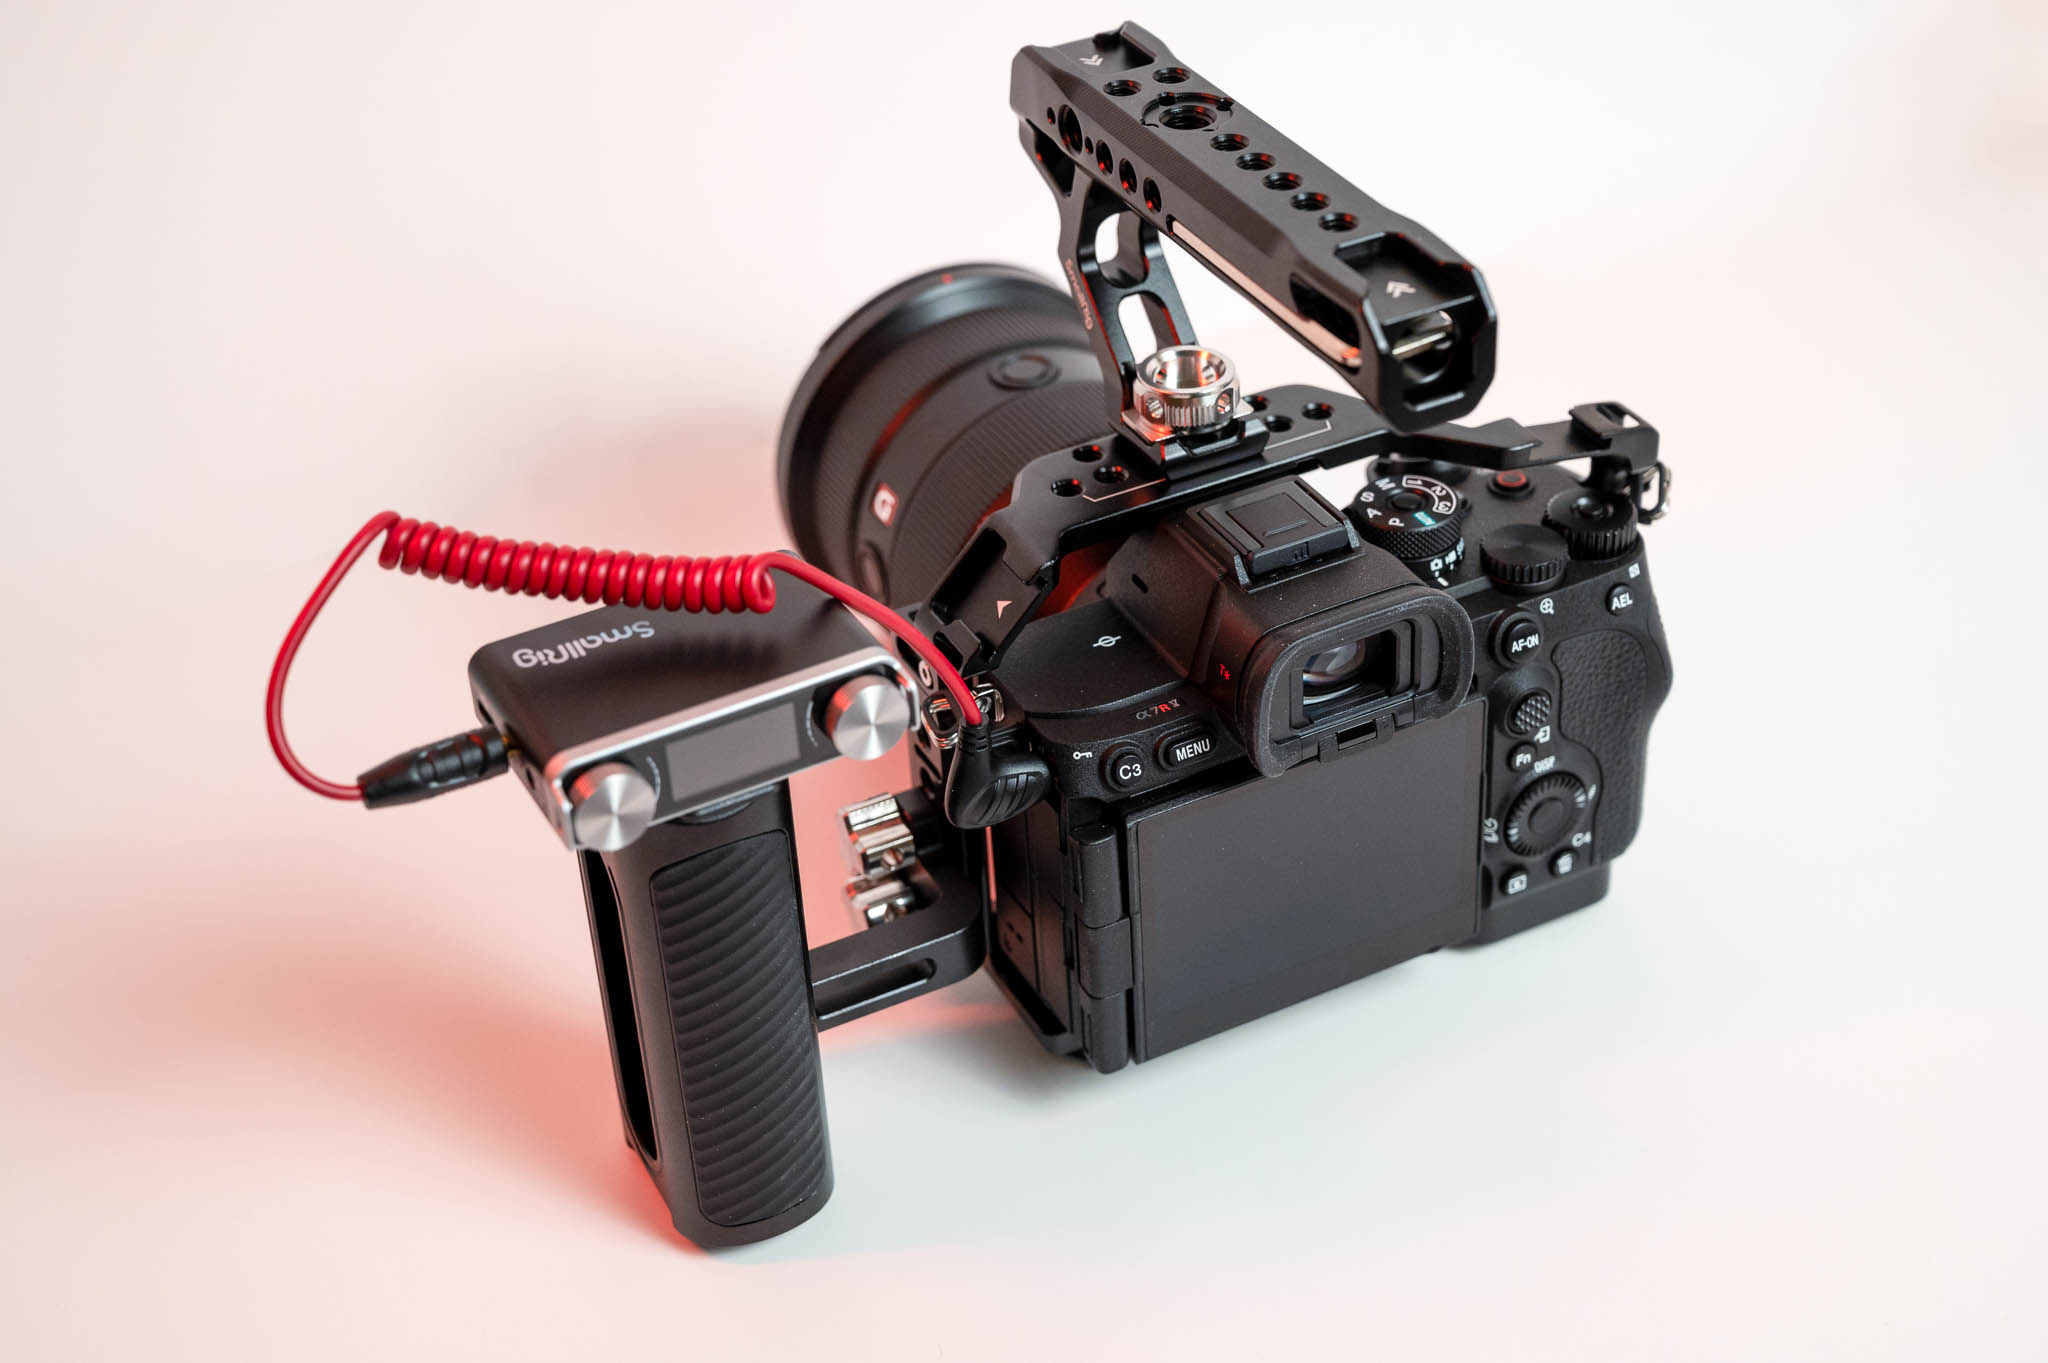
1.3. Cage
You’re probably getting the sense that filming video requires a lot of accessories! Unlike dedicated video cameras, mirrorless cameras don’t have many places to mount these pieces of gear. That’s where cages come in.
A cage is basically a wrapper for your camera that adds dedicated mounting points. This can range from small and simple to quite large and complex. Full cages include dozens of mounting points, handles, cable clamps, and more.
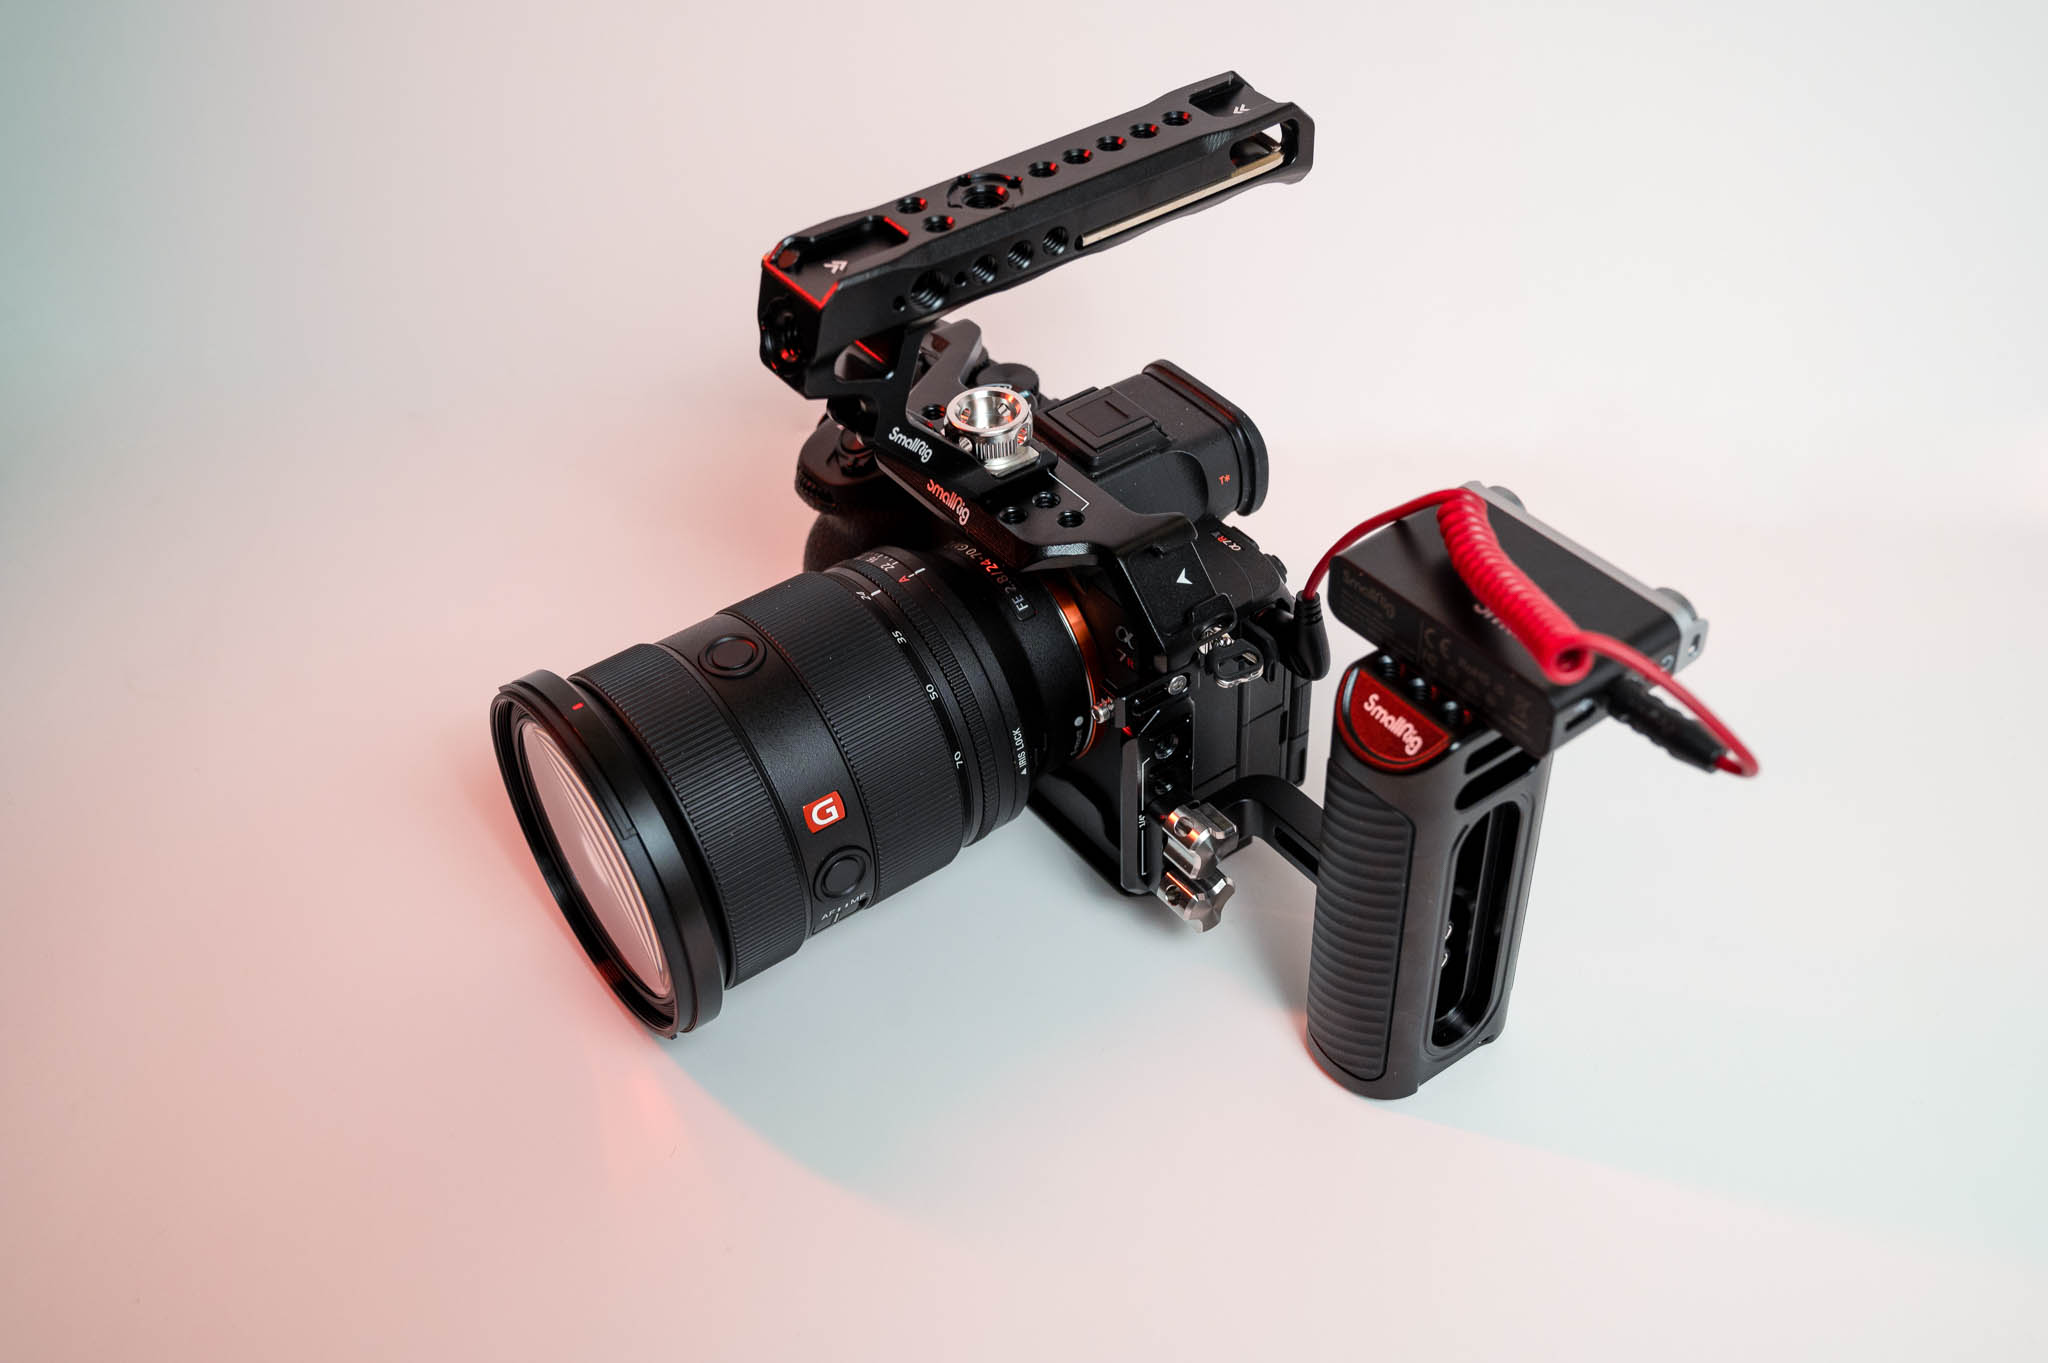
I haven’t tested everything out there, but I’ve been happy with Smallrig’s cages for my personal videography. Their full cage options, including the 3669B shown above, are well-made and a great value. But regardless of the brand you pick, make sure to get a cage that fits all the gear you plan to use – for example, mics, lighting, handles, and follow-focus rigs.
As a perk, attaching your video accessories to a cage also makes it easier to transition between video and stills. With most cages, you can just unscrew your camera from the whole cage at once, shedding a lot of bulk quickly! You don’t need to detach all the accessories one by one.
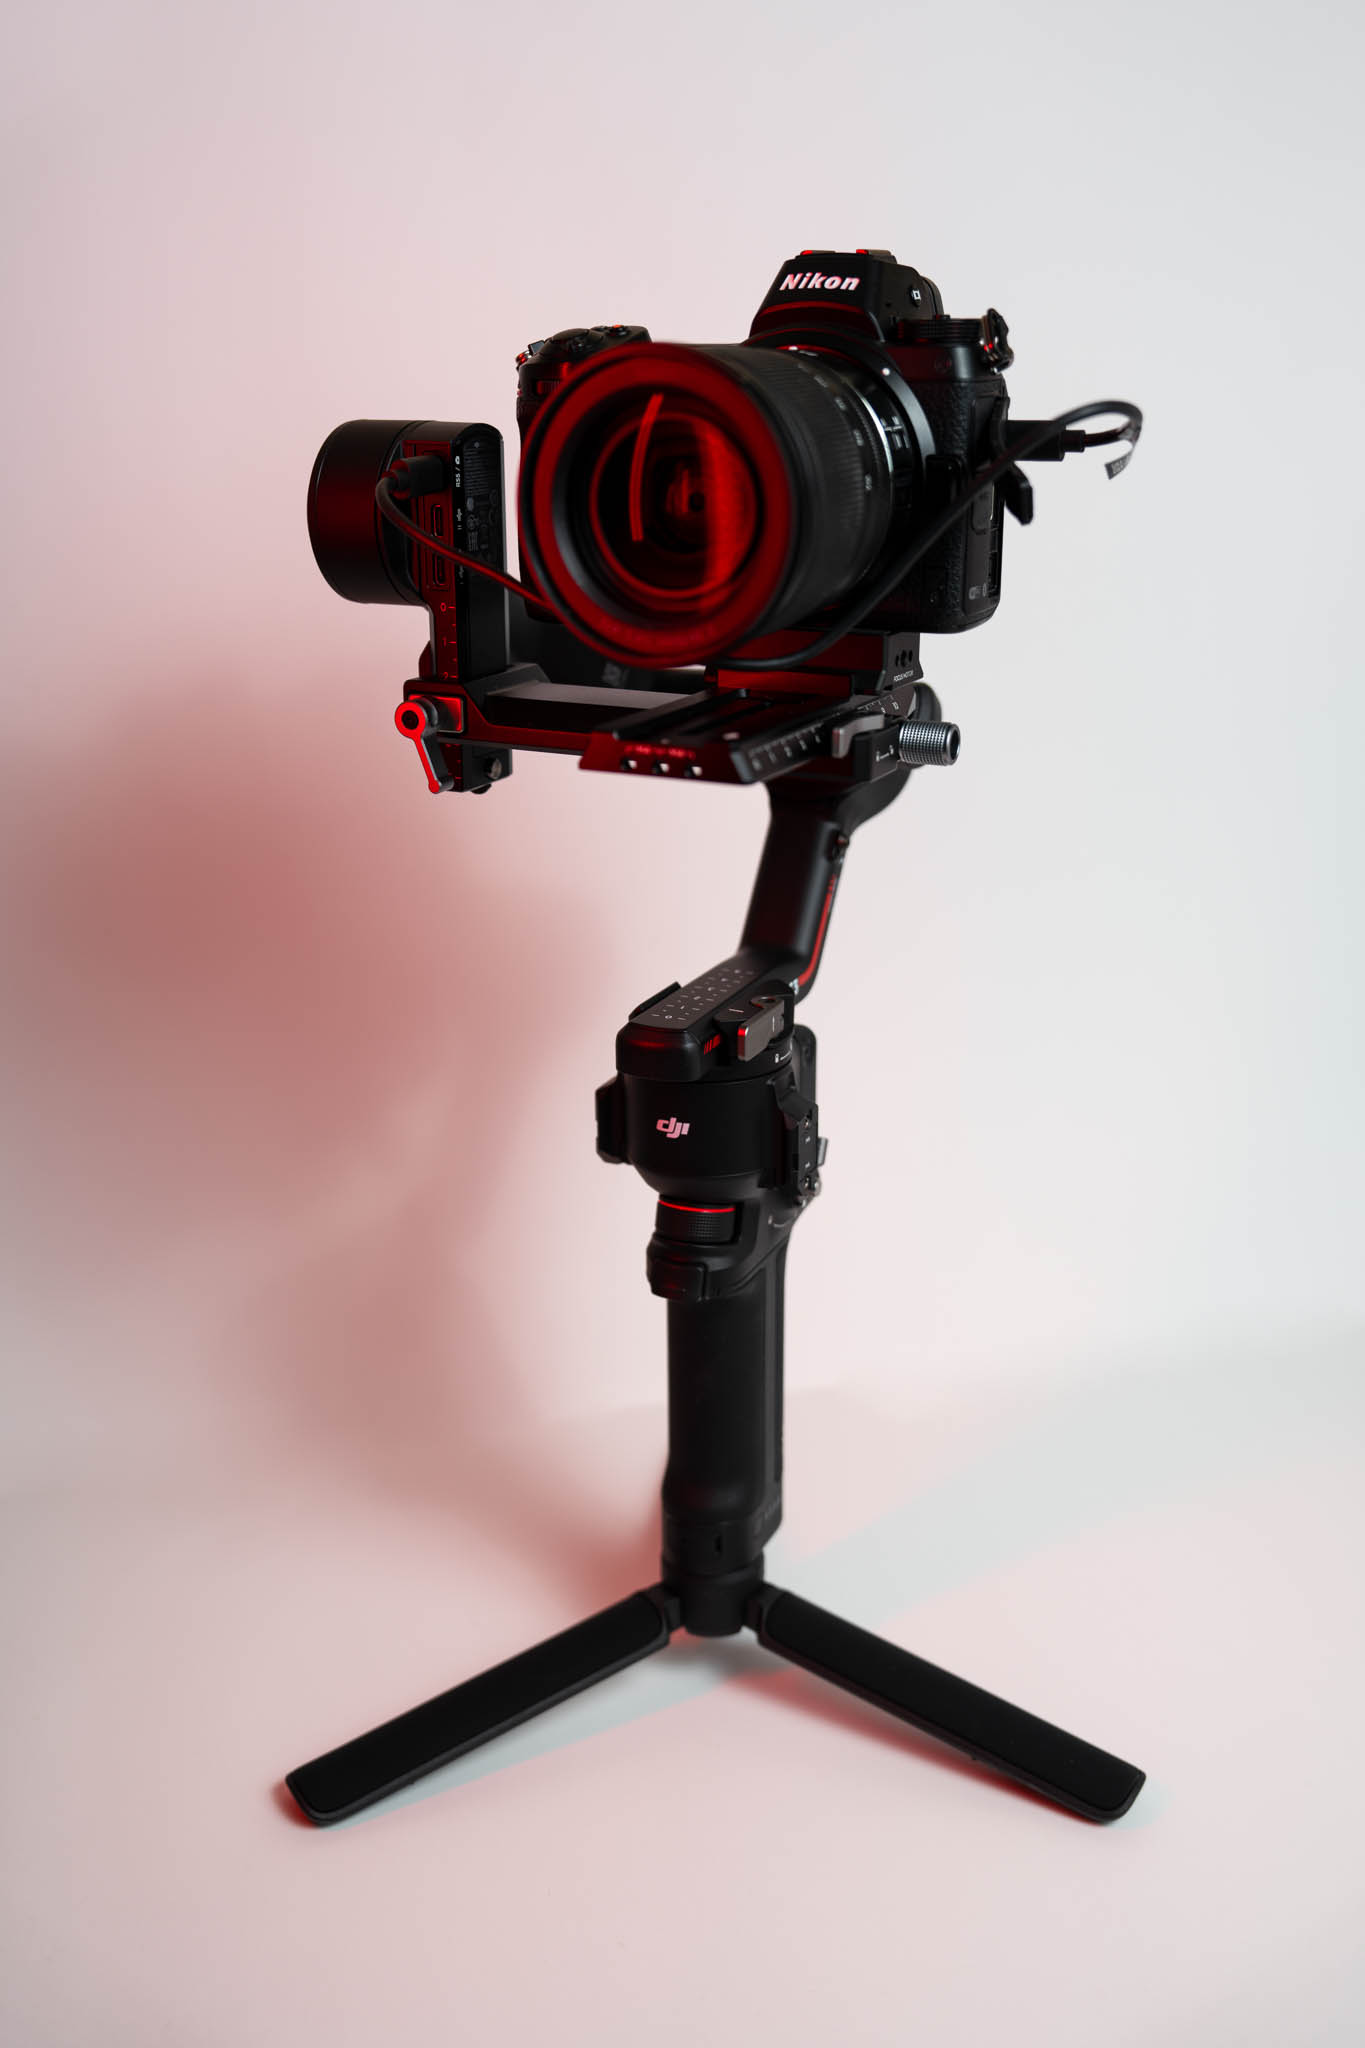
1.4. Video Gimbal
If you’re shooting on the go, a video gimbal is another essential option. As I’ve covered gimbals in-depth in a separate article, as well as listed some of my favorite gimbals in a buying guide, I won’t go into too much detail in this section. As a brief recap, a gimbal uses small motors to keep your camera steady while moving. It’s basically “whole-camera image stabilization” with the added benefit of creative control, allowing for smooth pans and other camera moves.
For mirrorless cameras, I think the two best gimbals on the market right now are the RS 3 Mini and RS 3, both from DJI. DJI’s gimbals have performed so well in my shoots that I’ve switched over to them entirely at this point. But there are also great, less expensive options from companies like Zhiyun if you’re on a budget.
1.5. Variable Neutral Density Filter
For reasons I’ll detail later in this guide (in the “shutter speed” section), a variable ND filter can be quite useful for videography. When you’re shooting video, your choice of shutter speed carries a lot more baggage than it usually does in photography. A variable ND filter allows you to reduce the amount of light that reaches your camera sensor, giving you more control over the exact shutter speed you use.
Although some videographers prefer to use a set of three or four individual ND filters, I find that a variable ND filter is the best use of money. If you get a high-quality one, you won’t see any image quality issues with a variable ND filter. This is the one I use. My recommendation is to get one with a large filter thread size, like 77mm or 82mm, to use on all of your lenses with step-up rings.
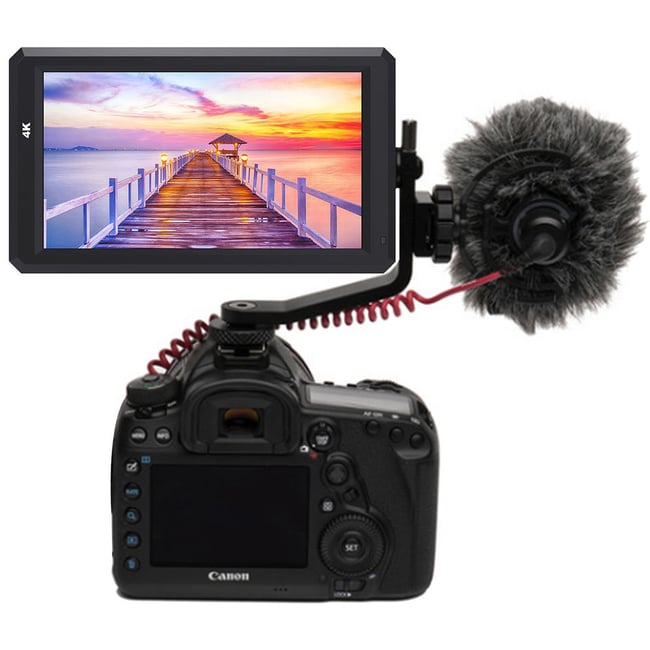
1.6. External Capture Device
An external capture device, like the Atomos Ninja V, is a more niche product, but still an important one for many videographers. It functions as an external monitor with a large, bright, color-accurate screen. Not to mention that with some mirrorless cameras, you don’t get the full video quality when you record to an internal SD or CF card! You may need to film over HDMI to maximize the image quality, and a device like this is how to do it.
But look up your camera beforehand, because these aren’t cheap devices and aren’t necessary for everyone. If you only need the monitor capabilities and don’t need external HDMI capture, a basic video monitor is going to be a less expensive alternative.
1.7. Follow Focus
For cine-style shoots, or when you’re shooting with manual focus lenses, using a follow focus can make the manual focusing process easier. A follow focus device allows you to focus by turning a large, geared dial, rather than spinning the focusing ring on your lens.
One benefit is that this dial can let you choose focus distances to jump between ahead of time. But beyond that, it’s just more ergonomic (and leads to less shaky video) to adjust focus this way, compared to the lens focusing ring.
Mirrorless video AF performance has come a long way, but having one of these is still very helpful when working with precise focus situations, not to mention manual focus lenses like anamorphic lenses and others.
1.8. Lighting
Depending on what you’re filming, an on-camera video light may be a good piece of gear to add to your kit. And of course, if you’re filming larger productions, you’ll want all manner of external lighting choices. The variations are endless, but a basic on-camera light like this is a good place to start.
2. Camera Settings
Setting your camera properly is just as important as getting the right video gear and accessories. I’ll go through some of the keys below. While the following menu options may not be worded identically to your camera, understanding the rationale behind them should help a lot. As always, don’t be afraid to consult your camera’s manual for specifics!
2.1. Frame Rate
One of the most important video options is what frame rate your camera is shooting at. Cameras will typically offer a number of options, including 24, 30, 60, and 120 fps. In PAL regions, 25 and 50 fps are also common. Jason has a full guide on the best frame rates for video, but I’ll go through some details below, too.
For the cinematic look, 24 fps has been the standard for ages, and often seems “right” to movie viewers. However, it won’t have as much motion clarity, making it a challenging choice for action, sports, or documentary style footage.
Moving up to 30 fps makes it a bit easier to integrate footage from other sources, and it’s the standard for TV. Shooting at 30 fps makes it easier to add clips from unusual sources to your video, too – like computer screen capture, or basic phones/action cameras that don’t have 24 fps options.
Shooting at 60fps is typically done when you want a slow-motion effect. In other words, you film at 60 fps and then play back the video at 30 or 24 fps instead. Frame rates faster than 60fps, like 120 or 240, allow for even more drastic slow motion, but often make compromises on image quality with today’s mirrorless cameras (like maxing out at 1080p instead of 4K or higher).
For many of today’s uses, like digital delivery via platforms like YouTube, 30 fps is a good, balanced choice.
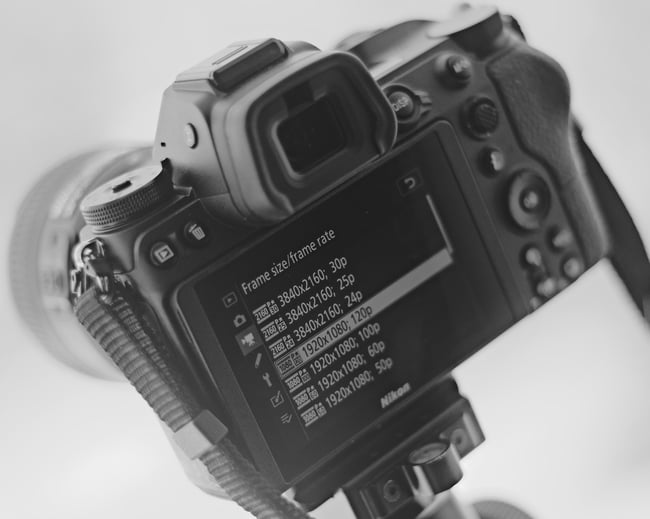
2.2. Frame Size
If you’re working with a full frame camera, you may have the choice to use all of the sensor, or a cropped portion of it. On some cameras, this might not even be an explicit choice, but instead is dictated by your choice of resolution and frame rate – like only being able to shoot 4K with a bit of a crop. For more details, consult your camera’s manual.
Shooting with a crop isn’t necessarily right or wrong, but it can impact the lenses you decide to use. For example, if your camera has a built-in crop when shooting 4K, a midrange zoom like a 24-70mm could feel too long. But for something like wildlife videography, you might find a huge benefit from a built-in crop! For example, if your camera can shoot 4K video at both full-sensor width and with a 1.5x crop, wildlife videographers will love the 1.5x option.
2.3. Resolution
Almost every modern mirrorless camera can shoot at least 4K video these days. 4K video looks great on high-resolution monitors and TVs, and it also gives you more flexibility when cropping the video. (The same is true to an even more extreme degree with things like 6K and 8K video.)
That said, you won’t always want to use the highest resolution setting for your video. If you shoot at something like 1080p instead, you’ll make storage, transfer, and editing significantly faster. A good balance is to shoot at 4K most of the time even if your camera has higher-resolution modes like 8K, but it all depends on the project at hand – and the speed of your computer!
2.4. Shutter Speed
For video, setting your shutter speed requires more effort than in photography. Broadly speaking, you want to respect the 180 degree shutter rule: motion blur looks natural when your shutter speed is 1/[double your frame rate]. In other words, shooting at 30 fps, you’ll get the most natural motion at 1/60th of a second. 24 fps footage looks natural at 1/48th of a second (which can safely be rounded to 1/50th second).
Like many rules in photography and videography, this rule isn’t set in stone. Using a faster or slower shutter can lend interesting artistic effects. For example, a lot of action scenes are shot at fast shutter speeds in movies, in order to make them look more jarring and intense. If you’re just getting started, however, following the rule is a safe bet. Hence why I recommended a graduated ND filter earlier.

2.5. Color Options
Depending on your camera, you may have a choice of color controls, profiles, or gamma curves. All of these options are going to vary between cameras, but broadly speaking, you can choose between having footage that is “ready to go” or requires more work in post (called grading). If you’re familiar with the “JPEG vs raw” debate in still photography, this is pretty similar.
Picture styles or other color controls, like Standard, Vivid, etc., will affect your video’s final look. This is not a bad choice if your goal is to get contrasty, colorful footage right out of camera. For quick delivery and less post-processing work, it’s perfectly fine to shoot your video this way.
But if you have time to color grade your videos properly, you’ll get better image quality with logarithmic recording. Shortened to “log” recording – and often modified to S-Log for Sony, N-Log for Nikon, D-Log for DJI, and so on – log formats are much flatter. These files can look extremely dull out of camera! This is on purpose, as they enable videographers to capture the most dynamic range in their video, and therefore have the greatest flexibility to edit and adjust in post.
Not all cameras can capture in these modes, while some cameras will only do so with external capture devices like the ones I discussed earlier. If your camera offers it, however, log video can be a great way to increase your visual quality, at the cost of more work in the edit.
As a footnote, there’s a level beyond even log capture. Some cameras are capable of capturing raw video, akin to raw files in still photography. This allows for adjusting white balance in post, among other things, but is even more specialized than log. It involves bigger file sizes, more post-processing work, and more specialized capture devices. But in terms of pure image quality, it can’t be beat.

2.6. Audio
If you are making use of an external audio option, like a lavalier or shotgun mic, check if your camera requires you to specify that input. Some cameras may give you other options, like recording quality or mic gain. These will need to be set based on what mic you’re using, as well as how your camera handles it. (Read the manual for the mic and camera in question, and you’ll quickly find out the optimal settings.)
2.7. White Balance
A lot of photographers are used to setting their white balance entirely in post-production. But unless you’re shooting raw video, choosing a white balance at the time of capture is an important consideration. I don’t recommend relying on auto white balance, since, on most cameras, it can try to adjust the while balance during the middle of a clip. So, instead, setting your white balance manually is very important.
2.8. Vibration Reduction
Many cameras will feature two types of image stabilization: mechanical and electronic. Mechanical vibration reduction – which is either based on your lens, or in-body image stabilization – is no problem to keep turned on. I usually turn mine off when shooting from a tripod or a properly-balanced gimbal, but it’s unlikely to cause weird issues either way.
Electronic image stabilization functions differently. It crops your video in, essentially moving the frame around on your sensor, and is meant to provide another layer of stabilization on top of VR/IS. Unfortunately, it can jump around and mess with your framing, and sometimes it just looks weird (that’s a technical term :). Unless you absolutely need it, I’d suggest keeping electronic vibration reduction disabled.
Conclusion
Video has become an increasingly significant part of my business, with clients often requesting videos alongside the photos I usually provide. The story is similar for lots of photographers these days.
If you’ve got a mirrorless camera, you’re already a huge part of the way to capturing great video. Before your first video shoot, I’d recommend double checking this guide, picking up the relevant accessories, and setting your camera properly. After that, you you should be able to set up your camera to capture great quality videos! Let me know in the comments if you have any questions.
Excellent article. Thank you very much. I am Getting much better with manual mode for my photography these days, especially with manual OCF, but video is still very mysterious to me. Since you mention to avoid auto white balance, I am wondering about exposure. looks like I have to fix shutter speed. I’d also like to fix aperture. Then how is the exposure handled? Do I fix iso and hope for the best? What if light changes during filming. It’s not like I can adjust on the fly like I do with photos. Thanks!
Excellent article, Alex! Very useful for still photographers transitioning to video for one reason or another!
Thanks!
“These days, it’s more important than ever for photographers to know how to capture high-quality videos.”
And why exactly is that the case ? I mean unless you are videographer or a journalist WHY is it that important ? I really don’t give a …. about video and I don’t think I am alone afeeling like that here.
I agree more or less with noname. My main usage for a Digital camera is to take photos. I have used a DSLR in the past to do short movies as an extra during weddings, funeral services and other occasions.
Don’t know the current specifications … but that stupid limitation of filming only 29 minutes continuously has lead to problems in some occasions. If I were a serious or professional videographer I woud use a professional Video Camera that does not have that 29 minutes limitation.
I’m surprised so many people mention the 29 minute limitation. I can’t think of almost any shot that’s truly limited by that – even the longest “oner” will have hidden cuts and other ways to get around a 29 minute take length.
Exactly. I have even heard of that as a reason to get the Z9 over the Z6. The only time I can imagine a shot going past 30 is filming a kids concert/program. And if you can get your family/friends to watch a clip longer than 30, then you truly are an exception. Never mind the clips on youtube, feeds, etc aren’t even 30 minutes in total length post edit.
If you’re a working photographer (doesn’t matter the type), then many clients also like the ability to get video for their projects (especially the way social media prioritizes video over still images these days). So if you’re able to offer both stills and video, then your services are more attractive to clients. If you’re just doing photography as a hobby, then it’s less important to know video unless it’s something you’re interested in.
Ben got it right – if you’re shooting for clients, they’ll almost always request video or have video needs. If you are purely hobbyist, you don’t need video in the same sense you don’t need anything other than what you want to shoot.
I’ve been a stills-only amateur photographer since the early 1970’s (when my best friend was a 4×5 full monorail) but in the early 2000’s I had to learn videography (with a dedicated video camera) for a specific huge project at work. Painful! Then again 2 years ago I had to (re)learn videography for another huge work-related set of video projects, but with a Z7. VERY Painful (and expensive, given all the other gear I needed, as Alex has detailed). I would have given my eye teeth at that time for a “video 101 with a mirrorless camera” primer like Alex has presented here. And though I remain at heart a stills shooter, competent videography (even for some amateur-level projects) is becoming very useful and important (at least to me). Case in point: I recently did the videography for my daughter’s wedding (with a couple assistants and 3 total cameras, Ninja V, ProRes RAW, etc.). The reward is that she/they are extremely happy with the results which, in turn, reinforces Alex’s premise that knowing videography can definitely help some (maybe many) people — even amateurs but especially professionals shooting for clients. Given that, even though I do not especially enjoy videography (it is a LOT of work and very time-consuming), I agree that it may be really important for pro photographers (and some amateurs, too) to learn how to competently shoot (and edit & deliver) video projects.
Thank you, Alex, for this article.
Thanks Mark!
I was you…until about six months ago. Shooting stills only, then the volunteer org I work with decided to get more video for marketing purposes, social media, etc. The Z6 I already had fits the bill quite well. I bought the DJI mini and it works very well. There is a learning curve with and without the gimbal, but that has given this hobby a whole new life and interest,
Regarding 29 minute limitation, I have yet to get even close to that number. Most end product I produce is only about a minute comprised of clips that are much shorter.
I was the same as you until I moved to mirrorless. As a working pro it instantly became a way to earn more from the same clients vs having to always seek out new photo only clients. And camera tech these days means needing one brand of camera with one lens mount vs having dedicated photo and video kits.
I agree. I’m not interested in videos so I don’t do videos.
I did one once. The vet wanted one of our dog walking after an op. I used a phone. Job done.
The problem is that a naff video (hope US readers know that word) looks … well … very naff. I suspect it’s difficult to do one well and I have too many other things I need to do better.
Like still photography …