Some time ago, I heard about using consoles to control Lightroom. You may have heard about it too, because some of them were reviewed here, here and here on PhotographyLife. This is something that I thought could be fun, but products from Loupedeck or Tangent cost more than $200, which is too expensive for something I wasn’t 100% sure I’d use.
So, I decided to purchase a MIDI console – a general term for a controller usually intended for making electronic music – to try it instead. I went with the Behringer X-Touch Mini because of the low price of around €50 ($60) to try it. Besides the lower price, I preferred this option to something like Loupedeck because it can be fully customized and is thus more future-proof: If new options become available in my favorite software, I can easily adapt my configuration to take advantage of it. For example, Capture One introduced recently new sliders for Blacks and White, and then a new slider for Dehaze, and I am not sure I could have taken full control of it with Loupedeck. Moreover, as you will see, you can customize your MIDI console to a level that can’t be achieved with most of the other products.
If you are using Lightroom, you can find plenty of tutorials online that use a plugin called Midi2LR (there are perhaps also others, I didn’t dig into it) which seems to be working smoothly. However, with Capture One, I struggled to find proper tutorials on how to use a MIDI console. From what I have understood, the reason seems to be that Lightroom has official support of MIDI console with an API, but Capture One doesn’t. While searching online, I found a YouTube video, but it didn’t go far enough for me.
In this article, I will share with you what I have learned. This article will be more focused on Capture One but can be used for any software that uses keyboard shortcuts. This will not be a full tutorial since I only looked for solutions for a few specific problems. I will first explain how to perform some specific tasks so that you can have an idea of the ranges of options. Then, I will give you a few tips for the configuration, and finally, I will share with you my configuration files and show you the console in action in a video. Before going further, I would like to mention, I am not affiliated with any of the companies mentioned in this article.
Table of Contents
How a MIDI Console Works for Photo Editing
Let me first explain how things work: the MIDI console doesn’t directly control Lightroom, Capture One or any other program. Instead, the console sends a message through USB, and software or a plugin converts this message to a keyboard combination that is received by your photography program. Thus, you can only edit an image through what can be done with keyboard shortcuts.
Here, we will use Bome Midi Translator as our software for setting up the MIDI console. (From here on out, I will call it BMT.) There are two versions of BMT: Classic and Pro (the latter costs €59). We will need to create « rules » and this is only available in the Pro version. The program has an interesting way of working: if you don’t purchase it, it works for only 20 minutes. After 18 minutes, the program warns you, you can save your current configuration, close the program and open it again; the clock is then set back to 0 and you can use it again for 20 minutes.
Of course, if you enjoy the program, I encourage you to buy it. They have a forum and a YouTube channel with tutorials.
The Console
Before going further, I will make a quick presentation of the console I am using so that you can follow me. Here is an image of the Behringer X-Touch Mini:
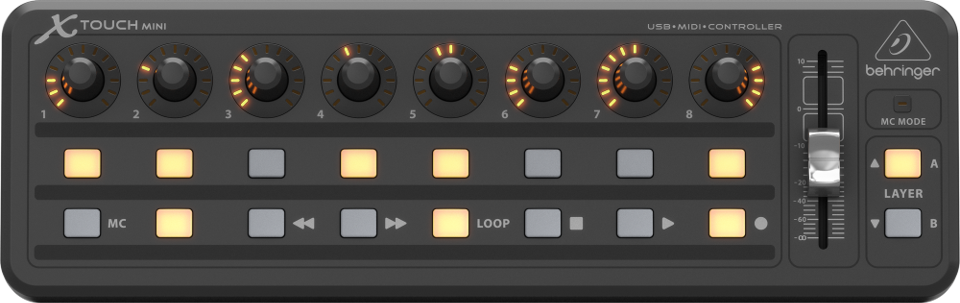
- On the top row, there are 8 knobs, each with 128 positions. Each position corresponds to a given message sent by the console. When you reach the last (or first) position, you can keep turning the knob and it doesn’t stop (but the message sent by the console is always the same, we will discuss that later). Also, the knobs can also work as a button when you press them.
- As you can see, there can be colors around the knobs to know where you are between 1 and 128. For these colors to work, the program you are using must send information to the console. This won’t be the case with BMT, so you can ignore the colors around the knobs.
- Below the top, there are two rows of 8 buttons.
- On the right, there is a fader which also has 128 positions. There are two main differences with the fader: (1) when you reach the first or last position, you can’t go further; (2) when you move it, it is smoother because you don’t feel each one of the 128 positions.
- On the far right, 2 buttons called “Layer” are here to double your possibilities. Each knob or button can thus be assigned two functions, one on layer A and one on layer B. By default, you are on layer A.
In total, you have 16 knobs, 48 buttons, 2 faders. I won’t make a full review of this console since it is the first one I am using. What I can say is that it seems to be well-built and solid and I don’t regret my choice of buying it. While searching for it, I read about other consoles, such as the Arturia Beatstep or the Korg NanoKontrol 2.
Two things that you should pay attention to when you choose a MIDI console are (1) check if the knobs are infinite (as described above) or not, and (2) check if the message sent is absolute (as described above) or relative (i.e. one message is sent if you turn a knob clockwise, and another message if counterclockwise). For the latter, if the message is relative, the rules given below won’t work and you must adapt them.
Understanding Bome Midi Translator
Before actually using a photography program like Capture One, we will learn how to use BMT so that you have an idea of what can be done. In this tutorial, we will go in 3 steps, from the easiest to the most difficult. We will first learn how to program a button of the console to send any key combination, then we will then learn how to use the knobs, and then the fader.
1. Buttons
Let’s open the program. The image below is what it looks like for me:
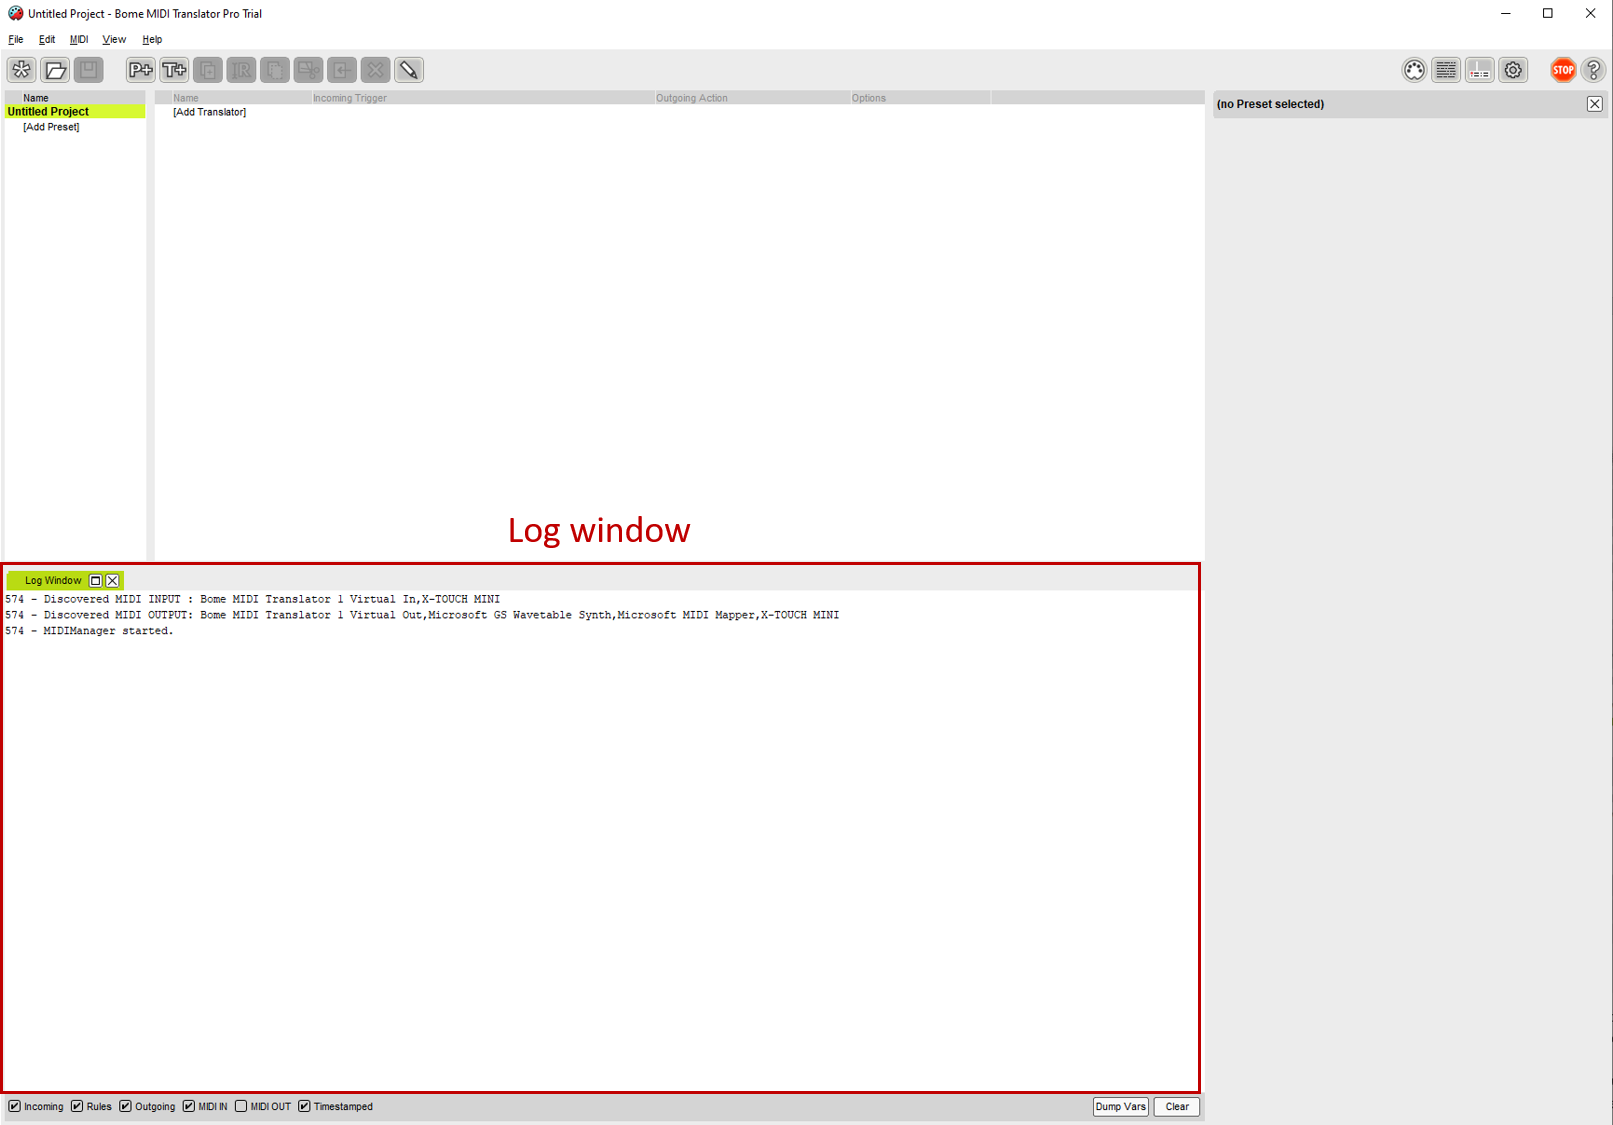
Note that in the bottom panel (Log Window), you may see different messages than the ones I have.
Click on “Untitled Project” in green (in the top left panel) and it will display new panels on the right. The only thing that matters for now is to choose your input (“X-TOUCH MINI” for me) by clicking the box in the “Project Default MIDI Ports” panel, as you can see below:
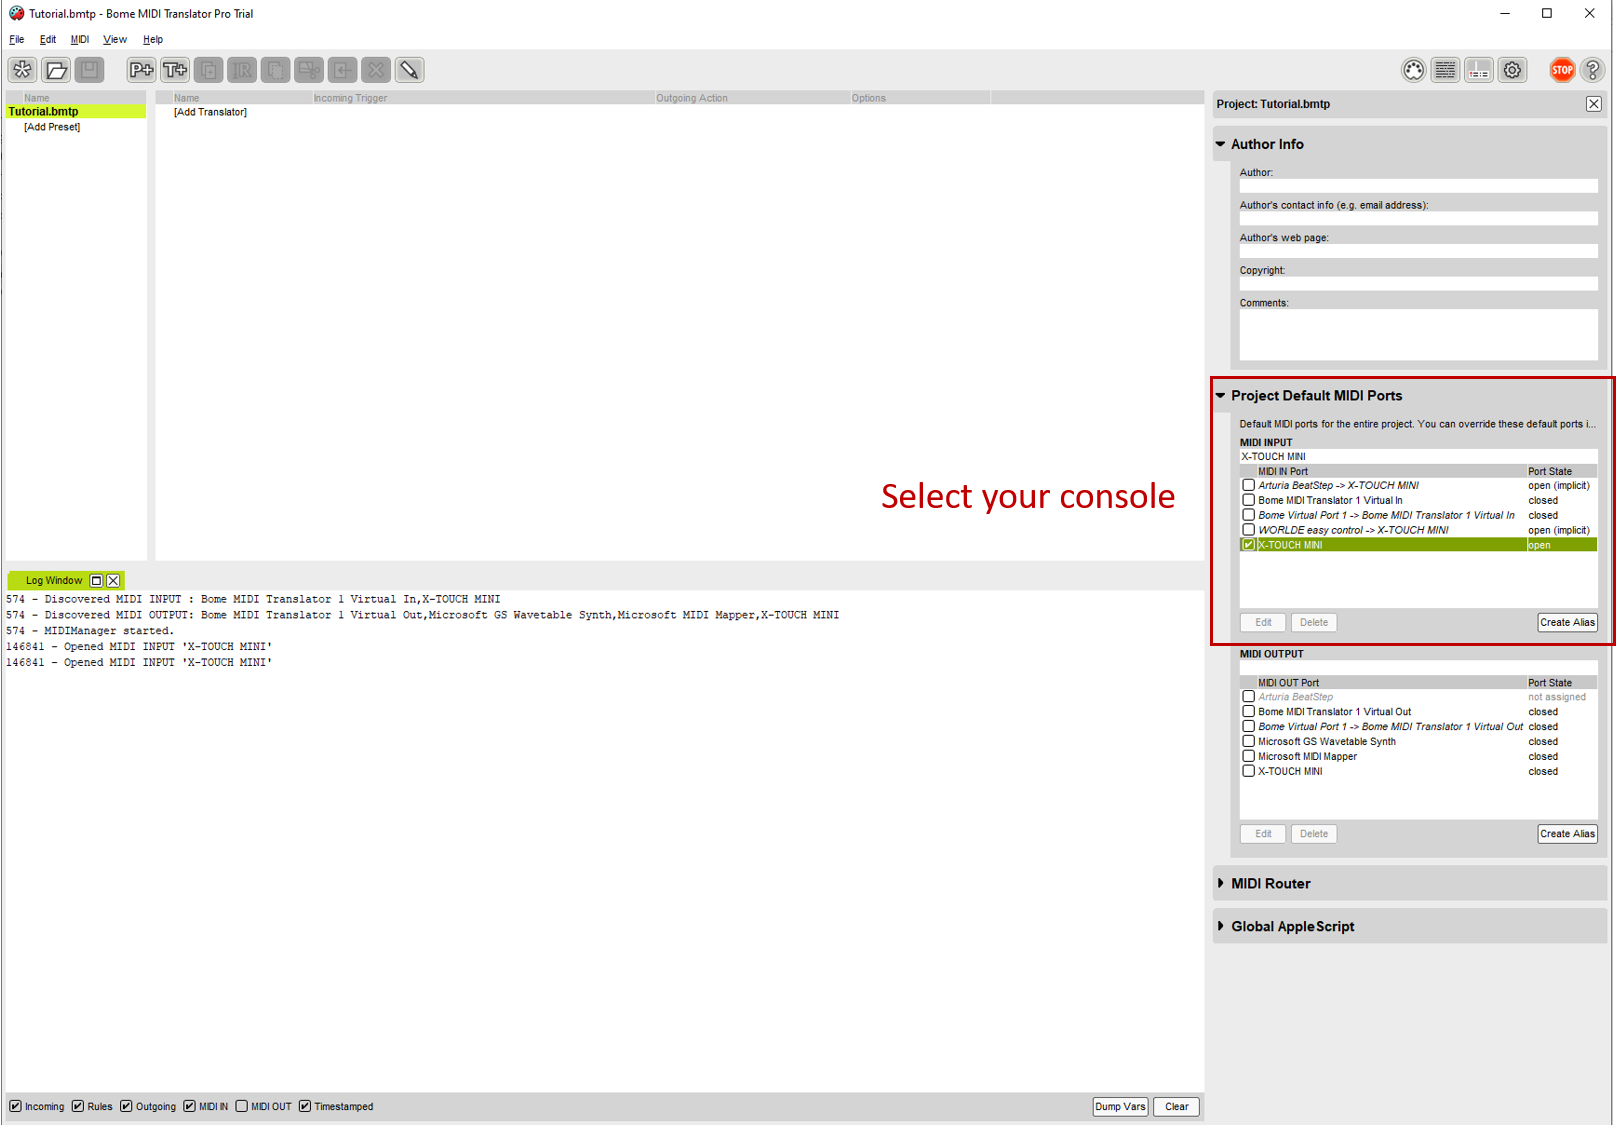
No need to do anything else in that area (no MIDI OUTPUT for example). To be sure we don’t lose our configuration, we save the project as Tutorial.bmtp.
The next steps are all shown in the image below. First, I’m going to click [Add Preset] on the left panel. In this case, I named it “Tutorial.” In the middle panel, click on [Add Translator]. A new line is created, and you can directly rename the translator; I’m going to call it “Exposition-Button.” On the right-hand panel, the “Translator Options” can remain untouched (though be sure the Active box is checked). In the “Incoming” panel, in the first dropdown menu, choose “Midi Message.” In the second dropdown menu, choose “Raw MIDI / System Exclusive.” Then, check the box “Capture MIDI.”
Now, when you press a button on your console, the message sent by the console and received by your OS will be displayed in the “incoming” panel as well as the bottom panel. These messages are hexadecimal numbers. In my case, you can see that 2 messages were sent: “MIDI 9A 10 7F” and “MIDI 8A 10 00.”

The first message was displayed while pressing the button, and the second one while releasing it (this will be useful in the future).
At this point, you can click on the last message that was received (MIDI 8A 10 00 for me) in the Incoming panel. The MIDI code (8A 10 00) will be displayed in the box below (after “Raw MIDI message”). This is the input information that the software will translate. If you already know the code for this button (see below), you don’t need to do the Capture MIDI step. For now, we leave the Rules unchanged.
Then, in the Outgoing panel, choose Key Stroke in the menu, choose “Physical Keys” from the four choices, click once on the white rectangle, and type the key combination that you want the input to represent. For example, if you want that button on your MIDI controller to map to the keyboard shortcut Alt+H, type Alt+H on your keyboard, and “Alt(H)” will be written automatically in BMT’s outgoing keystroke section. Let’s test it: Now that you’ve hit Alt+H on your keyboard, click again on the same button in your console.
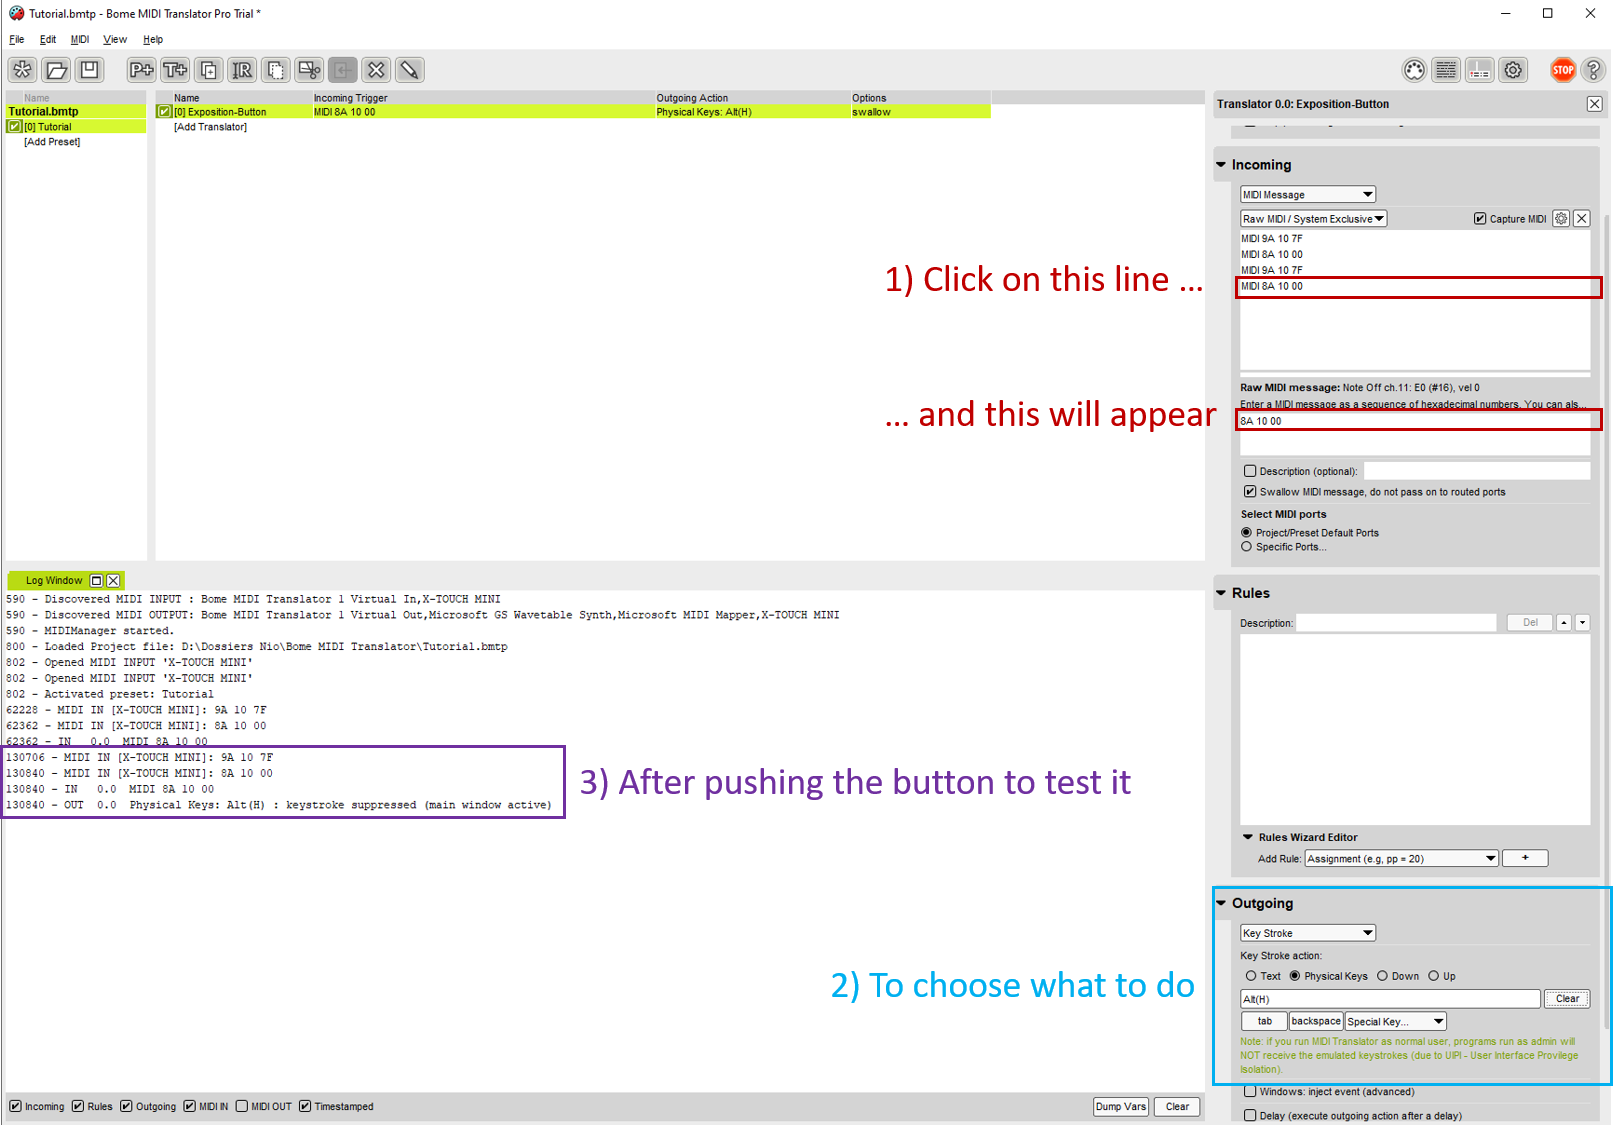
On the log window (bottom left), as shown in the image above, you will see written:
- IN 0.0 MIDI 8A 10 00
- OUT 0.0 Physical Keys: Alt(H) : keystroke suppressed (main window active)
This means that BMT received as input the command “8A 10 00” from the console, and gives as an output a Physical Keys which is “Alt+H”. It also tells you that since BMT is the main window active, it didn’t send this command to the OS. If you open another program that can use this shortcut to do something and you press the button on your MIDI console, it will work.
Any simple keyboard shortcut can be configured like this. It is useful for culling photos (e.g. assign left and right arrows, a star rating or a color label) or do single actions (perhaps assign a preset or a color profile if you have a shortcut for this).
Although you could technically use this for more complex edits like raising the brightness by 0.1, it would be very annoying to press the button 15 times in order to boost brightness by something like 1.5. That’s why we will now use the knobs instead.
2. Knobs
If you do the same as above with one of the knobs, when you click on “Capture MIDI” and move the knob, you will see that at every iteration a different message is sent, until the knob reaches the end and then the same instruction is always sent. See the image below, where I turned one of the knobs clockwise:

The message from the last position is “BA 01 7F” and was sent four times (in hexadecimal numbers, 7F is 128). A quick note: if you turn too quickly, some positions are missed. For example, in the capture above, the positions 4A, 4C, 4D, 50 are not displayed by BMT. This may lead to bugs in your rules if you don’t pay attention.
You can set the last instruction (BA 01 7F) to whatever keyboard shortcut increases exposure. As such, when you reach the end of the knob, if you keep rotating it the exposure will be increased. However, to decrease exposure, if you turn counterclockwise nothing will happen. The solutions are then:
- Assign the shortcut for decrease exposure to the same knob but in the first position. The problem is that if you want to decrease, you need to go through all the 128 positions before something happens: very annoying.
- Assign the shortcut for decrease exposure to a second knob (at the first position) close to it, and manipulate both at the same time. Similarly, you can assign decrease exposure to the same knob on another layer, and every time you want to switch direction you change the layer before. It works and is not as painful as it seems, but you lose half your knob.
- Assign the shortcut for decrease exposure to a button, but it’s boring to press a lot of times the button if you have really gone too far.
Instead, the best solution is to move one level up and we will use rules in BMT. Click on Add Translator and name the new translator Exposition, since it is dealing with your exposure. In the Incoming panel (shown below), choose “MIDI Message” in the first dropdown menu and “Raw MIDI / System Exclusive” in the second. Check the “Capture MIDI” checkbox. Then, turn the knob on your MIDI (once is enough) and, in the “incoming” panel, click on any message received, as you can see below:
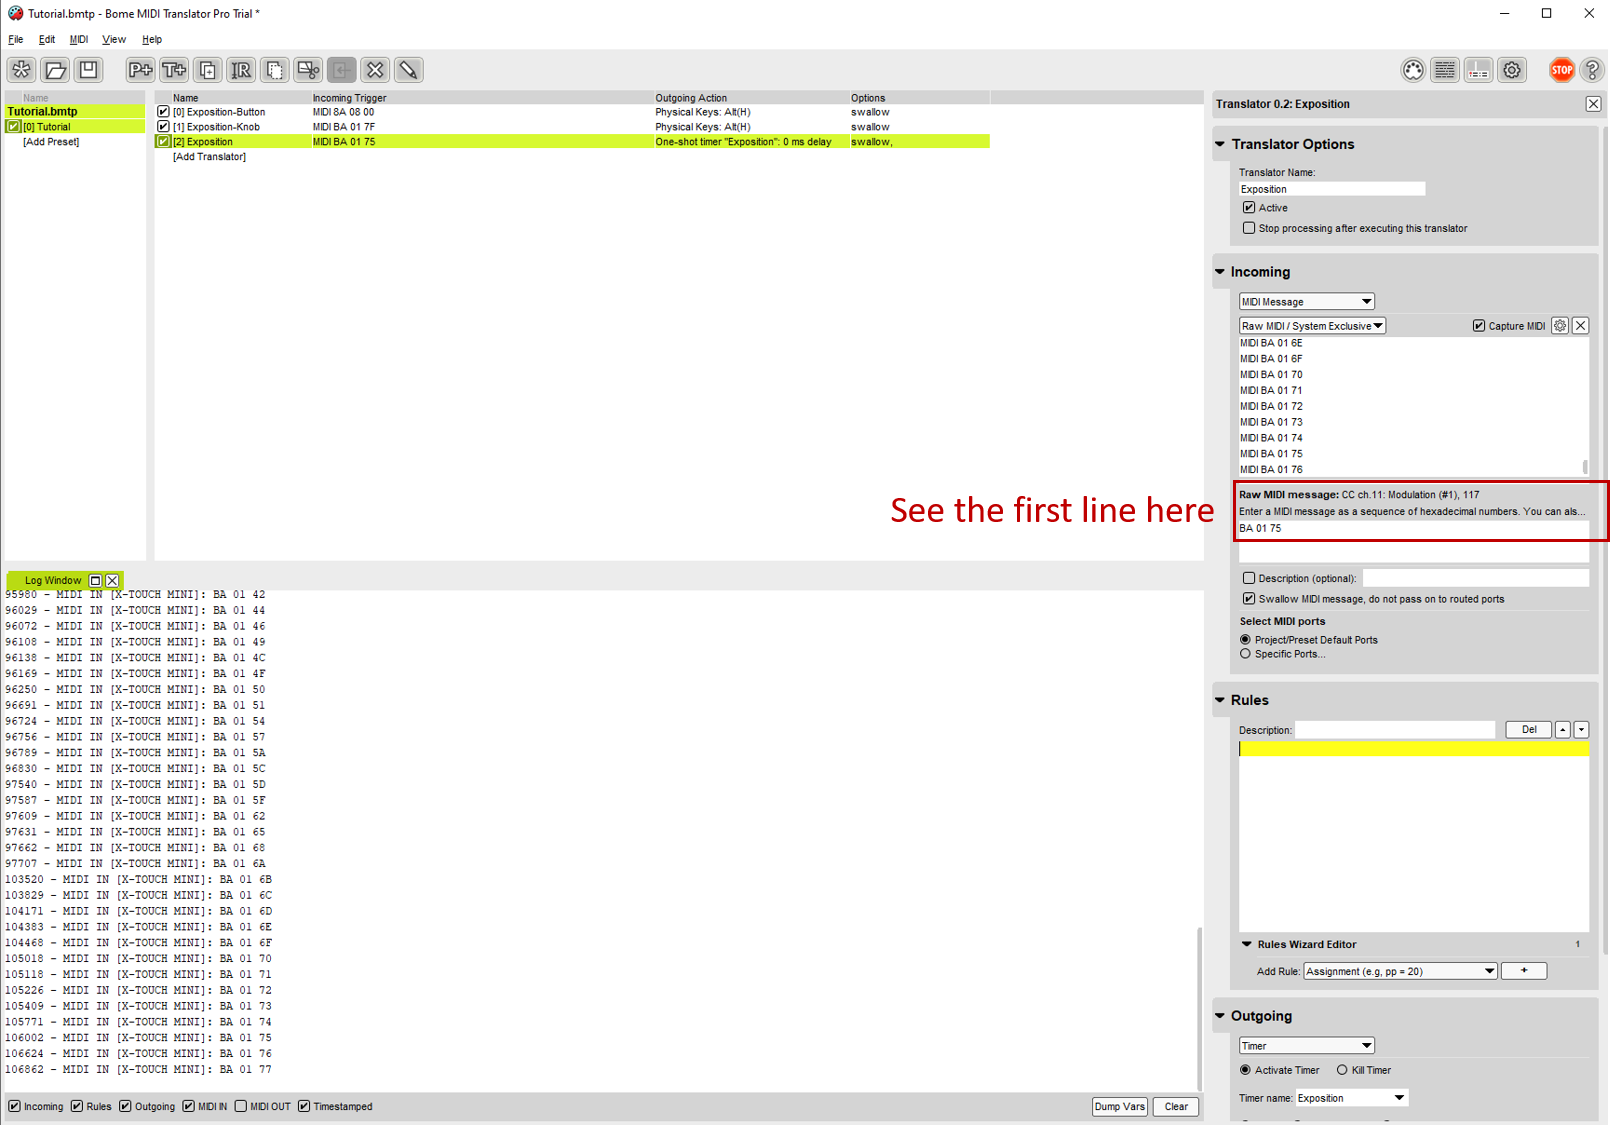
I clicked on “MIDI BA 01 75,” and that changed the panel directly below to say “Raw MIDI message: CC ch. 11: Modulation (#1), 117” (highlighted in red in the image above). This message means that the knob we have changed uses channel 11, it is controller 1, and it is at position 117 (=75 in hexadecimal number). “Modulation” is written because, for the console’s intended use of electronic music, the first knob usually controls the modulation (I don’t know what that means!).
In the dropdown menu from earlier where we have selected “Raw MIDI / System Exclusive,” we now choose “Control Change.” The options that appear are shown in the following image:
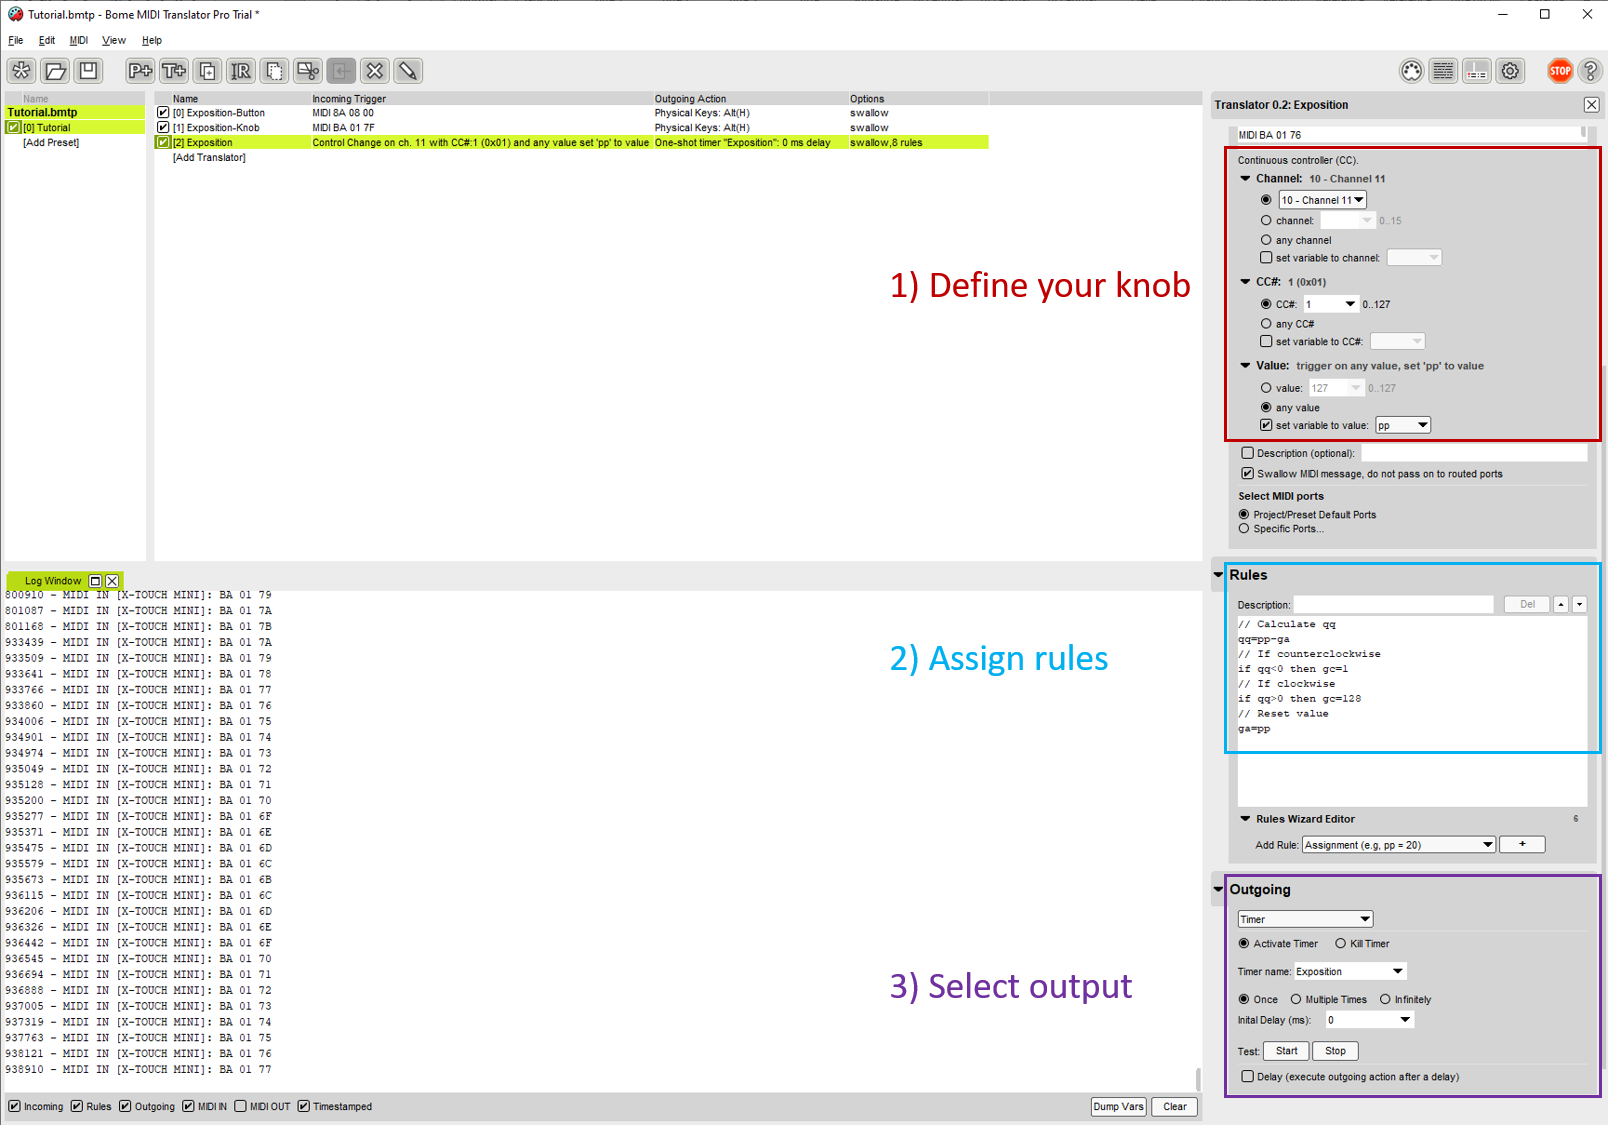
At this point, choose “10 – Channel 11” for Channel, “1” for CC# (values taken from the previous text that we have described) and choose “any value” and check “set variable to value.” In the menu, choose one variable (pp here). What this means, is that if you reach position 71 in your knob, the variable pp will have the value 71. We will then add some rules. They will use variables (I chose the following variable names because these are the ones that were used in one of the tutorials I found; see below for more details on what can be used):
- ga will be used to store where the knob is before being moved (for example on position 70).
- qq will be used to check if the knob is moved clockwise or counterclockwise by comparing the new position with the old position.
- gc will be the output value that will then be used by another translator.
Copy and paste the following rules (in BMT, any line that starts with // is a comment and is ignored):
// Calculate qq
qq=pp-ga

// If counterclockwise
if qq<0 then gc=1

// If clockwise
if qq>0 then gc=128

// Reset value
ga=pp
What this does is assign the value 1 or 128 to the variable gc depending on if qq is positive or negative. The values 1 and 128 could be anything else, it doesn’t matter (this 128 value is not related to the fact that the last position is 128). We will see after what is done with the variable gc. At the end of the rules, we register the current position to ga (so ga is now 71 for example). When you reach the end of the knob by turning clockwise (position 128), gc takes the value 128; if you keep turning clockwise, qq will be 0 (pp=128 and ga=128) and the value of gc is not changed (the conditions above apply if qq is strictly positive or strictly negative). Thus, gc is still 128 and in the following this value will be used. In the outgoing part, check “Timer” in the menu, give it a name (Exposition), and set the delay to 0 milliseconds.
We will then add two New Translator. The first one is called ExpositionUp, and it increases your exposure. Take a look below:

In the Incoming panel, choose Timer in the first menu and select the timer with the correct name (Exposition). In the rules, type “if gc==1 then exit rules, skip Outgoing Action” to be sure that nothing is done if gc=1, i.e. if you have turned the knob counterclockwise. (The double equals signs are intentional; when coding, == means that you check if two things are equal, and is different than = where you assign a value to a variable.)
In the Outgoing panel, choose Key Stroke, select “Physical Keys,” and type your keyboard shortcut. Then, right-click on the Translator ExpositionUp and choose Duplicate; rename the new Translator to ExpositionDown, change the rule to “if gc==128 then exit rules, skip Outgoing Action” and enter the good keyboard shortcut after clicking on Clear next to the shortcut. Then, turn your knob: the log window will display more information than before, but you will see that every time you turn clockwise “Alt+H” is used and every time you turn counterclockwise “Alt+J” is used. In the screenshot below, I turned once in every direction. You can see in the log window that BMT tells you which knob was used, which rules were followed, and which Physical Keys was sent.
With that in hand, you can now configure the console and this will also work with the fader. However, something else can be done with the fader and give you access to even more control.
3. Fader
With what we have seen up to now, we can control 16 knobs (8 on each layer). However, every photography software has more than 16 controls and you may want to have access to more than 16 parameters. What we will do now is use the fader to control multiple things. The idea is that when we will push a button one control will be activated and controlled by the fader, and if we push another button another parameter is activated, and so on. To implement this, we have two options, and every person will choose what they prefer:
- We can activate one control by pushing one button, then we can use the fader with the button released. If we do this, we must have one button to reset all controls so that the fader doesn’t do anything if we touch it by mistake.
- We can configure the fader so that it works only when one button is pressed. The advantage is that we don’t need a “reset” button.
Let’s start with the first option. We will configure the buttons by doing as we have already seen before (in the Incoming panel, select “Raw MIDI / System Exclusive” in the second menu, select Capture MIDI and press once on the button you want). However, here we will assign no Key Stroke in the Outgoing panel and we only will apply some rules to configure variables. For the first button:
g1=1
g2=0
g3=0
Here, the example is for the case where we will control three parameters with the fader. If you want to control 15 parameters (one for each button + one button to reset), you need 15 lines with 15 variables: one is assigned to 1, all the others to 0. For the second button:
g1=0
g2=1
g3=0
and for the third button:
g1=0
g2=0
g3=1
For the reset button, put all variables to 0. Then, we configure the fader as we have configured the knobs (using Control Change in the second menu of the Incoming panel and assigning a Timer). What will be important is the rules because what we need is the ability to apply two conditions for example: “if Button1 has been selected and if the fader moves towards the top, then apply this shortcut”. With BMT, we can’t have 2 conditions with the rules, so we merge them into one by multiplying the variables. Hence, we create a new variable i1 which is g1*qq. If Button1 was pressed, g1=1 and i1 will be different than 0 and i1 will have the same sign as qq. If another button has been pressed, g1=0 and i1=0. Here, the output value will no more be gc but h1 for Button1, h2 for Button2, etc… So, here are the rules for the fader:
// Calculate qq
qq=pp-ga

// Create new variables
i1=g1*qq
i2=g2*qq
i3=g3*qq

// Choose what to do
if i1>0 then h1=128
if i1<0 then h1=1
if i2>0 then h2=128
if i2<0 then h2=1
if i3>0 then h3=128
if i3<0 then h3=1

// Reset value
ga=pp
Once it is done, we create two new translators (as we did before) for each button with a Key Stroke in the Outgoing panel. They will all use the same Timer (that I have called Fader). For Button1, when Fader goes up the rules will be (!= means different than, the line with if h1!=128 could start with if h1==1, I am only presenting another option):
if i1==0 then exit rules, skip Outgoing Action
if h1!=128 then exit rules, skip Outgoing Action

And when it goes down:
if i1==0 then exit rules, skip Outgoing Action
if h1!=1 then exit rules, skip Outgoing Action
At the end of the day, here is what BMT looks like for me (note that you can create a Translator that does nothing but only serves as sorting the lines). I didn’t make a screenshot for each step, and I don’t show you the setup in action, but you can easily try it with the provided file.
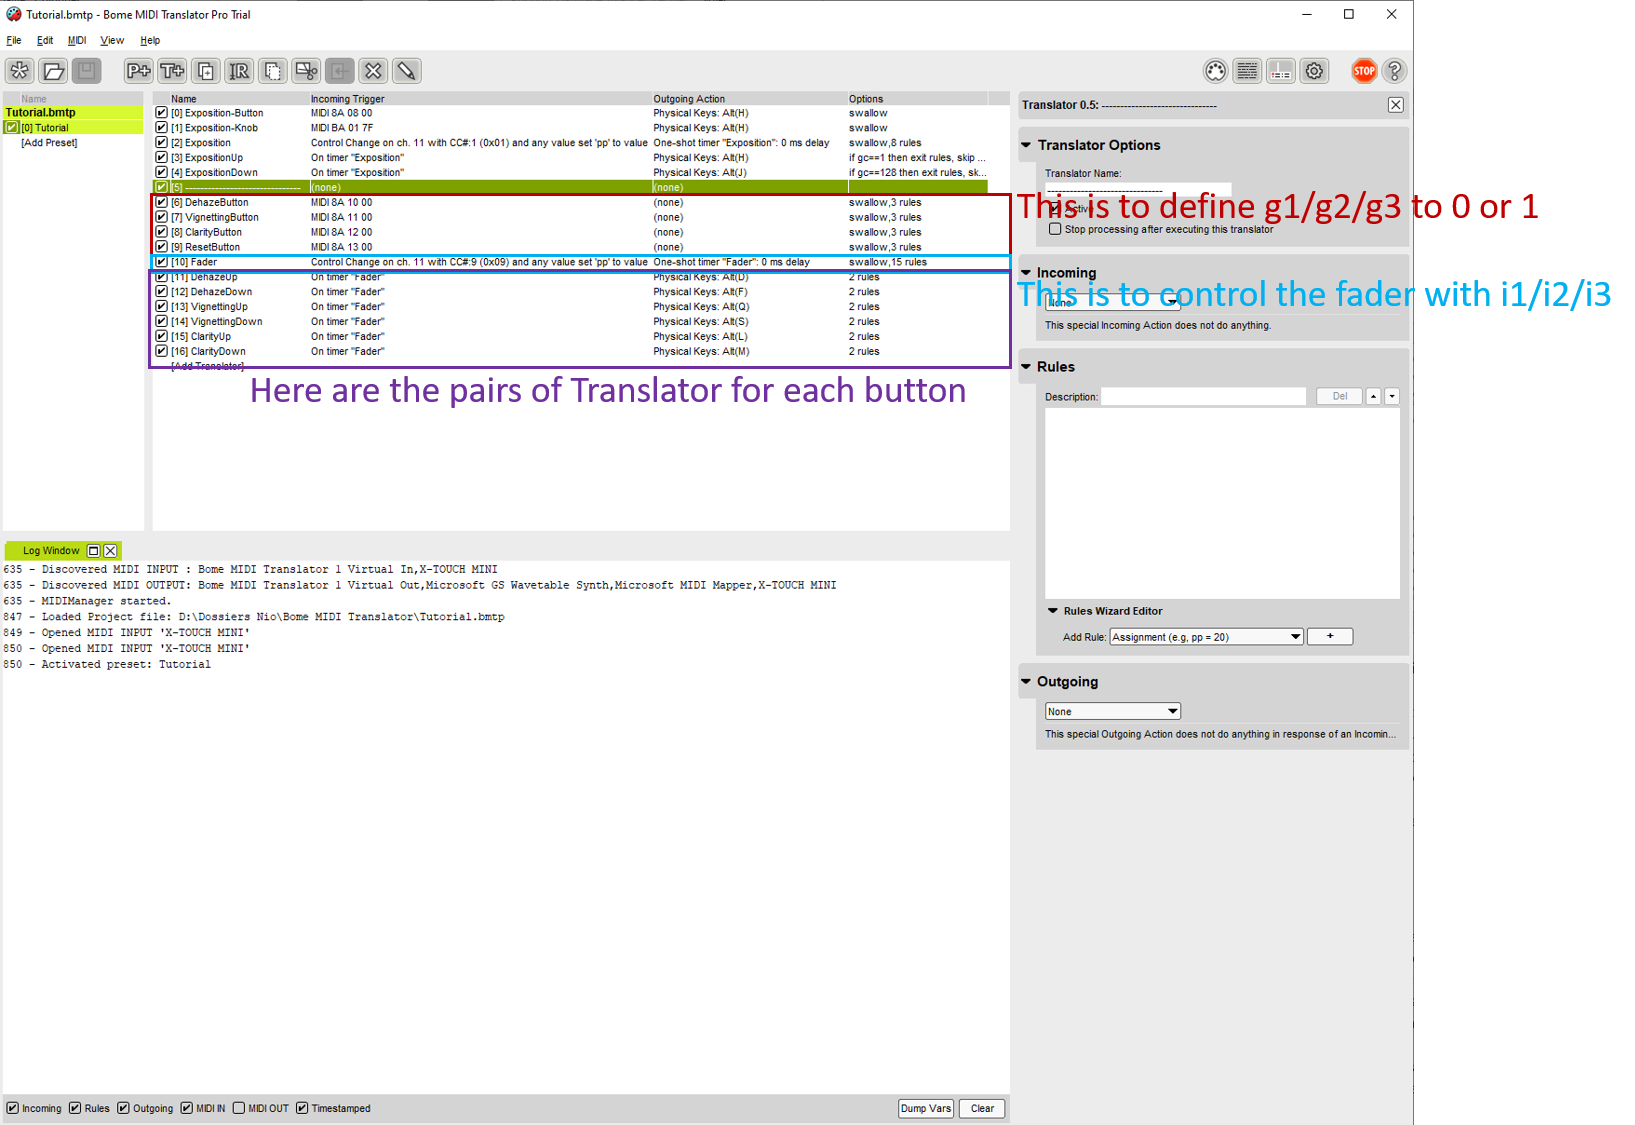
Now, let’s work on the second option that we have – the one where the fader is only activated when you keep a button pressed. For each button, we need two translators:
- One that activates the button, and which will use the MIDI message sent when you press the button. The rule is only “g1=1” for Button1.
- One that deactivates the button, and which will use the MIDI message sent when you release the button. The rule is only “g1=0” for Button1.
Thus, all buttons are automatically reset when we release them, and we don’t need a button to reset all the others. The Translator for the fader is the same as above, as well as the preparation of each pair of translators to go Up and Down. So, here is what BMT looks like:

4. Other options
A few other things can be done. I won’t write a full tutorial for these because it only depends on your imagination, and I will cover some of these in the real-world example below.
- What we have seen for the fader (which is activated by pressing a button) can work with the knobs. This can be especially interesting since knobs have also a button and we could choose to assign each knob to one of the colors from the HSL menu in Color Editor. When turning the knob, the saturation of this color may change, and when turning while pressing, the luminosity of this color may change (for example). This doesn’t work with Capture One since you can’t control the colors for HSL with shortcuts, but may work in other software.
- You can control the mouse: in the Outgoing panel, choose Mouse / Mouse Button Click / Click and Left, and Set Mouse Position. Then click on Capture, move the mouse where you want and click (this records the absolute position of the mouse, so it depends on your screen). This is interesting when you couple it with another option of the buttons: instead of choosing Physical Keys, you can select Text and write anything you want. Every time the button is pressed, the text will be written. This means that you can assign keywords with your console. For example, in the 16 buttons, you can have two buttons to choose the previous or the next photo, one button to move the mouse in the keyword panel, one button for “Return” to validate, and then you have 12 buttons available for your favorite keywords.
- For assigning stars, I can see three options: a) you can of course assign one button for 1 start, another button for 2 stars, etc… however, this is a waste of buttons. b) Another option is that every time you press a button you increase the number of stars, and when you are at 5 you go back to 0. c) The last option is to control the stars with the fader: when you press the button you activate the stars, and then you say in the rules “if fader has a value between 118 and 128, assign 5 stars; if fader has a value between 108 and 118, assign 4 stars; etc…”. It is up to you to define the range of positions to change stars: 1 is too small, 25 is too much, I have found that 10 is a good compromise. Options b) and c) are shown in the full bmtp file that I am providing (and they are shown in the video later in this tutorial).
Preparing the configuration
1. Some Advice
To configure everything, it will be time-consuming: You need first to assign all keyboard shortcuts in your photography software and then configure BMT. Thus, preparation is key, so that when you configure BMT, you just have to follow a simple recipe. You also need to think of what you want to control, although don’t spend too much time thinking about it at the beginning. You can always correct it later according to your needs.
When using a console, the goal is to speed up your workflow, so you should avoid a configuration where you have too many options and you constantly need to look at labels on your console to remember how to change things. Having access to all the available controls with the console is not a good idea and you should keep it simple. Moreover, with too many options, reading the labels on the console will be complicated if there are too many of them. Remember also that you can have a configuration file for culling and one for editing, for example. You can also have everything within the same configuration file, and you active the Preset you want (in the left panel) according to your needs.
2. The Console
To avoid clicking on Capture MIDI for every button, I have found useful to first write on a piece of paper all the MIDI message from the buttons/knobs/faders. When you duplicate a translator, it will then be quick to adapt it by only changing the MIDI message and the shortcut. It will also help you to debug your configuration. Here is the result for the Behringer X-Touch Mini.

3. Photography Software
Within your favorite photo editing software, you must assign the shortcuts. The idea is not to have something easy to remember to use with your keyboard, but something that makes it easy to configure BMT. To avoid overlapping with shortcuts from the OS (such as Ctrl+C), I used “Ctrl+Alt+…”, “Ctrl+Shift+…” and “Ctrl+Alt+Shift+…”. I used the letters from the keyboard in the order they are displayed.
I advise you not to use numbers and special characters because it may be complicated when you write the shortcut in BMT, but you can try it yourself if you want. You should probably write on a piece of paper all your shortcuts during the preparation. (Capture One can export all the assigned shortcuts in a html file.)
4. BMT
Then comes the configuration of the console with BMT.
- Think carefully to something that makes sense to you, try something, and then after some time you can change it if you want.
- During the configuration of BMT, use the option to duplicate Translators a lot, and change only what you need.
- Organize your translators: on the left panel, use different parameter sets. For example, one for the knobs on layer A, one for the buttons on layer A, etc.
- Save your configuration file often.
- To avoid bugs, use a different variable for each knob/button/fader. You should probably write the variables you have used to remember what has been used.
A quick note regarding variables: you can’t use whatever you want, and what can be done is explained in section 10 (page 65) of the user manual of BMT. To sum up: variables are made of 2 letters and can be local or global:
- The lifetime of local variables is the incoming event and they go from oo to xx (e.g. oo, pp, qq, rr, …); during my configuration, I have used only pp and qq. Local variables are not pre-initialized so you must define them before using them (otherwise they will have a random value).
- Global variables start with g, h, i, … to n and also y and z. For example, ga, gb, gc, …, gz, g0, …, g9. Global variables are passed between translators and are set to 0 at startup.
5. Real-World Example
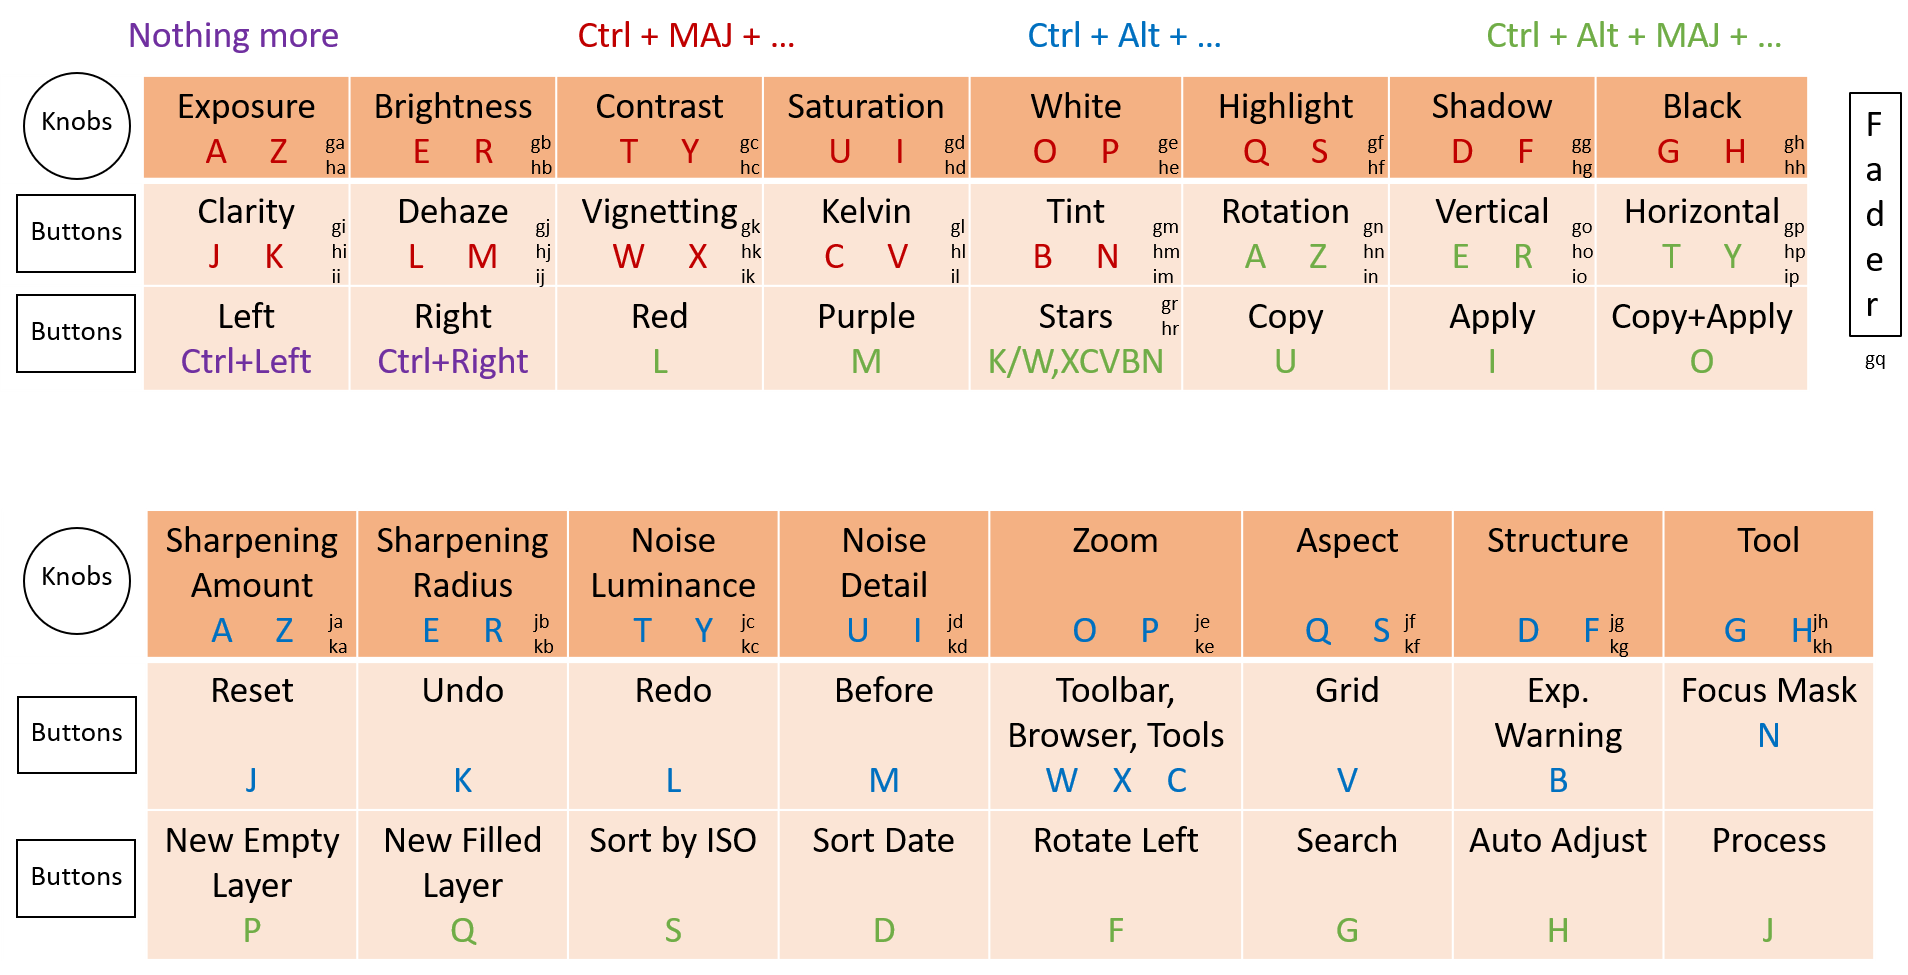
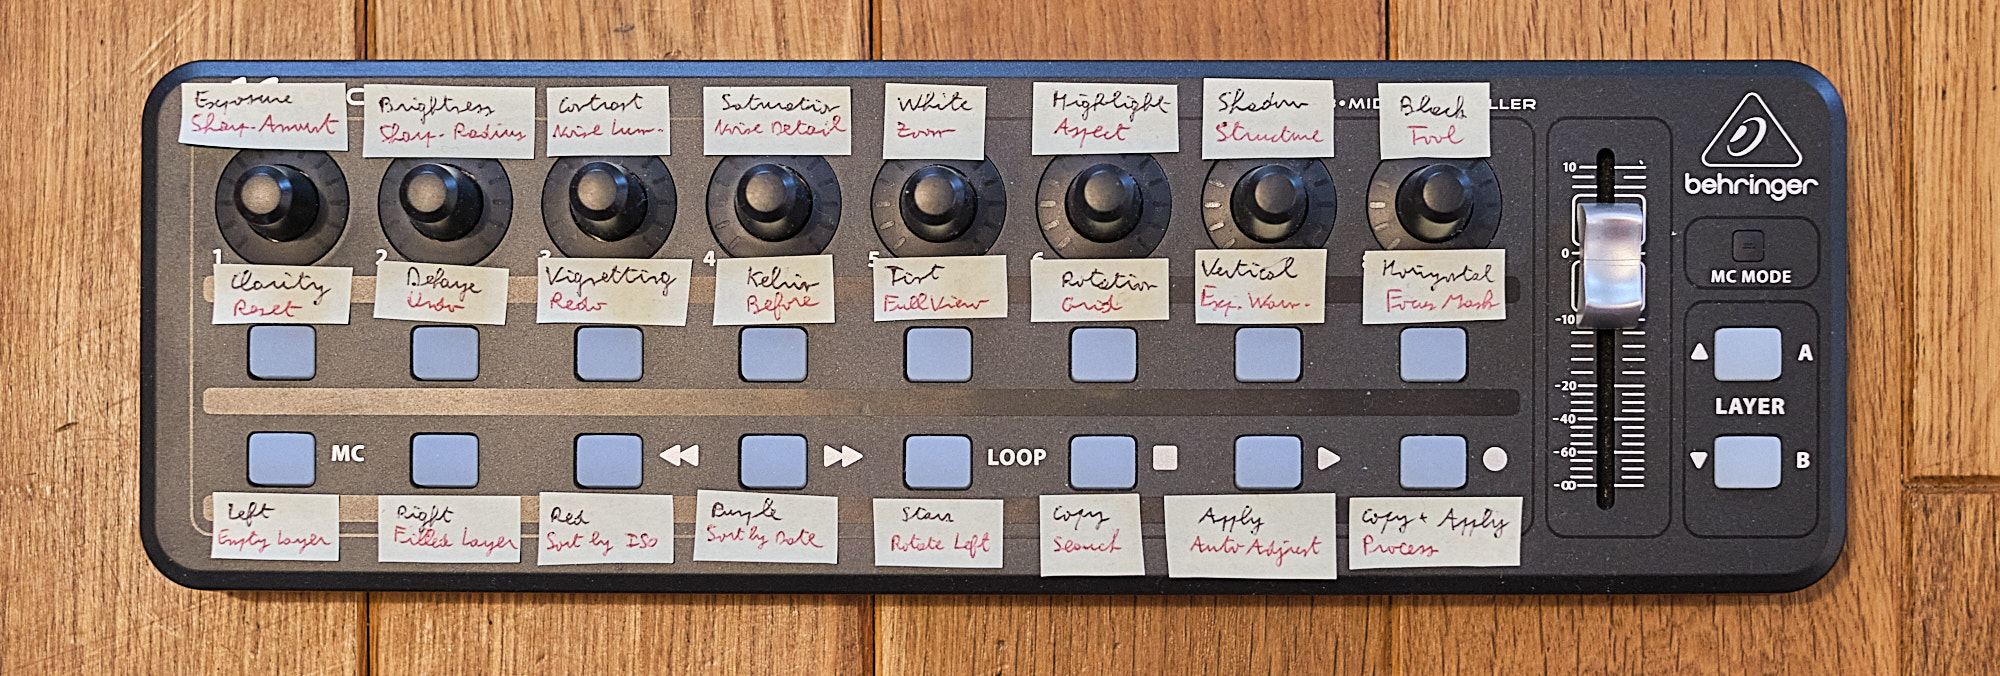
Here is an image of what I have prepared for myself, and some explanations:
- The table on top is for layer A, the table on the bottom is for layer B.
- For Exposure, A and Z in red means that to increase exposure, the shortcut in Capture One is Ctrl+MAJ+A and to decrease exposure it is Ctrl+MAJ+Z. (On English keyboards, “MAJ” would be the shift key.)
- ga and ha are written in small in the Exposure box: I have used these variables for Exposure, and thus won’t use them for something else. For layer A, I have used variables that start with g, h, i and for layer B variables that start with j and k. For the second letter of the variable, on each layer, I have to use the alphabetical order.
- On layer A: for the knobs, I have the basic controls for editing; on the first layer of buttons, I have secondary controls that are all controlled by the fader; on the second layer of buttons, I have basic controls for culling or quickly editing (such as Copy/Paste). For color labels, I use only two to avoid wasting buttons: Red is for photos that are rejected, Purple is for any photos that need another label (I can then assign Blue for the HDR, Yellow for Black and White, Green for Panorama, etc). Stars are controlled with the fader (with the two options explained above); when I set a star level to 0, at the same time it also removes the color label and this is on purpose (shortcuts Ctrl+Alt+MAJ+K and Ctrl+Alt+MAJ+W are assigned at the same time).
- On layer B: for the knobs, I have first sharpening and noise options, then zoom control since it is useful to control zoom for the details. The tool is to navigate between the tool panels in Capture One. The 5th button (Toolbar, Browser, Tools) assigns 3 shortcuts and hides or shows these three options: thus, you can quickly go in full view by hiding what is not needed. In my case, the Reset button doesn’t work but the keyboard shortcut also doesn’t work in Capture One so the bug is not coming from BMT (keep that in mind when you debug the configuration). The first layer of buttons is mainly for stuff related to displaying the image.
The final thing to do is to prepare labels to put on your console. Some very nice things can be done, see here for example. You can use Post-It, a label maker, sheet of papers, or whatever you want. I didn’t finalize my decision, so for now my console looks like this (made with Post-It, written in black for Layer A and in red for Layer B):
Video
I have put this information into a video tutorial if you would like to watch the process in practice:
Configuration File Download
To download the configuration file, click here.
Concluding Remarks
Editing photography can be long and boring. Doing this with a console adds a layer of fun and is by itself a good reason to try it, since MIDI consoles are not too expensive. When you have configured the console to your needs, your workflow can be sped up significantly. Recently, Capture One has introduced Speed Edits and it is in the same idea of going faster.
While configuring my console, I have found that there are two things that can’t be controlled with shortcuts with Capture One and which would be nice to have: (1) colors from the color editor, (2) presets or film simulations. I have already talked about colors above. For presets or films simulations, it would be nice to have a way to control them with shortcuts, so that using a knob we could test different options.
If you have other ideas on what to do with the console, write them in the comments, and we may update this article to add them. The benefit here is the extreme customizability and low price. Even though the setup I’ve described may seem complex, it’s a lot easier in practice, and there’s no coding knowledge required if you follow the steps shown here.
Nicolas Chéron is is a French chemist and amateur photographer who sent us this article in hopes that it would help non-Lightroom users set up a MIDI Console. He is not affiliated with Behringer or any other company mentioned in this article. Thank you, Nicolas!
Curious, once shortcuts have been made in BOME, does bome need to run in the background when the controller is in use ?
For rules for knobs, I’m finding that sometimes when turning clockwise (for a positive value), the initial value outputted is negative.
For the rule: qq=pp-ga
eg. CC pp=66
(qq=pp-ga) = -23
then gc=1 –> leading to anticlockwise rules enforced.
Do you know why the first positive click of using a know results in a negative value?
For some reason ga is being used as larger than pp.
Subsequent positive turns of the knob work as expected.
Thanks.
Thanks for the great write up! You’ve solved a number of problems that I can’t find solutions for elsewhere.
Thank you for your article. I too use the exact MIDI console to edit in LR. I found the learning curve in setup with MIDI2LR to be a little tough but once you get going, it’s not really that bad. The most important part of setting up the MIDI is figuring out which LR controls to place on the pots (turn knobs) and which place on the touch pads. I too set up my pots with the most used LR controls (Treatment:) and use the MIDI A/B Layers tab to incorporate more. Over time I noticed that it was those 16 (8×2 pots) that i used most frequently and is a considerable time saver. The ability to fine tune adjustments with the pots control is far greater than that of a mouse, and it’s more convenient to move my hand up and down the knobs instead of directing a mouse. It’s been a few years since I started using the MIDI and find my hand immediately reaching for the controller. One nice thing about MIDI2LR is that it allows you to store multiple control profile variations and load them while working in LR.
Cool, I may try this. Could be a time saver – and wrist saver. I am a C1 user – and the Behringer will work well with my Midi software too ;) The sound on the YouTube video is rather low unfortunately. Complex setup, but good idea. Though you have to keep in mind the Controller + the software will be $120/E120.
I finally implemented this, and it was really easy – if you use the author’s “default” settings – which are supplied. I’ve made labels using a Brother label maker – the 9mm labels fit well between the buttons. My biggest regret is that I don’t think it will work with DxO PhotoLab – I can’t figure out how to customise DxO. I use Capture One for DSLR and DxO for M43 images.
“… the first knob usually controls the modulation (I don’t know what that means!)”
Two well known uses of modulation are:
• tremolo (amplitude modulation)
• vibrato (pitch modulation)
Brilliant!
Ummm, this article failed to convince me of any advantages to this system. On the other hand it is one hell of a lot of effort to figure out, let alone implement.
By having all the adjustments on knobs and buttons, your eyes never leave the photo you’re working on. With a mouse, you are constantly looking to find the slider, eyes leaving the photo. It is vastly more efficient, and much more fun. I have been using the Mini in LR for years, but wanted to move to Capture One. This article convinces me I can.
In cinematography, we finish projects in facilities where the “colourist” uses boards much like this example (just a lot more fancy). Watching them work was my inspiration to try this method, and I can’t imagine ever going back.
Thanks for a very detailed article, and for generously supplying the setup file!