
Adobe Photoshop Lightroom comes with powerful tools to sharpen images during post-processing. Located in the Develop module of Lightroom, the “Detail” box contains both Sharpening and Noise Reduction tools that allow Photographers to enhance their digital workflows by fine-tuning images and getting them ready to be published and printed in a quick and efficient way. Since I have already covered the noise reduction part in my Noise Reduction Tutorial, in this article, I will show you how to properly use the Sharpening tool instead.
Table of Contents
1. Problems with Sharpening Images
Sharp images look aesthetically more pleasing than soft or blurry images. Because of this, most photographers try to sharpen their images in post-processing applications, which can result in all kinds of problems such as:
- Over-sharpening – when too much sharpening is used, it results in harsh, visible lines on edges and around objects. Over-sharpened images often look too “textured”.
- Too much noise – using excessive amounts of sharpening can add a lot more noise to an image. The worst result is when an image is already shot at high ISO levels and sharpening is applied on top of the digital grain, resulting in even more noise.
- Zigzag lines – straight thin lines can get converted over to zigzags and circular shapes can get cubic transitions when excessive sharpening with a large radius is applied.
Here is an example of an over-sharpened image:
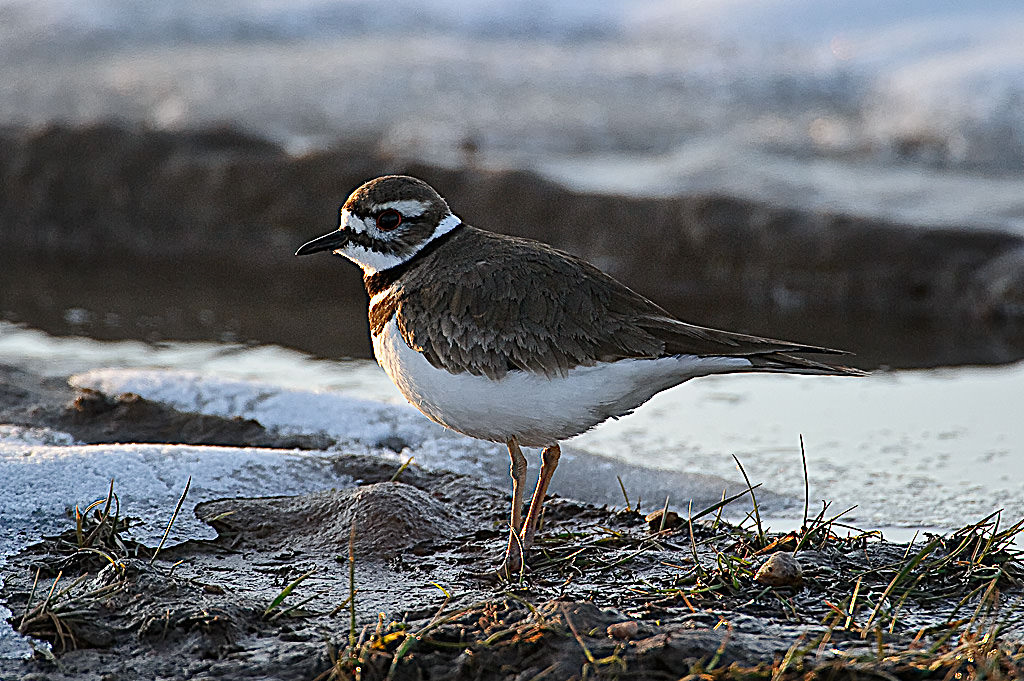
Note the amount of noise, visible lines, zigzag lines on the grass and too much texture – all because of over-sharpening an image.
2. Lightroom Detail Panel – Sharpening
Lightroom comes with a very powerful sharpening tool within the Develop module, under the “Detail” panel. It is very similar to Photoshop’s “Unsharp Mask” tool, but better because it gives you extra controls over how you can sharpen your images. Before Lightroom, I used to sharpen every single image through Photoshop, which was painful, time-consuming, and destructive (meaning once you make changes to an image in Photoshop, you cannot undo them). Unlike Photoshop, Lightroom does not modify images – it stores changes either in a separate file or in image headers, depending on the image format. If I make a mistake or want to go back to the original image, I can simply reset the image to its original state or revert modifications through the history panel. Being able to specify custom settings on images during the import process is also another time saver, especially when working with thousands of photographs.
3. Sharpening Settings
It is always easier to explain things with examples. Go ahead and open a sample image in Lightroom, then do the following:
- Press “D” on your keyboard or click on “Develop” on the top right panel to get into the Develop module.
- Left-click your image to view it at 100%. I highly recommend to view your images at full size (100%) before making any sharpening changes.
- Expand the right panel in Lightroom and scroll down until you get to “Detail”.
The detail panel will look like this:

The Sharpening Tool has four different sliders:
- Amount – the amount of sharpening you want to apply to an image. Zero means no sharpening is applied to the image. The higher the number, the more sharpening you will see. Too much sharpening will also increase the noise. I typically set 50 as the default value for my images, but sometimes can increase or decrease the amount depending on the image and noise levels.
- Radius – the size of the sharpening area around the edges. The default value of 1.0 means that Lightroom will apply sharpening over 1 pixel around the edge. If you increase the radius to a maximum value of 3.0, sharpening will be spread over three pixels around the edge, resulting in thicker, “shadowy” edges. I use the default radius value of 1.0 most of the time and I recommend keeping it under 1.5.
- Detail – as the name suggests, the detail slider controls the amount of sharpening on the edges or “details” of the image. A small value like 0 only sharpens large edges, while a high value like 100 would sharpen even the smallest edges. For example, if you are working on an image of a bird, if you leave the detail at “0”, only the edges of thick feathers would get sharpened, while using a larger number above 50 would bring out and sharpen even the thinner feathers. I try to stay below 50 on the detail slider because higher numbers often considerably increase the amount of noise.
- Masking – the most useful and versatile feature that masks out areas that should not be sharpened, similar to the mask tool in Photoshop. This is the tool that would take care of the extra noise produced by “Amount” and “Detail” sliders around your subjects. While it is not very useful for images that have too much detail and too many edges all over the image, it works magic for images that isolate subjects from the background. The softer and less defined the background, the better the results. See the examples below.
Combining the above controls, you could effectively sharpen your images without much work and dramatically cut your workflow time. Let’s now play with a real image to see how we can sharpen it in Lightroom.
4. The Option/Alt Key
I had to write about this in a separate header so that you don’t miss it. The Option (Mac) or Alt (PC) key on your keyboard can do a lot of the magic in Lightroom. One of the biggest challenges in sharpening is seeing the effect of sharpening on your images. Sure, viewing the image at 100% helps, but playing with such sliders as radius, detail, and masking often confuses Lightroom users, because slight changes could be invisible when looking at the image. That’s when the Option/Alt key comes in handy. Simply press the Option/Alt key on your keyboard and then use the mouse to move the slider from left to right for any of the four settings. You will see something like this:

That’s how the image looks like when I press the Alt button and move the “Radius” slider. It gives me a clear indication of how exactly the radius will affect my image. As you can see, at the maximum setting of “3.0”, the radius around the edges is too thick, giving an unnatural look to the image and dark shadows around the subject. Pressing the Control/Alt key while moving the sliders for Amount and Detail will also show the effects on a gray background, giving us a pretty good idea of how the setting will affect the image.
The “Masking” slider works a little differently with the Option/Alt key. As I have explained earlier, the masking tool is used for leaving the smooth areas intact, while applying sharpening only to the edges. We can control where the edges start by moving the slider from 0 to the right. At “0”, no masking is applied to the image, and therefore, the entire image is sharpened. If you have a smooth background like the sky, sharpening will certainly add noise to the sky, even when noise is very minimal to start with. Here is what happens when you start moving the slider:

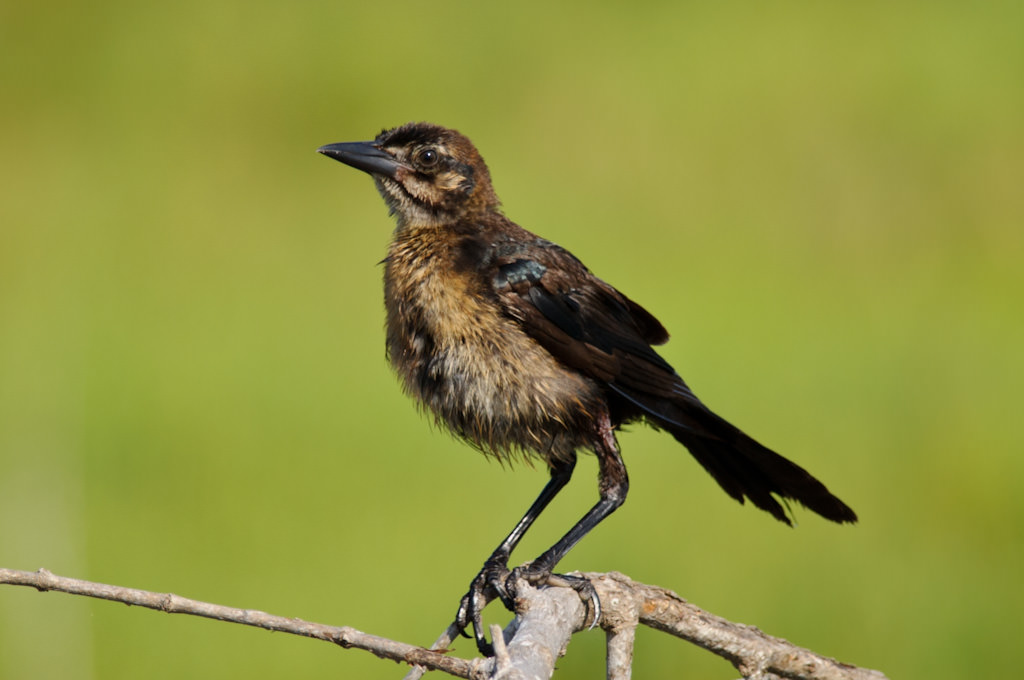
As you can see, both the bird and the background have lots of grain. This means that sharpening is applied to all of those areas. Now take a look at this image:

As I moved to the right, I was able to get rid of the static/grain in the sky and only leave the bird in the frame. What this does, is it makes Lightroom apply sharpening only on the bird, leaving the surrounding areas intact. This is a great way to selectively sharpen subjects, without affecting the entire image.
5. Sharpening Example
Let’s now jump to a real example. Download the full-size version of the following image to your PC and import it into Lightroom:
- Inside Lightroom, press the “D” button to go to the Develop module. Once you are in the Develop module, open the right sidebar and scroll down to “Detail”.
- Hold the Option/Alt key and move the Amount slider to around 75. Note how the background gets a little noise when the value goes above 50. Try moving all the way to 100 to see plenty of noise in the background. Go back to 75 and release the Option/Alt key when done.
- Hold the Option/Alt key and move the Radius slider from 1.0 to 3.0. Note how thick the edges around the bird get. Release the Option/Alt key and see how badly the edges look in color. Now put the Radius back to 1.0 by moving the slider or typing “1” on the right hand side.
- Hold the Option/Alt key and move the Detail slider to 75. Note the whiter edges and added noise to the background.
- Finally, hold the Option/Alt key and move the Masking slider from 0 to 50. Note that only the bird and the tree are visible – the background should be completely black.
- Look at the final result and press the “” button on your keyboard several times to see how the image looked before and after you applied sharpening to it. You can also see the Before and After images in two separate windows by pressing the “Y” button, or you can use the switch on the “Detail” panel to turn Sharpening on or off.
Check out the differences in the below before and after versions:


The above values are for this example only – I normally do not use values above 50 for Amount and Detail sliders.
6. What about Output Sharpening?
Many Lightroom users get confused about the Output Sharpening feature in the Export window. Should it be used after sharpening is already applied to an image? If you are exporting the image in its original size, then I recommend turning off Output Sharpening during the export process. If you are resizing the image to a smaller version for the web, then I recommend leaving it checked with the Screen/Standard amount of sharpening applied. When images are reduced in size via Lightroom, the sharpness is also slightly reduced, so sharpening the images a little bit does not hurt. Output Sharpening does not use the same settings you used for the image in the Develop Module though – it just slightly sharpens the entire image. Also, check out our article on three-step sharpening.
Please let me know if you have any questions in the comments section below.
I am relatively new to photography, for over a year now, and find it extremely satisfying as a hobby. I recently acquired a Canon 90D and was out last night taking pics of the eclipse. I am now doing the post-processing of the images and, in the process, ran across this article. I really appreciate the information in it and how it is presented. I like to keep things simple and the concise steps you give are easy to follow and to understand. This is one of the best articles of this type that I have ever read. I’ll be looking for more of your work. Thank you.
Thanks! That was a really helpful article.
Thank you very much! I just transitioned from another editing program and really needed an explanation of the Detail pane settings. Your article explained it very well and, as a bonus, added the Alt key observation tool. Simply wow! Again, thanks so much
I don’t see an answer to this question anywhere. Is sharpening applied to the uncropped image or to the cropped one? If I edit a 24MP and crop it to 4MP, is the sharpening applied to the 24MP and then cropped or to th3 4MP?
I think you have a misconception somewhere. Sharpening is applied at a pixel level; the amount of sharpening does not change based on your decision to crop the photo or not.
If that’s still confusing, the reason your question is difficult to answer is that you are basically asking, “is the contrast slider applying to the uncropped 24MP image, or to the cropped 4MP image?” The answer isn’t really either of those situations – it’s just applied, and cropping is irrelevant. (And that’s all sharpening is anyway: a form of contrast that is applied to edges within a photo.)
And in Lightroom, the order in which you perform the adjustments has zero impact on how the photo will look. Order of adjustments is completely irrelevant in Lightroom.
at what point in the workflow do you sharpen?
If you keep the photo in Lightroom throughout the entire editing process, it doesn’t matter whatsoever. Lightroom’s adjustments do not depend at all upon the order in which you do them. You will get identical results whether you sharpen first, last, or anywhere in between.
In other software like Photoshop, it’s always best to sharpen as the last step in your process. If you sharpen first and then perform significant adjustments, you can end up exaggerating sharpening artifacts and noise in the photo.
Thank you for this! I only used the Sharpening Amount but now I understand how the other sliders for Sharpening work and will be using them as necessary. I was also extremely happy to find out about the Option/Alt key! That was a high point for me! Superb explanations in this article.
I always get a lot of noise in the background when I use this method to sharpen my image. D810 this typically happens whenever the ISO is above 200. If I enlarge a crop the noise is amplified.
Hi Nasim,
This article is really helpful, I taken some notes from it for personal use. I just some advice on applying the sharpening to multiple images at once, is that possible? or would I have to go through each individual image and apply different sharpening settings?
Thank you for the good read, all the best.
Rule of thumb is that it is ok when the images are similar, eg. the same camera/lens combo, the same ISO, the same lighting and the same subject. There are minor differences between lenses and bigger ones bettween cameras, I would do that sepparetely. The biggest difference is IMHO the iso, lighting and the subject. High ISO with low light really limits how much you can sharpen the image (practicaly zero). If you have a good lighting and high ISO, its little bit better, best is of course low ISO and lots of light. Then you can sharpen a lot, but be aware of the subject. You have to be careful when sharpeing a human face, dont overdo it. But its fine when you are shooting a still life.
Excellent article, thank you Nasim. Really well written and easy to absorb, and some great mini-tutorials. Although I feel fairly confident with many of LightRoom’s features, I never understood many of the sharpening controls. You have changed that. Thanks again.
Thank you. EXACTLY what I needed.